HTML Manuscript
W00 - Introduction and organization
Course materials are available on GitHub: https://github.com/RafLew84/ProgUM.
Assessment rules
To receive a positive grade for the laboratory part, the following criteria must be met:
- There are 6 assignment lists.
- Each list receives a separate grade.
- One list may be missing or failed. For that list, the student receives a grade of 2.0.
- Each list has a defined submission deadline and point value.
- For each week of delay, the grade is lowered by 1.
- Lists are submitted during laboratory classes.
- Each assignment list includes a list of questions that the student is required to answer orally during laboratory classes. From each question list, if it exists, questions are selected at random. The number of questions depends on the number of points on the list. For example, if a list has 10 points and the practical tasks can give the student 5 points, 5 questions are selected. The questions cover both theory and practice.
- The student is required to submit the source code in a GitHub repository. The repository link must be provided as the answer to the task on MS Teams. Missing a repository link with task solutions is equivalent to not passing the course.
- The final grade is the arithmetic mean of the grades from the lists.
- Grade 3.0 - average 3.0 - 3.24
- Grade 3.5 - average 3.25 - 3.74
- Grade 4.0 - average 3.75 - 4.24
- Grade 4.5 - average 4.25 - 4.74
- Grade 5.0 - average 4.75 - 5.0
- Three unexcused absences from laboratory classes are allowed.
- Grades and points are available continuously in a file on MS Teams.
Course content
The lecture plan covers the following topics:
- Introduction: data types, expressions, statements, loops
- Garbage Collection
- Functions
- Collections
- Classes, Objects and Interfaces
- Initialization and Delegation
- Android Application Fundamentals: Activity, Lifecycle
- Jetpack Compose: UI basics, Composition, Recomposition, State
- UI structure elements (Scaffold) and handling collections in UI
- Navigation (Compose Navigation, Tab Navigation, Drawer)
- Design patterns
- Widgets and their lifecycle
Introduction to the Kotlin language
Kotlin is a statically typed programming language running on the Java Virtual Machine (JVM), developed by JetBrains. It was designed to be fully interoperable with Java, which makes it possible to combine both languages smoothly within a single project. Since 2019, Kotlin has been the recommended language for developing applications on the Android platform.
The most important features of the language include:
- Safety (Null Safety): A built-in mechanism for preventing
NullPointerExceptionby distinguishing, at the type-system level, references that may storenullfrom those that may not. - Conciseness: The language syntax significantly reduces boilerplate code through constructs such as data classes, properties, and automatic type inference.
- Multiplatform support: Beyond the JVM, Kotlin can be compiled to JavaScript and native code (Kotlin/Native), which enables sharing business logic across different platforms (iOS, Android, Desktop, Web).
- Support for programming paradigms: The language offers advanced support for functional programming, coroutines for asynchronous programming, and extension functions (extension functions), which make it possible to add new functionality to existing classes without inheritance.
In this chapter, we will build a solid foundation for all further learning. We will not only learn syntax; we will try to understand why certain mechanisms work the way they do and what problems they solve.
Type system
In Java, which you probably already know, there is a distinction between primitive types (int, double, boolean) and reference types (objects). Kotlin simplifies this model by treating everything as an object - at least from the programmer's perspective.
At the top of Kotlin's type hierarchy is Any. It is the counterpart of java.lang.Object, but with one key difference: Any is not nullable (we will return to this when discussing Null Safety). Every class we create inherits from Any by default.
val liczba: Any = 42
val tekst: Any = "Hello"
In languages such as C++ or Java, functions that do not return a result are marked with the void keyword. In Kotlin, to keep the type system consistent, such functions return a special object of type Unit.
You can think of Unit as an empty package. A function always sends a package (returns a result), but in this case the package does not contain any useful information. Unit is a singleton - there is only one such empty package in the whole system.
fun przywitanie(): Unit {
    println("Hi!")
    // return Unit - implicitly added here by the compiler
}
Kotlin introduces a very interesting type: Nothing. This is a type that has no instances. This means that it is impossible to create a variable of type Nothing. Why does such a type exist?
It is used to mark situations in which a function never completes normally (it does not return control). Examples include:
- A function that throws an exception (the exception interrupts normal control flow).
- An infinite loop.
fun blad(message: String): Nothing {
    throw IllegalArgumentException(message)
}
The Nothing type is a so-called bottom type - it is a subtype of every other type. This allows us to use it, for example, in an Elvis operator expression:
val name: String = person.name ?: throw Exception("Missing name")The compiler knows that the right-hand side (Nothing) fits the left-hand side (String), because Nothing fits everywhere (control will not reach that point anyway).
Variables: val vs var vs const val
This is one of the most important design decisions we make when writing code.
val(from value) declares a read-only reference.var(from variable) declares a mutable variable.
val imie = "Anna"
    // imie = "Marek" // Error: Val cannot be reassigned
var wiek = 25
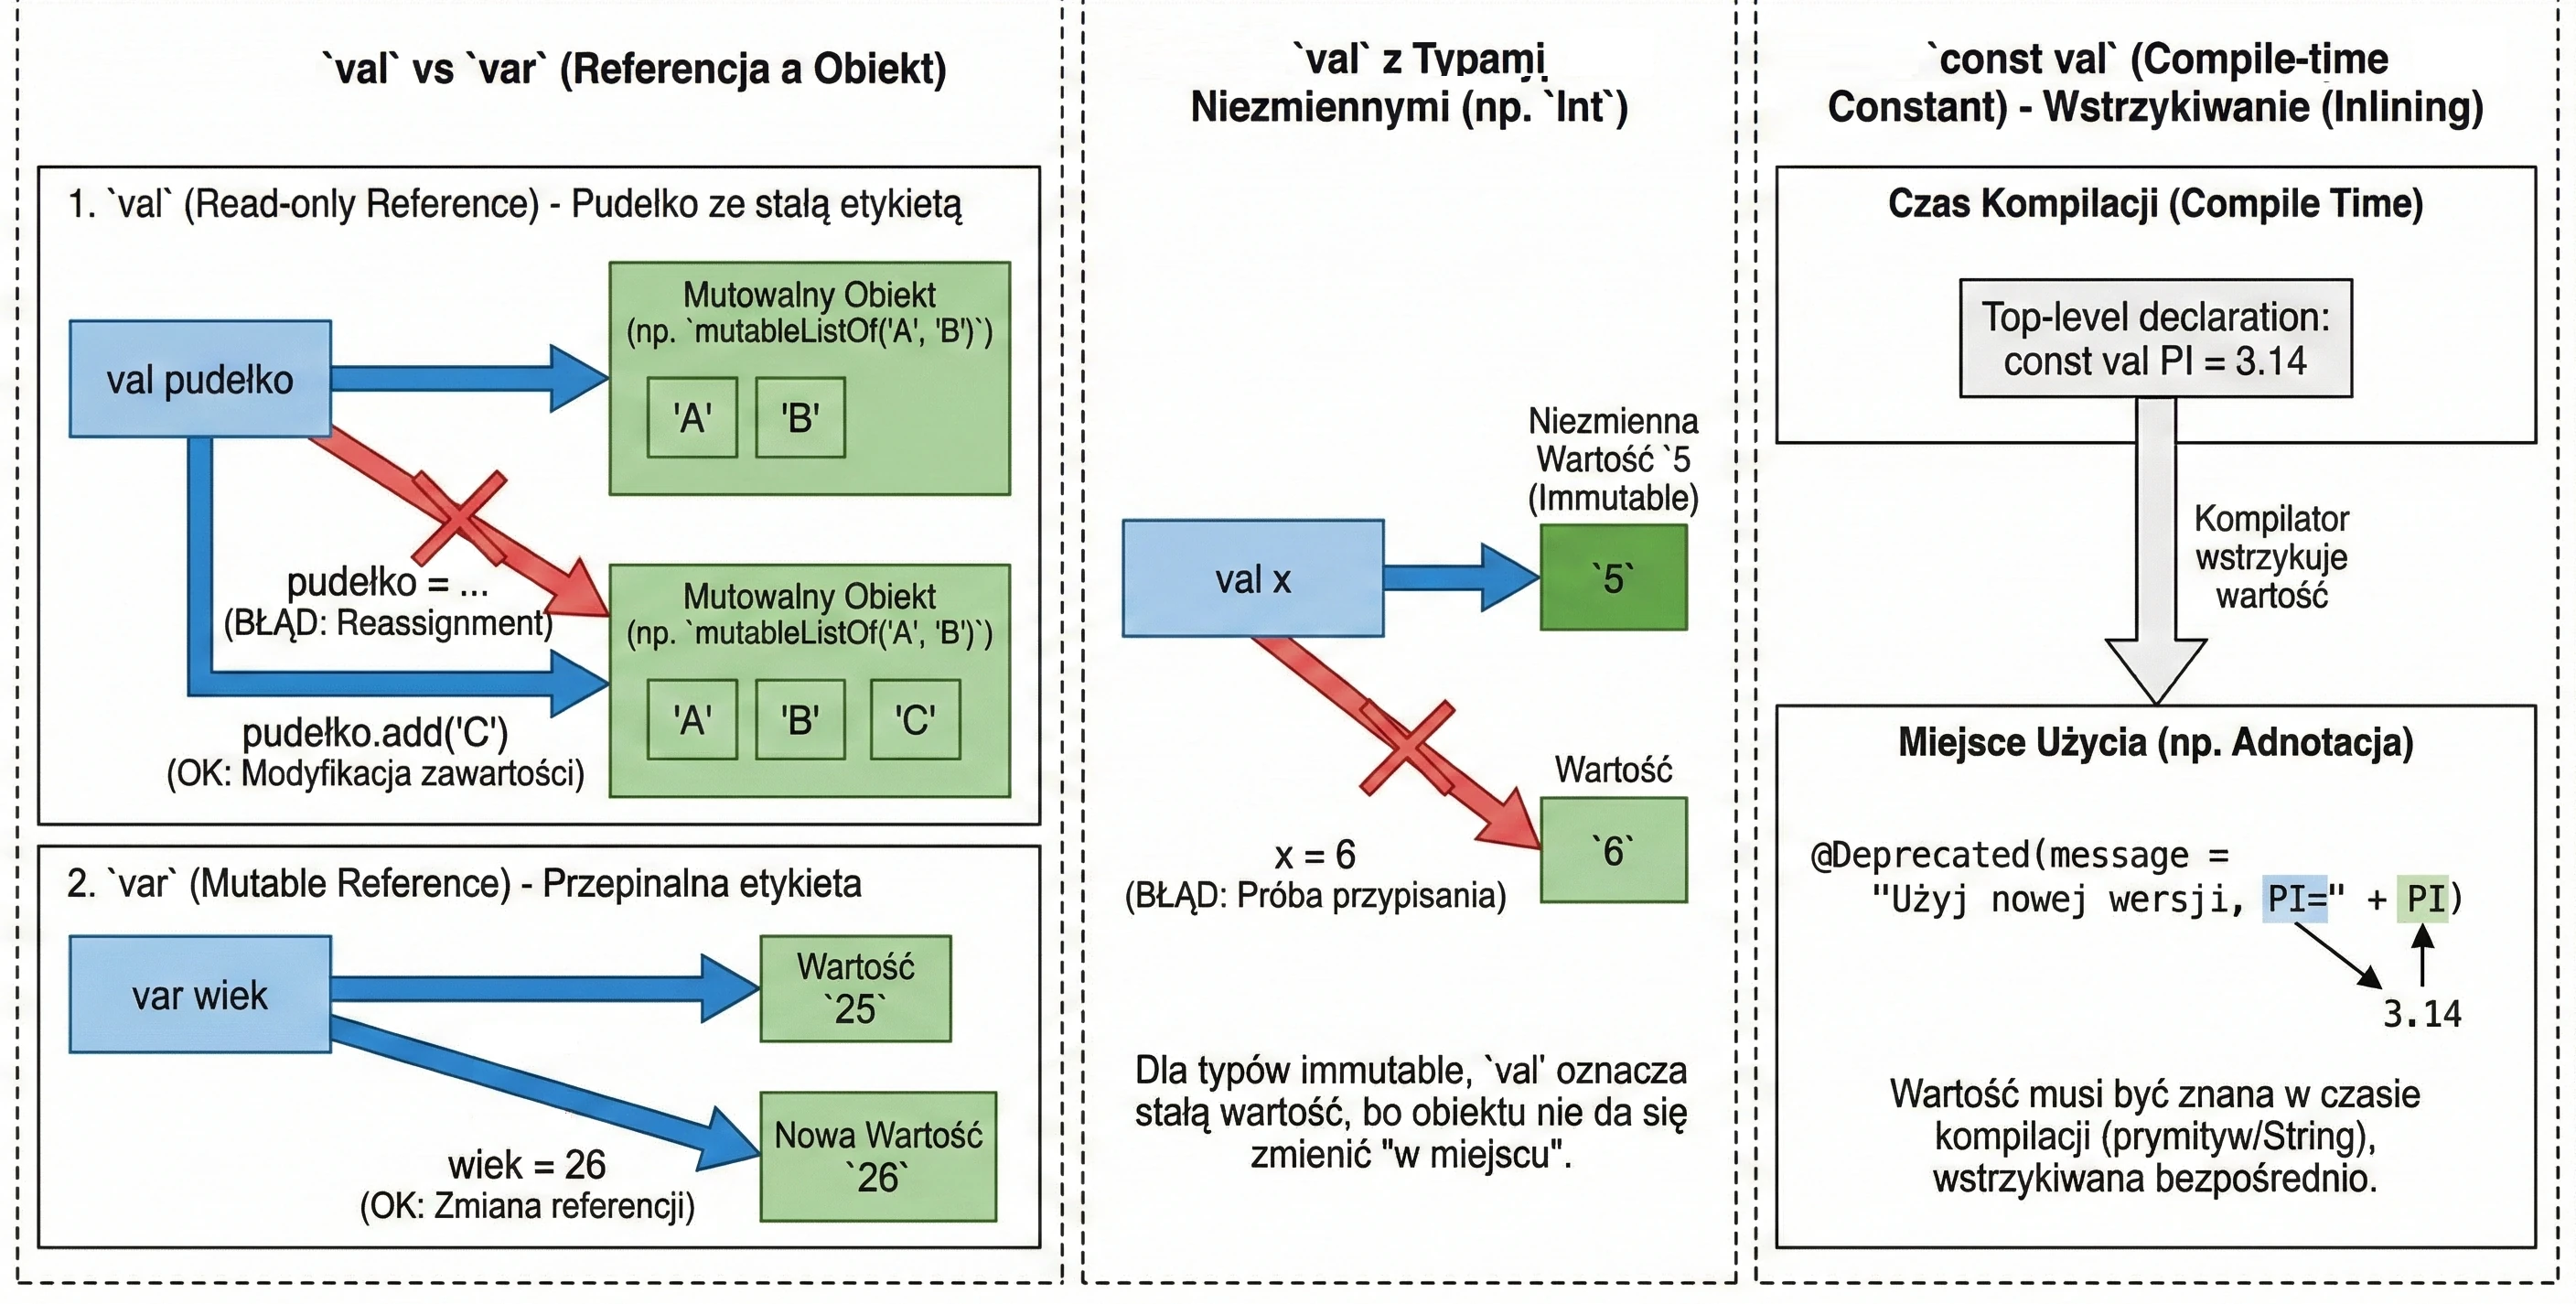
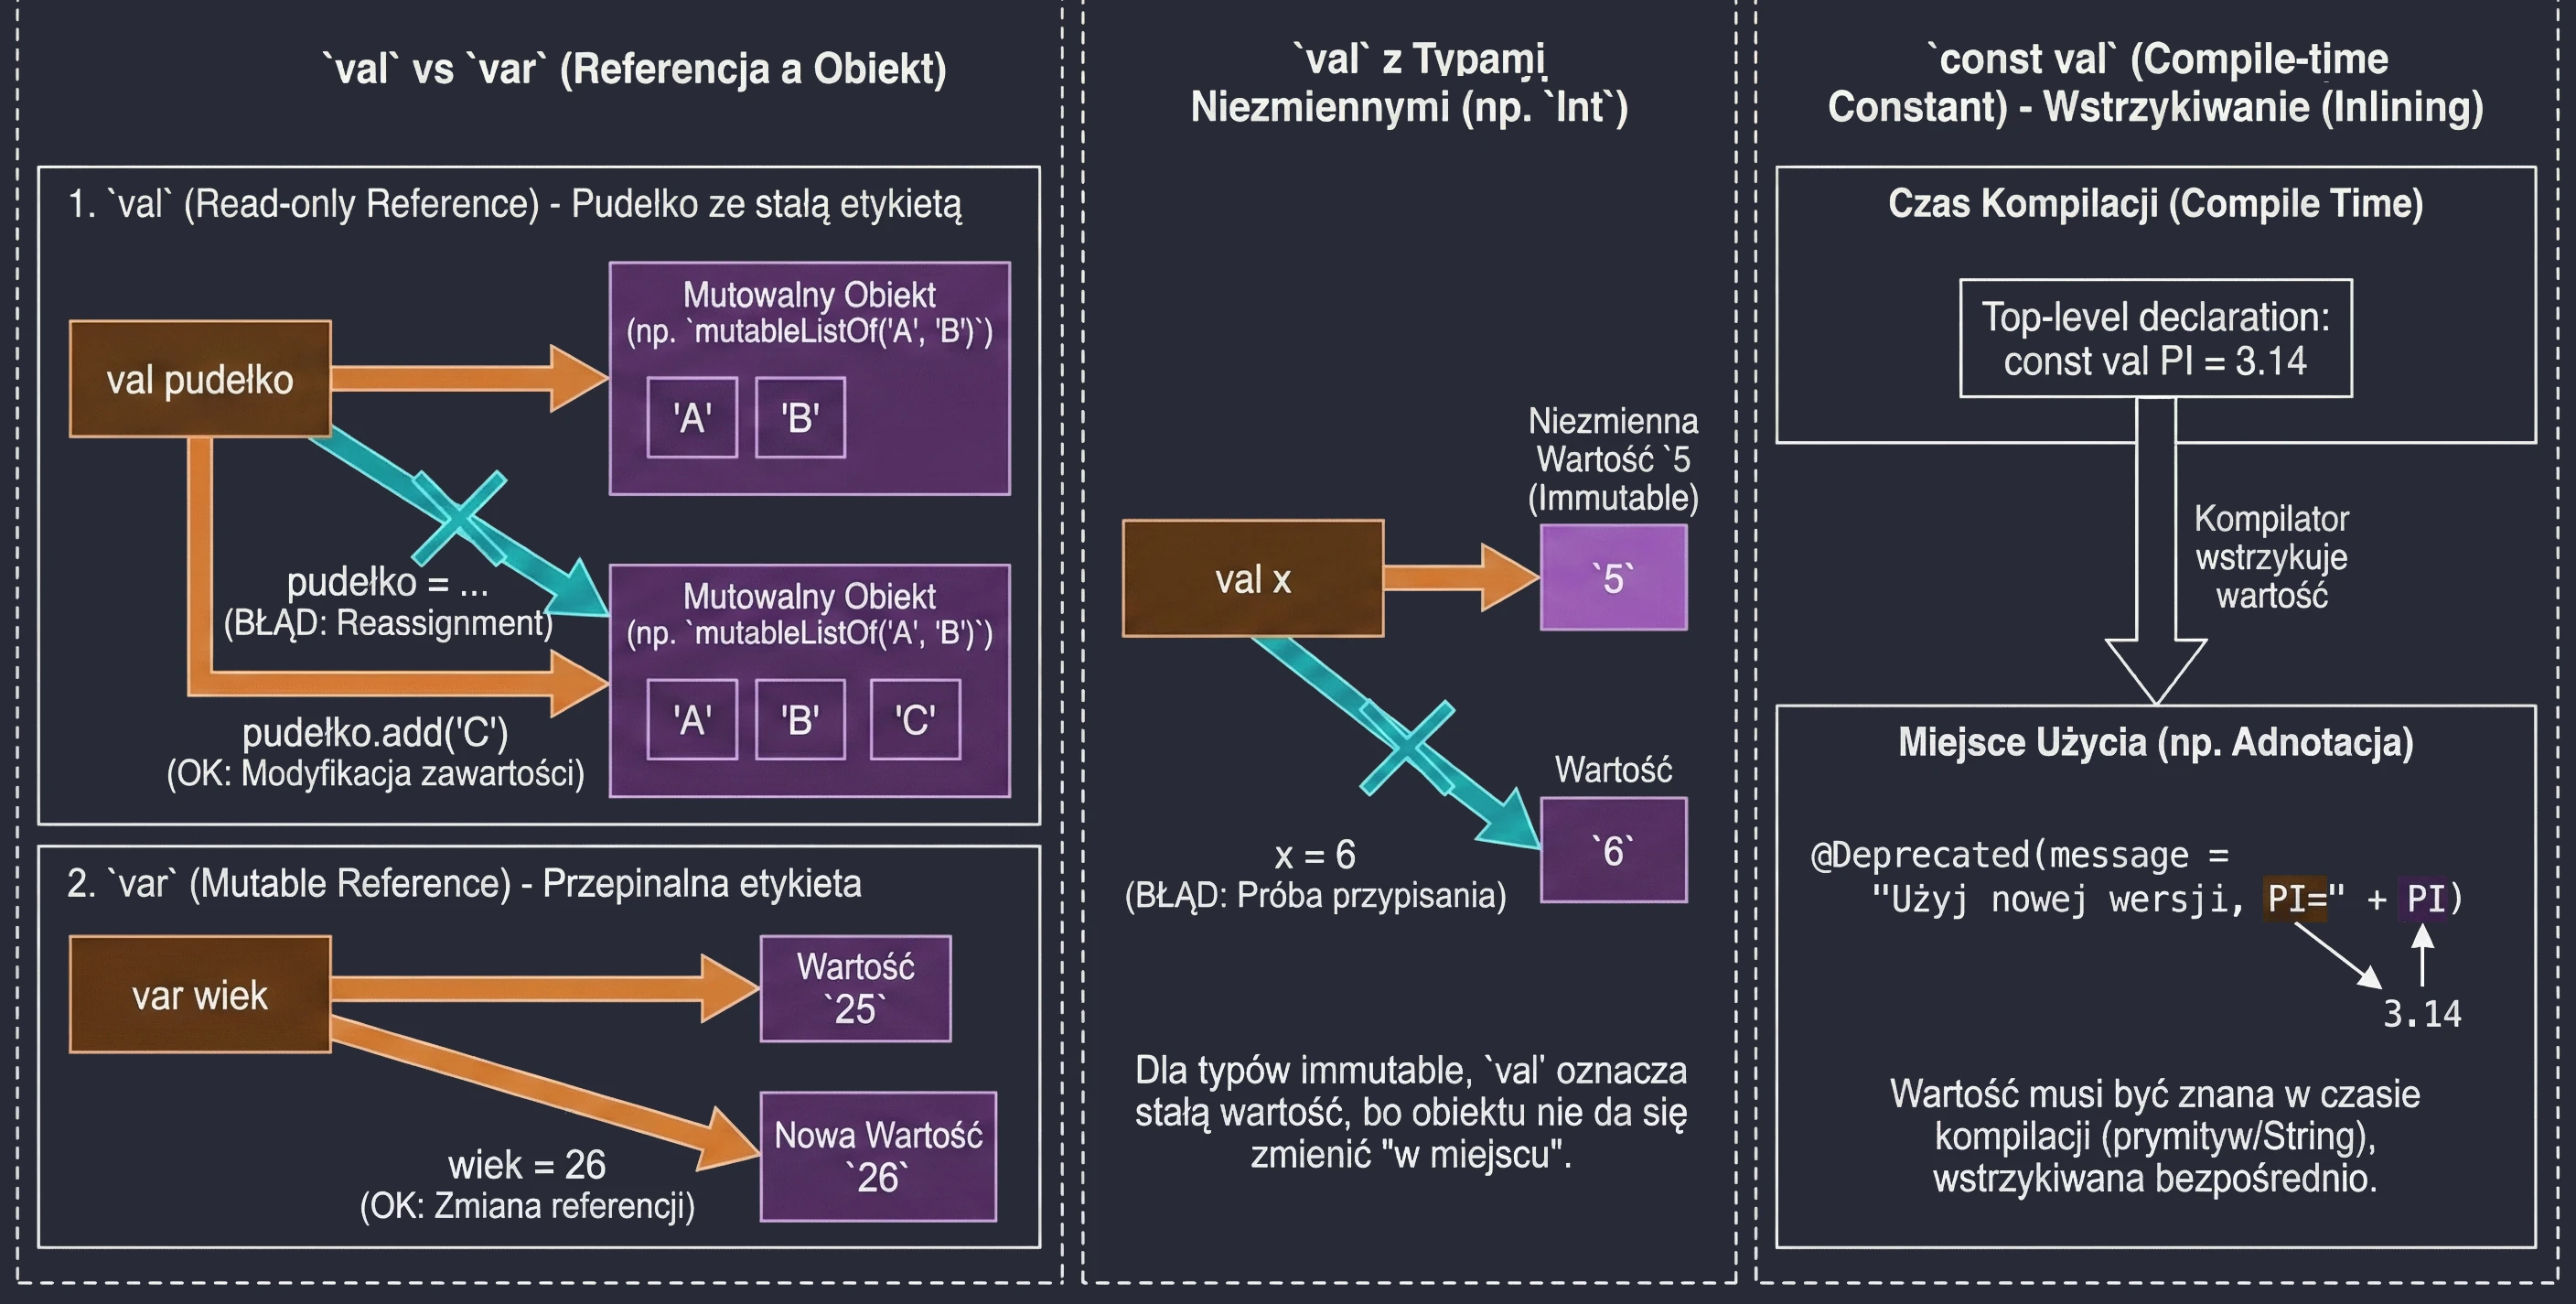
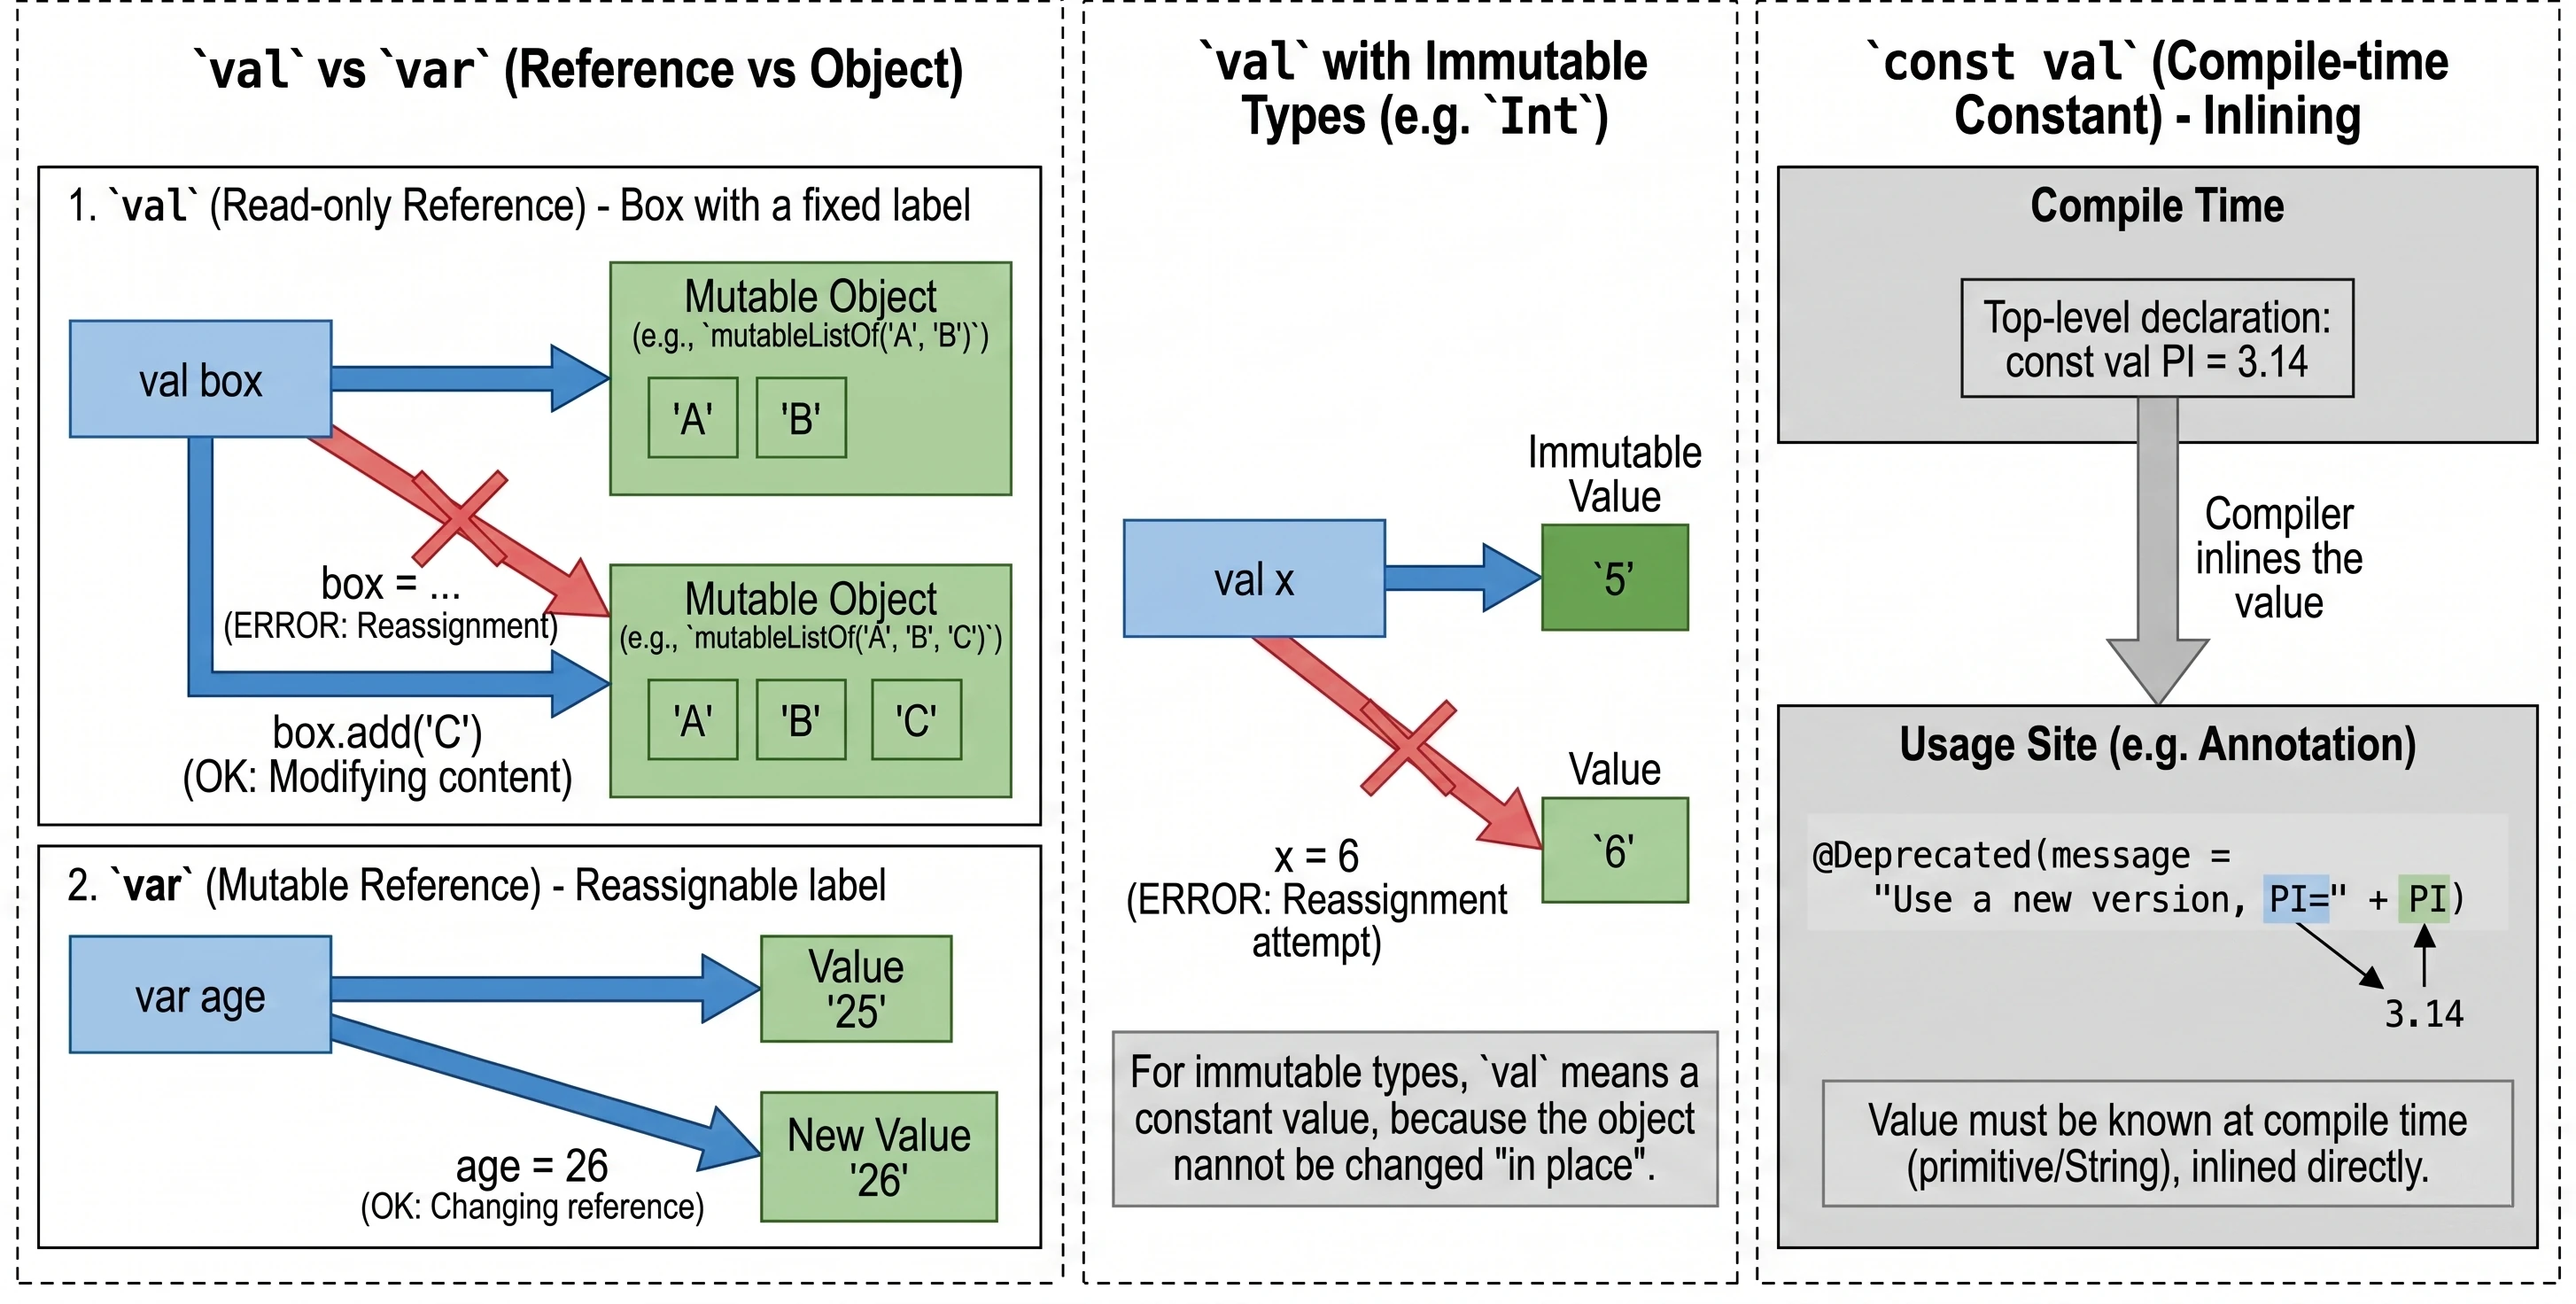
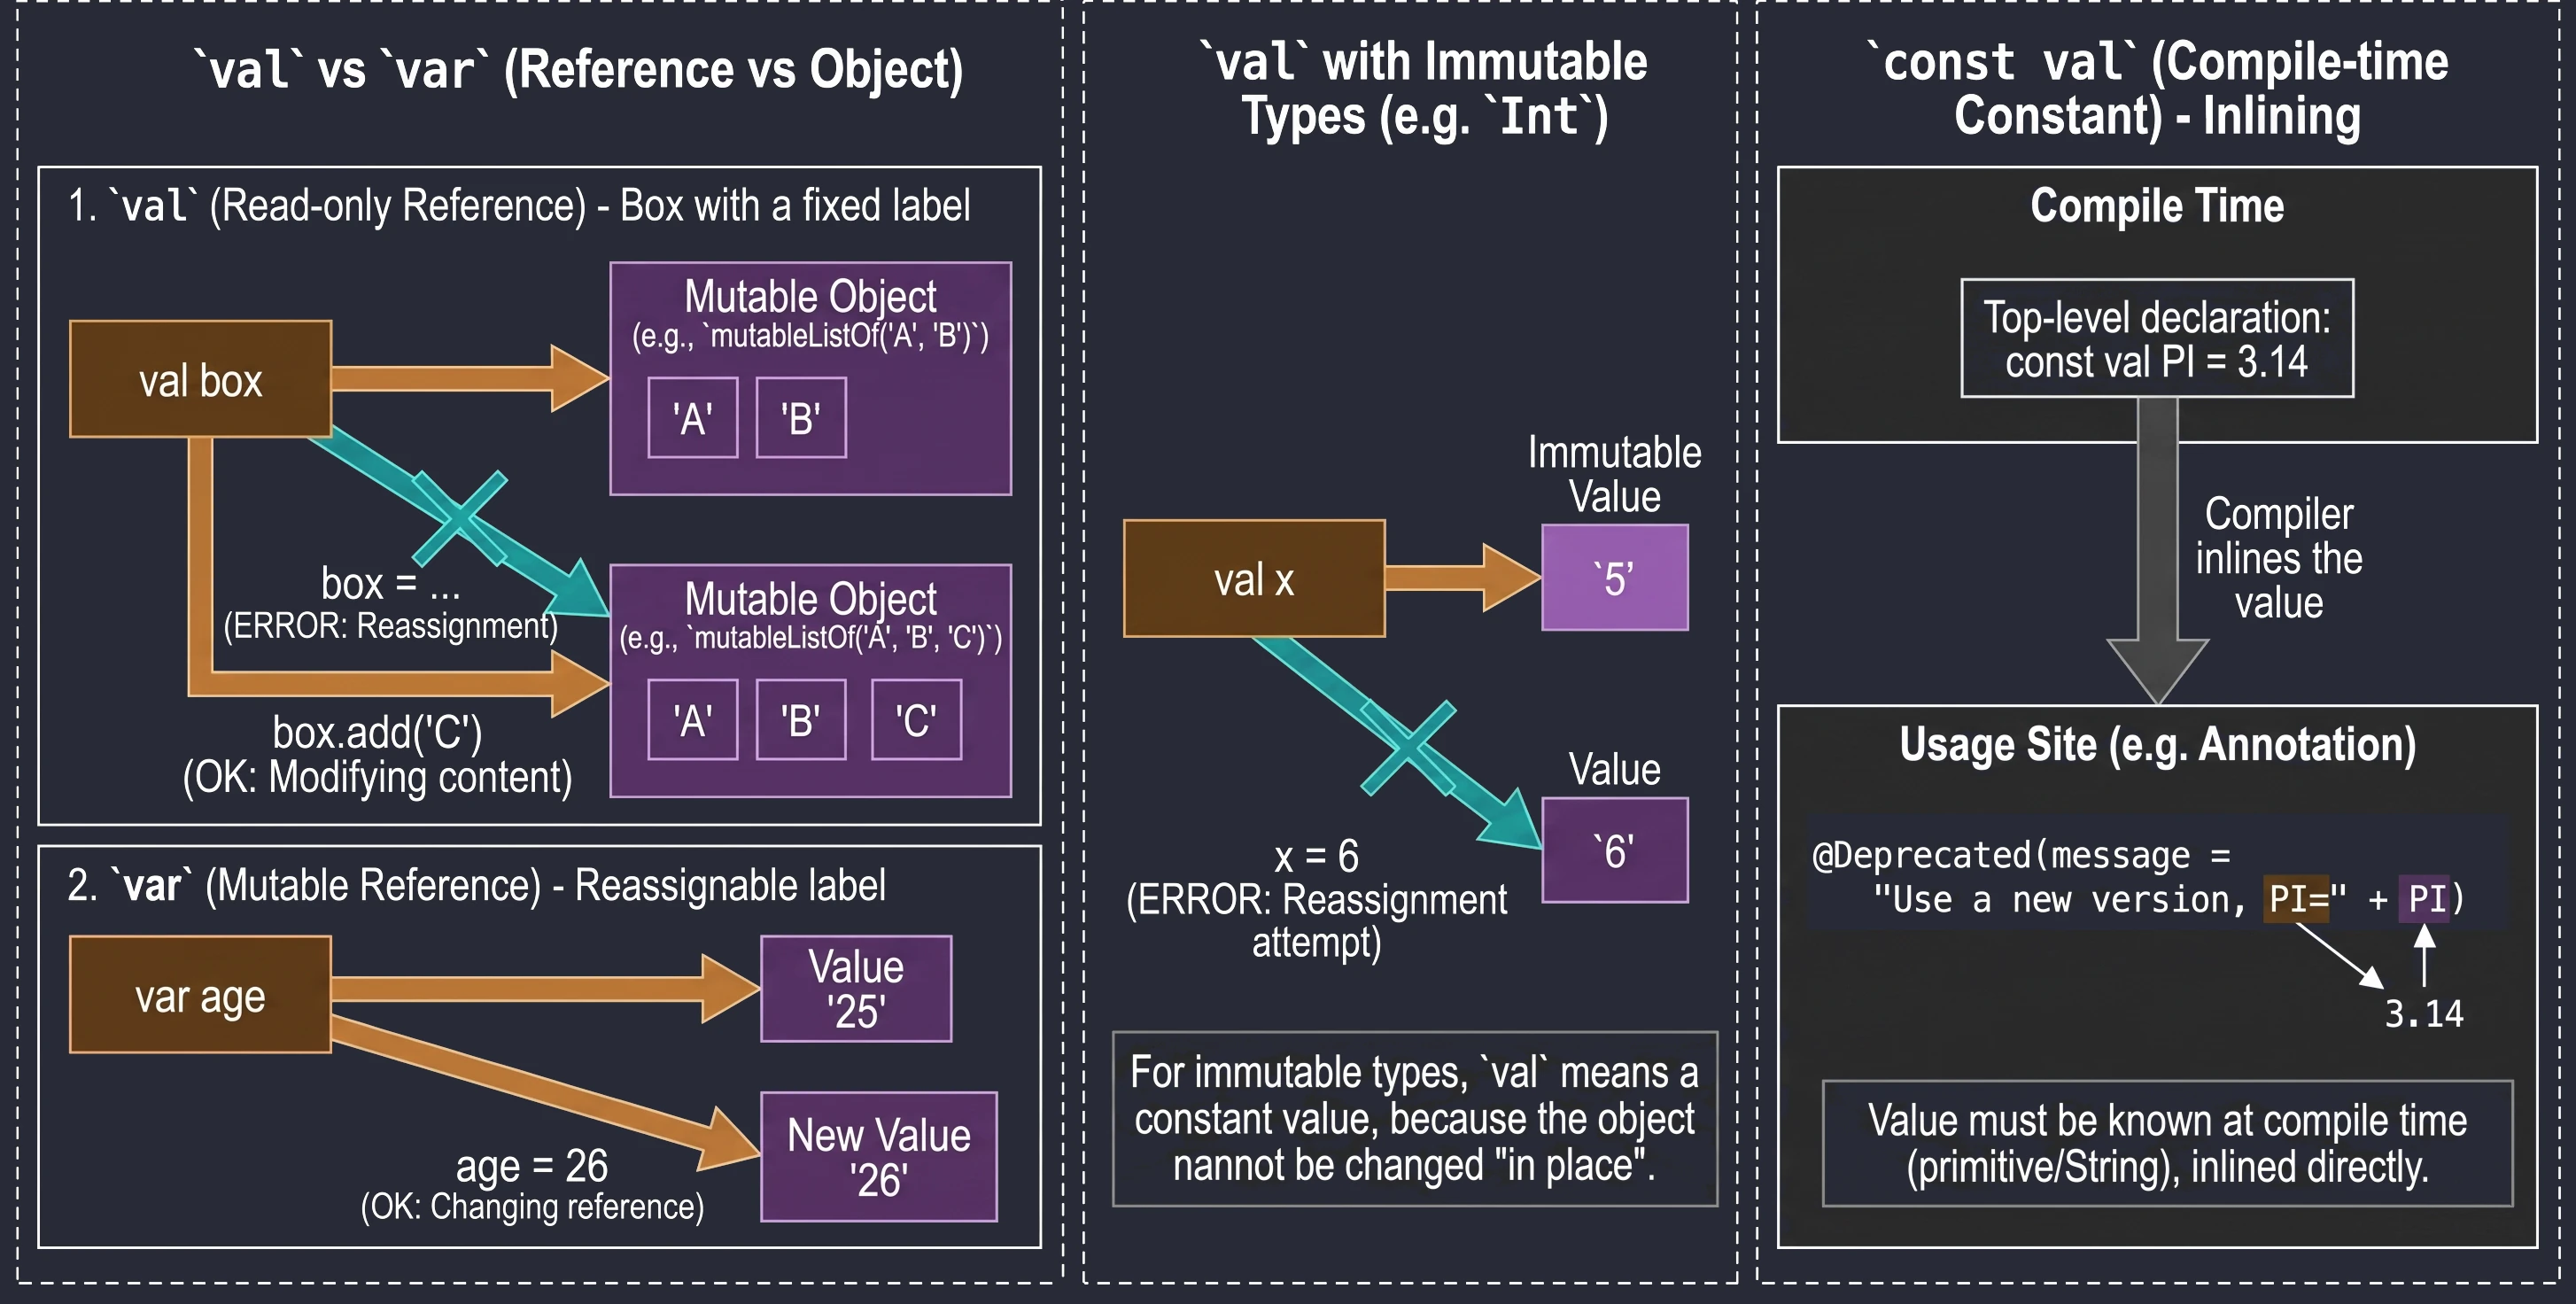
wiek = 26 // OKIMPORTANT!!! val guarantees immutability of the reference, not immutability of the object. Imagine a box with a label.
val pudełko: You cannot remove the label and attach it to another box. But you can open the box and change its contents, for example by adding an element to a list inside it.
val lista = mutableListOf("A", "B")
// lista = mutableListOf("C") // ERROR! A val reference cannot be changed
lista.add("C")                // OK! The object's state changes
For types such as Int, which are immutable by themselves, val makes the value effectively constant because we cannot change the number itself in place; we can only try to assign a new value:
val x = 5
// x = 6 // ERROR! Attempted reassignment

var y = 5
y = 6    // OK! Variable 'y' now points to a new value
A regular val is evaluated at runtime. When we need a constant known already at compile time, for example for annotations, we use const val. Restrictions:
- Location: It must be declared at the top level of a file (top-level) or as a member of an
object(including acompanion object). It cannot be a local variable. - Data types: Only primitive types such as
Int,Double,Boolean, and theStringtype are allowed. - Initialization: The value must be known during compilation. It cannot be the result of a function call and it cannot have a custom getter (custom getter).
The compiler treats const val as a constant that it injects (inlines) directly at the places where it is used. This is necessary, for example, when defining annotation parameters.
Null Safety
Tony Hoare, the creator of the null reference, called it his billion-dollar mistake. In Java, NullPointerException (NPE) is an everyday problem - this error occurs when a program tries to access a method or field of an object through a reference that in fact does not point to any location in memory (it has the value null). Kotlin solves this problem at the type-system level by introducing a strict distinction between references that may be null and references that must always point to a concrete object.
For example, a variable of type String, Int, Boolean can never store null. If you want it to be able to do so, you must use String?, Int?, Boolean? (a nullable variable).
When we have a nullable variable, for example text: String?, the compiler will not allow us to directly call a method such as text.length. We must handle the possible null:
1. Safe call (?.): If it is not null, execute it; otherwise, return null.
val length: Int? = text?.length2. Elvis operator (?:): If the left-hand side is null, use the right-hand side.
val length: Int = text?.length ?: 03. !! operator (Not-null assertion): I know what I am doing; this is definitely not null. If you are wrong -> NPE.
Control flow
In Kotlin, many constructs that are statements in other languages are expressions here, meaning that they return a value.
In Kotlin, if is an expression, which means that it returns a value. For this reason, Kotlin does not have the traditional ternary operator (condition ? a : b) - its role is simply played by if-else written in one line.
val max = if (a > b) a else bIf the if or else branches contain code blocks in curly braces, the returned value is the last line of the given block.
val stanSilnika = if (temperatura > 100) {
    println("Warning: overheating!")
    "ALARM" // This will be assigned to the variable
} else {
    "OK"
}
An important rule is that when using if as an expression (that is, assigning its result to a variable or returning it from a function), we must always provide an else branch. The compiler must be sure that in every possible situation the variable receives some value.
when replaces the traditional switch, offering much greater flexibility. It can be used as a statement or as an expression.
// As an expression - must be exhaustive (usually requires else)
val opis = when (obj) {
    1 -> "One"                            // Single value
    2, 3 -> "Two or three"                // Several values (OR)
    in 4..10 -> "Number in range 4-10"    // Range check
    is String -> "Text of length ${obj.length}" // Type check + Smart Cast
    !is Int -> "This is not an integer"   // Negated type check
    else -> "Something else"              // Default case
}
One feature of when is that it can be used without an argument. In that case, each branch must contain a Boolean expression (Boolean). This works like a more readable replacement for a long chain of if-else if.
when {
    x > y -> println("x is greater")
    x < y -> println("y is greater")
    else -> println("They are equal")
}
It is worth noting that thanks to the Smart Casts mechanism, after checking a type with is String, the compiler allows us to use the variable as if it were of type String (for example, to call .length) without manual casting.
The for loop in Kotlin is used to iterate over anything that provides an iterator (has an iterator() function). Unlike the traditional for loop known from Java or C++, here we always use the in syntax.
Most often, we use for loops together with ranges (Ranges):
// Closed range (includes 5)
for (i in 1..5) print(i)        // 12345

// Half-open range (without 5)
for (i in 1 until 5) print(i)   // 1234

// Backward iteration
for (i in 5 downTo 1) print(i)  // 54321

// Iteration with a defined step
for (i in 1..10 step 2) print(i) // 13579
Kotlin also allows very convenient iteration over collections and maps using destructuring:
val lista = listOf("Kotlin", "Java", "Swift")
for (jezyk in lista) {
    println("Language: $jezyk")
}

// Iteration with an index
for ((index, value) in lista.withIndex()) {
    println("Position $index is $value")
}

// Iteration over a map
val map = mapOf(1 to "One", 2 to "Two")
for ((klucz, wartosc) in map) {
    println("$klucz -> $wartosc")
}
In addition to the for loop, Kotlin also provides standard while and do-while loops, whose behavior matches the expectations of programmers coming from other imperative languages.
// while loop - checks the condition before execution
var x = 3
while (x > 0) {
    println("Countdown: $x")
    x--
}

// do-while loop - executes at least once
var y = 0
do {
    println("I will execute at least once, even if the condition is false")
} while (y > 0)
It is worth noting that in a do-while loop, variables declared inside the do block are visible in the while condition.
When programming in high-level languages such as Kotlin or Java, we usually do not think about what happens under the hood. We have the luxury of automatic memory management - we create objects, use them, and then simply forget about them. The Java Virtual Machine (JVM) or the Android Runtime (ART) takes care of the rest.
Lack of awareness of the costs introduced by our design decisions leads to applications that run slowly, stutter (so-called jank), and drain the battery at an alarming rate. Building intuition about how memory works allows us to write code that is not only correct, but also efficient.
Data types and memory organization
Before we move on to cleaning up (GC), we need to understand how the mess is created - that is, how data is arranged in memory.
Although in Kotlin everything is an object, underneath (at the JVM/ART level) we still operate on simple types with strictly defined sizes. It is useful to have an intuition about how much our data weighs:
- 1 byte:
Boolean(theoretically 1 bit, but addressable as a byte),Byte. - 2 bytes:
Short,Char(UTF-16). - 4 bytes:
Int,Float. - 8 bytes:
Long,Double.
Why mention this if Kotlin does not give us explicit access to primitive types?
Unlike Java, where there is a clear distinction between int (a primitive) and Integer (an object), Kotlin offers a uniform class-based syntax. Under the hood, however, the compiler performs an important optimization: wherever possible, it replaces our objects with raw primitive types in the bytecode.
When does costly wrapping (boxing) into an object occur?
- Nullable types:
Int?must be an object because a raw primitive cannot hold the valuenull. - Generics: Standard collections such as
List<Int>always store objects.
Whether a value is represented as a primitive or as an object affects its form in memory: a primitive is a value stored directly at the declaration location, while an object is a reference (pointer) to an area on the heap where the actual data is stored.
The application's working memory can be divided into two main areas that work in completely different ways.
Stack is temporary storage for currently executing methods. It is very fast (LIFO - Last In, First Out).
- It stores local variables (simple types) and references to objects.
- It is cleaned automatically after leaving a function (after the stack frame is removed).
- Allocation here is almost instantaneous.
Heap is a large storage area for objects.
- This is where every object created with
new(in Java) or with a constructor (in Kotlin) lands. - Access is slower than access to the stack.
- This is where the Garbage Collector works.
Imagine that the Stack is a corkboard above your desk. You pin small notes to it (local variables) and strings (references). The strings lead to a large storage room in the basement - the Heap. That is where the actual folders with documents (objects) are stored. When you remove a note from the board (the end of a function), the string disappears. But the folder in the basement remains until someone (the GC) notices that no string leads to it anymore.
Memory management: manual vs automatic
In languages such as C or C++, the programmer manages the life and death of objects.
malloc()- you allocate memory.free()- you must release it.
This gives full control, but it also creates serious problems:
- Memory leaks: Did you forget to release memory? It remains occupied forever (until the process restarts).
- Dangling pointers: You released memory, but you still have a reference to it ("a pointer to nowhere"). Trying to use it ends with an error (segmentation fault).
Kotlin, running on JVM/ART, removes this responsibility from us. It introduces the Garbage Collector (GC) - an automatic cleaner.
Garbage Collection
Garbage Collection is based on a simple assumption: An object is garbage if it is not reachable from any "root" (GC Root).
The GC builds a virtual map of relationships called the object graph. Each newly created object to which we assign a reference becomes a node in this graph, and the references themselves are the edges (connections).
This process is fully automatic and invisible to the programmer:
- On each assignment, for example
val user = User(), the system records a new connection. - The graph grows and changes dynamically while the application is running.
- The GC periodically searches this graph, starting from the starting points, to check which memory islands are still reachable by some path.
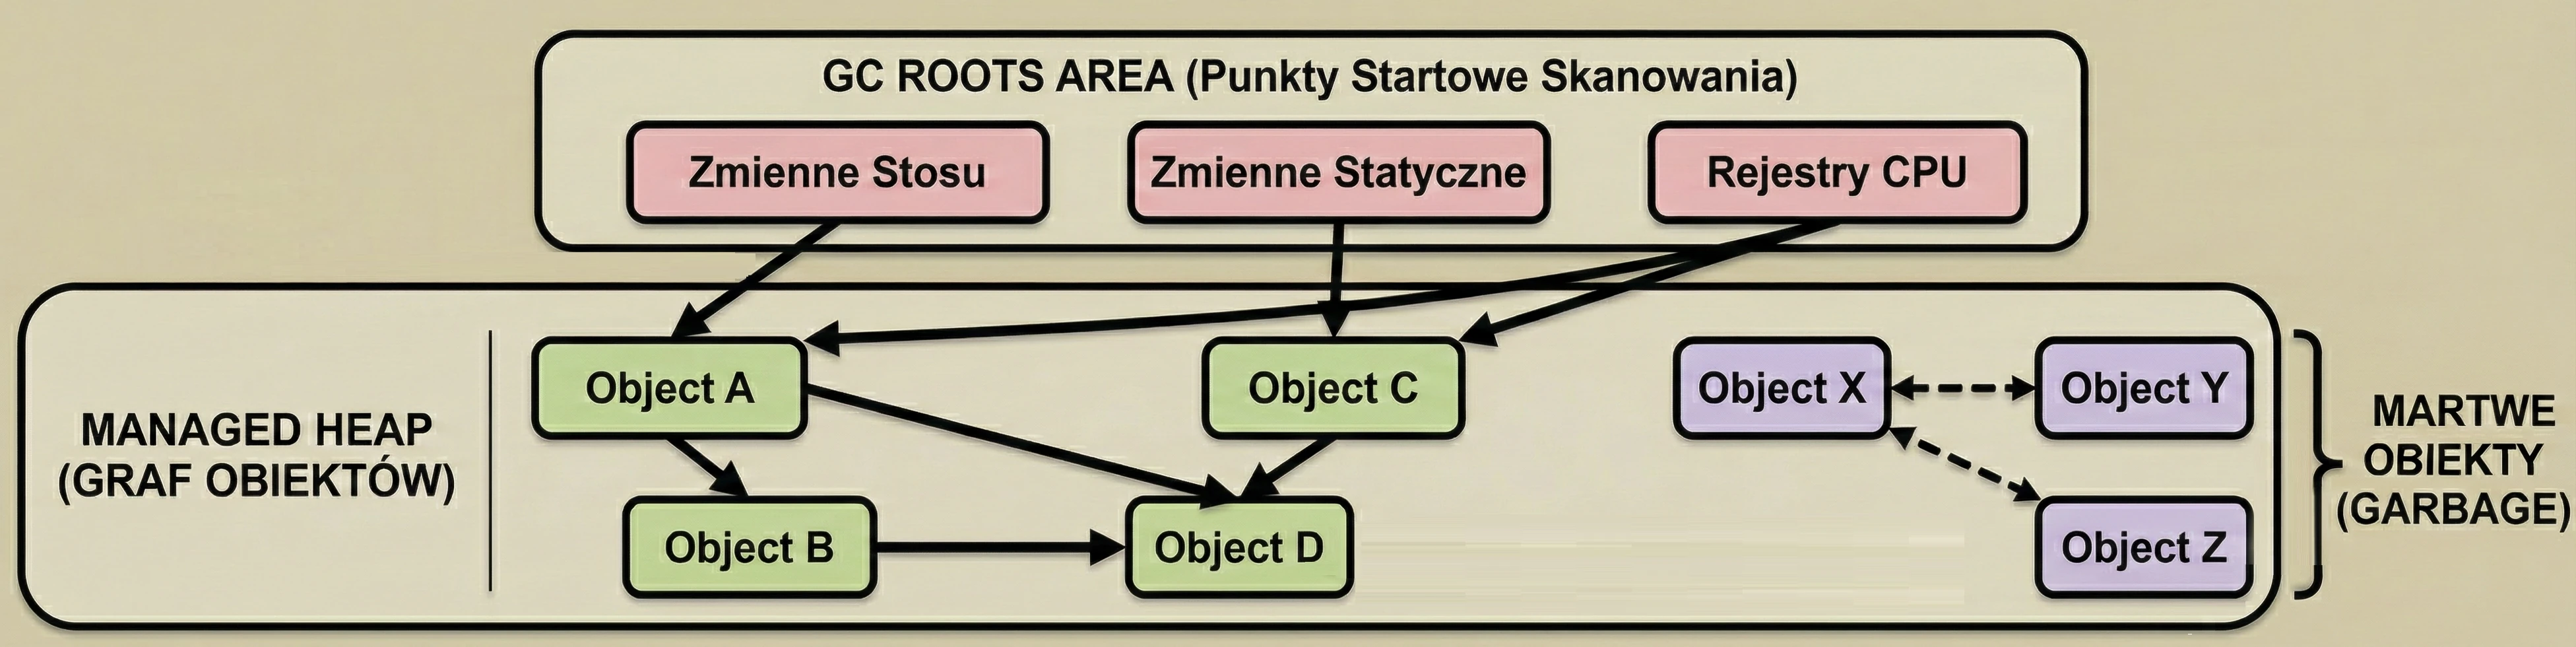
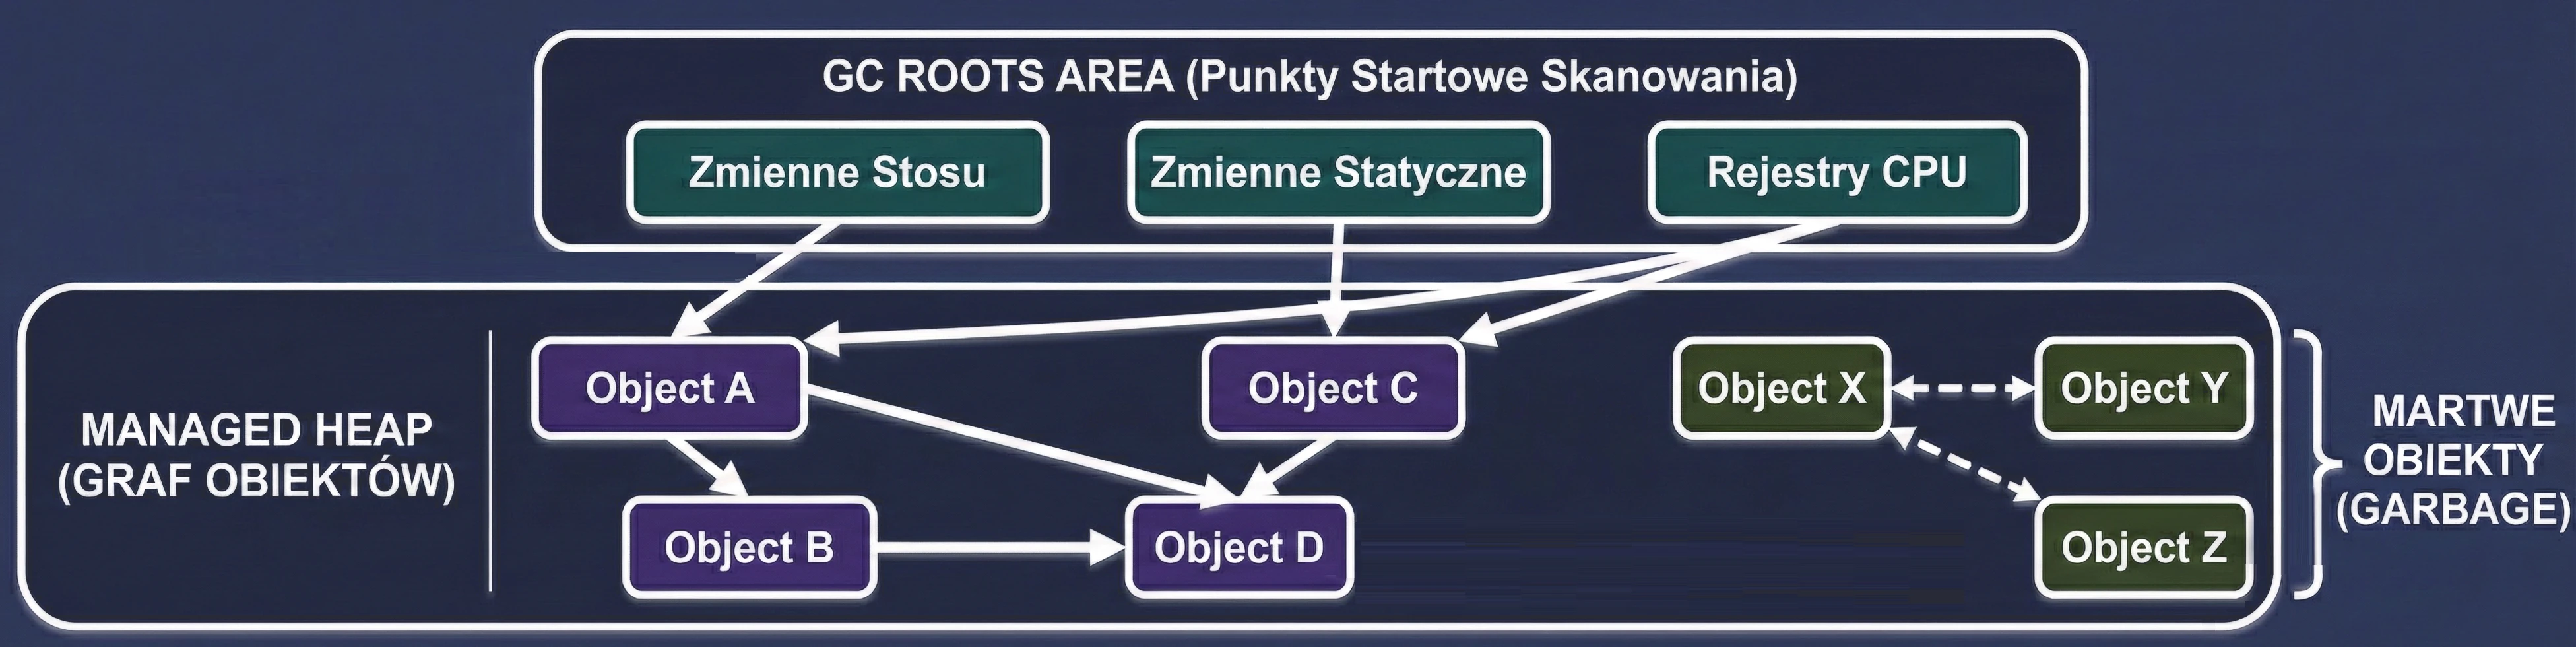
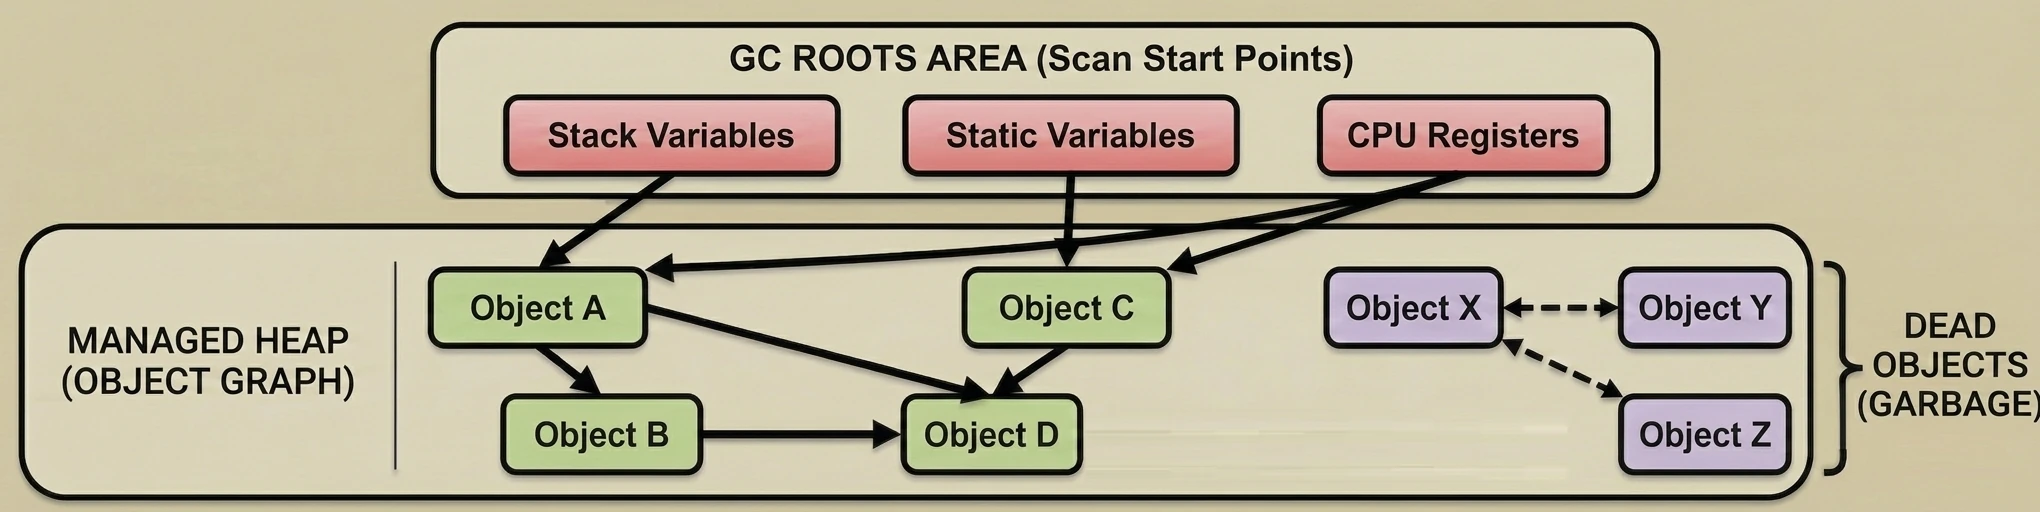
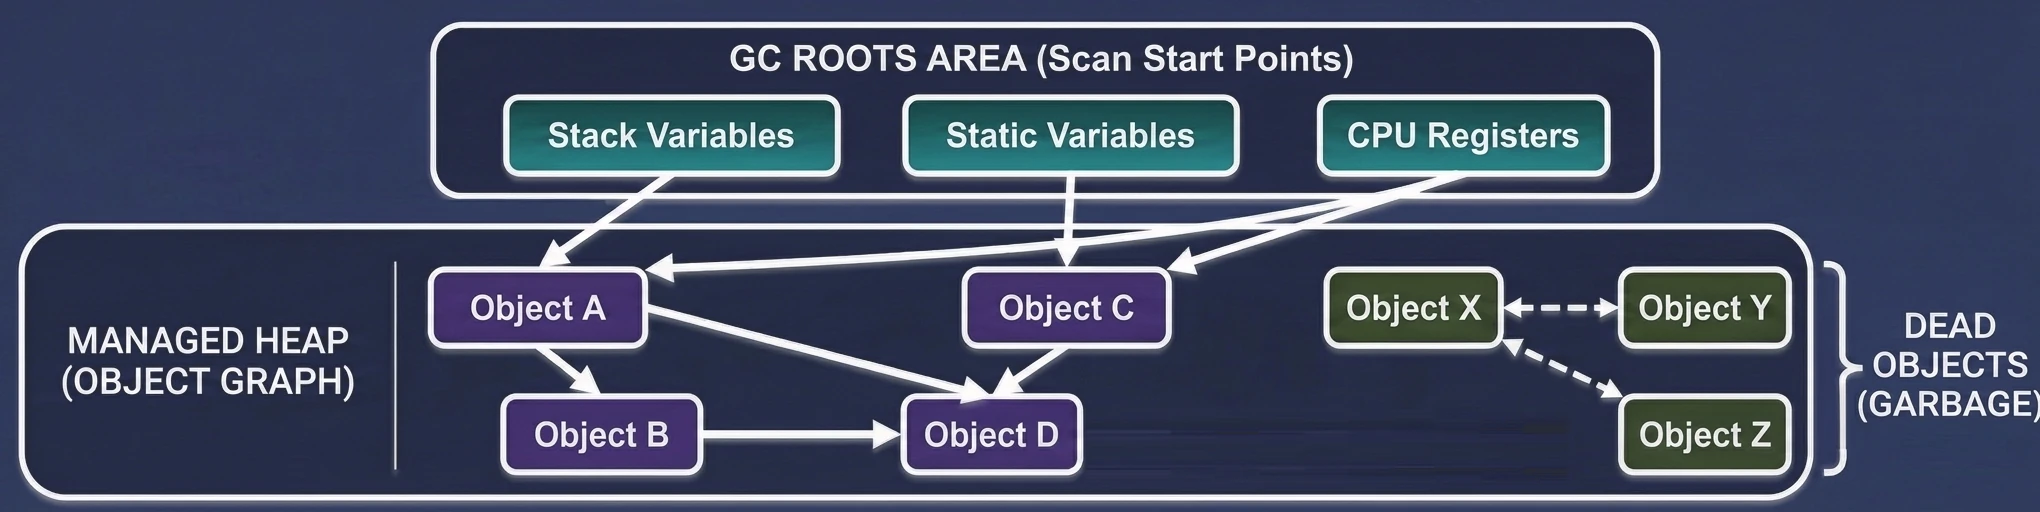
What is a root, meaning an object that is definitely needed?
- Local variables on the stack: Everything in currently executing functions.
- Static fields: Objects attached to classes, for example
companion object. - Active threads: As long as a thread is running, its objects are alive.
- JNI references: Objects held by native code (C/C++).
The cleanup process can be divided into three phases, in a simplified view:
- Mark:
- Sweep:
- Compact:
The GC pauses application threads (although newer GCs do this concurrently). It traverses the entire object graph, starting from GC Roots. Each visited object is marked as alive (Live Object).
The GC scans the heap. Everything that was not marked during the Mark phase is considered garbage (Dead Objects), and the memory is released.
This is a key step. After garbage is removed, holes appear in memory (fragmentation). The GC moves live objects next to each other to free one large, continuous block of memory. This makes allocation of new objects very fast (it is enough to move a pointer).
Generational Hypothesis
Research on program behavior has shown an interesting regularity called the Generational Hypothesis:
Most objects die young.
Temporary objects (variables in loops, iterators, UI events) live for a very short time. If an object survives this initial period, it will probably live for a long time, for example as a singleton, cache, or main service.
Based on this observation, heap memory was divided into zones (generations):
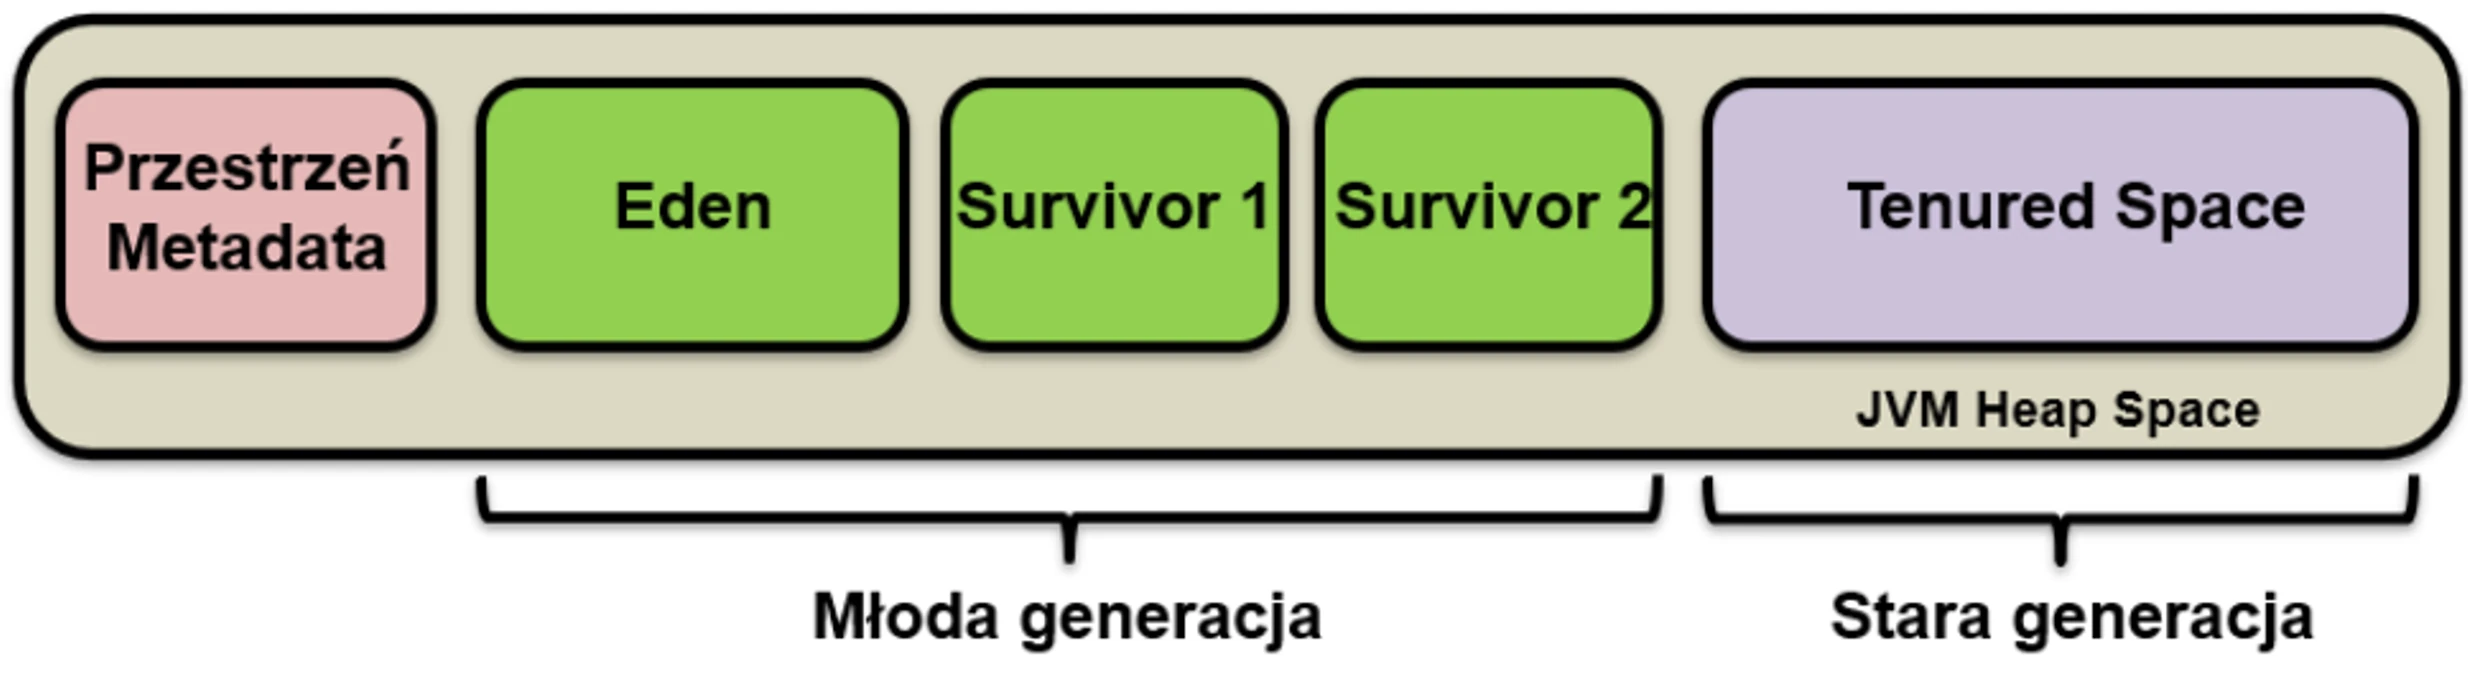
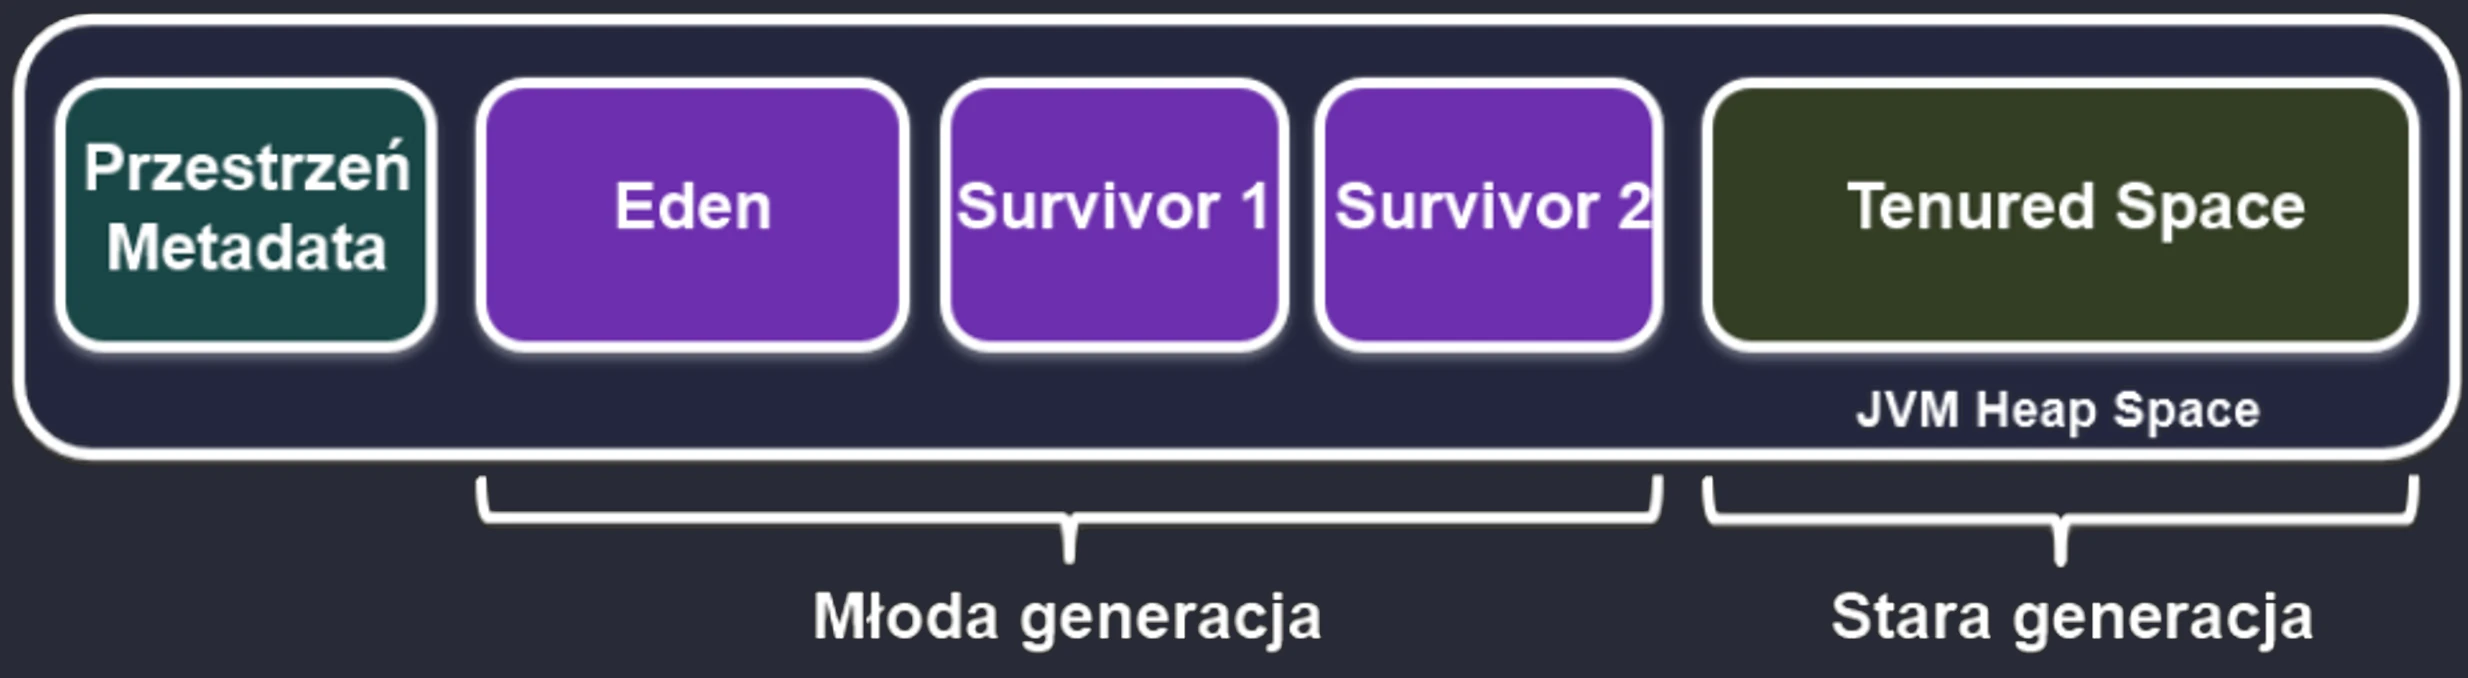
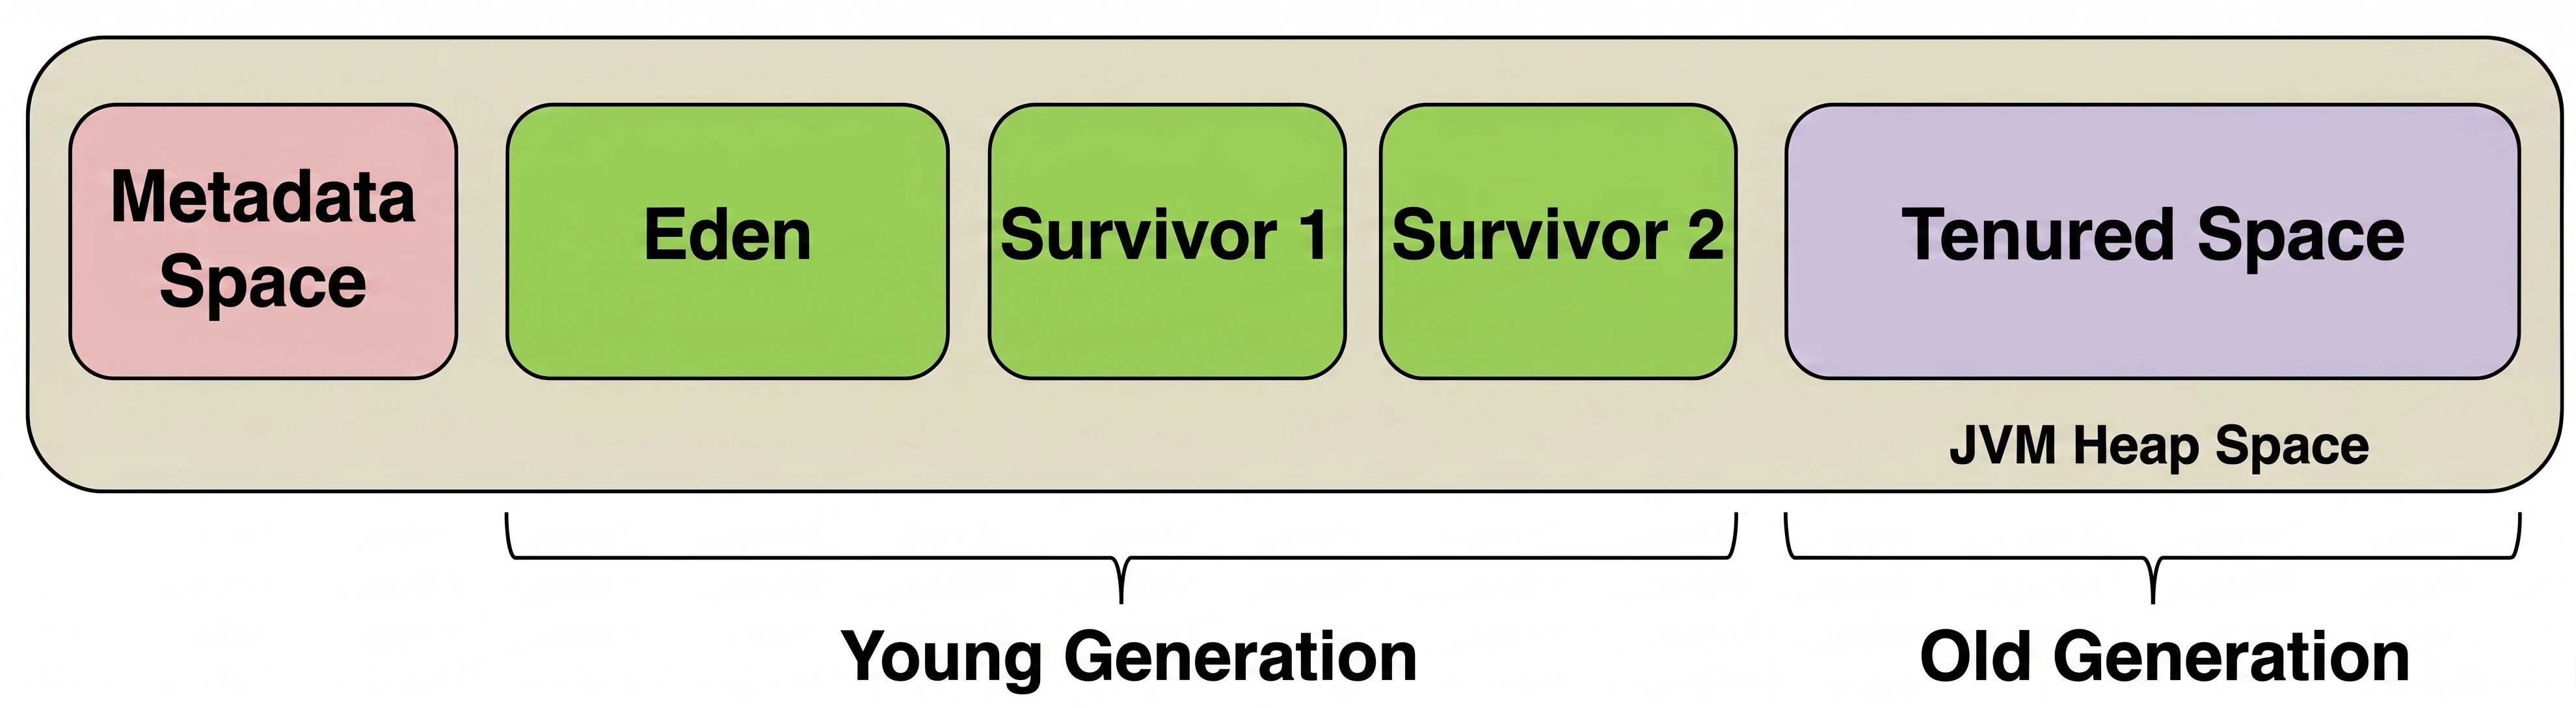
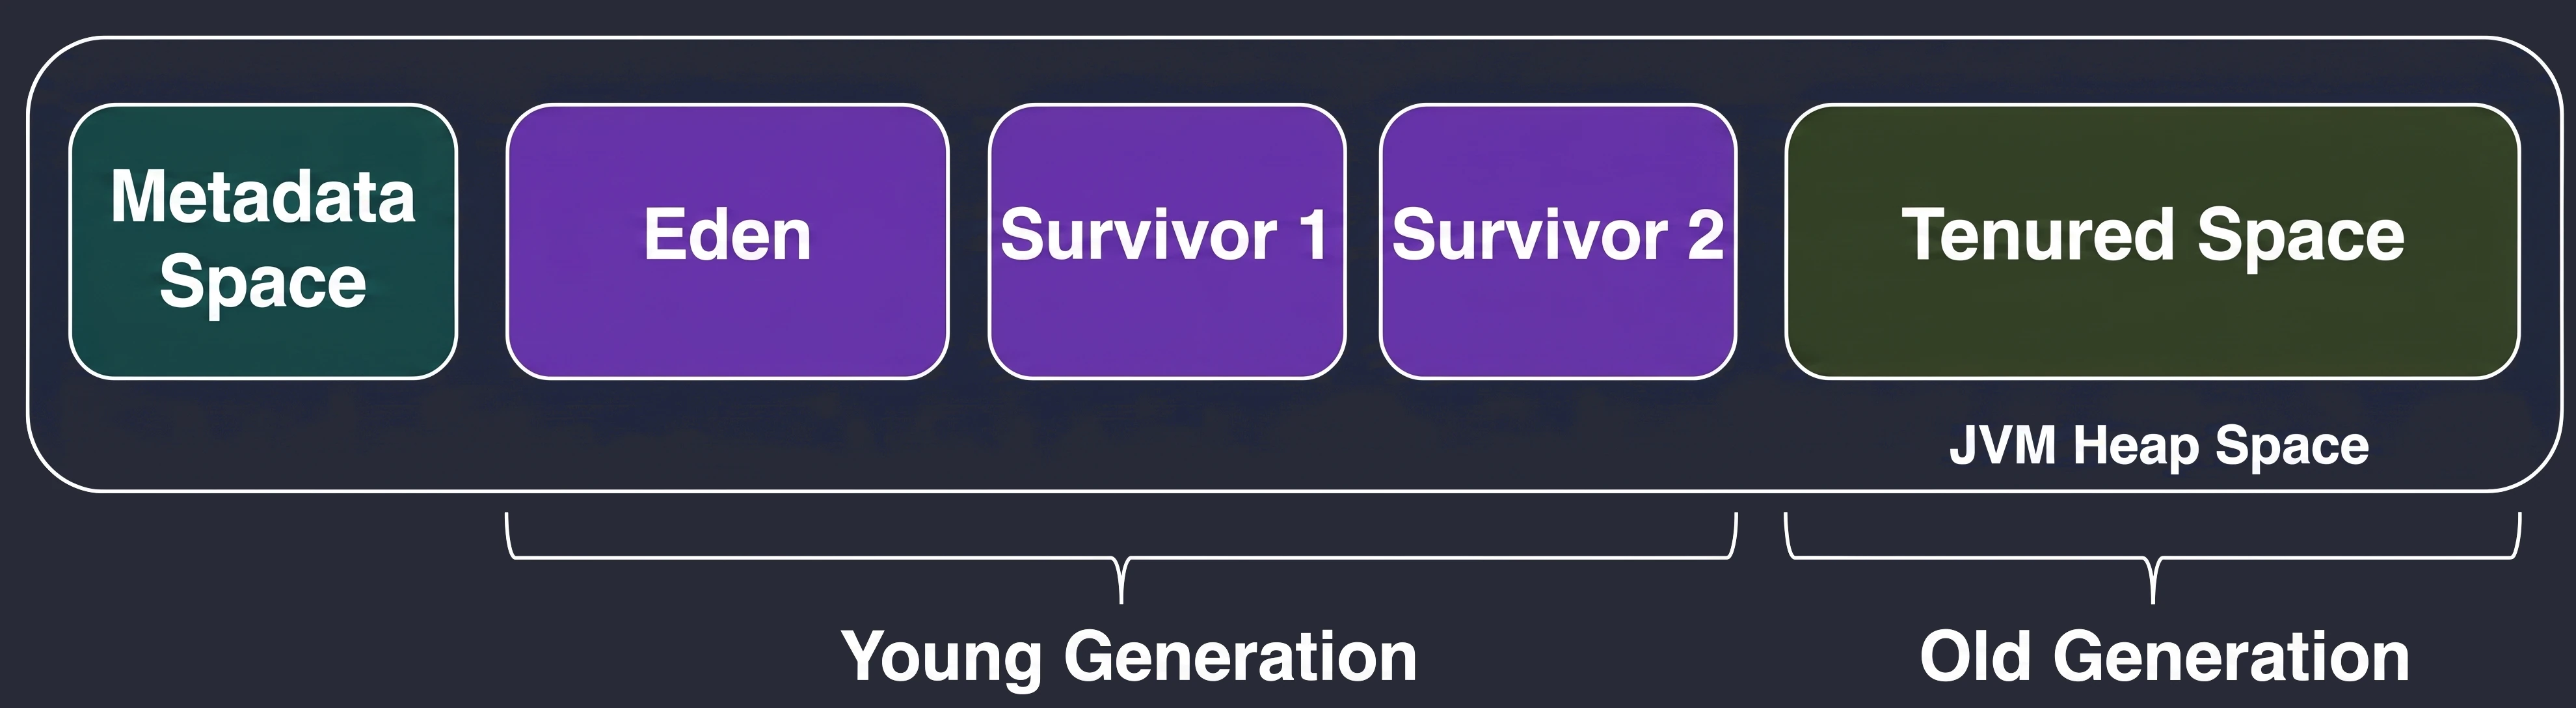
Young Generation
This is where all new objects are born. It is small and cleaned very frequently. It is divided into:
- Eden: The birthplace. When it fills up, a Minor GC occurs.
- Survivor Space (S1 and S2): Two twin spaces for survivors.
Lifecycle in the Young Generation:
- New objects land in Eden.
- When Eden fills up -> Minor GC.
- Live objects from Eden and, for example, S1 are copied to the empty S2.
- Object age (survival counter) is increased.
- Eden and S1 are cleared to zero (very quickly!).
- In the next cycle, S1 and S2 swap roles.
Old Generation
If an object survives enough cycles (for example 15) in Survivor Space, it is promoted to the Old Generation.
- This zone collects veterans.
- It is cleaned much less frequently, but cleanup here (Major GC) is much more expensive and takes longer.
Conclusions
- Avoid allocations in loops and
onDraw(): Even though the GC is fast, creating thousands of objects within one animation frame (16 ms) fills Eden and forces frequent pauses (GC pauses), which the user experiences as interface stuttering. - Memory leaks: The GC will not clean up an object to which you still hold a reference, even if you no longer need it. A classic Android mistake is holding a reference to an
ActivityorContextin a static object or a long-lived thread. This prevents the whole screen from being released from memory. - Choose appropriate data structures: Prefer arrays and
ArrayListover scattered structures when performance matters.
Metaspace (Metadata Space)
Metadata Space is a JVM memory area intended for storing information about the structure of the running code, not the actual data (objects) created by the programmer.
What does this space contain? It stores "recipes" for classes, meaning metadata needed by the virtual machine to operate:
- Class definitions: Class names, their parents (superclasses), and implemented interfaces.
- Method definitions: Method bytecode and parameter information.
- Fields: Names and types of fields (variables in a class).
- Constant Pool: References to constants used in the class.
Important distinction: Heap vs Native Memory In many diagrams (including the one above), this space is included inside the heap frame. This is a simplification referring to older Java versions (before Java 8), where there was an area called PermGen that was part of the heap. In newer versions:
- This area is called Metaspace.
- It is no longer part of the heap.
- It is located in Native Memory, meaning it uses RAM directly rather than the memory limit assigned to the heap (
-Xmx).
When an application loads a new class, the JVM stores information about its structure in Metaspace. If an application loads thousands of classes, for example when using large frameworks, this area grows dynamically and occupies the available working memory of the device.
In Kotlin, functions are first-class citizens. This means that functions are not only named blocks of code inside classes, as methods are for example in Java. They are full-fledged objects that we can pass as parameters, return from other functions, and store in variables.
Function fundamentals
Function definition in Kotlin is simple and readable. We use the fun keyword.
fun double(x: Int): Int {
    return 2 * x
}
The return type is specified after a colon. If a function returns nothing useful (that is, it returns Unit), this type can be omitted.
Kotlin introduces default values for parameters.
fun connect(
    url: String,
    timeout: Int = 5000,
    retry: Boolean = true
) { /*...*/ }
Now we can call this function in many ways using named arguments. This mechanism allows us to pass parameters in any order, as long as we name them exactly as in the function definition.
connect("http://example.com") // timeout=5000, retry=true
connect("http://example.com", retry = false) // timeout=5000
connect(timeout = 1000, url = "http://example.com") // Order does not matter
If we need a function that accepts any number of arguments, for example a list of IDs to delete, we use the vararg modifier. Inside the function, such a parameter is visible as an array (Array<T>).
fun printScores(vararg scores: Int) {
    for (score in scores) {
        print("$score ")
    }
}

printScores(1, 2, 3, 4, 5)
Functions in Kotlin style (idioms)
Kotlin offers mechanisms that make it possible to write code that reads almost like prose. Two of them deserve special attention: extension functions (Extensions) and infix functions (Infix).
Extension functions allow us to add a new function to an existing class without inheriting from it and without using the Decorator pattern. We can even extend classes whose source code we do not own, for example String from the JDK standard library.
We define them by placing the type name before the function name:
// We extend the String class with the isEmail() method
fun String.isEmail(): Boolean {
    // 'this' refers to the String instance on which we call the function
    return this.contains("@") && this.contains(".")
}

val email = "user@example.com"
if (email.isEmail()) {
    println("Valid email")
}
Under the hood, the compiler turns this into a static function that receives the object as the first parameter. Because of that, extensions do not break encapsulation; they do not have access to private fields of the class.
Infix functions allow us to call functions that have exactly one parameter in a way that resembles mathematical operators or natural language.
infix fun Int.times(str: String): String {
    return str.repeat(this)
}

// Standard call
3.times("Hello")

// Infix call - like a sentence
3 times "Hello"
Infix functions are commonly used in DSLs (Domain Specific Languages) and in tests, for example in the AssertK library: assertThat(price) isEqualTo 100.
Higher-order functions and lambdas
A higher-order function is a function that takes another function as a parameter or returns one. This is the foundation of functional programming.
Lambda expressions are anonymous functions (without names) that we can write in a concise way.
Full syntax:
val sum: (Int, Int) -> Int = { x: Int, y: Int -> x + y }Simplified syntax (type inferred):
val sum = { x: Int, y: Int -> x + y }Kotlin has a convention that greatly simplifies code: 1. If a function is the last parameter of a call, we can move the lambda outside the parentheses. 2. If a lambda has only one parameter, we do not have to name it - it is available under the default name it.
val numbers = listOf(1, 2, 3, 4, 5)

// "Long" version
numbers.filter({ x -> x > 2 })

// Idiomatic version (trailing lambda + it)
numbers.filter { it > 2 }
This is why Compose code (Column { ... }) or Gradle code (dependencies { ... }) looks the way it does. These curly braces are lambdas.
Function references (operator ::)
The :: operator is used to create references to functions or properties. This allows us to pass existing functions as arguments to other functions, for example higher-order functions, instead of defining a new lambda.
fun isEven(n: Int): Boolean = n % 2 == 0

val numbers = listOf(1, 2, 3, 4, 5, 6)

// Passing a function reference instead of the lambda { isEven(it) }
val evenNumbers = numbers.filter(::isEven)

// Reference to a class method
val list = listOf("a", "bc", "def")
val lengths = list.map(String::length)
Anonymous functions
Anonymous functions are functions that do not have an assigned name. They are expressions, just like lambdas, but their syntax is closer to traditional functions.
val sum = fun(x: Int, y: Int): Int {
    return x + y
}
Key features and differences compared with lambdas:
returnstatement: In anonymous functions, thereturnkeyword works the same way as in named functions - it returns a value from the anonymous function itself. In lambdas, an unlabeledreturntries to return from the surrounding function (non-local return).- Explicit types: Anonymous functions require explicit parameter declarations and a return type when using a block body.
- Use case: They are useful when we need precise control over the returned type or when we want to avoid ambiguity related to how
returnworks inside a lambda.
Scope functions
This is a set of 5 standard functions: let, run, with, apply, also. They all do something very similar: they execute a block of code on an object. They differ only in how that object is available inside the block (this or it) and what they return (the object itself or the lambda result).
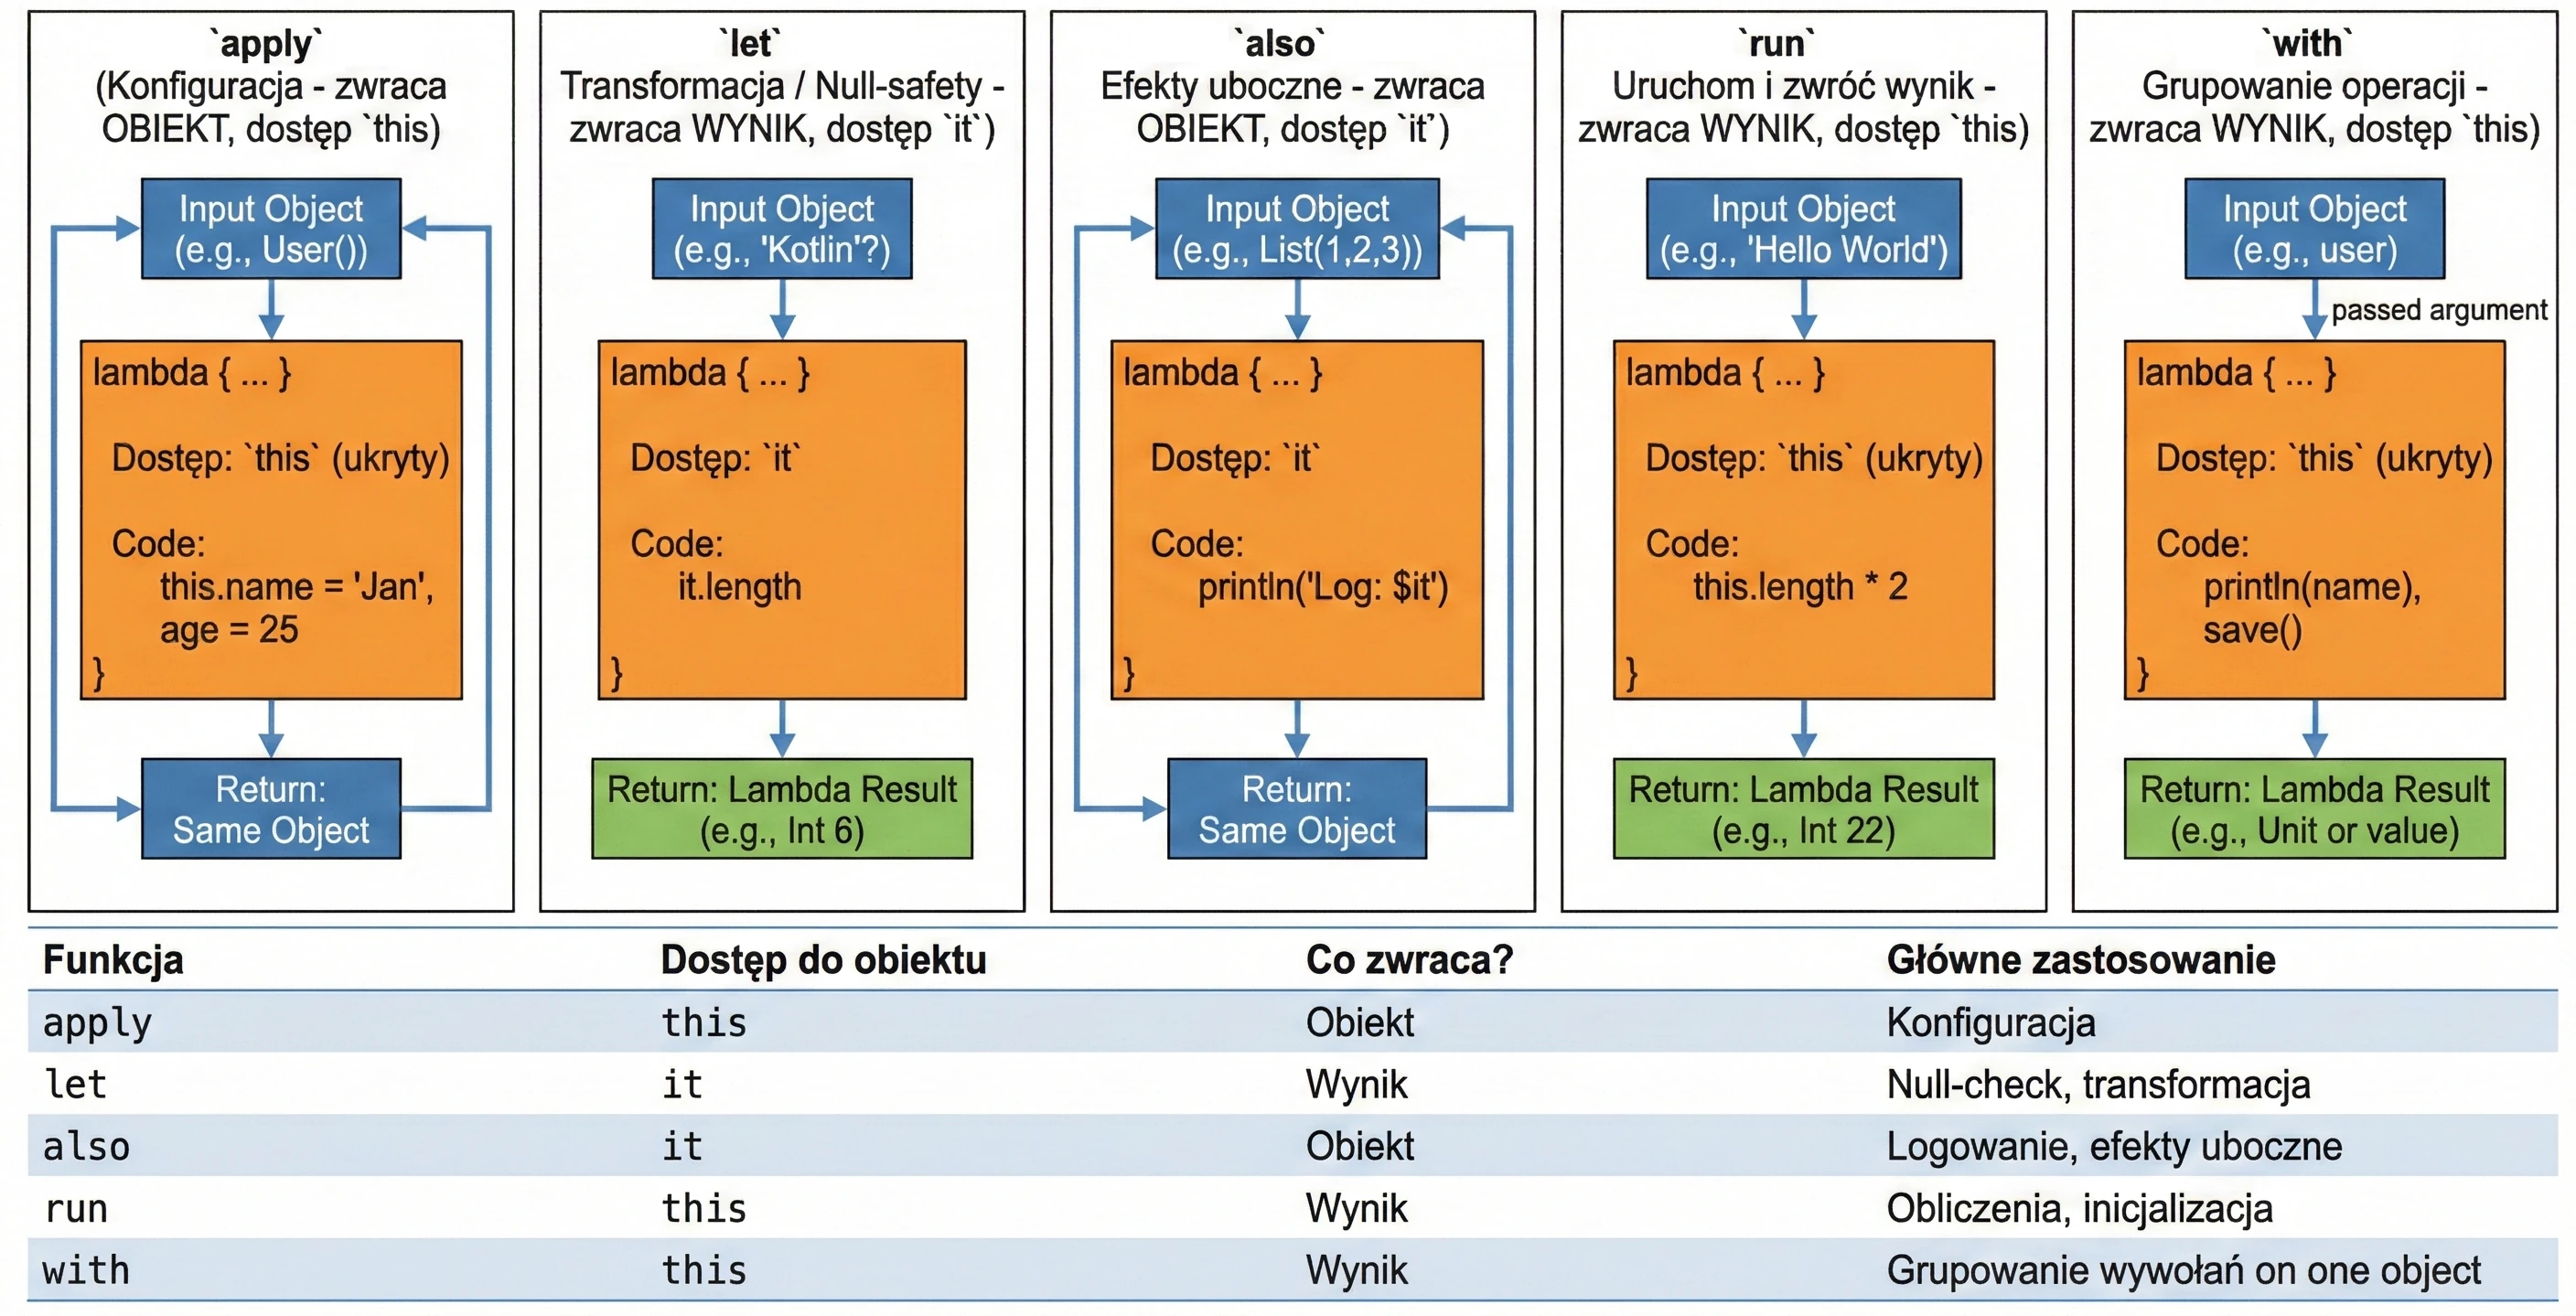
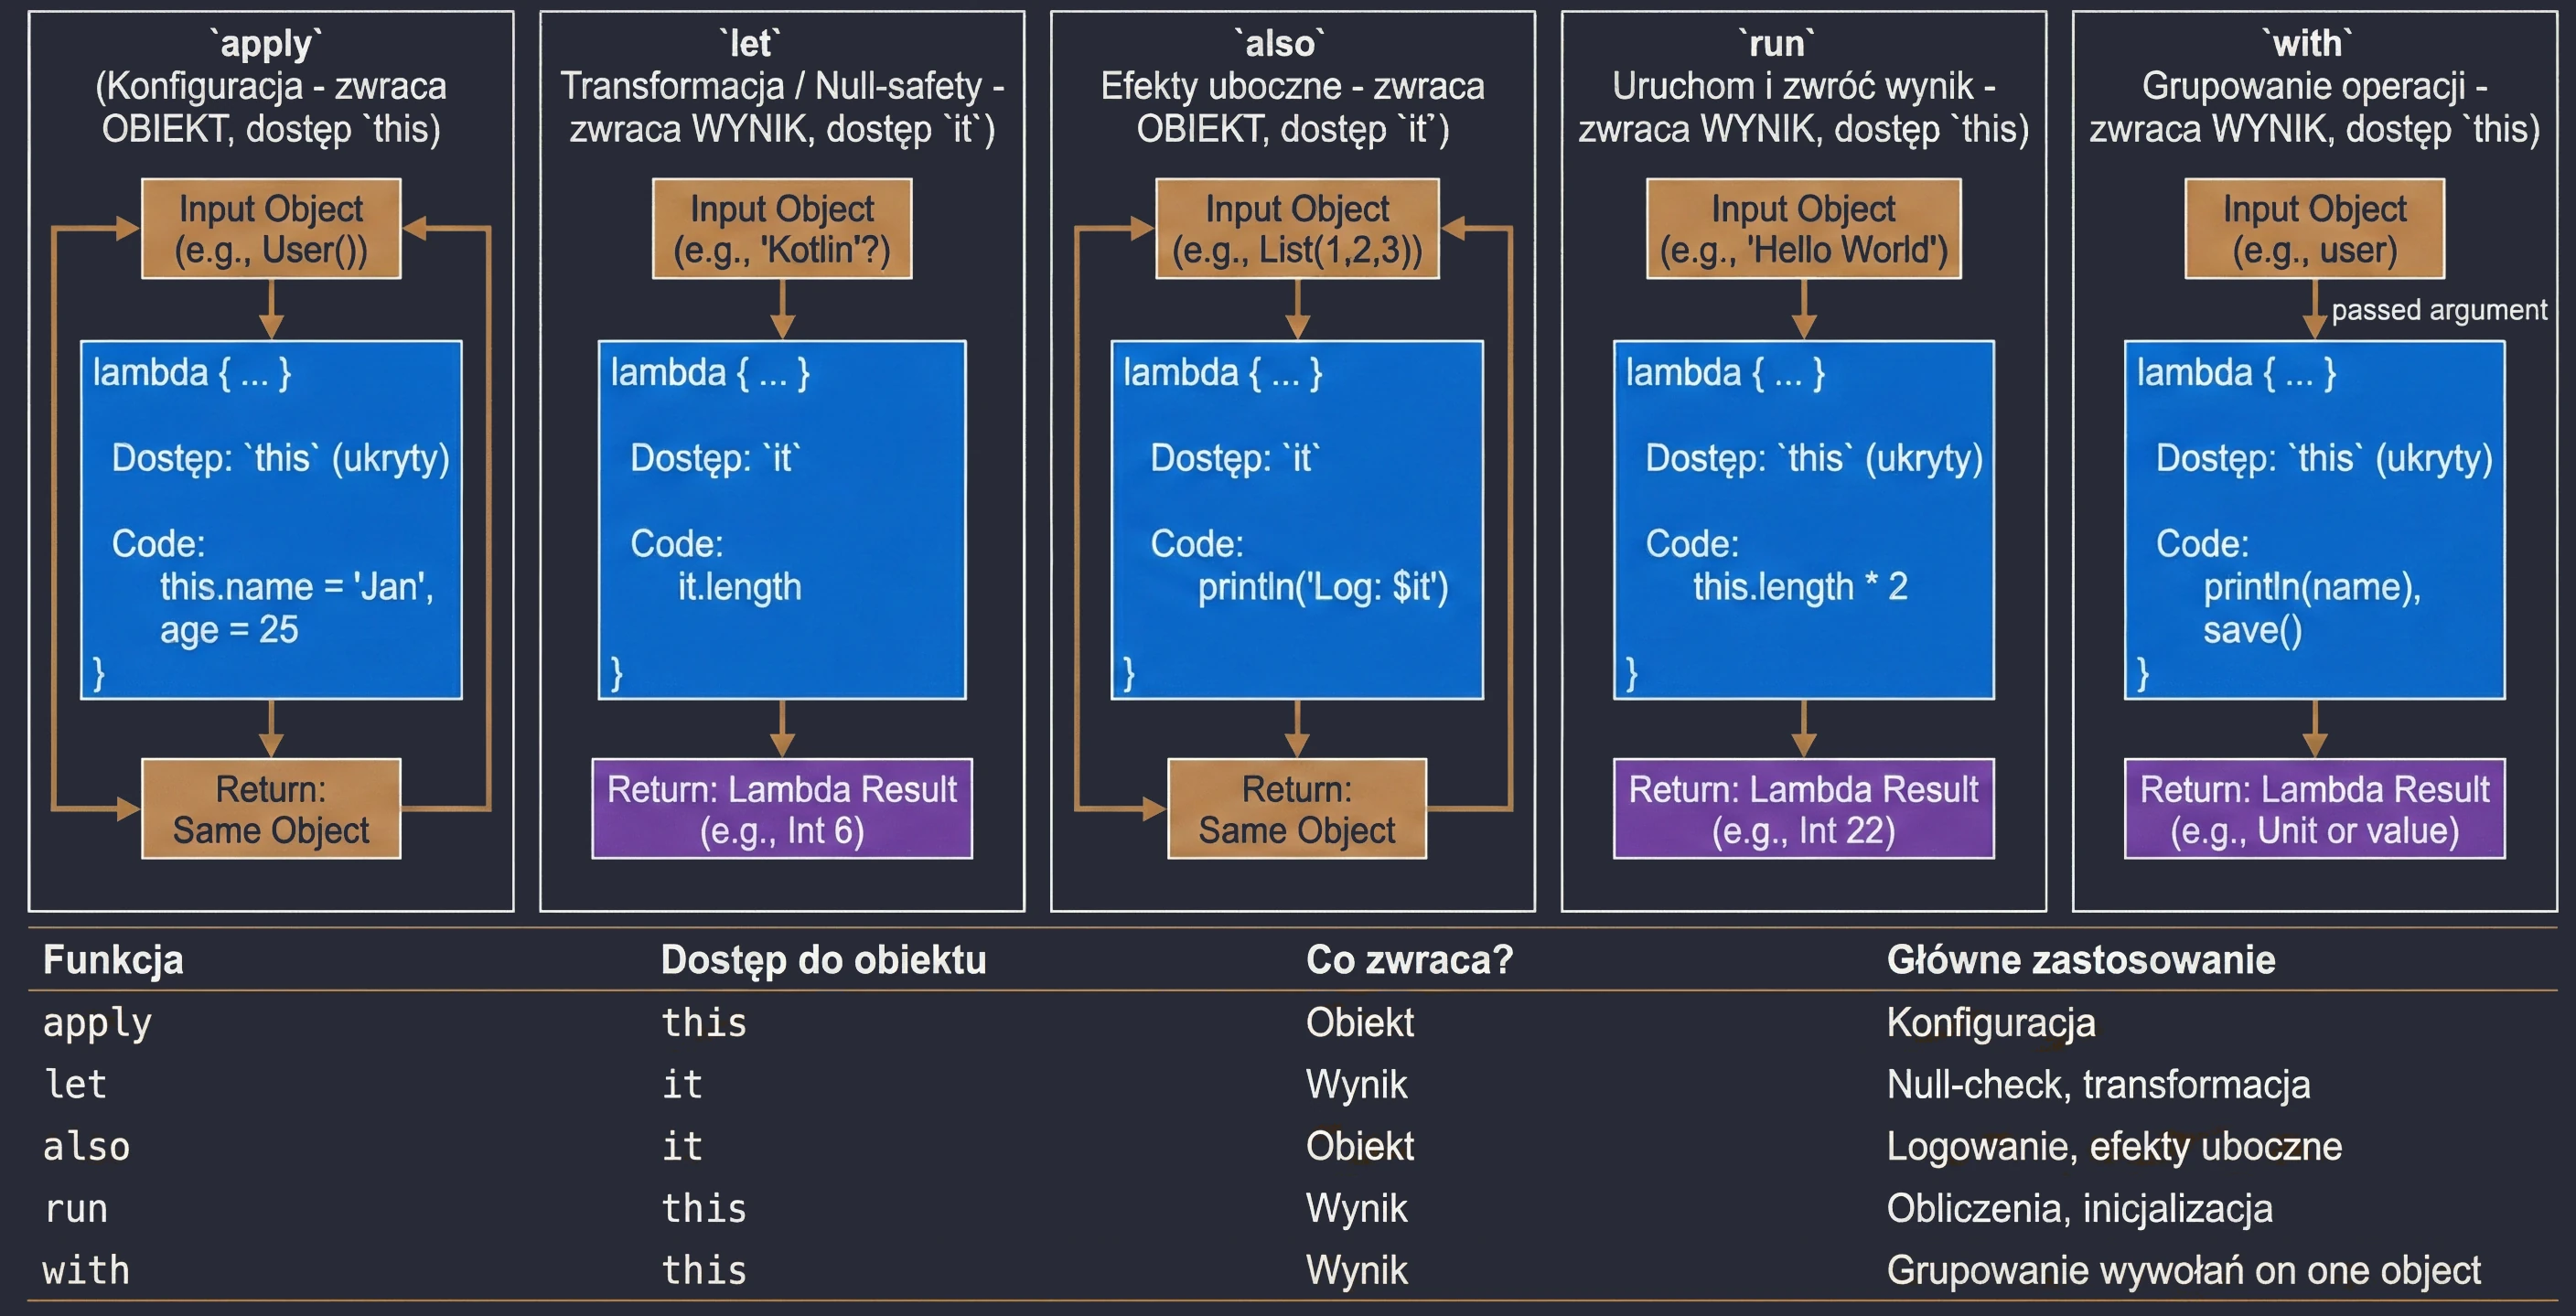
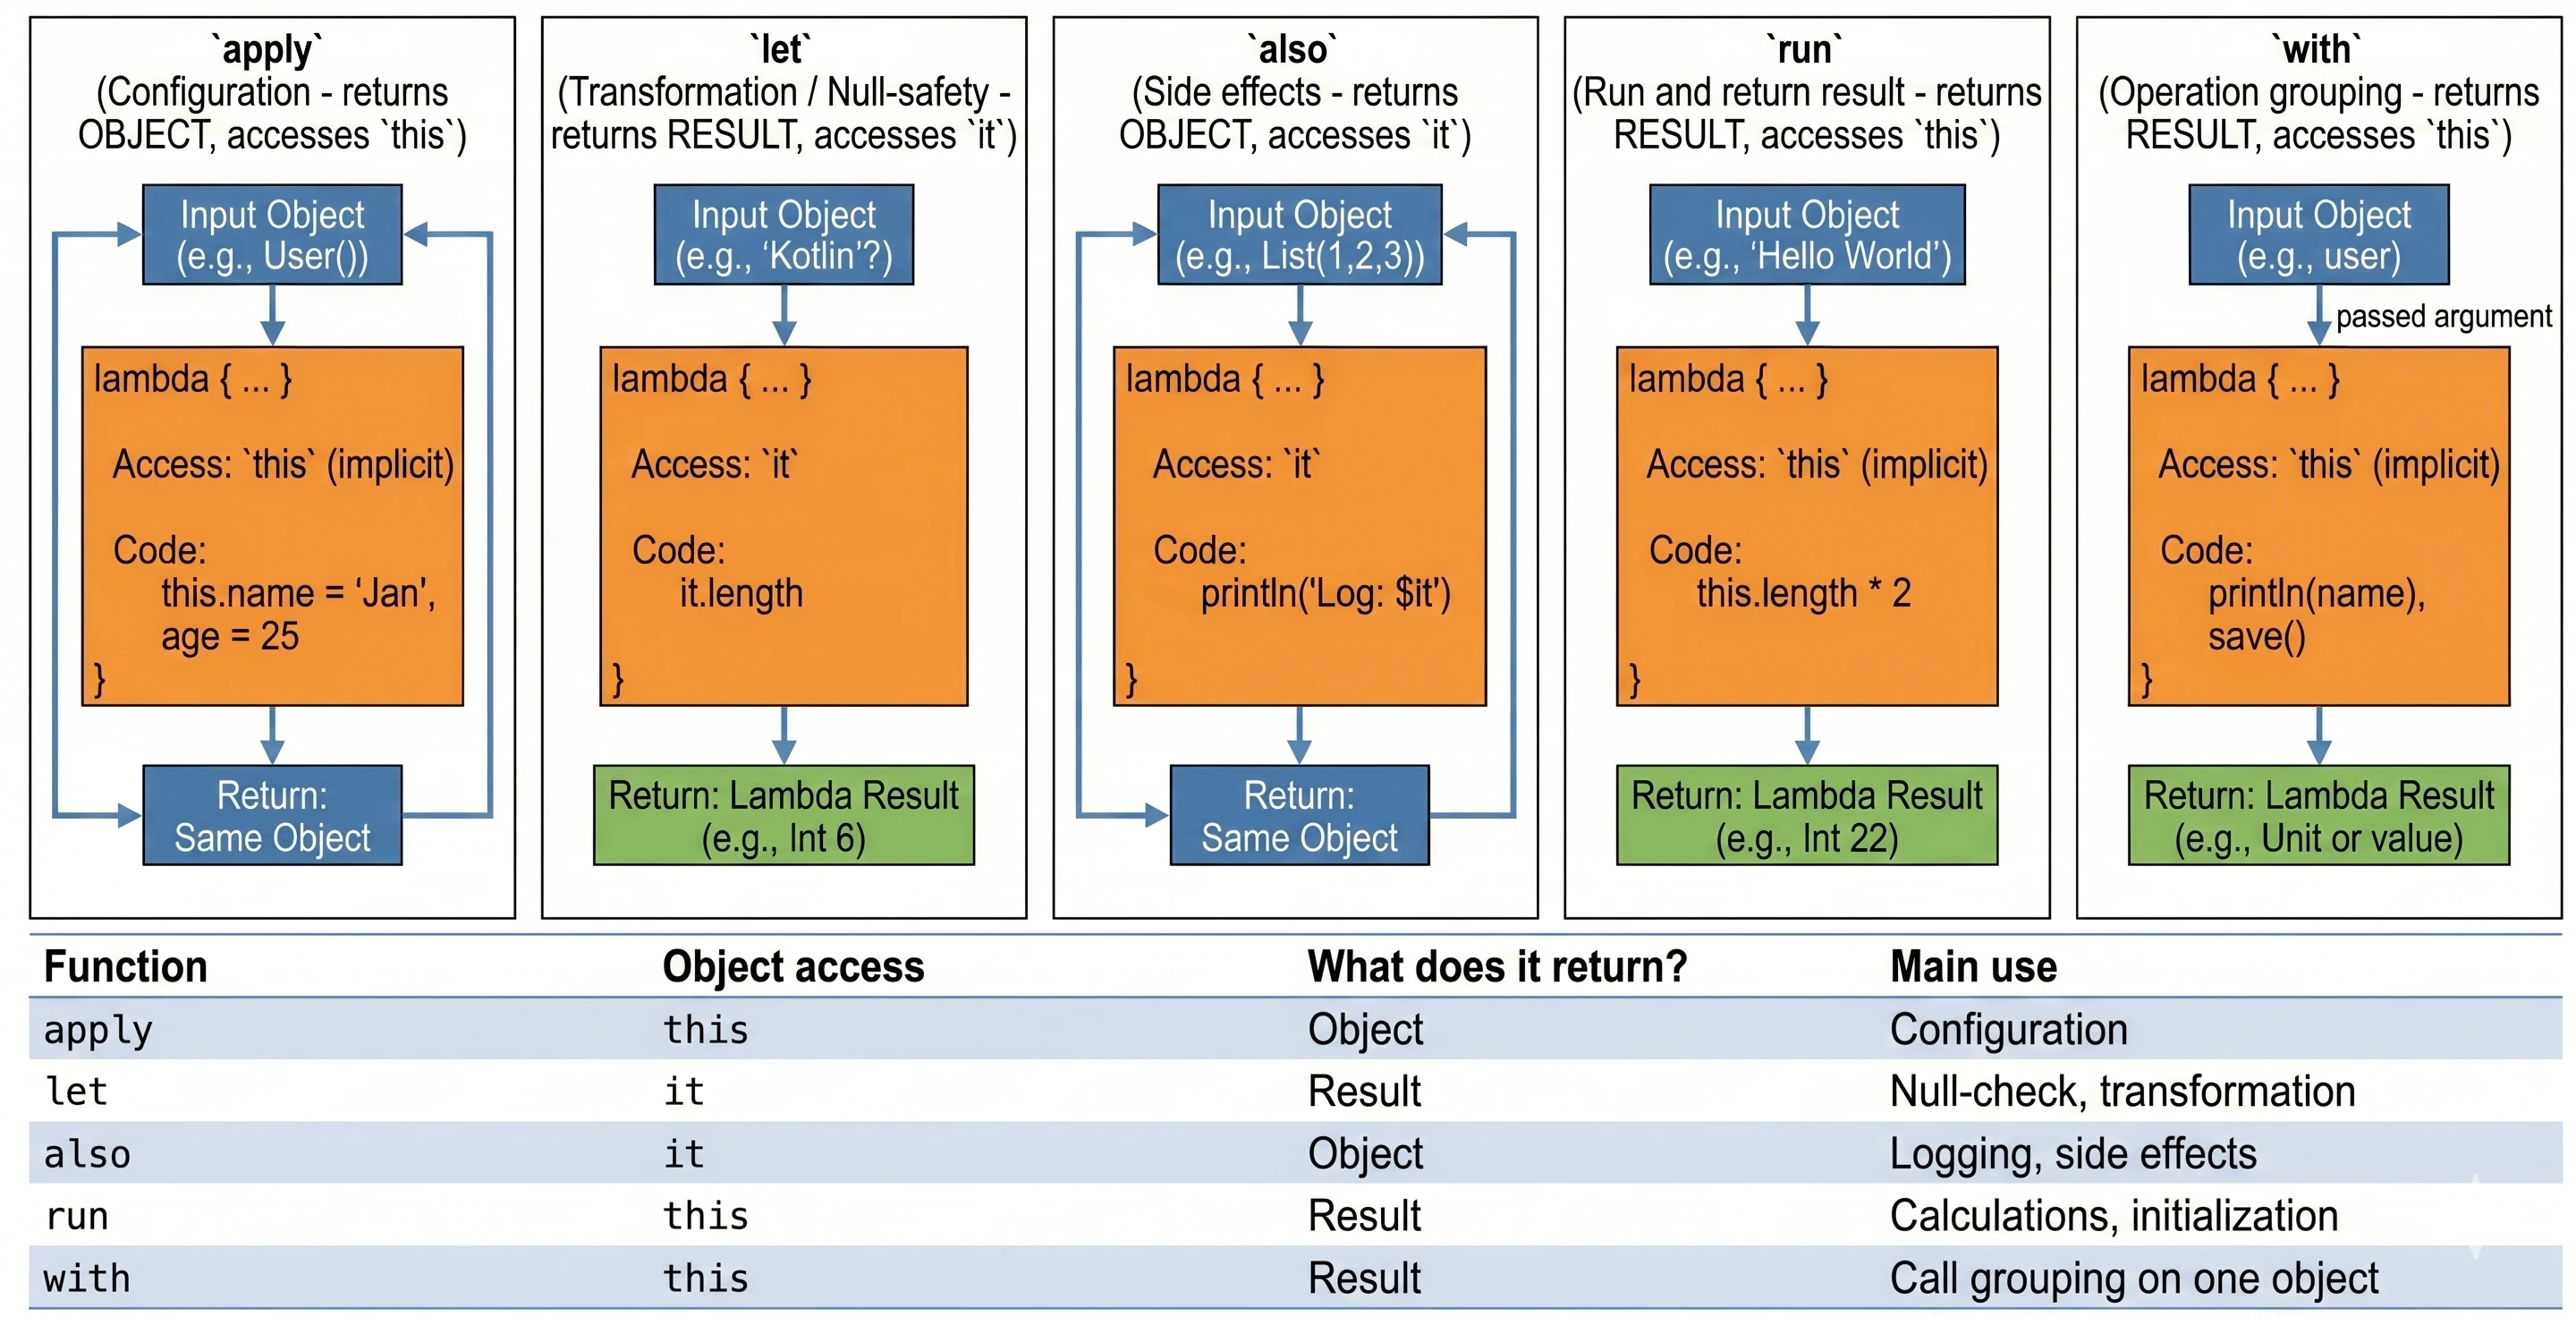

Cheat sheet for choosing the right function:
apply: Object configuration. Access throughthis, returns the object.let: Working with nullable objects or transformation. Access throughit, returns the lambda result.also: Performing additional operations, so-called side effects (actions that do not change the object itself, but affect the outside world, such as logging or saving to a database), without breaking the call chain. Access throughit, returns the object.run: A combination ofwithandlet. Runs a block of code on an object and returns the result. Access throughthis.with: Similar torun, but the object is passed as an argument. Used when we want to perform many operations on one object without repeating its name.
val user = User().apply {
        name = "John"
        age = 25
        city = "Krakow"
}val name: String? = "Kotlin"
val length = name?.let {
println("Processing: $it")
it.length // lambda result assigned to length
}val numbers = mutableListOf(1, 2, 3)
.also { println("Log: list created $it") }
.apply { add(4) }val result = "Hello World".run {
println("Text length: $length")
length * 2
}with(user) {
println("Name: $name")
println("Age: $age")
saveToDatabase()
}Advanced concepts
Inline functions
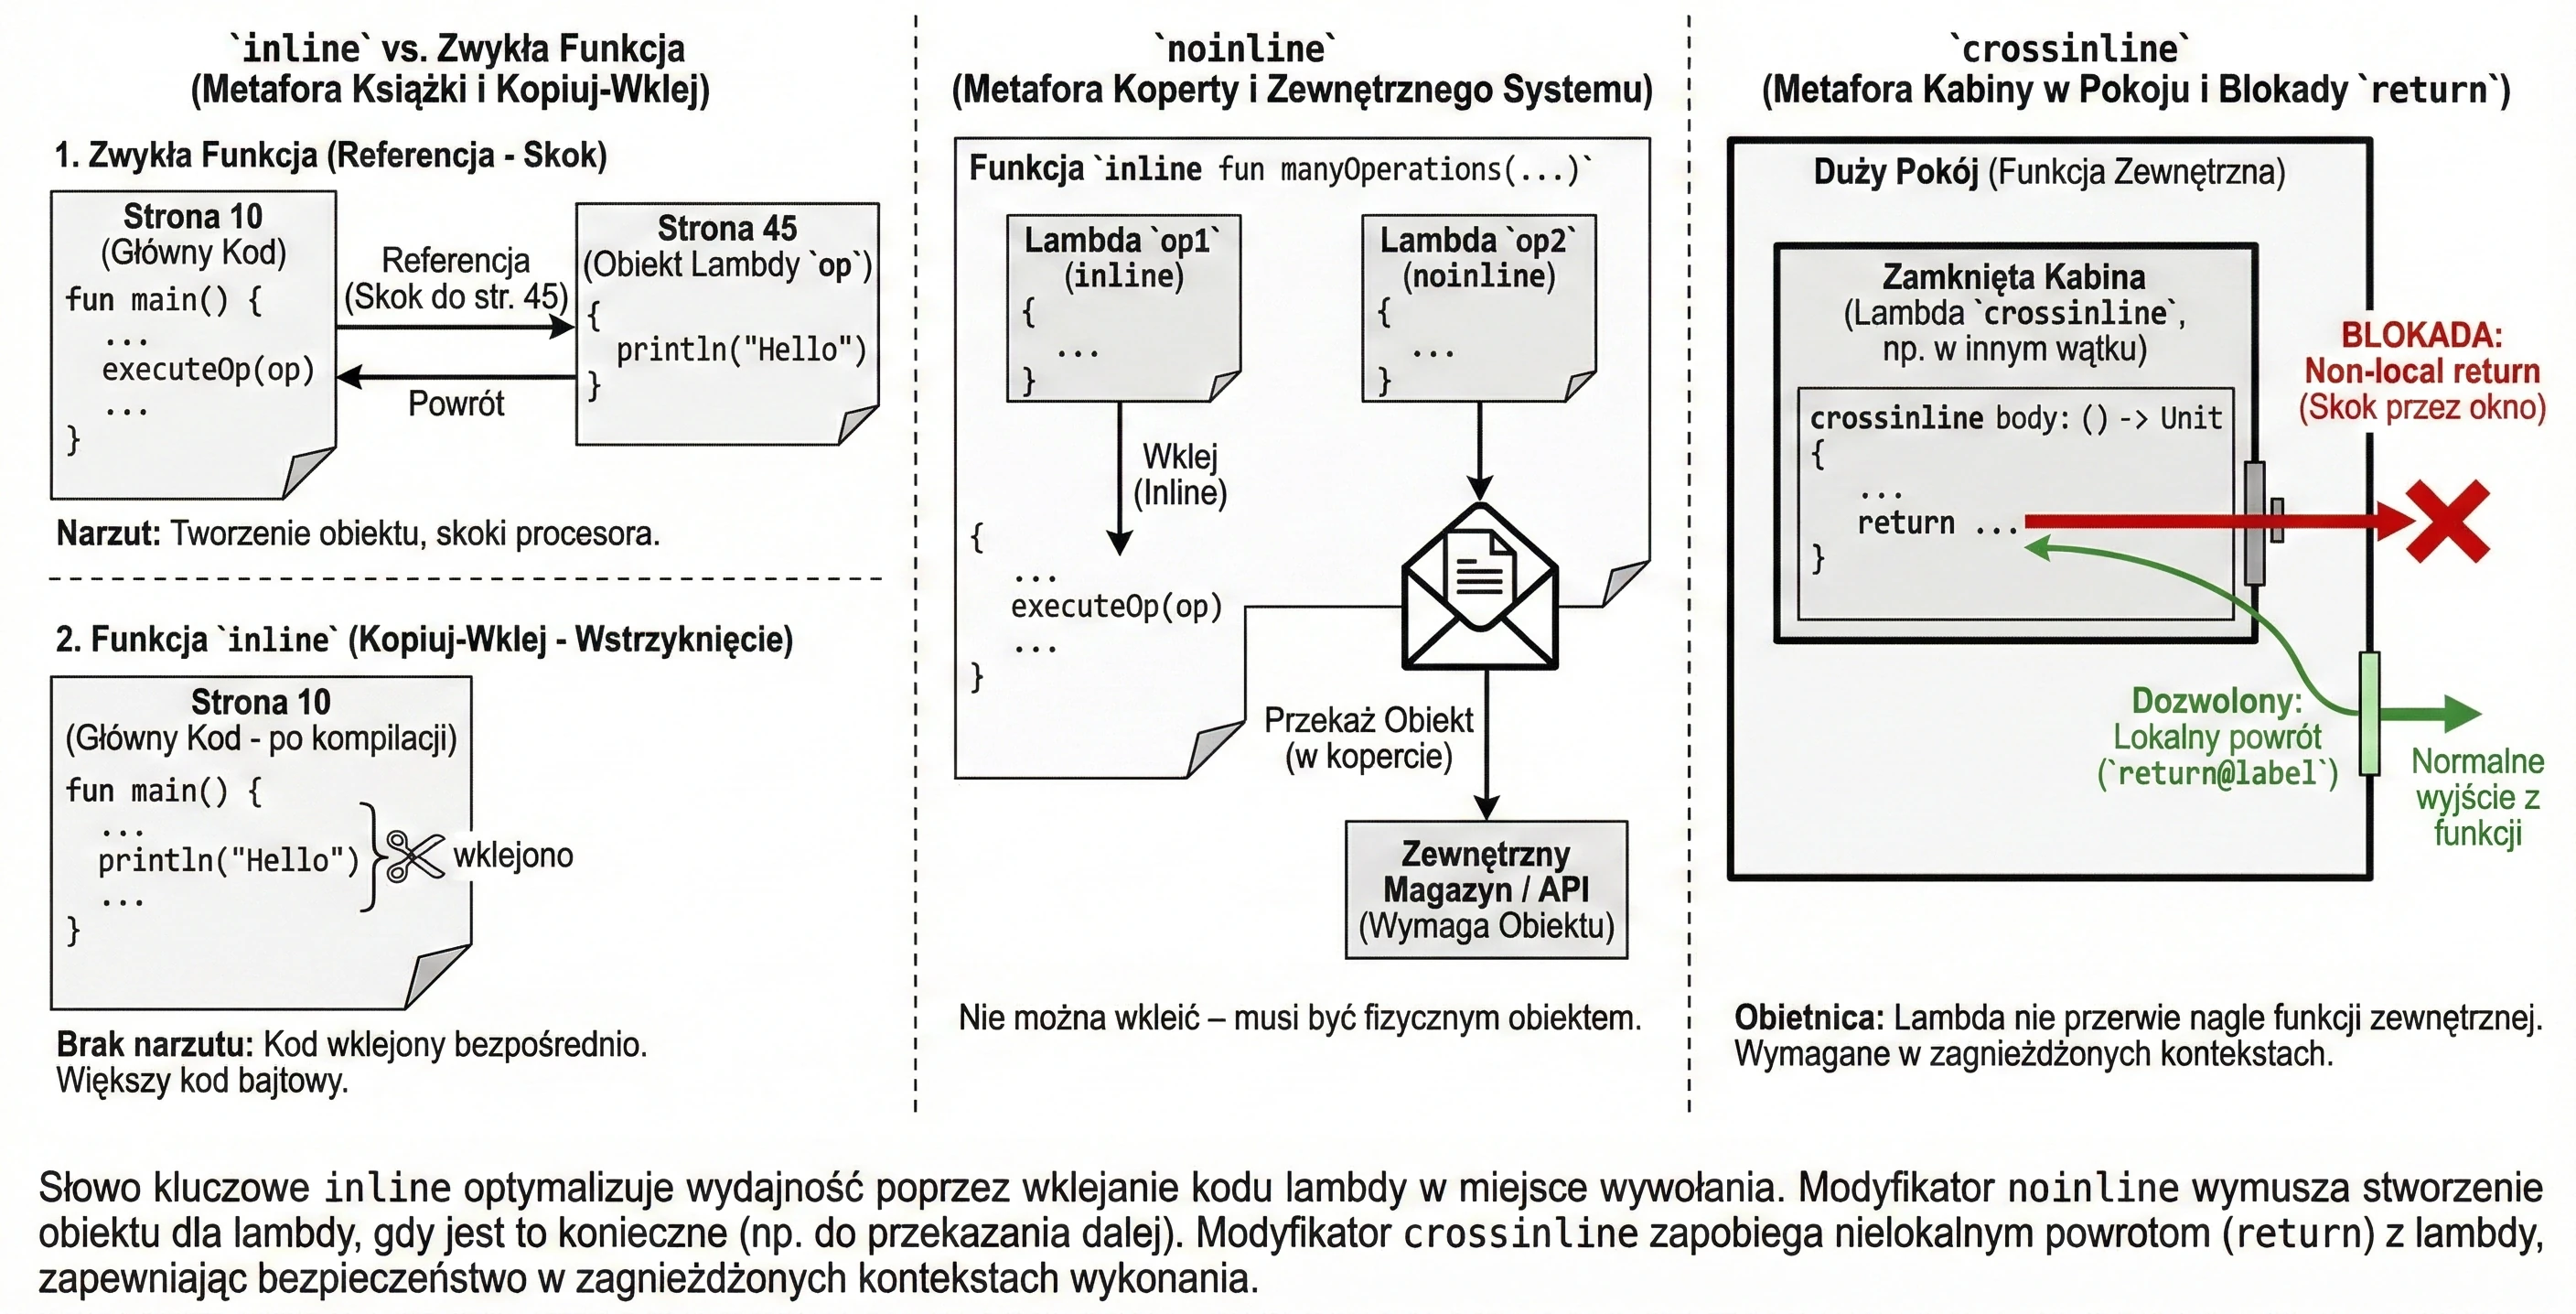
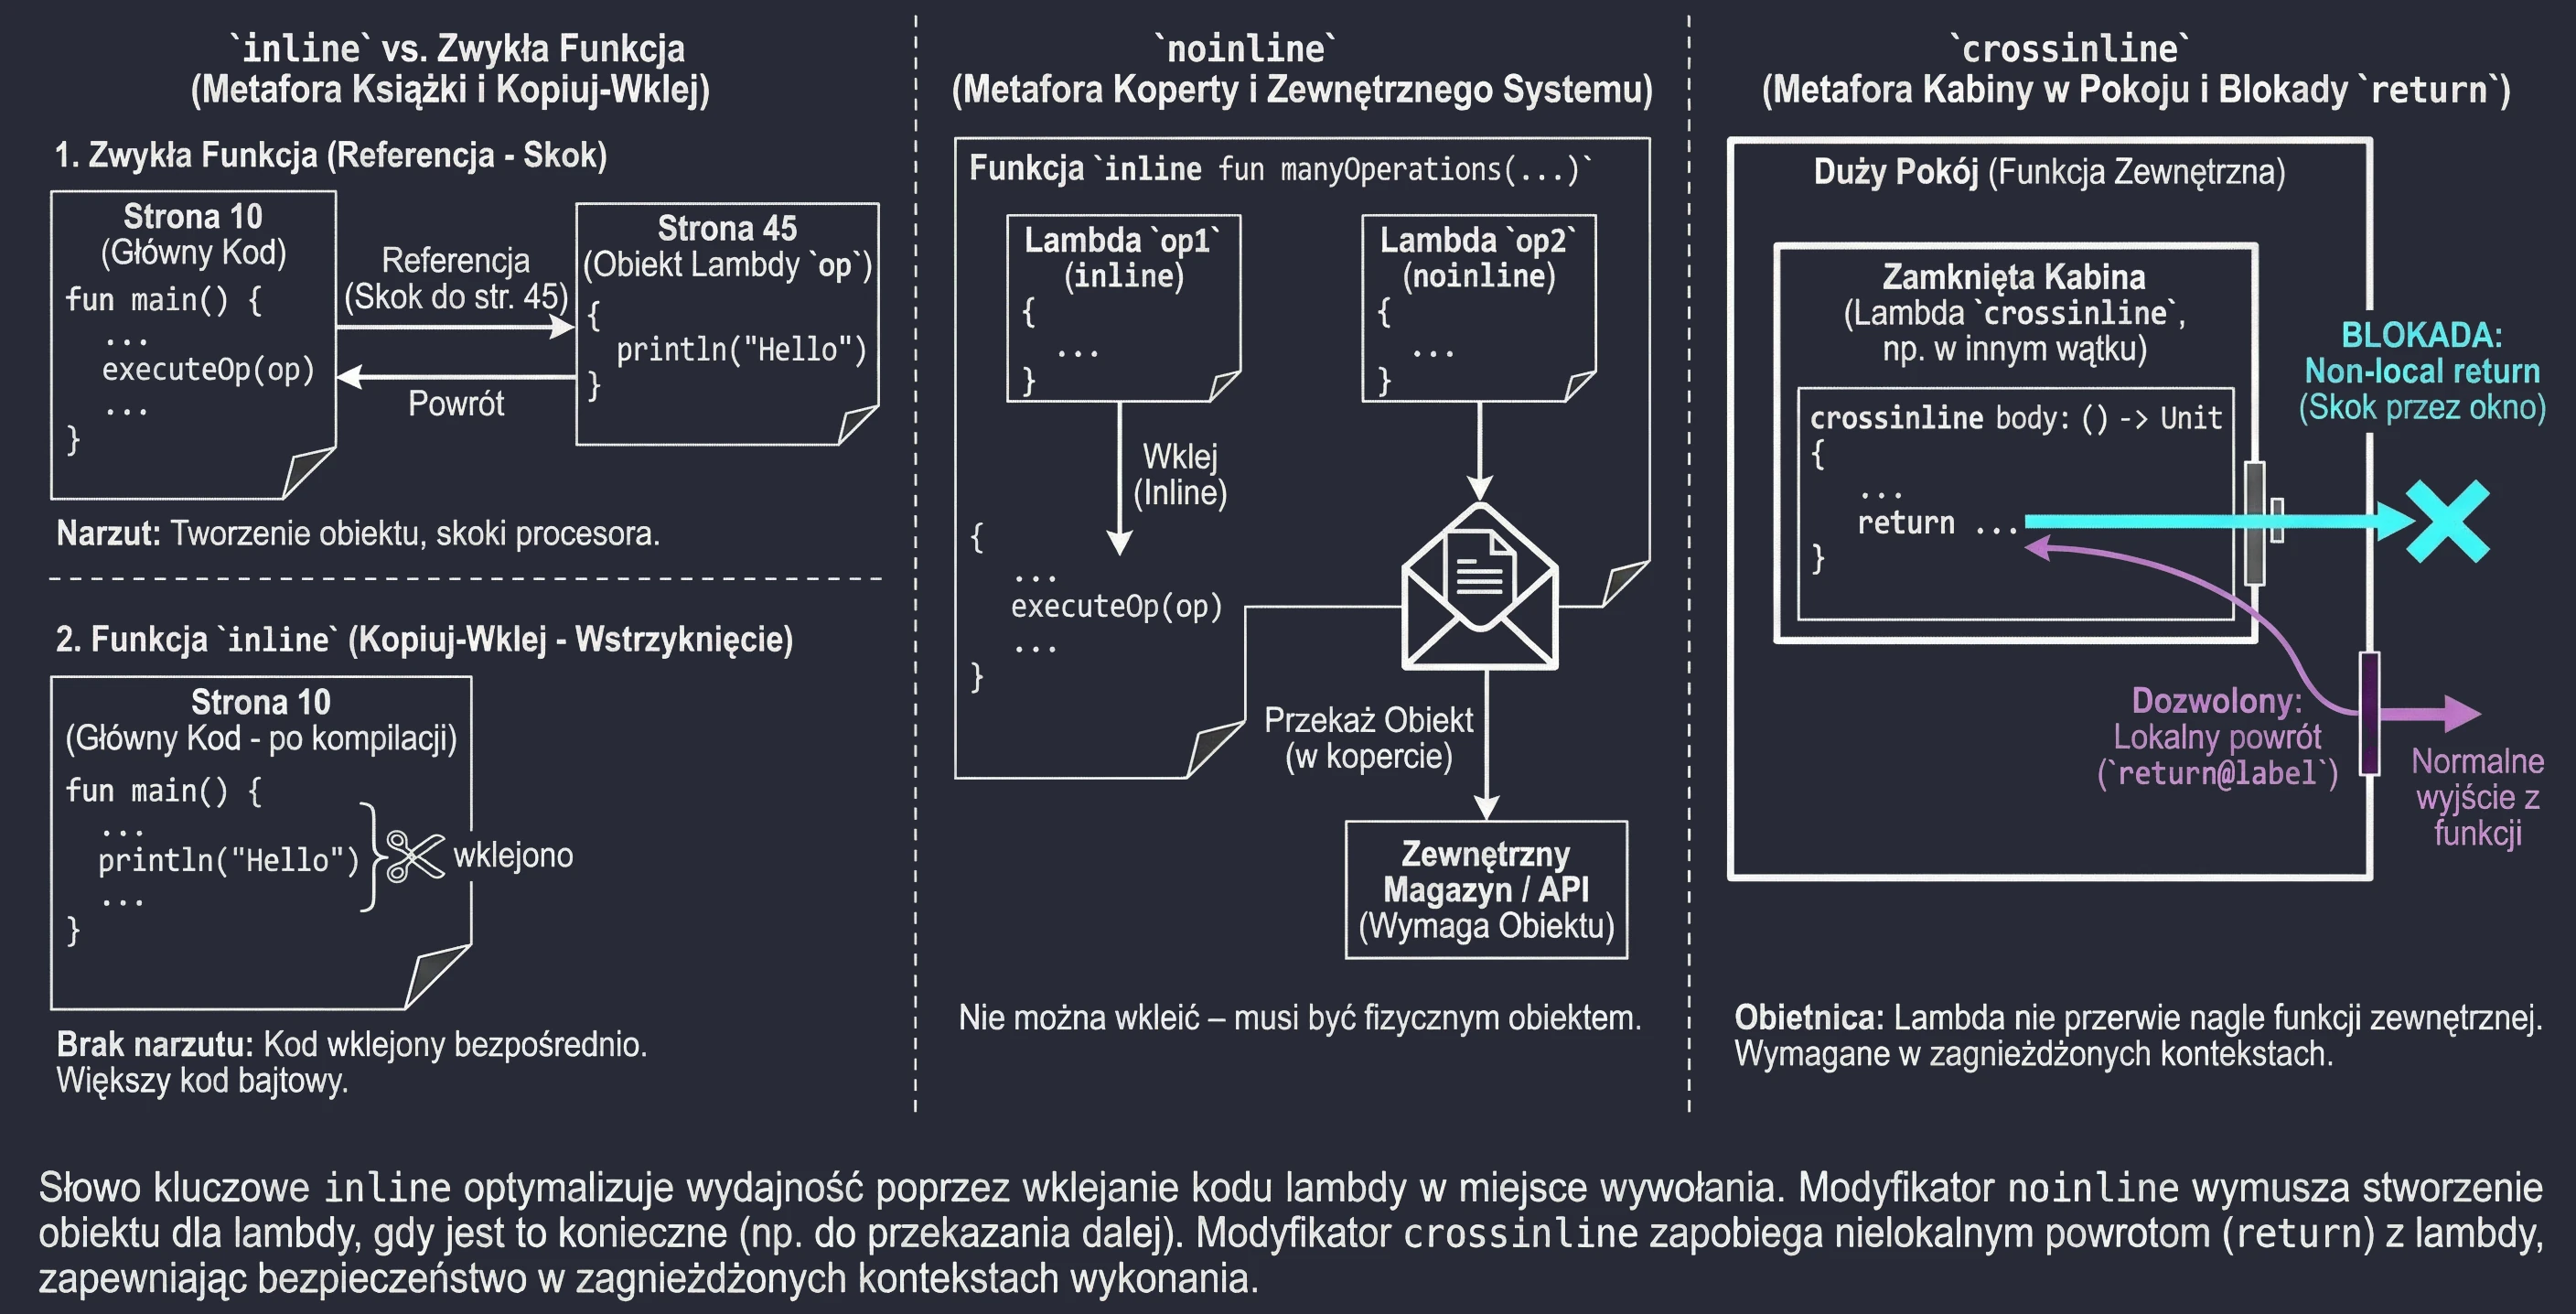
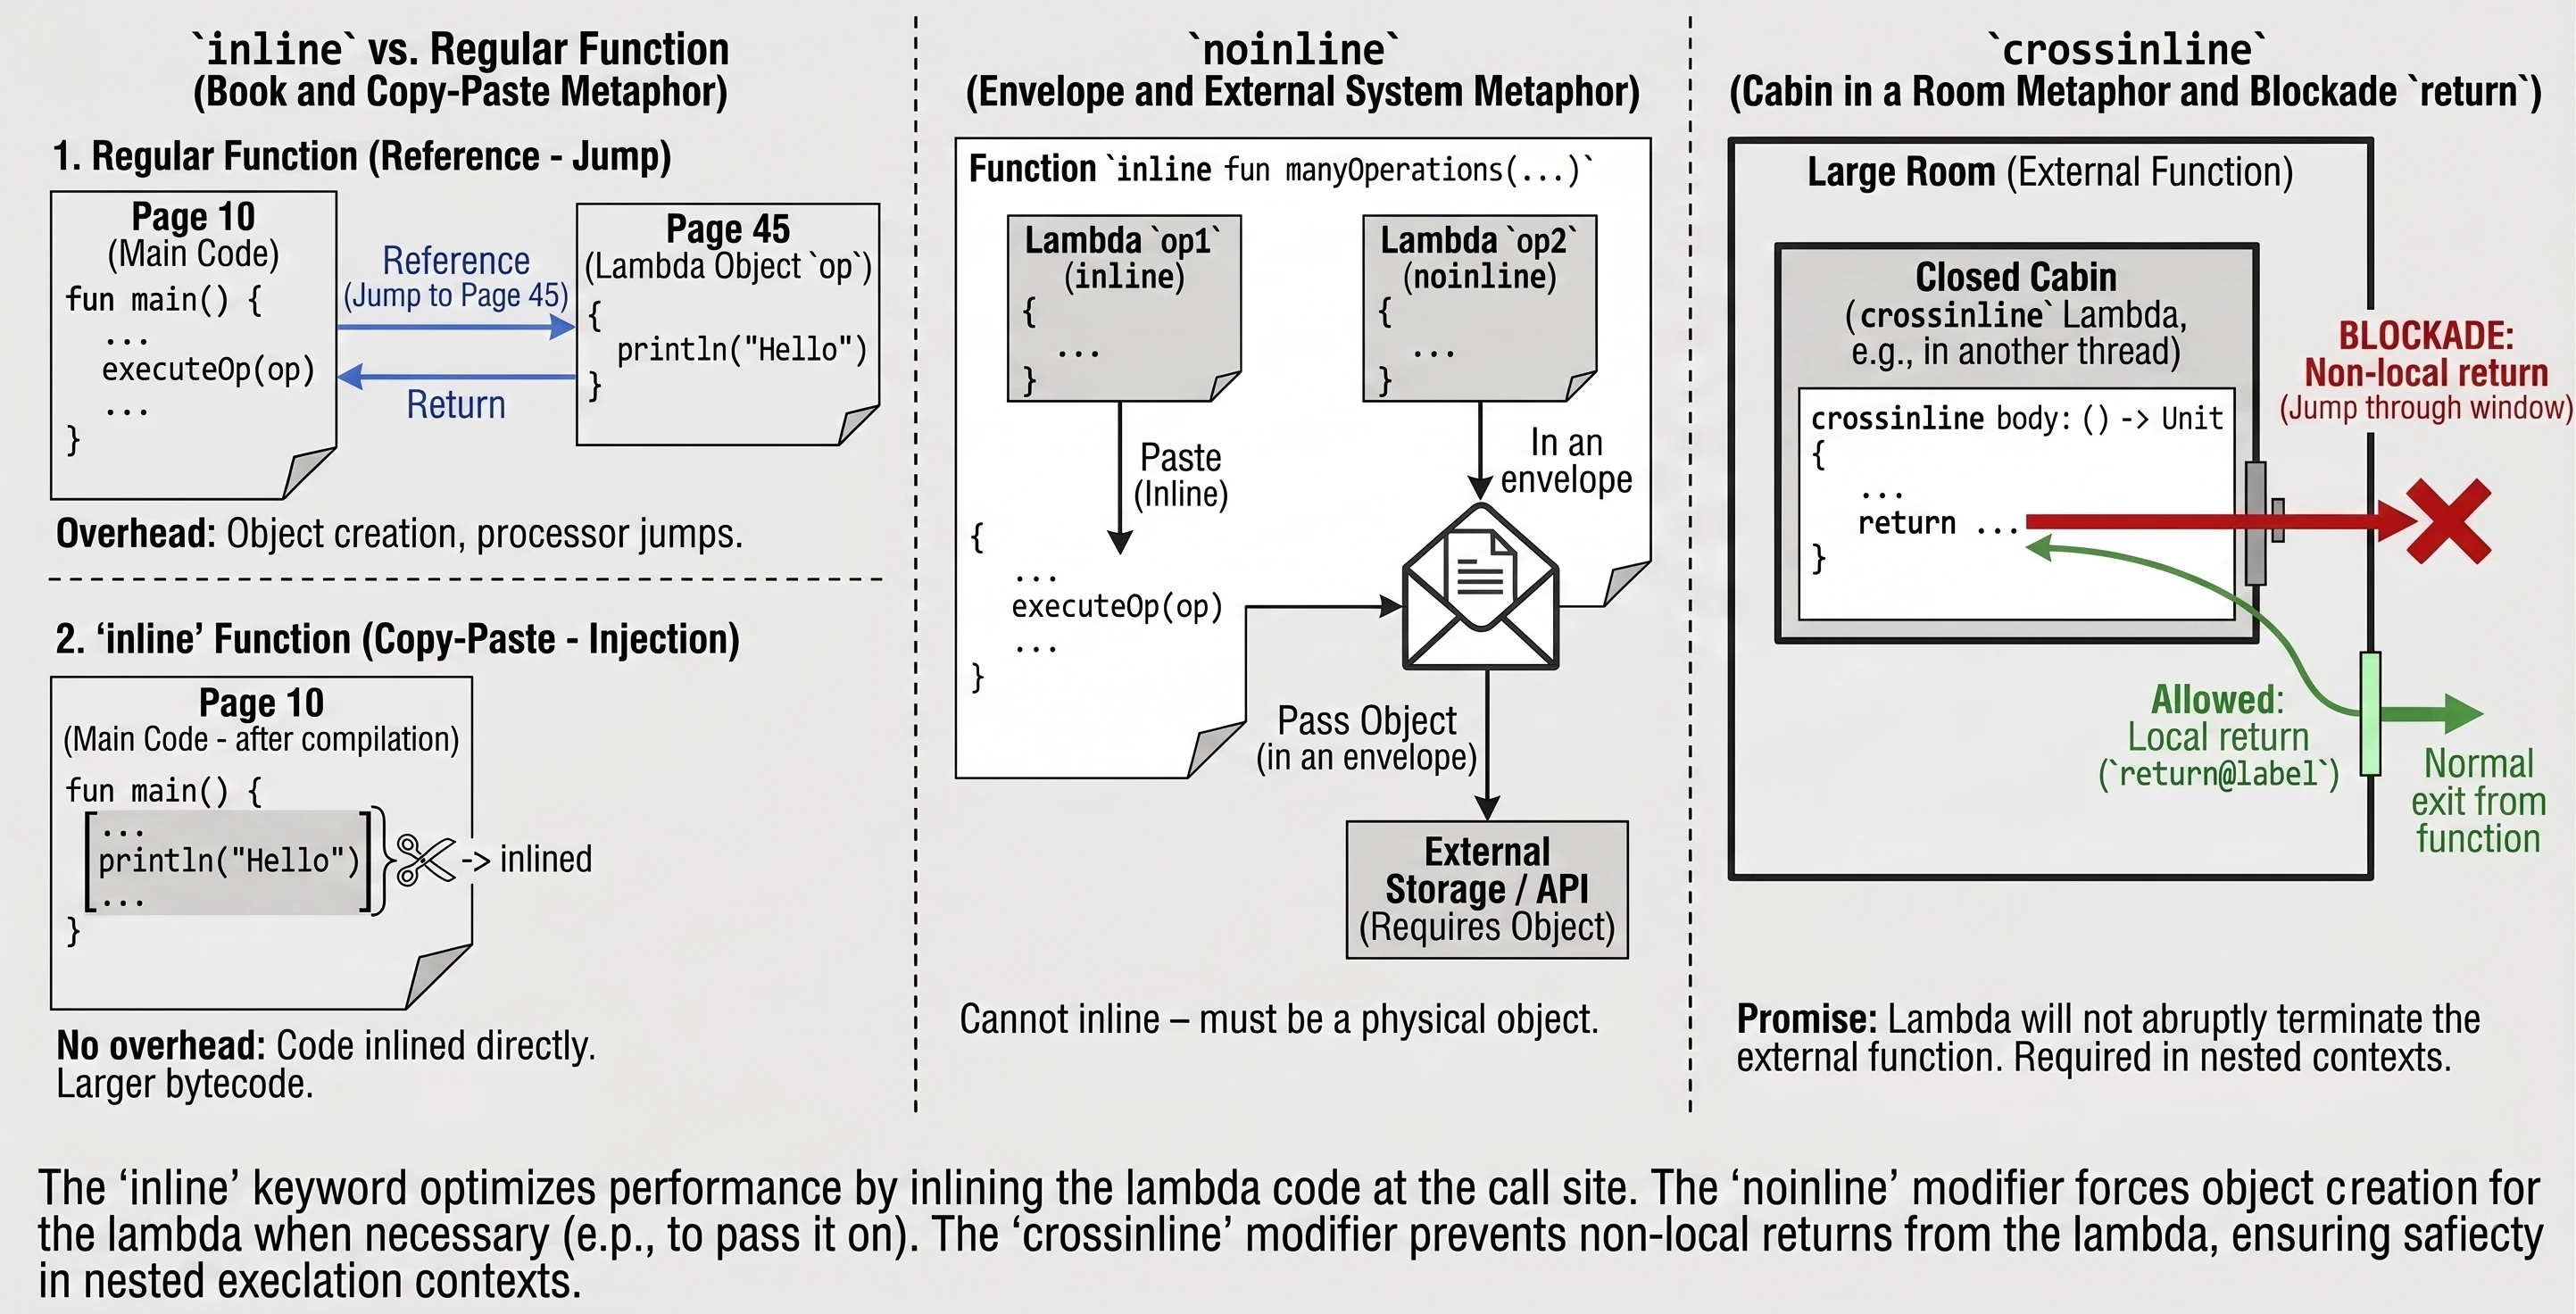
Every lambda in Kotlin is compiled into an anonymous class. This means that every call involves creating a new object, which takes memory and CPU time. For functions called millions of times, for example in loops, this overhead becomes noticeable.
The inline keyword is an instruction for the compiler: Do not create an object for this lambda. Instead, copy the code of this function and paste it ("copy-paste") directly at the call site.
inline fun executeOp(op: () -> Unit) {
    op() // The body of 'op' will be pasted here
}
Imagine that you are writing a book (a program).
- A regular function is a footnote (reference): See page 45. The reader (processor) has to interrupt the current reading flow, jump to page 45, read it, and return.
- An
inlinefunction is a Find and Replace operation in an editor. The editor takes the content from page 45 and physically pastes it everywhere the reference appeared. The book becomes thicker (more bytecode), but it is read smoothly, without constantly jumping between pages.
Sometimes an inline function takes several lambdas, but we only want to paste some of them. Others may be passed further to other functions that are not inline or stored in class fields. In such a situation, pasting is impossible - we need a physical lambda object. We then use the noinline modifier.
inline fun manyOperations(
    op1: () -> Unit,
    noinline op2: () -> Unit // This lambda will remain an object
) {
    op1()
    someExternalStore(op2) // Cannot pass "pasted" code; an object is needed
}
Assume we have two documents. We rewrite one by hand into the main notebook (inline), but the second must be put into an envelope and mailed to an office (noinline). You cannot send the rewritten content - the office requires the original (the object in the envelope).
As mentioned earlier, return is allowed in inline functions (a non-local return). Sometimes, however, a lambda is executed in another context, for example inside a nested function or another thread, where suddenly interrupting the outer function would be dangerous or impossible.
The crossinline keyword blocks the use of return in the lambda even though the function is inline. This allows the lambda to be used safely in nested contexts.
inline fun executeLater(crossinline body: () -> Unit) {
    val runnable = Runnable {
        body() // Call in another context - non-local return forbidden
    }
    runnable.run()
}
Assume we are in a room (a function).
- A regular
returnis leaving through the main door. - A
crossinlinelambda is entering a smaller locked booth inside this room. We promise the compiler (crossinline) that we will not try to jump out through the window (return) directly from the booth to the outside of the building, bypassing the room door. We can only finish the task inside the booth (return@label).
Tail recursion (tailrec)
Recursion can lead to stack overflow (StackOverflowError). Kotlin offers an optimization: if the recursive call is the last operation in a function, we can add the tailrec modifier. The compiler then turns recursion into a regular loop, preventing stack overflow.
tailrec fun silnia(n: Int, run: Int = 1): Int {
    return if (n == 1) run else silnia(n - 1, n * run)
}
Generic functions
Generic functions allow us to create template-like code that can work with different data types while preserving full type safety and avoiding casts. We define a generic type in angle brackets <T> before the function name.
fun <T> singletonList(item: T): List<T> {
    return listOf(item)
}
Sometimes our template makes sense only for a certain group of types, for example only for numbers. We can enforce this after a colon:
// T must inherit from Number (Int, Double, Float...)
fun <T : Number> doubleValue(value: T): Double {
    return value.toDouble() * 2
}
If we need several conditions at the same time, for example it must be a number and it must be comparable, we use the where keyword:
fun <T> sortNumbers(list: List<T>)
where T : Number, T : Comparable<T> {
// ...
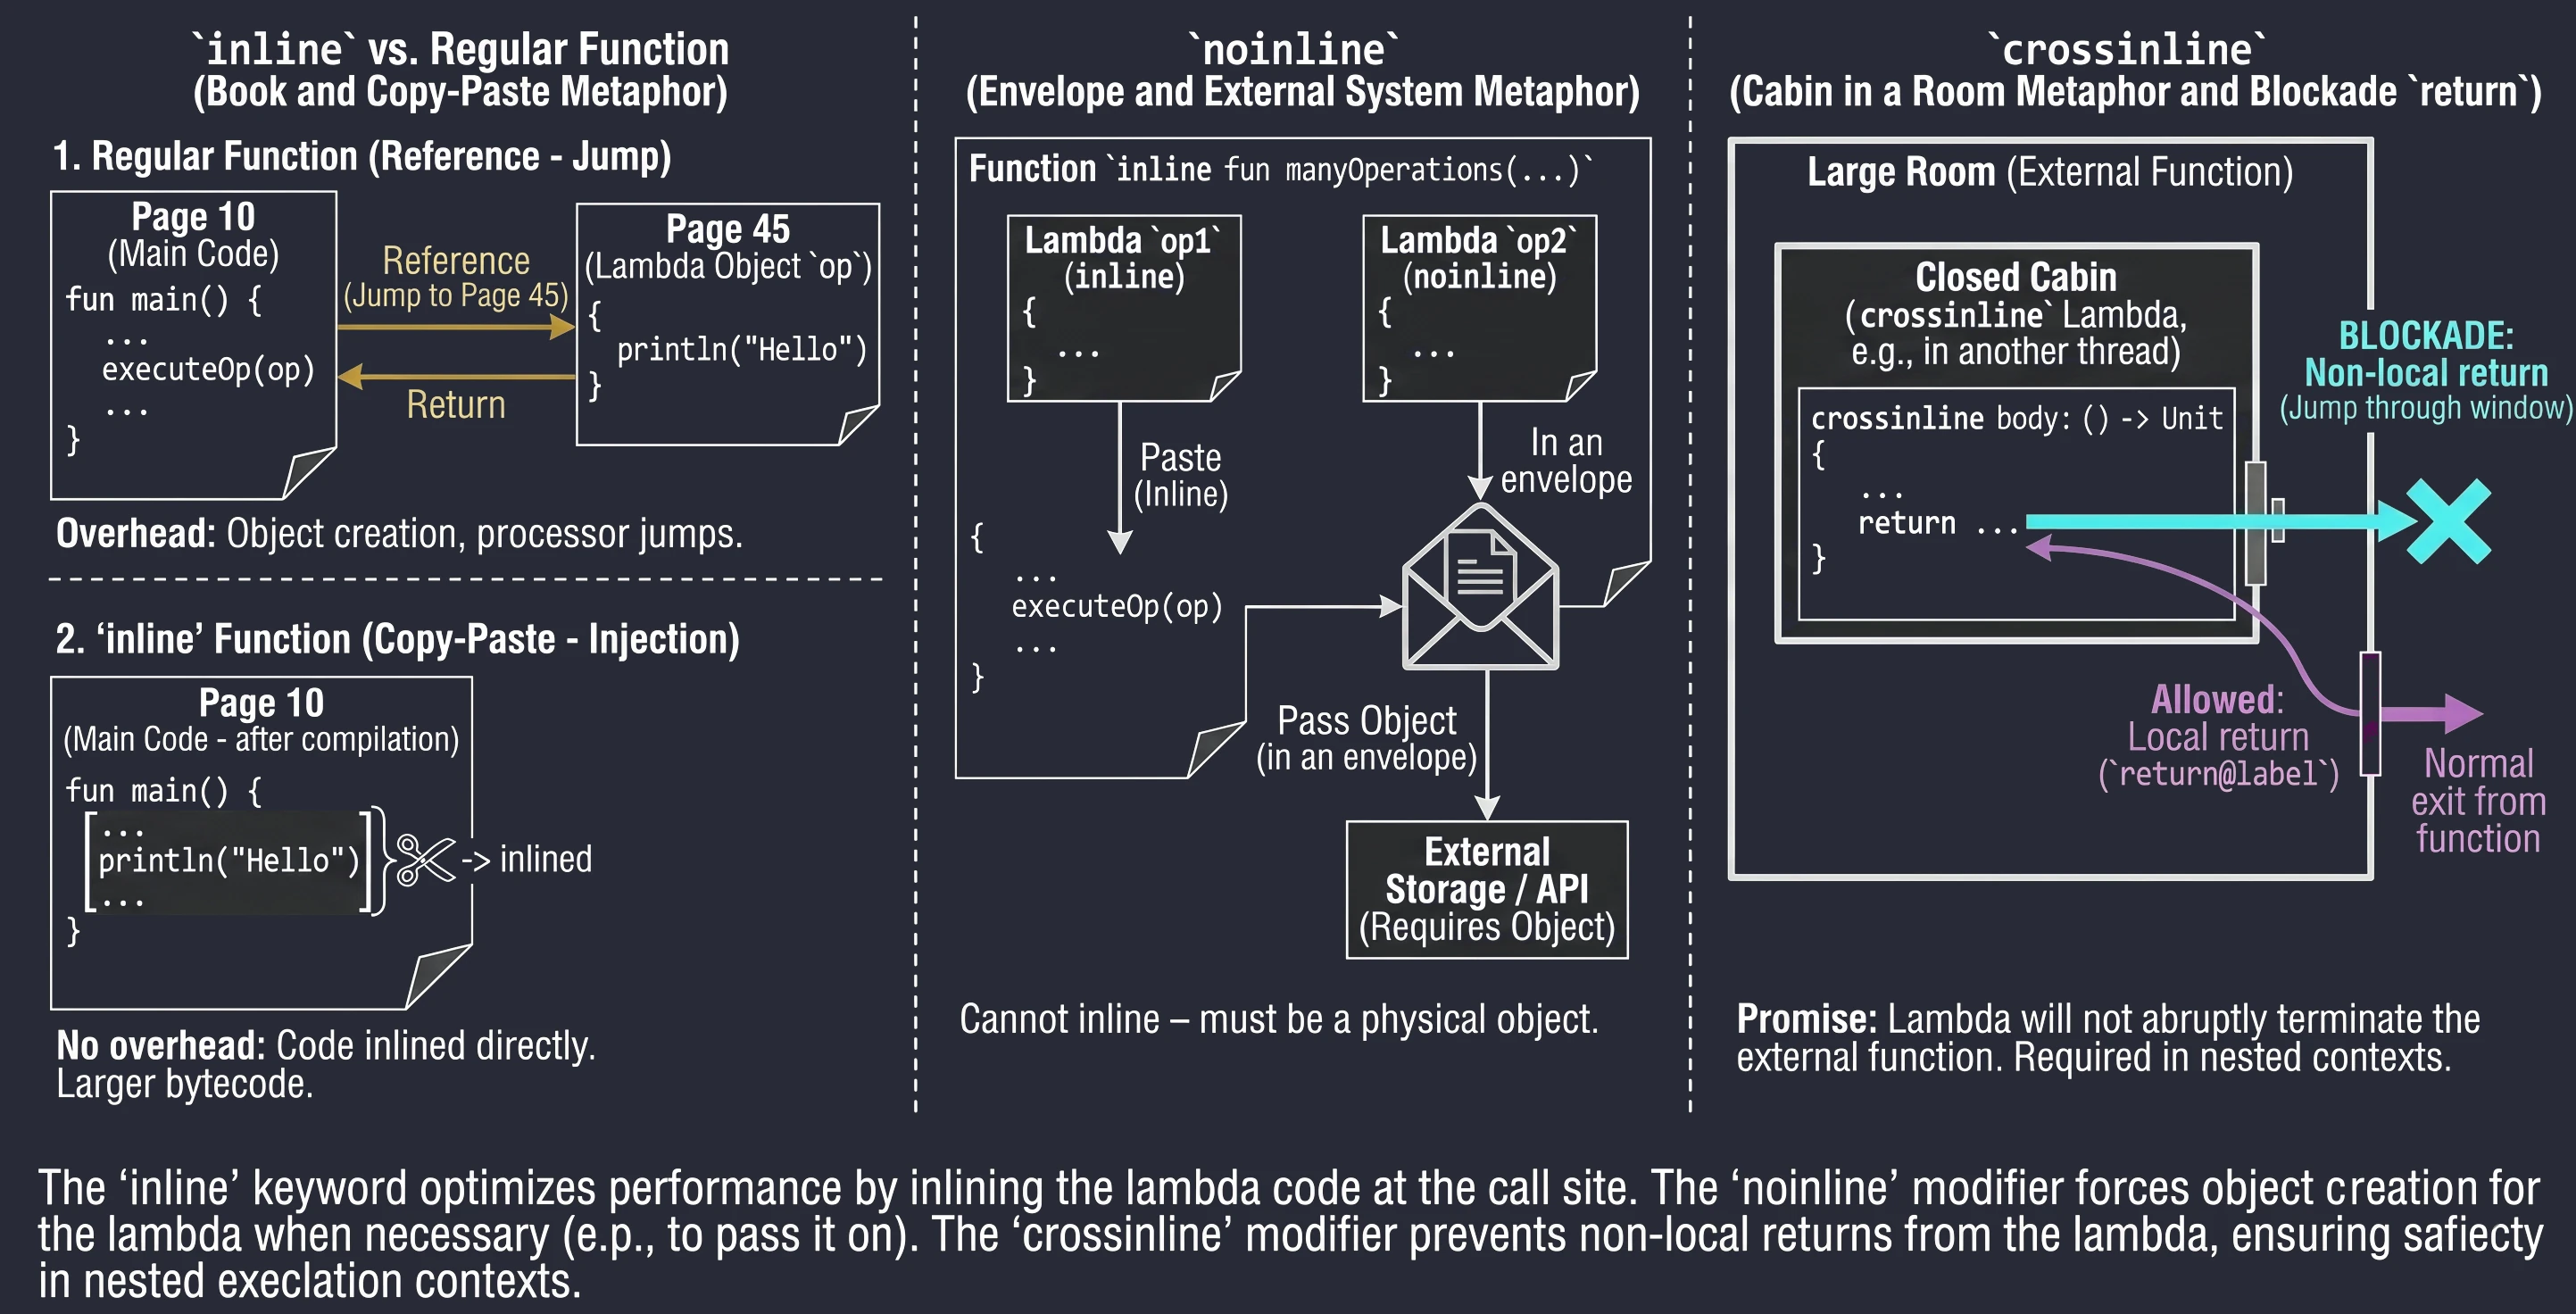
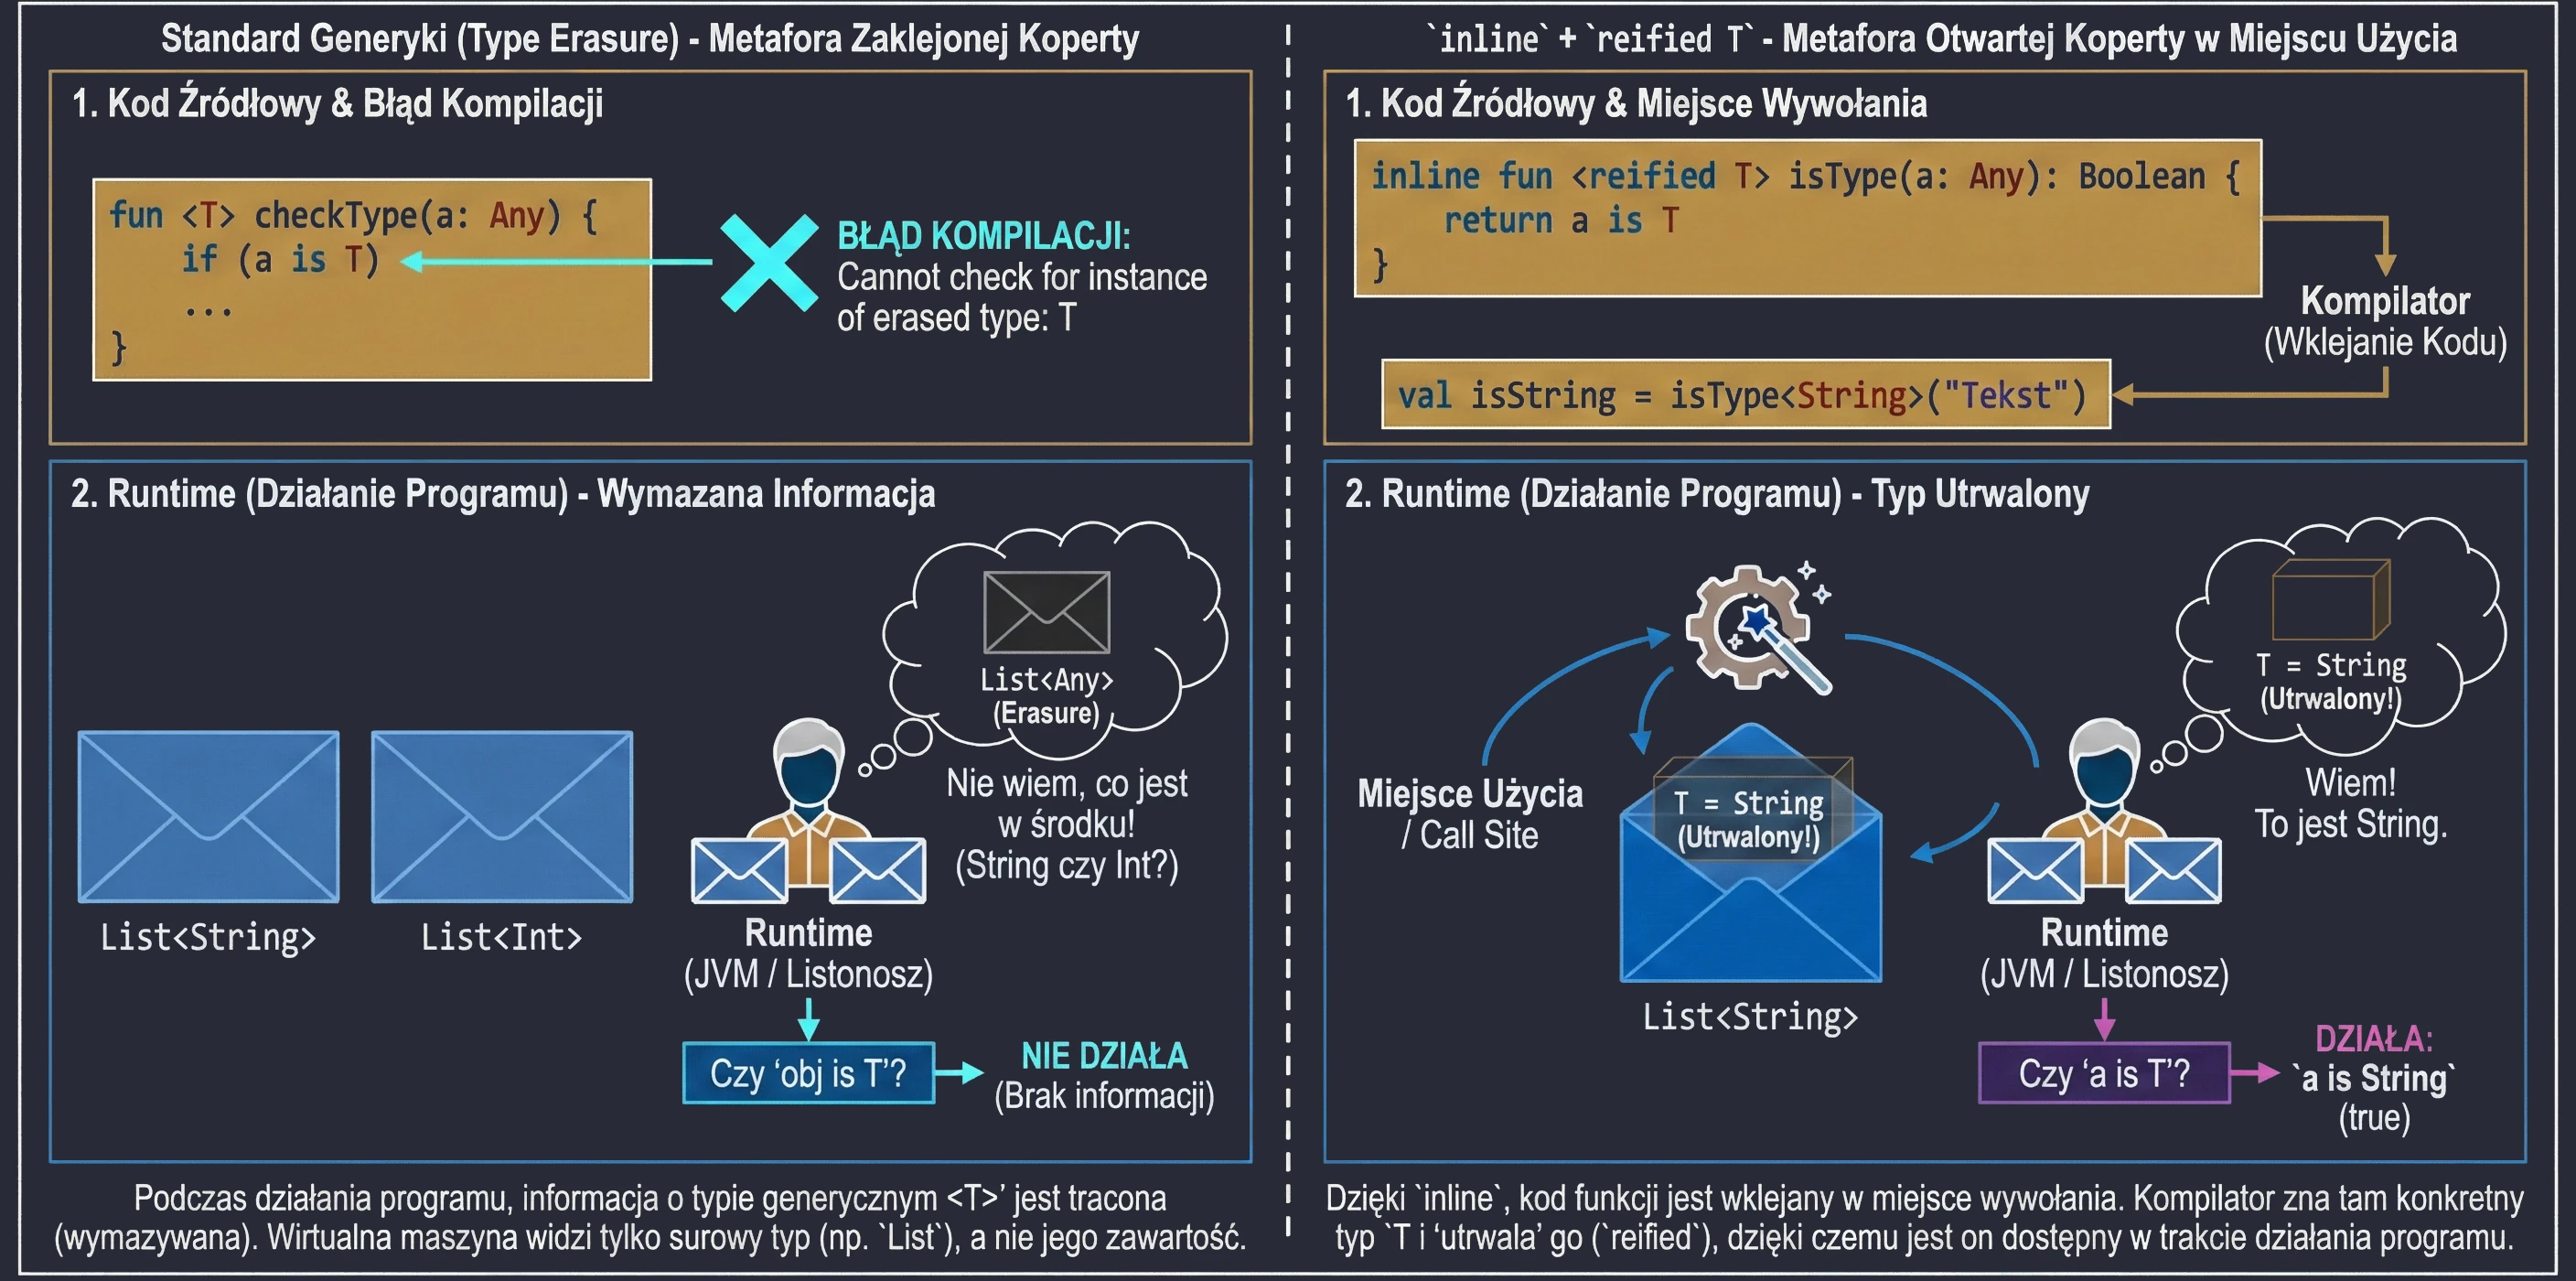
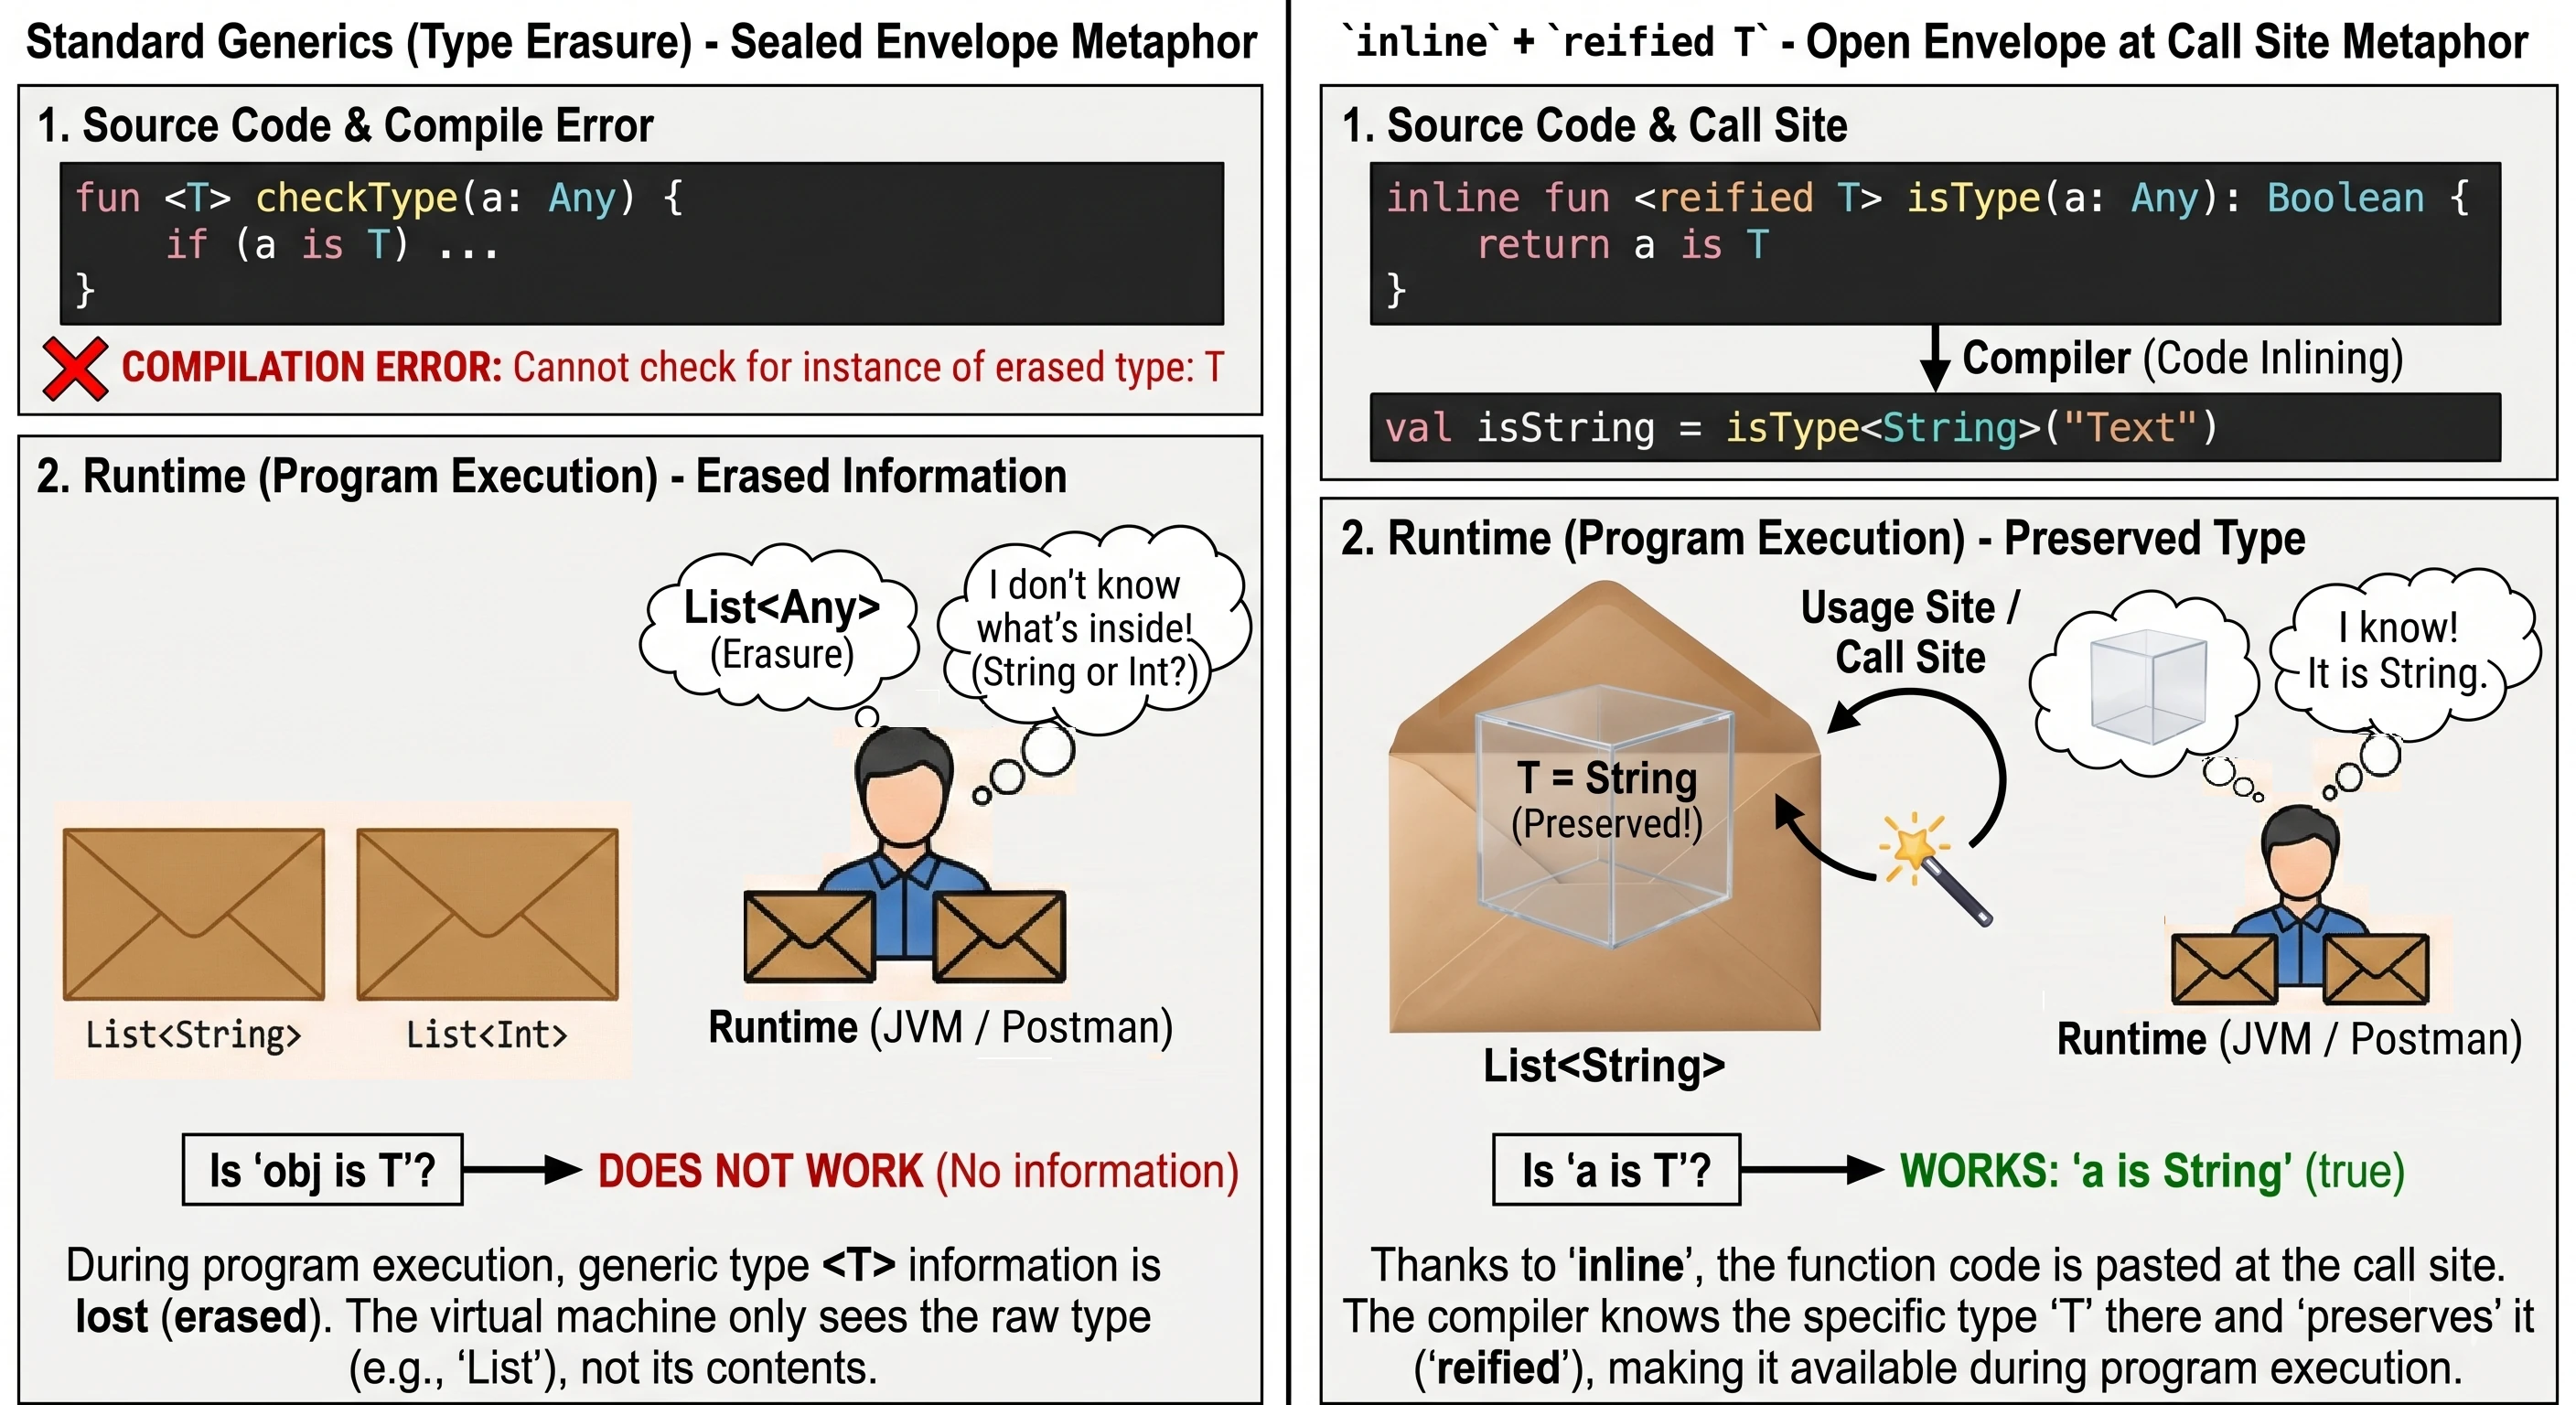
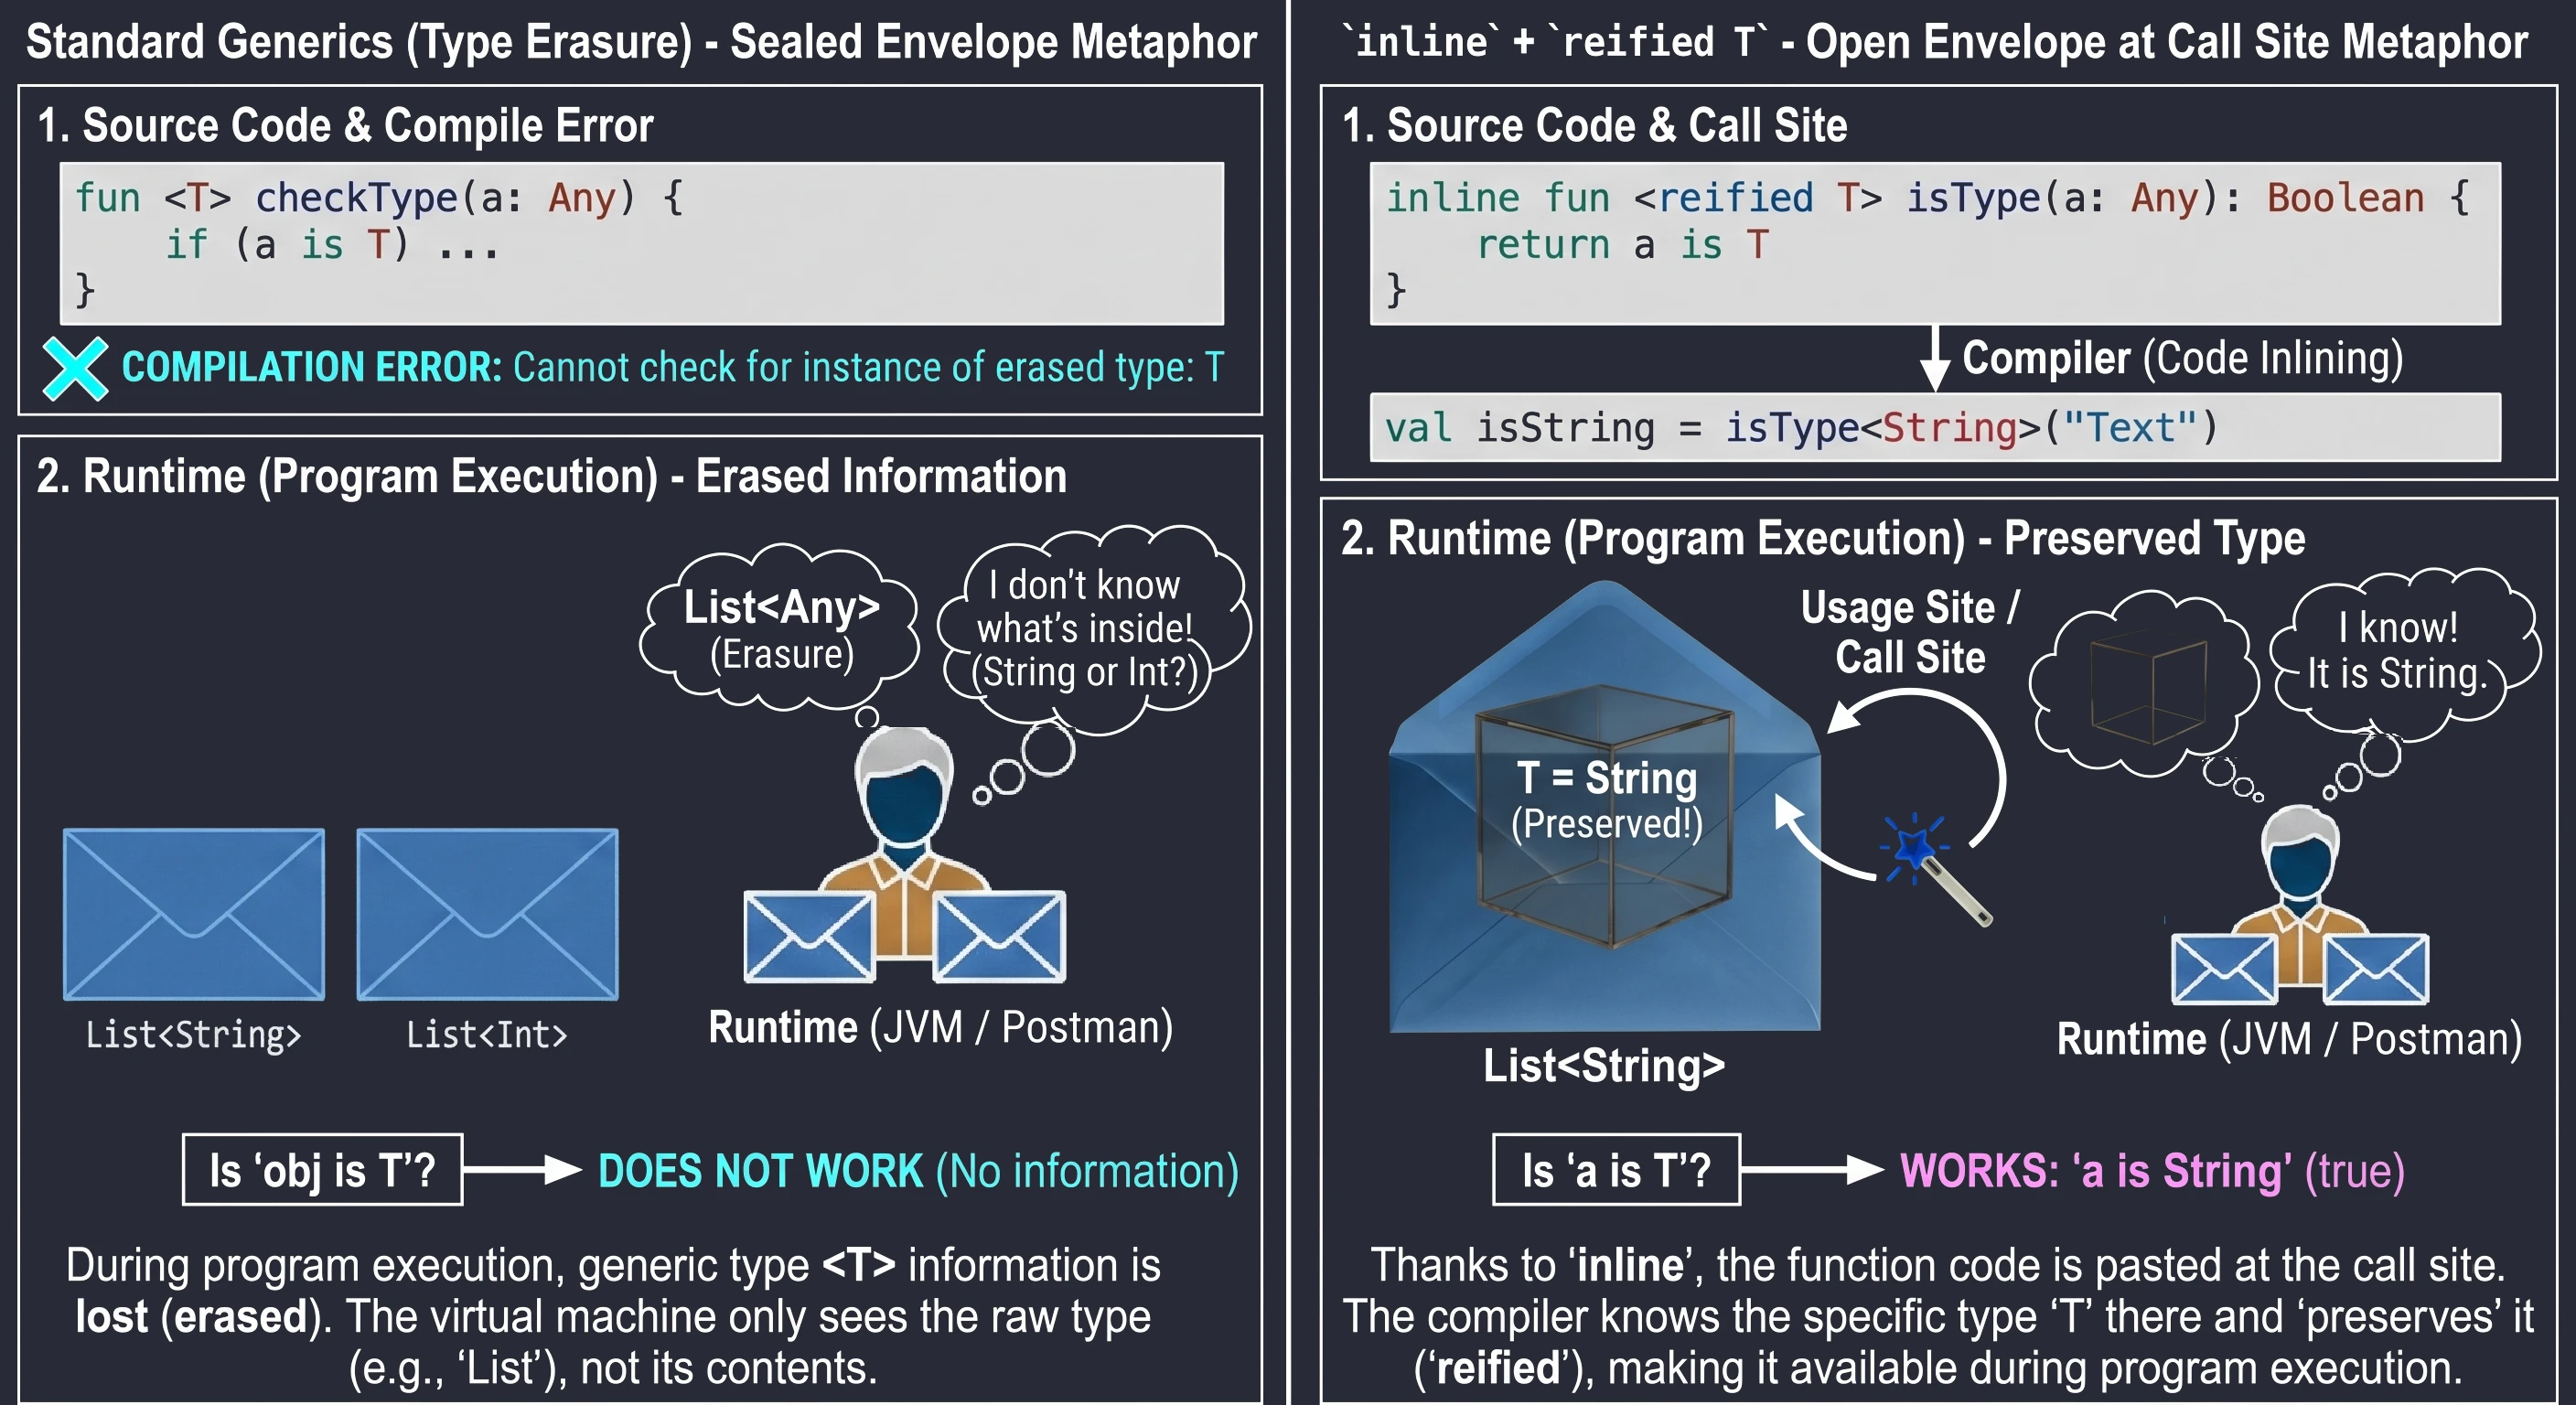
}In Java, and by default in Kotlin, generic types are subject to type erasure. This means that at runtime List<String> and List<Int> are the same thing: simply List. The virtual machine does not know what was inside. That is why we cannot write if (obj is T).
However, thanks to inline functions, we can use the special reified keyword. Because the function code is pasted at the call site, the compiler knows the exact type at that specific place and can preserve it (reify).
// Regular function - this will not work:
// fun <T> checkType(a: Any) = a is T // Compilation error! Erasure.

// Inline + reified function
inline fun <reified T> isType(a: Any): Boolean {
    return a is T // Now it works
}

val isString = isType<String>("Text") // true
val isInt = isType<Int>("Text")       // false
Let us use an analogy:
- Regular generics are like a letter in a sealed envelope. The mail carrier (runtime) knows that they are carrying a List, but does not know what is inside (String or Int), because the envelope is opaque (erasure).
reifiedin aninlinefunction is a situation in which the sender (compiler) opens the envelope right before handing it to you at the delivery location. You see the contents, so you know exactly what type it is.
Operator overloading (operator fun)
Kotlin allows us to provide custom implementations for a fixed set of operators, such as +, *, ==, or []. For a function to act as an operator, it must be preceded by the operator keyword and have a specific reserved name.
data class Vector(val x: Int, val y: Int) {
    // Overloading the + operator
    operator fun plus(other: Vector): Vector {
        return Vector(x + other.x, y + other.y)
    }
}

val v1 = Vector(1, 2)
val v2 = Vector(3, 4)
val v3 = v1 + v2 // Result: Vector(x=4, y=6)
The most common operators are:
plus,minus,times,div,rem(arithmetic).get,set(access through square brackets[]).invoke(allows an object to be called like a function:object()).contains(theinoperator).
Collections are one of the most important elements of any programming language. They are used to store groups of objects. In Kotlin, the approach to collections is distinctive because of the strict separation between mutable collections and read-only collections. This distinction is essential for writing safe and predictable code.
Collection hierarchy
In the standard Java library (before newer APIs were introduced), the List interface had methods such as add() and remove(). If a list was immutable, for example Arrays.asList(), calling these methods ended with a runtime error (UnsupportedOperationException).

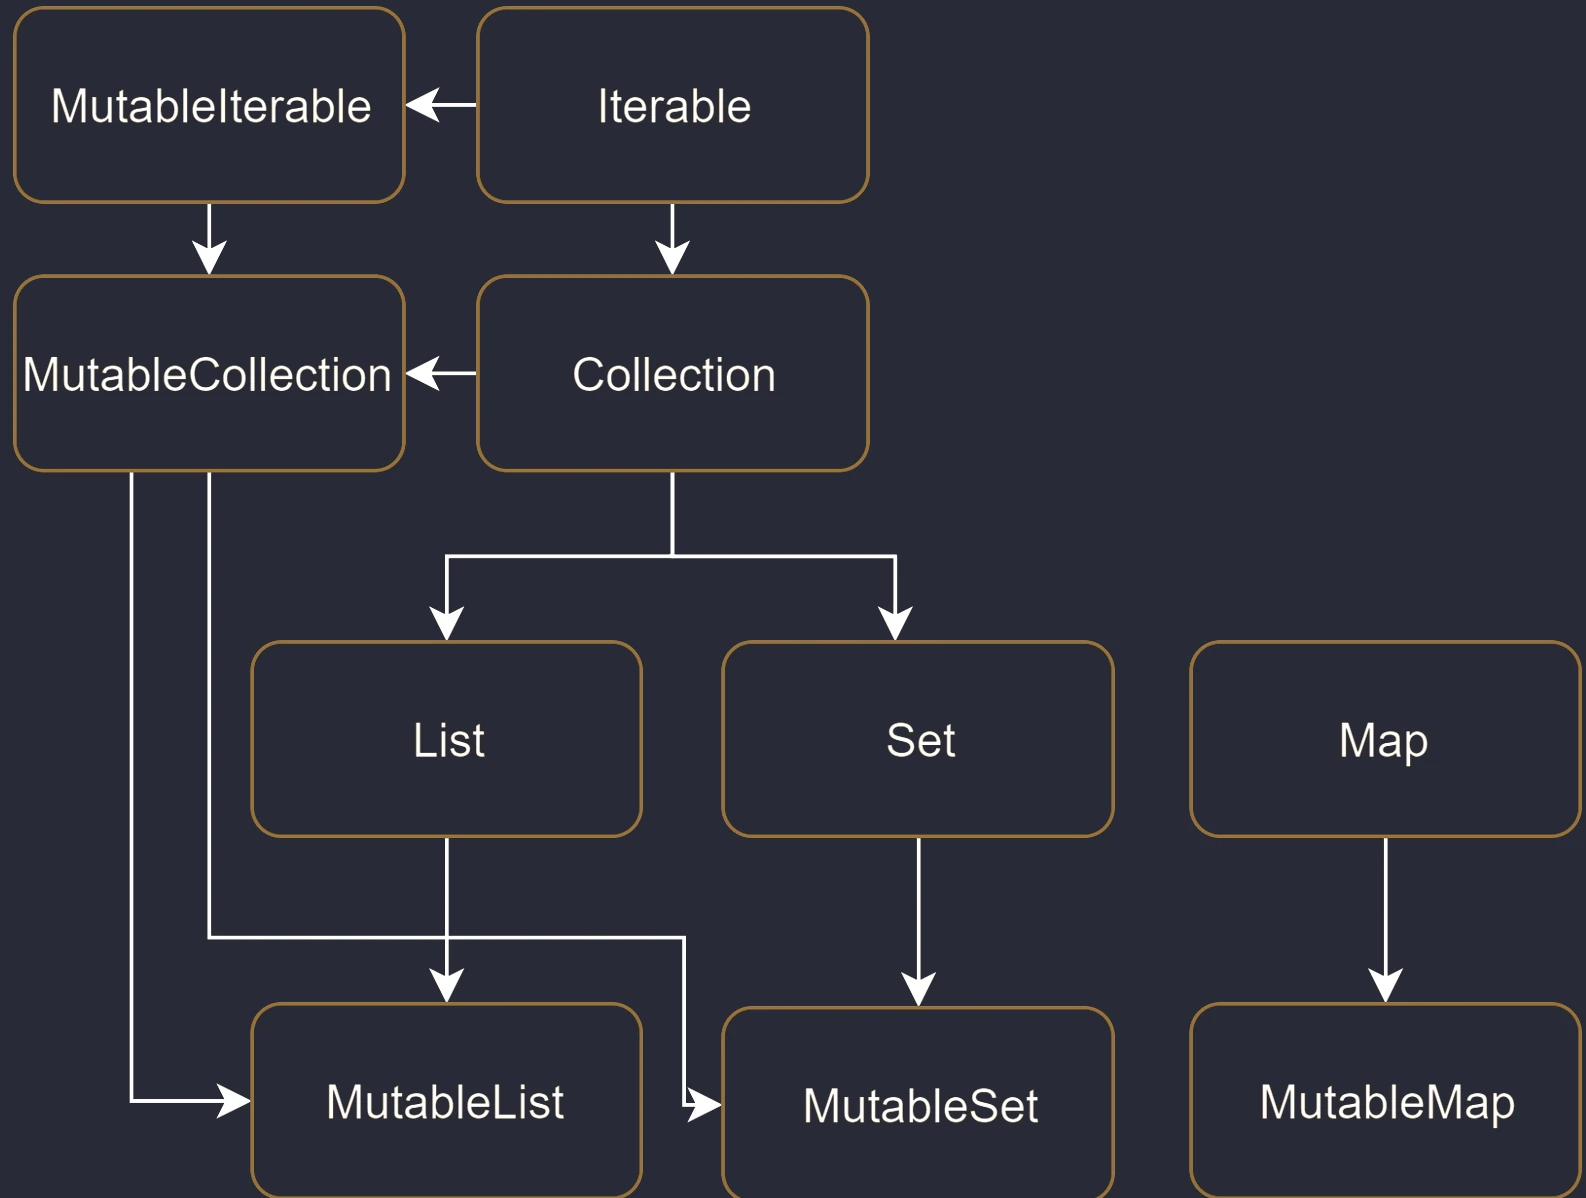
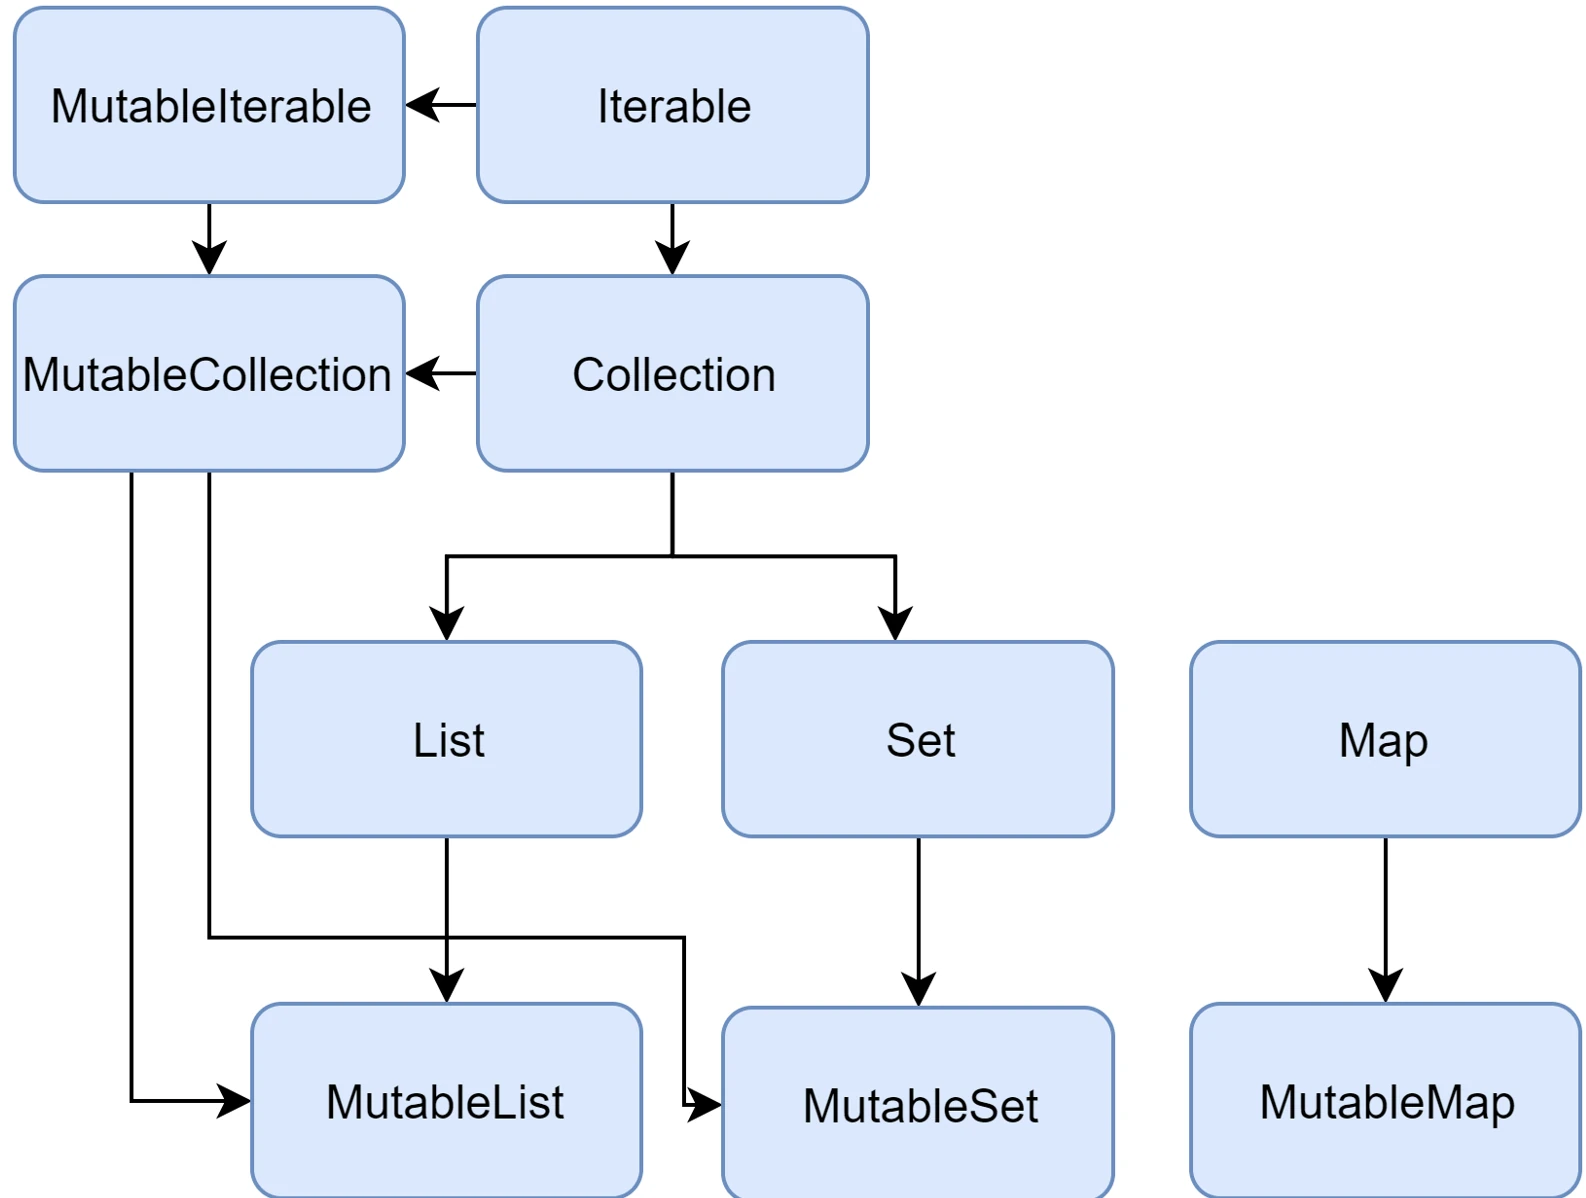

Kotlin solves this problem at the type-system level by introducing two separate sets of interfaces:
- Read-only interfaces:
List<T>,Set<T>,Map<K, V>. They do not have modifying methods. They guarantee that "through this interface" you will not change the contents. - Mutable interfaces:
MutableList<T>,MutableSet<T>,MutableMap<K, V>. They extend the read-only interfaces by adding methods such asadd,remove, andclear.
// Read-only list
val readOnlyList: List<String> = listOf("A", "B")
// readOnlyList.add("C") // Compilation error! No add() method

// Mutable list
val mutableList: MutableList<String> = mutableListOf("A", "B")
mutableList.add("C") // OK
Important: The List interface is only a view. Having a reference of type List does not mean that the underlying object is immutable. It may be an ArrayList that someone else can access as a MutableList and modify. However, when we only have a List, we promise that we will not modify it.
Basic collection types
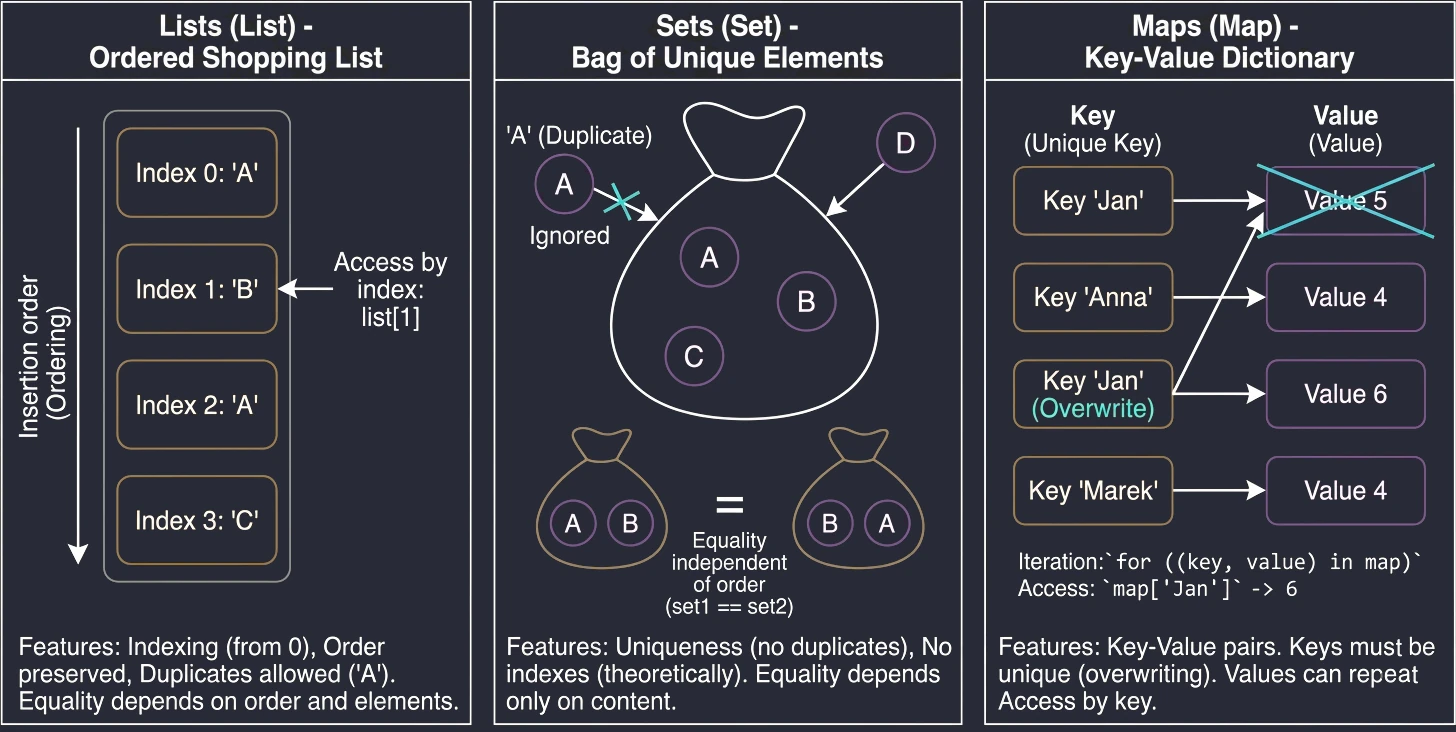
Lists (List)
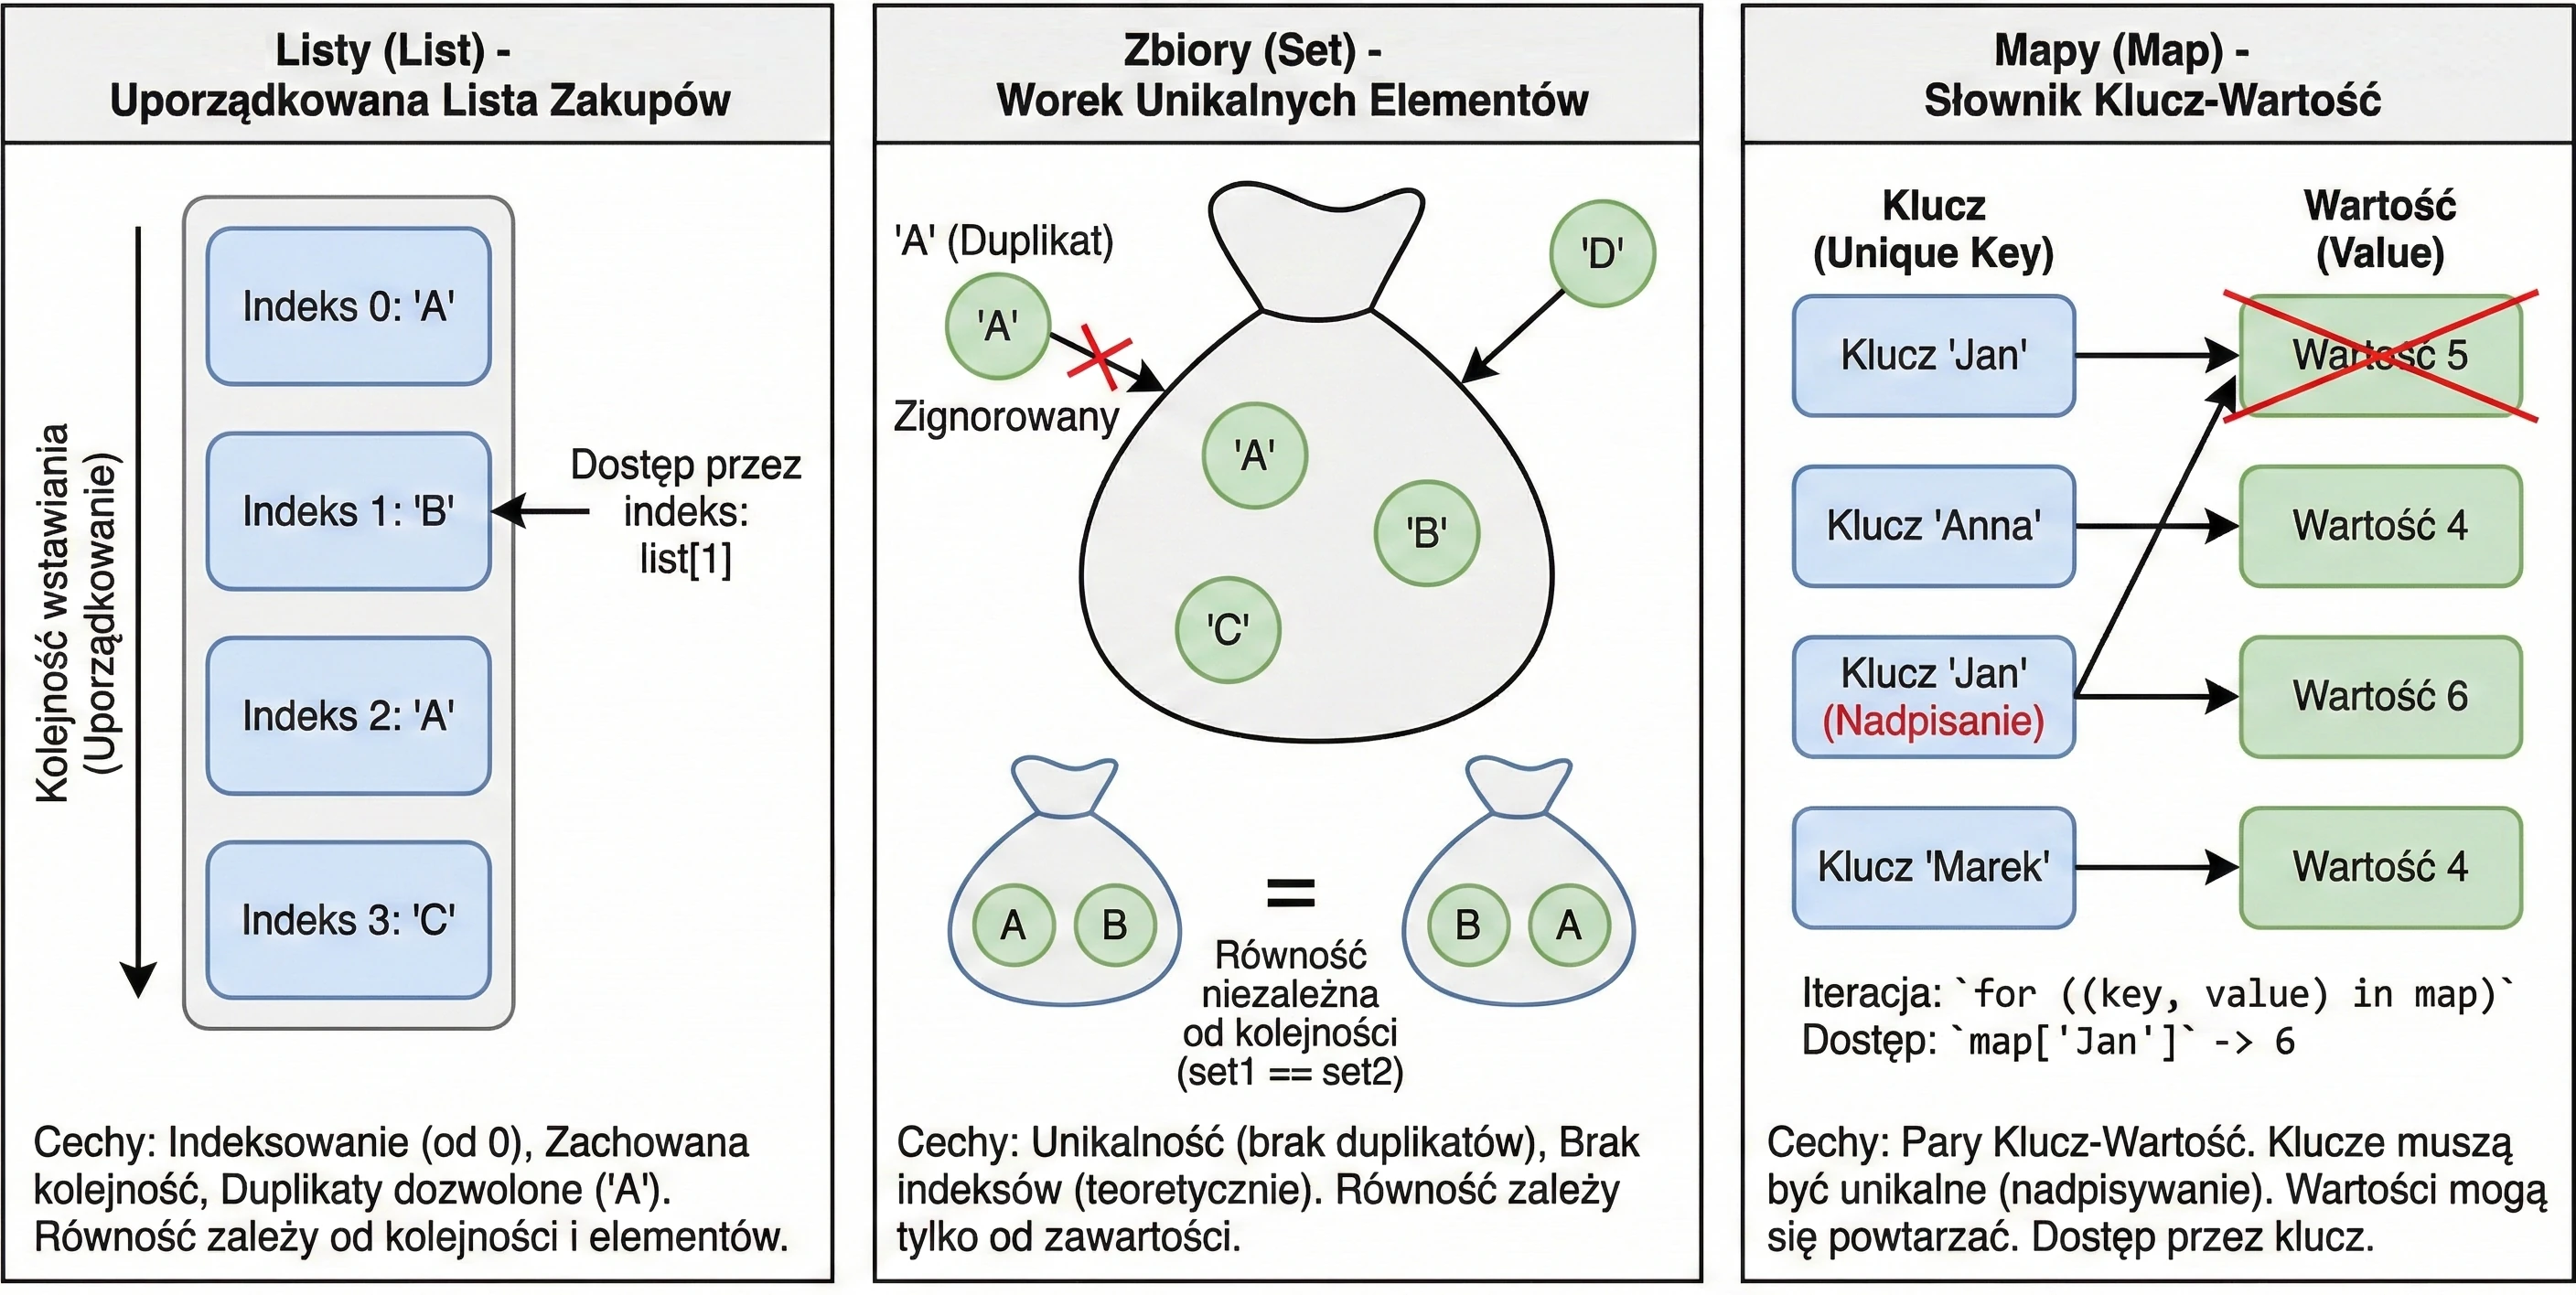
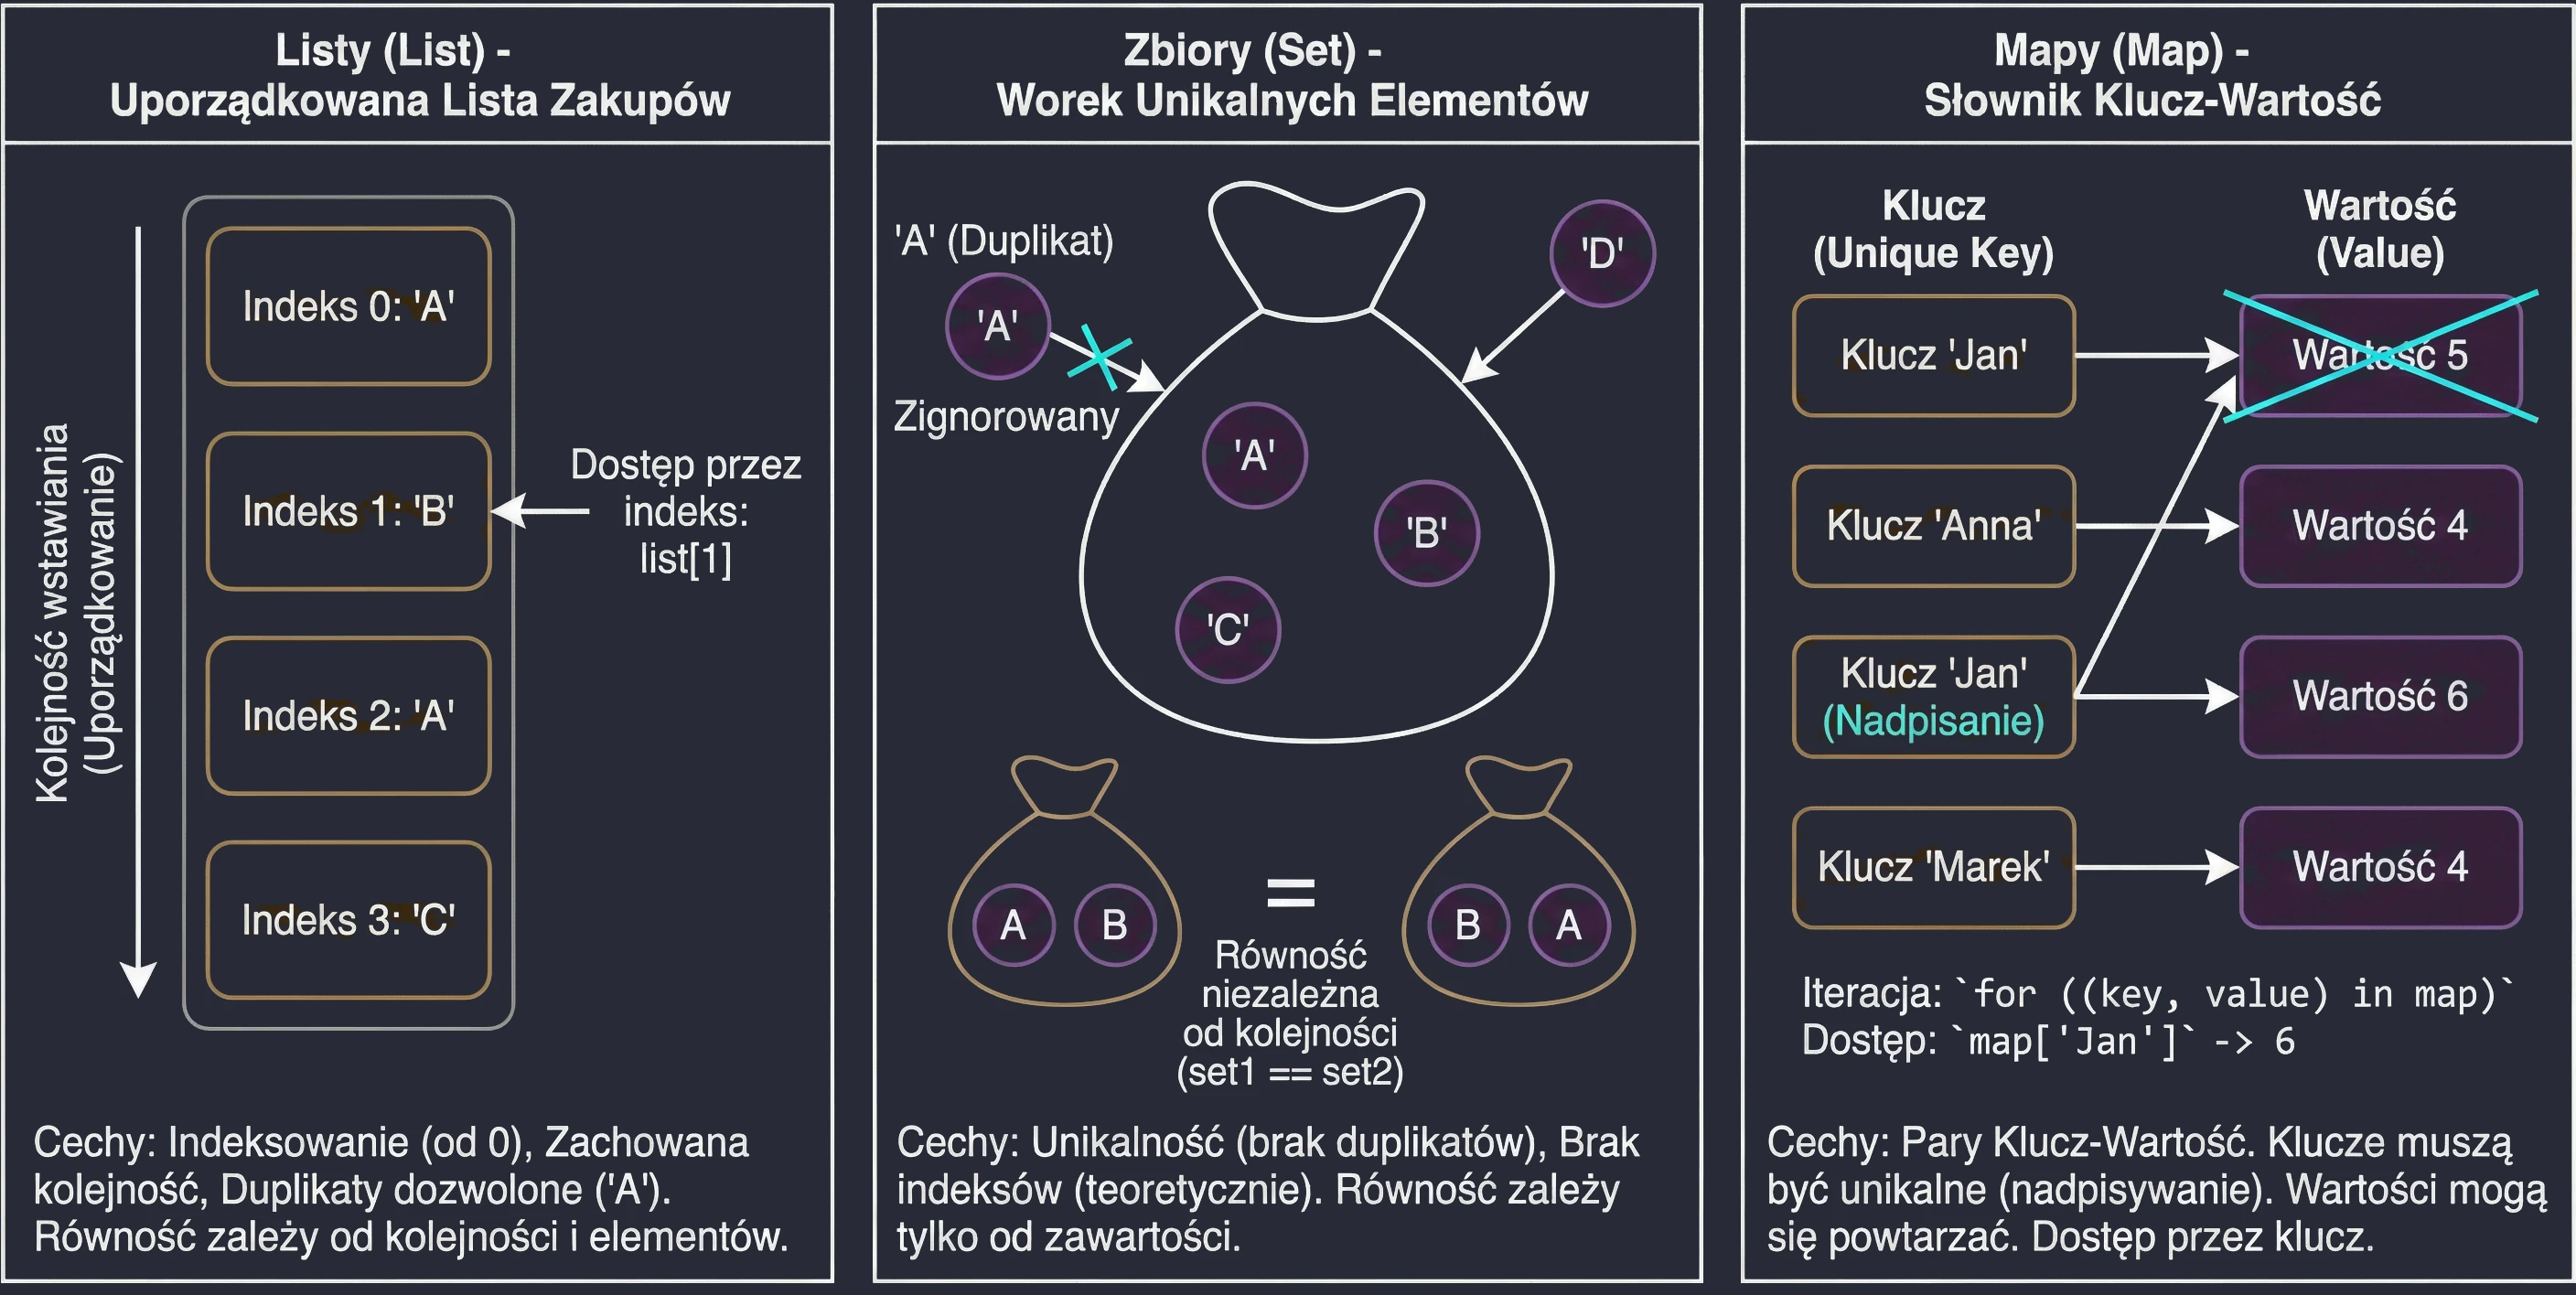
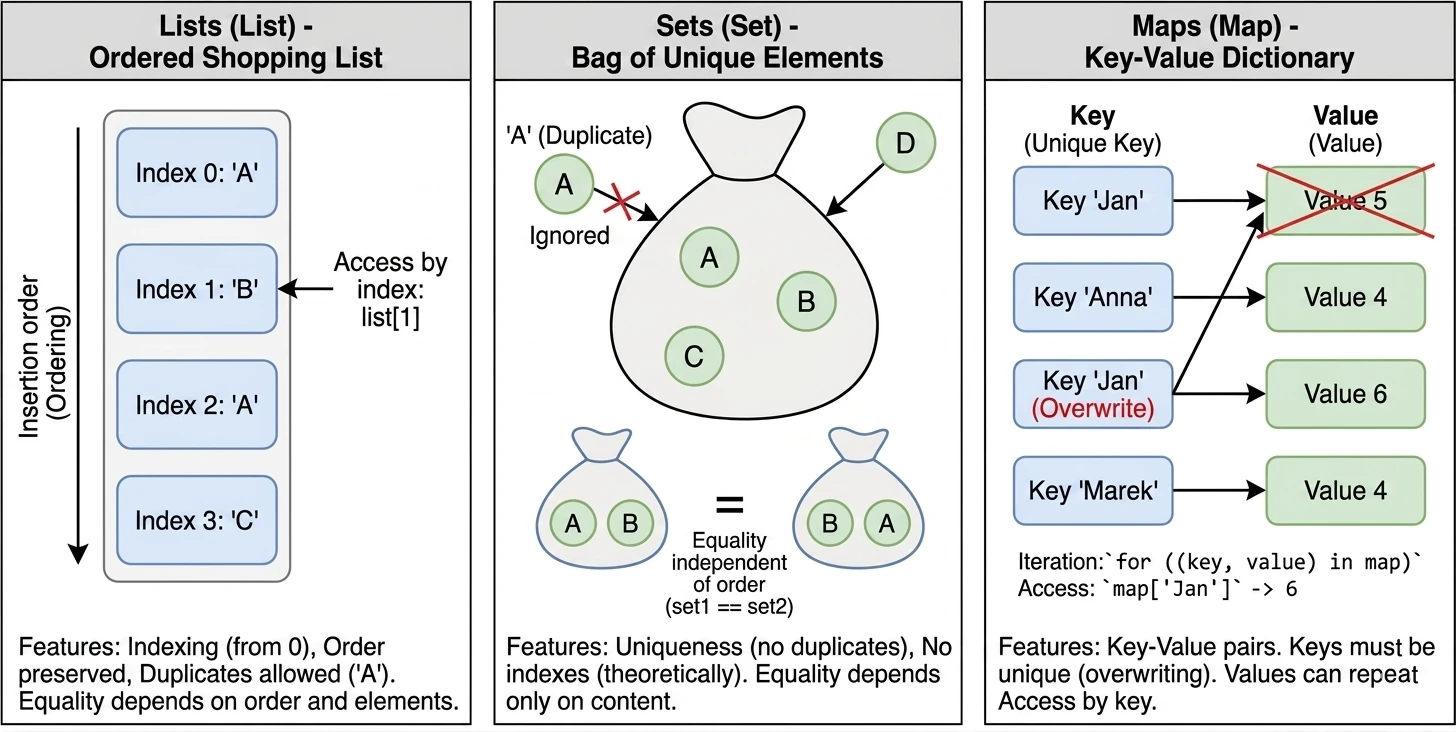
A list is the most intuitive collection type. We can compare it to a shopping list written on a piece of paper: items are placed one under another, in a specific order.
Main features:
- Ordering: Elements are stored in the order in which they were added.
- Indexing: We access elements by index (position number), starting from 0.
list[0]is the first element. - Duplicates: The same value may appear in a list multiple times.
- Equality: Two lists are considered equal (
equalsreturnstrue) only if they have the same size and the same elements at exactly the same positions.
val list1 = listOf("A", "B", "A")
val list2 = listOf("A", "B", "A")
println(list1 == list2) // true

println(list1[1]) // "B"
Sets (Set)
A set is similar to the mathematical definition of a set or to a bag of unique objects. We are not interested in which element is first or second. What matters is only whether a given element belongs to the set.
Main features:
- Uniqueness: Elements cannot be repeated in a set. If you try to add a duplicate, it will be ignored.
- No ordering (in theory): In the general sense, sets do not have indexes. You cannot ask for the second element of a set.
- Equality: Two sets are equal if they have the same size and contain the same elements, regardless of their internal order.
Note: In Kotlin, the default implementation of setOf is LinkedHashSet, which means that it remembers insertion order during iteration (a for loop), but it still does not allow indexed access such as set[0].
val set1 = setOf("A", "B")
val set2 = setOf("B", "A", "A") // Duplicate "A" ignored, different order
println(set1 == set2) // true
Maps (Map)
A map, also called a dictionary or an associative array, is used to store Key-Value pairs. It is like a phone book (Surname -> Number) or a dictionary (Word -> Definition).
Main features:
- Keys and values: Each element is a pair. The key is used for identification and lookup, while the value is the data assigned to that key.
- Unique keys: A map cannot contain two identical keys. If you add a new value under an existing key, the old value will be overwritten. Values may repeat.
- Equality: Two maps are equal if they contain the same set of key-value pairs, regardless of order.
val map = mapOf("John" to 5, "Anna" to 4)
println(map["John"]) // 5 (access by key, not by index!)
In Kotlin, we can iterate over a Map in several convenient ways.
val map = mapOf("John" to 5, "Anna" to 4)

// 1. By pairs (key, value) - the most common way
for ((key, value) in map) {
    println("$key -> $value")
}

// 2. By keys (explicitly through map.keys)
for (key in map.keys) {
    println("$key -> ${map[key]}")
}

// 3. By values
for (value in map.values) {
    println(value)
}

// 4. Iteration with an index (less common for maps)
for ((index, entry) in map.withIndex()) {
    println("$index: ${entry.key} -> ${entry.value}")
}
Functional processing (transformations)
Kotlin offers a large set of functions for processing collections in a functional style. Instead of writing for loops, we describe what we want to do with the data.
Mapping (map)
Transforms each element of a collection into another element, potentially of a different type. The result is a new list with the same length.
val numbers = listOf(1, 2, 3)
val doubled = numbers.map { it * 2 } // [2, 4, 6]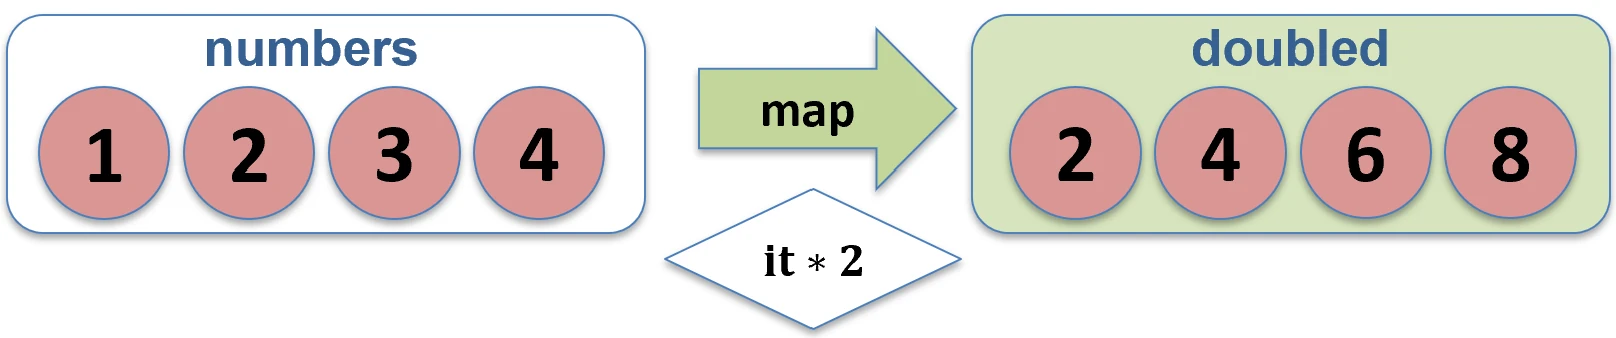
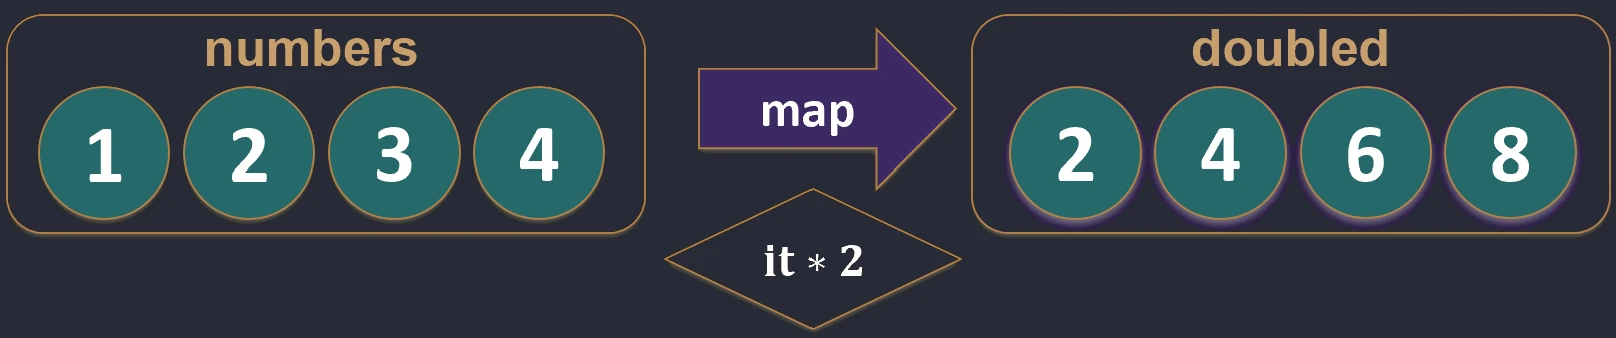


map function works.For Map, Kotlin provides dedicated functions mapKeys and mapValues, which allow us to transform only the key or only the value.
val map = mapOf("John" to 5, "Anna" to 4)

// Key transformation
val upperKeys = map.mapKeys { it.key.uppercase() } // {"JOHN"=5, "ANNA"=4}

// Value transformation
val doubledValues = map.mapValues { it.value * 2 } // {"John"=10, "Anna"=8}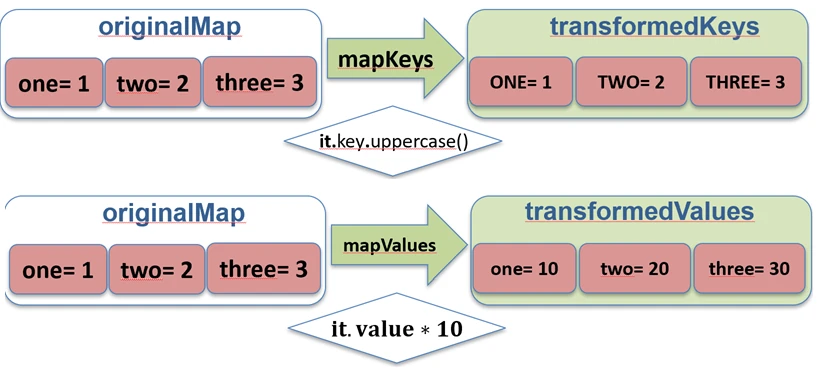


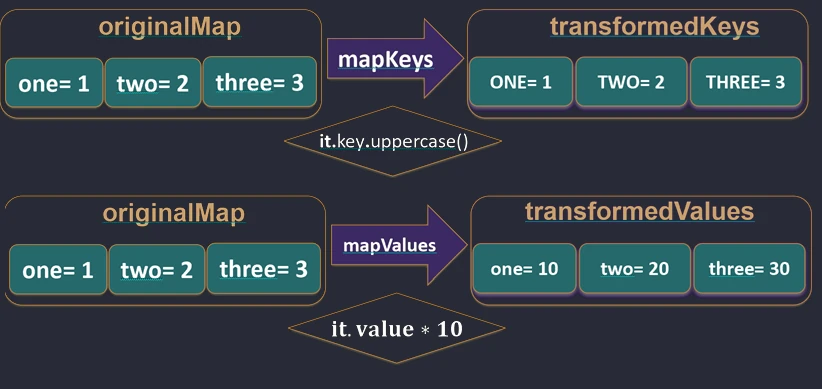
mapKeys and mapValues functions work.Zipping (zip and unzip)
Creates pairs from elements of two collections with the same indexes. If the collections have different lengths, the resulting list has the length of the shorter one.
val names = listOf("John", "Anna")
val ages = listOf(25, 30)
val pairs = names.zip(ages) // [(John, 25), (Anna, 30)]
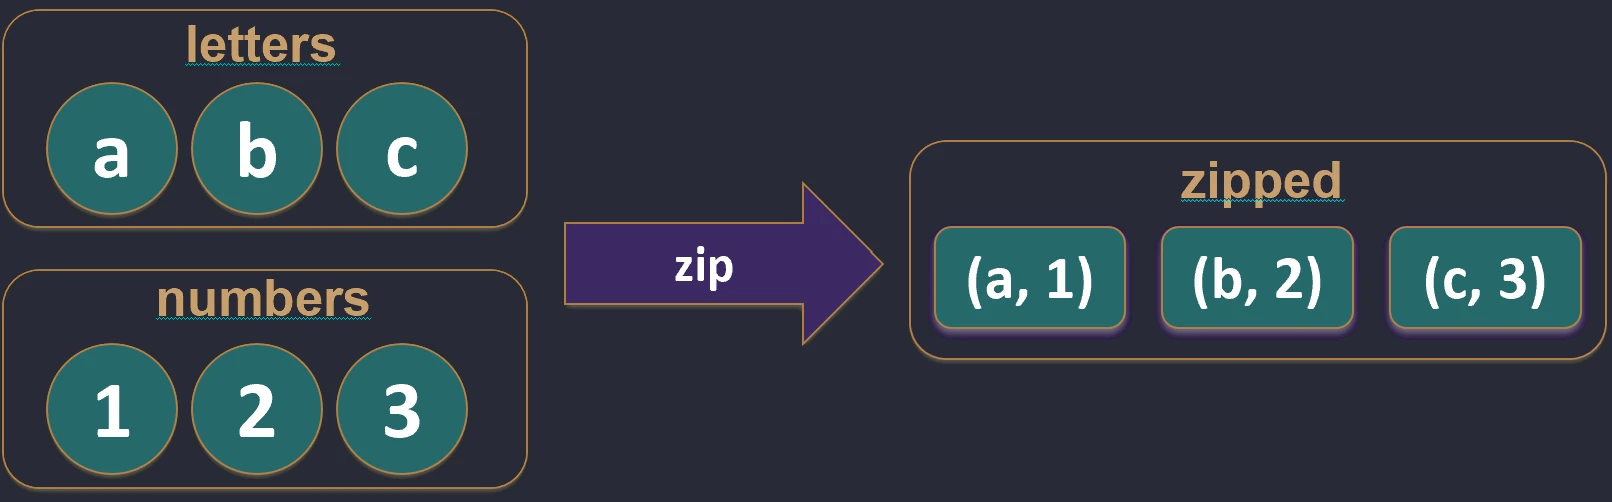
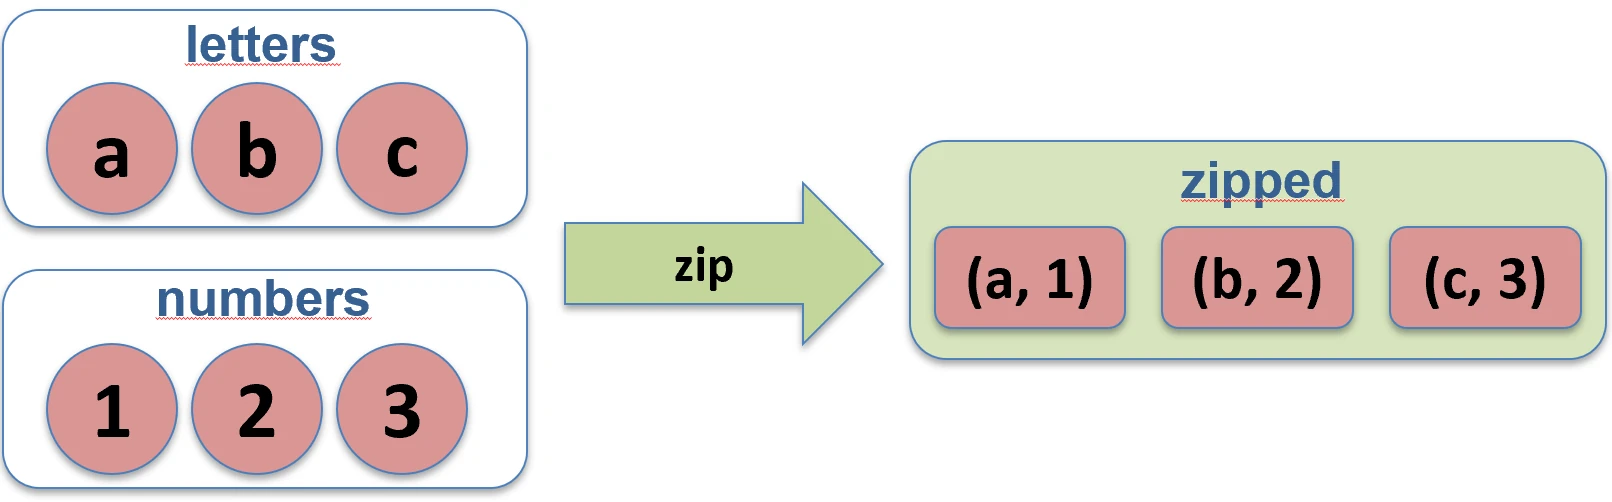

zip function works.The unzip function performs the opposite operation: it splits a list of pairs into two separate lists.
val pairs = listOf("John" to 25, "Anna" to 30)
val (names, ages) = pairs.unzip() // names=["John", "Anna"], ages=[25, 30]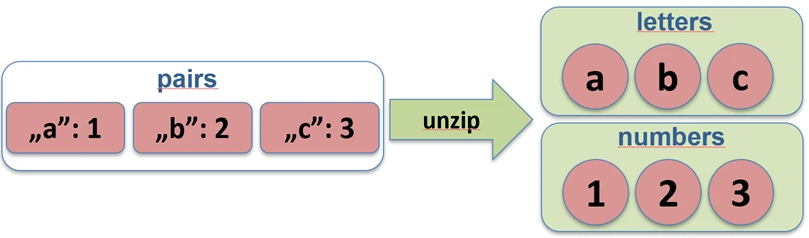
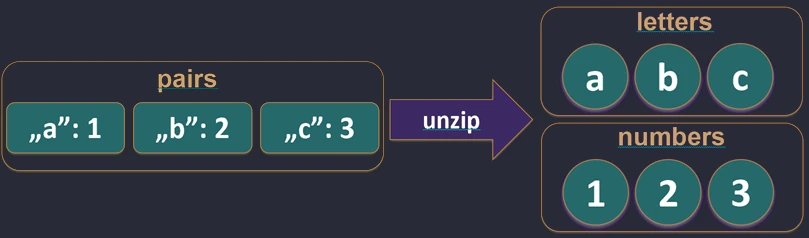


unzip function works.Associations (associate)
We often want to convert a list of objects into a map so that we can quickly look them up, for example by ID.
associateBy: Elements of the list become map values, and we provide a function that generates the key.
val users = listOf(User(1, "John"), User(2, "Anna"))
    val mapById = users.associateBy { it.id } // Map<Int, User>: {1=User(John), 2=User(Anna)}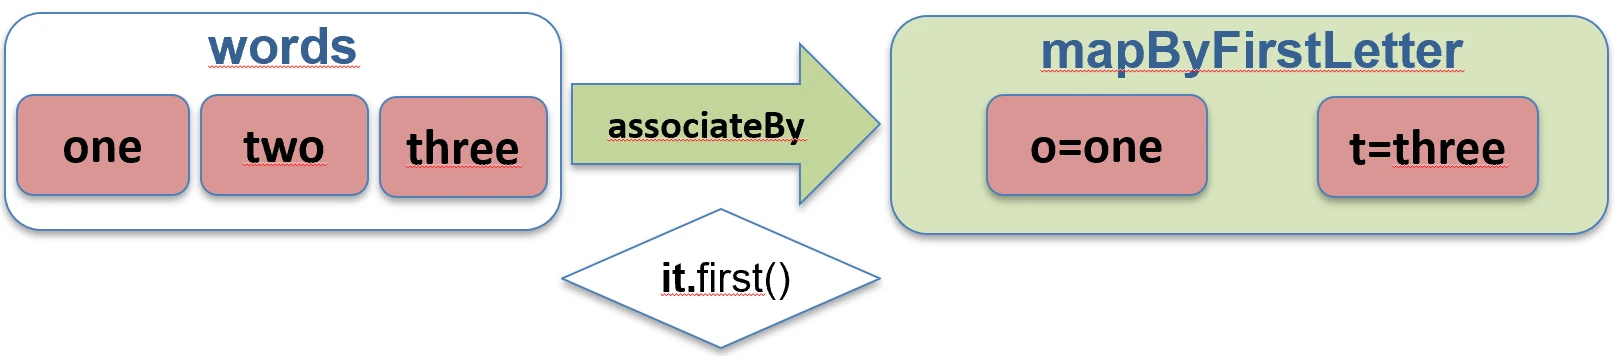
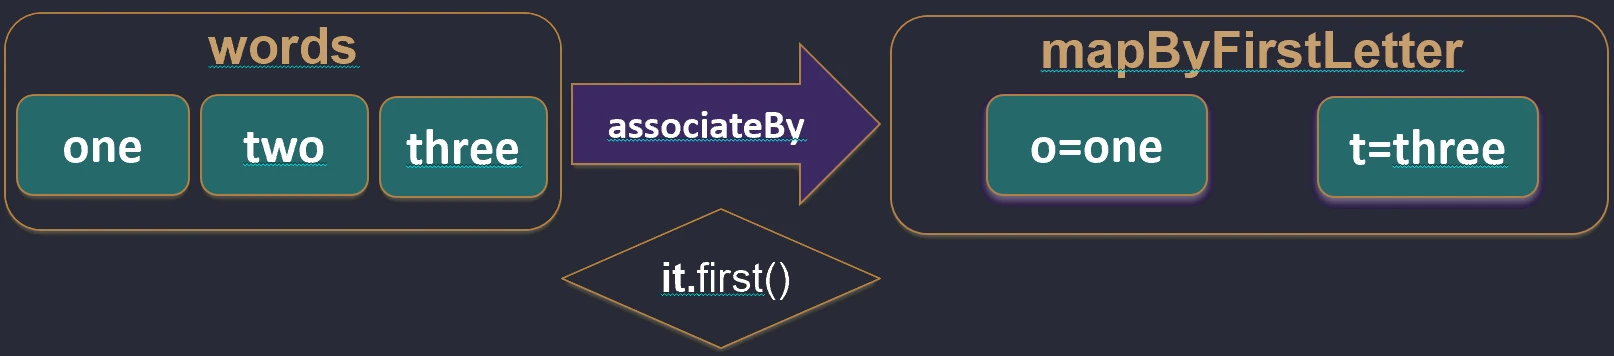


associateBy function works.associateWith: Elements of the list become keys, and we generate values.val items = listOf("A", "B")
val lengths = items.associateWith { it.length } // Map<String, Int>: {"A"=1, "B"=1}


associateWith function works.associate: Elements of the list become both keys and values of the map, and we generate the values.val items = listOf("A", "B")
val lengths = items.associate { it to it.length } // Map<String, Int>: {"A"=1, "B"=1}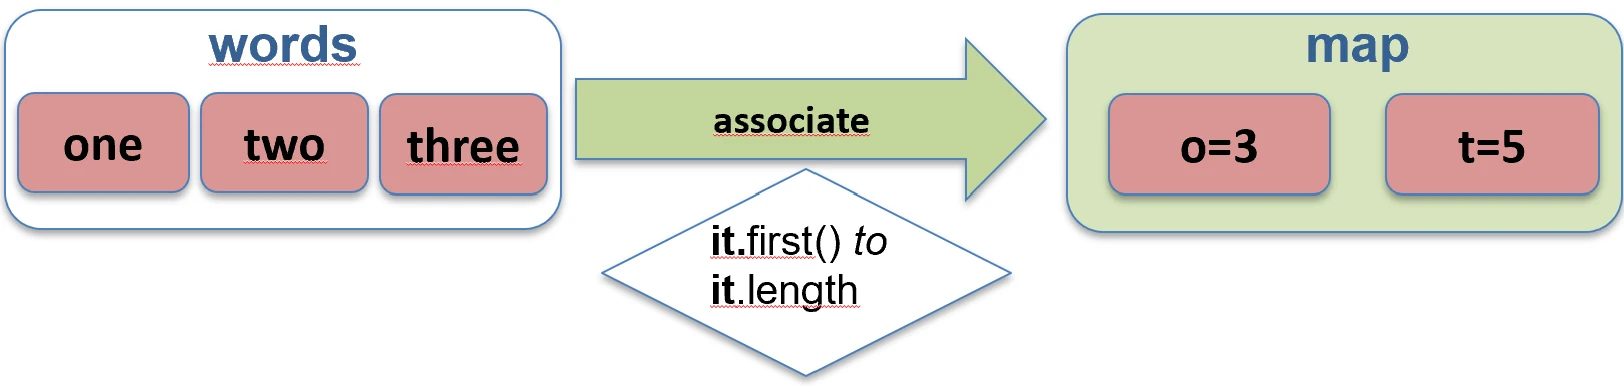


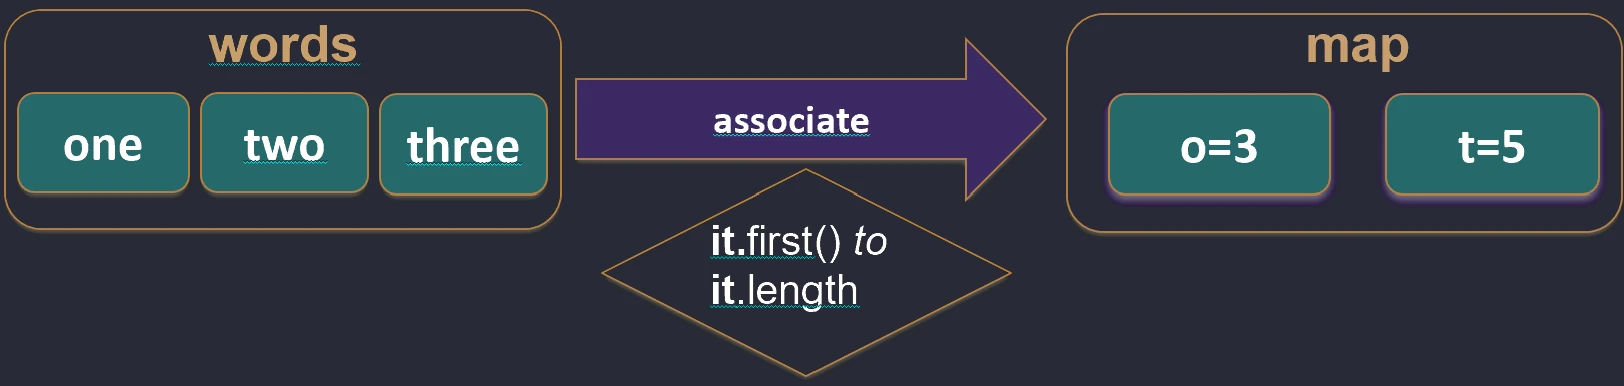
associate function works.Flattening (flatten and flatMap)
When we have a collection of collections, for example a List of Lists, we often want to merge them into one flat structure.
flatten(): Simply joins nested lists.flatMap(): First transforms each element into a collection (map), and then flattens the result (flatten).
Imagine that you have a list of boxes (elements), and each box contains several candies.
mapis like painting each box a different color. You still have a list of boxes.flatMapis like pouring candies from all boxes onto one large table. You no longer have boxes, only one long list of candies.


flatten function works.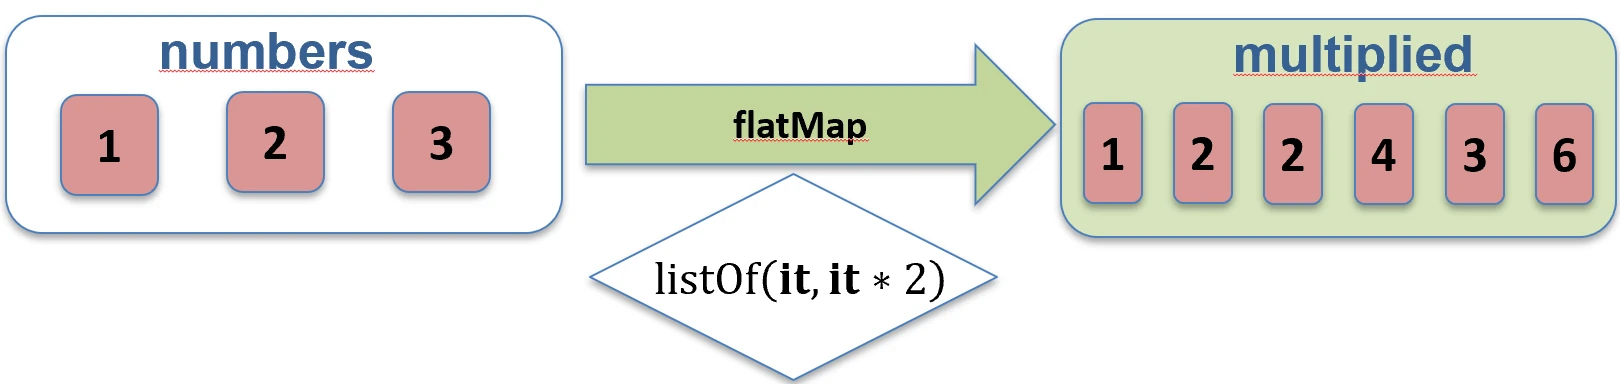
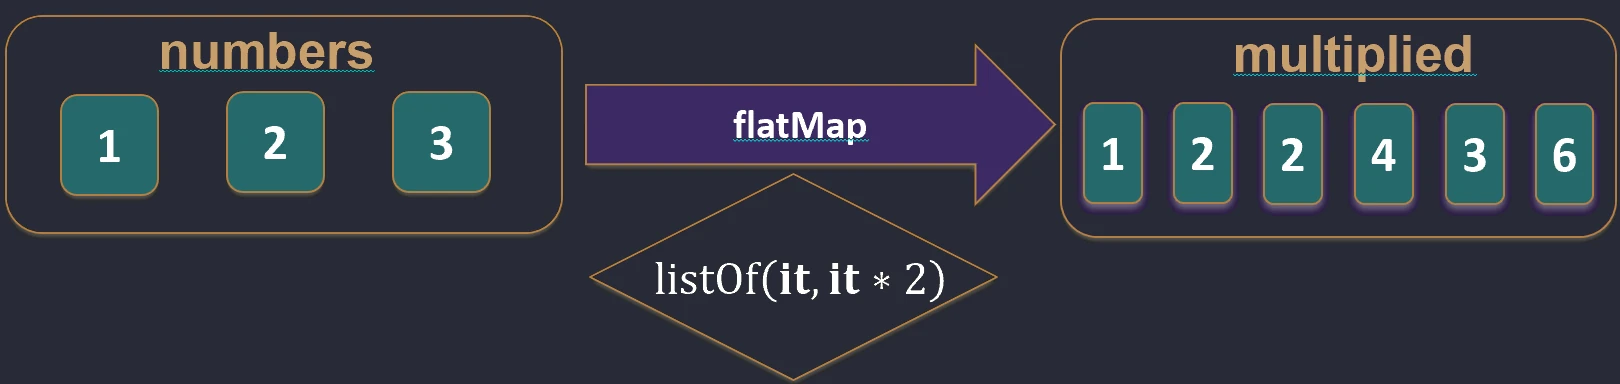


flatMap function works.Filtering and searching
Filtering
Selecting elements that satisfy a condition (predicate).
filter { ... }: Returns elements for which the predicate istrue.
val numbers = listOf(1, 2, 3, 4)
    val evens = numbers.filter { it % 2 == 0 } // [2, 4]

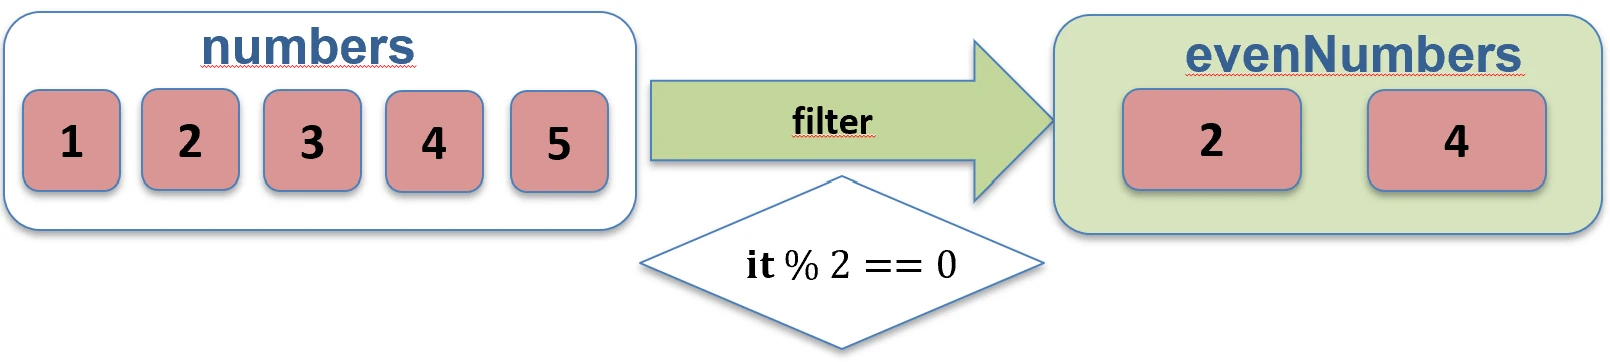
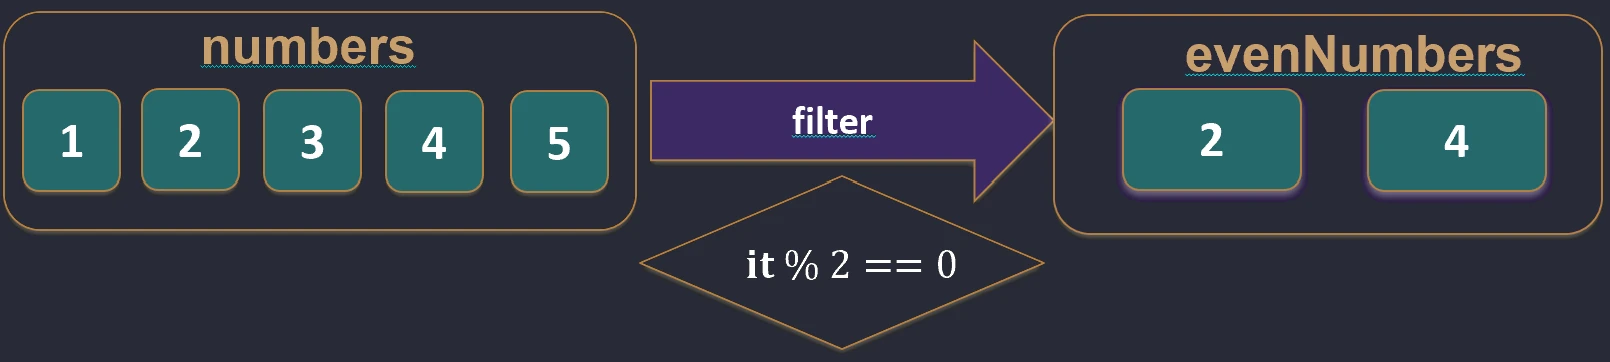
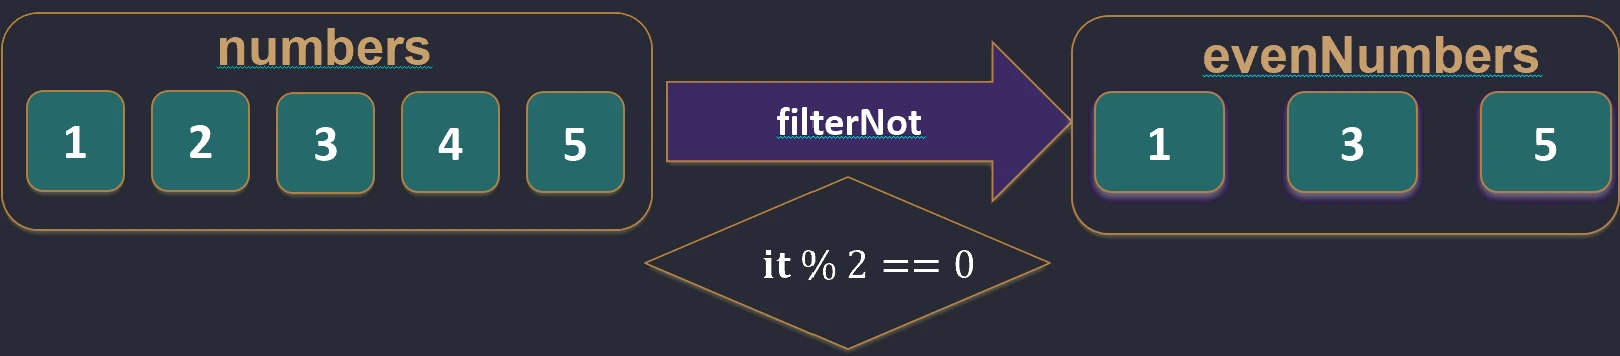
filter function works.filterNot { ... }: Returns elements for which the predicate is false.val numbers = listOf(1, 2, 3, 4)
val odds = numbers.filterNot { it % 2 == 0 } // [1, 3]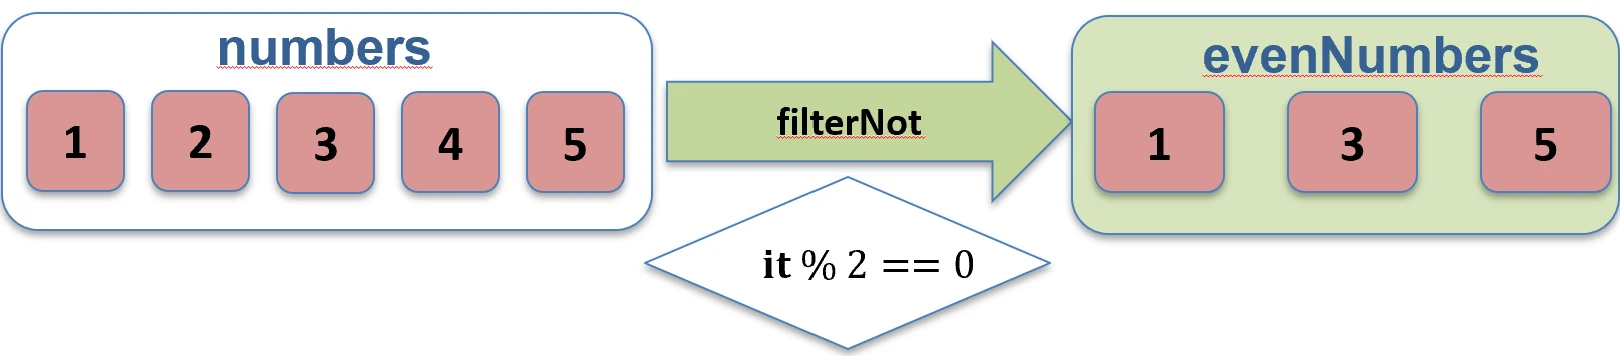


filterNot function works.partition { ... }: Splits a collection into two lists (a Pair): elements that satisfy the condition and elements that do not. This is very useful when we need both groups.val (even, odd) = listOf(1, 2, 3, 4).partition { it % 2 == 0 }
// even: [2, 4], odd: [1, 3]
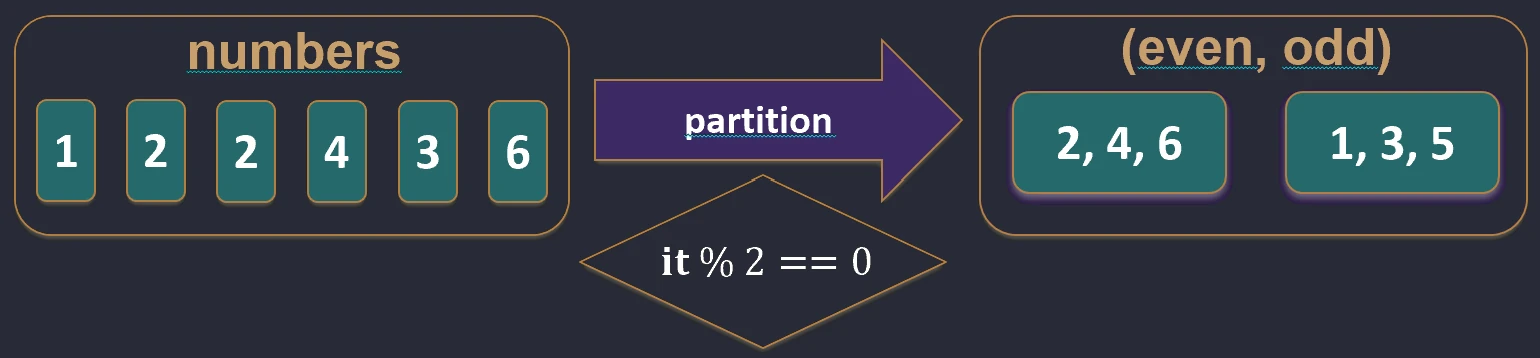
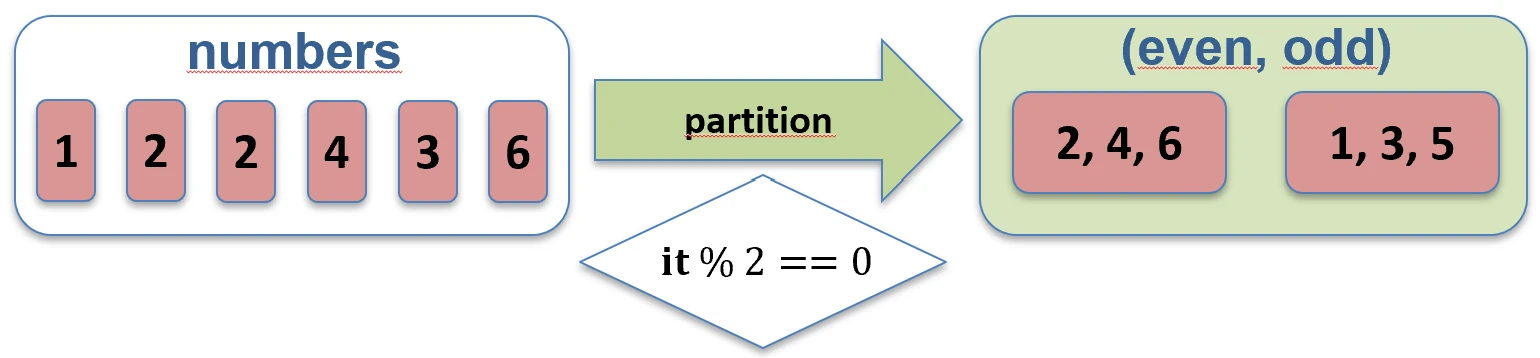

partition function works.Testing (predicates)
Instead of filtering, we can check whether elements satisfy conditions:
any { ... }: Does at least one element satisfy the condition?all { ... }: Do all elements satisfy the condition?none { ... }: Do no elements satisfy the condition?
Grouping (groupBy)
Splits a collection into groups according to a key. The result is a map where the key is the feature used for grouping and the value is a list of elements with that feature.
val words = listOf("apple", "apricot", "banana", "cherry")
val byFirstLetter = words.groupBy { it.first() }
// Map<Char, List<String>>:
// 'a' -> ["apple", "apricot"]
// 'b' -> ["banana"]
// 'c' -> ["cherry"]

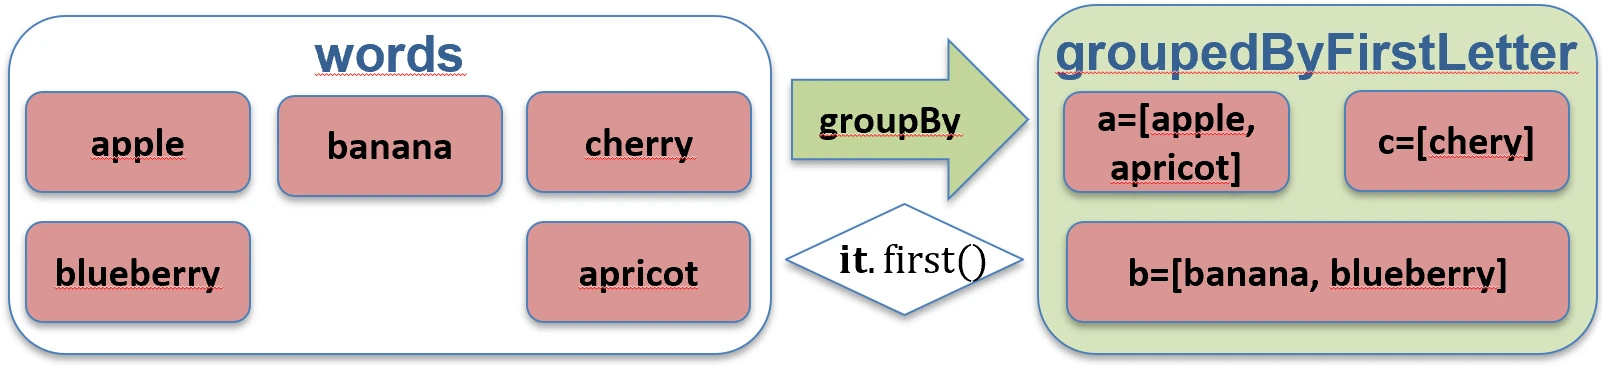
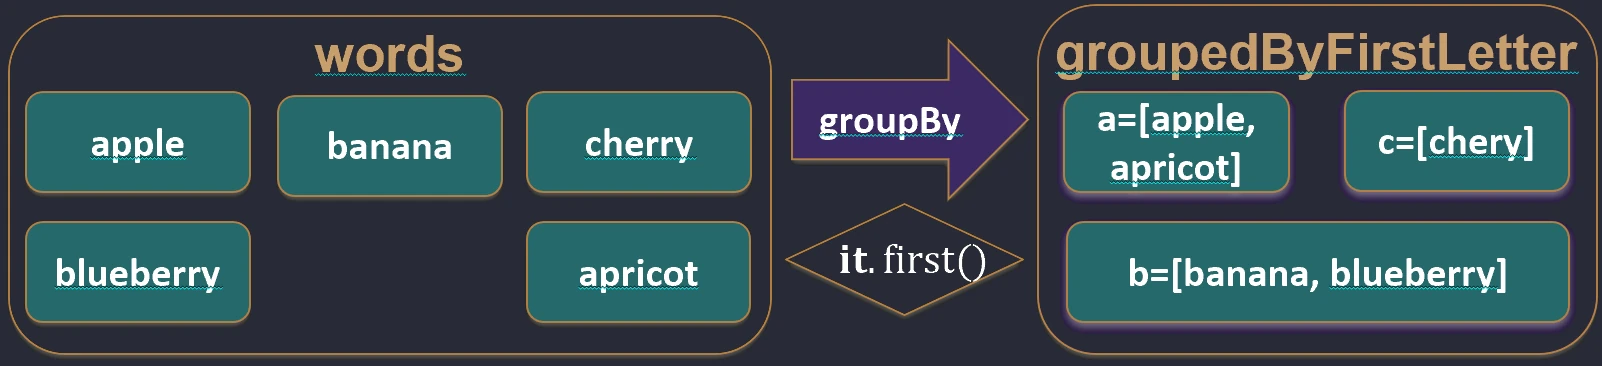
groupBy function works.Destructuring declarations
Allows us to unpack an object into component variables. This works for data classes (data class), pairs (Pair), triples (Triple), and maps.
val (name, age) = Person("John", 30) // Person must be a data class

val pair = "A" to 1
val (letter, number) = pair

// Iterating over a map
for ((key, value) in map) {
    println("$key -> $value")
}
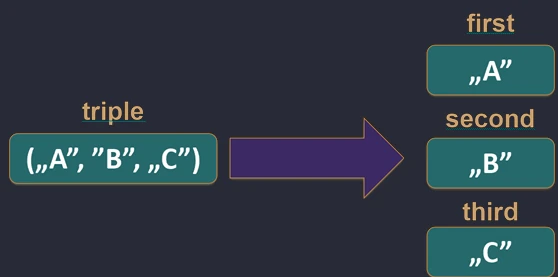
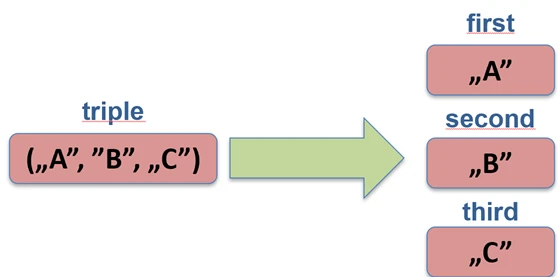

Under the hood, the compiler calls the component1(), component2(), and subsequent methods.
Object-oriented programming (OOP) is based on the concepts of classes and objects. A class is a blueprint that defines structure and behavior. An object is a concrete instance created from that blueprint.

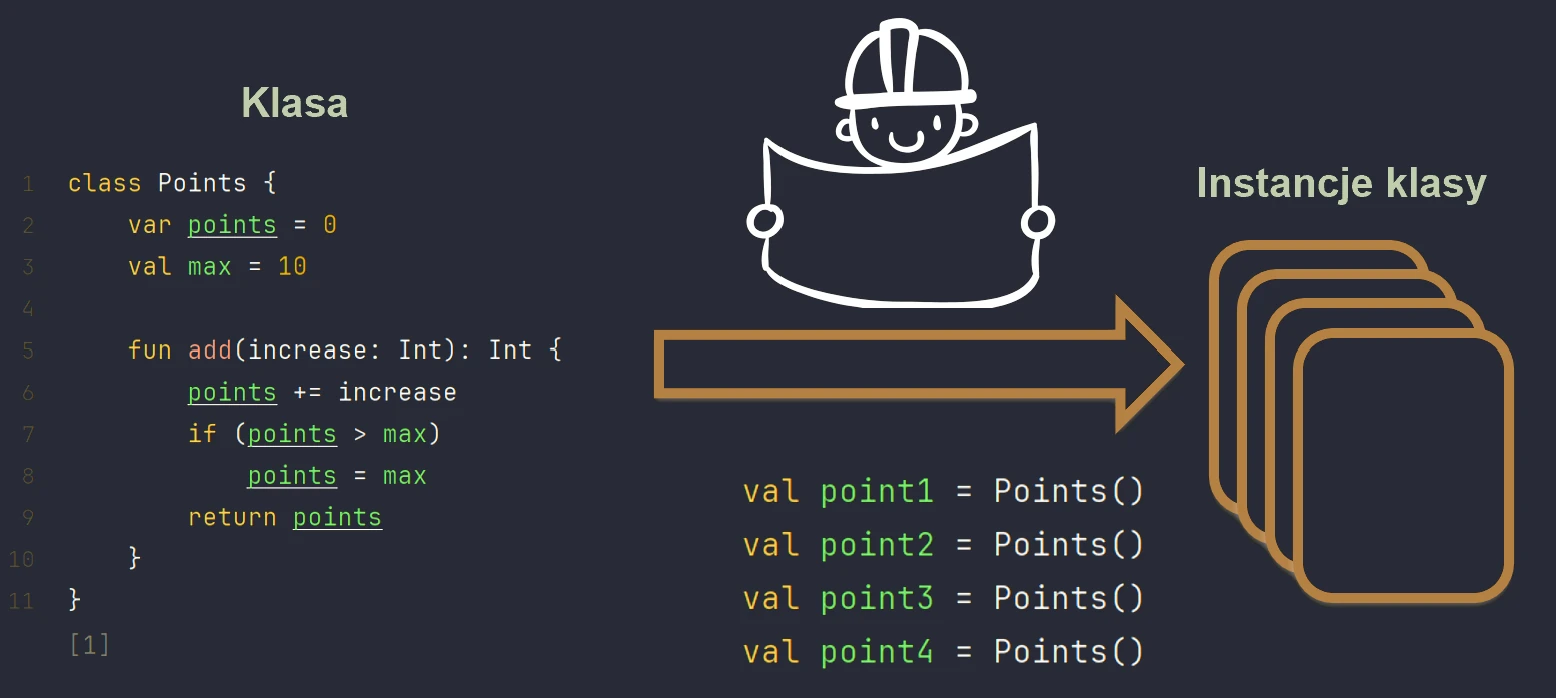
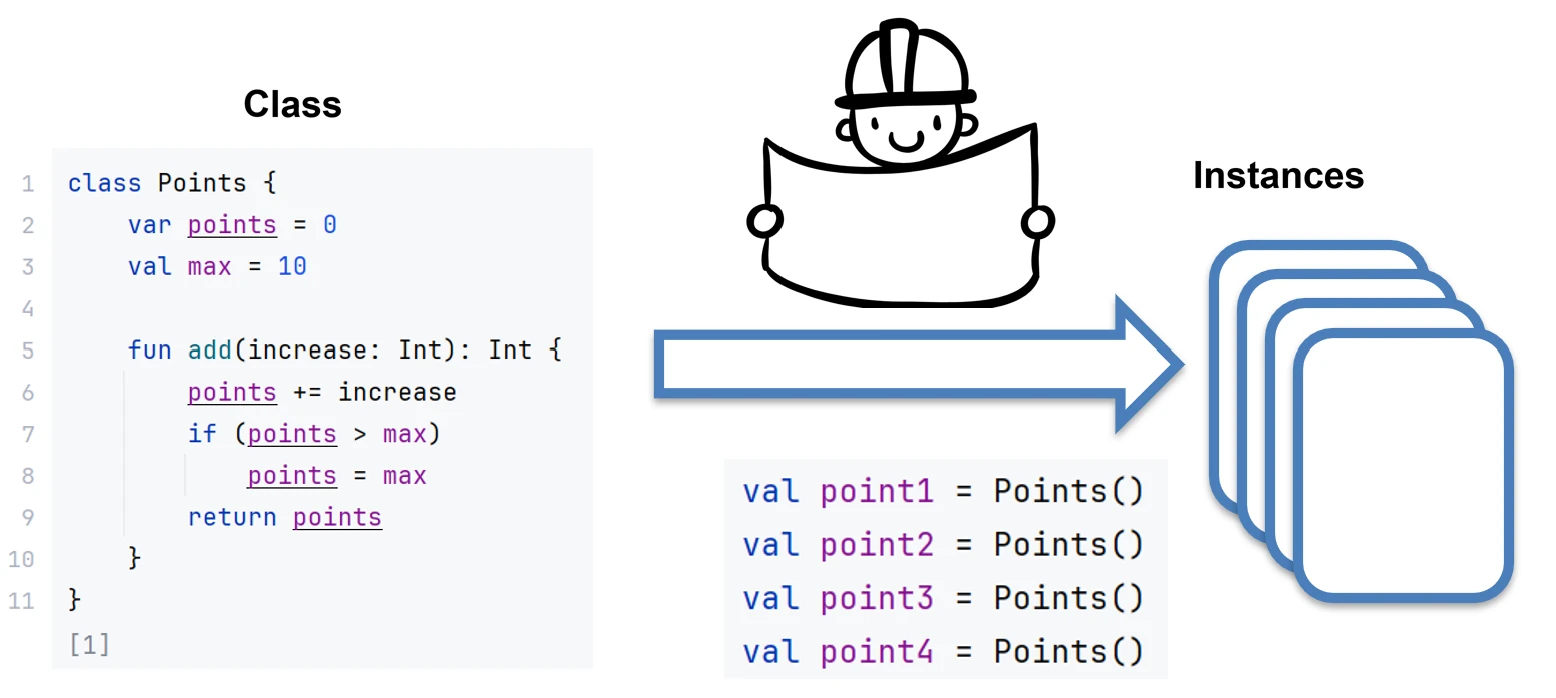
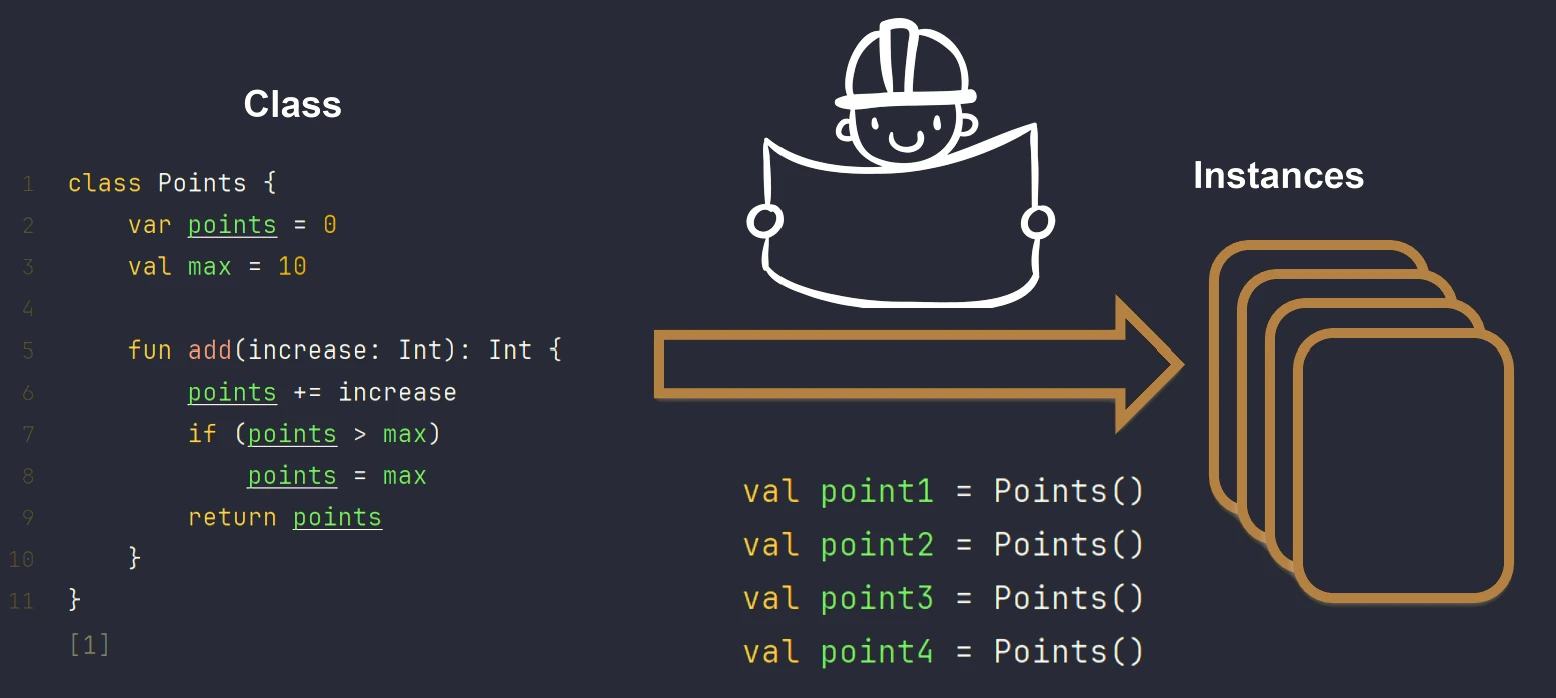
We can imagine this using the example of a house.
- Class is the architectural design, or technical drawing, of a house.
- Object is a specific house built from that design. You can build many houses (objects) from one design (class).
Class definition
In Kotlin, class definitions are very concise. If a class has no body, we can omit the curly braces.
class EmptyUsually, however, a class has properties (state) and functions (behavior).
class Lamp {
    // Property (state)
    var isOn: Boolean = false

    // Method (behavior)
    fun turnOn() {
        isOn = true
    }
}
Creating an instance in Kotlin does not require the new keyword known from Java or C++. We simply call the constructor like a function:
val myLamp = Lamp()
myLamp.turnOn()
Constructors
Kotlin distinguishes two types of constructors: the primary constructor and secondary constructors.
The primary constructor is part of the class definition. This is the most idiomatic way to define classes.
// Short form - declaring properties directly in the constructor
class Person(val name: String, var age: Int)

// The code above is equivalent to:
/*
class Person(_name: String, _age: Int) {
    val name: String = _name
    var age: Int = _age
}
*/
If we need to execute code during initialization, for example validation, we use an init block. The primary constructor itself cannot contain code.
class User(val login: String) {
    init {
        println("Creating user: $login")
        if (login.isEmpty()) {
            throw IllegalArgumentException("Login cannot be empty")
        }
    }
}
Sometimes we need alternative ways to create an object. In that case, we use the constructor keyword inside the class body. Every secondary constructor must eventually call the primary constructor by using this(...). Unlike the primary constructor, a secondary constructor can contain code. This is useful when we want to create an object from different data than the data passed to the primary constructor. It is not possible to automatically declare properties in a secondary constructor, so we must do it manually. It is also worth noting that a secondary constructor cannot be called directly from outside the class, but only from the primary constructor or another secondary constructor. In practice, secondary constructors are rarely used in Kotlin because default values in the primary constructor cover most use cases, such as constructor overloading in Java.
class Rect(val width: Int, val height: Int) {
    // Helper constructor for a square
    constructor(side: Int) : this(side, side) {
        println("Created a square with side $side")
    }
}
Access modifiers
They define who sees our classes, methods, and properties.
public(default): Visible everywhere.private: Visible only inside the file (for top-level functions/classes) or inside the class.protected: Visible in the class and its subclasses. Kotlin does not have Java-style package-private access.internal: Visible in the whole module, for example a Maven module, Gradle module, or IntelliJ module. This is Kotlin-specific and very useful for hiding library implementation details.
Data classes
We often create classes whose only purpose is to store data (DTO - Data Transfer Object). Kotlin provides a special kind of class for this purpose, marked with the data class keyword.
data class User(val name: String, val age: Int)Thanks to this one keyword, the compiler automatically generates:
toString(): Returns a readable string, for example"User(name=John, age=30)".equals(): Compares field contents, not references.hashCode(): Generates a correct hash based on the fields.copy(): Allows us to copy an object while changing only selected fields. This is essential when working with immutability.componentN(): Methods that enable destructuring, for exampleval (n, a) = user.
Using these generated methods removes the need to manually write repetitive code (boilerplate), which significantly improves readability and application safety. These methods are especially useful in architectures based on data immutability, where instead of modifying an existing object, we create its copy with changed parameters.
val u1 = User("John", 25)
val u2 = u1.copy(age = 26) // User(name="John", age=26)
println(u1 == u2) // false
The primary constructor must have at least one parameter, and all parameters must be marked as val or var. Data classes cannot be inherited from; they are final.
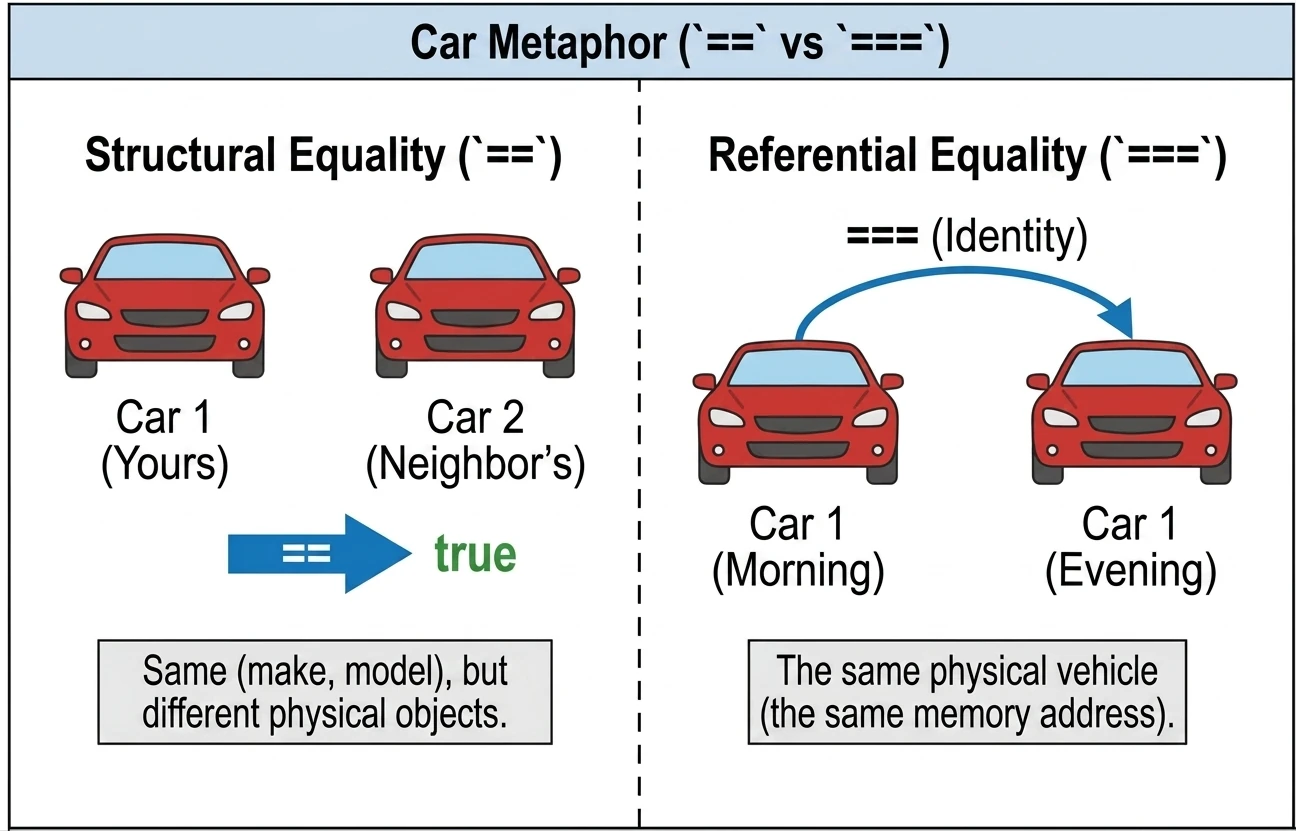
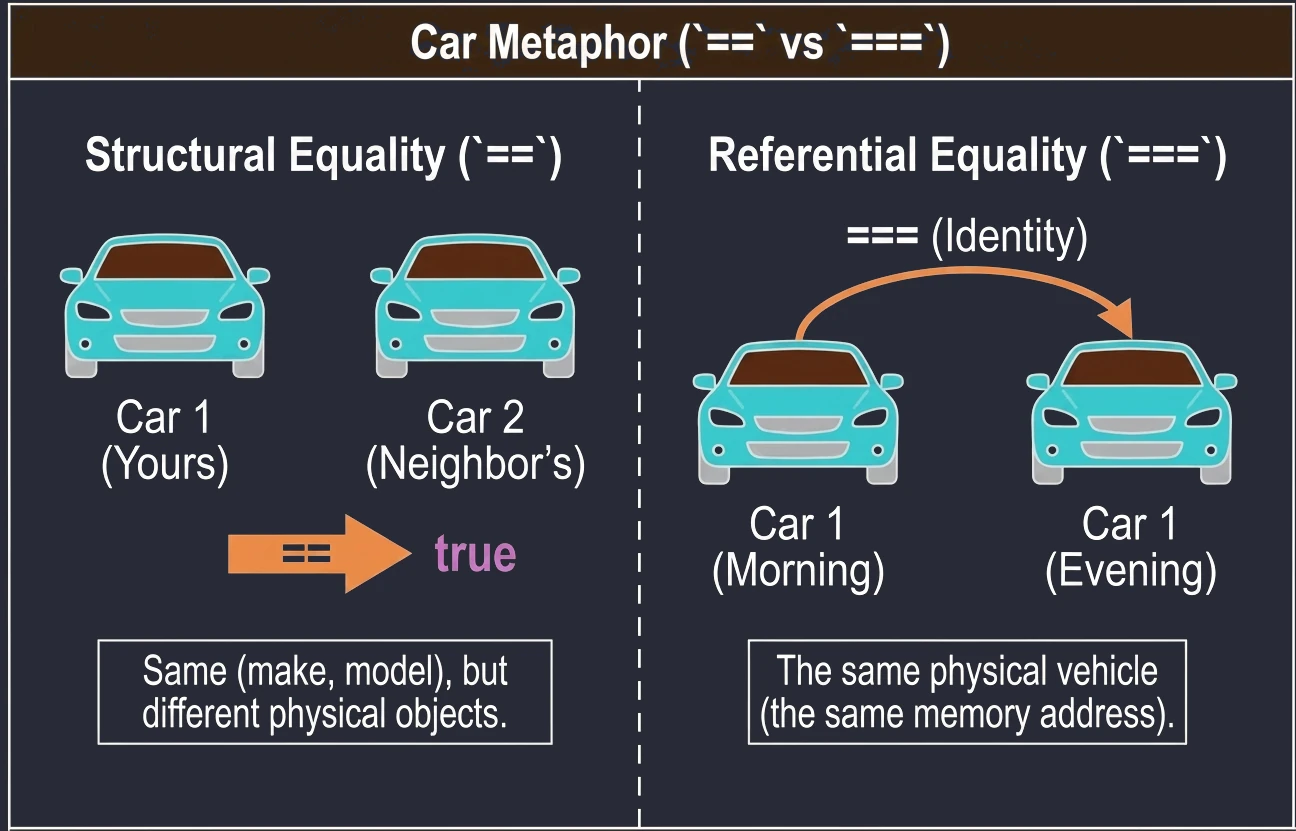
Comparing objects
In Kotlin, we have two types of equality:
- Structural equality (
==): Checks whether objects are the same in content. Under the hood, it callsequals(). It is null-safe, for examplenull == nullreturns true. - Referential equality (
===): Checks whether two variables point to the same object in memory, that is, the same address.
The behavior of the == operator depends on whether we are working with a regular class or a data class. In a regular class, == checks the reference, unless we manually override equals(). In a data class, it compares the contents of fields.
class Person(val name: String, val age: Int)
data class User(val name: String, val age: Int)

val p1 = Person("Eve", 30)
val p2 = Person("Eve", 30)
println(p1 == p2)  // false (regular class compares addresses)

val u1 = User("Eve", 30)
val u2 = User("Eve", 30)
val u3 = u1

println(u1 == u2)  // true (data class compares contents)
println(u1 === u2) // false (two different objects in memory)
println(u1 === u3) // true (u3 points to the same object as u1)
We can imagine this using the example of cars:
==(structural equality): Your car and your neighbor's car. They are the same in terms of brand, model, and color, but they are two different physical cars.===(referential equality): Your car in the morning and your car in the evening. It is the same physical vehicle.
In data classes, when structural equality is checked, only fields from the primary constructor are compared. Fields added inside the class body, but not included as primary-constructor parameters, are not taken into account.
data class User(val name: String, val age: Int) {
    var email: String = ""
}

val u1 = User("Eve", 30)
val u2 = User("Eve", 30)

u1.email = "eve@example.com"
u2.email = "e.w.q@example.com"

println(u1 == u2)  // true (data class compares primary-constructor fields)
It is worth noting that for types represented at runtime as primitive types, such as Int, Double, and Boolean, the === operator is equivalent to ==. This is because these values do not have a separate object identity.
val a = 100
val b = 100
println(a === b) // true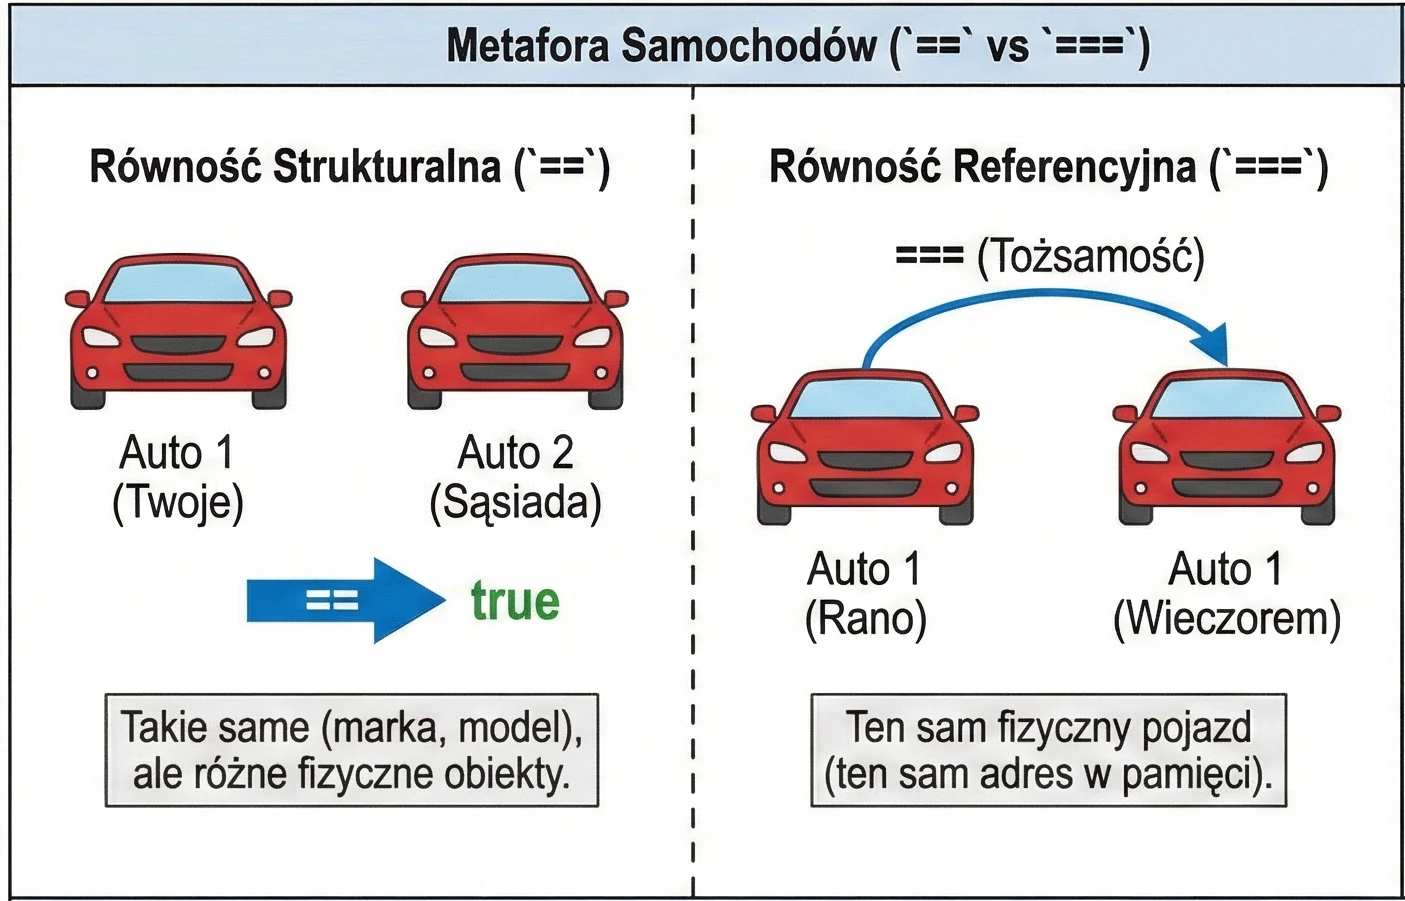

Enum classes
They are used to define a fixed set of values, for example seasons, order states, or directions.
enum class Direction {
    NORTH, SOUTH, EAST, WEST
}
Enums can also have properties and methods:
enum class Color(val hex: String) {
    RED("#FF0000"),
    GREEN("#00FF00"),
    BLUE("#0000FF"); // semicolon required when methods are present

    fun rgb() = "Color: $hex"
}

val color = Color.RED
println(color.hex)
Inheritance and access modifiers
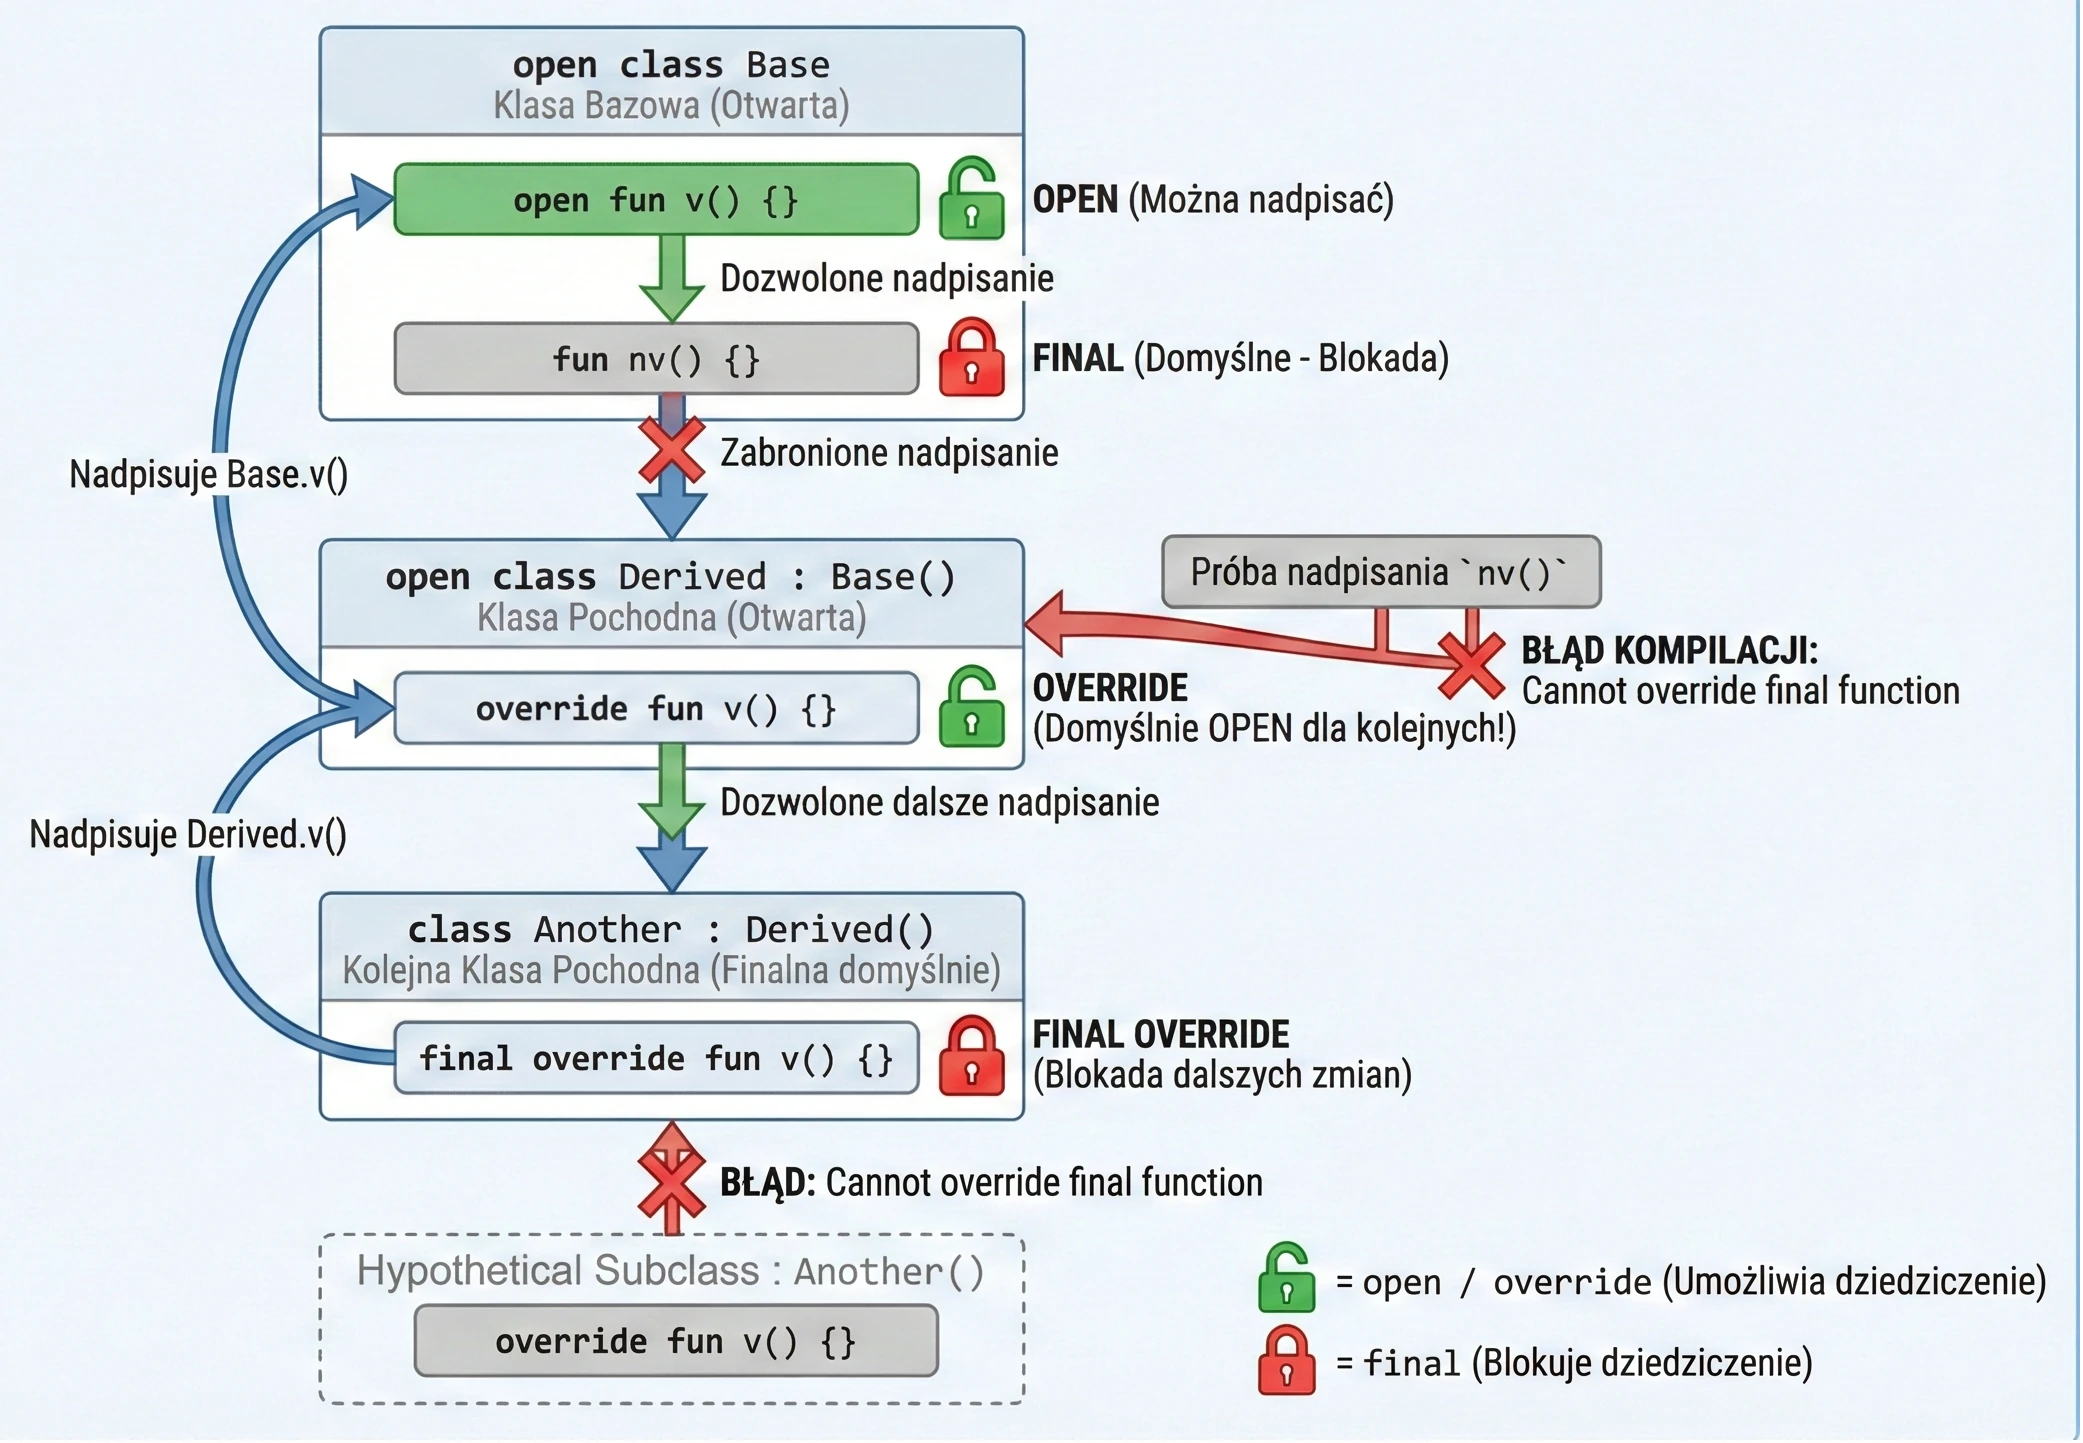
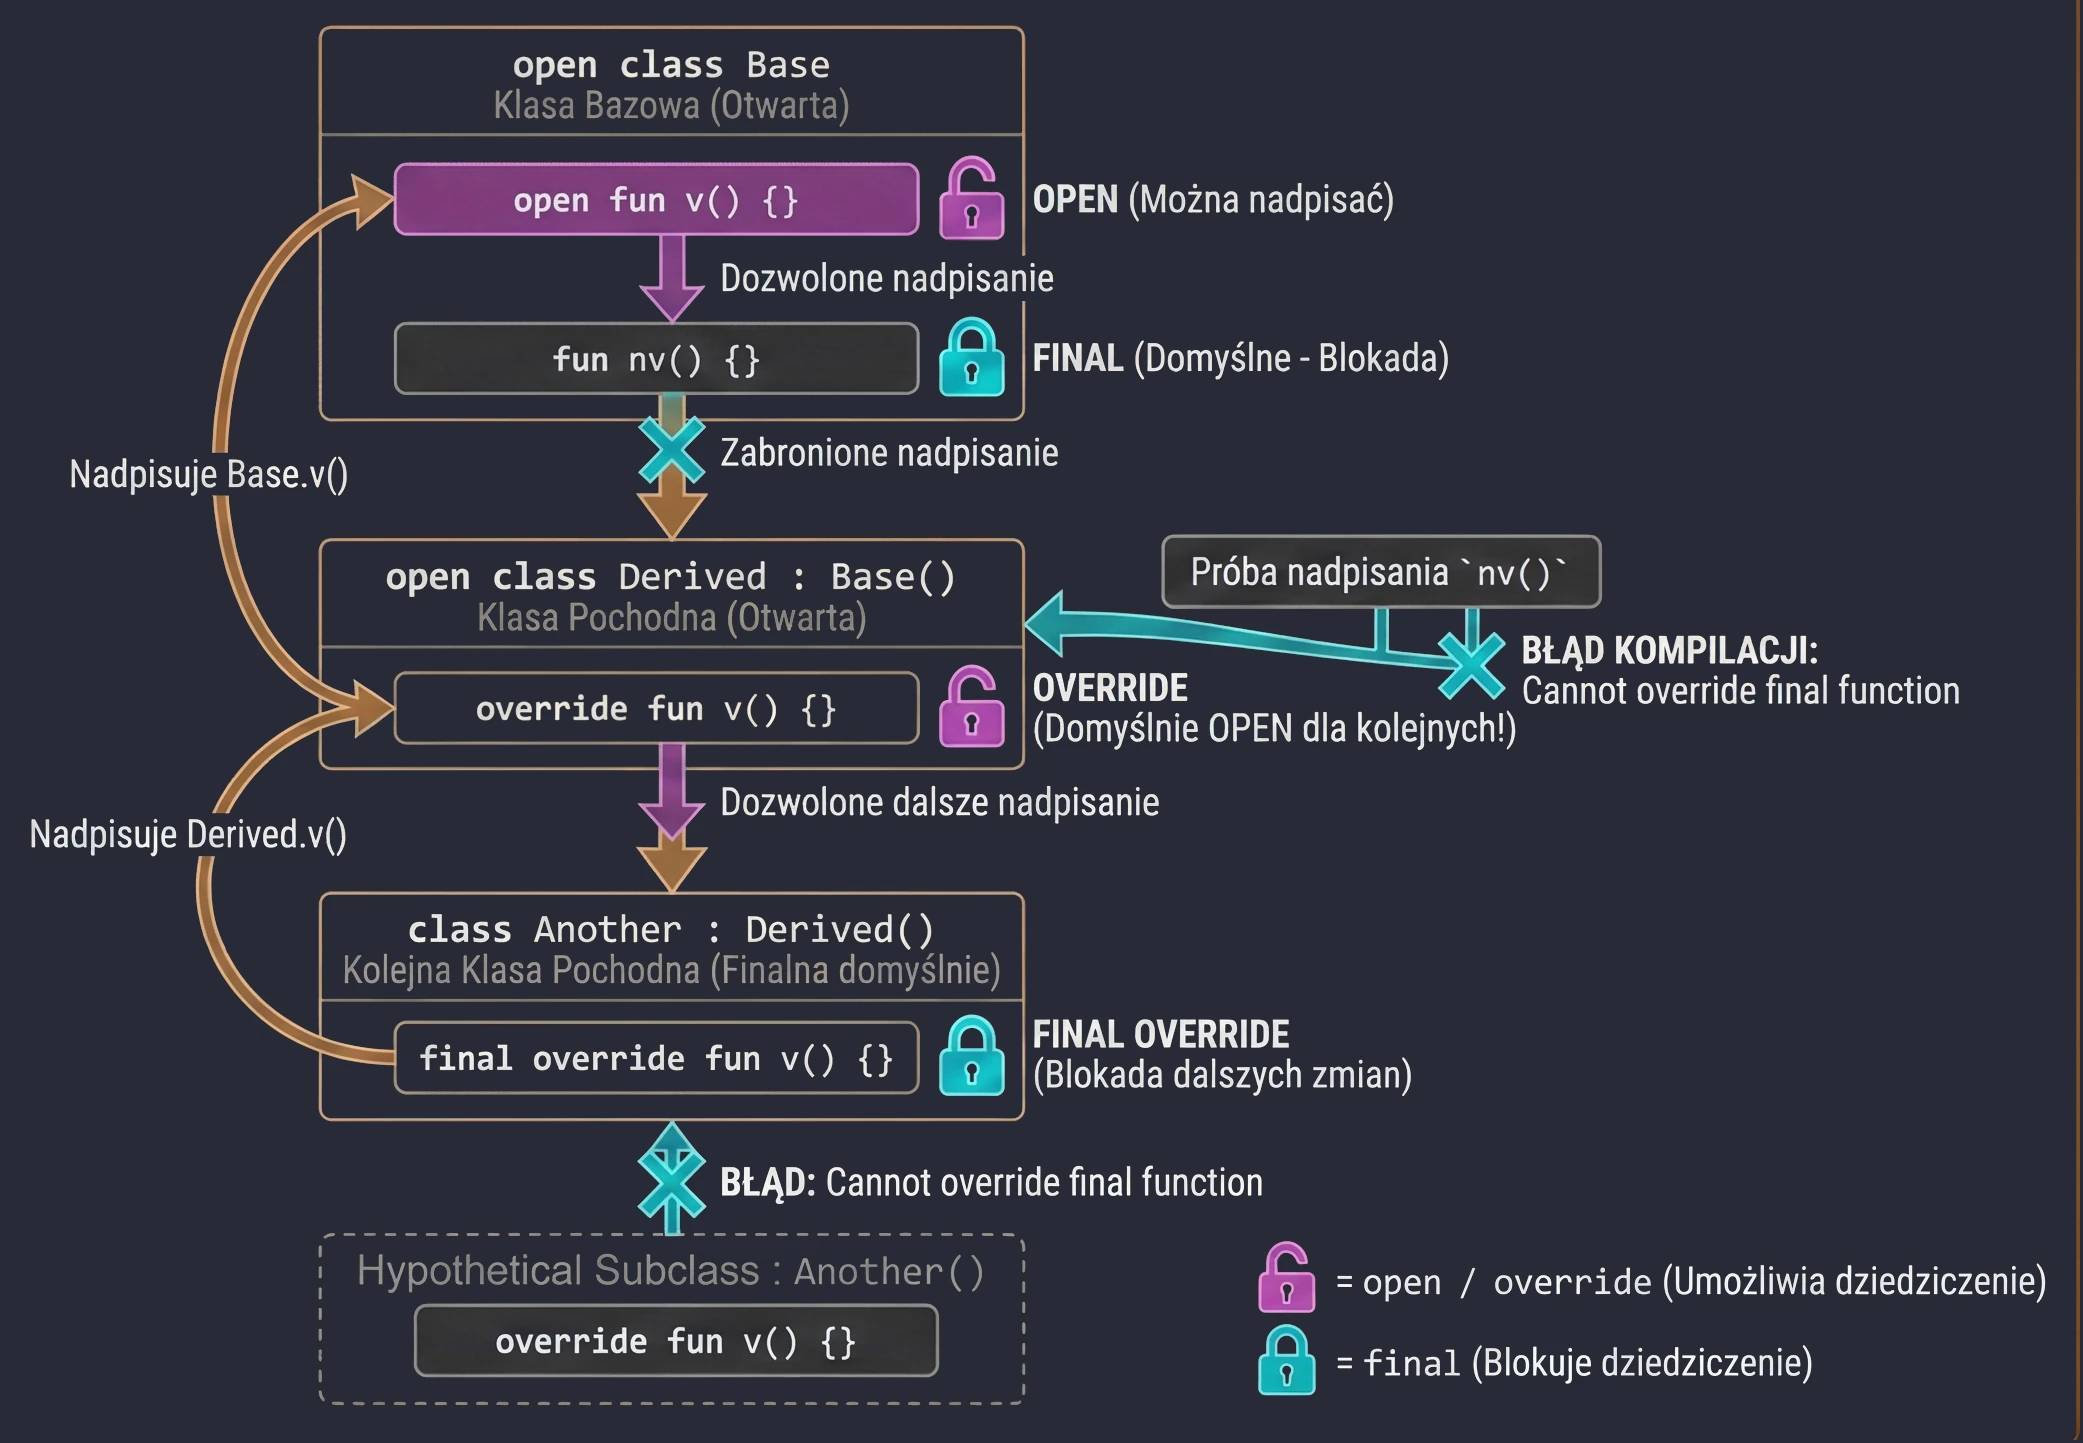
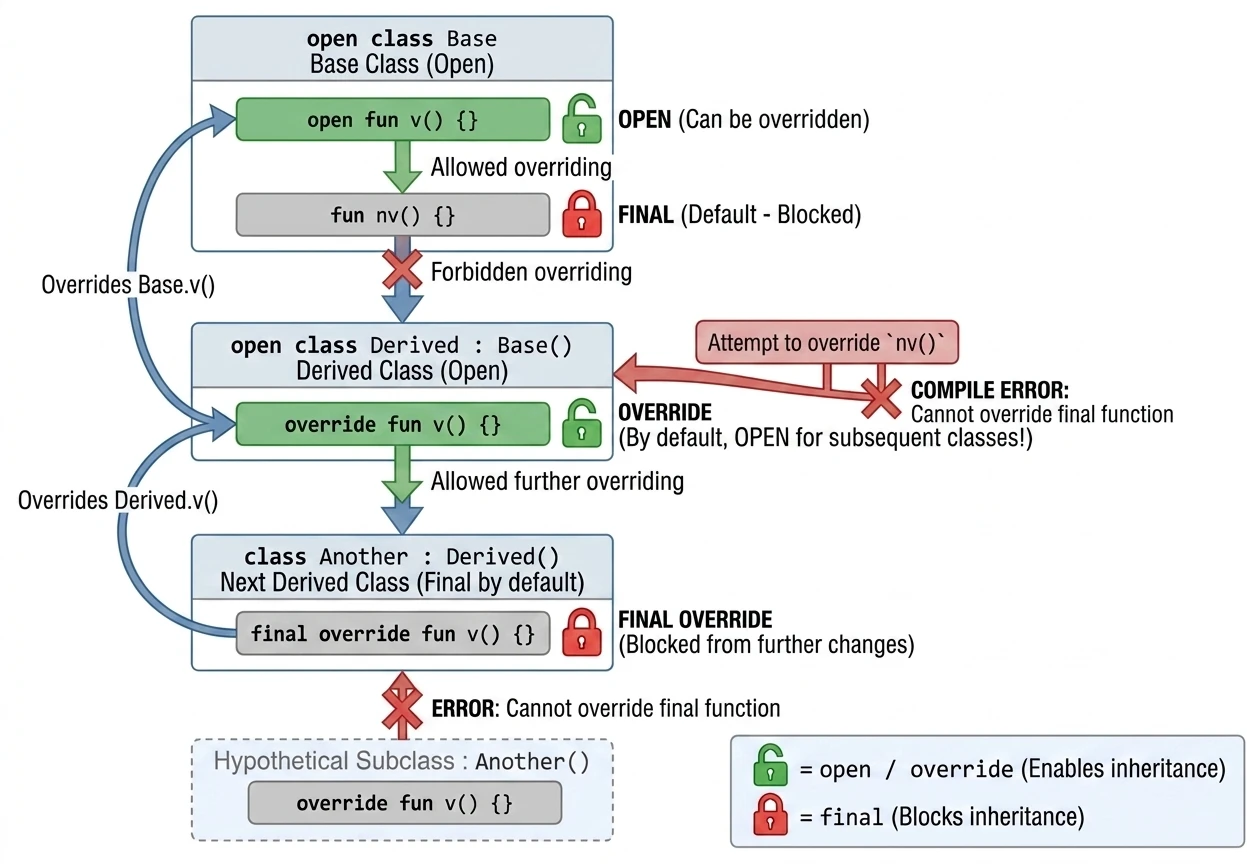
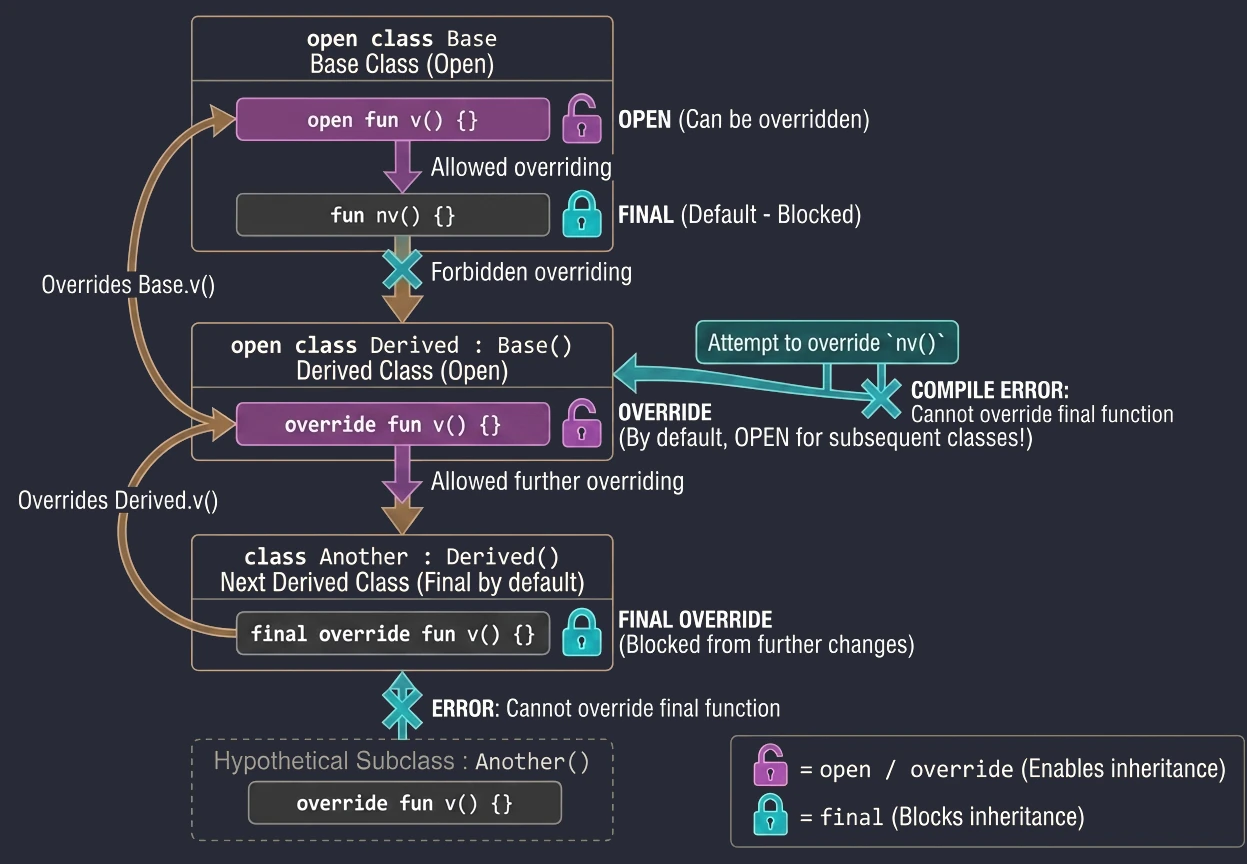
Kotlin takes a restrictive approach to inheritance: it is "closed by default". Unlike Java, where everything can be inherited unless it is final, in Kotlin all classes and methods are final by default.
To allow inheritance or overriding, we must explicitly use the open keyword.
Keywords in inheritance
final(default): Blocks inheritance from a class or overriding a method. We do not need to write it, because it is the default.open: Opens a class for inheritance or a method for overriding.override: Required when we override a method from the base class. Importantly, a function marked asoverrideisopenby default. This means that the next subclass may override it again.final override: If we have overridden a method in a derived class but want to forbid further overriding in subsequent subclasses, we must use thefinal overridecombination.
open class Base {
    open fun v() {} // Open method, can be overridden
    fun nv() {}     // Final method by default, cannot be overridden
}

open class Derived() : Base() {
    override fun v() {} // Overriding method v()
                        // This method is still OPEN for later classes!
}

class Another : Derived() {
    final override fun v() {} // Override and BLOCK further changes
}
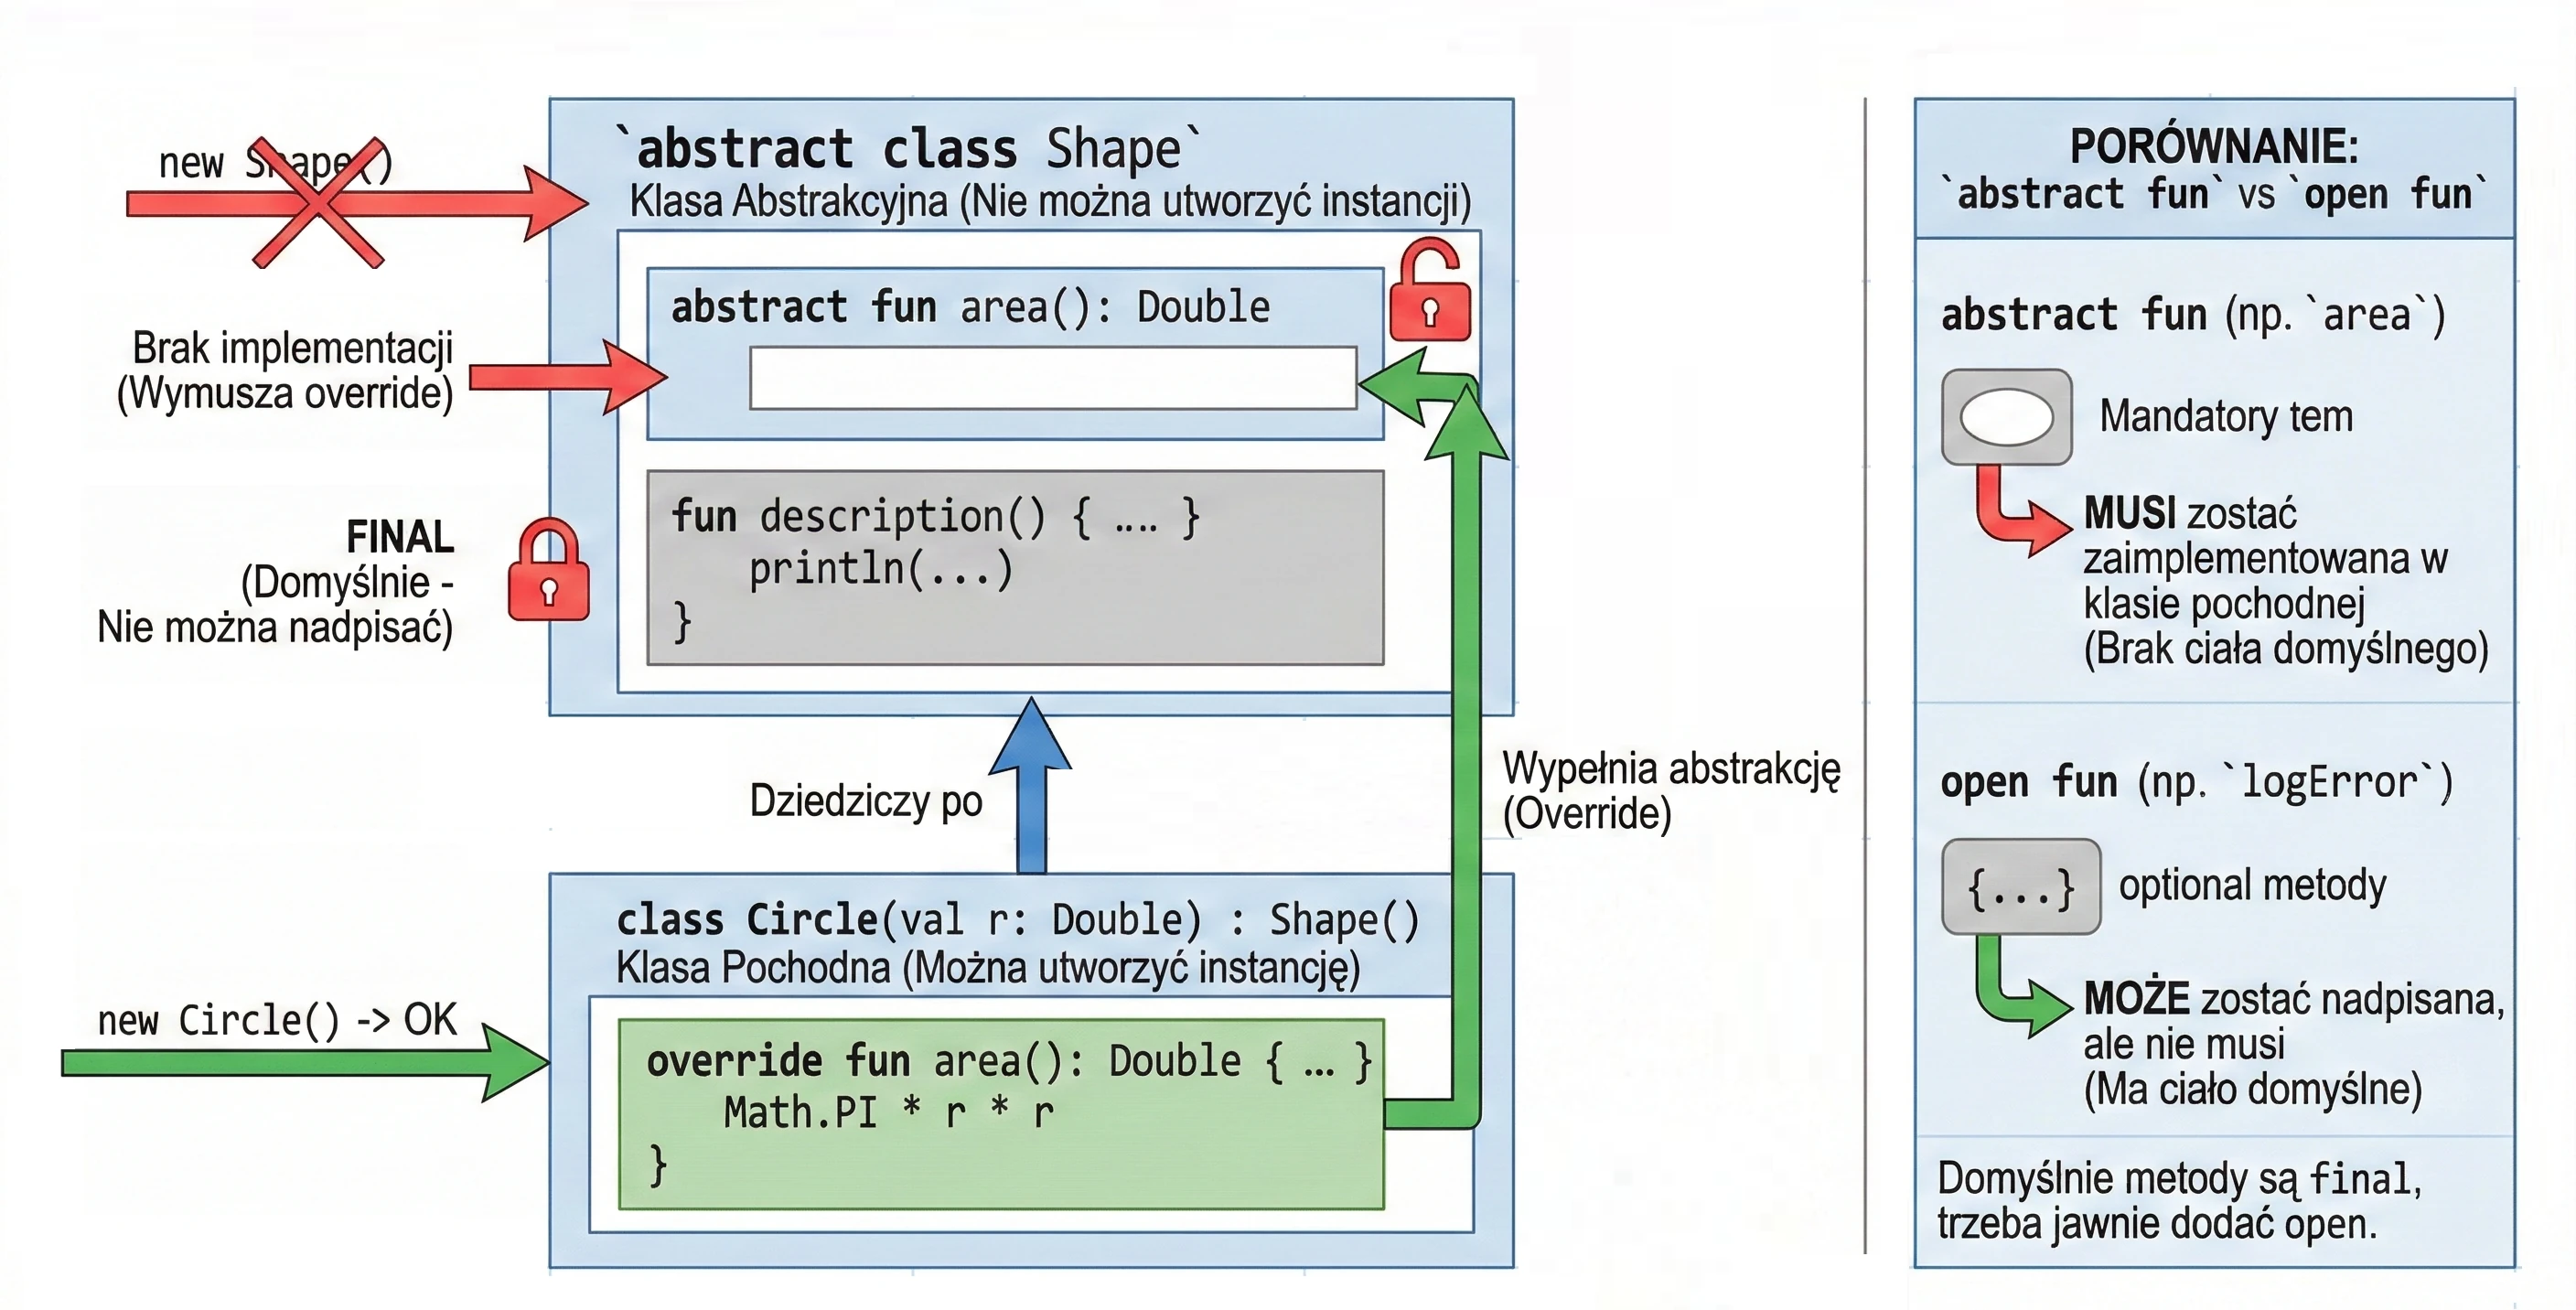
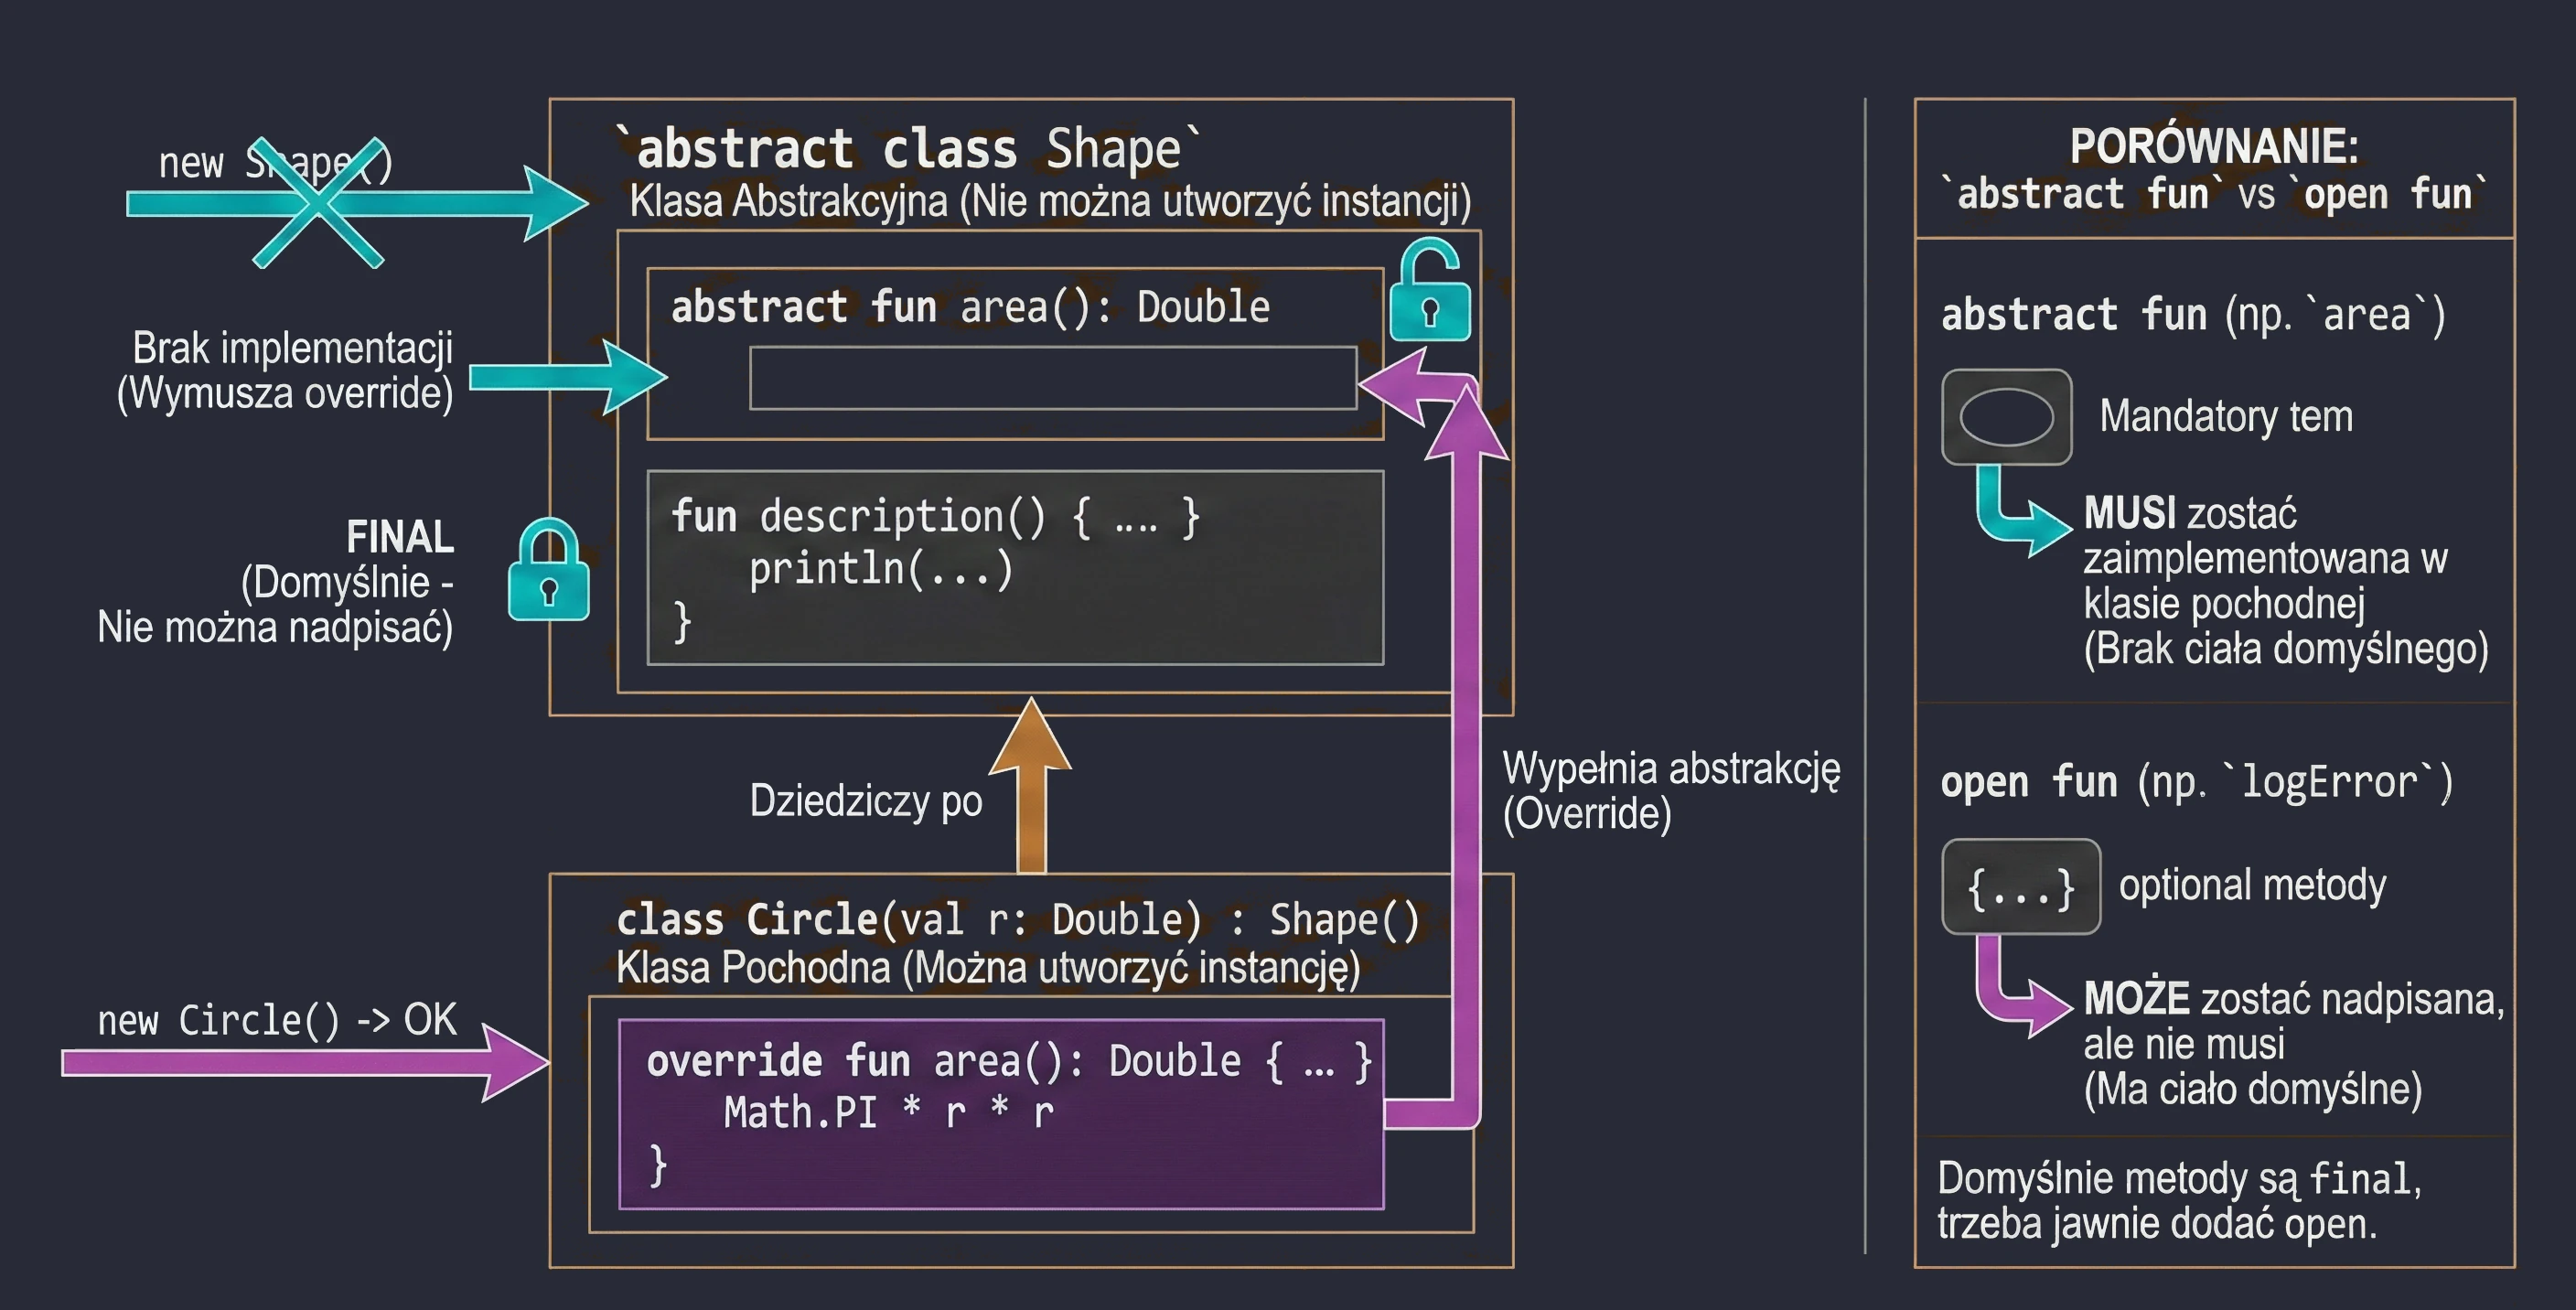
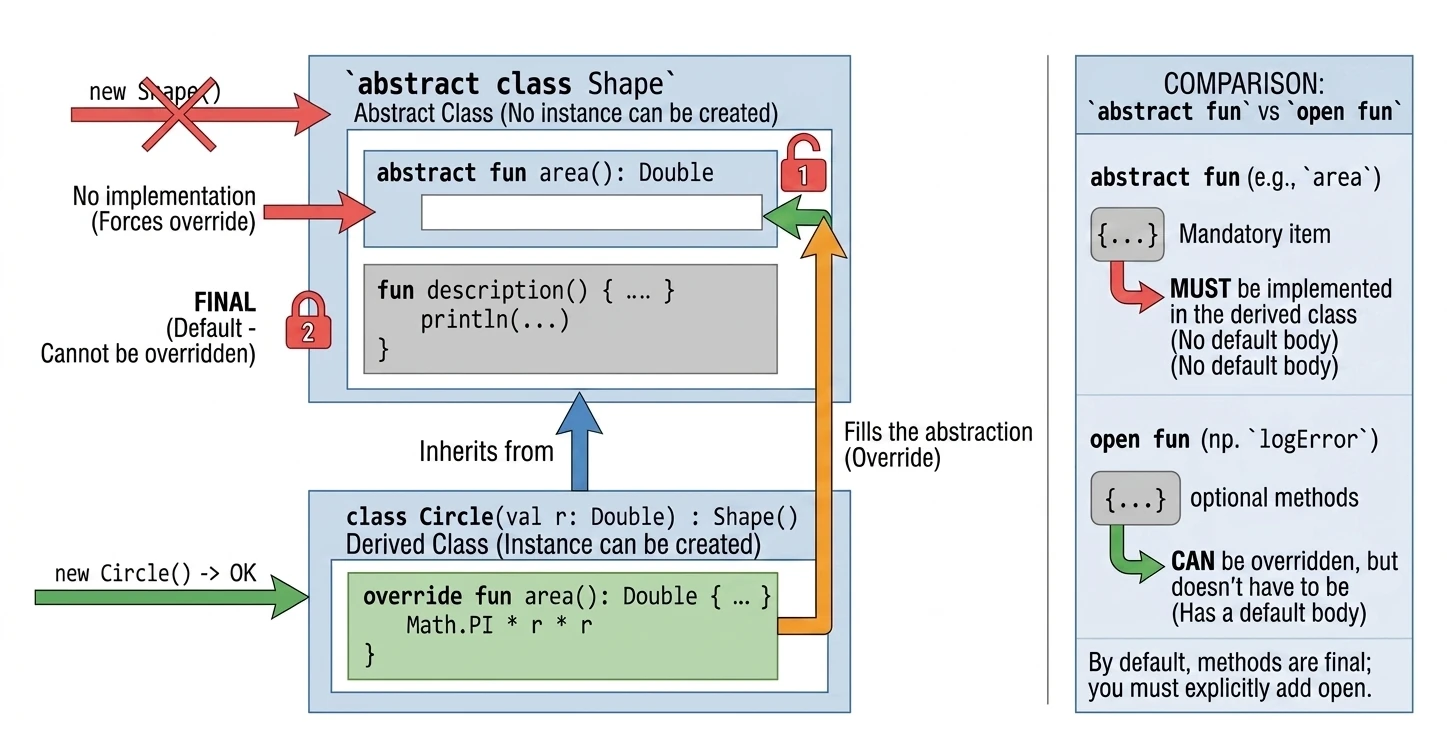
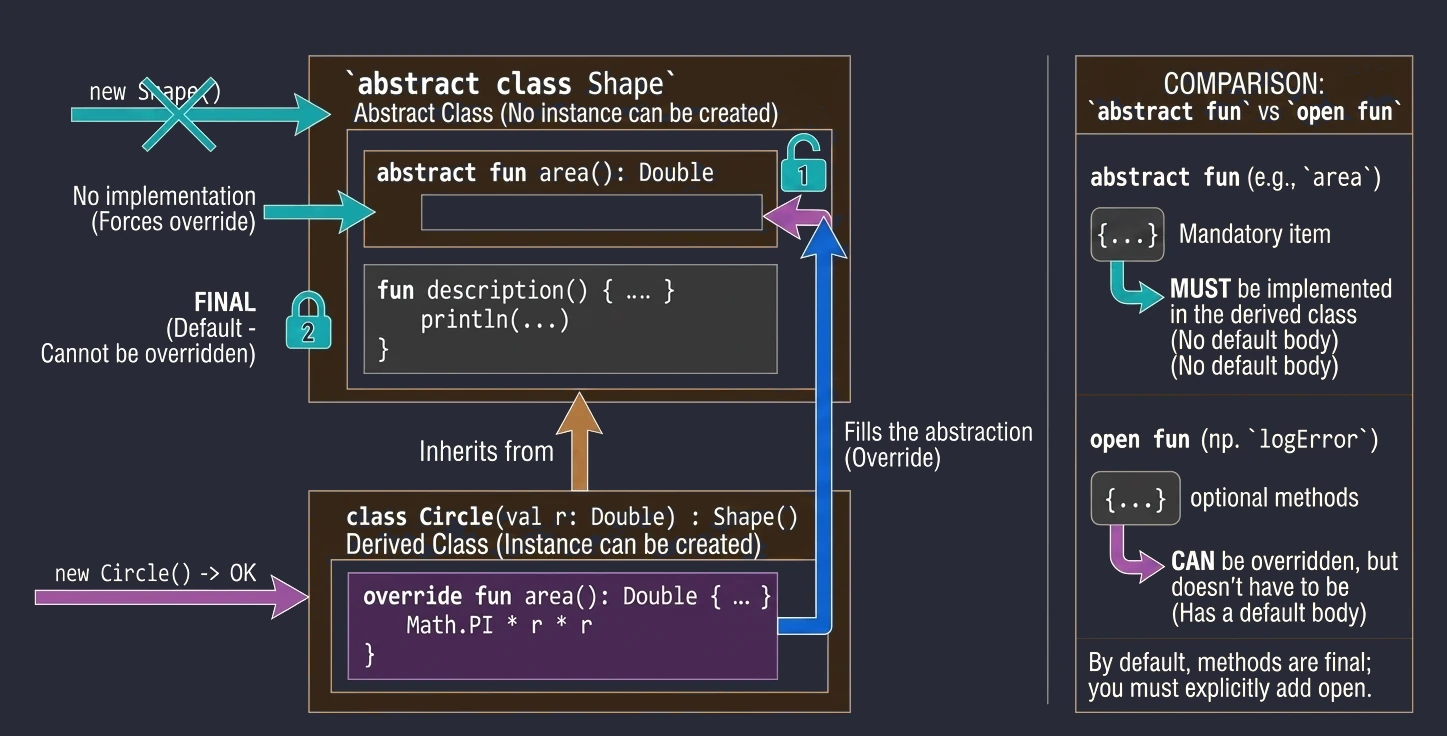
Abstract classes
An abstract class can contain methods without implementation (abstract methods), which must be implemented in derived classes. An abstract class cannot be instantiated.
abstract class Shape {
    abstract fun area(): Double // No method body

    // Method with implementation (final by default unless we add open)
    fun description() {
        println("This is some shape with area ${area()}")
    }
}

class Circle(val r: Double) : Shape() {
    override fun area(): Double = Math.PI * r * r
}
Abstract vs Open
In abstract classes, we often face a design choice: should we use abstract or open?
abstract fun: Has no body (implementation). A derived class must implement it, unless the derived class is also abstract. We use this when there is no meaningful default implementation, for examplecalculateArea()for a generic shape.open fun: Has a body (default implementation). A derived class may override it, but does not have to. We use this when there is meaningful default behavior, for examplelogError()printing to the console, which we may want to change in specific cases, for example by writing to a file.
Sealed classes
A sealed class is a class with a limited, known in advance number of descendants. All inheriting classes must be located in the same package.
It is an ideal tool for modeling states.
sealed class UiState {
    object Loading : UiState()
    data class Success(val data: String) : UiState()
    data class Error(val message: String) : UiState()
}
When we use a when expression, the compiler knows that we have covered all possible cases. We do not need an else branch.
fun handleState(state: UiState) {
when(state) {
is UiState.Loading -> showProgressBar()
is UiState.Success -> showData(state.data)
is UiState.Error -> showError(state.message)
// No else. The compiler knows these are all possible options.
}
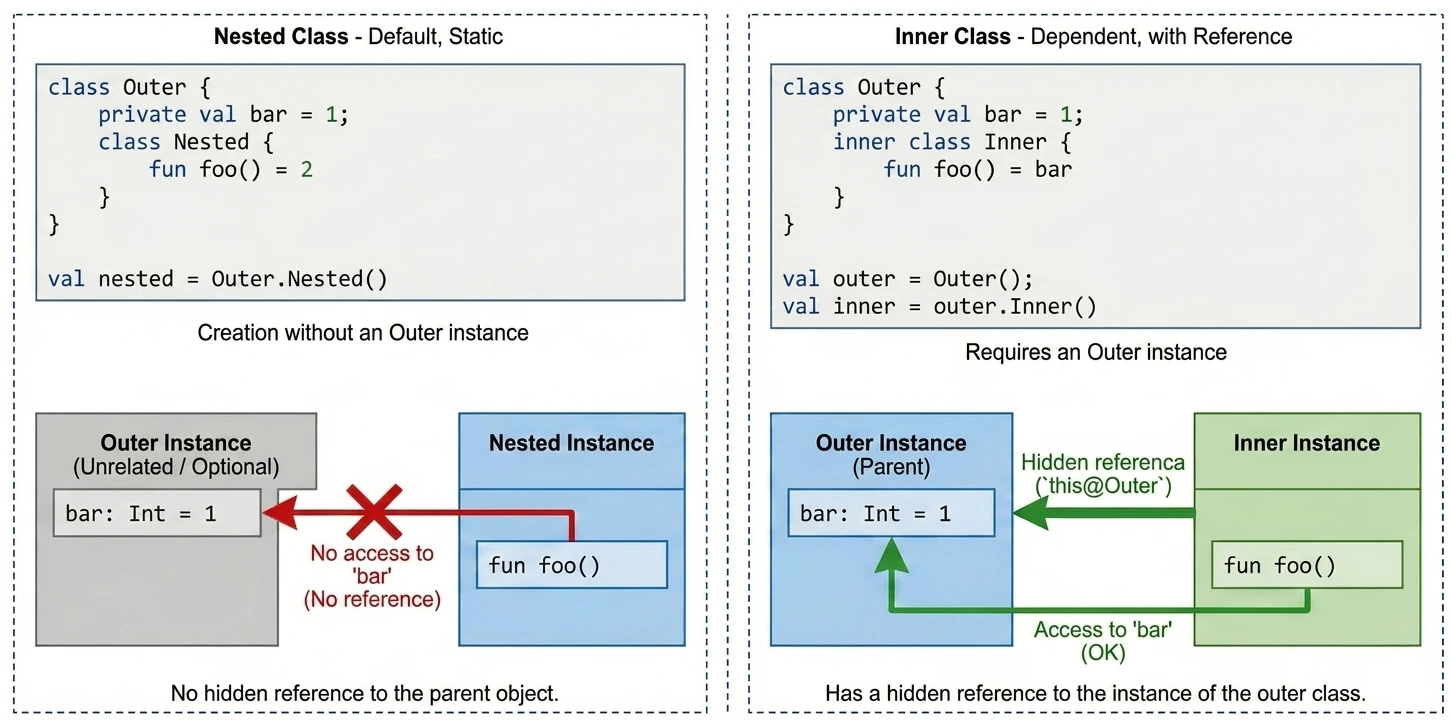
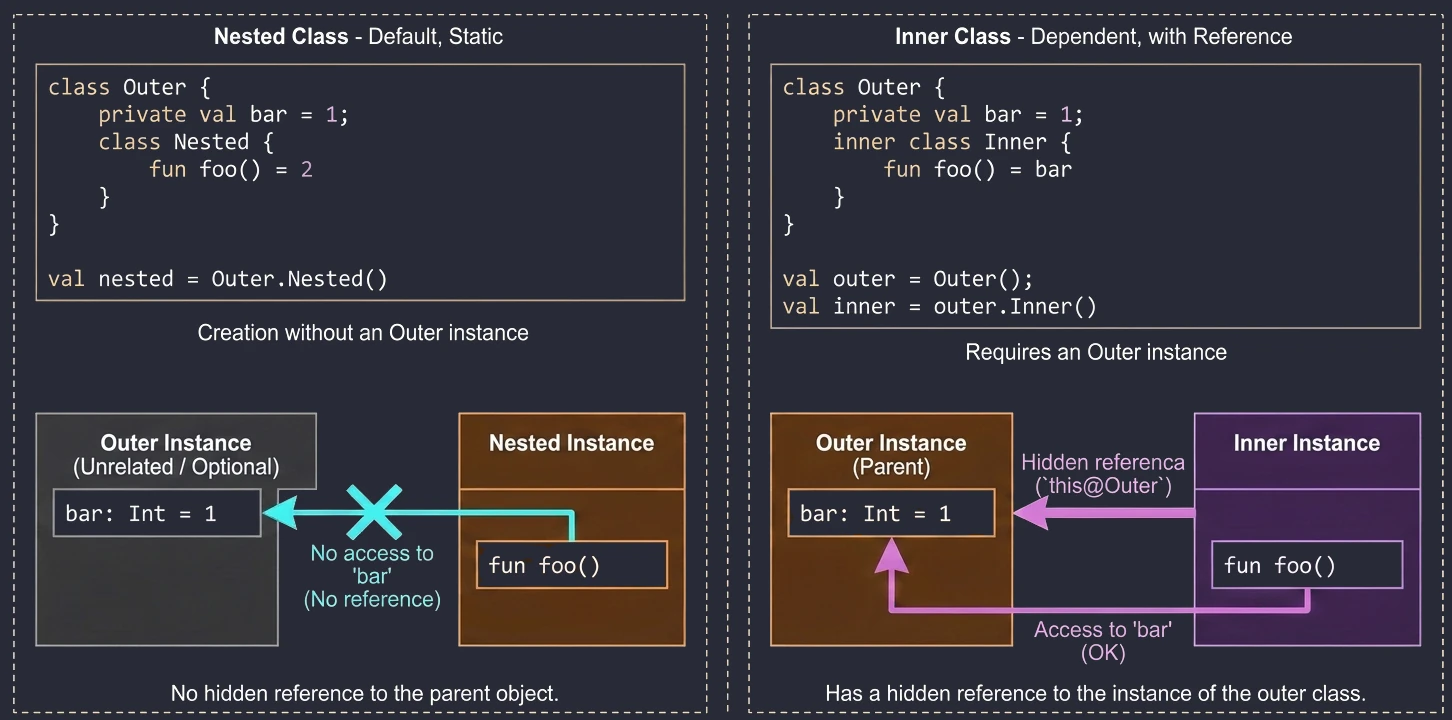
}Nested and inner classes
We often want to define a class inside another class to group logic and hide implementation details. Kotlin offers two approaches here, and they differ fundamentally in access to memory and instances.
Nested class
This is the default behavior when we do not use any modifier. A nested class is an independent entity. It does not have a reference to the object of the outer class.
- Use case: When a helper class is logically related to the outer class but does not need access to its fields (data). It works like a
static classin Java. - Advantage: Lower memory usage, because there is no hidden reference to the parent object.
class Outer {
    private val bar: Int = 1

    class Nested {
        fun foo() = 2
        // fun getBar() = bar // ERROR! It cannot see Outer.bar
    }
}
val nested = Outer.Nested() // Created without an Outer instance
Inner class
Marked with the inner keyword. Such a class has a hidden reference to the outer-class instance in which it was created.
- Use case: When a helper class must operate on data from the main class. A classic example is adapters in Android; a ViewHolder often needs to call a method from the Adapter. Another example is a Listener pattern implementation, where the listener must modify view state.
- Access to the parent: To refer to the outer instance, we use the
this@OuterClassNamesyntax.
class Outer {
    private val bar: Int = 1

    inner class Inner {
        fun foo() = bar // OK! It sees bar

        fun getOuterReference(): Outer {
            return this@Outer // Access to the Outer instance
        }
    }
}
val outer = Outer()
val inner = outer.Inner() // We need an Outer instance to create Inner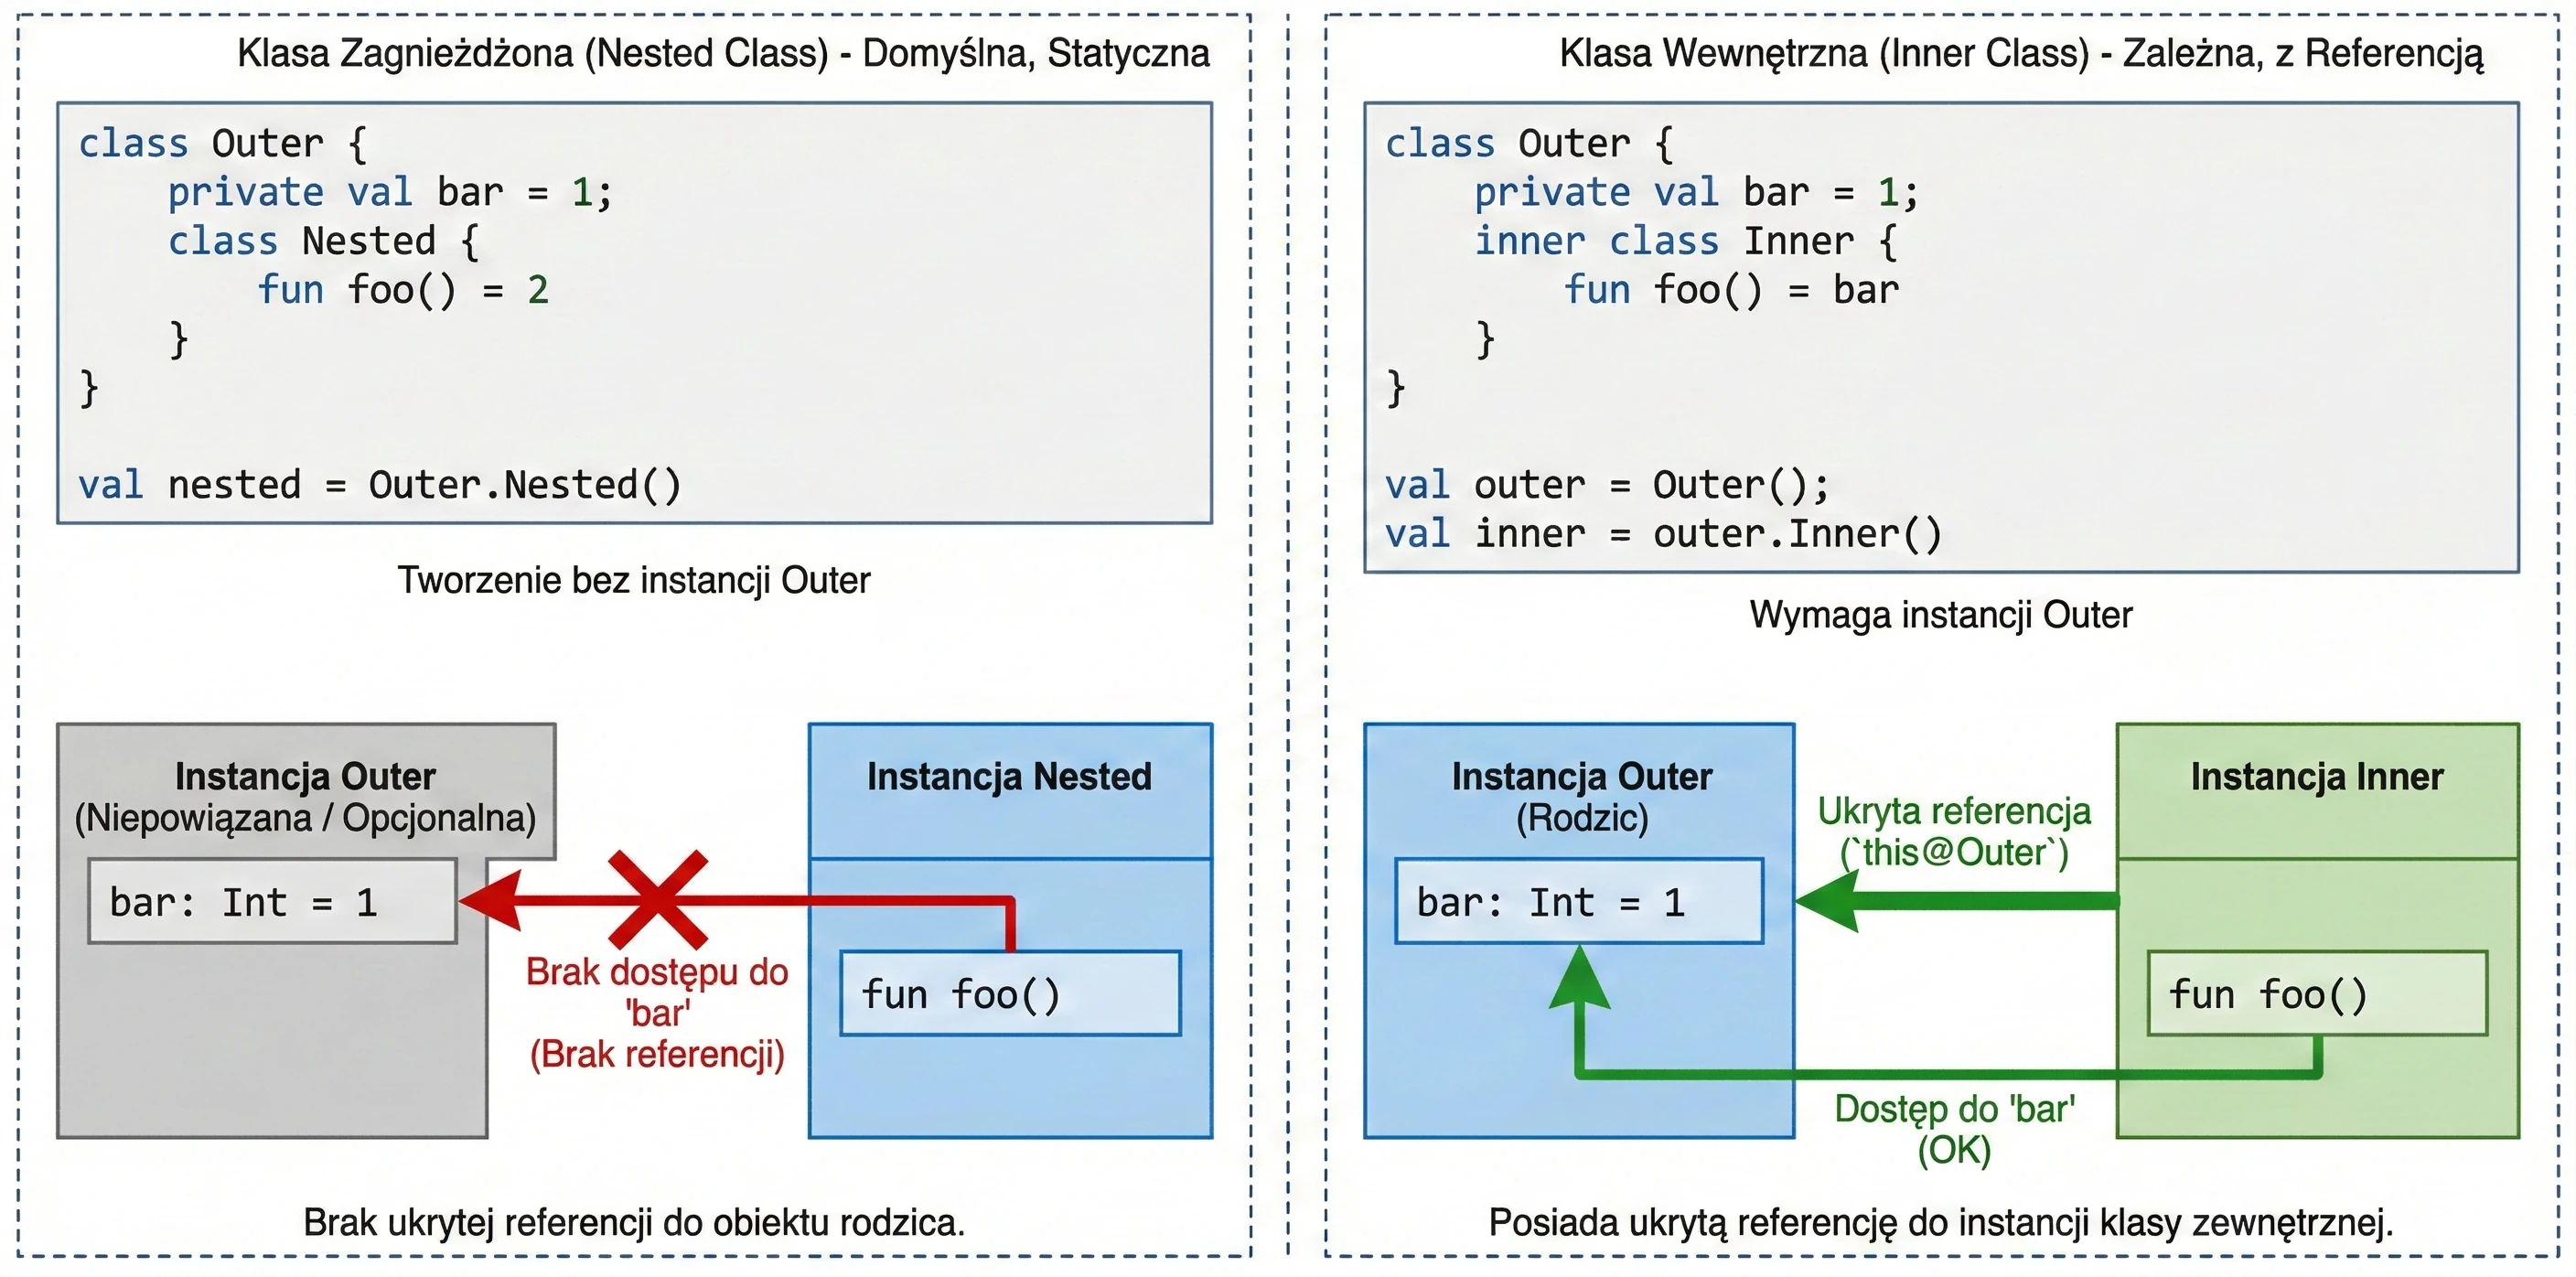

Companion objects
Kotlin does not have a static keyword. Instead, if we want a method or field associated with a class rather than with an object, for example a factory method or a constant, we place it in a companion object.
class User {
    companion object {
        const val MAX_AGE = 120
        fun createDefault(): User = User()
    }
}

// Usage (like static in Java)
val max = User.MAX_AGE
val user = User.createDefault()
Generics
We mentioned generic types in functions in Chapter 3. Now it is time for classes.
class Box<T>(val item: T)
val intBox = Box(1)      // Box<Int>
val strBox = Box("Hi")   // Box<String>
Variance
This is a difficult topic, but it is essential for understanding collections in Kotlin. Assume that Dog inherits from Animal. Is Box<Dog> a subtype of Box<Animal>? By default, no.
If it were, we could put a cat into a box of dogs (Box<Animal>), which would break the box of dogs.
Kotlin allows us to control this behavior with the out and in keywords (declaration-site variance).
- Covariance (
out): Producer. The class only returns (produces) values of typeT. - Contravariance (
in): Consumer. The class only accepts values of typeT.
// List<out T> in Kotlin is covariant
    val dogs: List<Dog> = listOf(Dog(), Dog())
    val animals: List<Animal> = dogs // OK! Because List is <out T>
We can safely read an Animal from a list of dogs, because every dog is an animal.
interface Consumer<in T> {
        fun consume(item: T)
    }

    val animalConsumer: Consumer<Animal> = ...
    val dogConsumer: Consumer<Dog> = animalConsumer // OK!
If something can handle every animal, then it can also handle a dog. The inheritance direction is "reversed".
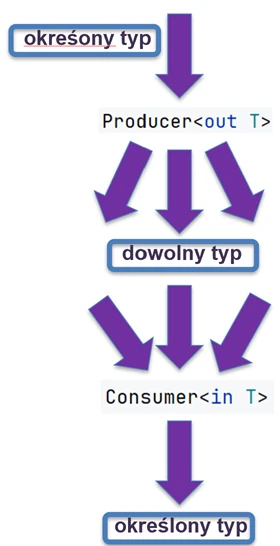
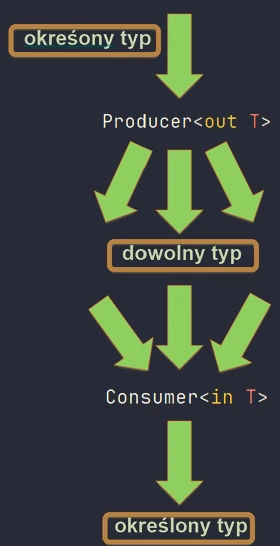
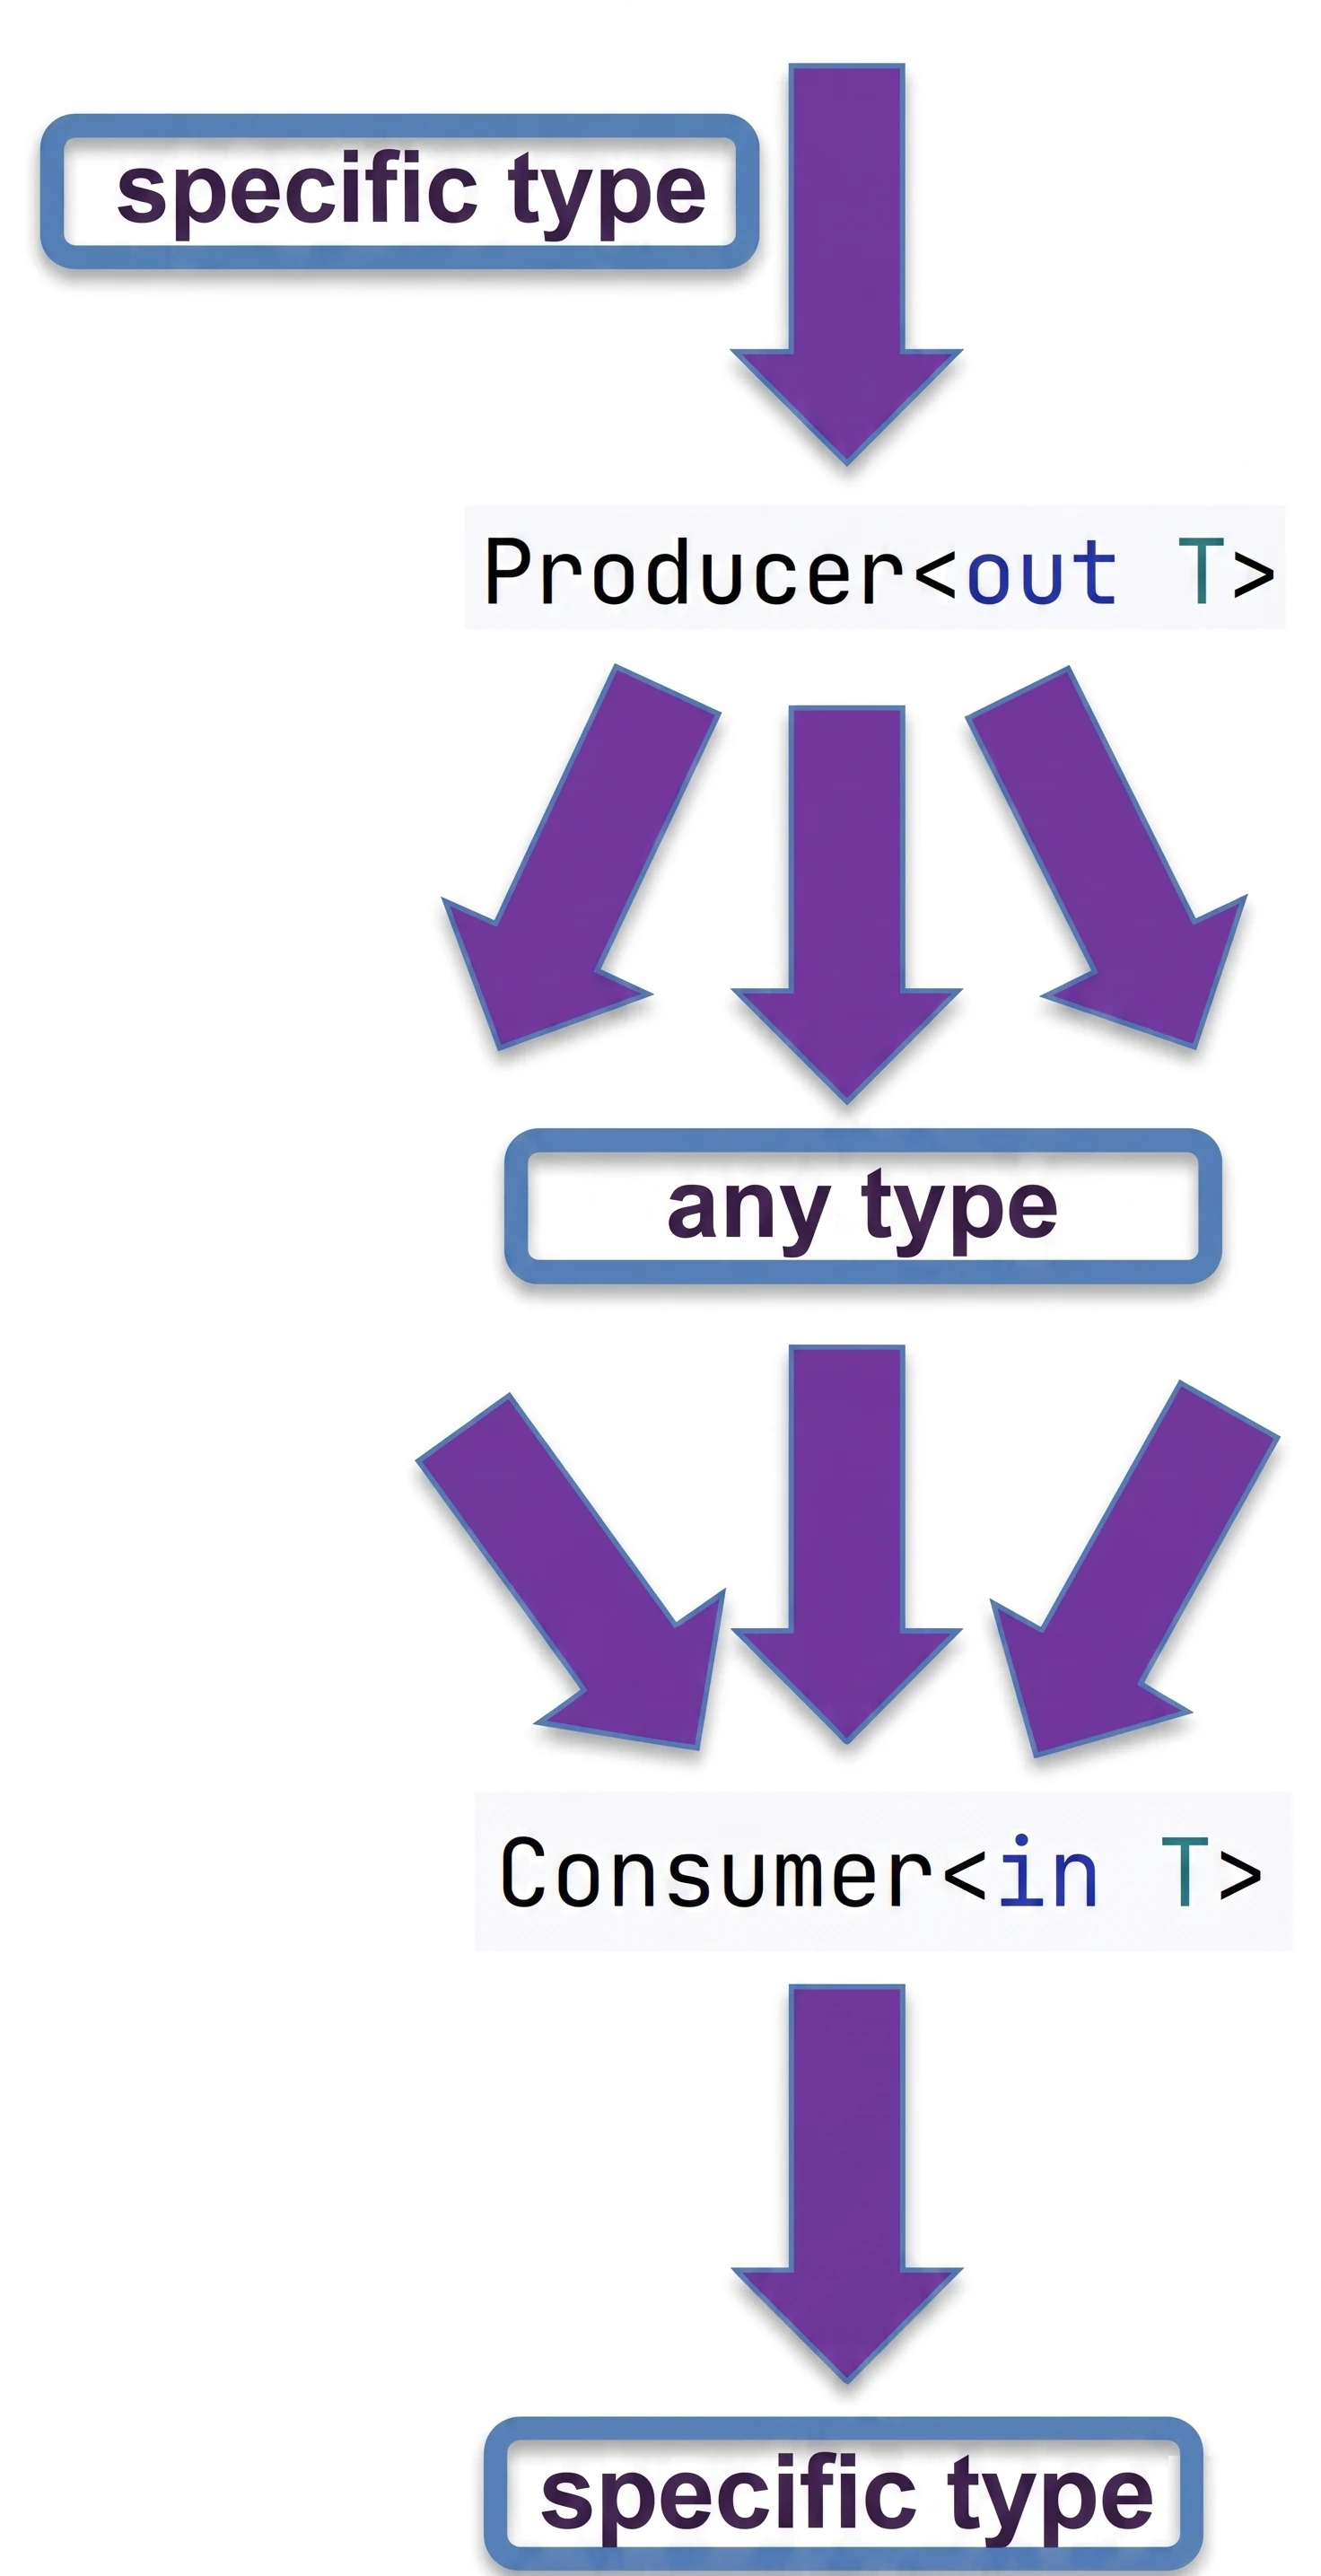
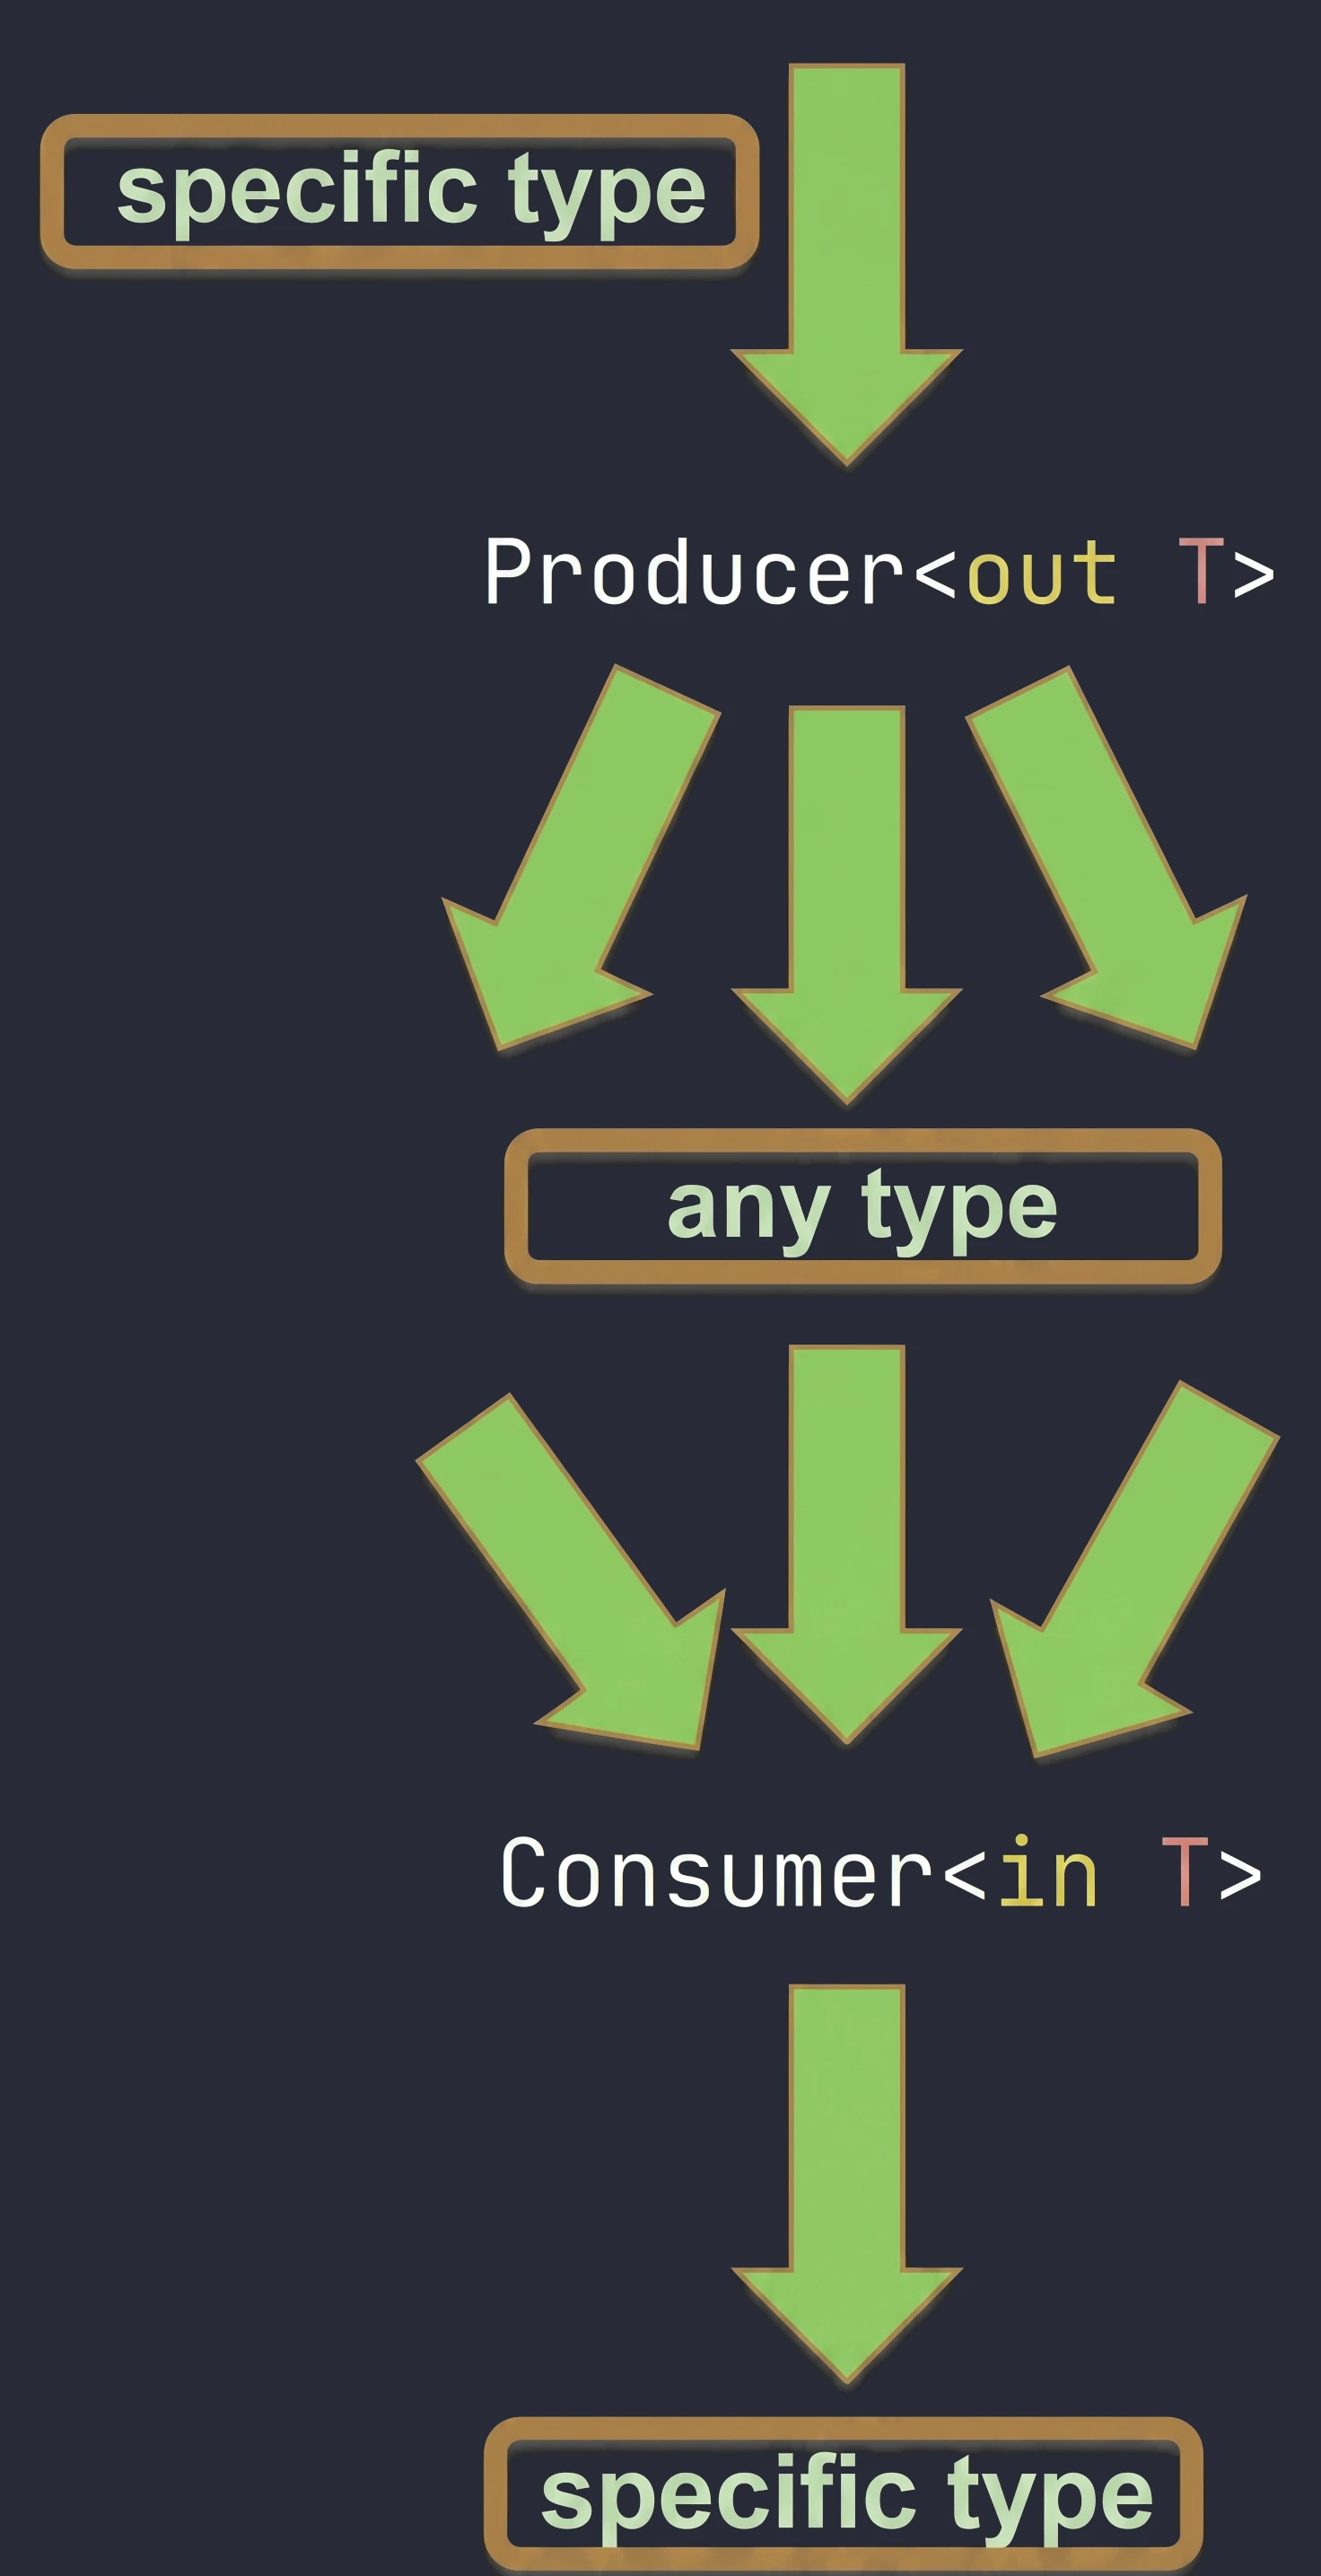
We can remember it in the following way:
out(Producer): We focus on what comes out of the object. If dogs come out of a source, we can safely treat them as animals.in(Consumer): We focus on what goes into the object. If someone can take care of any animal, for example a veterinarian, they can also handle the case where specifically a dog goes into them.
In the previous chapter, we discussed classes and inheritance. Kotlin also introduces several unique constructs that greatly simplify common design patterns, such as Singleton and anonymous inner classes. The key concept here is the object keyword.
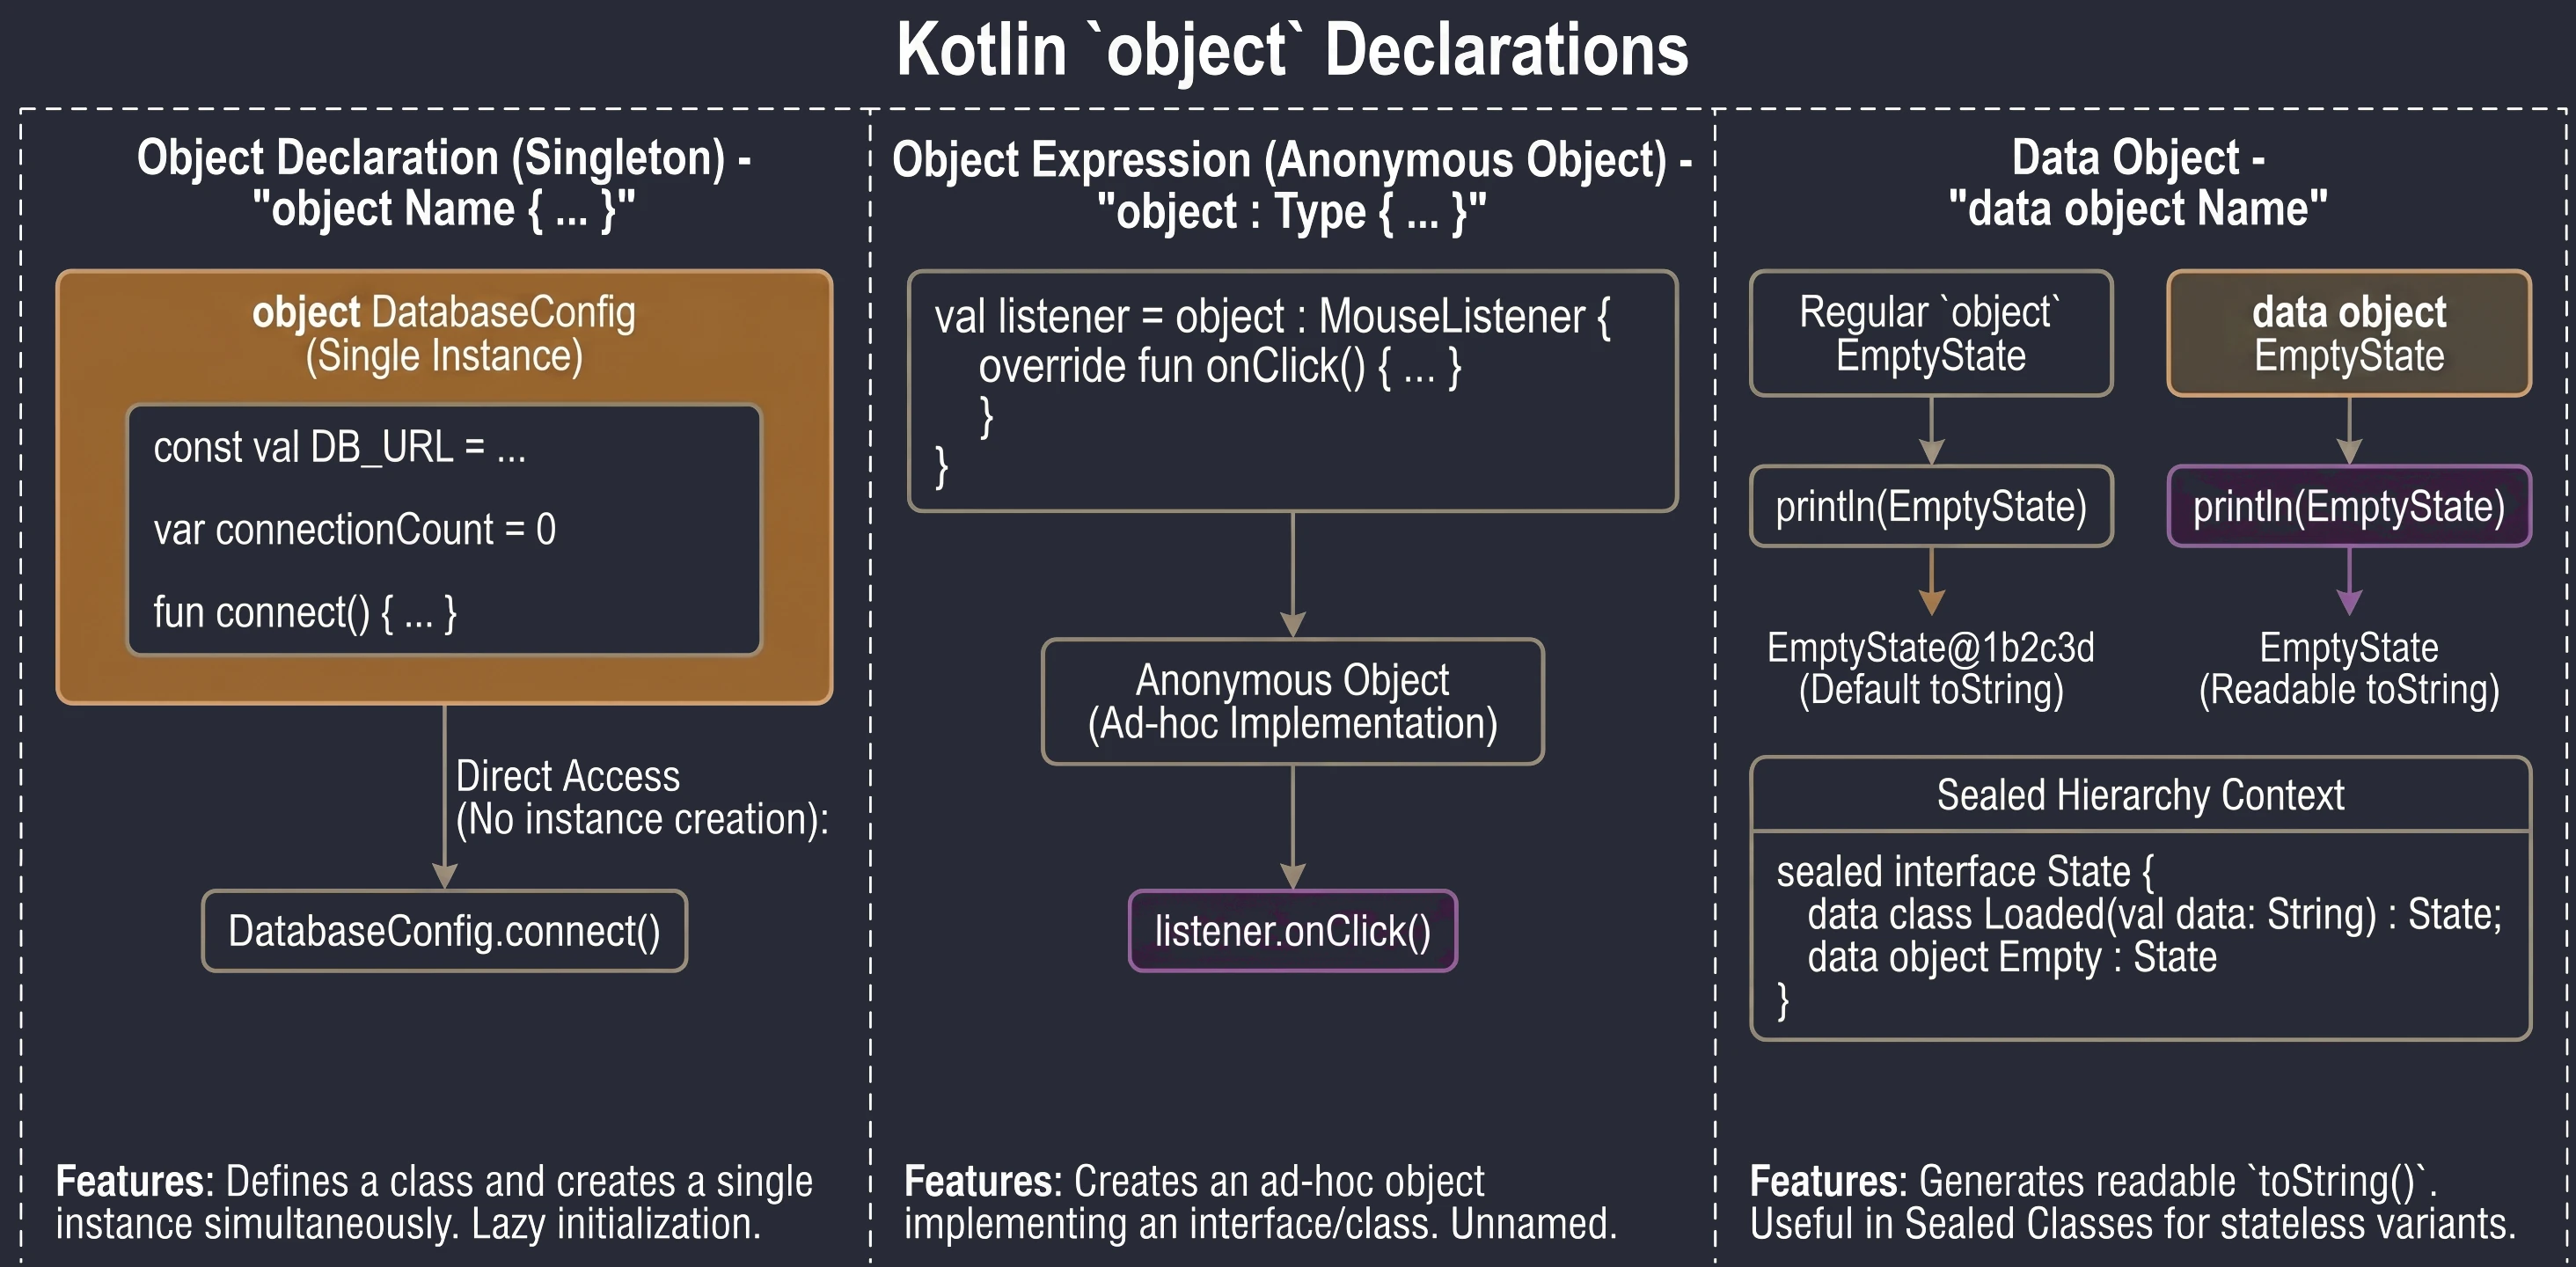
The object keyword
In Kotlin, object is a special construct that defines a class and creates its only instance at the same time. This is a built-in language-level implementation of the Singleton pattern.
When we want to make sure that only one instance of a given class exists in the whole application, for example configuration or a database manager, we use an object declaration:
object DatabaseConfig {
    const val DB_URL = "jdbc:mysql://localhost:3306/db"
    var connectionCount = 0

    fun connect() {
        connectionCount++
        println("Connected to $DB_URL")
    }
}
We access members of such an object directly through its name, without creating an instance with the () operator:
DatabaseConfig.connect()
println(DatabaseConfig.connectionCount)
These objects are initialized lazily, only when they are accessed for the first time.
Sometimes we need an object of a given class, or an object implementing an interface, only in one place (ad hoc), without giving it a name. In Java, we would use anonymous inner classes. In Kotlin, we use object expressions (object expression).
interface MouseListener {
    fun onClick()
}

// We create an anonymous object implementing the interface
val listener = object : MouseListener {
    override fun onClick() {
        println("Mouse clicked!")
    }
}
We can also inherit from a class and implement multiple interfaces at the same time:
open class A(x: Int)
interface B

val ab = object : A(1), B {
    val y = 15
}
Since newer Kotlin versions, objects (object) can be marked as data object. This works similarly to data class: it generates a readable toString() method.
data object EmptyState

println(EmptyState) // Prints "EmptyState" instead of "EmptyState@1b2c3d"
This is especially useful with sealed classes/interfaces, where some variants are classes with data and some are simple stateless objects.

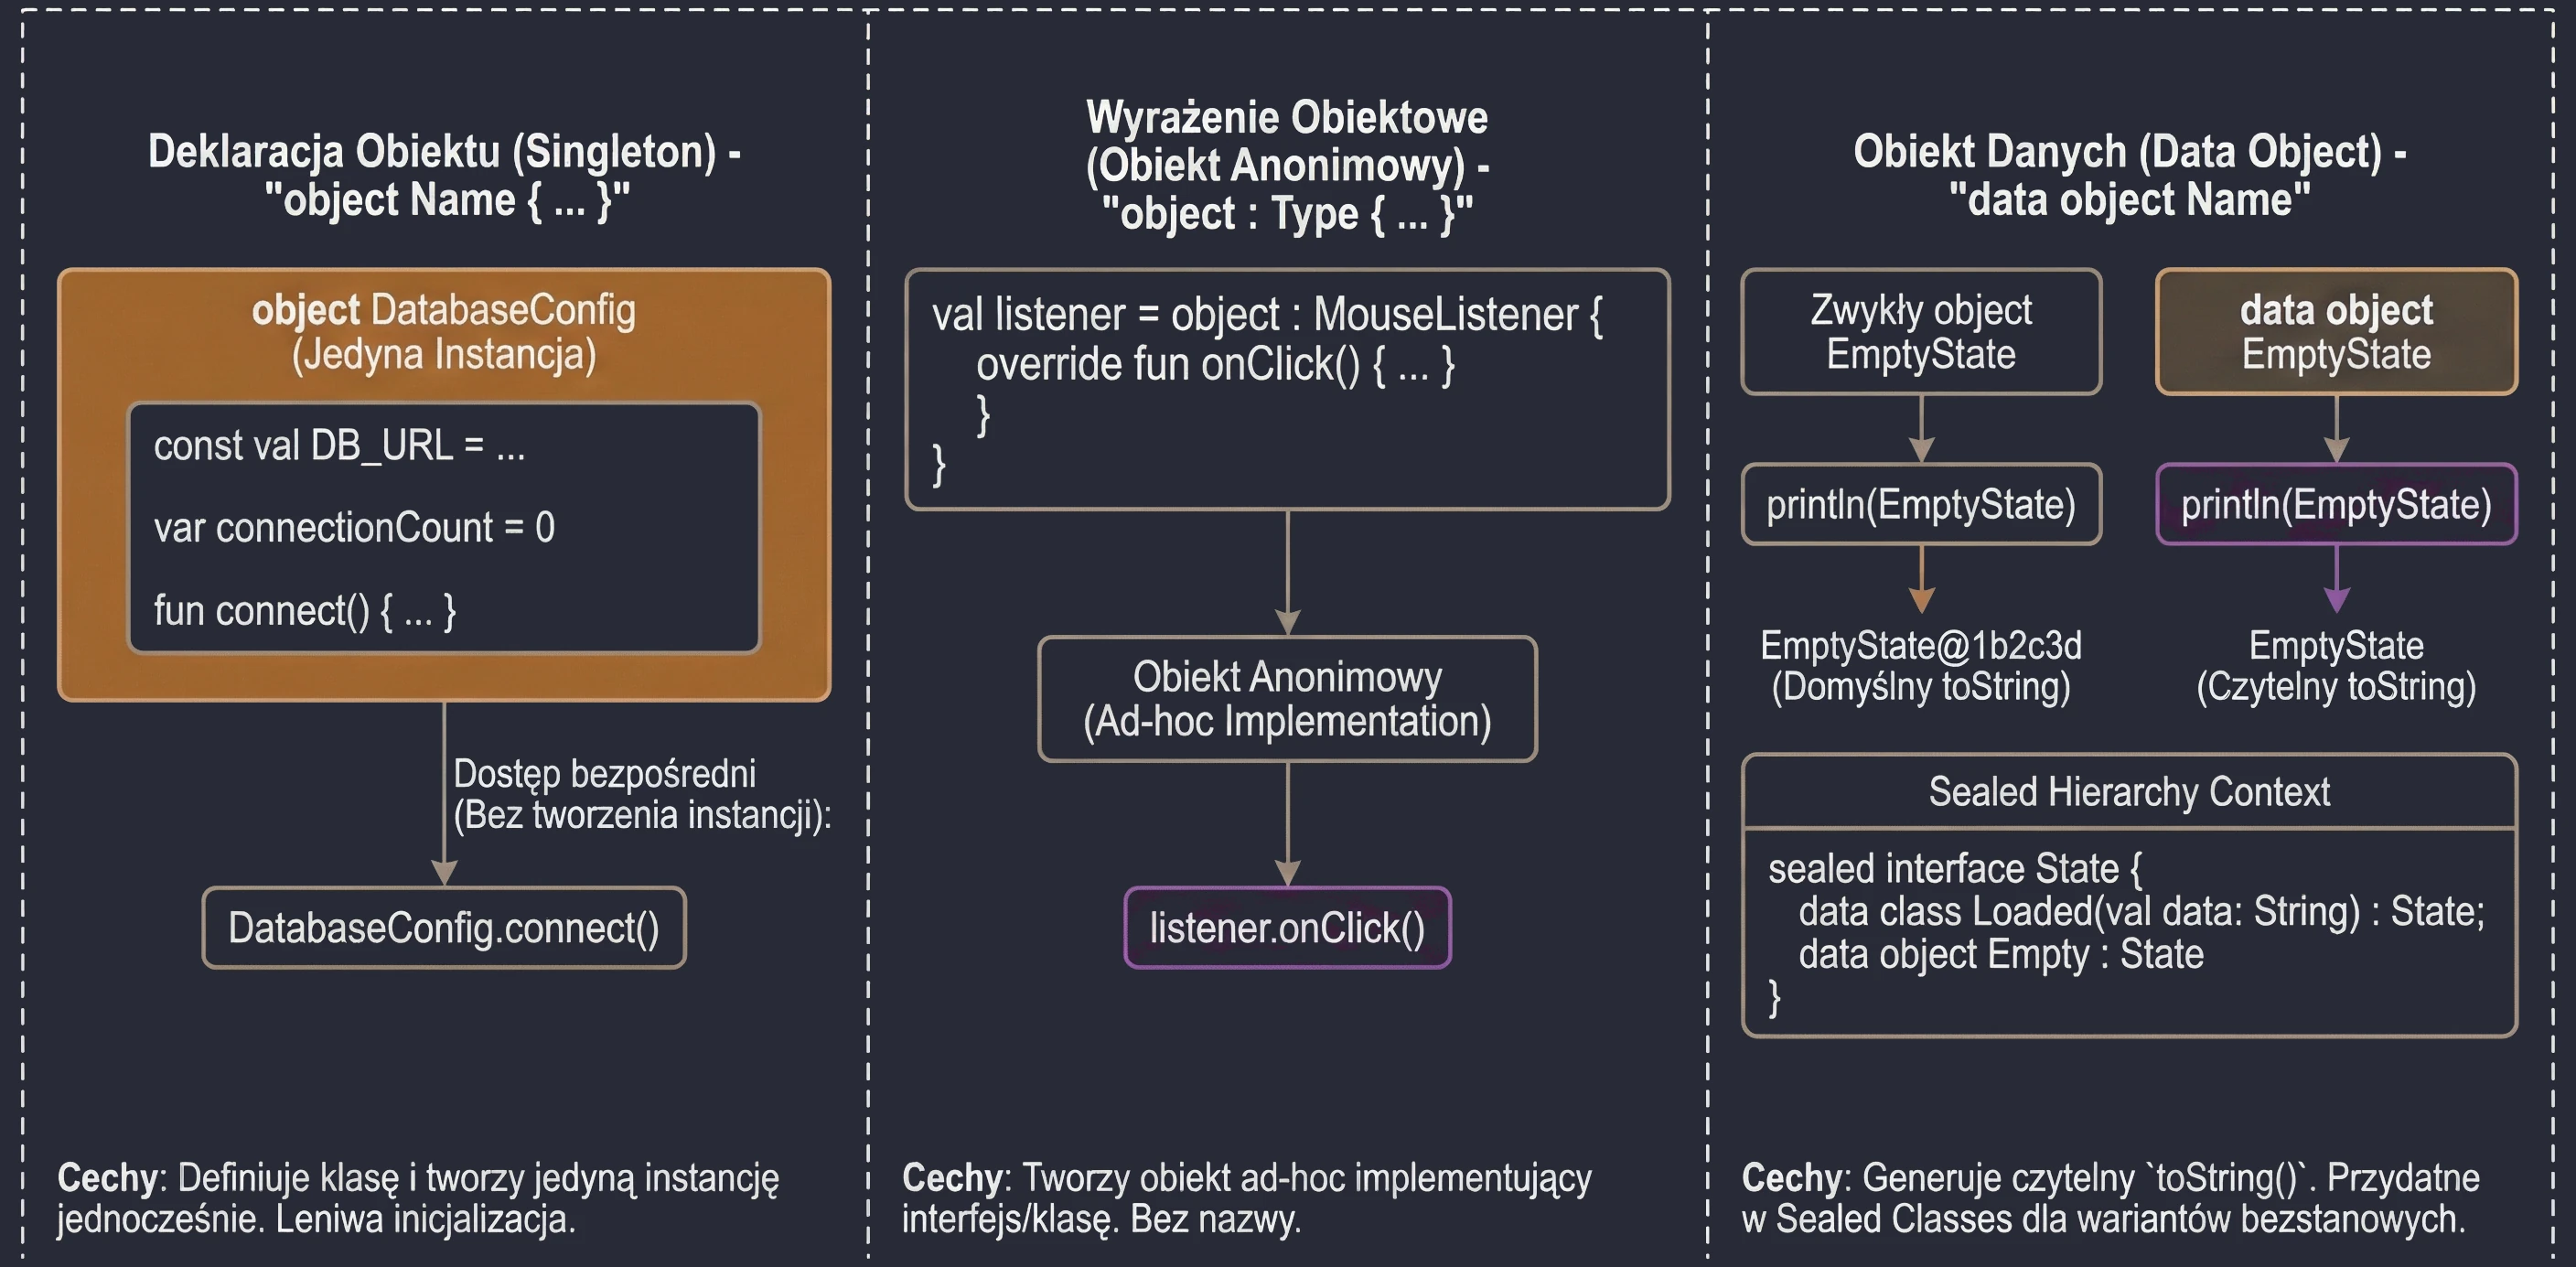
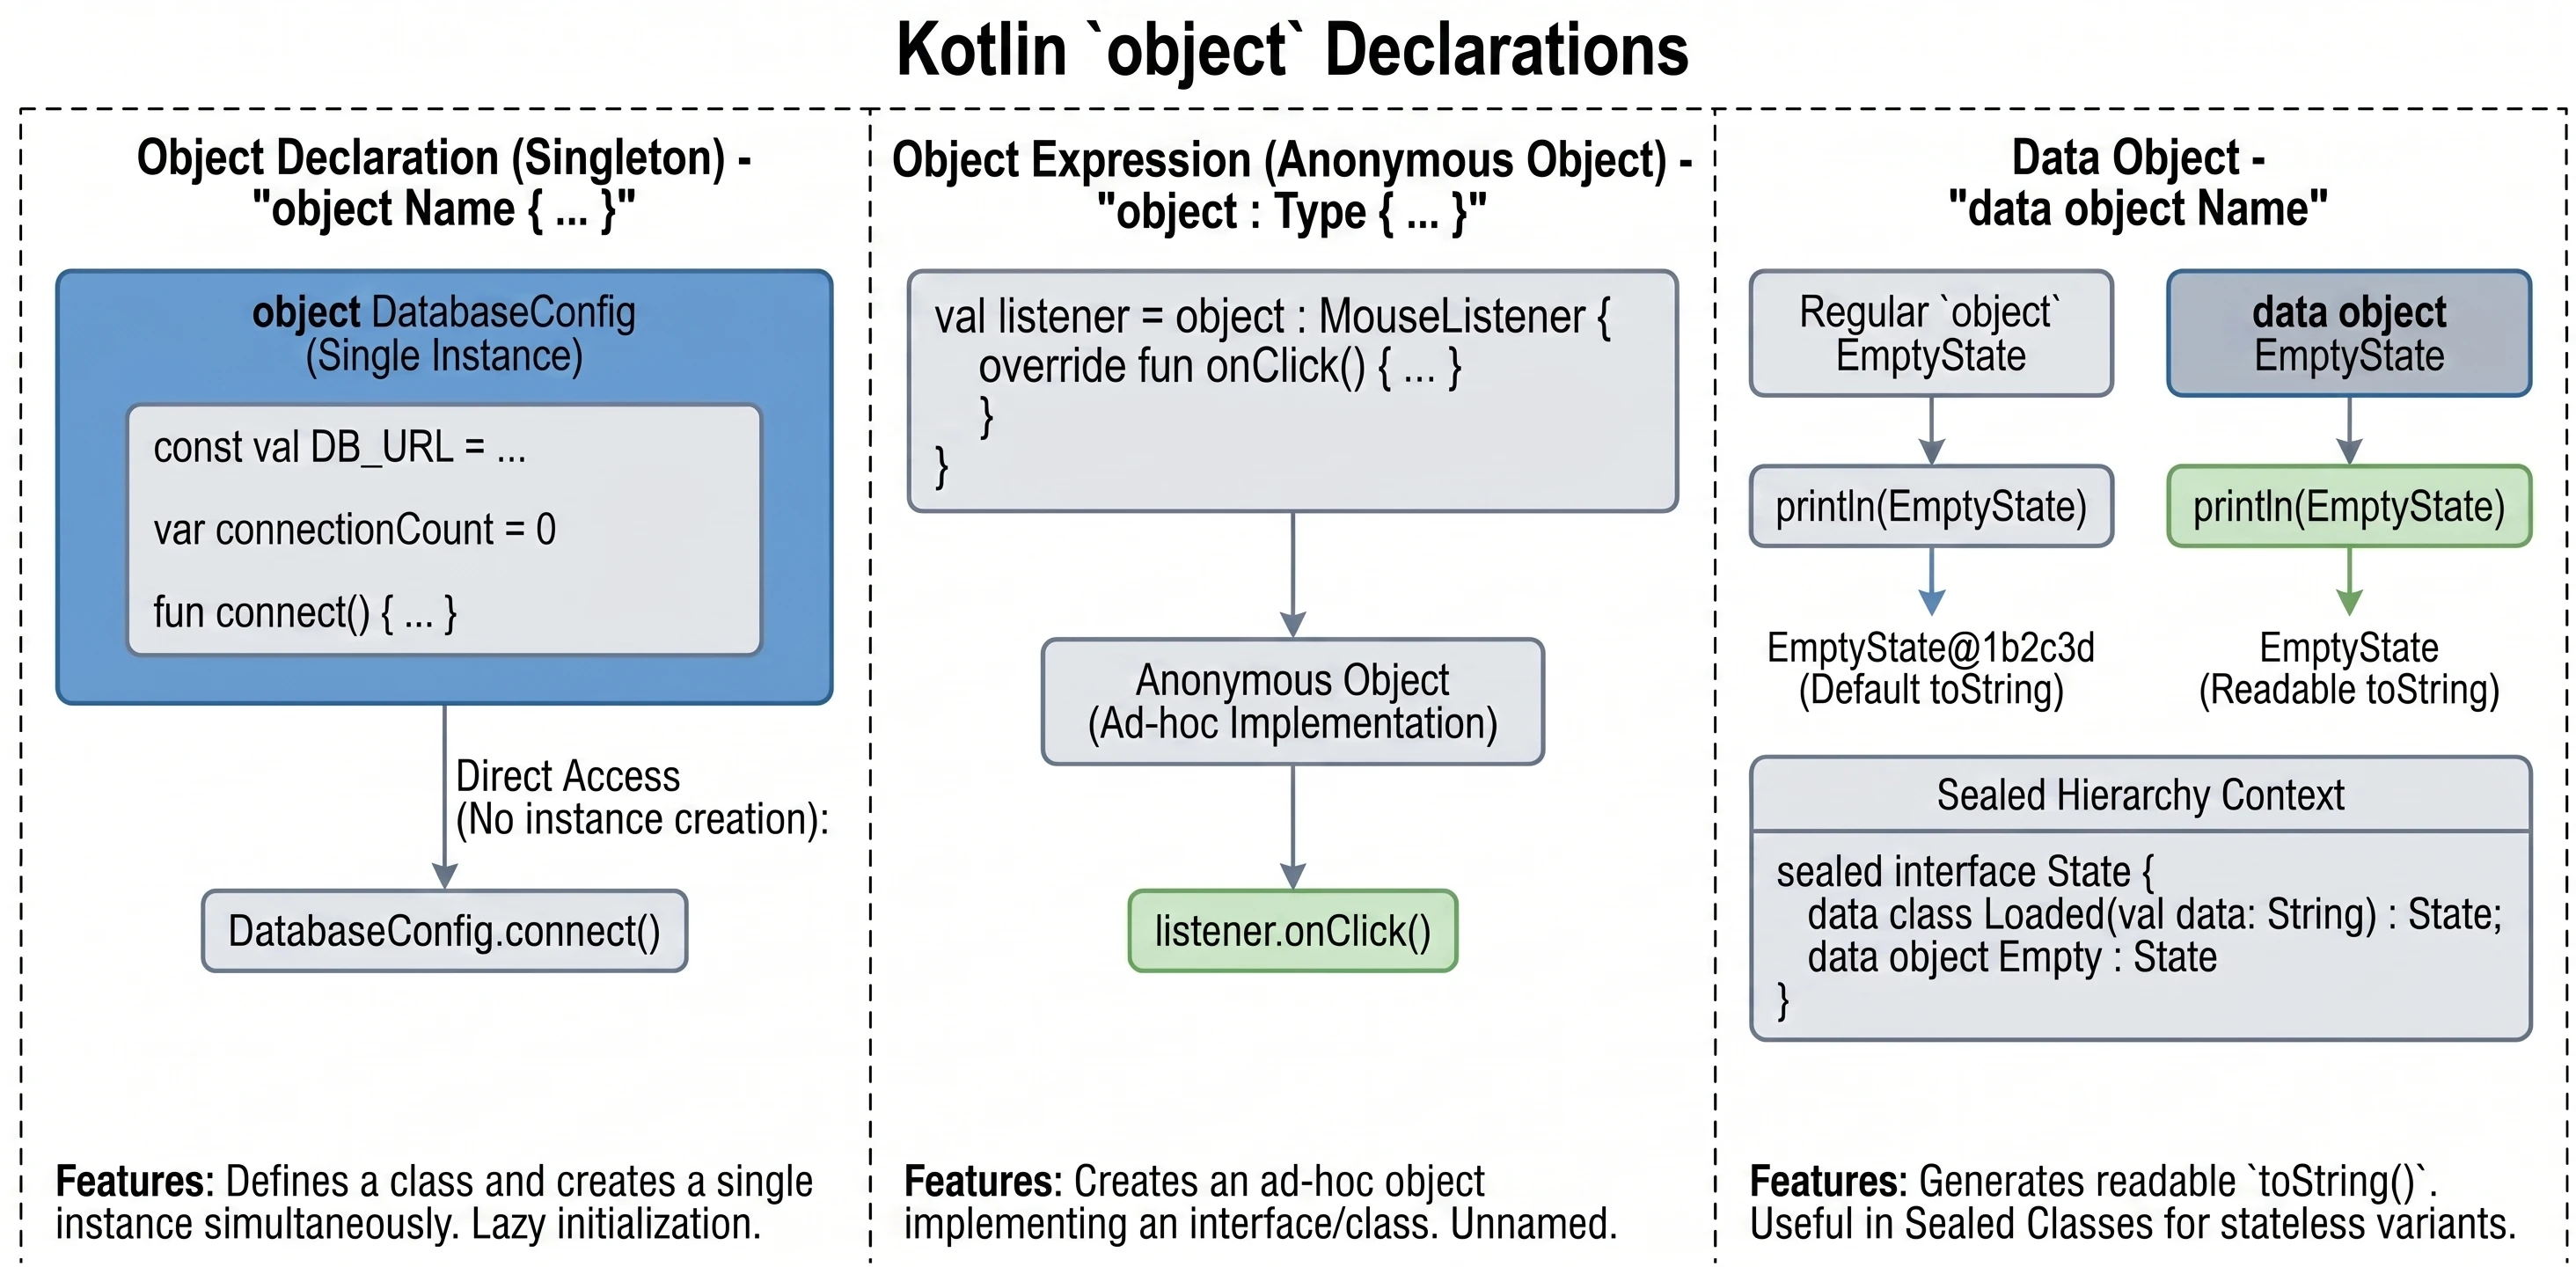
object keyword in Kotlin.Interfaces
An interface defines a contract: a set of methods and properties that an implementing class must provide. In Kotlin, interfaces are very flexible. They can contain abstract methods and methods with default implementation.
interface Drivable {
    val maxSpeed: Int // Abstract property

    fun drive() // Abstract method (no body)

    // Method with default implementation
    fun stop() {
        println("Stopping.")
    }
}
A class implementing an interface uses the same syntax as inheritance (:):
class Car : Drivable {
    override val maxSpeed = 200 // We must override the property

    override fun drive() {
        println("Driving a car at speed $maxSpeed")
    }
    // We do not have to override stop(); the default will be used
}
Interfaces in Kotlin cannot store state; they do not have instance fields. However, they can declare properties:
- Abstract properties, which a class must override.
- Properties defined through accessors (getters), as long as they do not refer to
field.
interface Named {
    val name: String // abstract

    val nameLength: Int
        get() = name.length // OK, computed from name
}
A class can implement many interfaces at the same time. If a method-name conflict appears, meaning two interfaces have a method with the same signature and both provide a default implementation, we must explicitly specify which version to call by using super<Type>.
interface A {
    fun foo() { print("A") }
}
interface B {
    fun foo() { print("B") }
}

class C : A, B {
    override fun foo() {
        super<A>.foo() // Call the version from A
        super<B>.foo() // Call the version from B
    }
}
Uses of interfaces
Interfaces play a key role in object-oriented programming that goes beyond simply defining methods.
An interface creates a new data type that we can use in code. A variable, function parameter, or class field can have an interface type. This makes code independent of a concrete implementation.
fun playMusic(player: Playable) { // The parameter has an interface type
    player.play()
}
An interface forces implementing classes to provide code for the defined methods. This guarantees that every object satisfying the contract, that is, implementing the interface, has specific behaviors.
By treating an interface as a type, we can achieve polymorphism. Objects of different classes, for example Car, Bike, and Plane, can be treated uniformly as Drivable, as long as they implement the same interface. This allows us to write general code that works with abstractions rather than concrete classes.
val vehicles: List<Drivable> = listOf(Car(), Bike())
for (v in vehicles) {
    v.drive() // Works for every object, regardless of its concrete class
}
Sometimes an interface has no methods or properties. This is called a marker interface. It is used only to mark a class, giving it a certain feature or informing a framework that it should be treated in a special way. Examples in Java/Kotlin include Serializable, which means that an object can be serialized, and Cloneable. Such interfaces are often used in frameworks that need to know whether a given class can be used in a particular context.
Interfaces make it possible to give a common feature to classes that are not related in an inheritance hierarchy. For example, the Comparable interface makes objects comparable and sortable, while Iterable allows us to iterate over an object in a for loop.
Functional interfaces (SAM)
If an interface has exactly one abstract method, it is called a functional interface or SAM (Single Abstract Method).
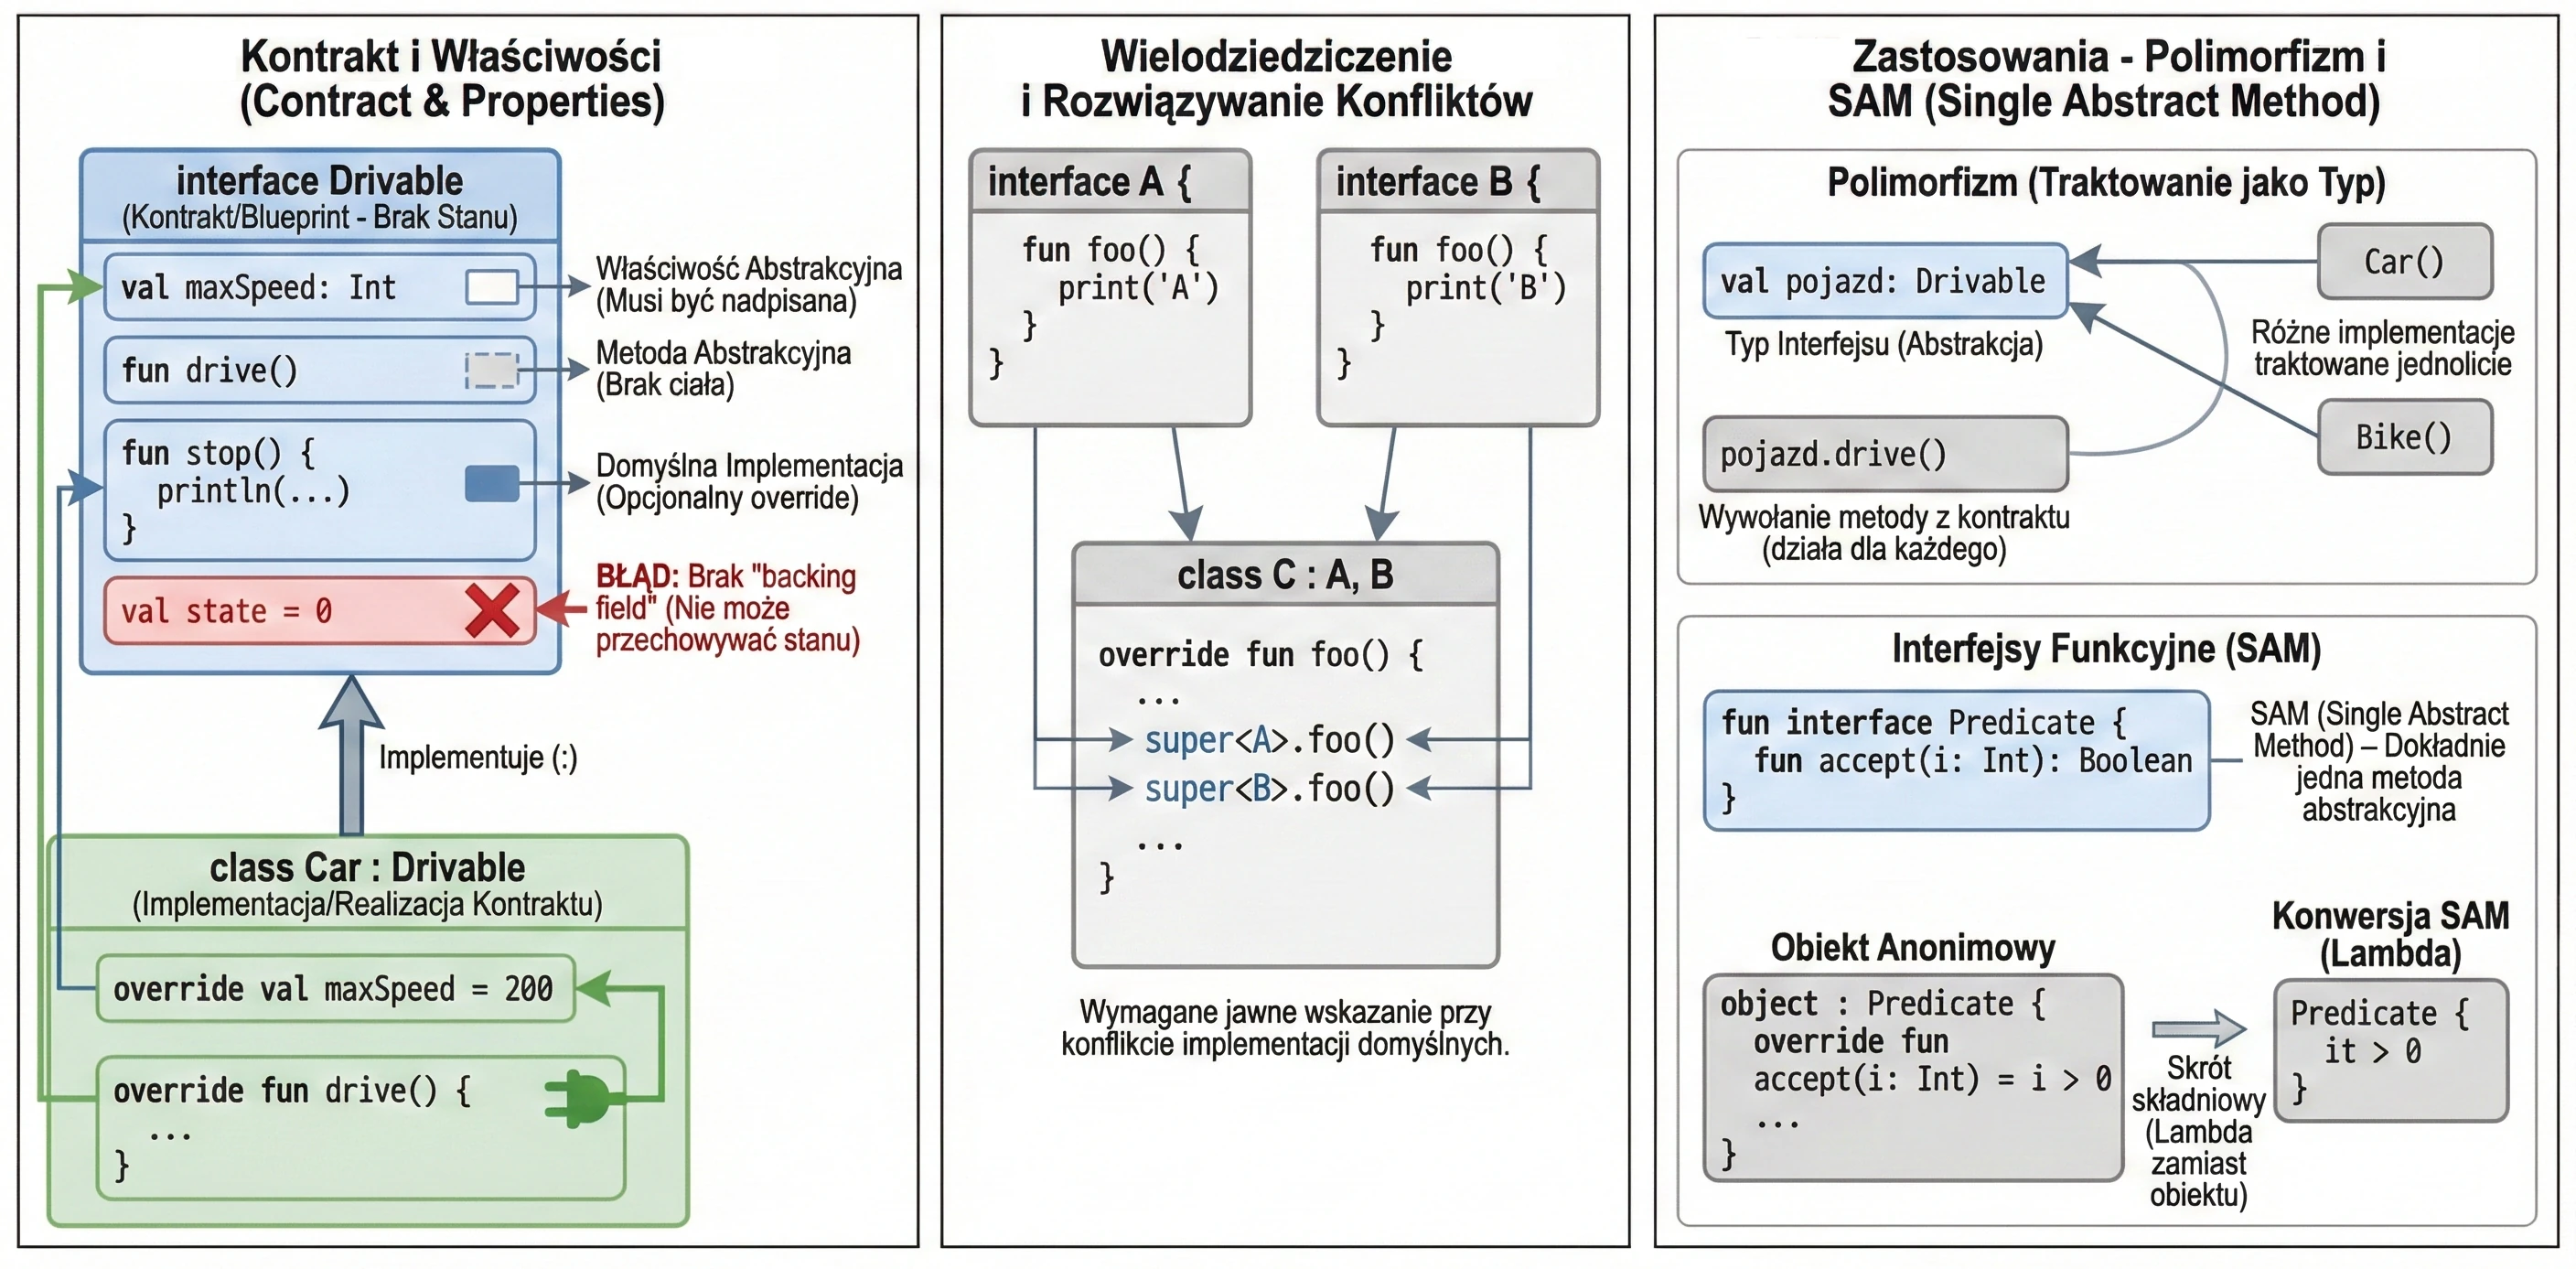
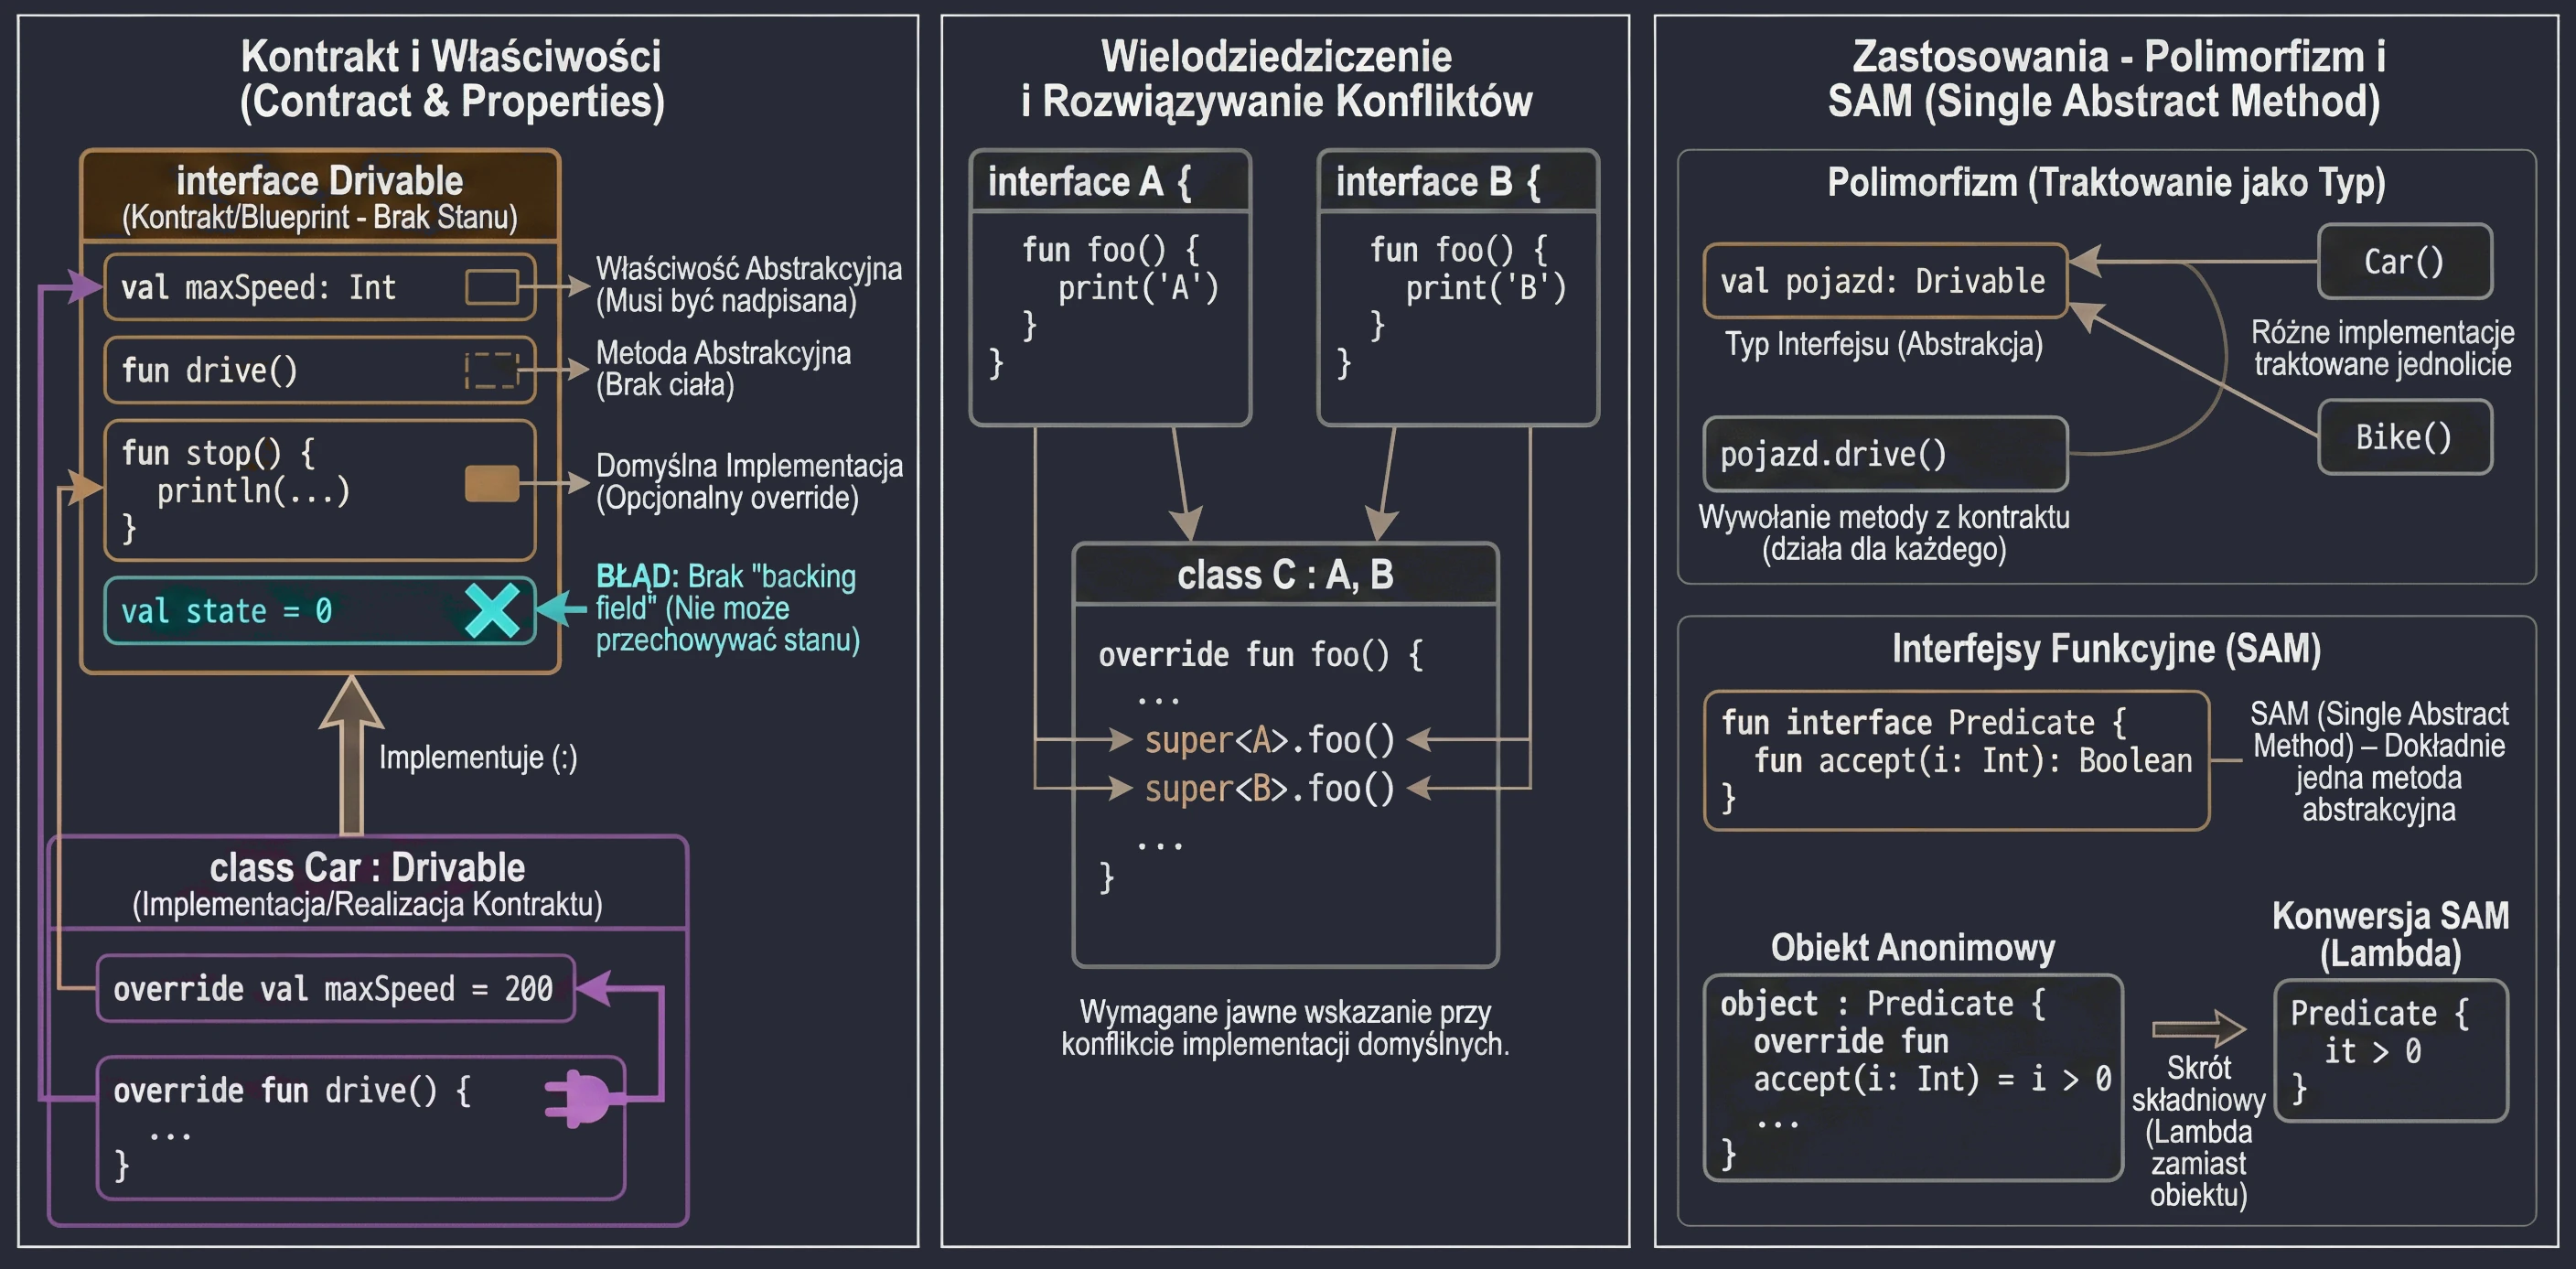
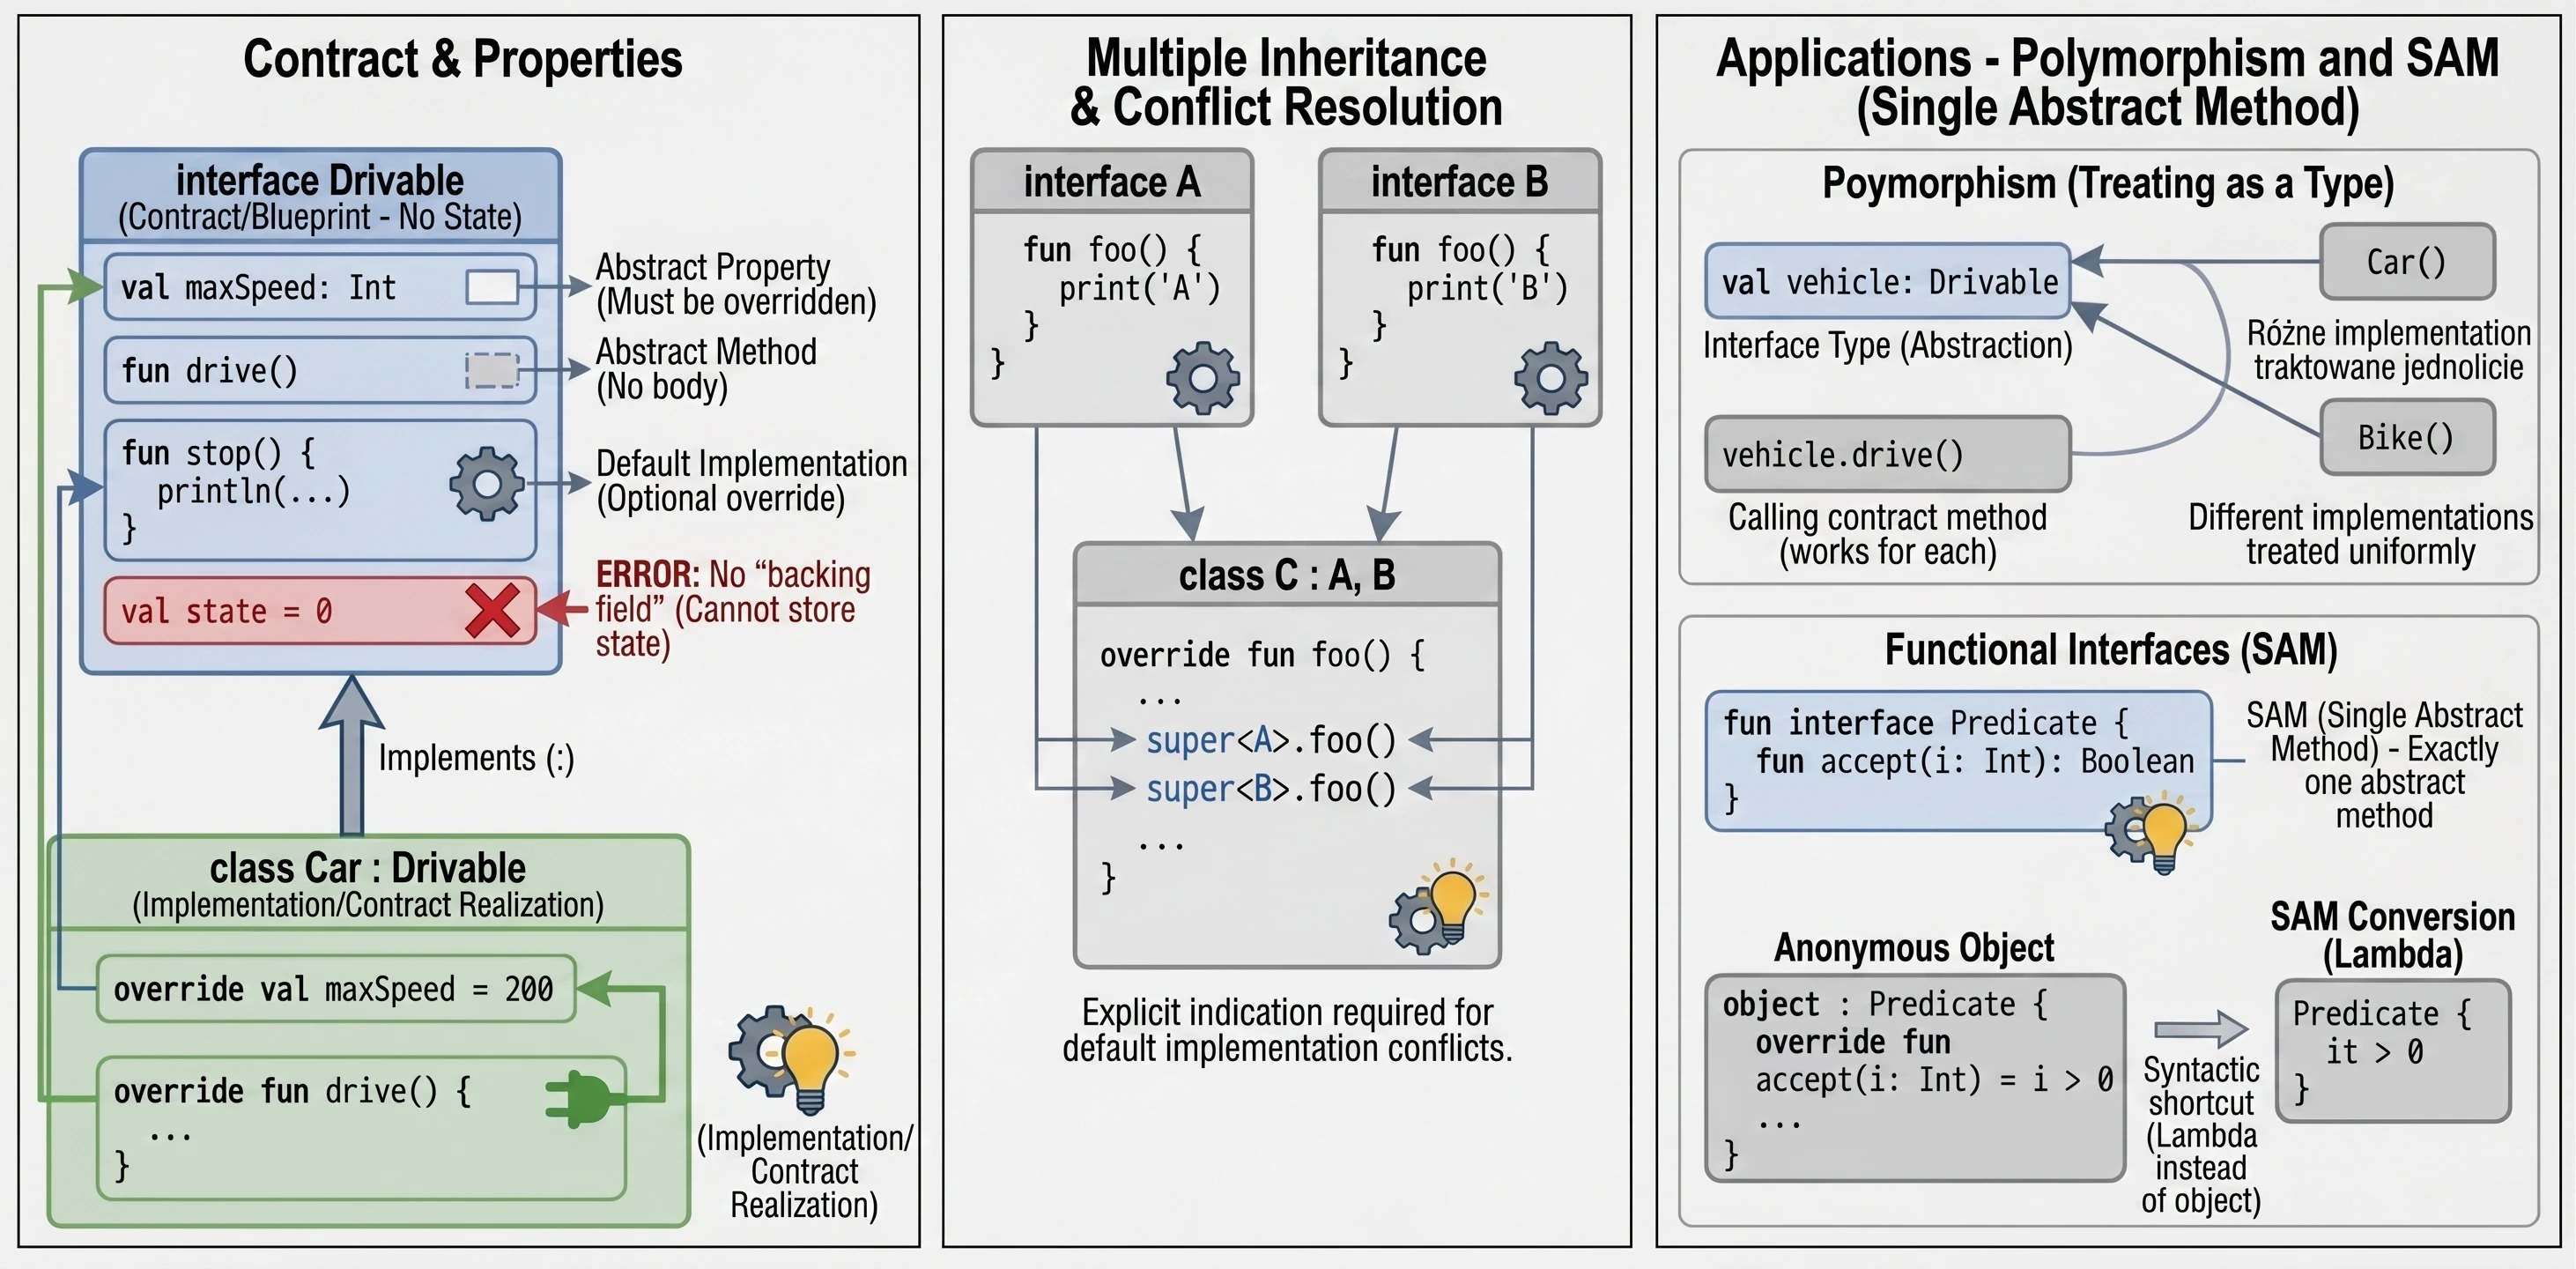
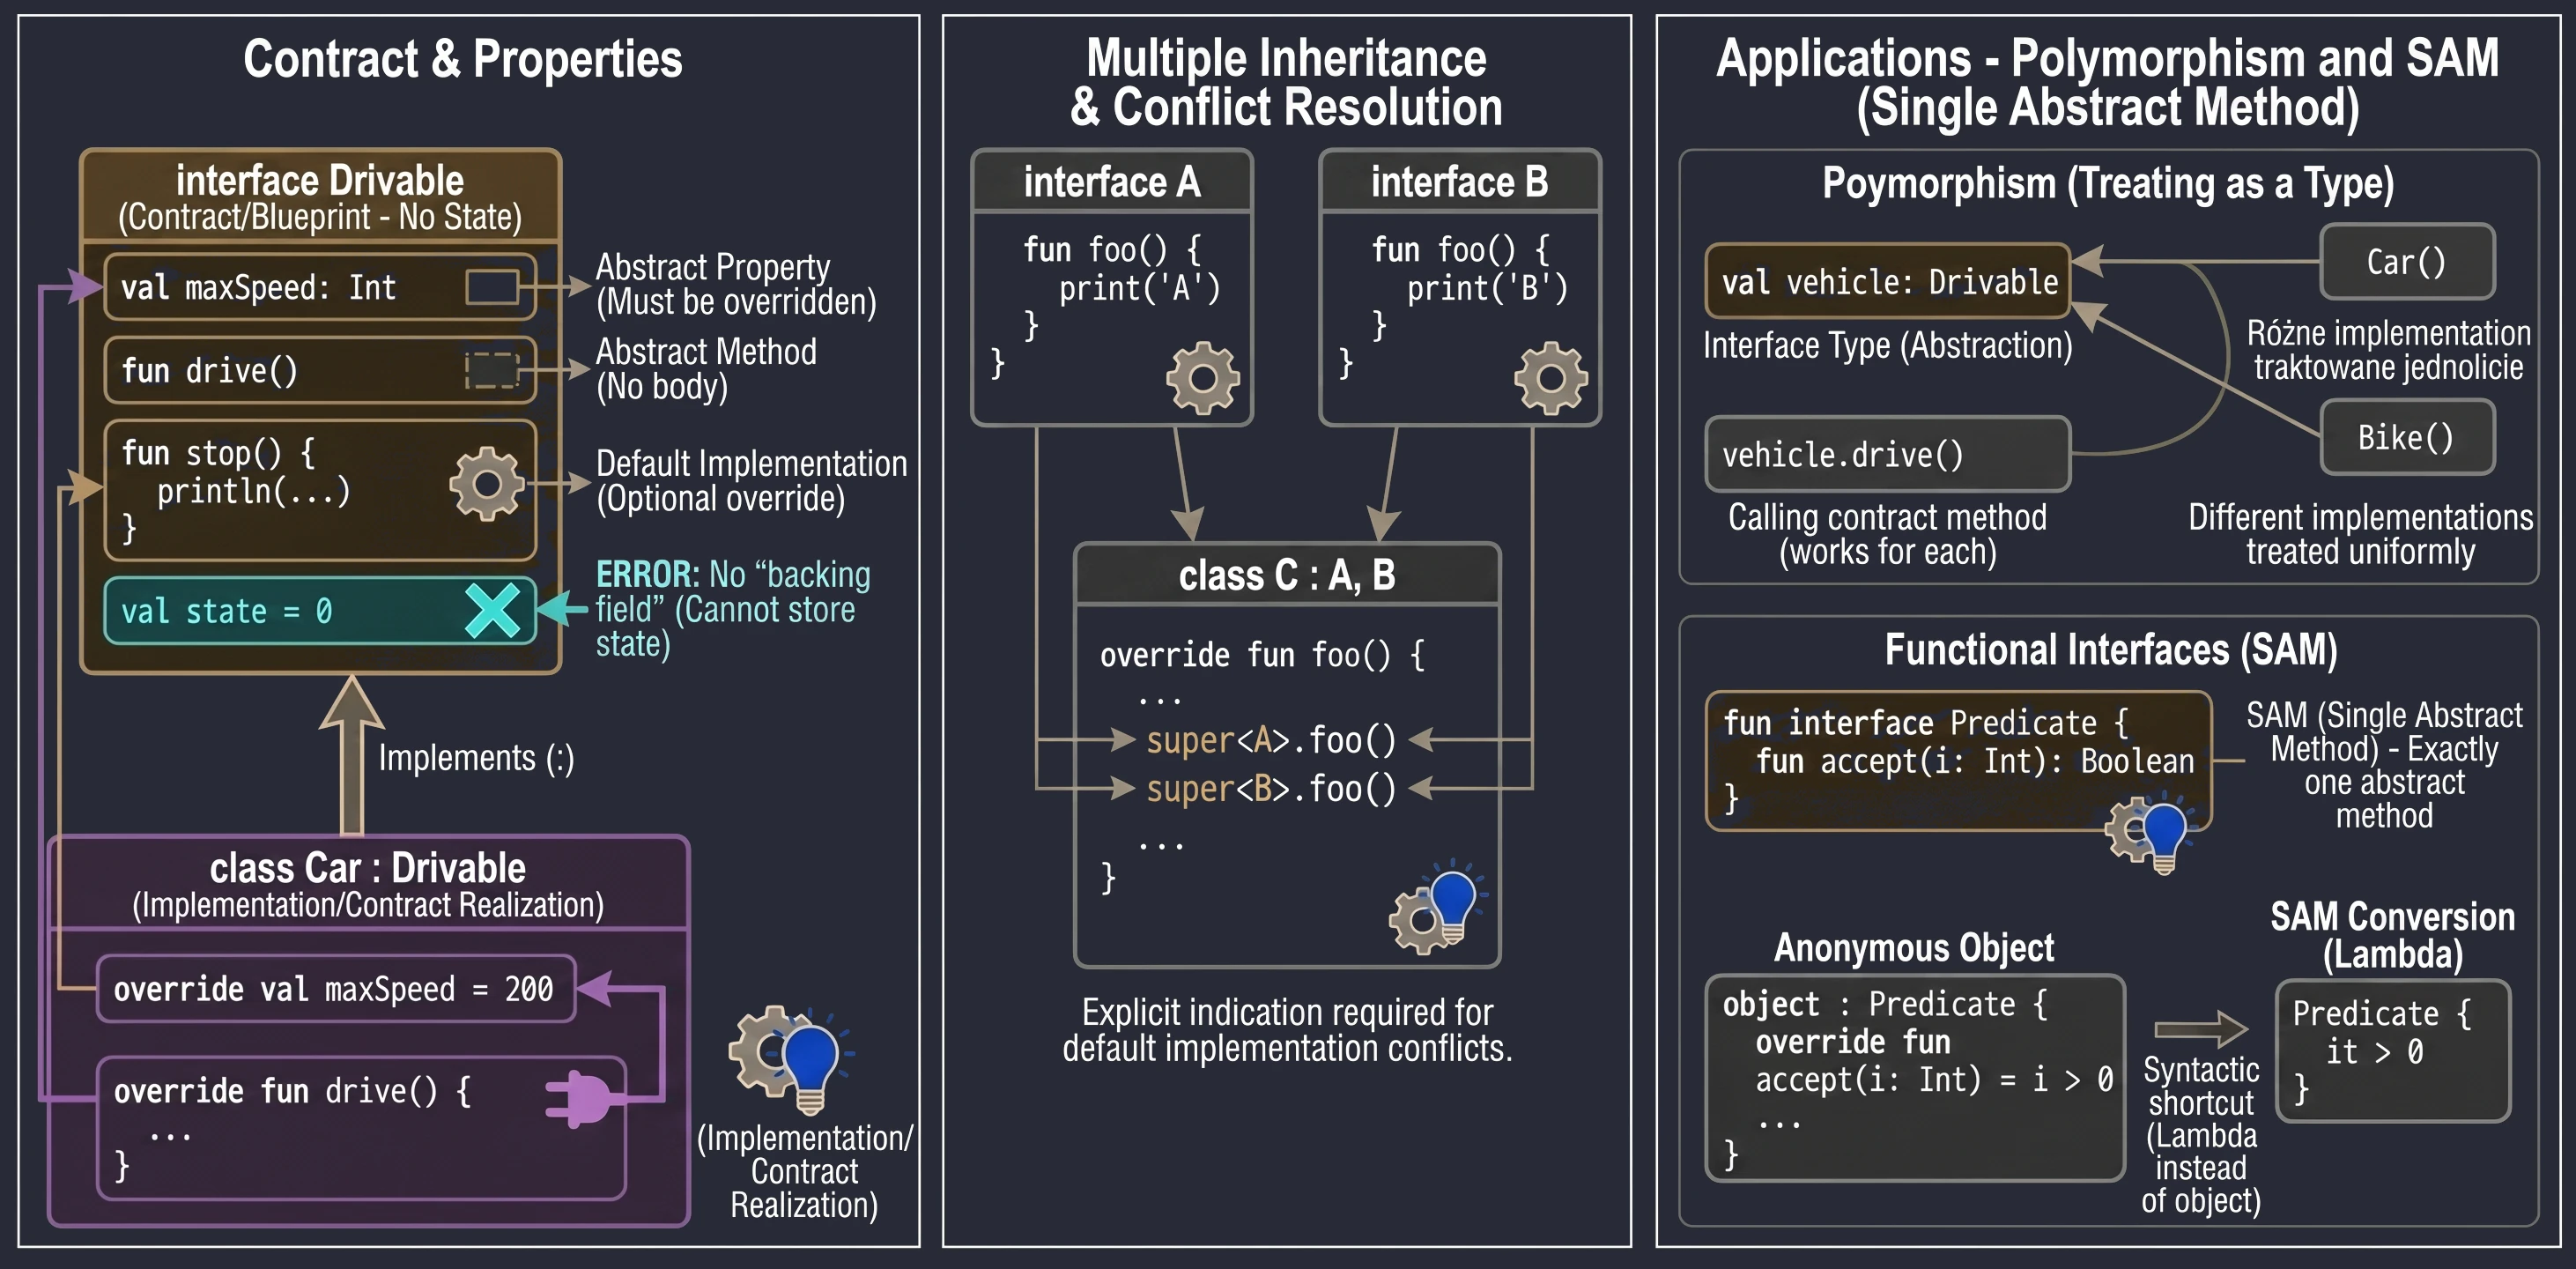
In Kotlin, we mark such interfaces with the fun interface keyword.
fun interface Predicate {
    fun accept(i: Int): Boolean
}
This allows us to use SAM conversion: instead of creating an anonymous object, we can pass a lambda expression:
// Traditional way (anonymous object)
val p1 = object : Predicate {
    override fun accept(i: Int) = i > 0
}

// Using SAM conversion (lambda)
val p2 = Predicate { it > 0 }
This significantly shortens code, especially when handling UI events, for example OnClickListener.
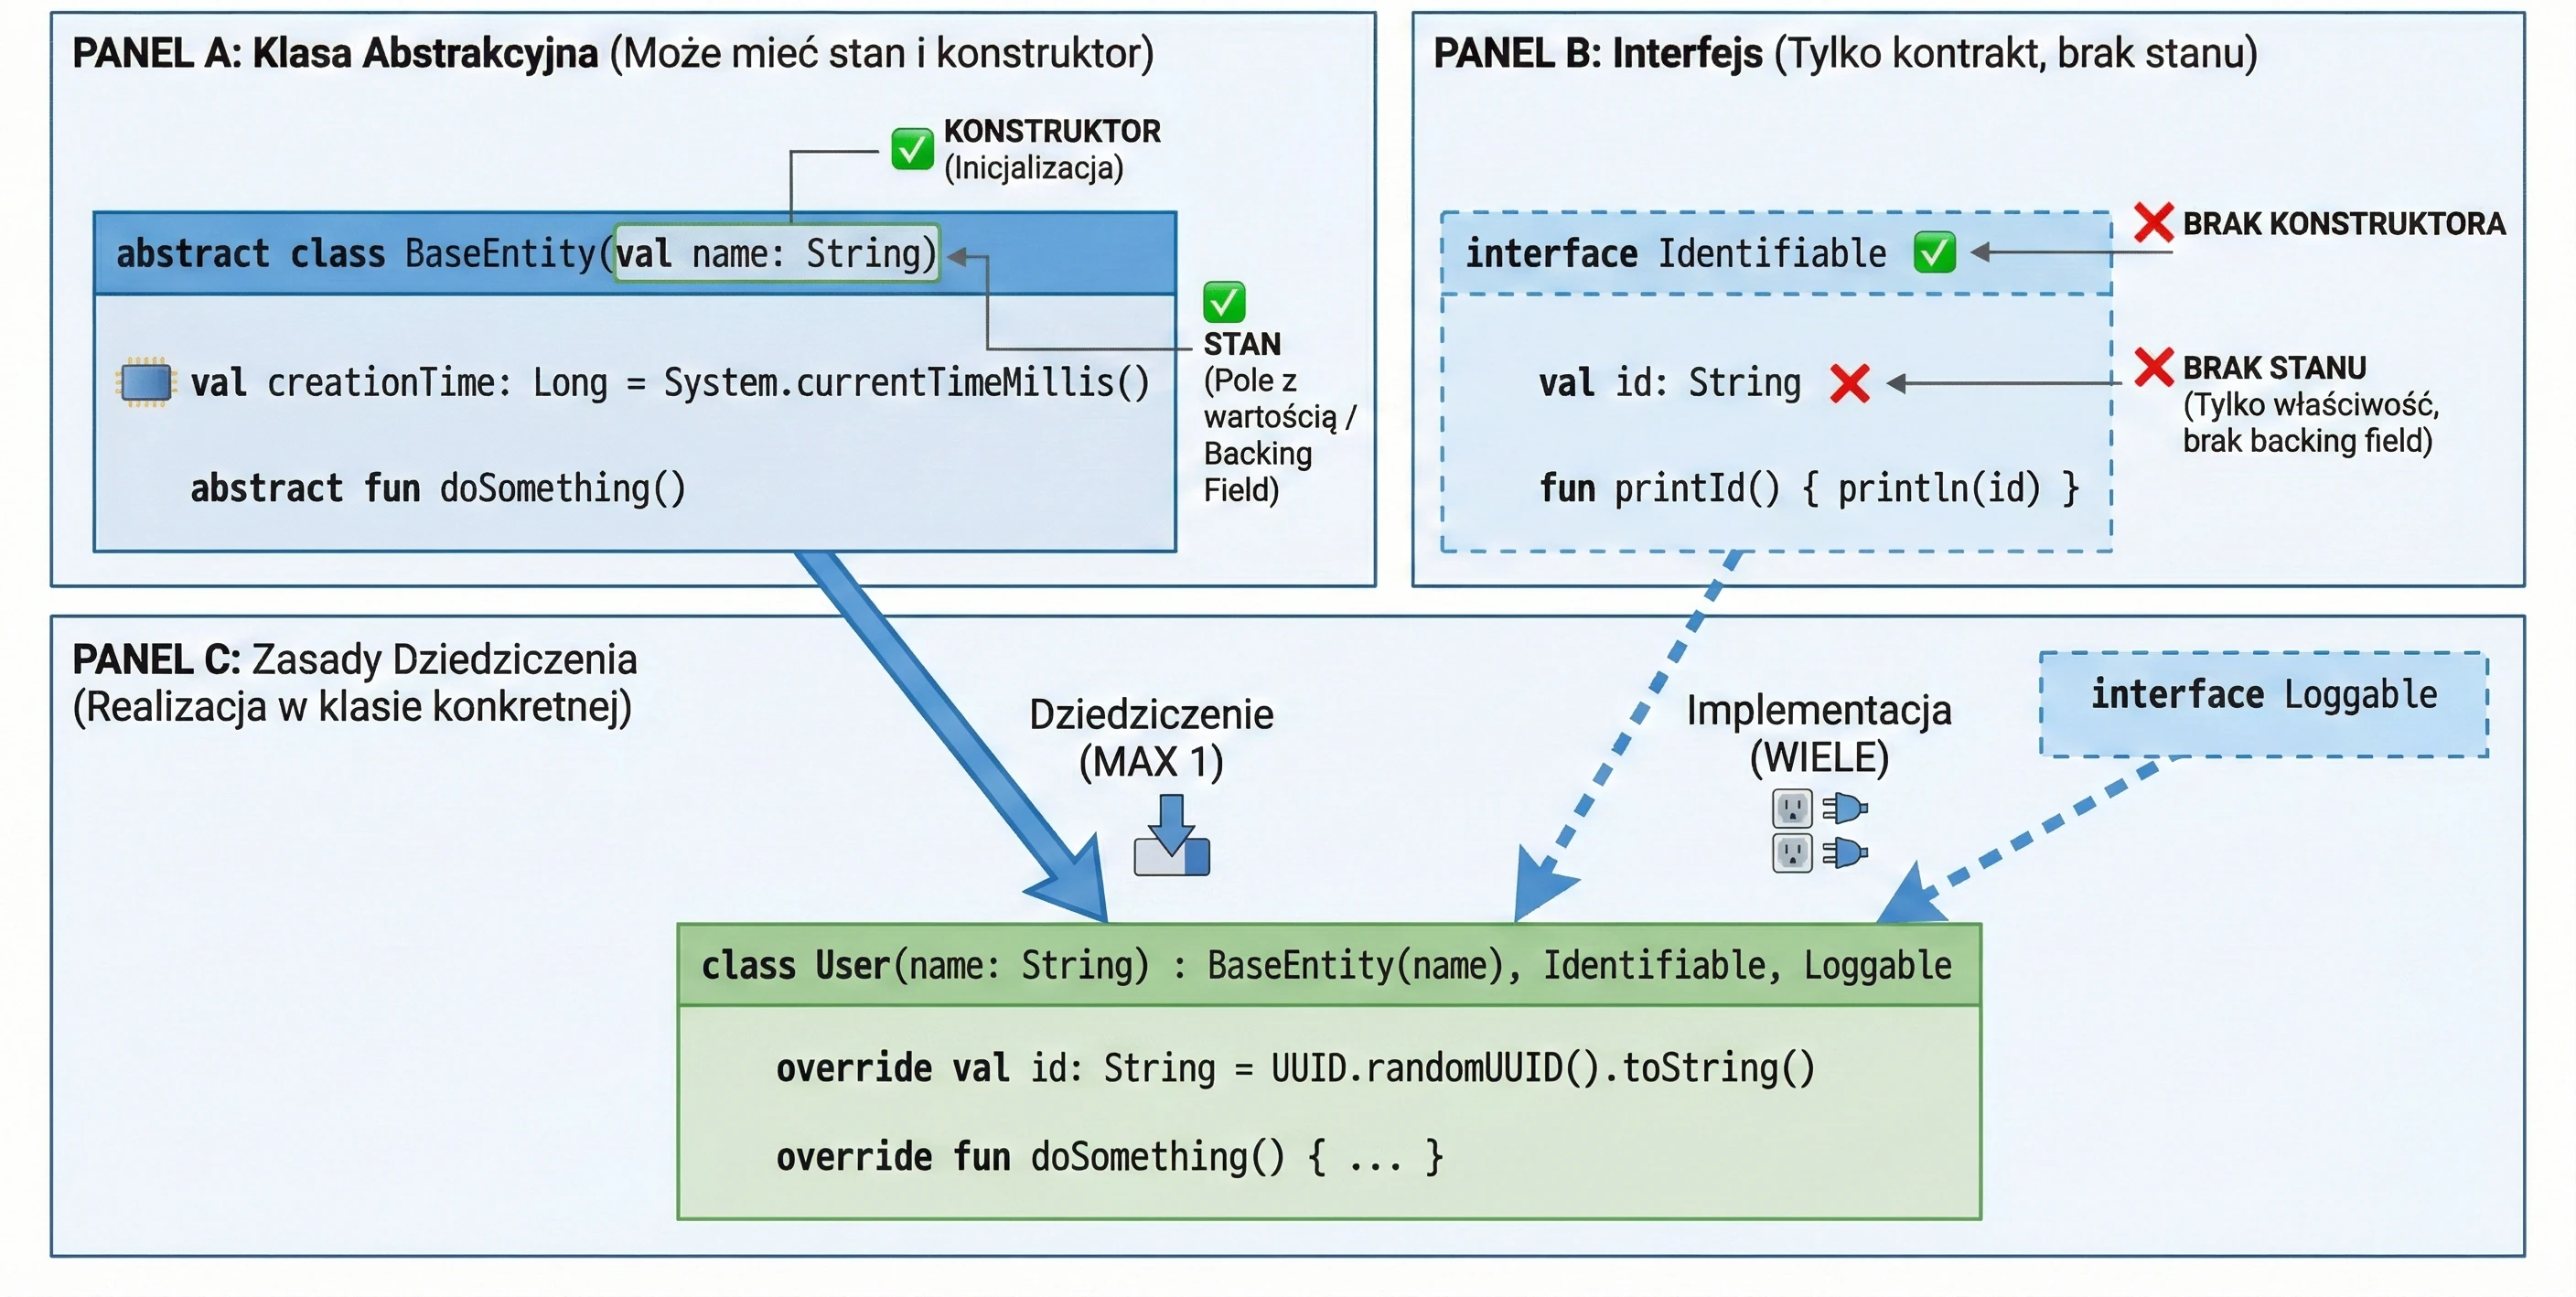
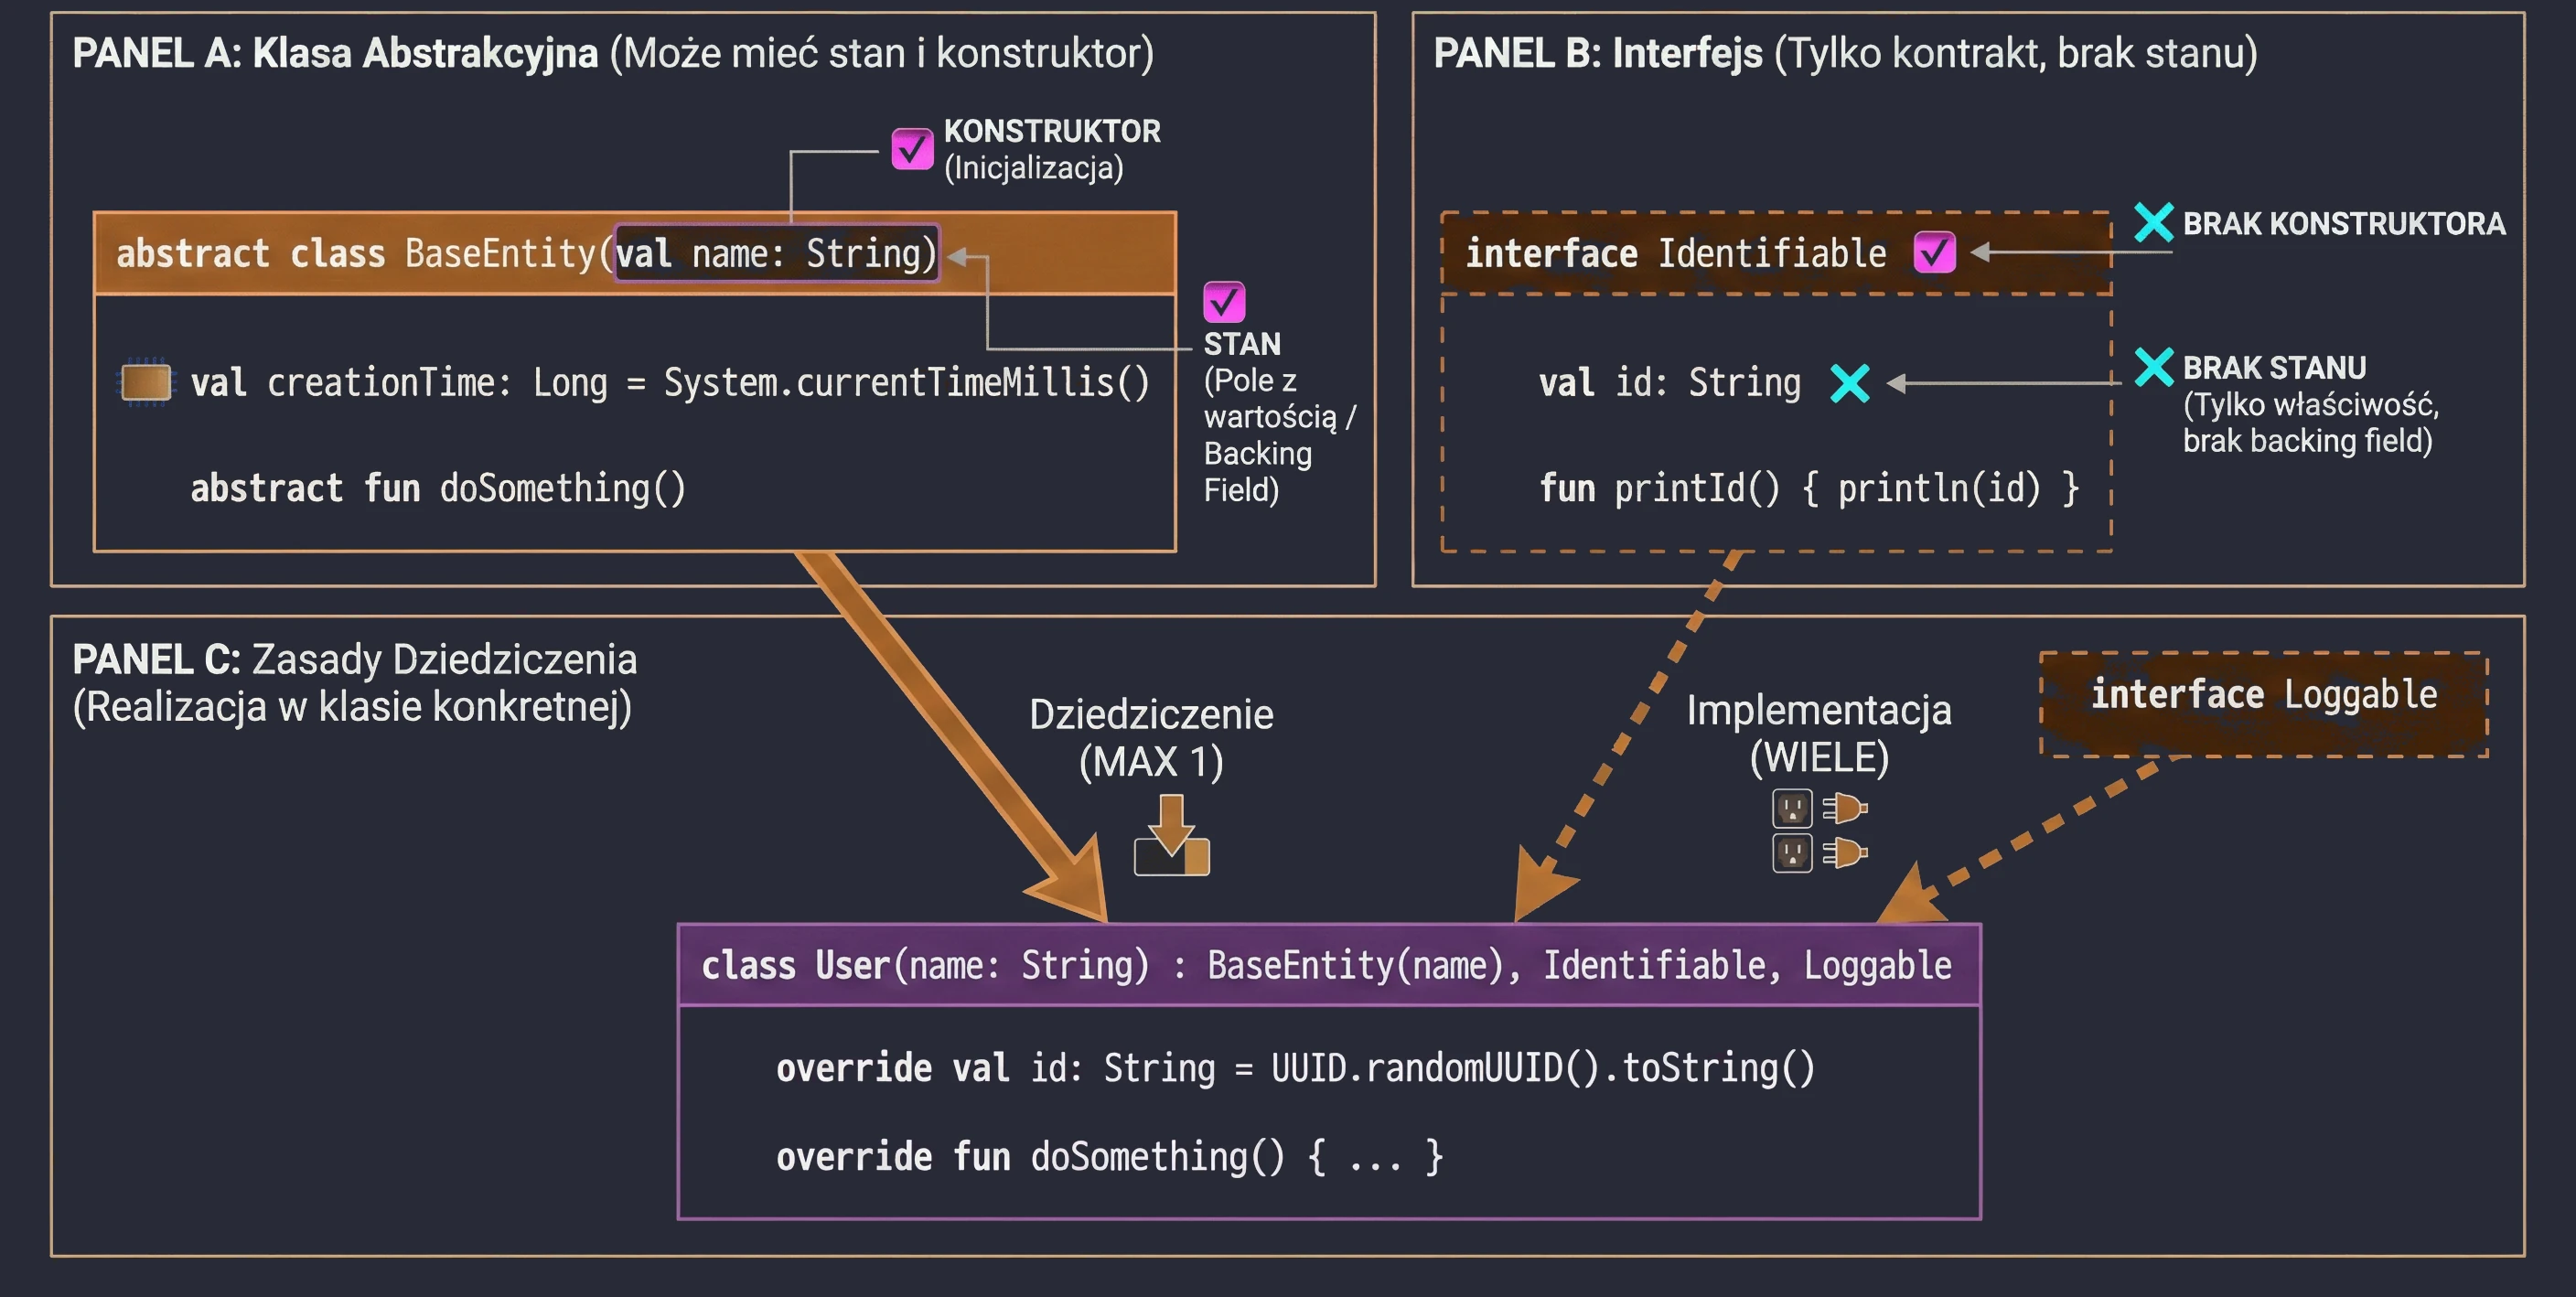
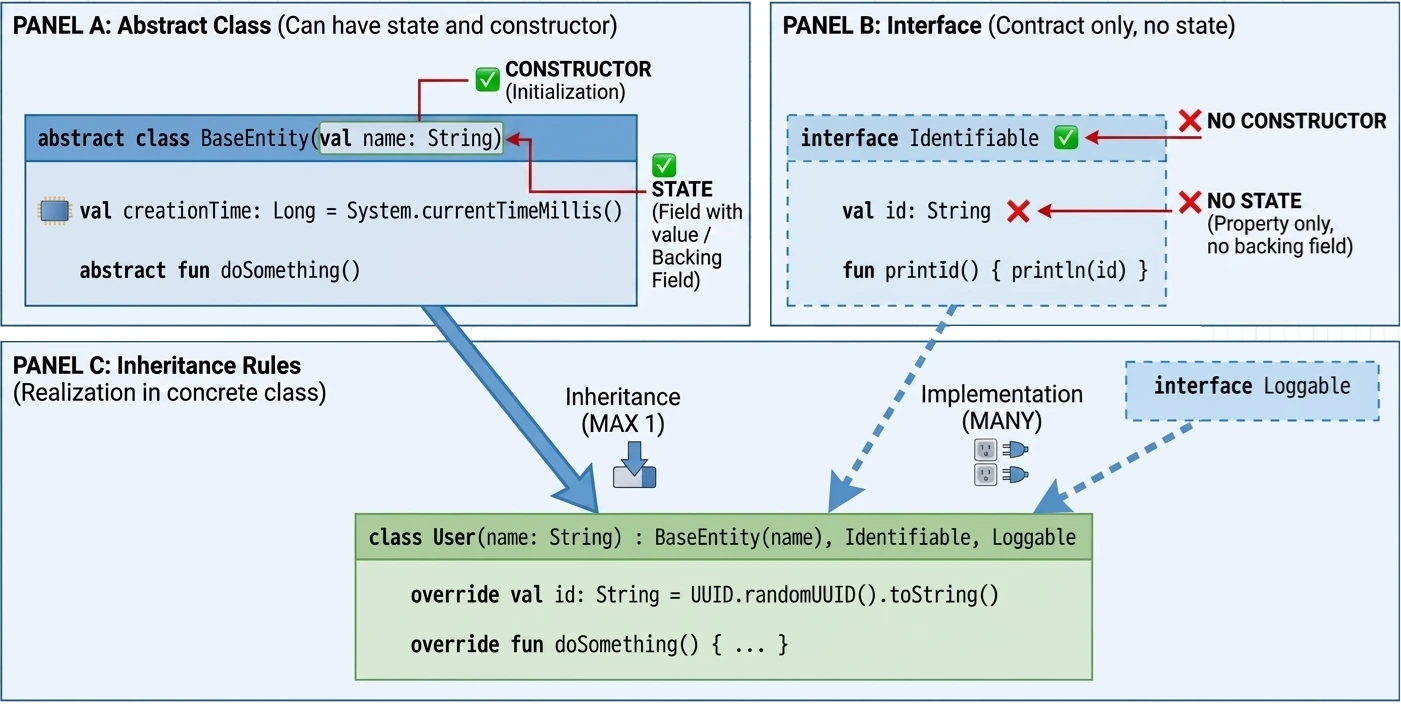
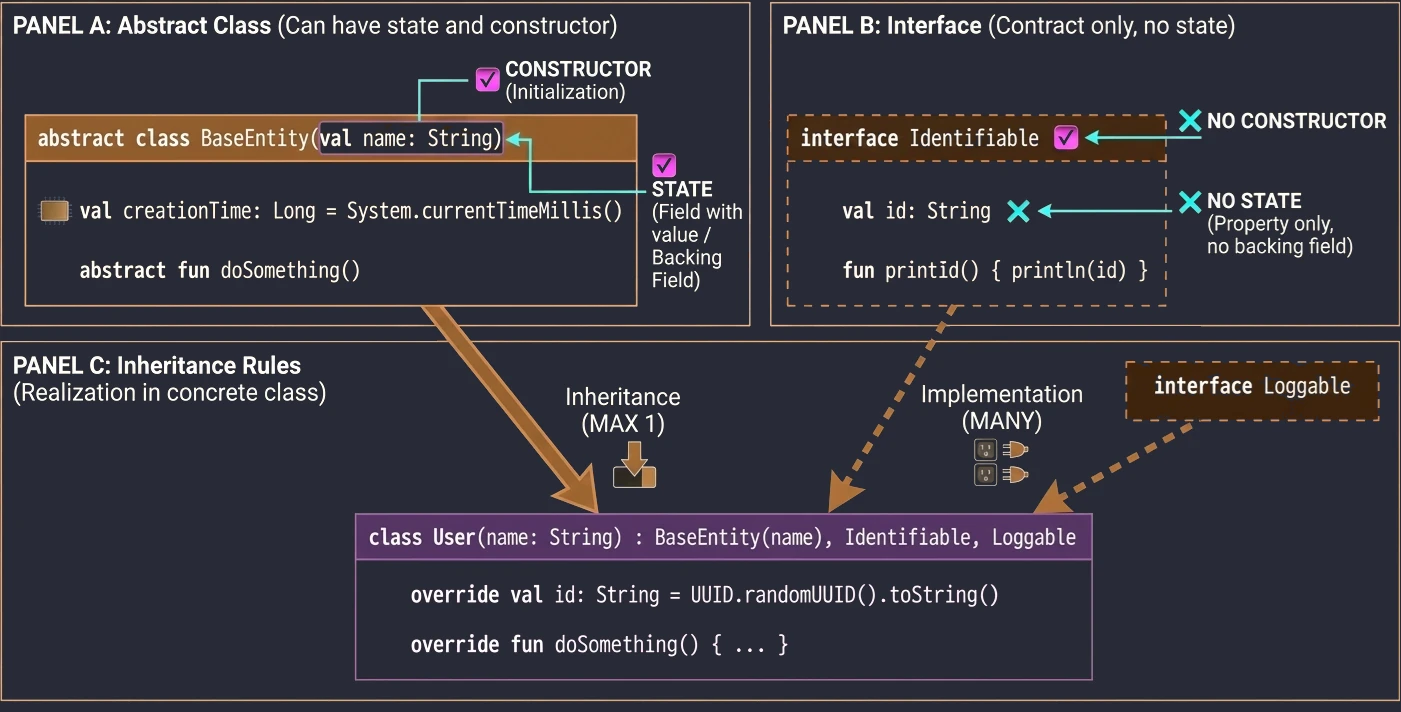
Abstract class vs interface
If interfaces can have methods with implementation, how do they differ from abstract classes?
- State: Abstract classes can have state (fields, instance variables). Interfaces cannot; they can only have properties without a backing field.
- Constructors: Abstract classes have constructors, interfaces do not.
- Multiple inheritance: A class can inherit from only one class, abstract or not, but it can implement many interfaces.
In this chapter, we will discuss mechanisms that allow us to manage property initialization efficiently and delegate responsibility for handling properties to other objects. We will cover the lateinit keyword, by lazy, and the Delegate pattern.
Late initialization (lateinit)
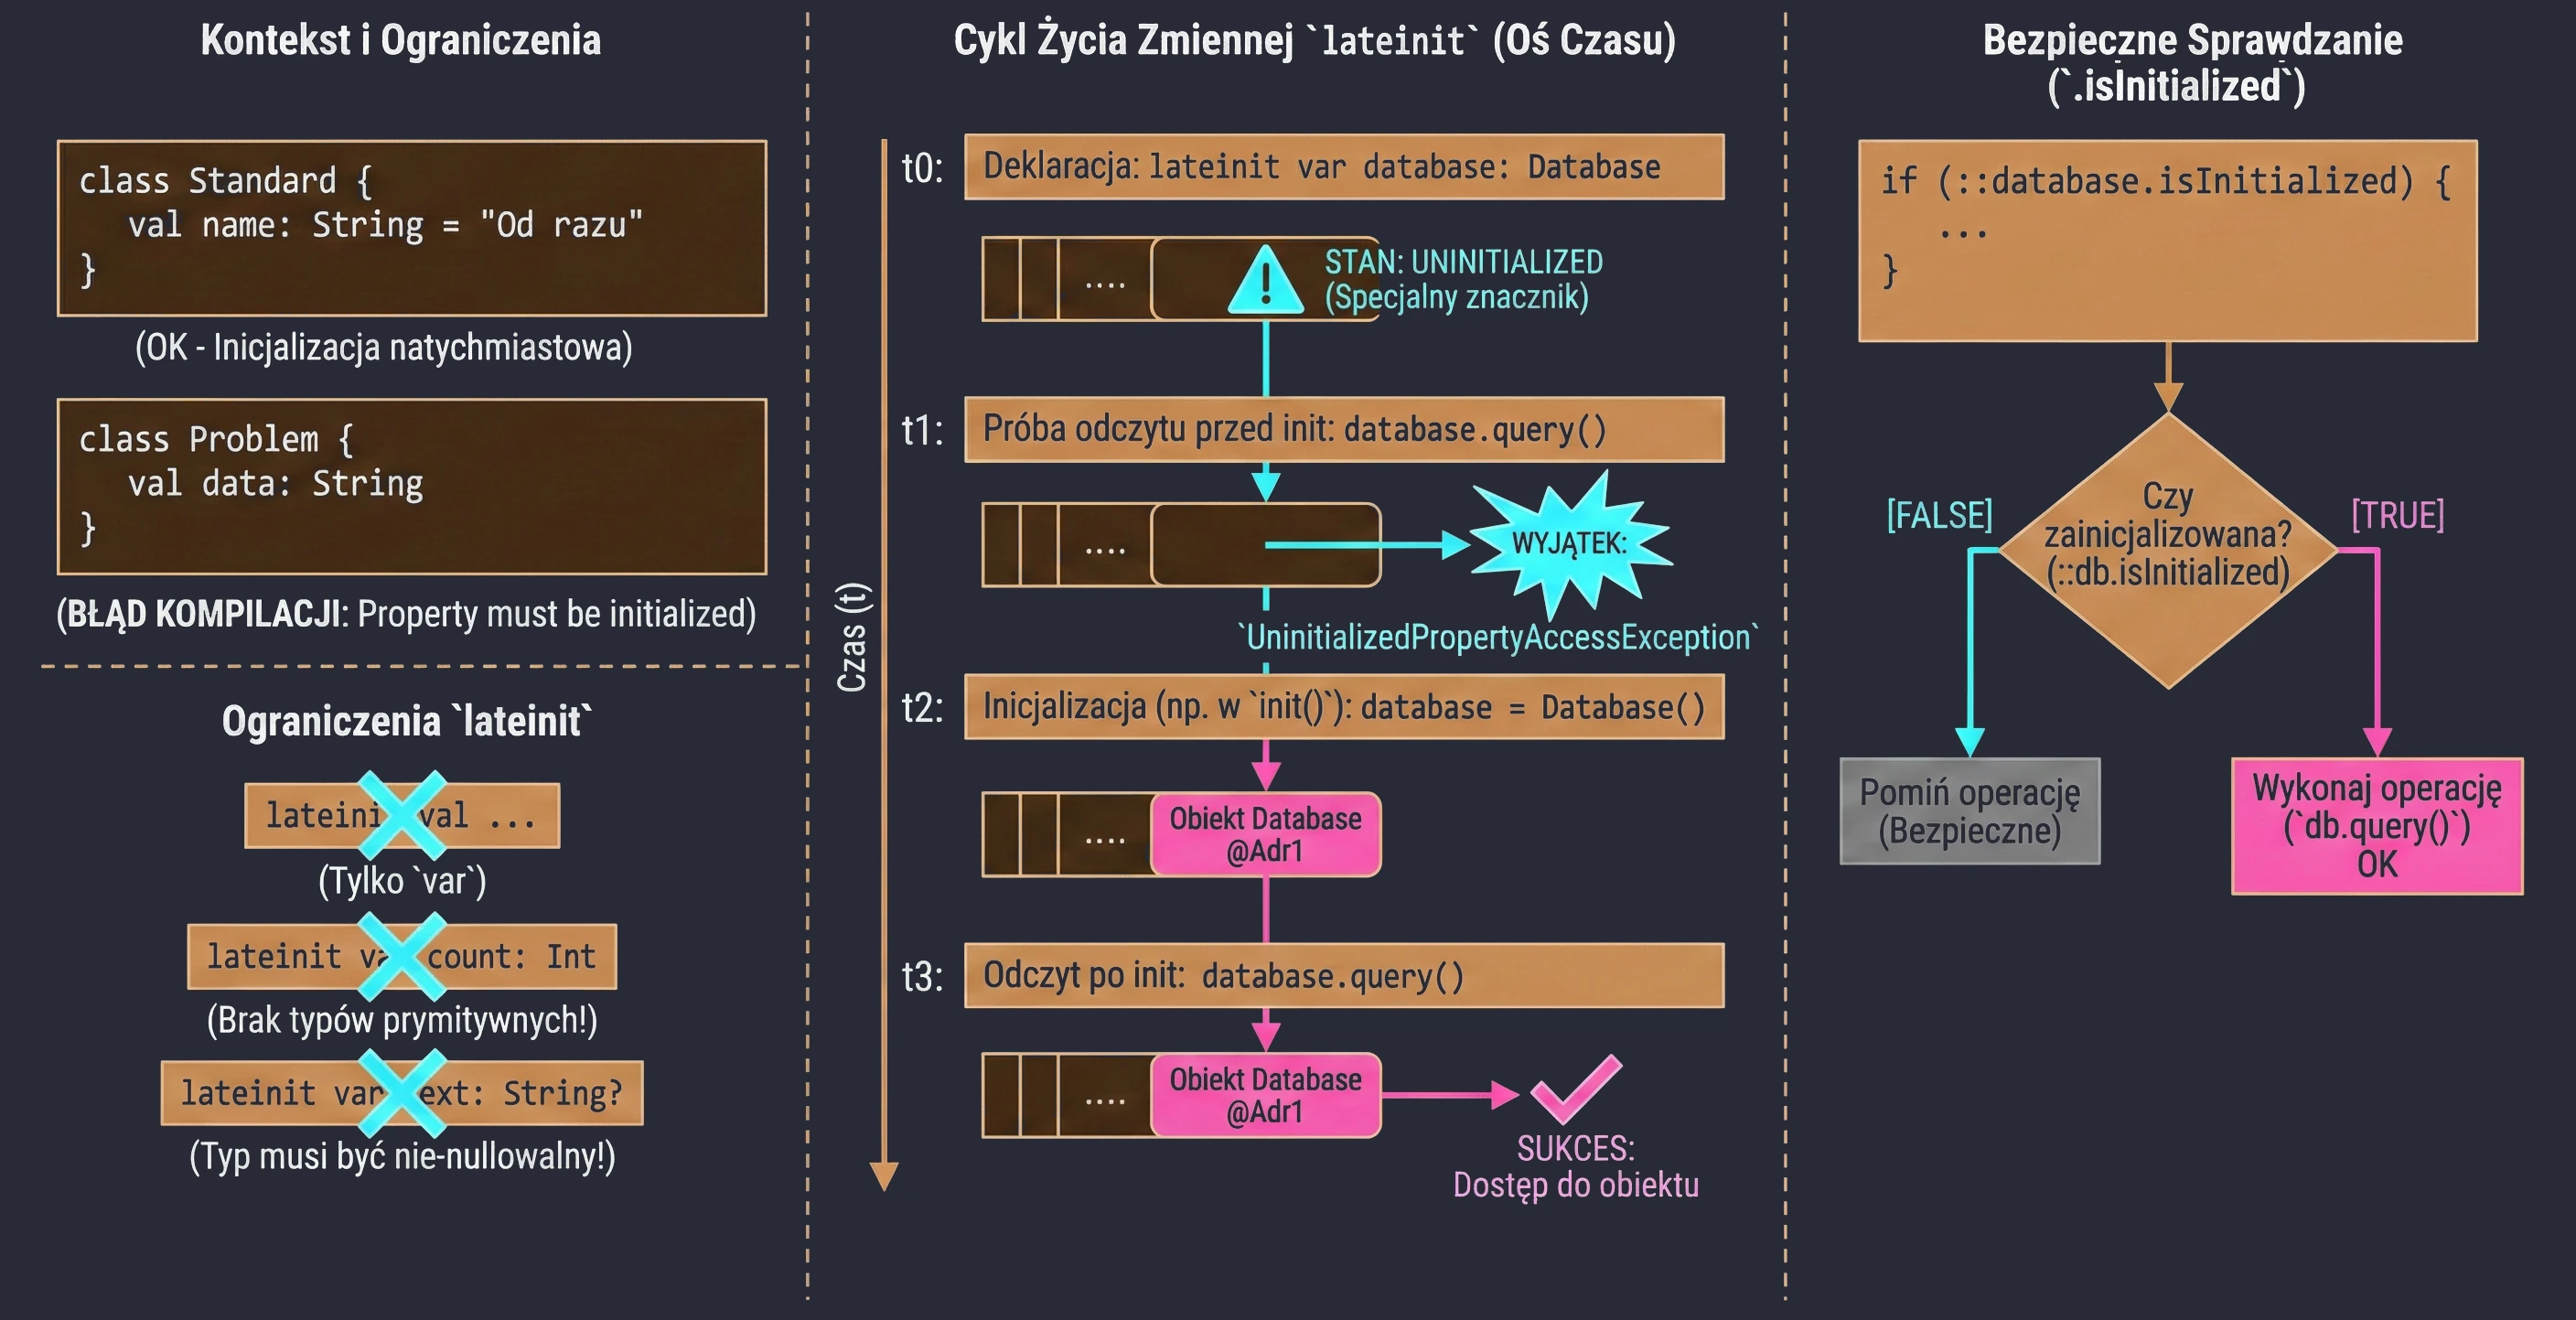
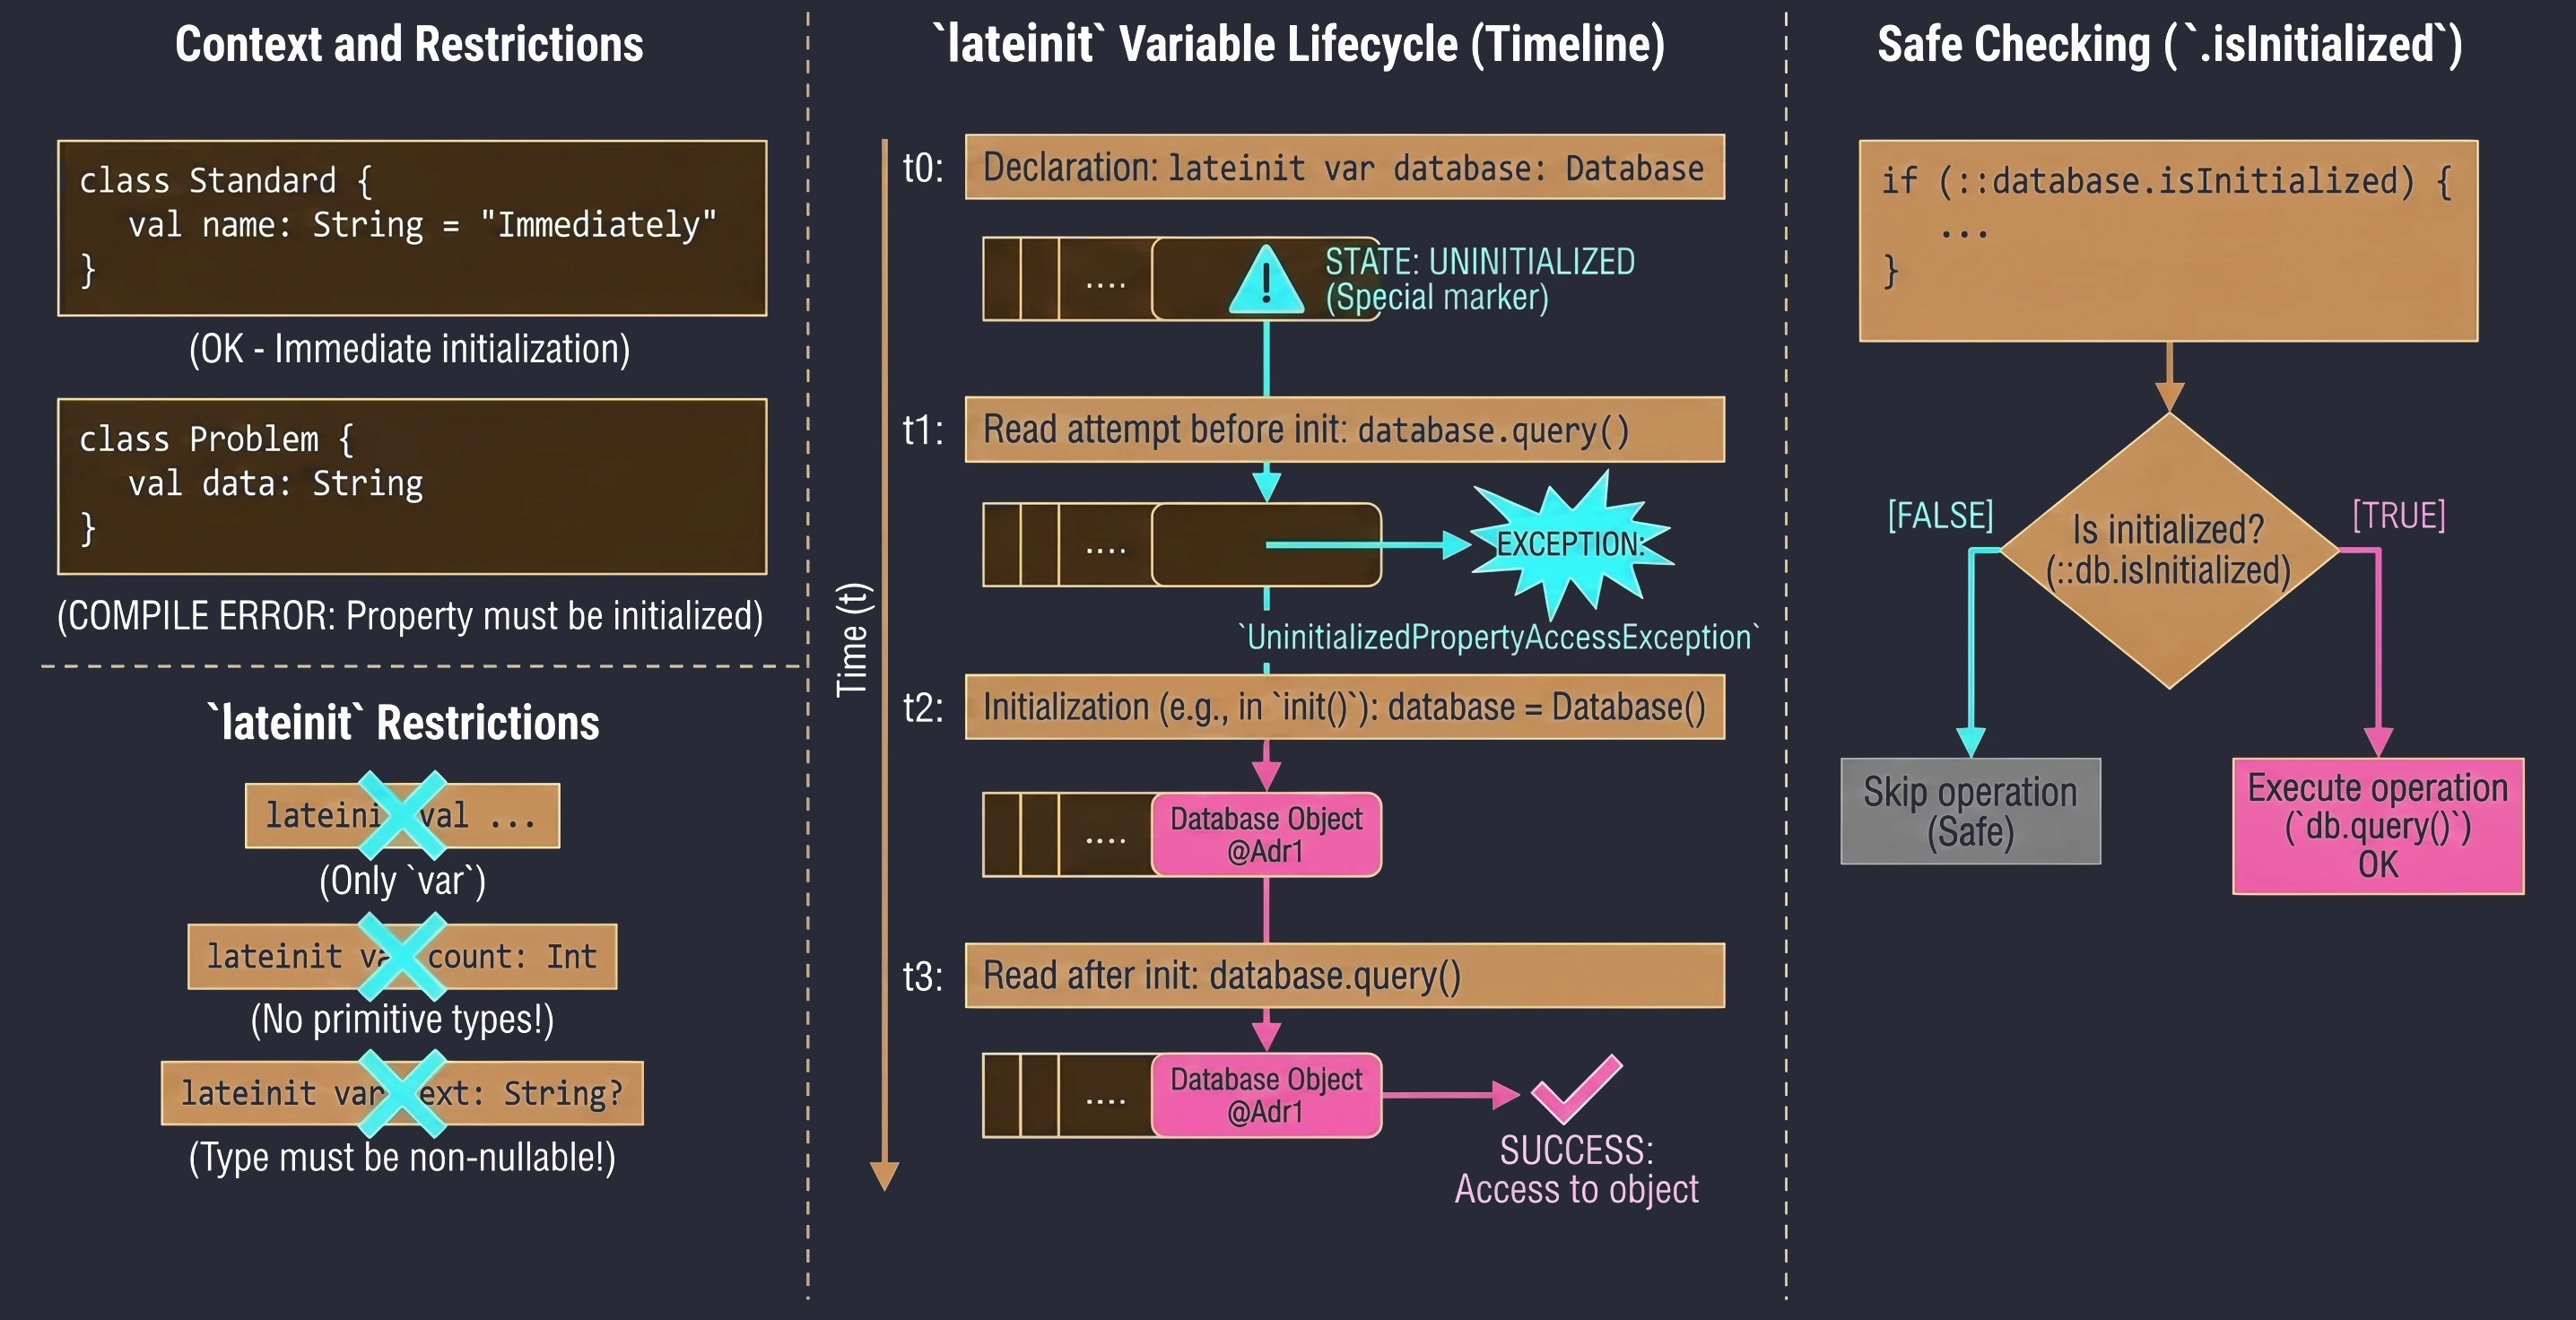
In Kotlin, class properties that are non-nullable, meaning they do not have ?, must be initialized in the constructor or immediately at declaration. Sometimes, however, we do not know the initial value when the object is created, for example when the value is injected by a framework such as Dependency Injection in Android.
In such situations, we use the lateinit modifier. It defines a variable that is non-nullable but is not initialized in the constructor.
class MyService {
    lateinit var database: Database // We do not need to assign a value immediately

    fun init() {
        database = Database() // Initialization later
    }

    fun query() {
        // If we call this before init(), we will get an exception
        database.query()
    }
}
Limitations:
- Only for
varvariables. - Cannot be used with primitive-like types such as
Int,Double, andBoolean. - The type cannot be nullable.
To check whether a variable has been initialized, we can use the .isInitialized reference:
if (::database.isInitialized) {
    println("Database ready")
}

Delegates (delegated properties)
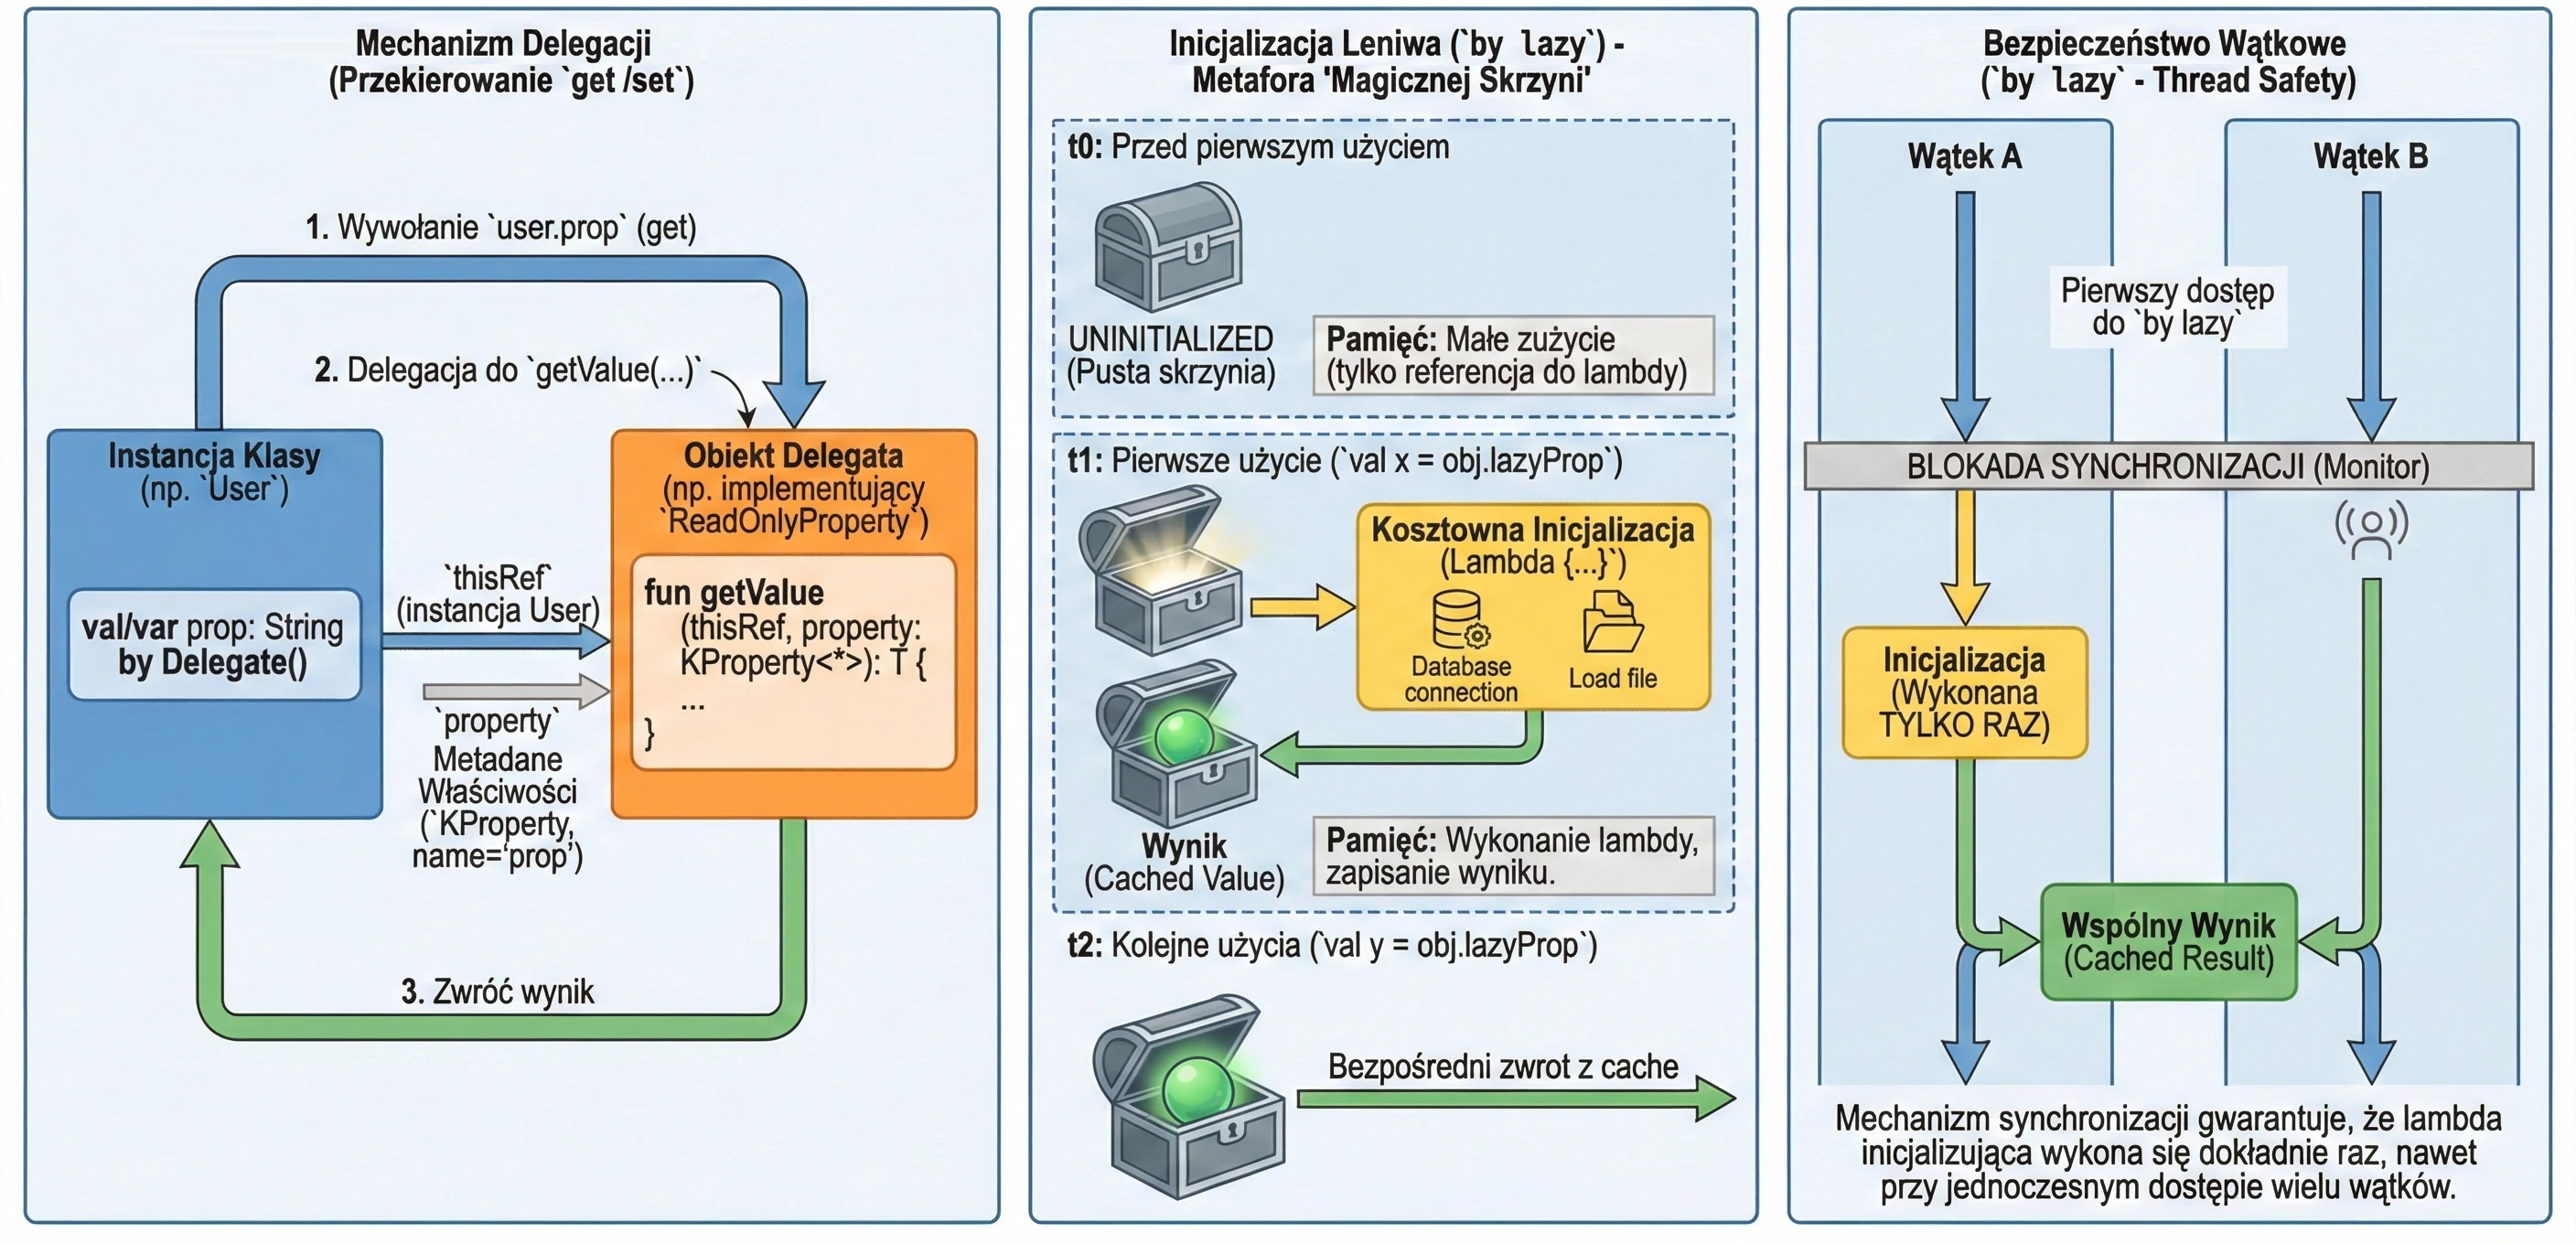
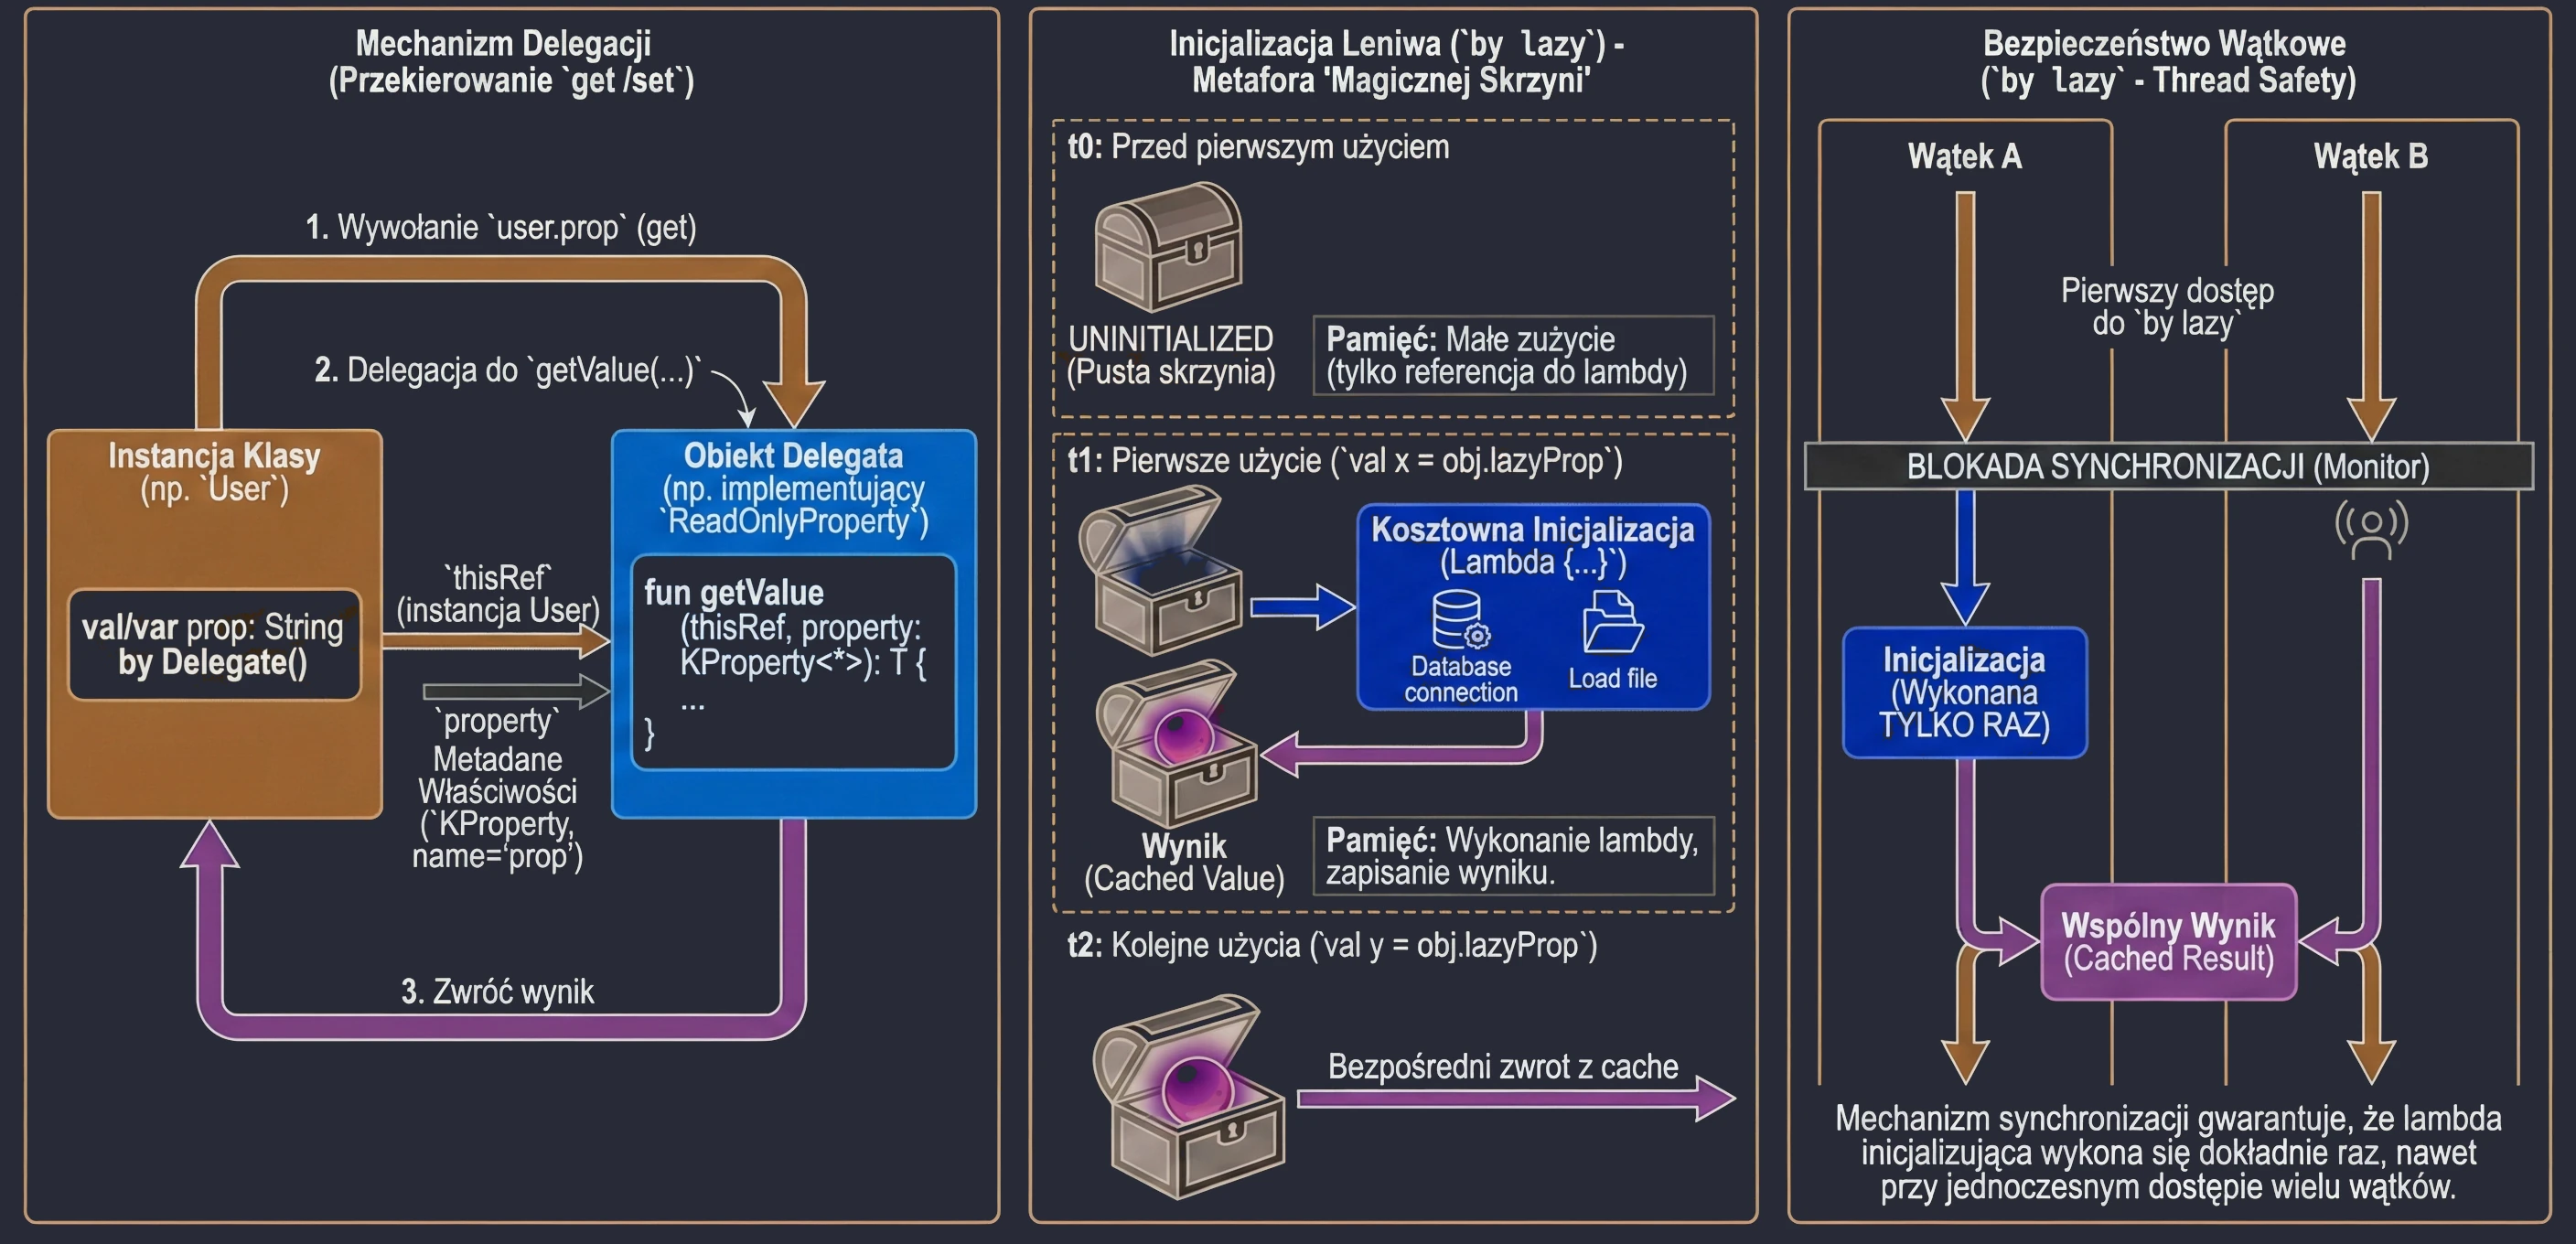
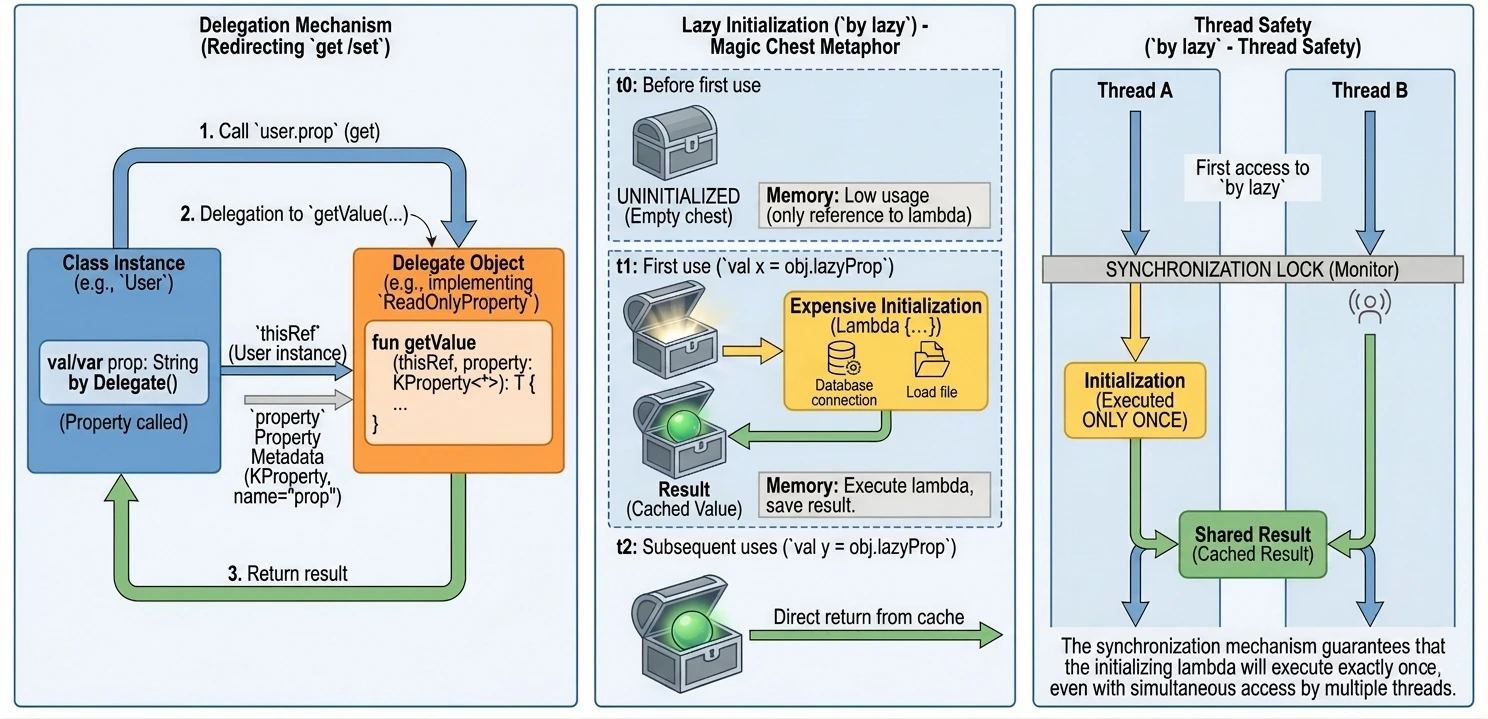
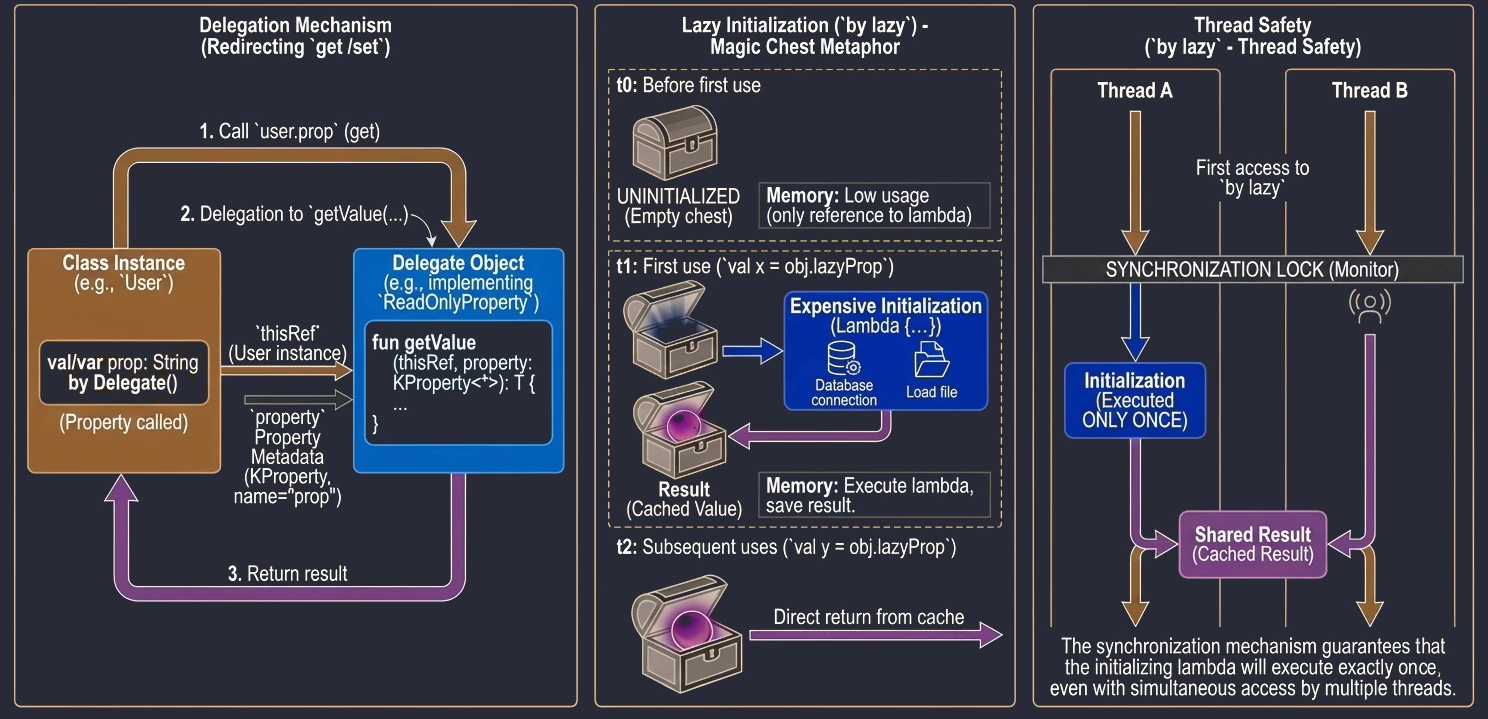
Property delegation is a mechanism in which handling of the get() method, and optionally set(), is passed to another object. The syntax uses the by keyword.
Delegates make it possible to transfer responsibility for implementing a property to another object: calls to get() and set() are delegated to that object.
Kotlin provides two built-in interfaces that define method signatures for read-only properties and read-write properties.
interface ReadOnlyProperty<in R, out T> {
    operator fun getValue(thisRef: R, property: KProperty<*>): T
}

interface ReadWriteProperty<in R, T> {
    operator fun getValue(thisRef: R, property: KProperty<*>): T
    operator fun setValue(thisRef: R, property: KProperty<*>, value: T)
}
KProperty is an interface from the reflection library (kotlin.reflect) that represents a property declaration. Thanks to it, in delegate methods (getValue/setValue) we have access to metadata of the property to which the delegate is assigned, especially its name (name), but also its type or annotations.
The notation KProperty<*> uses a so-called star projection. It means that the delegate can handle a property of any type, and we do not need to know that exact type at the place where the getValue method is declared.
Put more simply: KProperty<*> matches every property, such as KProperty<String> or KProperty<Int>, because inside the delegate we are usually interested only in metadata of the property itself, for example its name, not in the type of value it stores. It is a safe way to say: I do not care what the exact generic type is, as long as this is a KProperty.
Lazy initialization (by lazy)
The most popular delegate in Kotlin is lazy. It allows a property value to be computed only on its first use. The result is cached and returned for all subsequent accesses. This is an ideal solution for expensive operations such as loading a file, opening a database connection, or performing complex calculations that we do not want to execute if they are not needed.
Imagine that you have a magic chest at home that supposedly contains a very heavy object, for example an anvil. Until you open the chest, meaning until you try to use the object, there is actually nothing inside and no memory is occupied. Only when you open it for the first time, meaning on the first access to the variable, the object is "materialized" or created. From then on, every later opening of the chest shows the same already existing object.
class DataProcessor {
    val heavyData: List<String> by lazy {
        println("Loading data from disk...") // Runs only once!
        Thread.sleep(1000) // Simulates a long operation
        listOf("Data 1", "Data 2", "Data 3")
    }
}

fun main() {
    val processor = DataProcessor()
    println("Processor created")
    // "Loading data..." has not appeared yet

    println(processor.heavyData) // First use: initialization + printing
    println(processor.heavyData) // Second use: printing only (cached value)
}
The lazy delegate is thread-safe by default. This means that if many threads try to read a by lazy property for the first time at the same moment, the synchronization mechanism guarantees that the initialization code will run only once, and all threads will receive the same instance.
Because of this, by lazy is a very good way to implement the Singleton pattern for a single property or expensive resource. We do not need to worry about manual synchronization, such as Java synchronized or double-check locking. Kotlin handles this for us.
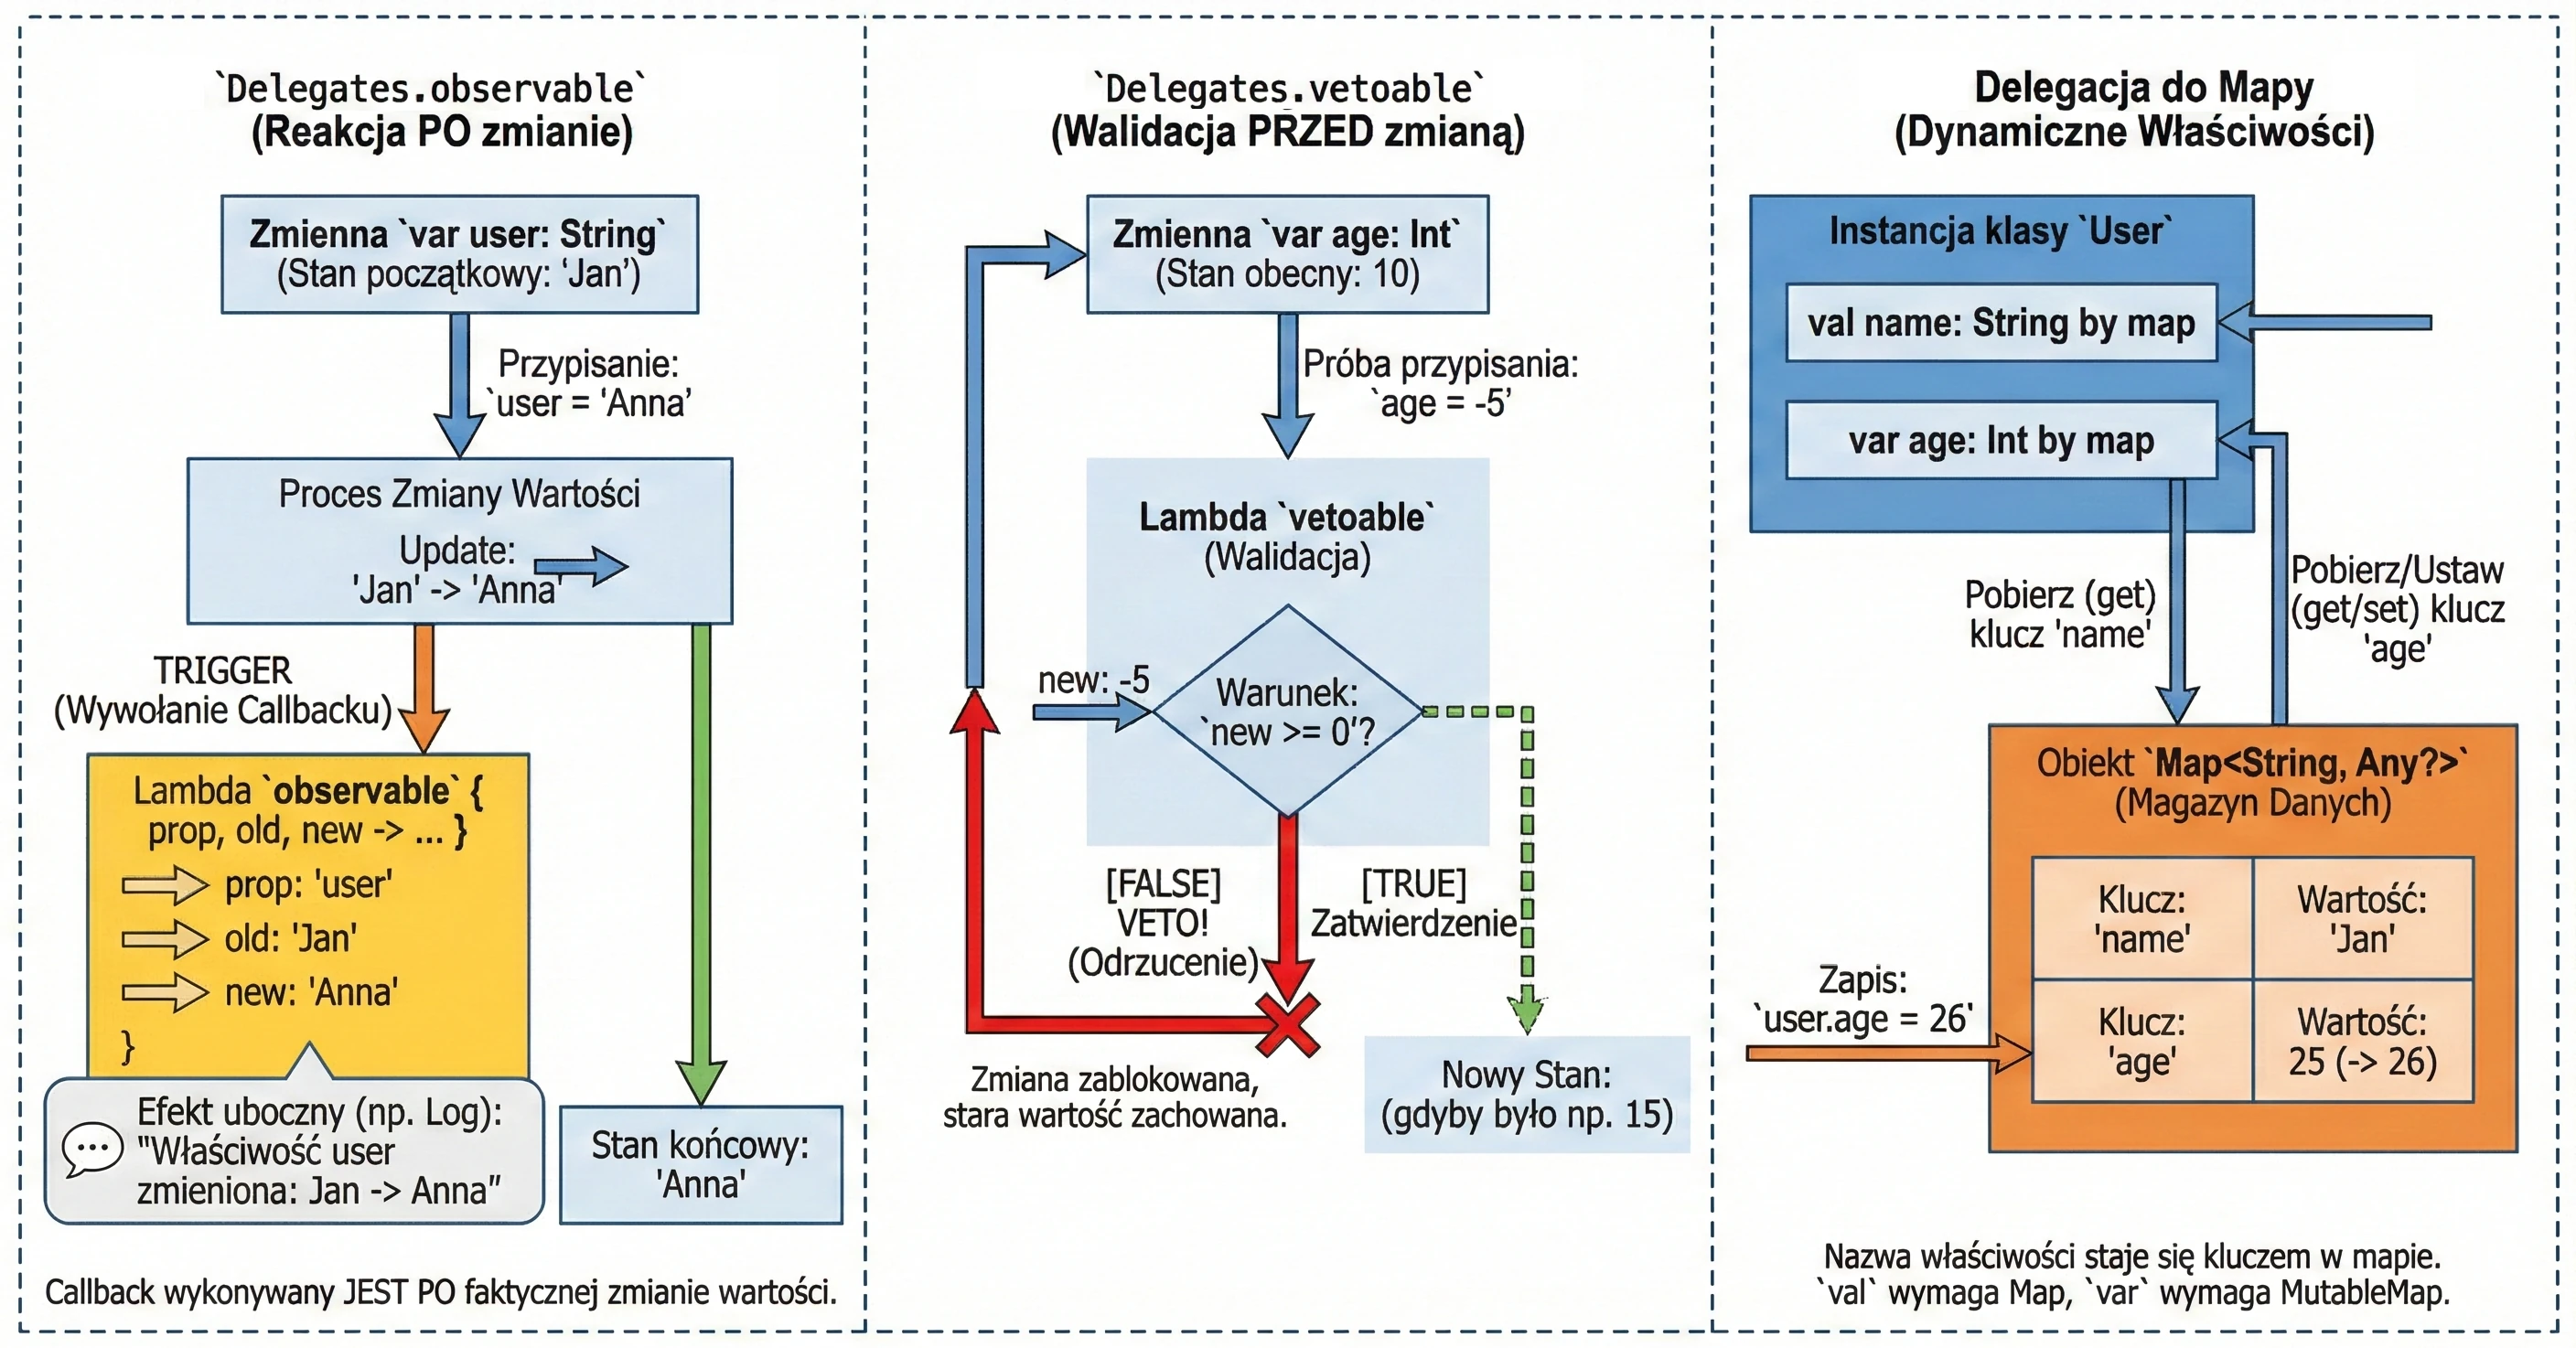
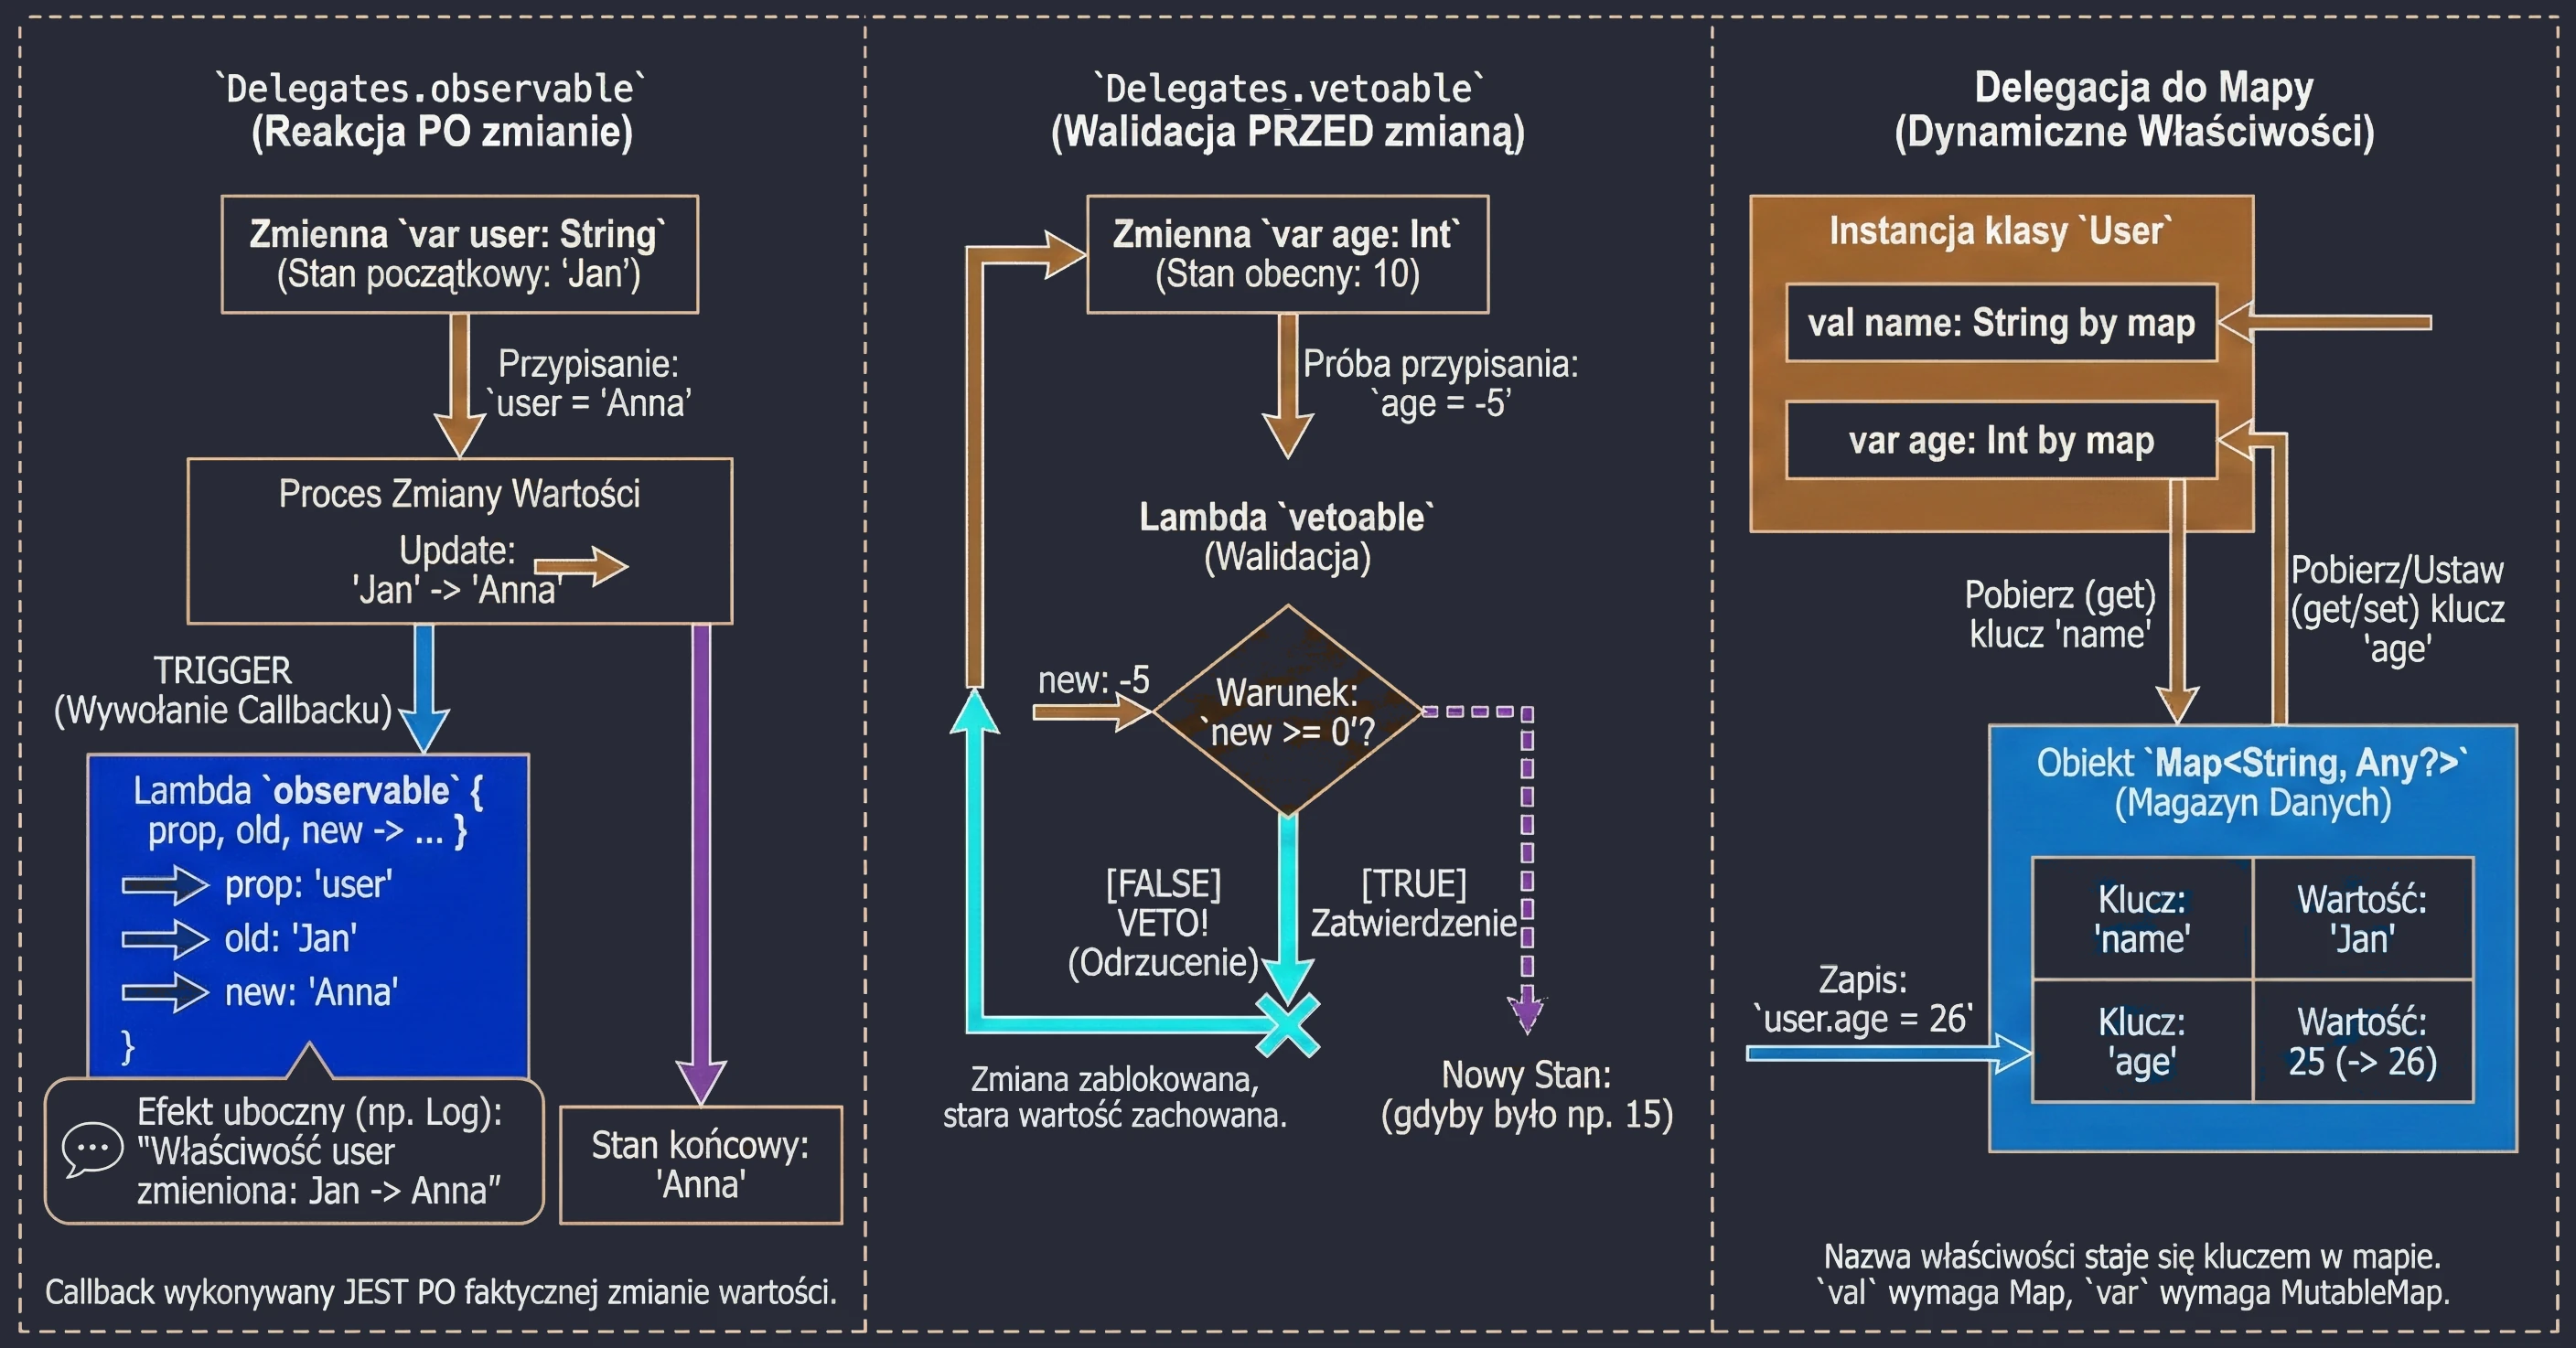
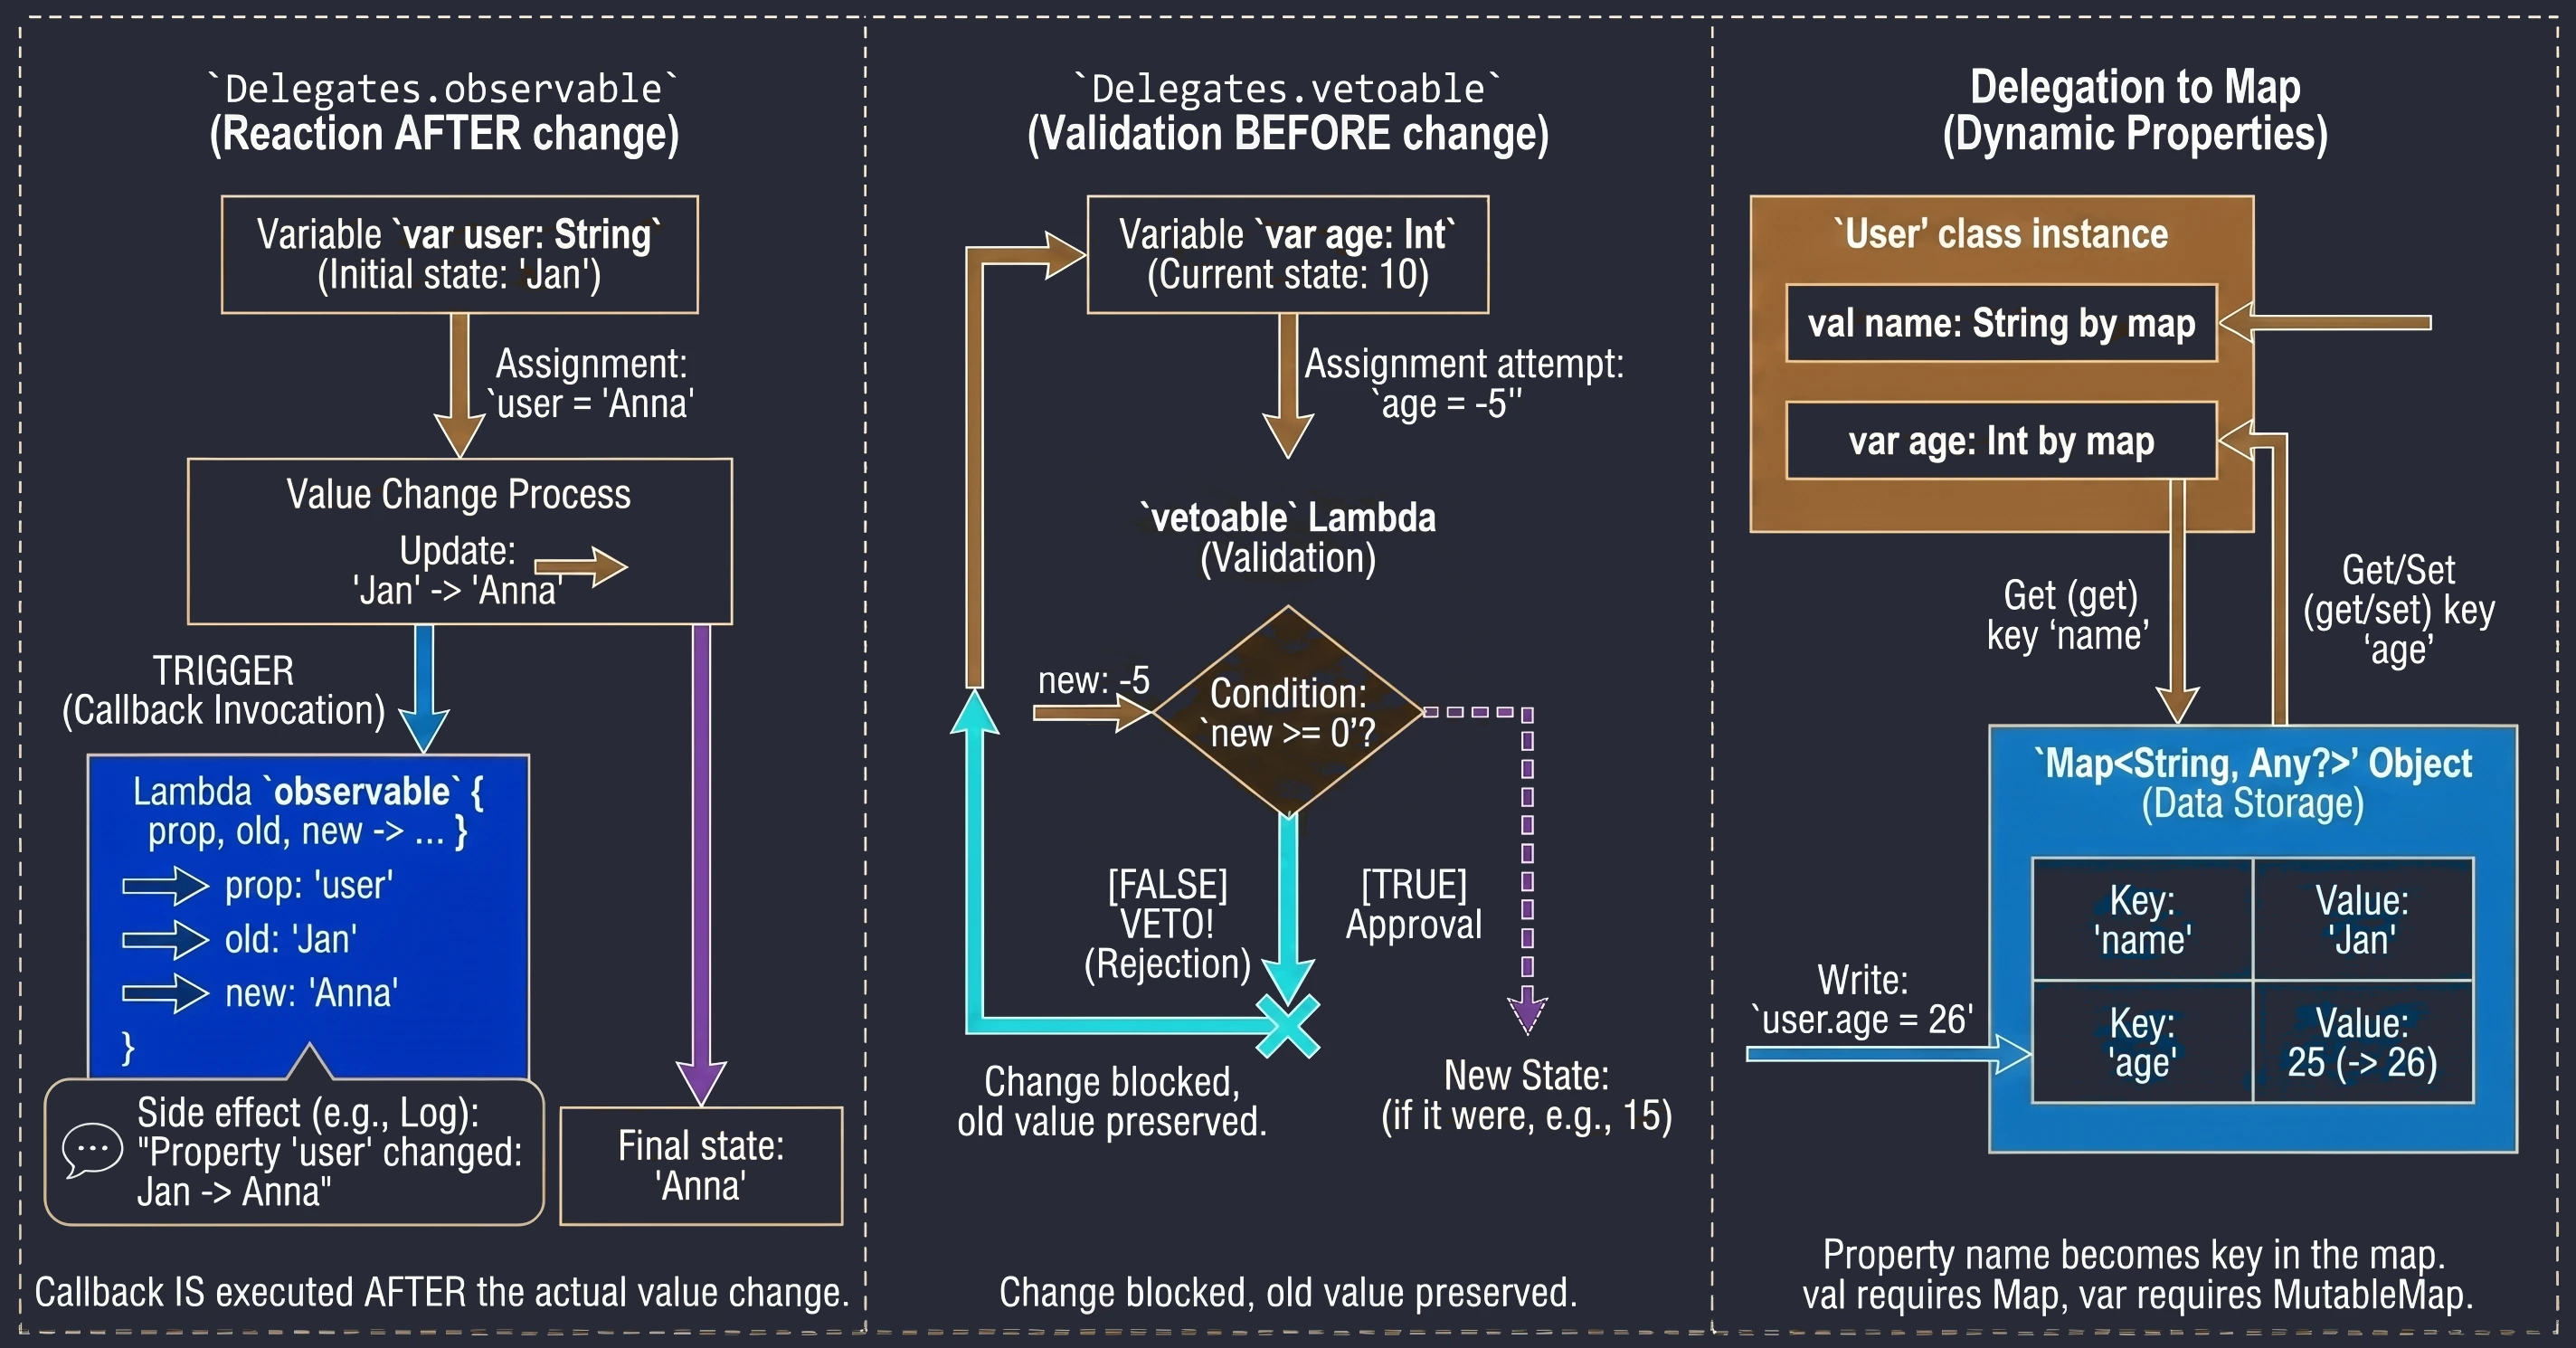
Observing changes (Delegates.observable)
This delegate allows us to attach an observer to a property. Every time the property value changes, a lambda function (callback) is called with information about the change. This is very useful for logging, updating the UI after data changes, or notifying other parts of the system.
The delegate takes two arguments:
- Initial value (default value).
- Lambda function called after every change. This lambda receives three parameters:
property: Property metadata (KProperty).oldValue: Previous value.newValue: New value.
import kotlin.properties.Delegates

var user: String by Delegates.observable("<none>") { prop, old, new ->
    println("Property '${prop.name}' changed: '$old' -> '$new'")
}

fun main() {
    user = "John"    // Prints: Property 'user' changed: '<none>' -> 'John'
    user = "Anna"    // Prints: Property 'user' changed: 'John' -> 'Anna'
}
The callback is called after the new value is assigned, so inside the lambda the field already has the new value.
Vetoing changes (Delegates.vetoable)
This delegate works similarly to observable, but it gives us the ability to block, or veto, a change. The lambda function is called before the new value is assigned and must return a Boolean value:
true: The change is accepted.false: The change is rejected, and the variable keeps its old value.
This is an ideal place for simple validation "on the fly".
var age: Int by Delegates.vetoable(0) { prop, old, new ->
    println("Attempt to change ${prop.name} from $old to $new")
    new >= 0 // Condition: age cannot be negative
}

age = 10     // Accepted (10 >= 0)
println(age) // 10

age = -5     // Rejected (-5 < 0) - old value remains
println(age) // 10
Delegation to a map
Kotlin allows us to use a map as a delegate for properties. In this mechanism, the property name is used as the key for retrieving the value from the map.
This is especially useful when we work with dynamic data sets, such as:
- Parsing JSON objects without creating dedicated DTO classes for every structure.
- Working with application configuration, where parameters are loaded into a map, for example from a .properties file.
- Interacting with external APIs or libraries that return data as key-value pairs.
class User(val map: Map<String, Any?>) {
    val name: String by map
    val age: Int by map
}

val data = mapOf("name" to "John", "age" to 25)
val u = User(data)
println(u.name) // "John"
The requirement is that map keys (String) must exactly match property names.
If we use MutableMap, we can also delegate mutable properties (var). In that case, assigning a value to a property updates the corresponding entry in the map.

In this chapter, we move from pure Kotlin to building applications for the Android platform. Understanding the basic components and the application lifecycle is essential for writing stable and efficient mobile software.
Application structure and manifest
Every Android application consists of a set of components declared in the AndroidManifest.xml file. This file is the application's identity document. The Android operating system reads it before running any application code. It contains:
- Package name: A unique application identifier, for example
com.example.myapp. - Component declarations: Activities (
<activity>), services (<service>), receivers (<receiver>), and content providers (<provider>). - Permissions: What the application needs in order to work, for example access to the Internet or camera.
Example fragment:
<manifest xmlns:android="http://schemas.android.com/apk/res/android"
    package="com.example.myapp">

    <uses-permission android:name="android.permission.INTERNET" />

    <application ... >
        <activity android:name=".MainActivity"
            android:exported="true">
            <intent-filter>
                <action android:name="android.intent.action.MAIN" />
                <category android:name="android.intent.category.LAUNCHER" />
            </intent-filter>
        </activity>
    </application>
</manifest>
In the example above, two elements of the intent filter are crucial:
- Action MAIN: Tells the system that this activity is the main entry point to the application.
- Category LAUNCHER: Causes the application icon to be placed in the Android launcher. Without this category, the application would not be visible on the list of installed programs, and the user would not be able to start it manually.
An application must have at least one activity so that the user can interact with it directly. Although the system allows packages without a graphical interface, for example libraries or specific system services, the Activity is the only component capable of rendering a full-screen window and directly receiving touch events. Other elements, such as notifications or widgets, are only auxiliary entry points and in most cases redirect the user to a specific activity to perform the full action.
Activity
Historically, an Activity (Activity) is the basic component representing a single screen of the user interface with which the user can interact.
- Classic approach (View System): The Activity was the central point for UI management. It was responsible for loading XML layouts, finding views (
findViewById), and handling events. This often led to enormous classes, sometimes called a God Activity. - Jetpack Compose: The Activity becomes a lightweight container, or host. Its main task is to set the content (
setContent) and optionally handle specific system events. The whole UI is built from@Composablefunctions.
Android manages applications aggressively to save battery and resources. An Activity may be destroyed at any time, for example because of screen rotation, an incoming call, or low memory. Therefore, the system notifies the Activity about state changes through lifecycle methods:
onCreate(): The Activity is created. Here we initialize UI and variables. It is called only once.onStart(): The Activity becomes visible to the user, but it is not yet interactive.onResume(): The Activity is in the foreground and the user can interact with it.onPause(): The Activity loses focus, for example because a dialog appears or the user leaves. Here we stop animations or save lightweight data.onStop(): The Activity is no longer visible. We release heavier resources.onDestroy(): The Activity is removed from memory.

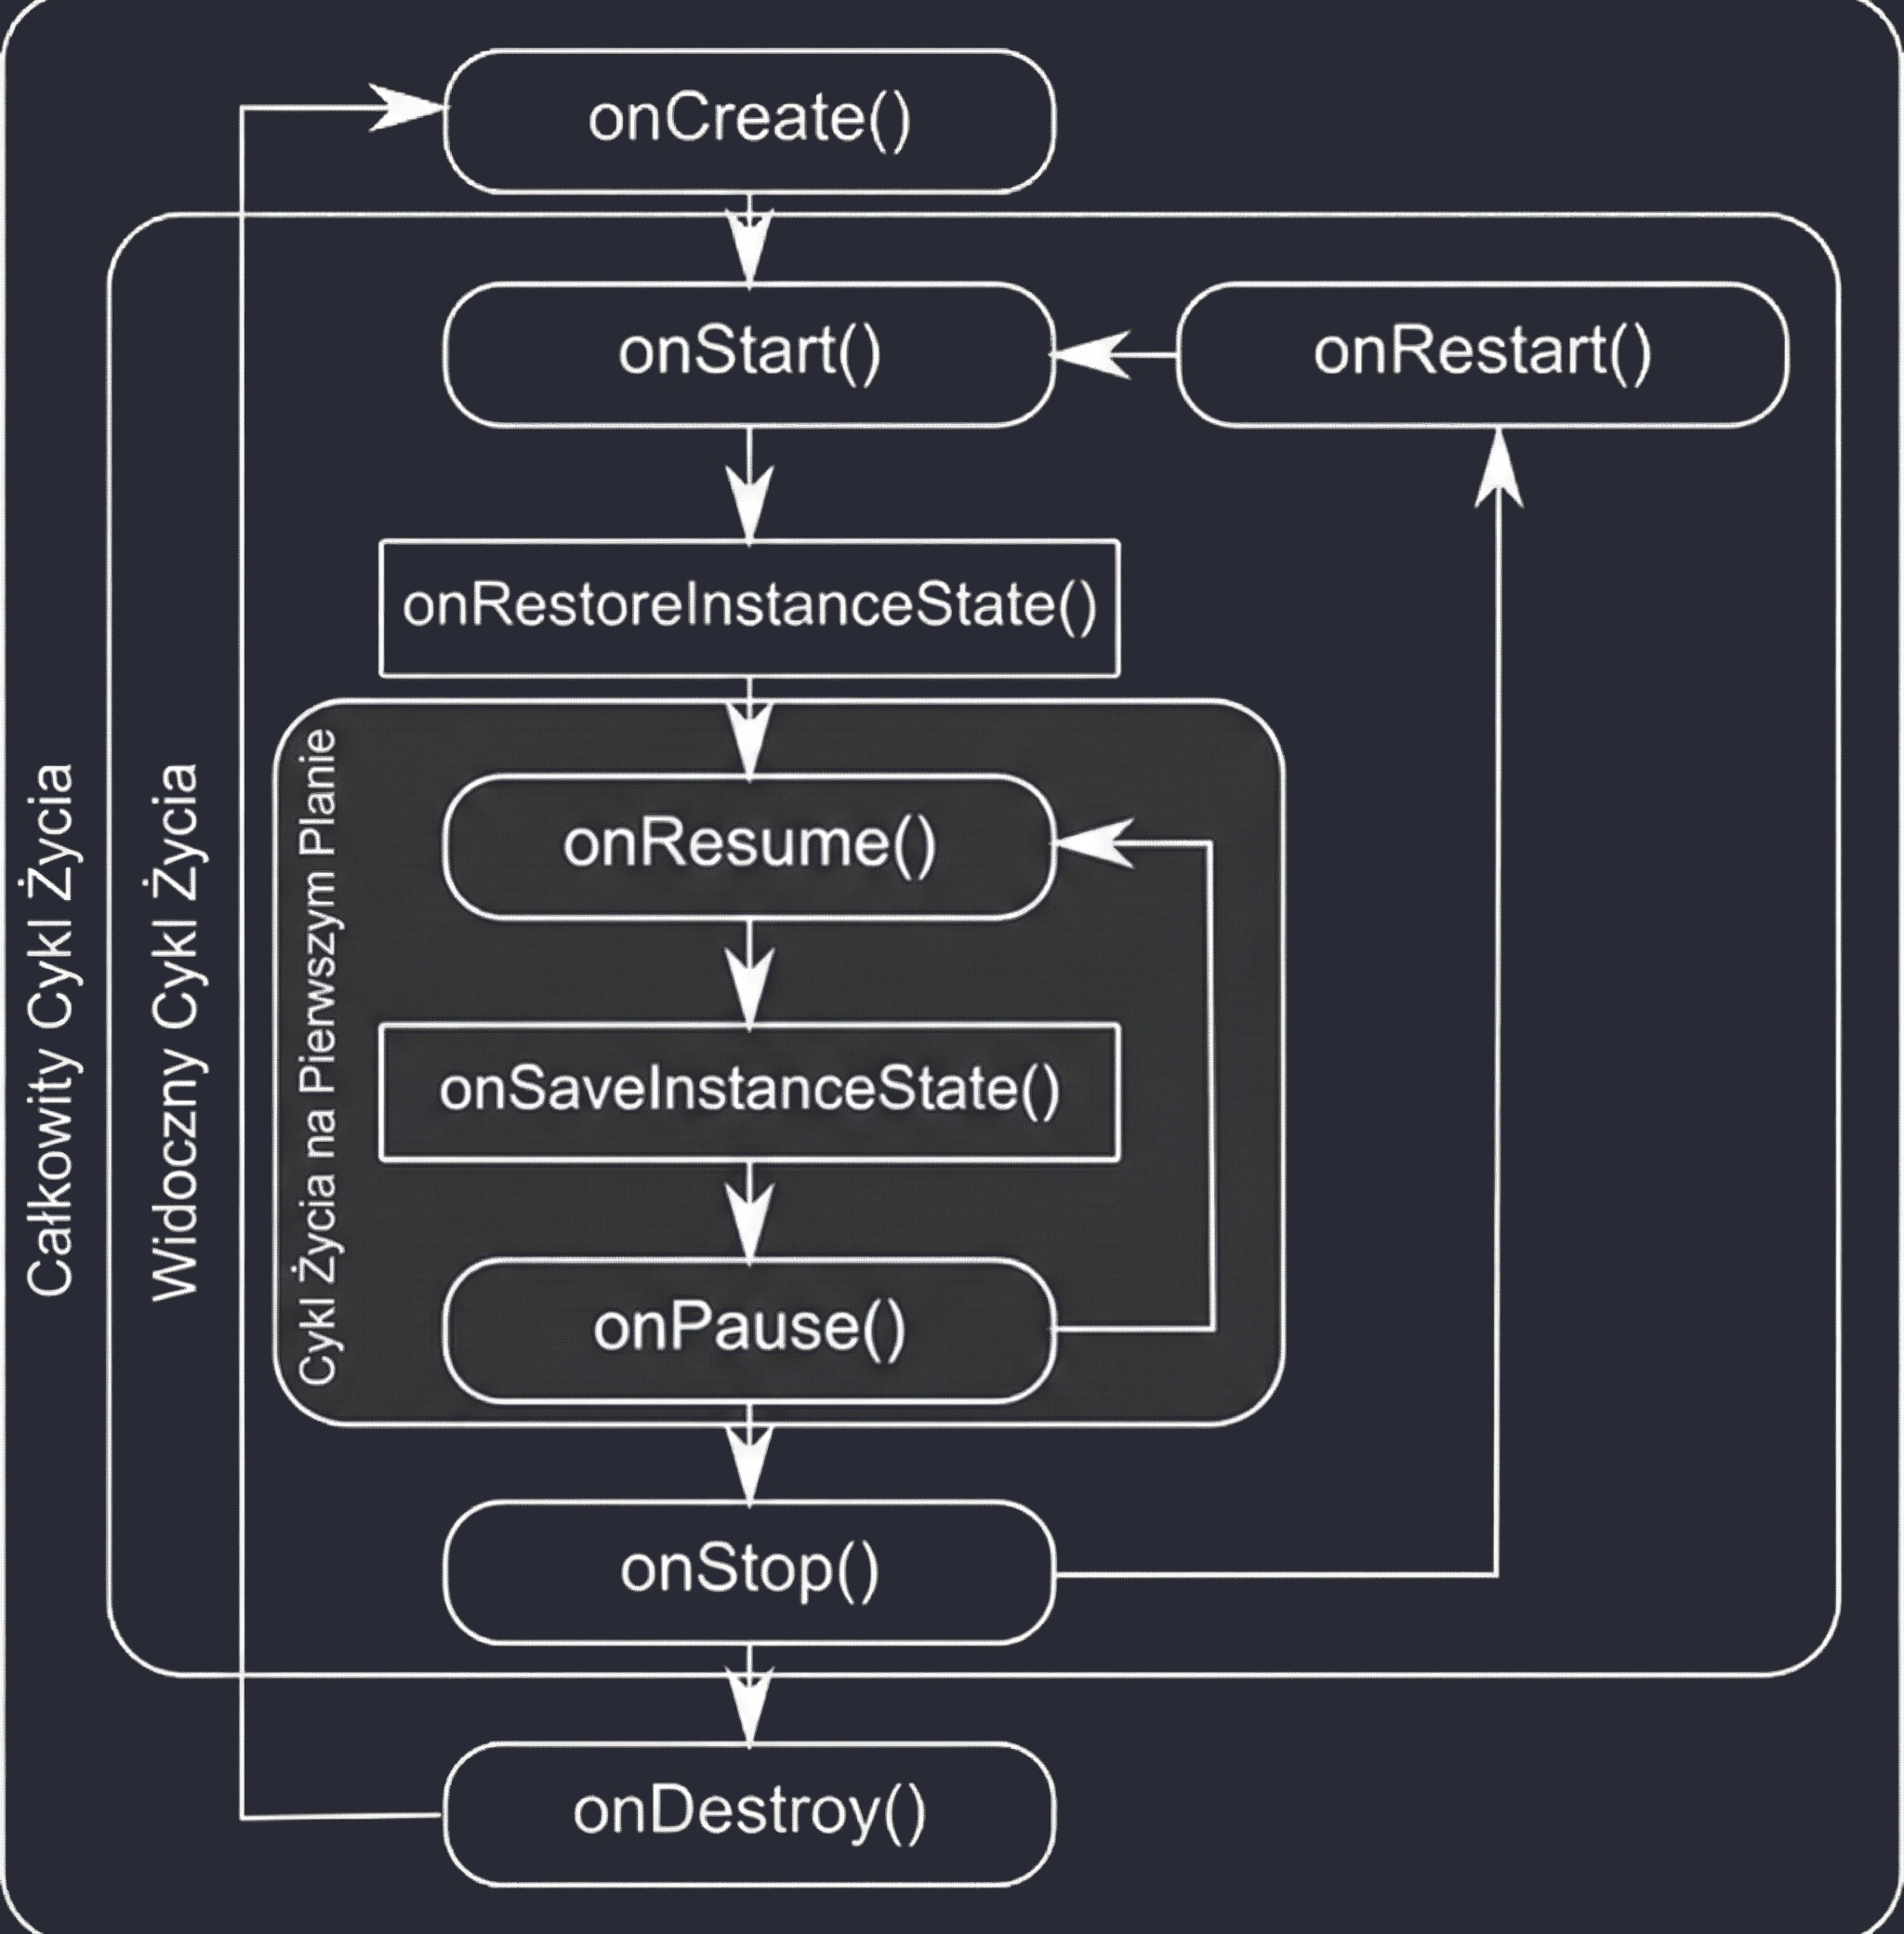
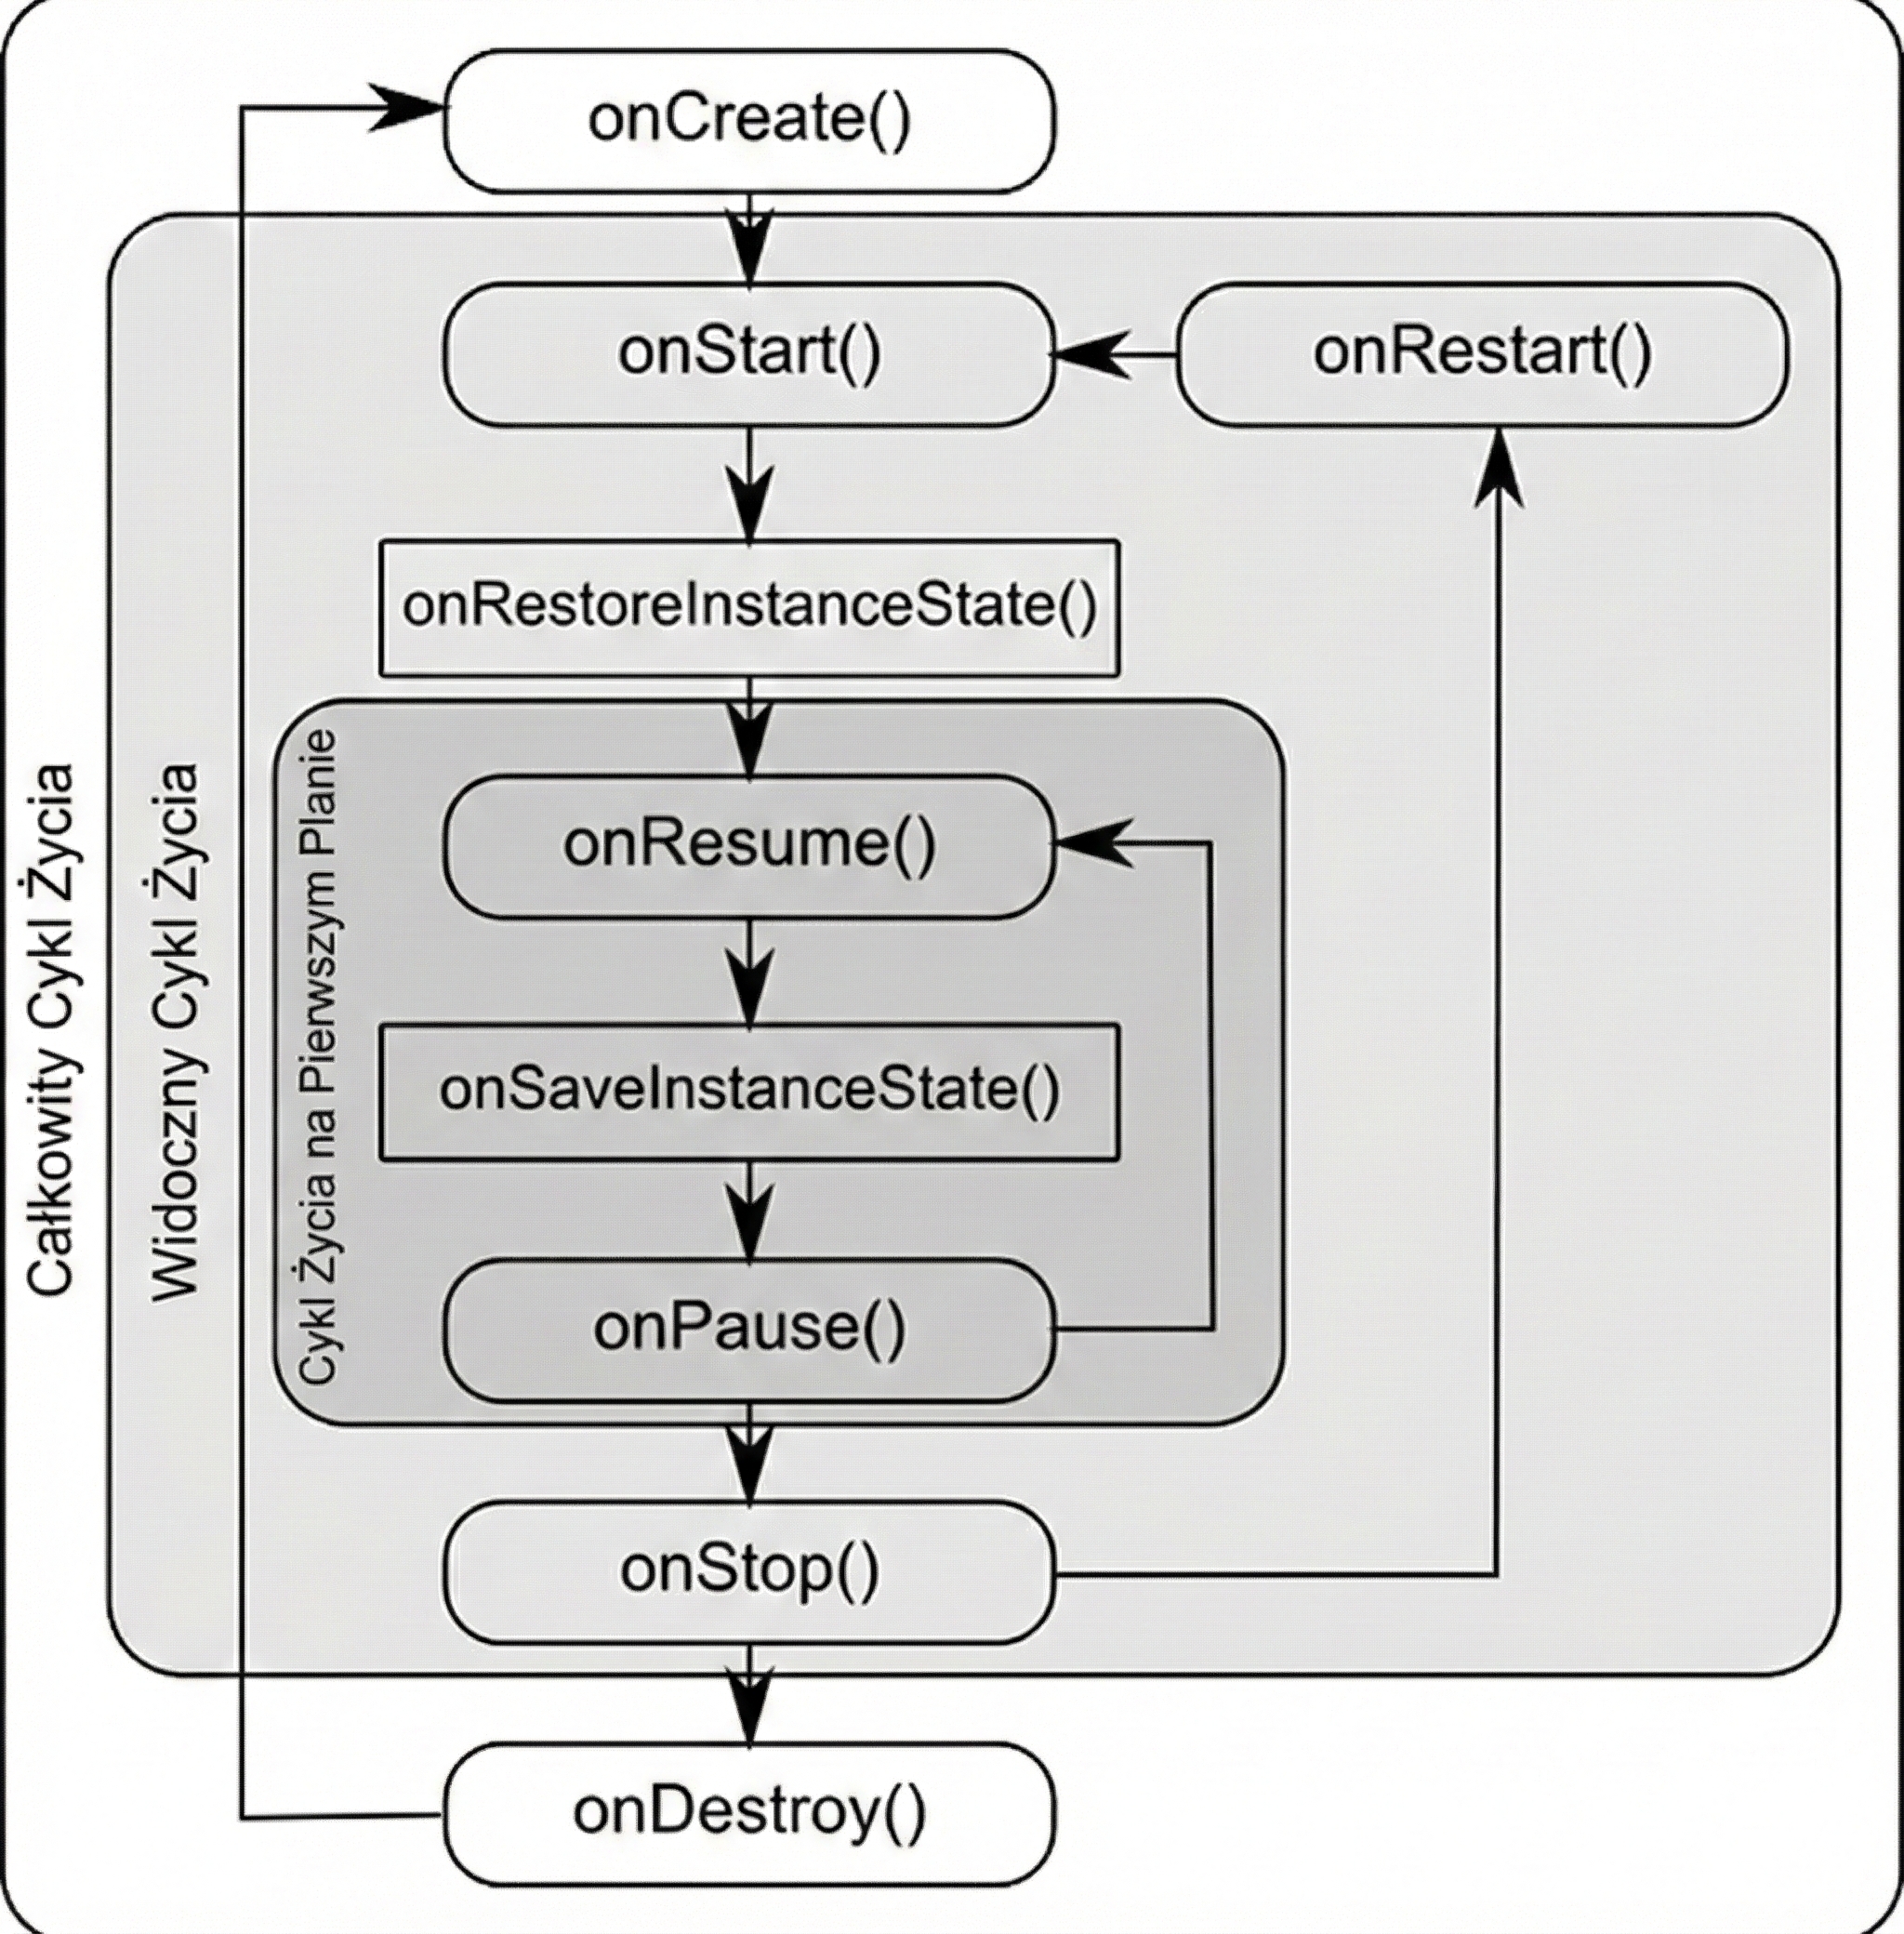

Why were so many methods introduced? This granularity allows precise resource management by dividing the Activity lifetime into three nested cycles:
- Entire lifetime: Between
onCreateandonDestroy. This is the time during which the Activity object exists in memory at all. Here we initialize global state. - Visible lifetime: Between
onStartandonStop. The user sees the application on the screen, so we can keep resources needed to display the interface. - Foreground lifetime: Between
onResumeandonPause. The Activity is on top and has the so-called focus.
A good way to remember this hierarchy is the analogy of an actor in a theater:
onCreate: The actor comes to the theater and prepares in the dressing room (initialization).onStart: The actor enters the stage. They are visible to the audience, but may still stand in the shadow.onResume: The spotlight falls on the actor; they start their line and the main interaction.onPause: The spotlight turns off. The actor is still on stage, but the audience's attention moves to someone else.onStop: The actor leaves the stage and goes backstage.onDestroy: The actor removes the costume and leaves the theater building (memory release).
With this division, the system can manage resources intelligently. For example, in split-screen mode, one application may be in the onResume state, the one in which we are currently typing, while the other is in onPause but still visible. This allows video playback to continue in the second application (onStart/onStop), even though it is not the center of attention.
It is worth emphasizing an important technical detail: onPause() is often mentioned as the last safe method before the system may potentially kill the process. This comes from historical Android assumptions before version 3.0, where the process could indeed be immediately removed from memory after onPause() in critical low-resource situations. In newer versions, the system guarantees execution up to onStop(), but onPause() remains the moment when the application stops being interactive. This makes it the best place for quickly saving critical data before the user fully leaves the screen.
State restoration
When the system destroys an Activity for reasons outside the application's control, such as screen rotation, system-language change, or forced memory release, the state of local variables inside the class is lost. To preserve continuity of the user experience, Android provides a mechanism for saving and restoring state with a Bundle object.
Bundle is an optimized key-value map used to transfer data between processes (IPC). Because of system limitations, the Binder transaction buffer has a limit of about 1 MB for the whole process, so a Bundle should store only lightweight data such as identifiers, text entered into fields, or switch states.
The state-saving process is based on three key points:
- Saving data (
onSaveInstanceState): The system calls this method when an Activity moves to the background and there is a risk that it may be destroyed. We receive anoutState: Bundleobject and put data into it with methods such asputInt()andputString(). - Reading in
onCreate(savedInstanceState: Bundle?): This is the most common place for restoring state. If the Activity is created from scratch, this parameter isnull. If it is recreated after destruction, it contains previously saved keys. - Reading in
onRestoreInstanceState(savedInstanceState: Bundle): This method is called afteronStart(). It differs fromonCreatebecause the system calls it only when there is actually state to restore, so the passedBundleis never null. This allows us to separate initialization logic from UI-restoration logic.
In modern architecture recommended by Google, most UI state should be stored in a ViewModel, which survives simple configuration changes such as screen rotation. However, Bundle, often through SavedStateHandle in a ViewModel, remains necessary for handling the situation in which the system kills the application process because of low resources.

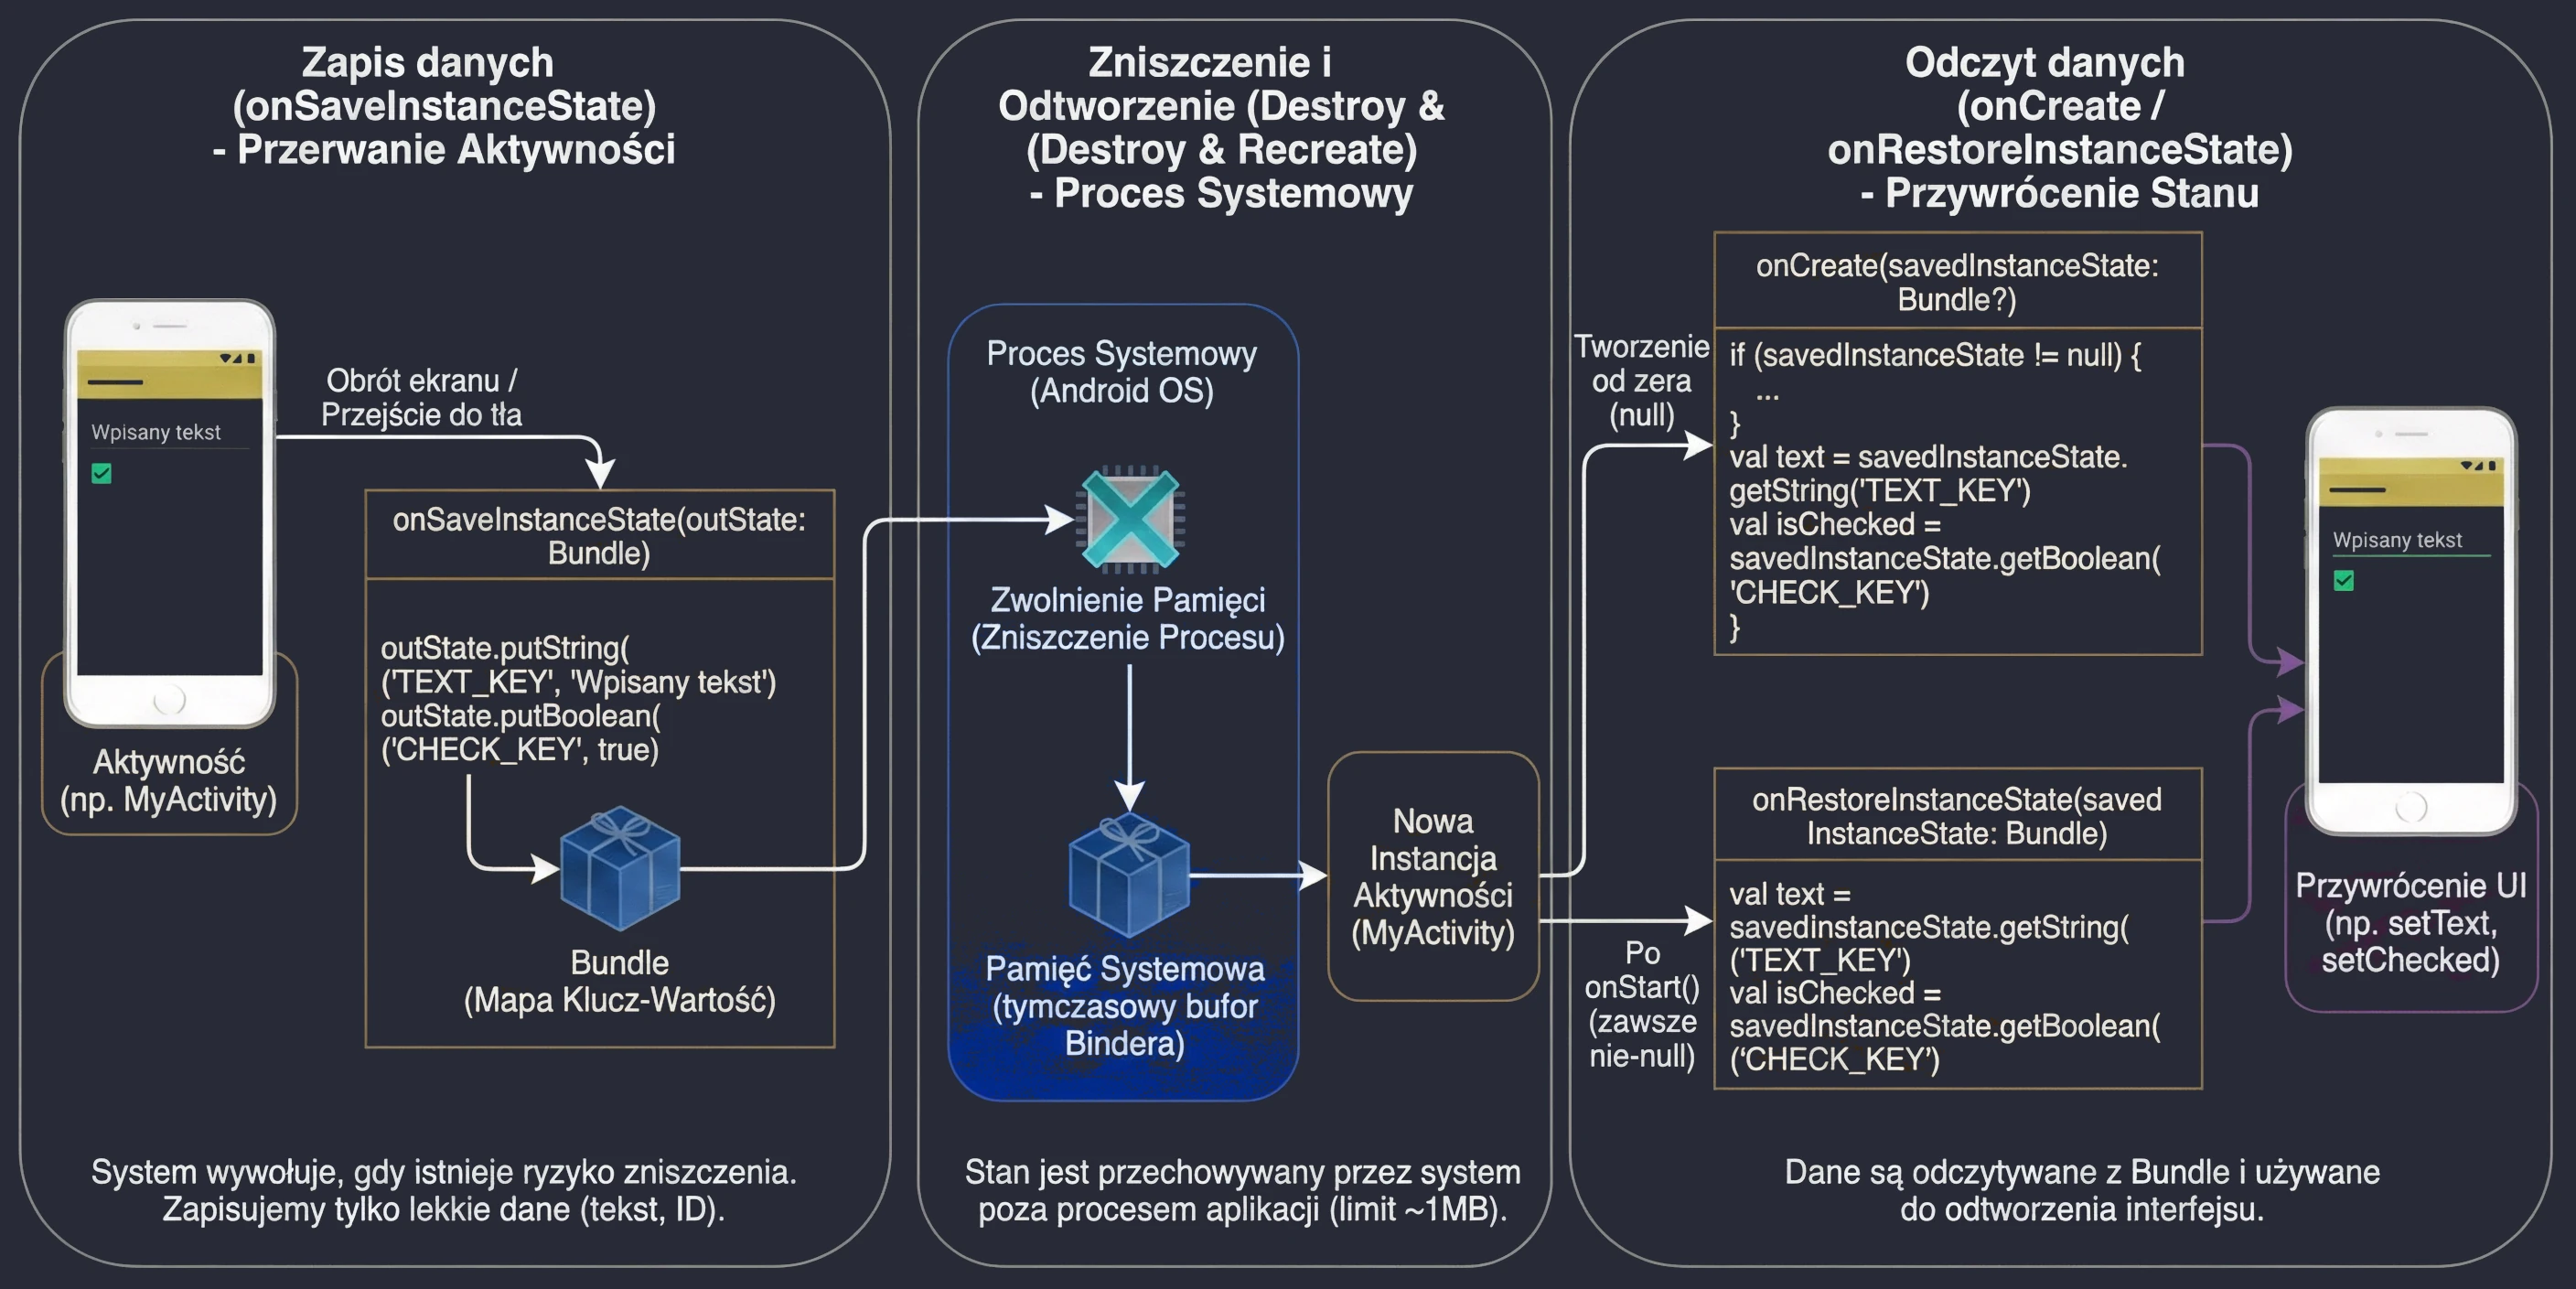
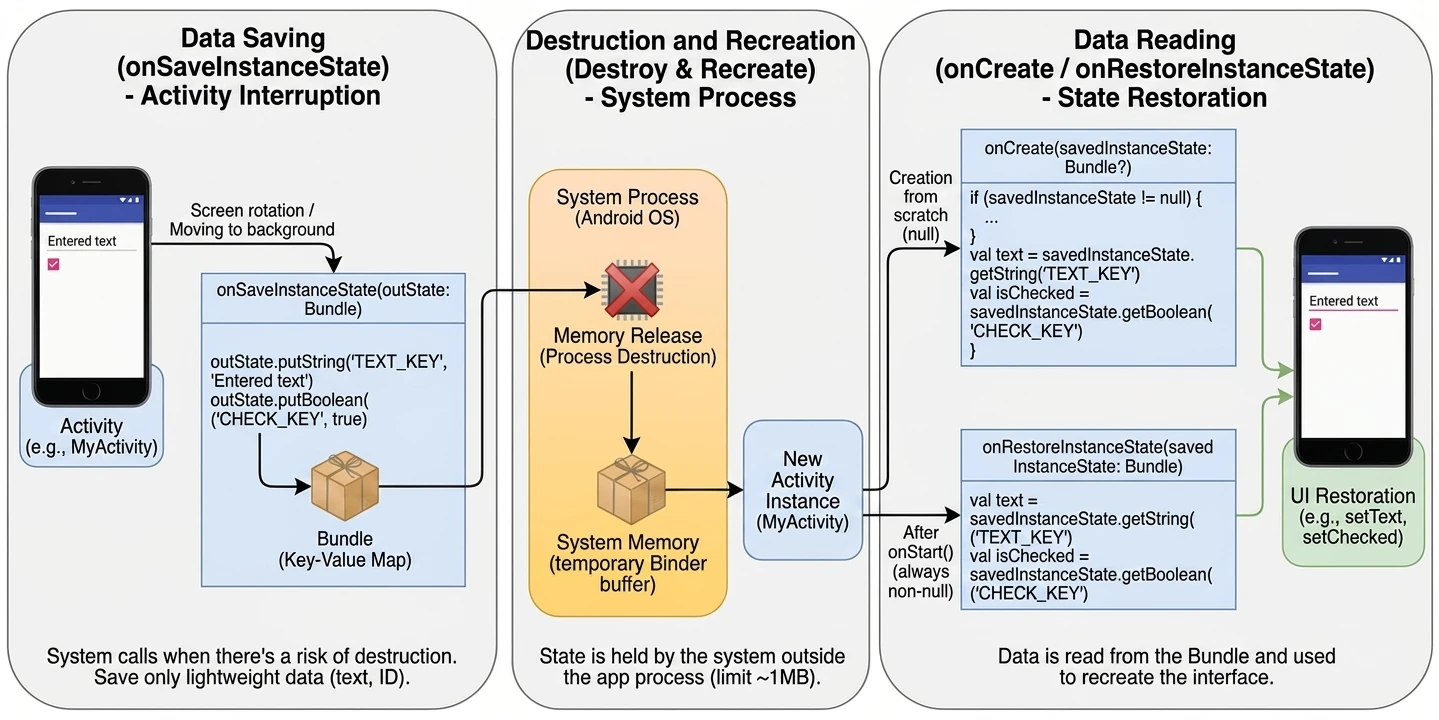
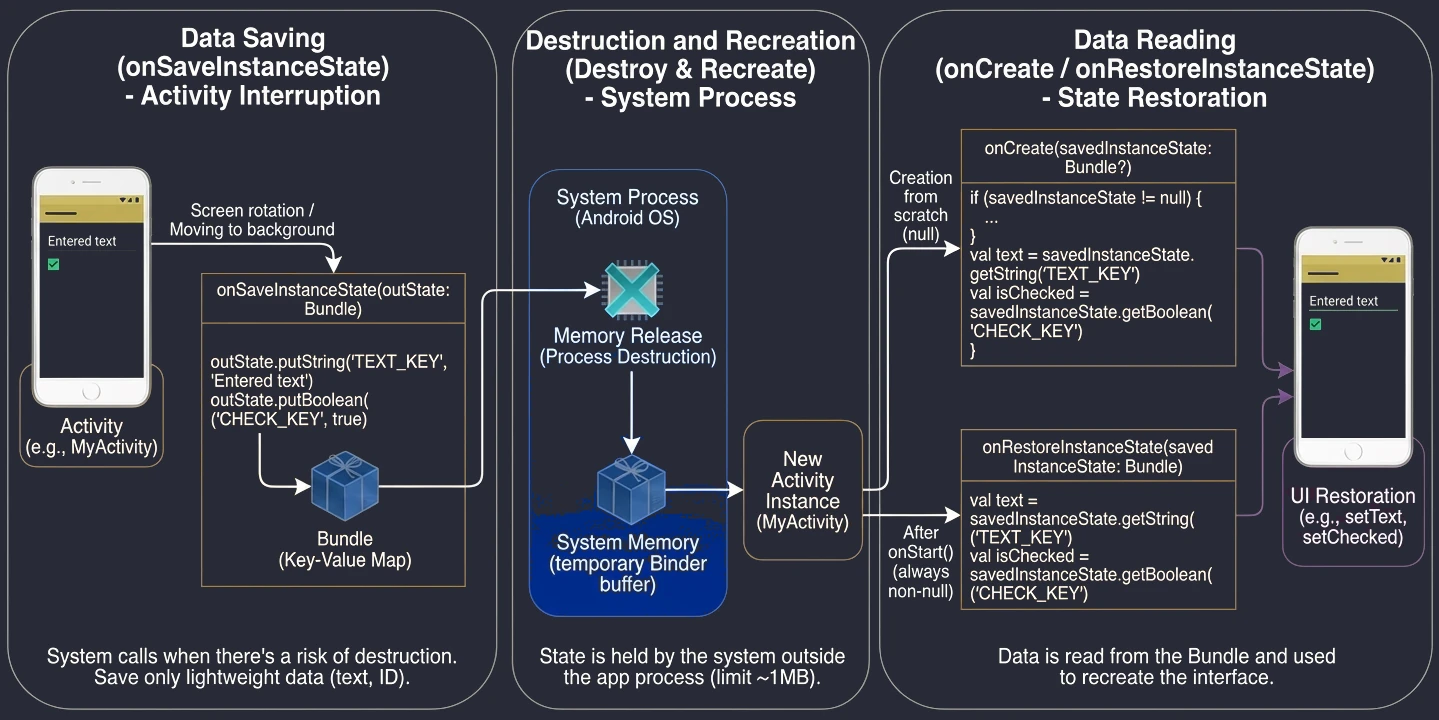
Context
Context is an abstract class that acts as a handle to the environment in which the application runs. It gives access to system resources such as files, databases, preferences, and launchers.
Types of context:
- Application Context: Lives as long as the whole application. It is a singleton. It is safe to use in the data layer, singletons, and long-running background operations. It does not know about themes or UI.
- Activity Context: Lives as long as the Activity. It knows about UI and styles. It is used to create views, display dialogs, and perform navigation.
Watch out for memory leaks: Passing an Activity Context to an object that lives longer than the Activity, for example to a singleton, will prevent the Garbage Collector from removing the destroyed Activity from memory.
It is worth asking: why do we need a Context object at all, when in desktop applications, for example Java SE or C#, access to files or system resources is often done directly through standard language libraries?
The difference comes from the architecture of Android and the fact that mobile applications run in an environment with very limited resources:
- Isolation (sandboxing): Every application runs in its own process with a unique user identifier (UID). It cannot simply open any file on disk.
Contextis a pass that allows the system to identify the application and grant it permission to use system resources. - Lifecycle management: Unlike a desktop application, which usually runs until the user closes it, Android components are constantly created and destroyed by the system. The existence of different types of context allows the system to precisely determine how long a given resource should be reserved.
Why, when creating classes responsible for a database, for example Room, or for the network layer, for example Retrofit + OkHttp, do we sometimes have to pass Context?
- Database: It must know where to physically create the
.dbfile. The path to the protected application-data folder (/data/data/package.name/databases) is available only through thegetDatabasePath()method, which belongs to the context. - Retrofit/OkHttp:
Retrofititself does not requireContext.Contextmay be needed when configuring theOkHttpclient, for examplecacheDirfor HTTP cache, or when accessing system services such asConnectivityManager.
In such cases, the key point is to pass the Application Context. Because a database or network client is usually a singleton object, living for the entire program runtime, keeping a reference to an Activity Context inside it would prevent the system from removing the closed screen from memory and would cause a memory leak.
From the programmer's point of view, Activity is a full Context object thanks to multi-level inheritance. The class hierarchy in Android looks as follows:
- Any (Kotlin) / Object (Java): The root of the class hierarchy.
- Context: An abstract class defining the contract, or interface, for system services.
- ContextWrapper: An implementation of the Decorator (Proxy) design pattern. Instead of implementing the logic by itself, it has a reference to another context and delegates all calls to it.
- Application and Service: They inherit directly from
ContextWrapper. - ContextThemeWrapper: An extension of
ContextWrapperthat adds support for themes and graphical styles. - Activity: Inherits from
ContextThemeWrapper.
Although Activity inherits from Context, it does not itself contain the code responsible for low-level system operations such as file-system access. When Android starts the application process, it creates an object of an internal hidden class called ContextImpl. This is the actual implementation that communicates with the system kernel.
During Activity initialization, the system calls attachBaseContext(contextImpl), injecting this object inside. As a result, a call to openFileInput() inside an Activity is effectively delegated to the ContextImpl object, which performs the actual work. This mechanism keeps components lightweight while still giving them access to powerful system functionality.
Intents
Intent is a message object used for communication between components, even between different applications. The Android system acts like a postman here.
Explicit intents
We specify exactly which class we want to start. This is used inside our own application. In applications based on Jetpack Compose, navigation between screens is implemented with the Navigation Compose library, which internally also uses explicit intents. We no longer explicitly create Intent objects; we only call navigation functions. Below is an example of using an explicit intent in the traditional approach with Activity.
val intent = Intent(context, SecondActivity::class.java)
intent.putExtra("USER_ID", 123) // Passing data (Bundle) under the hood
context.startActivity(intent)
Implicit intents
We declare what we want to do (the action), and the system looks for a suitable handler.
val intent = Intent(Intent.ACTION_VIEW, Uri.parse("https://google.com"))
context.startActivity(intent)
The process of matching an implicit intent to a concrete component is called Intent Resolution. The operating system, through PackageManager, analyzes the message based on three criteria:
- Action: The name of the operation to perform, for example
ACTION_VIEWorACTION_SEND. - Data: The URI of the data and its MIME type, for example
image/jpeg. - Category: Additional information about the type of component that should handle the intent, for example
CATEGORY_BROWSABLE.
For an application to handle an implicit intent, it must declare an <intent-filter> in the AndroidManifest.xml file. This is a declaration of a component's capabilities.
When we call startActivity with an implicit intent, the system performs the following process:
- Search:
PackageManagerscans manifests of all installed applications for filters matching the request. - Matching tests: The intent must pass three tests:
- Action test: The action in the intent must be present on the filter's action list.
- Category test: All categories contained in the intent must be present in the filter. The filter may have more categories, but not fewer.
- Data test: The URI scheme, for example
https, the host, and the MIME type must match the definition in the<data>tag. - Reaction:
- If exactly one component matches, the system starts it directly.
- If many components match, the system displays a chooser window (Resolver Activity), allowing the user to choose the preferred application.
- If no matching Activity is found, the application throws an
ActivityNotFoundException.
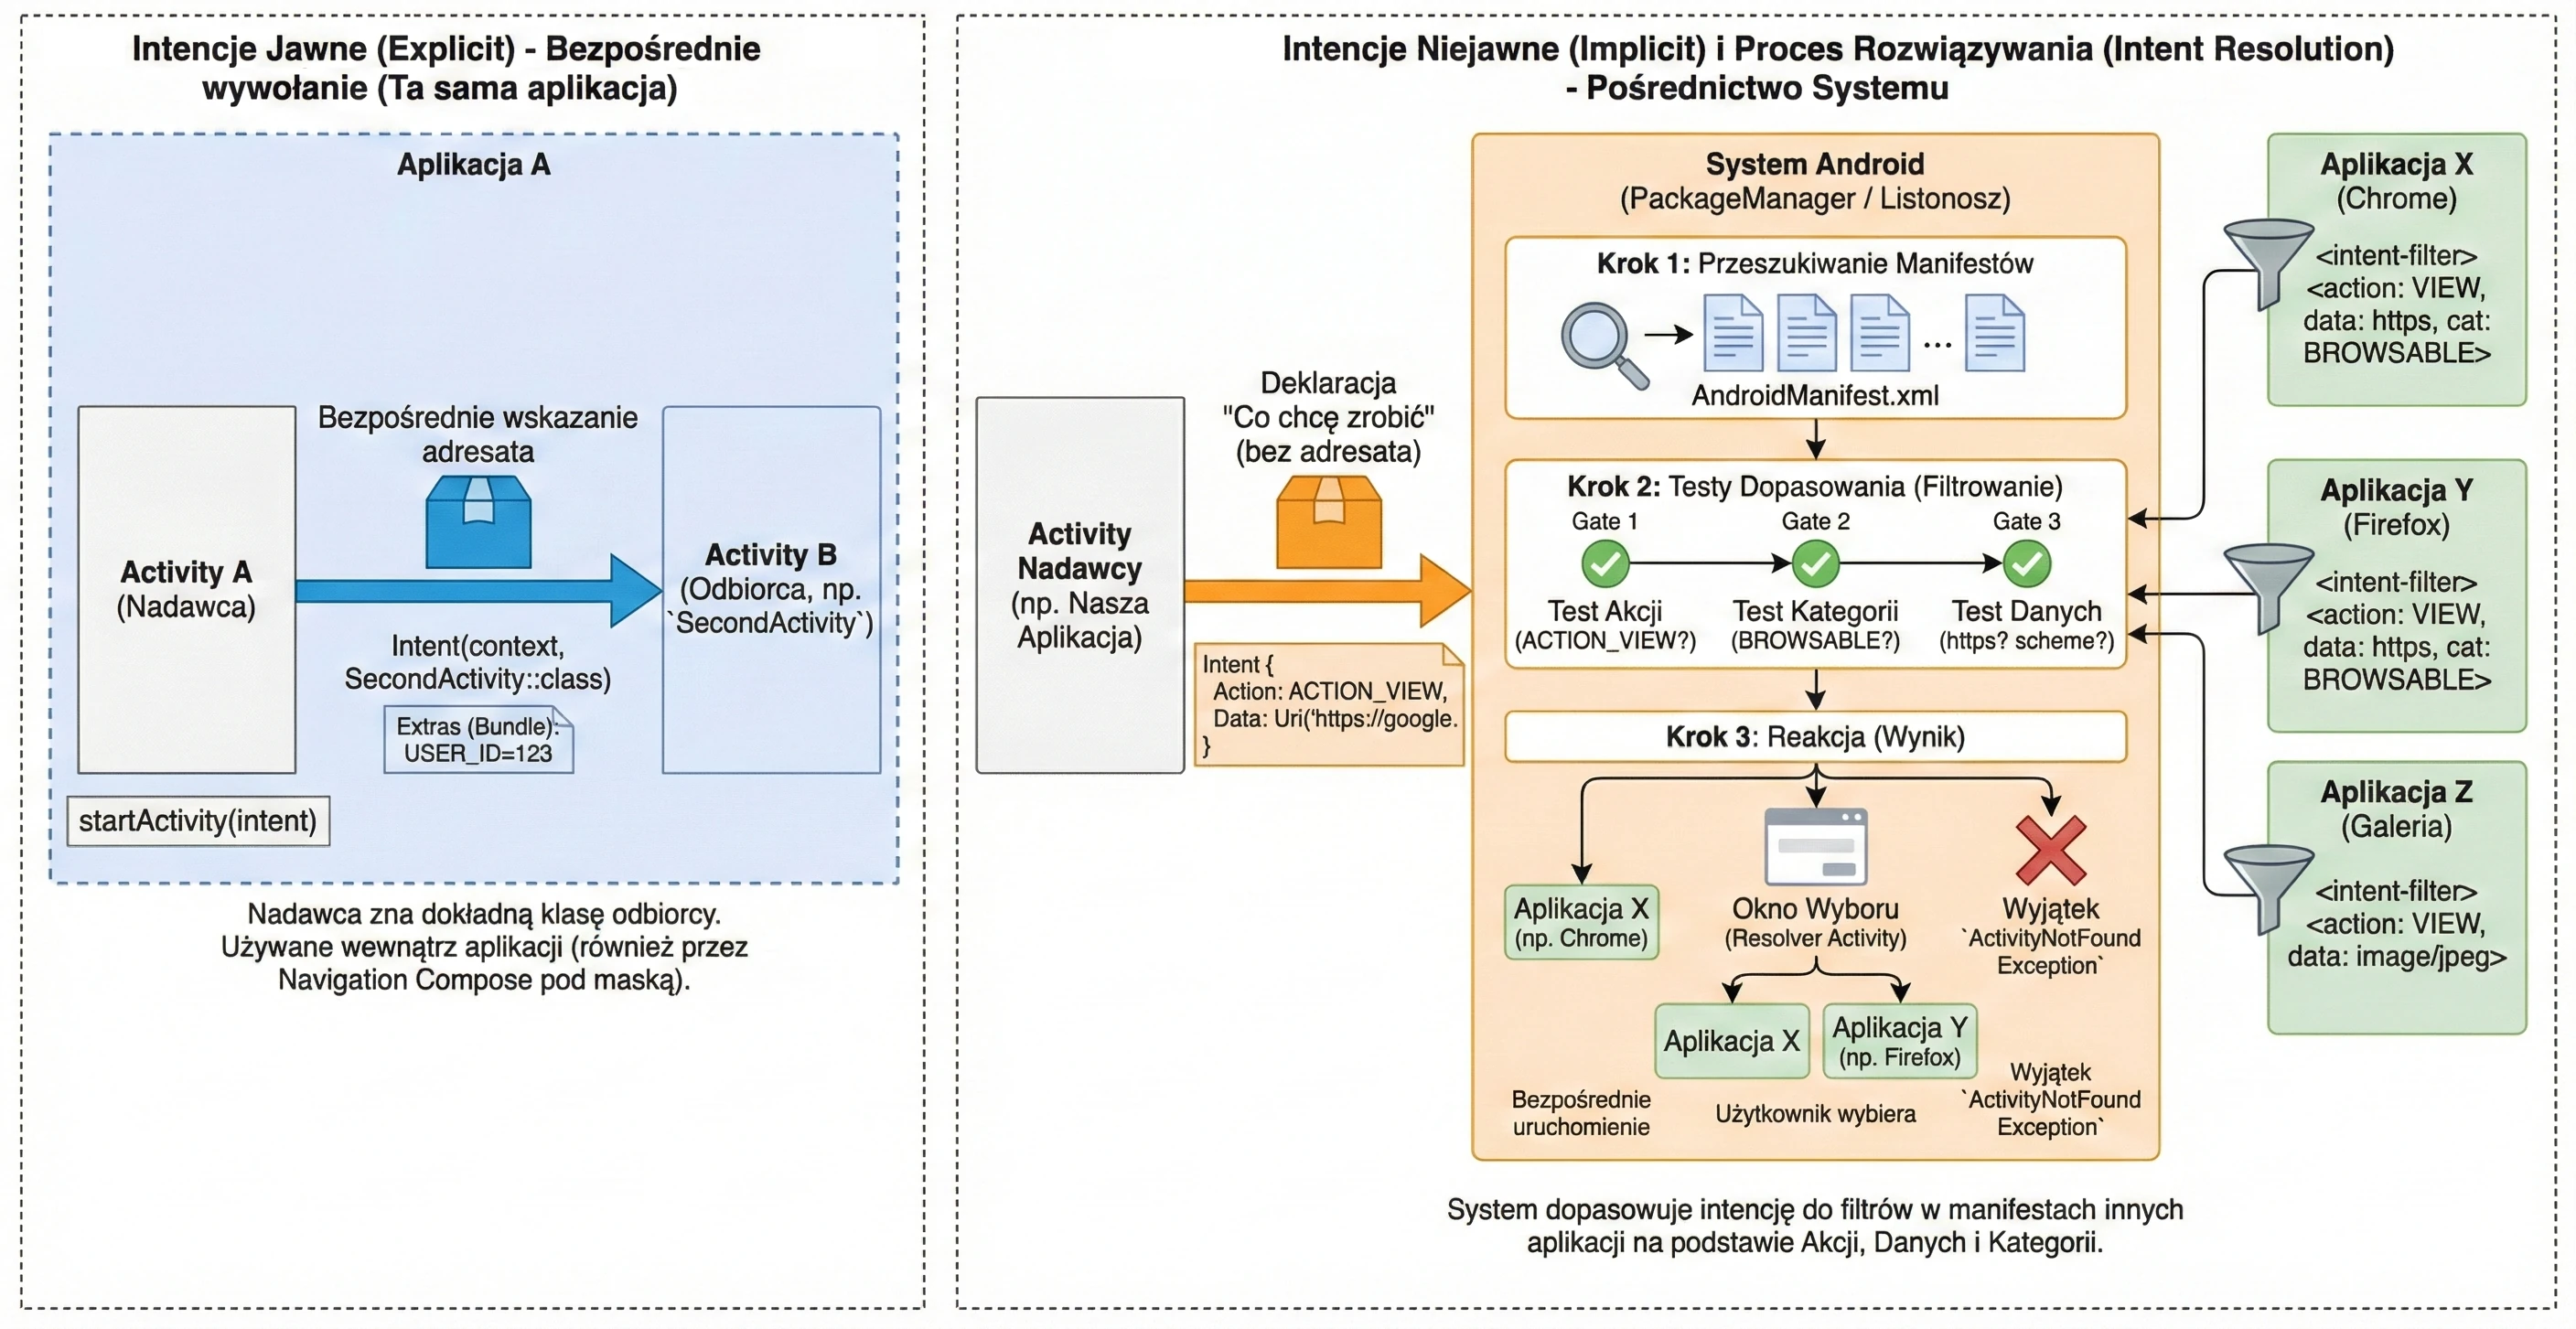
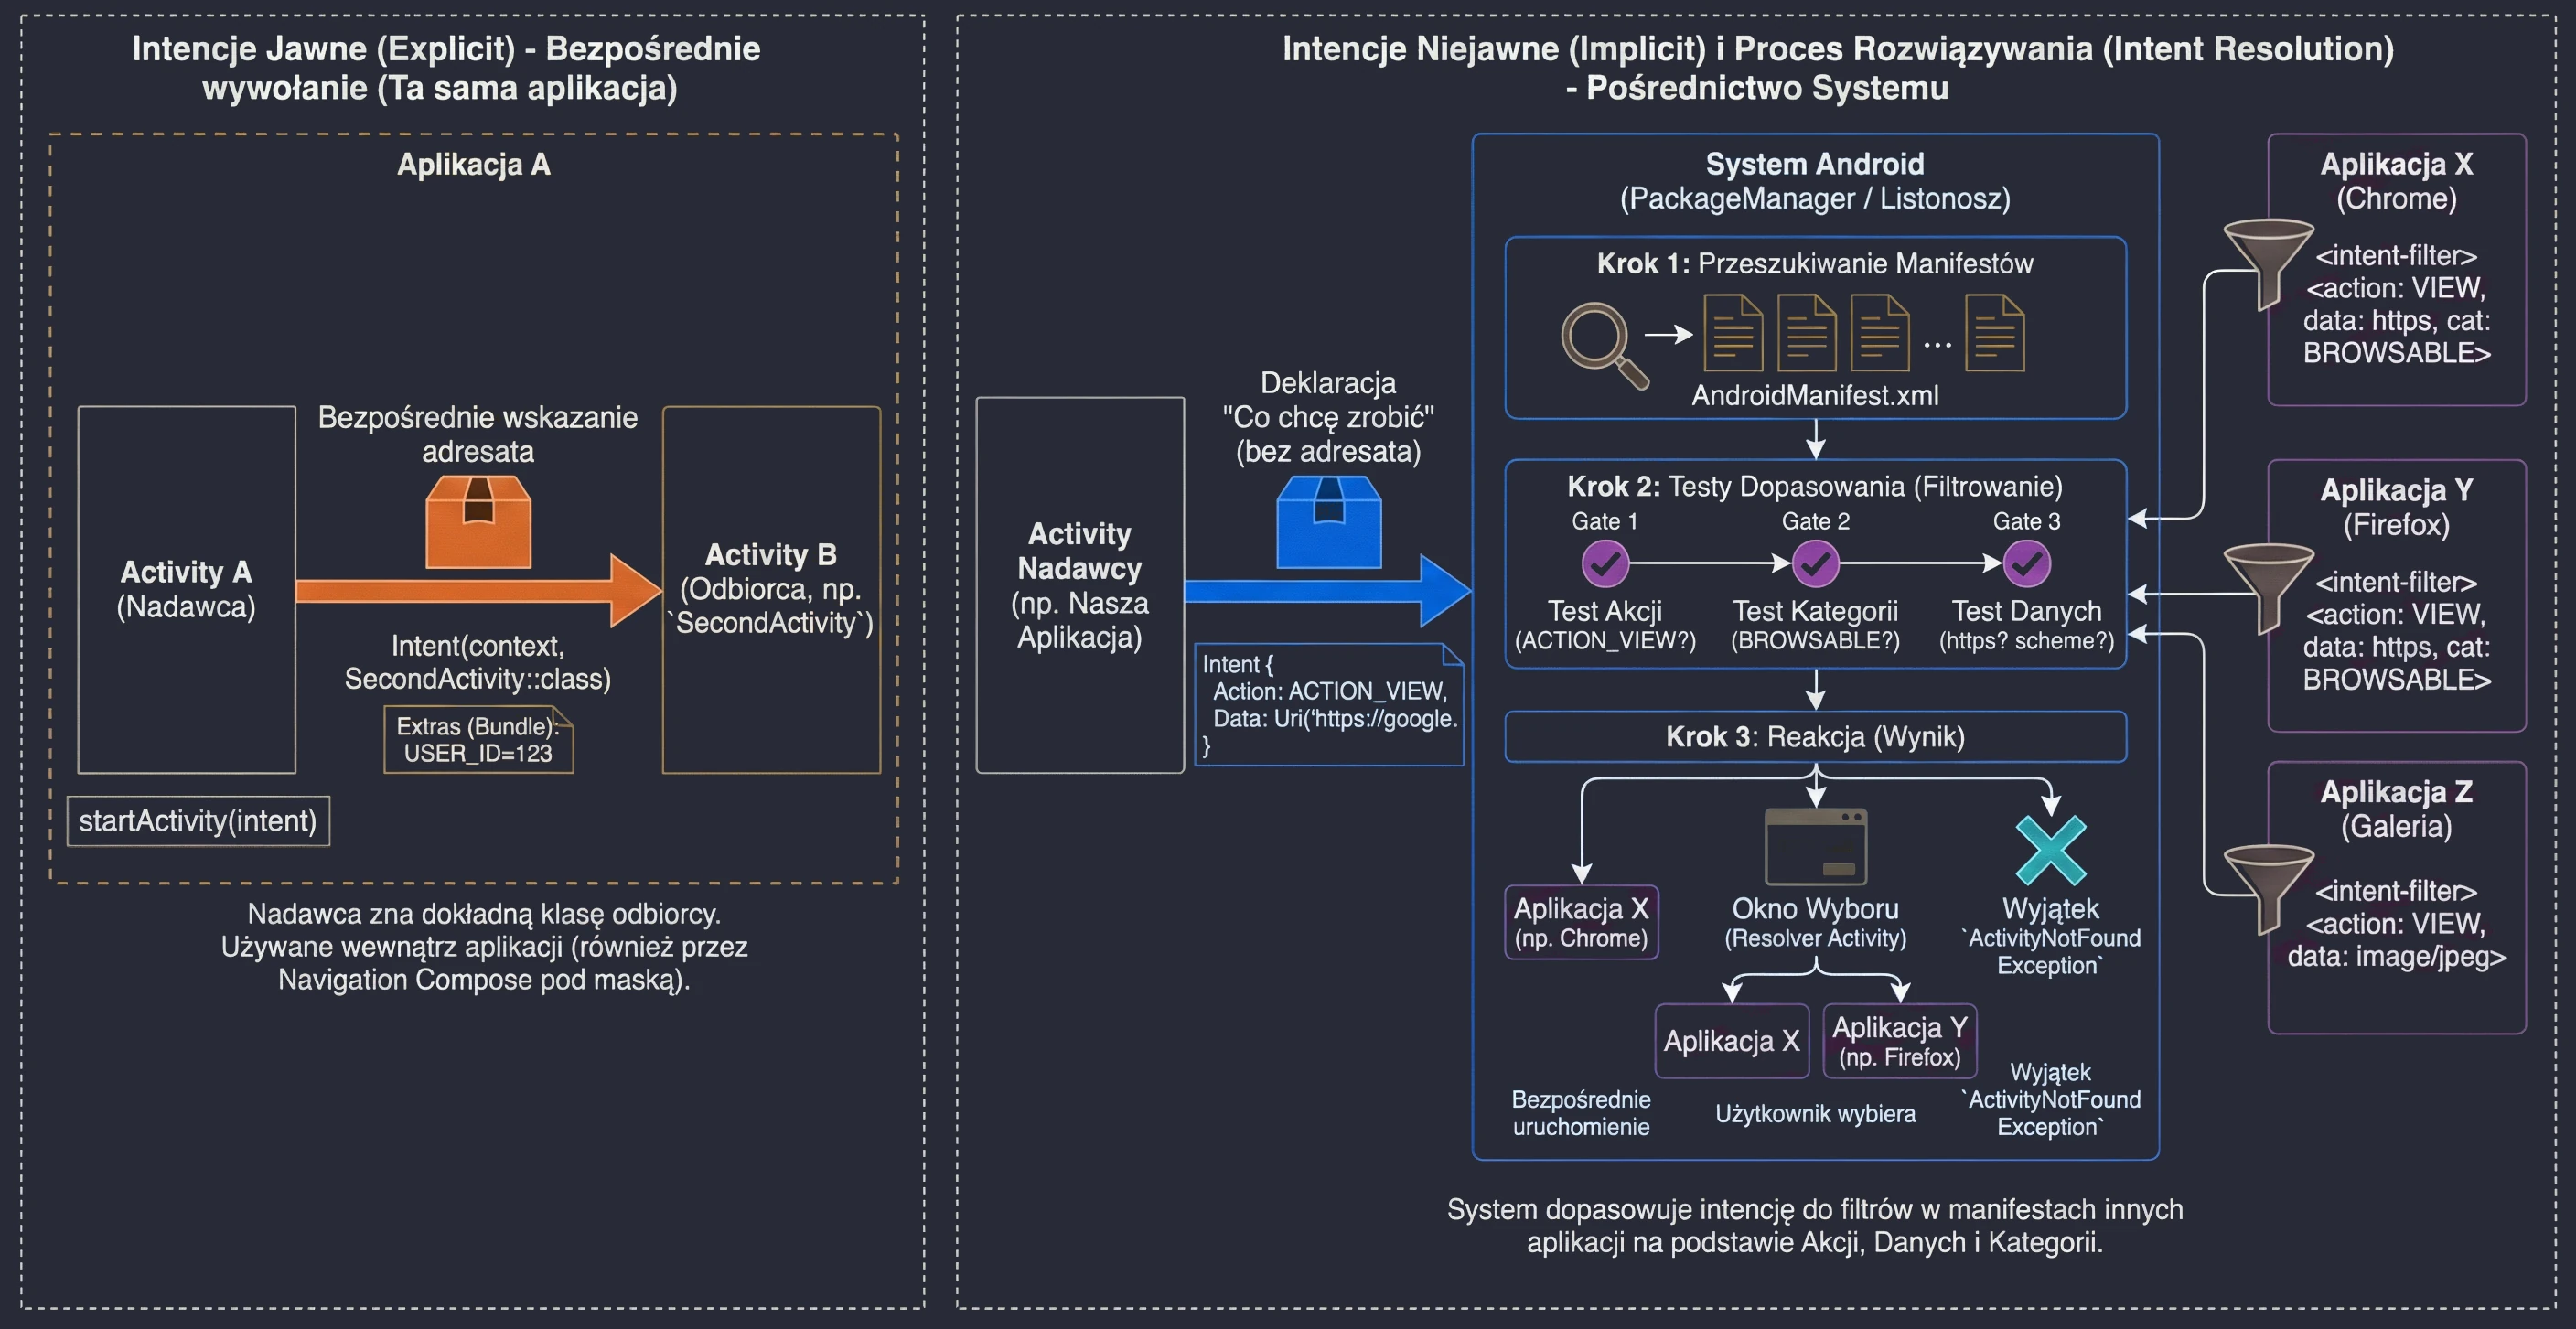
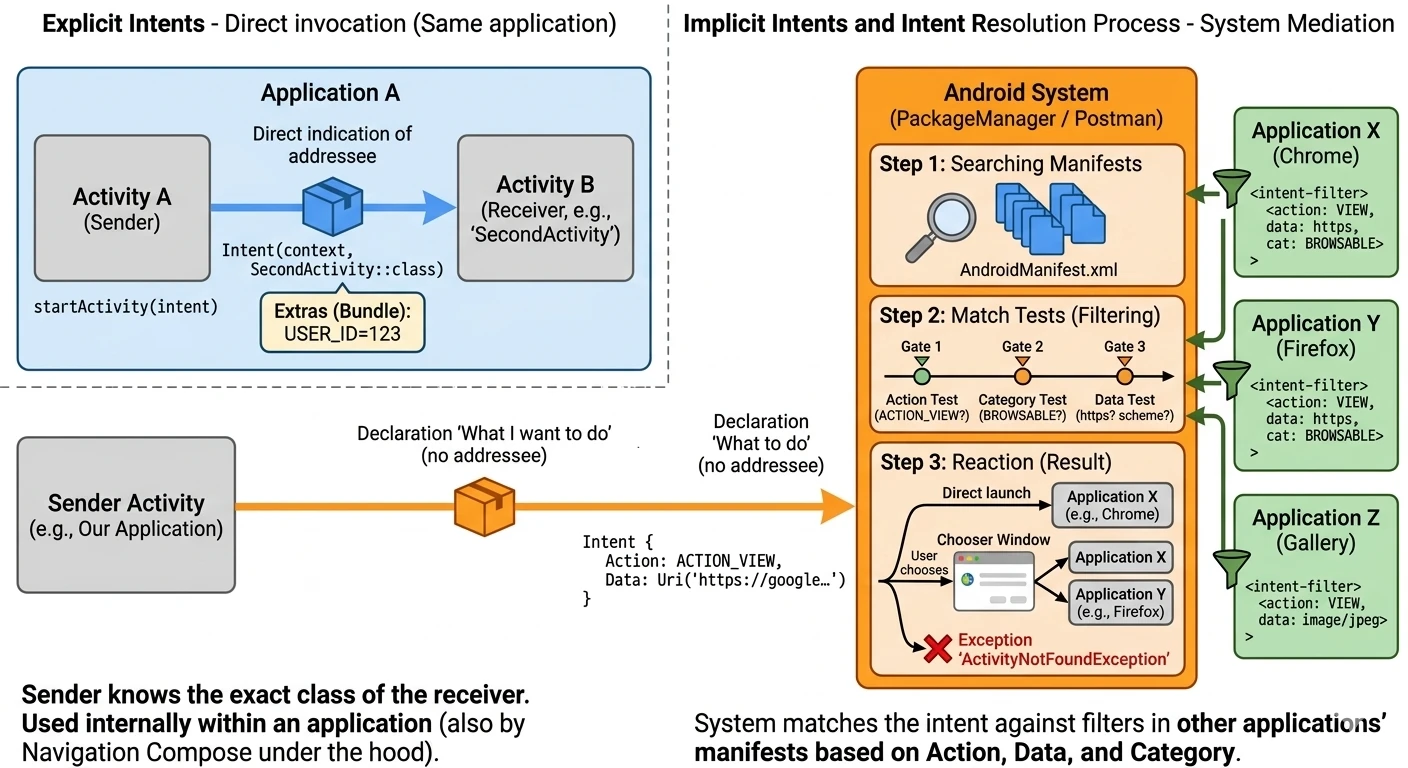
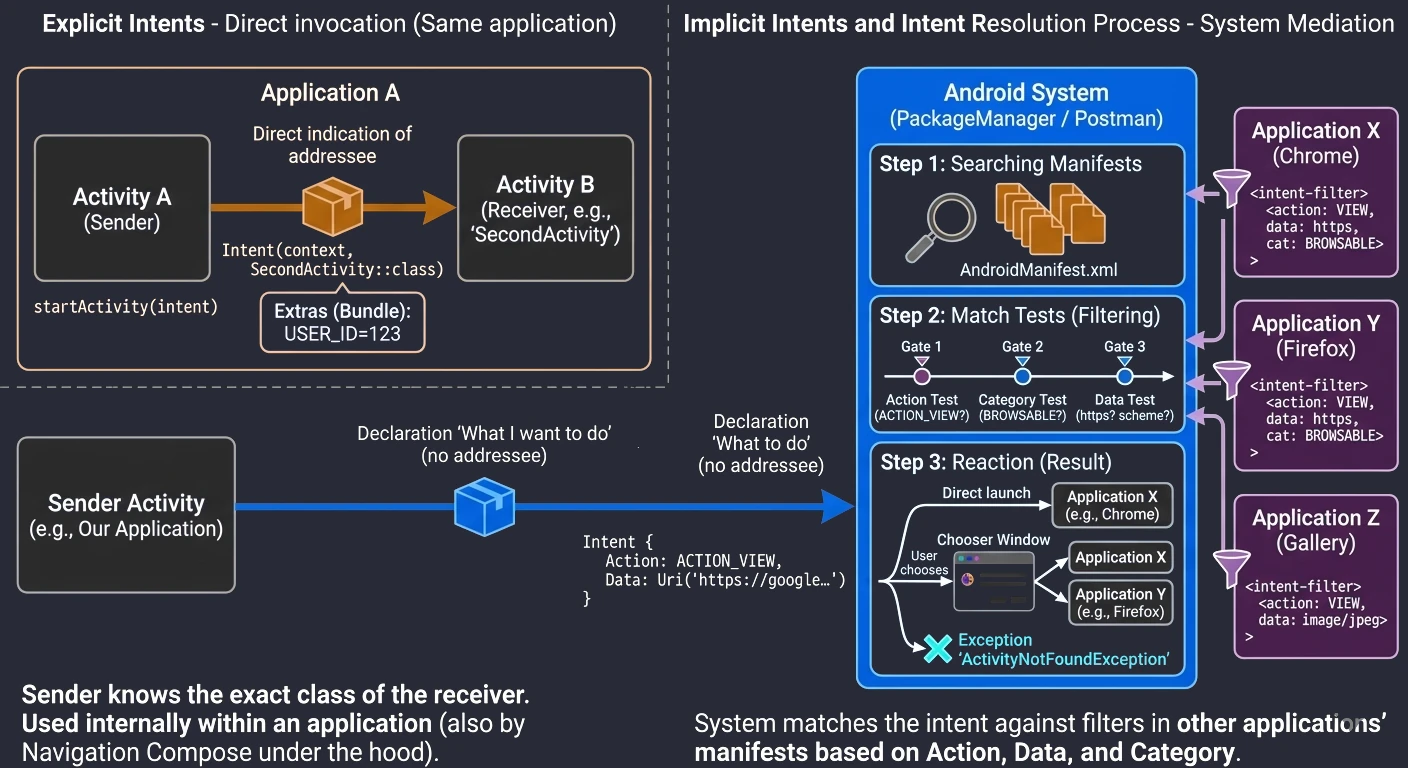
Complete implicit intent example
package com.example.openurlapp

import android.content.ActivityNotFoundException
import android.content.Intent
import android.net.Uri
import android.os.Bundle
import android.widget.Toast
import androidx.activity.ComponentActivity
import androidx.activity.compose.setContent
import androidx.compose.foundation.layout.*
import androidx.compose.material3.*
import androidx.compose.runtime.*
import androidx.compose.ui.Alignment
import androidx.compose.ui.Modifier
// Important import for LocalContext
import androidx.compose.ui.platform.LocalContext
import androidx.compose.ui.unit.dp

class MainActivity : ComponentActivity() {
    override fun onCreate(savedInstanceState: Bundle?) {
        super.onCreate(savedInstanceState)
        // Jetpack Compose starting point
        setContent {
            MaterialTheme {
                Surface(modifier = Modifier.fillMaxSize()) {
                    UrlOpenerScreen()
                }
            }
        }
    }
}

@Composable
fun UrlOpenerScreen() {
    // 1. We get the Context of the current Activity
    val context = LocalContext.current

    // State: text entered by the user
    var urlText by remember { mutableStateOf("https://developer.android.com") }

    Column(
        modifier = Modifier.fillMaxSize().padding(16.dp),
        horizontalAlignment = Alignment.CenterHorizontally,
        verticalArrangement = Arrangement.Center
    ) {
        Text("Opening a URL (implicit intent)")
        Spacer(modifier = Modifier.height(16.dp))

        OutlinedTextField(
            value = urlText,
            onValueChange = { urlText = it },
            label = { Text("Enter URL") },
            modifier = Modifier.fillMaxWidth()
        )

        Spacer(modifier = Modifier.height(16.dp))

        Button(onClick = {
            try {
                // 2. We create an intent: "I want to VIEW these DATA (Uri)"
                val intent = Intent(Intent.ACTION_VIEW, Uri.parse(urlText))

                // 3. We start it - the system looks for a suitable app
                context.startActivity(intent)

            } catch (e: ActivityNotFoundException) {
                // 4. Error handling when no browser is available
                Toast.makeText(
                    context,
                    "No application found to open this link!",
                    Toast.LENGTH_LONG
                ).show()
            }
        }) {
            Text("Open in browser")
        }
    }
}
The code above demonstrates a complete mini-application. Let us discuss the key Android-specific elements:
setContentLocalContext.currentToast- Context: Application context, meaning where to display the message.
- Text: Message content.
- Duration:
LENGTH_SHORTorLENGTH_LONG.
This is the bridge between the Activity world and the Composable world. Everything inside the setContent block is a UI tree built by Jetpack Compose.
In Jetpack Compose, UI functions (@Composable) are independent of the Activity class in which they are placed. Therefore, we do not have direct access to the this keyword representing the Activity. To access Context, needed for example to start intents, we use the CompositionLocal mechanism. LocalContext.current reaches up the UI tree and retrieves the Context made available there by the system. This is a safe way to obtain a reference to the application environment inside any Composable function.
This is a simple mechanism for displaying short messages that do not block the interface. They appear as a small popup at the bottom of the screen and disappear automatically. The makeText method takes three parameters:
Remember to call .show() at the end. Without it, the Toast will not appear.
Jetpack Compose is a declarative toolkit for building native user interfaces on Android. Its release, version 1.0 in 2021, marked the biggest revolution in UI development since the beginning of the Android system.
To understand why Compose was created, we need to go back to 2008. The classic view system (View System), based on XML, had been with Android since version 1.0. For more than a decade it evolved, but it carried the burden of early design decisions:
- Global state and mutability: In the classic approach, the developer had to manually manage view state. One had to find a view (
findViewById) and then call a method mutating its state, for exampletextView.setText(). This often led to bugs when the data state in the application drifted away from the state displayed on the screen. - Inheritance: The
View.javaclass currently has over 30,000 lines of code. All components inherit a huge amount of functionality from it, much of which they often do not need. For example,Buttoninherits fromTextView. - Dependence on the system: Classic views are part of the Android system framework (
android.jar). Fixing a bug inCheckBoxrequired updating the entire operating system on the user's device.
Jetpack Compose solves these problems by being a library independent of the system version, or unbundled. We can use new UI features even on older phones simply by updating the library version in the project.
Imperative vs declarative UI model
The difference between the old and the new approach is fundamental:
- Imperative approach (XML + View): We focus on HOW to change the UI.
// XML
    val button = findViewById<Button>(R.id.button)
    // Imperative state change:
    button.setOnClickListener {
        button.text = "Clicked!"
        button.setBackgroundColor(Color.RED)
}// Compose
@Composable
fun MyButton(isClicked: Boolean) {
// UI is a function of state
Button(
colors = if (isClicked) Color.Red else Color.Blue
) {
Text(if (isClicked) "Clicked!" else "Click me")
}
}In Compose, we do not change the button text. We describe the interface again for new data, and the framework handles refreshing, or recomposing, only those elements that actually changed.
Basic layout components
In Jetpack Compose, we build the interface by composing functions marked with the @Composable annotation. Instead of XML components such as LinearLayout or FrameLayout, we use their Compose counterparts:
Column arranges elements vertically, one under another. It is the counterpart of LinearLayout with vertical orientation.
@Composable
fun ColumnExample() {
    Column {
        Text("Element 1 (Top)")
        Text("Element 2 (Middle)")
        Text("Element 3 (Bottom)")
    }
}
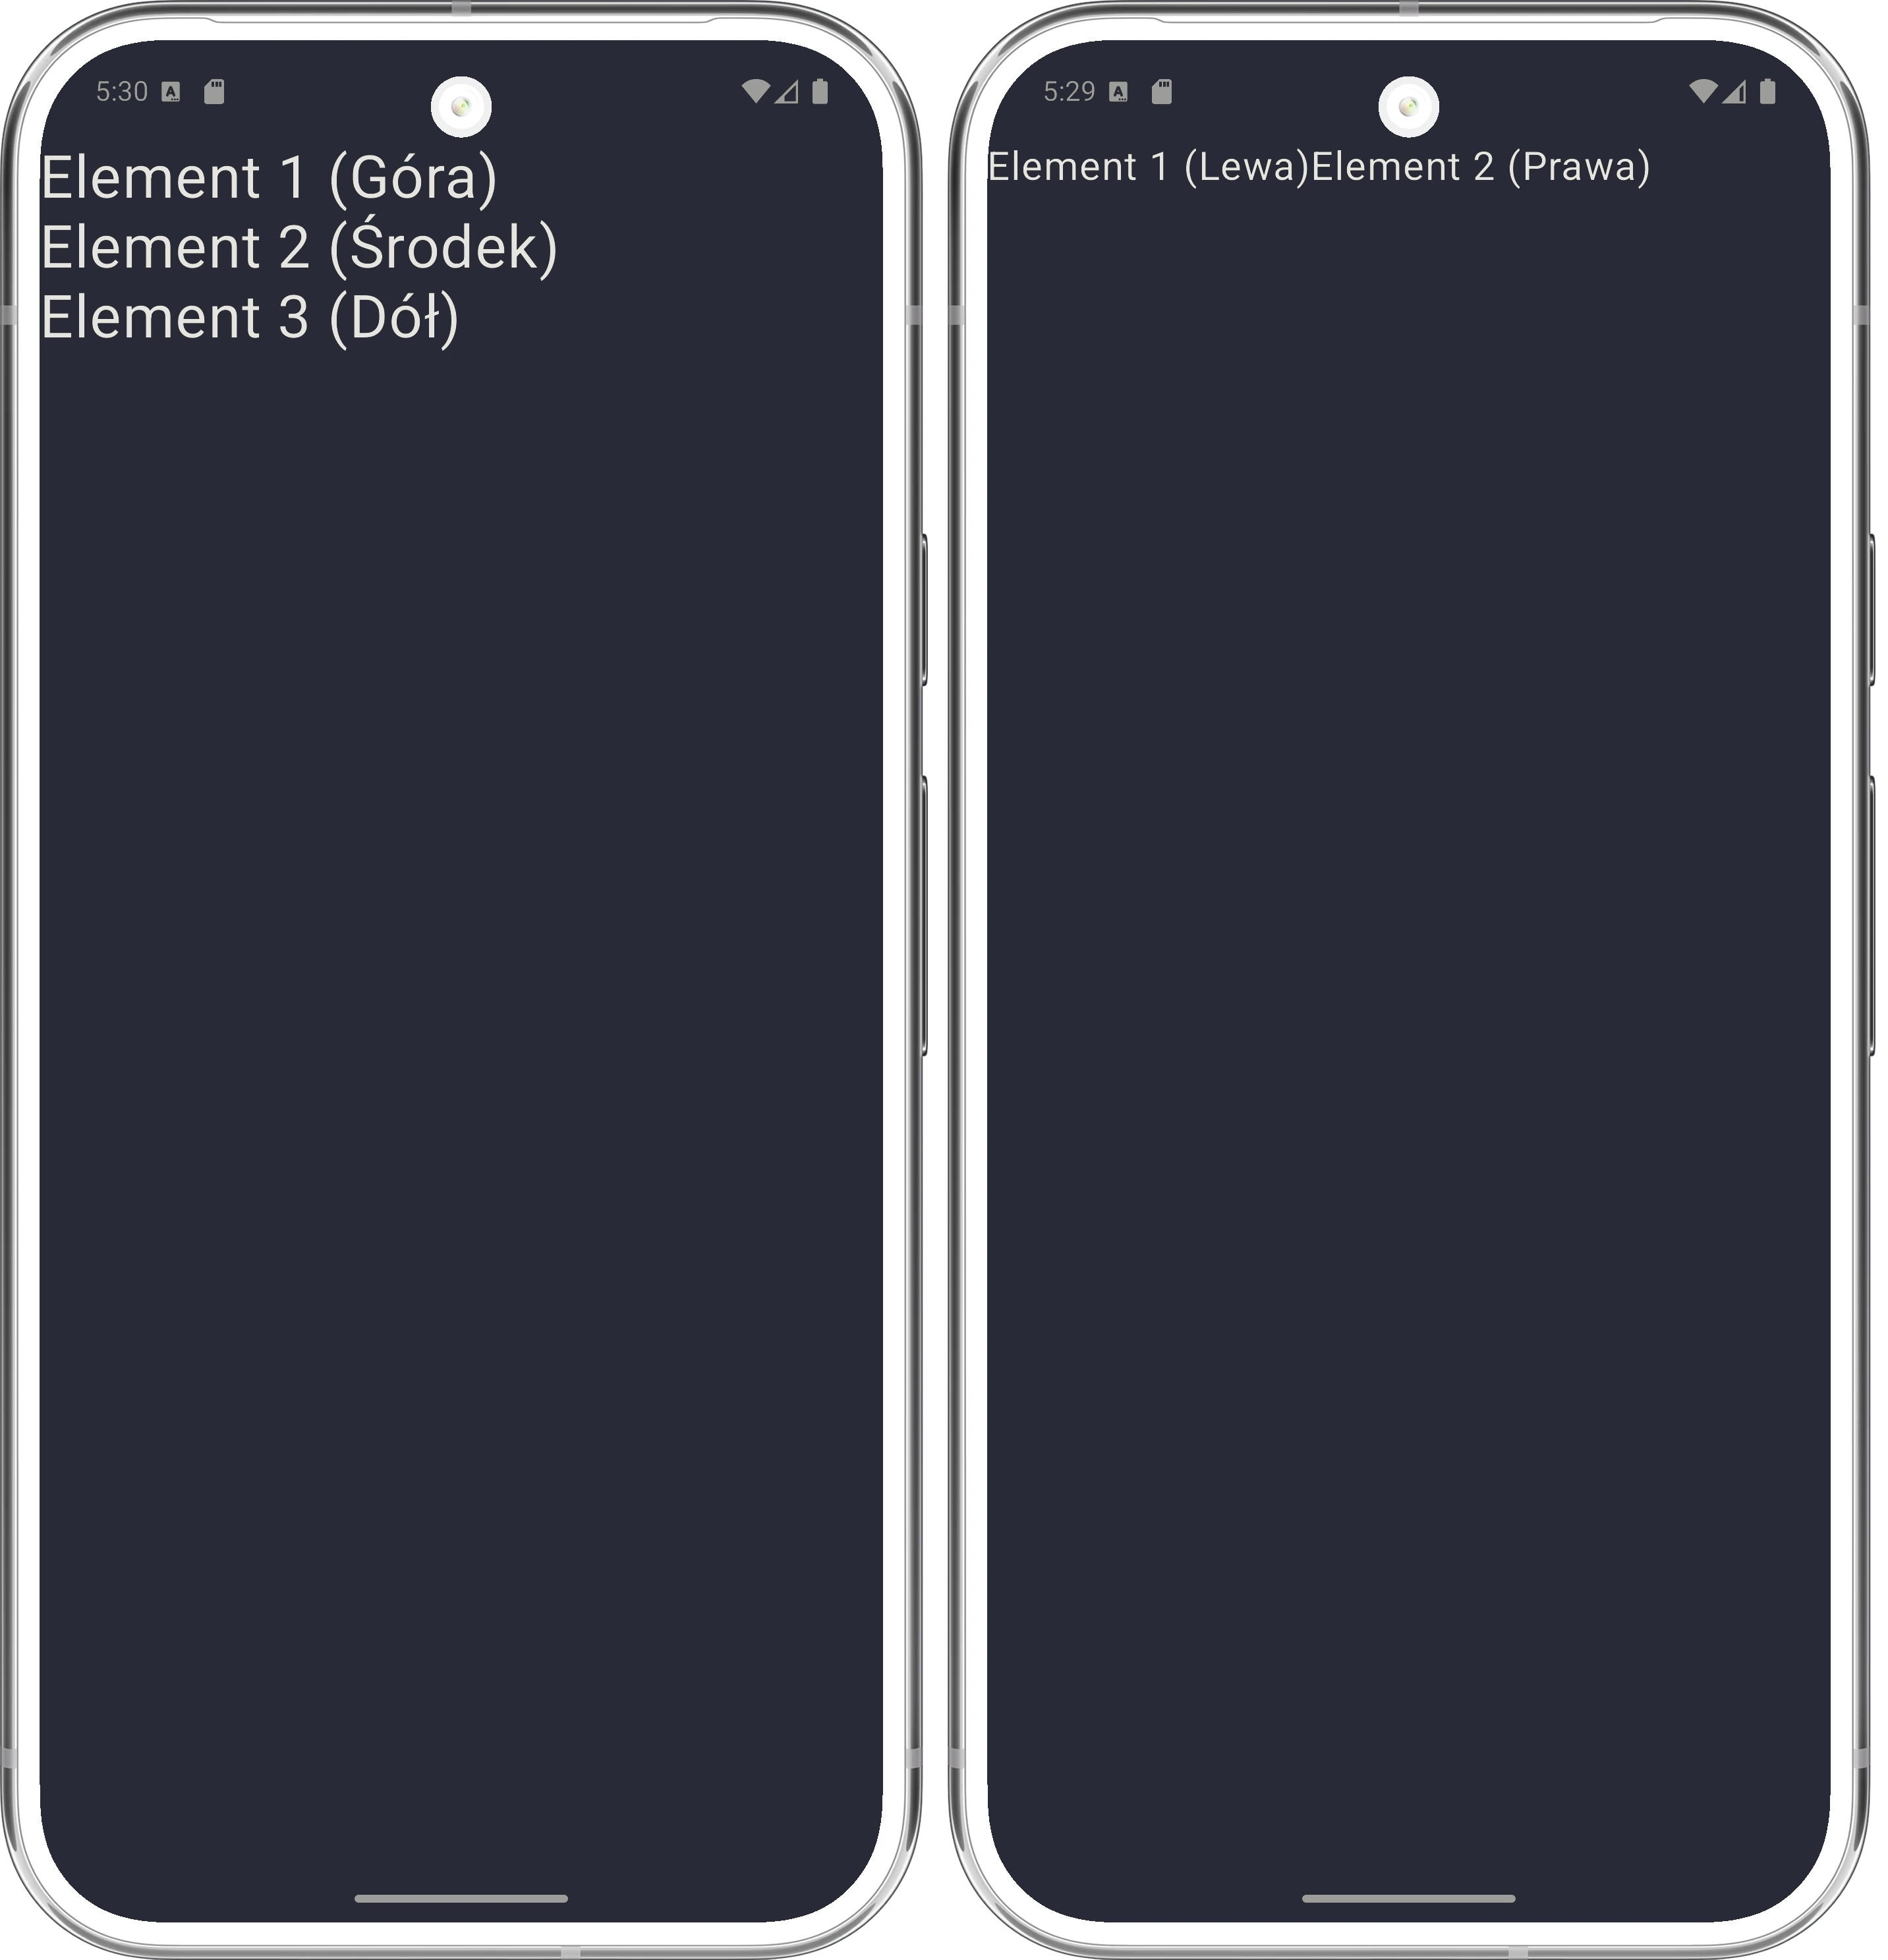
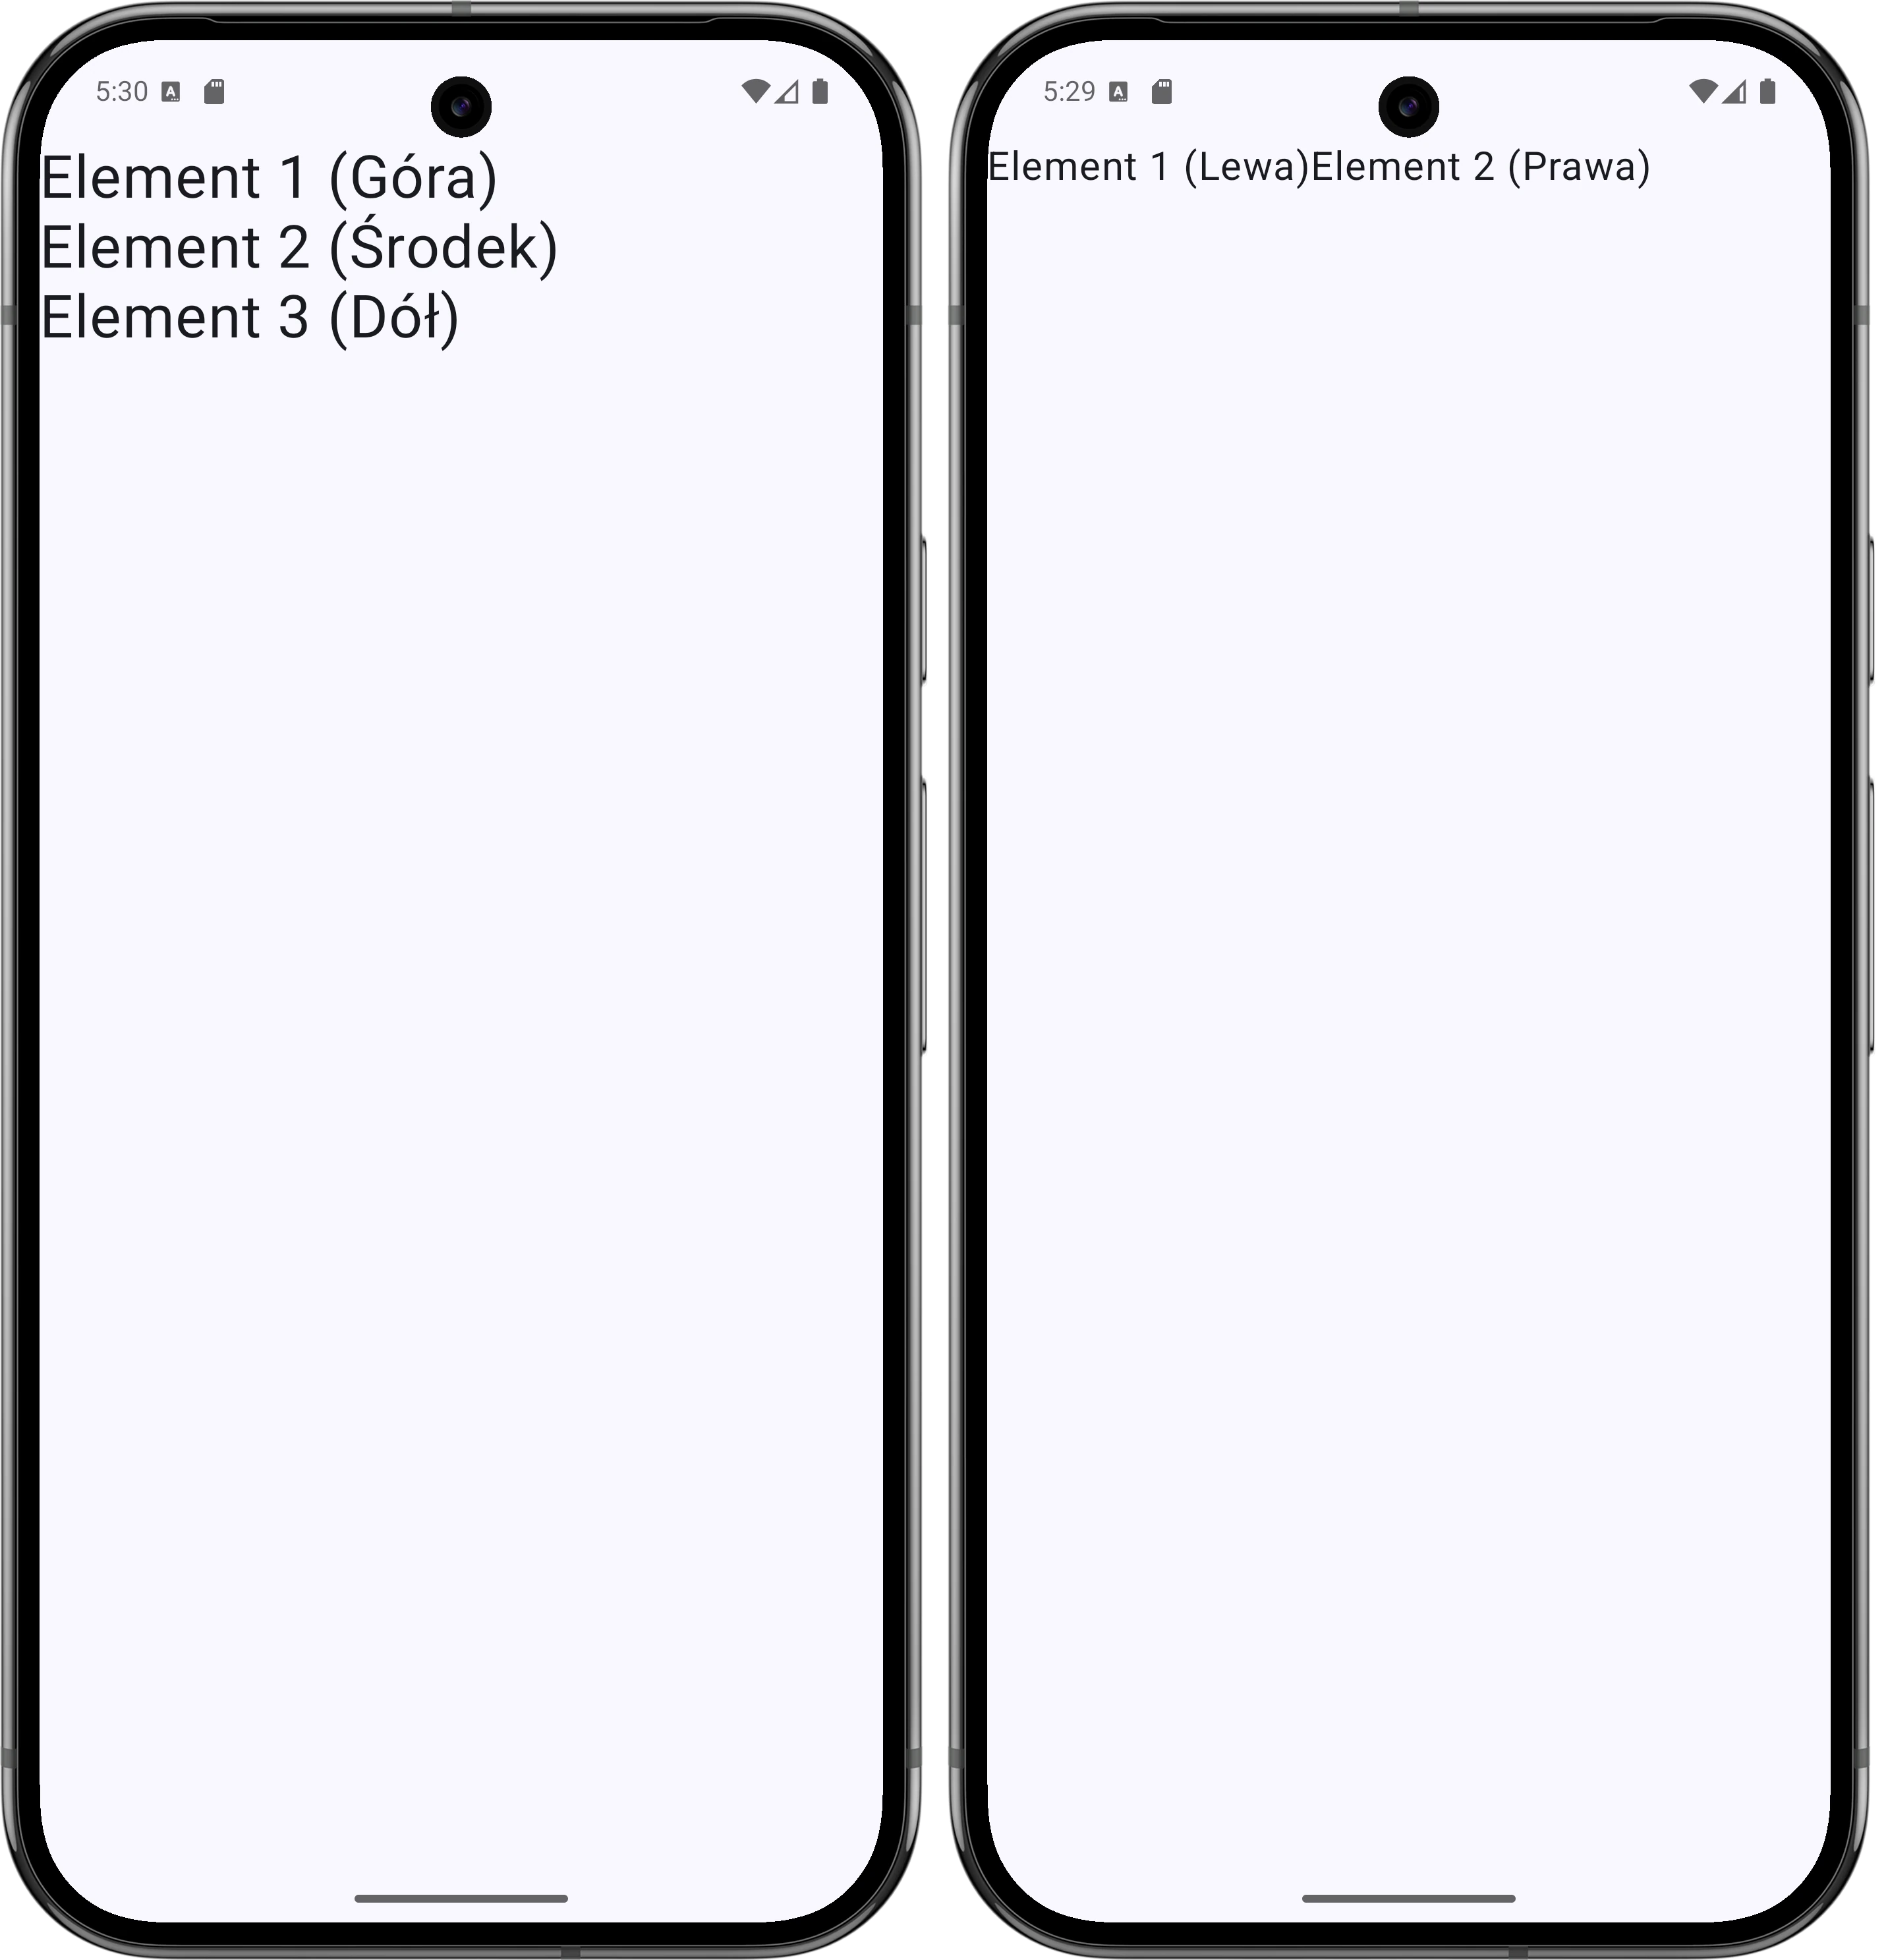

Column and Row componentsRow arranges elements horizontally, one next to another. It is the counterpart of LinearLayout with horizontal orientation.
@Composable
fun RowExample() {
    Row {
        Text("Left")
        Text("Right")
    }
}
Box places elements one on top of another, in layers. It is the counterpart of FrameLayout. The first element in the code is placed at the bottom, and the following elements are drawn over it.
@Composable
fun BoxExample() {
    Box {
        Text("Background (underneath)")
        Text("Text (on top)")
    }
}
The strength of Compose is how easy it is to combine these components. Below is an example of a simple layout where outer elements are arranged horizontally and inner elements vertically.
@Composable
fun UserProfile(name: String) {
    Row {
        // Text on the left
        Text(text = "A")

        // Text on the right, arranged vertically
        Column {
            Text("Hello,")
            Text(name)
        }
    }
}
The Text component is used to display text. When defining sizes in Android, we use two units:
- dp (density-independent pixels): Used for dimensions such as margins, width, and height. They ensure the same physical size of an element on screens with different pixel densities.
- sp (scale-independent pixels): Used only for font size. They work like
dp, but additionally respect the user's system settings, for example enlarged text for visually impaired users.
Modifiers
Modifier is a powerful tool in Compose that allows us to modify a component's appearance and behavior, for example by adding a background, margin, or click handling.
The key rule is that modifiers work sequentially, like a chain. The order of calls matters.
// Example: order of padding and background
Box(
    modifier = Modifier
        .background(Color.Red)   // 1. First, red background
        .padding(16.dp)          // 2. Then padding inside the red background
        .background(Color.Blue)  // 3. Blue background inside the padding
) {
    Text("Hi!")
}
If we swapped the order of padding and background, the visual result would be completely different.
The most common modifiers:
.fillMaxSize(): Take all available space..padding(): Internal spacing..clickable { }: Reaction to touch.
Layout and alignment (Alignment vs Arrangement)
Positioning elements in Row and Column containers is based on two key concepts: the main axis and the cross axis.
- Arrangement: Controls the placement of elements along the main axis.
- Alignment: Controls the placement of elements along the cross axis.
This means that the available properties depend on the container being used:
| Container | Main axis (Arrangement) | Cross axis (Alignment) |
|---|---|---|
Column | Vertical (verticalArrangement) | Horizontal (horizontalAlignment) |
Row | Horizontal (horizontalArrangement) | Vertical (verticalAlignment) |
The Arrangement parameter allows us to precisely define spacing between elements (children). The most popular options are:
Arrangement.Start(for Row) /Top(for Column): Elements attached to the beginning of the axis.Arrangement.End(for Row) /Bottom(for Column): Elements attached to the end of the axis.Arrangement.Center: Elements grouped in the center of the axis, touching one another.Arrangement.SpaceBetween: The first and last elements are at the edges, and the remaining space is distributed evenly between them.Arrangement.SpaceAround: Similar to SpaceBetween, but also adds space before the first and after the last element, equal to half of the internal spacing.Arrangement.SpaceEvenly: All spaces, including the outer ones, have the same size.


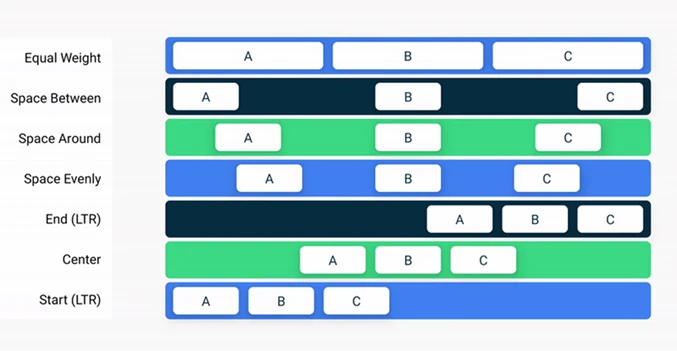
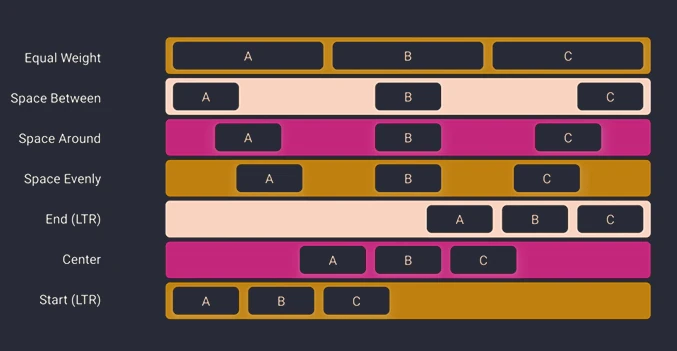
Sometimes, instead of fixed spacing, we want an element to take a proportional part of the available space. The weight modifier is used for this. If we have two elements in a Row, both with .weight(1f), they split the width equally (50% / 50%). If we want to change the proportions, we adjust the element weights.
Row(modifier = Modifier.fillMaxWidth()) {
    // Left element takes 1/3 (1f / (1f+2f))
    Box(Modifier.weight(1f).background(Color.Red))
    // Right element takes 2/3 (2f / (1f+2f))
    Box(Modifier.weight(2f).background(Color.Blue))
}
The code below centers an element both vertically and horizontally. Notice that the parameter names are precise (verticalArrangement vs horizontalAlignment), which prevents mistakes.
Column(
    modifier = Modifier.fillMaxSize(),
    // Main axis of Column = vertical -> Arrangement
    verticalArrangement = Arrangement.Center,
    // Cross axis of Column = horizontal -> Alignment
    horizontalAlignment = Alignment.CenterHorizontally
) {
    Text("Exactly in the center of the screen")
}
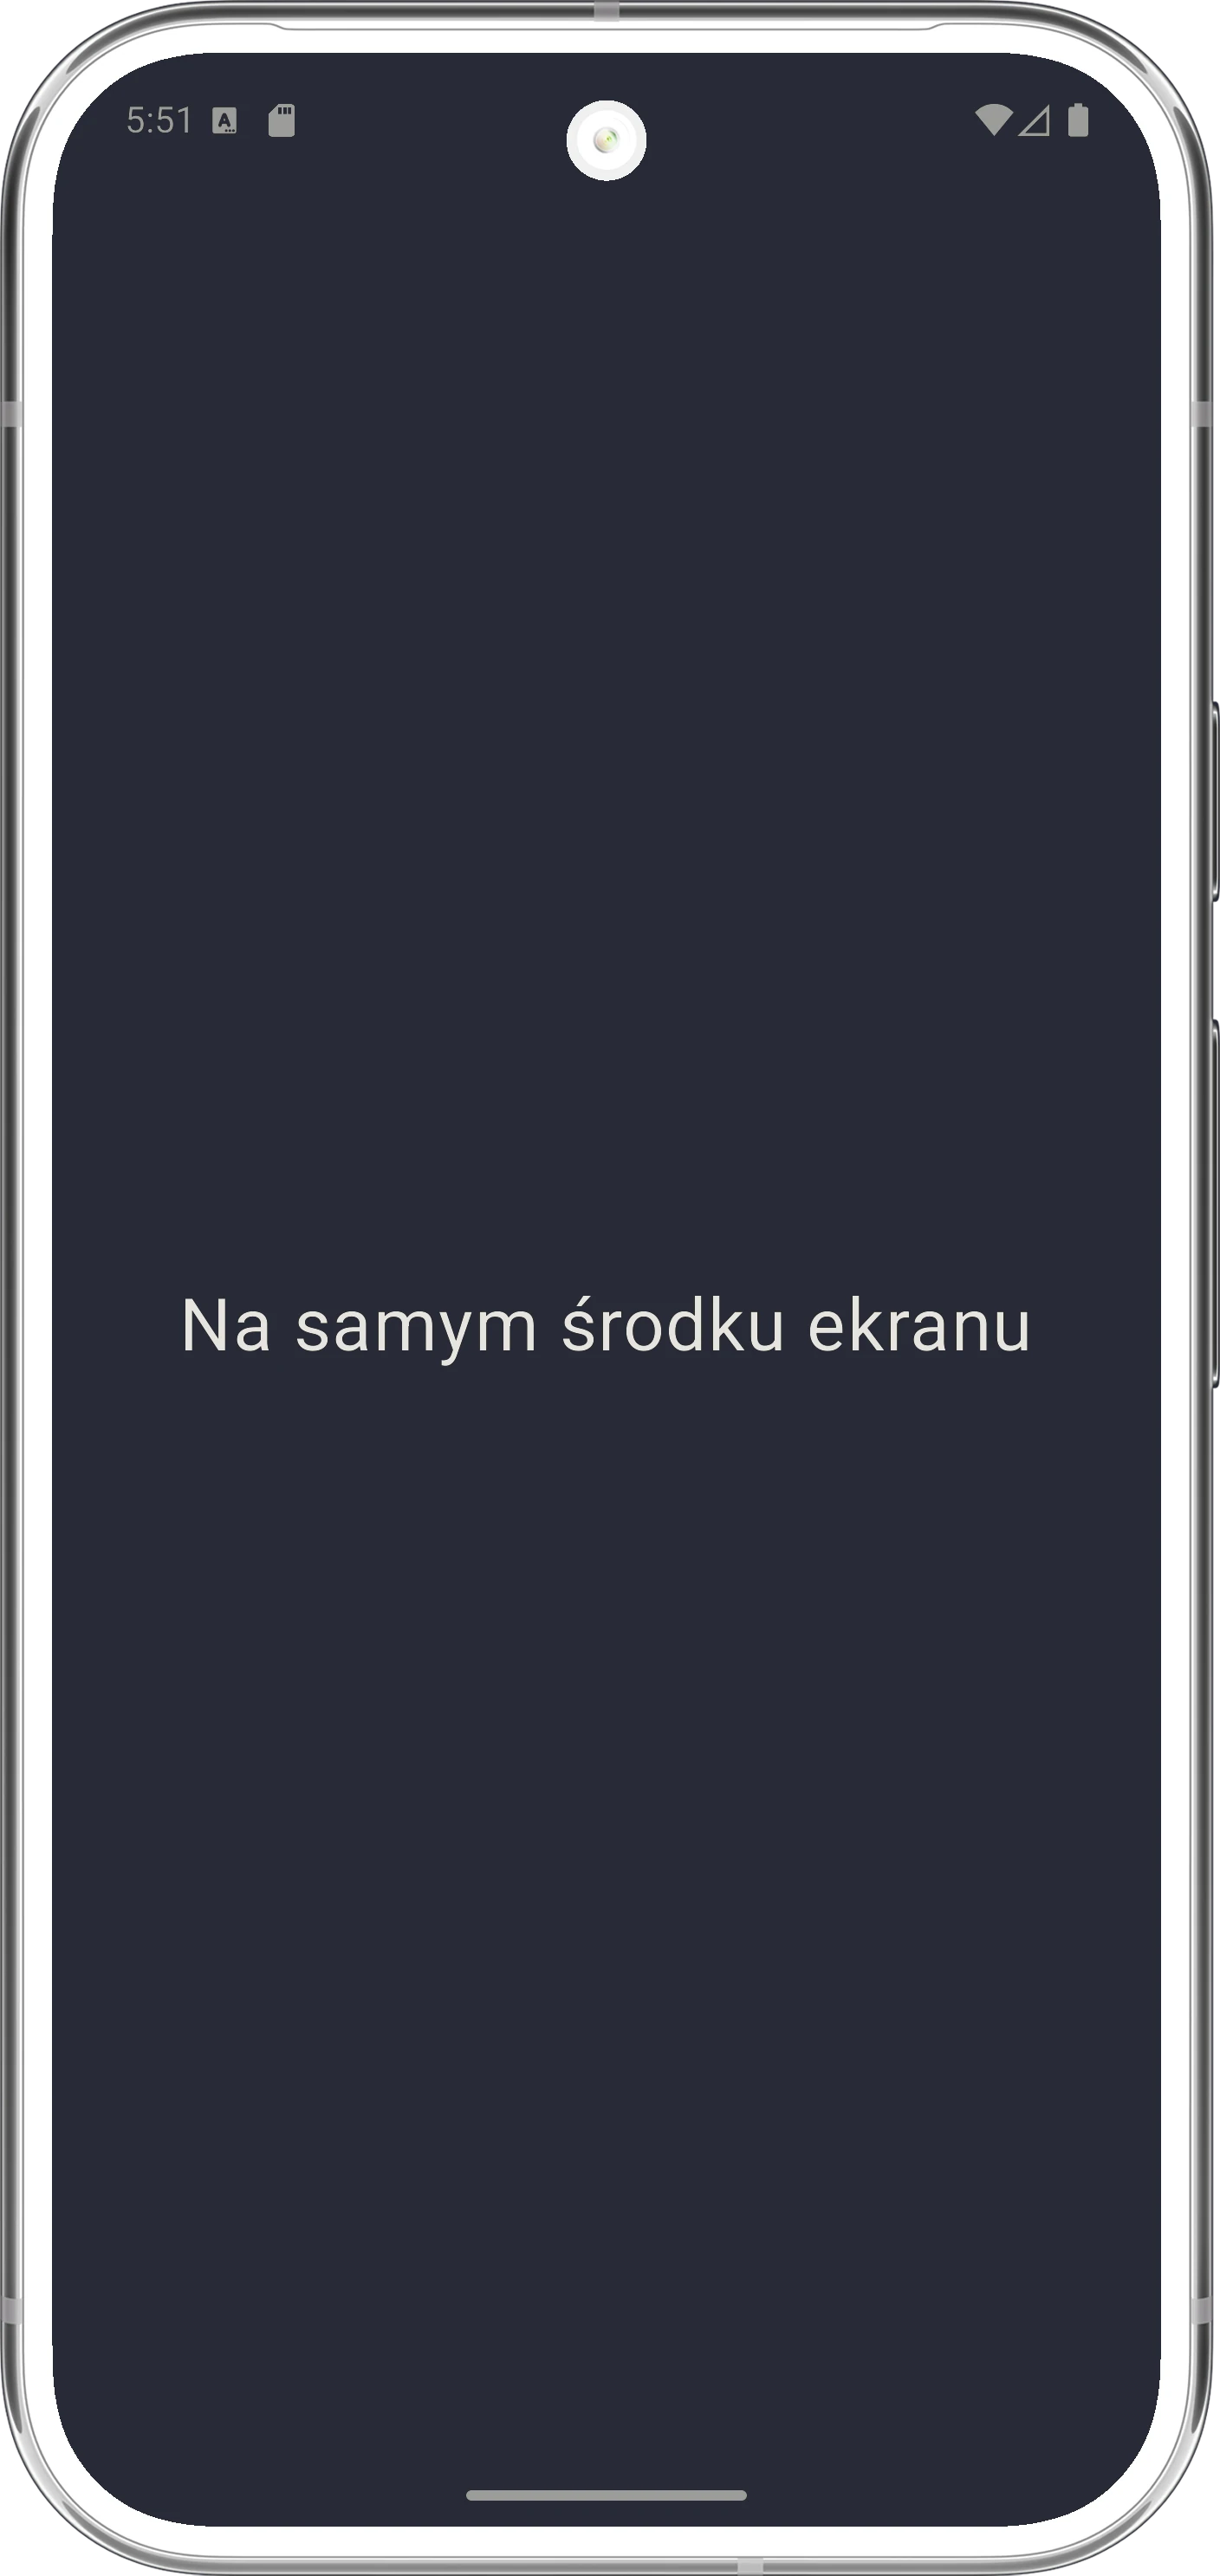

State management
The most difficult mental shift in Compose is understanding what state is and how it affects the UI.
Imagine that the user interface (UI) is a reflection in a mirror. If you are unhappy with what you see in the mirror, for example your hair is messy, you do not try to repair the mirror itself or paint over its surface. To change the reflection, you must change the object standing in front of the mirror, that is, comb your hair.
In this analogy:
- Mirror is the framework (Compose). It is not modified directly.
- Reflection is your screen (UI). It is only an effect, not a cause.
- Object in front of the mirror is state (data). This is where changes happen.
The equation $UI = f(state)$ means that the interface is only a visual representation of the current data. You cannot directly change text on the screen. You can only change a variable (state), and Compose (the mirror) automatically updates what the user sees.
At this point, let us introduce the concepts of composition and recomposition.
- Composition: The process in which Compose executes your
@Composablefunctions to build an in-memory description (tree) of the interface. It is the UI definition fed with current data. This is not yet the actual drawing of pixels, but rather the creation of a plan for what should be drawn. - Recomposition: Updating this description. When data (state) changes, Compose executes only the necessary functions again to adapt the UI tree to the new reality.
If only one small number in the state changes, Compose does not redraw the whole screen. It reruns, or recomposes, only the functions that use that specific number. The rest remains untouched.
Anatomy of an @Composable function
Since composition is the process of executing @Composable functions, we need to understand what they actually are. The @Composable annotation changes the function type in the eyes of the compiler.
- Emitting UI, not returning a value: These functions usually return
Unit. Their goal is not to return a view object, but to emit an interface description into the composition tree. - Call context: A
@Composablefunction can be called only from another@Composablefunction. This creates a call hierarchy that starts from thesetContentmethod in an Activity. - Content: Inside a composable function we can:
- Call other
@Composablefunctions, for exampleTextorColumn. - Use standard Kotlin logic (
if,for,when) to control what is emitted. - Manage state (
remember).
// Regular function - returns String
fun formatName(name: String): String {
    return name.uppercase()
}

// Composable function - emits UI
@Composable
fun Greeting(name: String) {
    // We can use logic
    if (name.isNotEmpty()) {
        // And call other Composable functions
        Text("Hello, ${formatName(name)}")
    }
}
Storing state
Kotlin functions are stateless by nature: when a function ends, its local variables disappear. How can we preserve, for example, a counter value between screen refreshes?
@Composable
fun Counter() {
    // 1. mutableStateOf creates observable state (we start from 0)
    // 2. remember makes this variable "survive" recomposition
    var count by remember { mutableStateOf(0) }

    Button(onClick = { count++ }) { // State change triggers recomposition
        // During recomposition, Compose sees the new count value
        Text("Clicked $count times")
    }
}
Here two players enter the stage:
mutableStateOf(value): A special box for data that is observable. When you change the contents of this box, for examplecount.value++, Compose receives a signal: "You must refresh everyone who is watching this".remember { ... }: An instruction for the compiler: Store this object in a cache next to the UI tree. When theCounterfunction is called again (recomposition),remembergives us the previously stored value instead of creating a new one reset to zero.
Without remember, after every click the Counter function would start again from 0. Without mutableStateOf, changing the variable would not send a signal to refresh the screen, so the interface would be dead.
Although remember works during recomposition, it has one drawback: it forgets everything during configuration changes, such as screen rotation, language change, or dark mode. Then the whole Activity is destroyed and recreated, and the remember cache is cleared.
To preserve state even after the death and rebirth of an Activity, or even a process, we use rememberSaveable. Under the hood, it uses the Bundle mechanism, the same one as in onSaveInstanceState from classic Android.
@Composable
fun ResilientCounter() {
    // rememberSaveable survives screen rotation!
    var count by rememberSaveable { mutableStateOf(0) }

    Button(onClick = { count++ }) {
        Text("Clicked $count times")
    }
}
For simple types (Int, String, Boolean), this works automatically. For custom objects, we must provide a so-called Saver, for example by implementing Parcelable and using @Parcelize.
Syntax: = vs by
We often encounter two ways of storing state:
// 1. Assignment (=)
val nameState = remember { mutableStateOf("John") }
Text(text = nameState.value) // We must write .value

// 2. Delegation (by)
var name by remember { mutableStateOf("John") }
Text(text = name) // We use it like a regular variable
The by keyword (property delegation) unwraps state for us.
- With
by, thenamevariable is of typeString; the compiler hidesStateunderneath. To change the value, we writename = "Eve". - With
=, thenameStatevariable is of typeMutableState<String>. To change the value, we must writenameState.value = "Eve".
Using by requires imports that are sometimes not added automatically by the IDE: import androidx.compose.runtime.getValue import androidx.compose.runtime.setValue
State Hoisting pattern
To make components reusable and easy to test, we use the State Hoisting pattern. It means that a component does not manage its state internally, but receives it from its parent.
Features of a stateless component:
- It receives state through a parameter, for example
value: String. - It reports events through a lambda, for example
onValueChange: (String) -> Unit.
// Stateful component (manages state - harder to test and reuse)
@Composable
fun HelloScreen() {
    var name by remember { mutableStateOf("") }
    HelloContent(name = name, onNameChange = { name = it })
}

// Stateless component (pure UI function)
@Composable
fun HelloContent(name: String, onNameChange: (String) -> Unit) {
    Column {
        Text("Hi $name")
        TextField(
            value = name,
            onValueChange = onNameChange
        )
    }
}
Thanks to this, HelloContent is independent of where the state comes from. It can be remember, a ViewModel, or a constant from a test. This pattern promotes Unidirectional Data Flow:
- Data flows down, from parent to child.
- Events flow up, from child to parent.
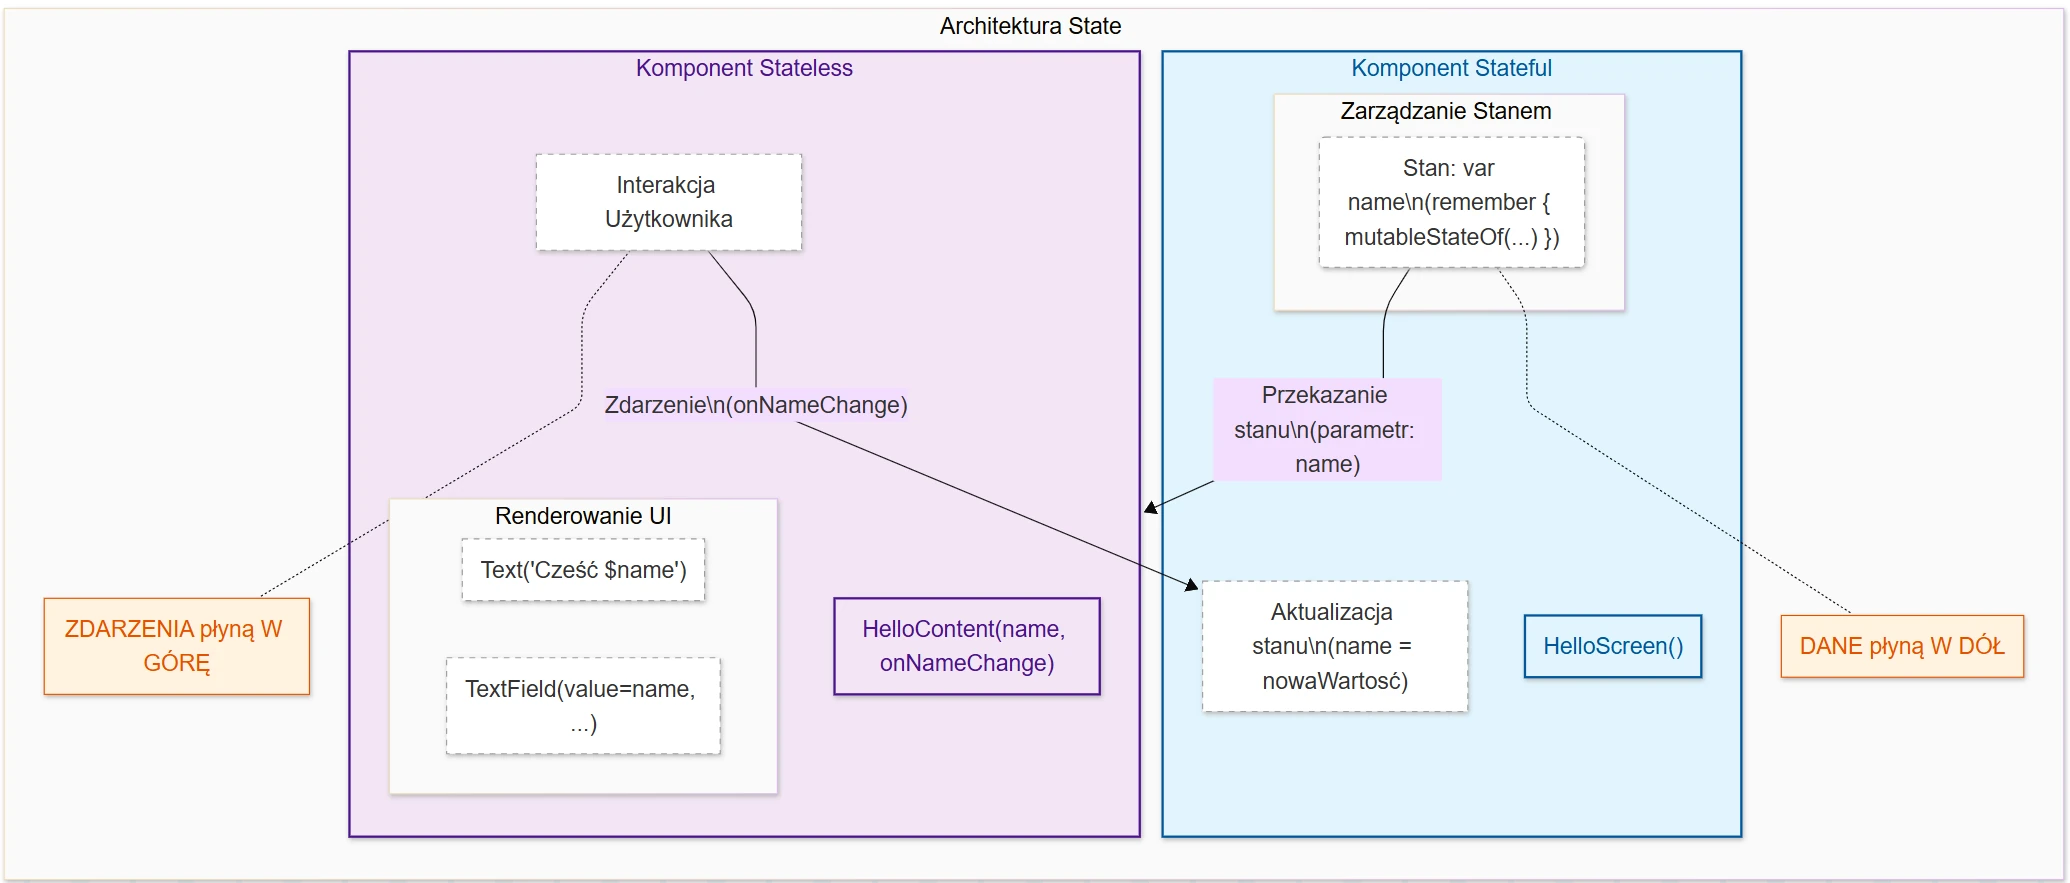
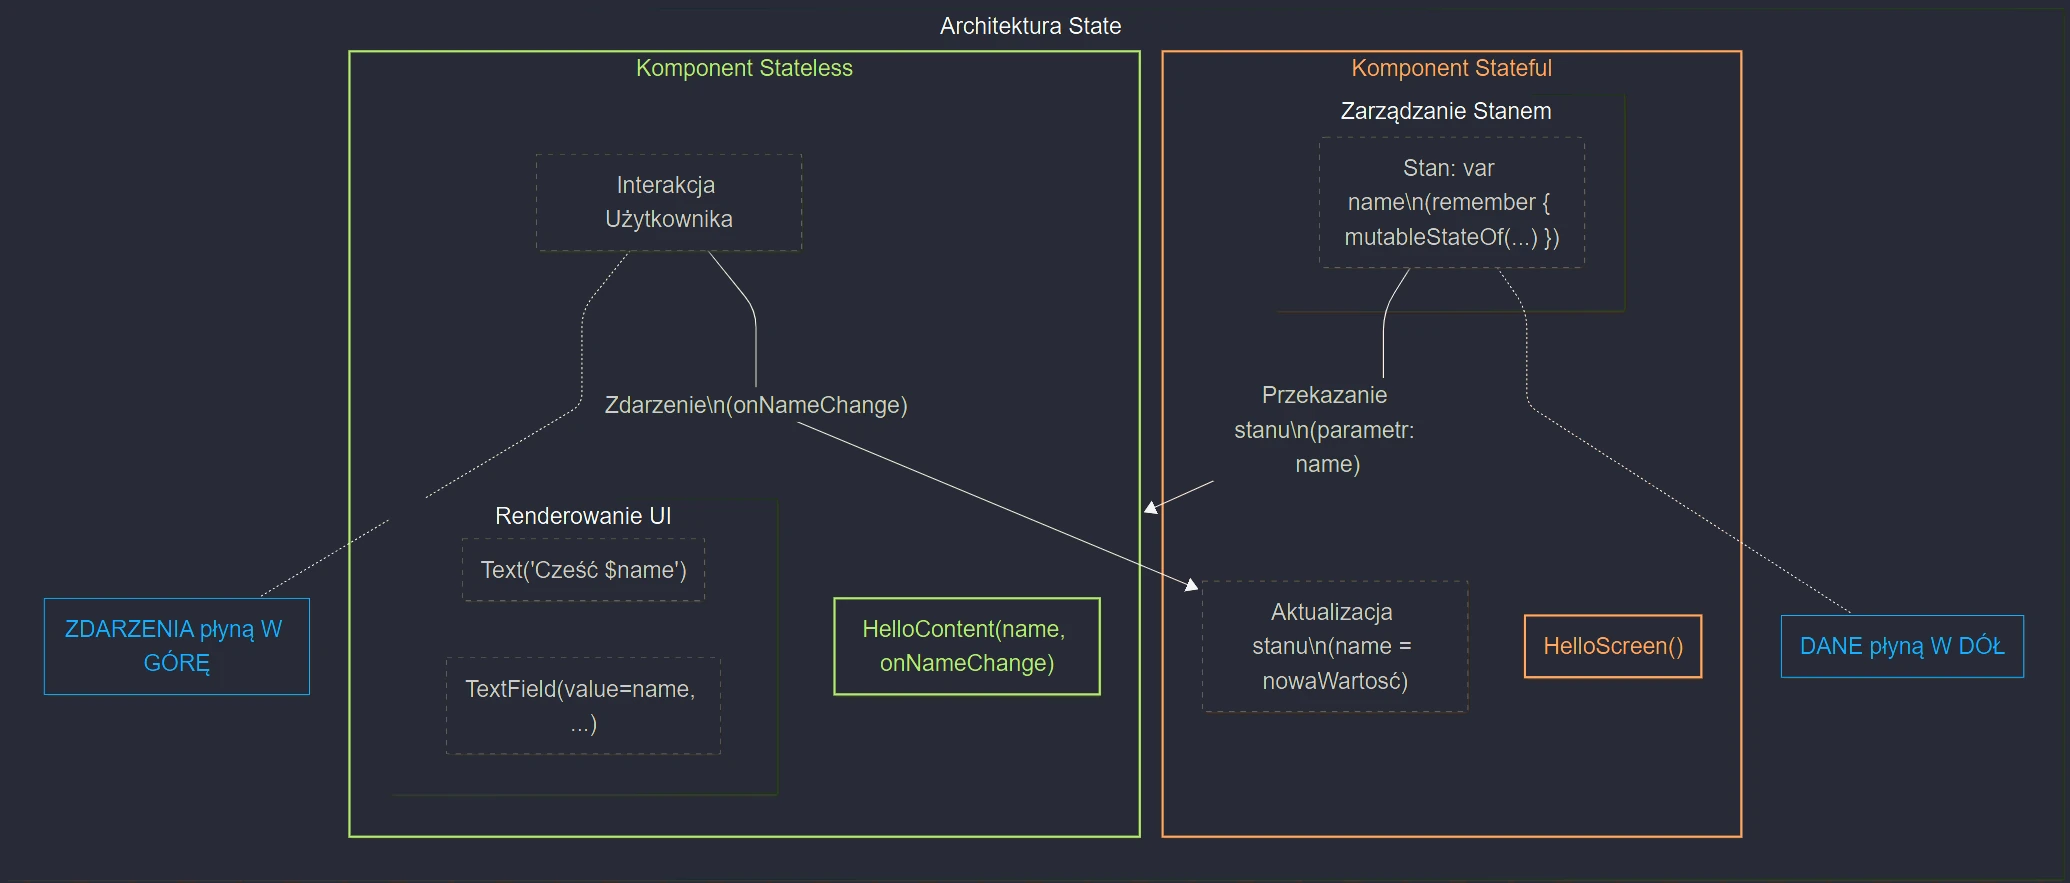
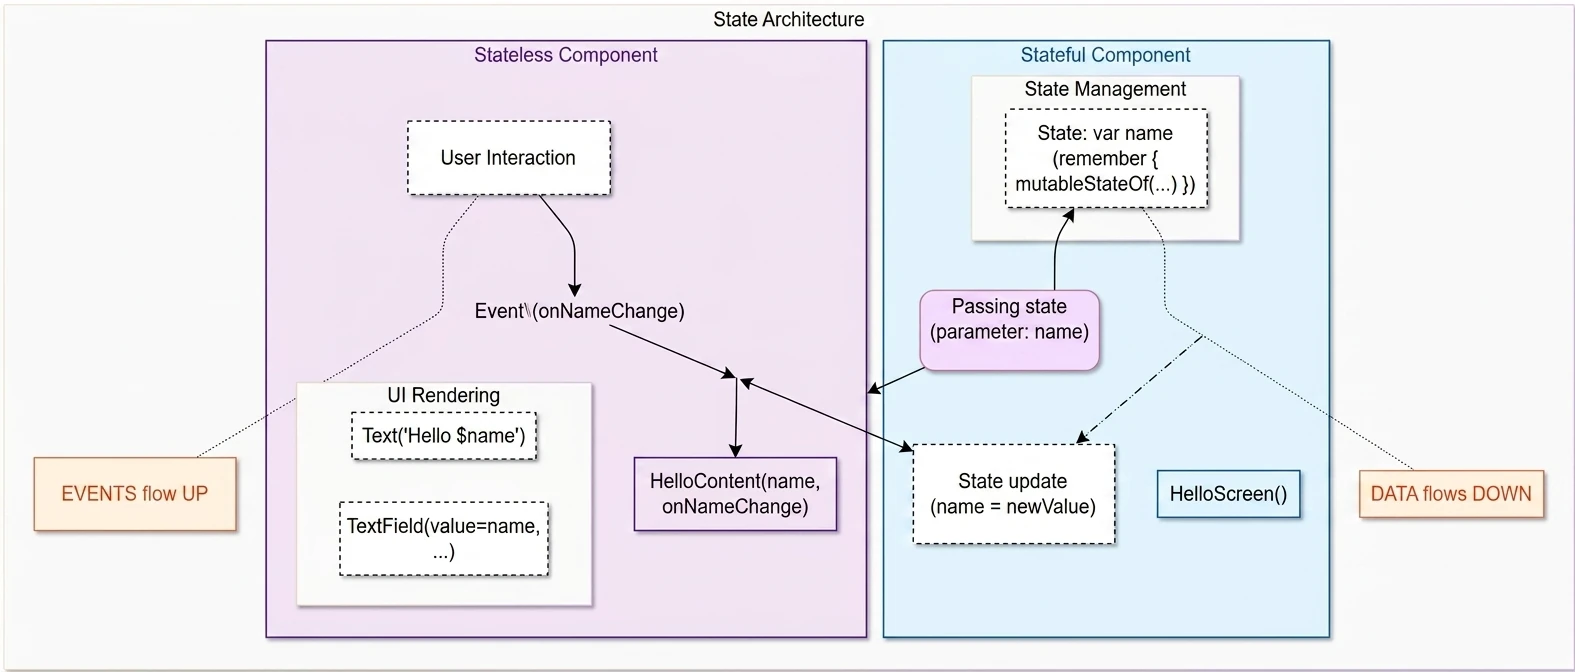
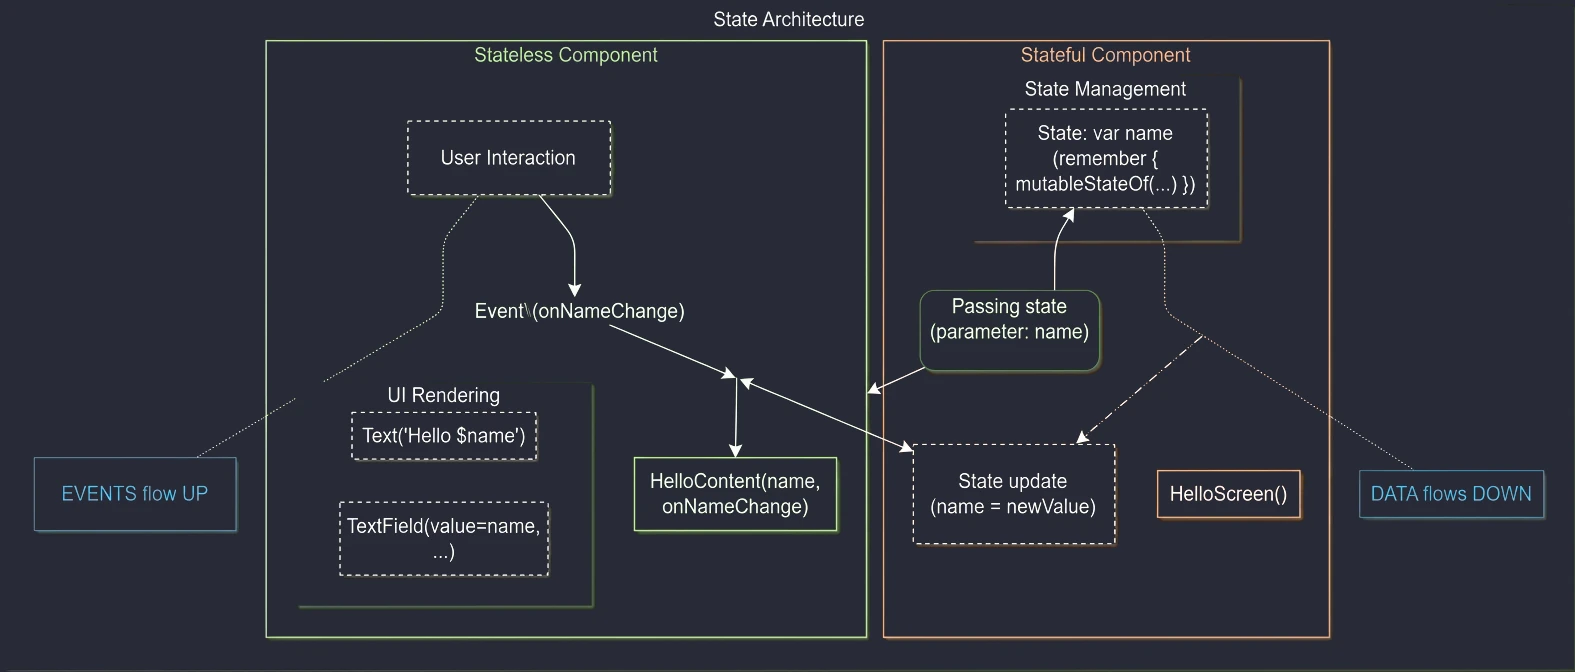
In the previous chapter, we learned the basic building blocks (Row, Column, Box) and the state mechanism. Now we will move on to building application screens that follow Material Design guidelines. We will discuss the screen skeleton (Scaffold) and efficient display of long data lists (LazyColumn).
Scaffold - screen skeleton
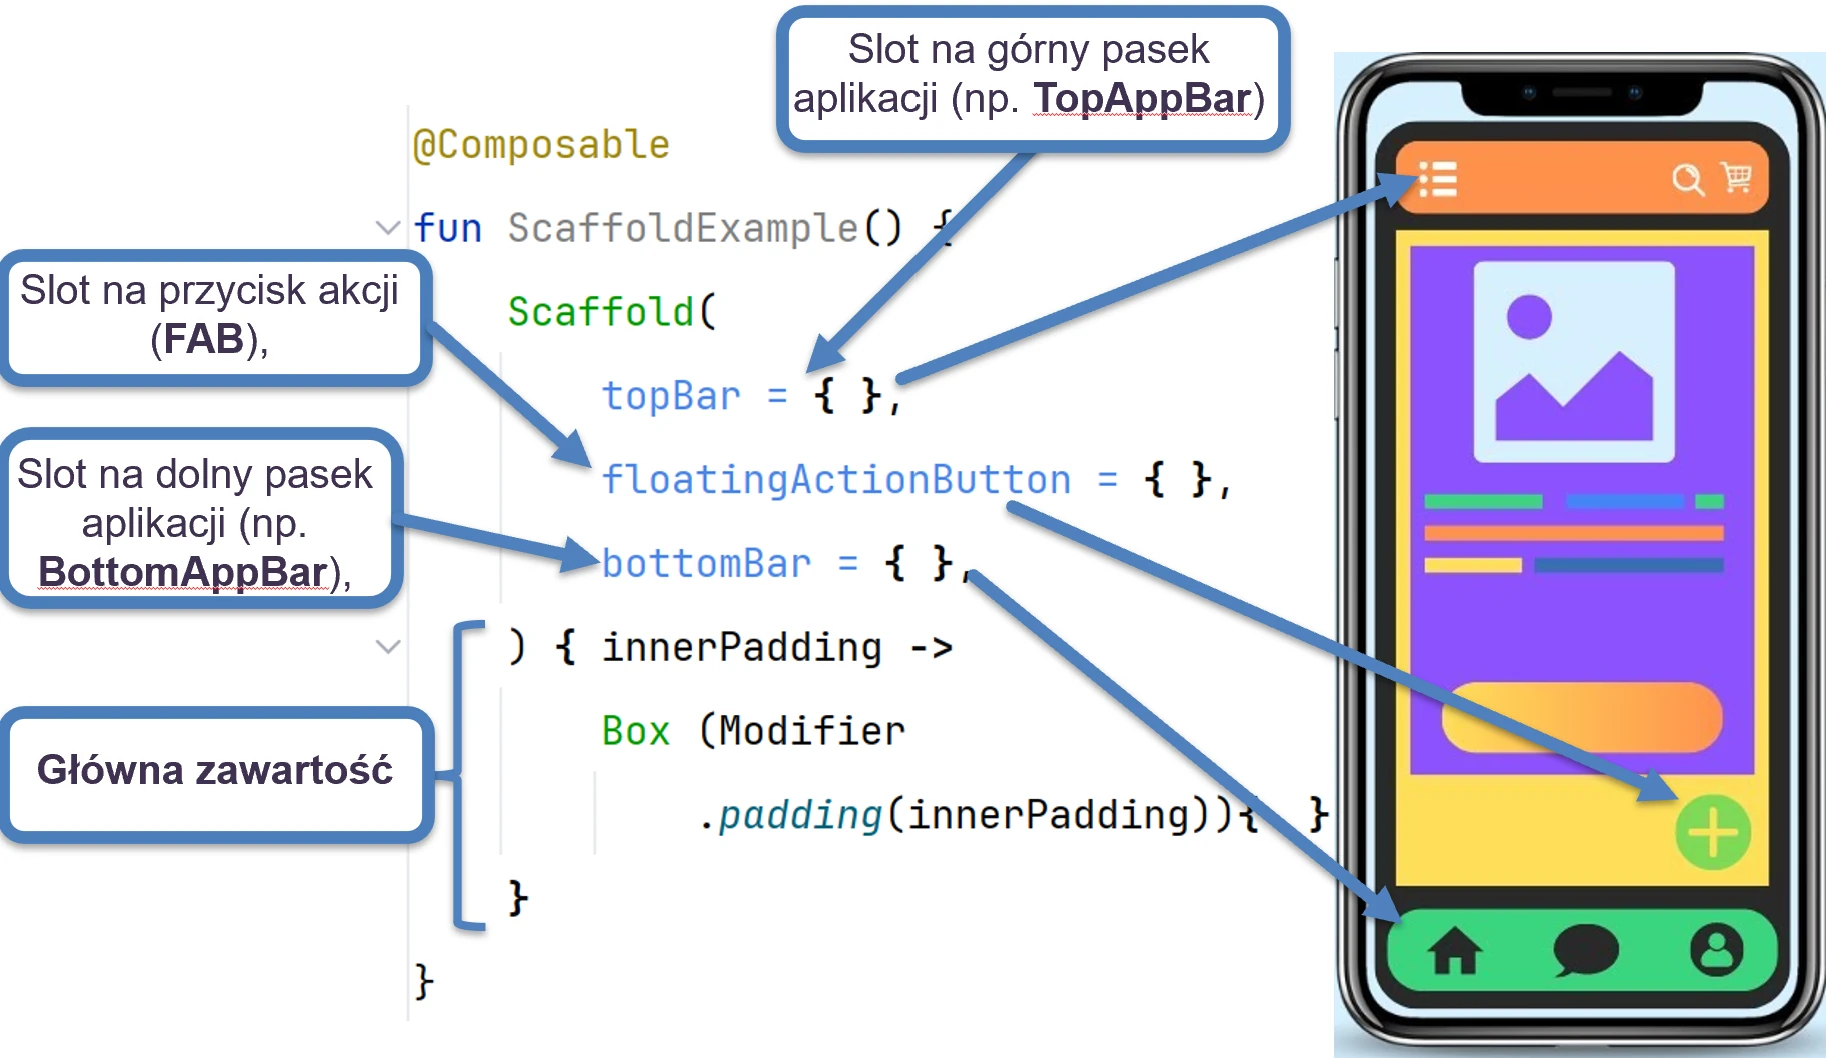

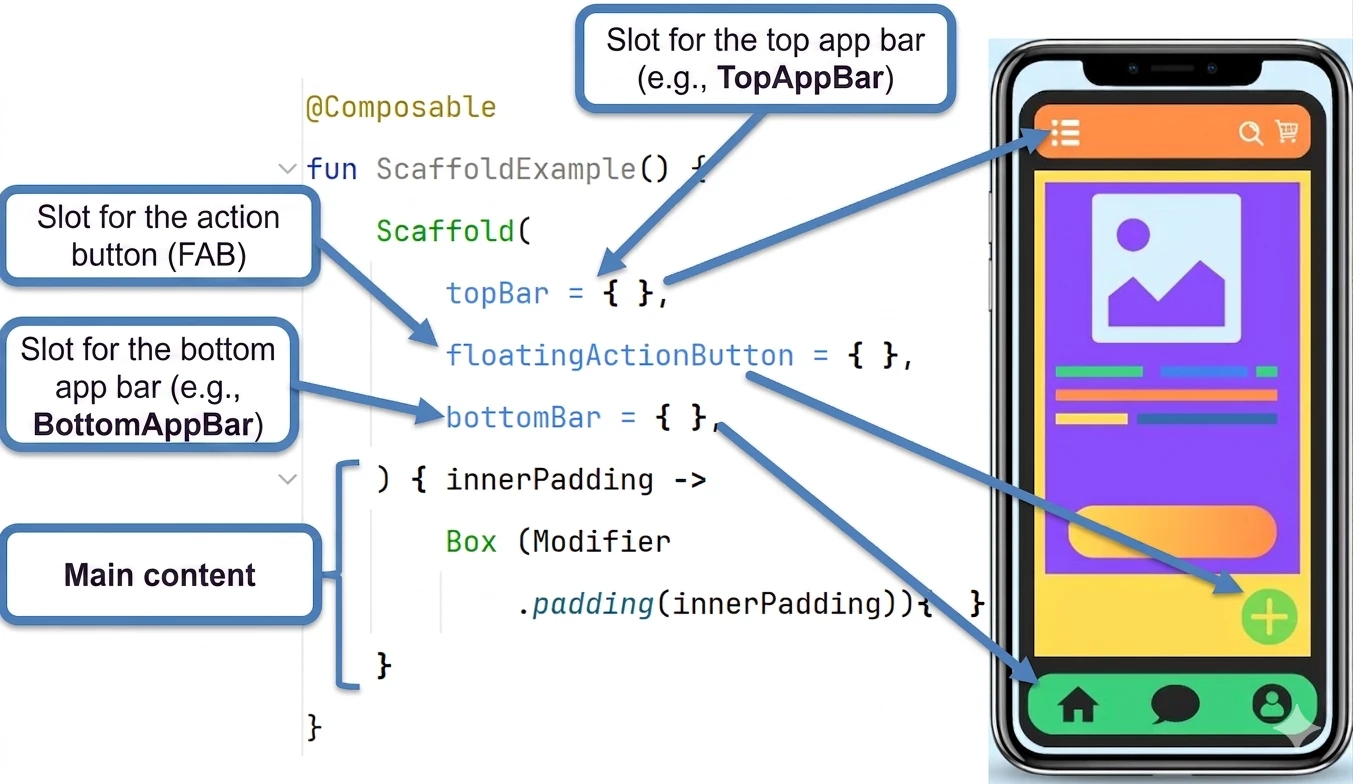
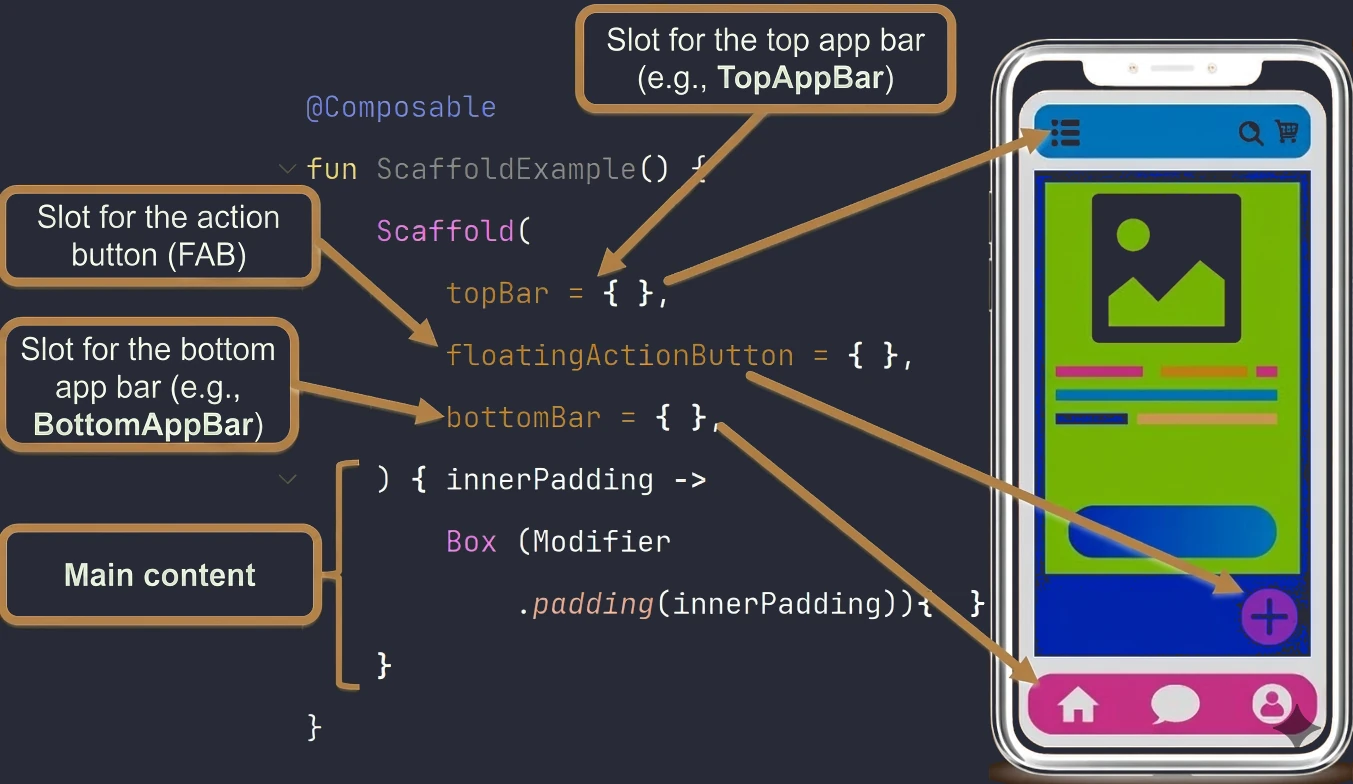
Scaffold is a ready-made component that implements the basic visual structure of Material Design. It provides slots for standard interface elements such as:
- Top application bar (
TopAppBar) - Bottom navigation bar (
BottomBar) - Floating action button (
FloatingActionButton) - Main content (Content)
The most important feature of Scaffold is that it automatically calculates the space occupied by system and application bars, passing the appropriate PaddingValues to the main content.
@OptIn(ExperimentalMaterial3Api::class)
@Composable
fun MainScreen() {
    Scaffold(
        topBar = {
            TopAppBar(
                title = { Text("My Application") }
            )
        },
        floatingActionButton = {
            FloatingActionButton(onClick = { /* action */ }) {
                Icon(Icons.Default.Add, contentDescription = "Add")
            }
        }
    ) { innerPadding ->
        // IMPORTANT: We must use innerPadding!
        Column(
            modifier = Modifier
                .padding(innerPadding) // Apply padding from Scaffold
                .fillMaxSize()
                .padding(16.dp) // Our own padding
        ) {
            Text("Screen content...")
        }
    }
}
A common mistake is ignoring the innerPadding parameter in the content lambda. If we do not use it, our content will slide under the top application bar (TopAppBar) and become invisible.

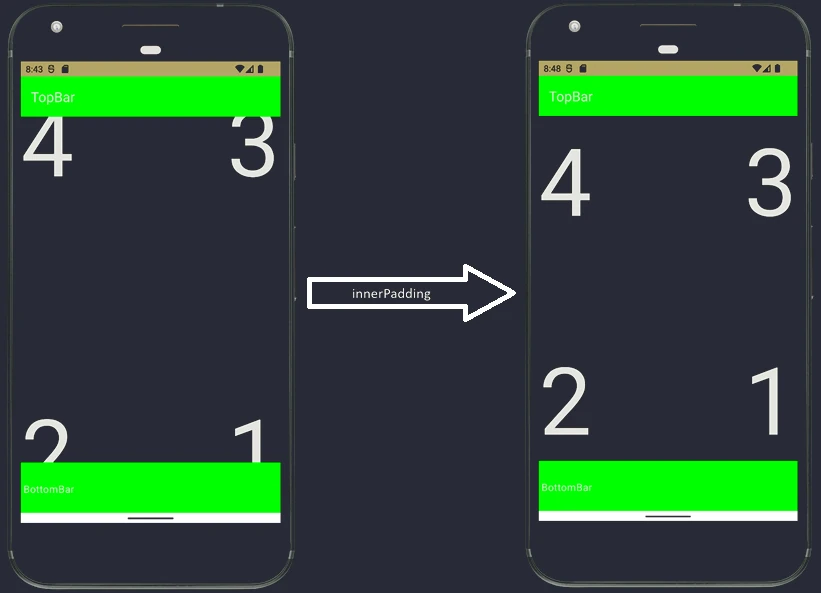
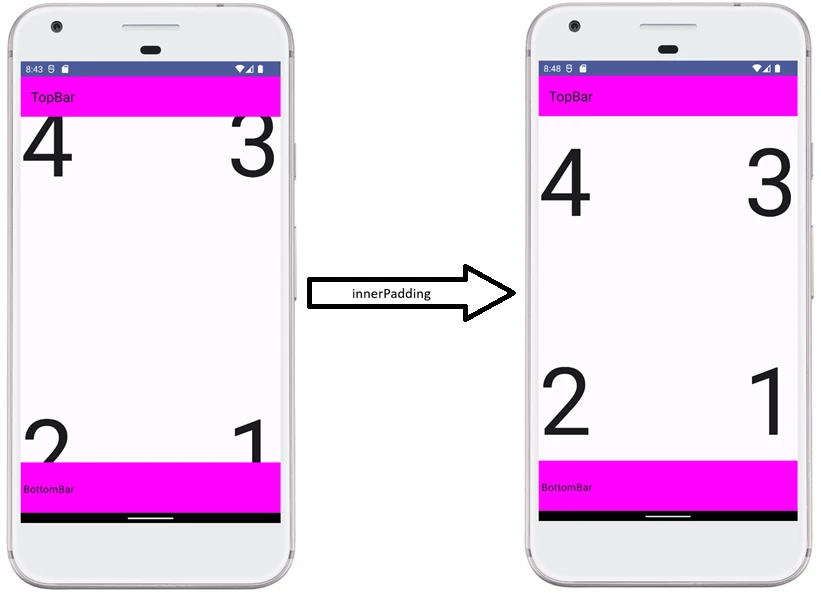

TopAppBar - top bar
In Material Design 3 (Compose 1.1+), the TopAppBar component is marked as experimental (@OptIn(ExperimentalMaterial3Api::class)). It offers four main versions:
TopAppBar(small, standard)CenterAlignedTopAppBar(centered title)MediumTopAppBar(medium, collapsible)LargeTopAppBar(large, collapsible)
Configuring actions (buttons on the right) and navigation (icon on the left) is very simple:
TopAppBar(
    title = { Text("Details") },
    navigationIcon = {
        IconButton(onClick = { /* navigate back */ }) {
            Icon(Icons.Filled.ArrowBack, "Back")
        }
    },
    actions = {
        IconButton(onClick = { /* share */ }) {
            Icon(Icons.Filled.Share, "Share")
        }
        IconButton(onClick = { /* settings */ }) {
            Icon(Icons.Filled.Settings, "Settings")
        }
    }
)
Bottom navigation bar (BottomBar)
In the bottomBar slot of Scaffold, we most often place NavigationBar (Material 3) or BottomAppBar. They are used for navigation between the main screens of an application.
NavigationBar {
    NavigationBarItem(
        icon = { Icon(Icons.Filled.Home, contentDescription = "Home") },
        label = { Text("Home") },
        selected = true, // Selection logic
        onClick = { /* navigation */ }
    )
    NavigationBarItem(
        icon = { Icon(Icons.Filled.Person, contentDescription = "Profile") },
        label = { Text("Profile") },
        selected = false,
        onClick = { /* navigation */ }
    )
}
Each NavigationBarItem represents one navigation destination. The selected state should be controlled by the current navigation state, for example by checking whether the current route is home.
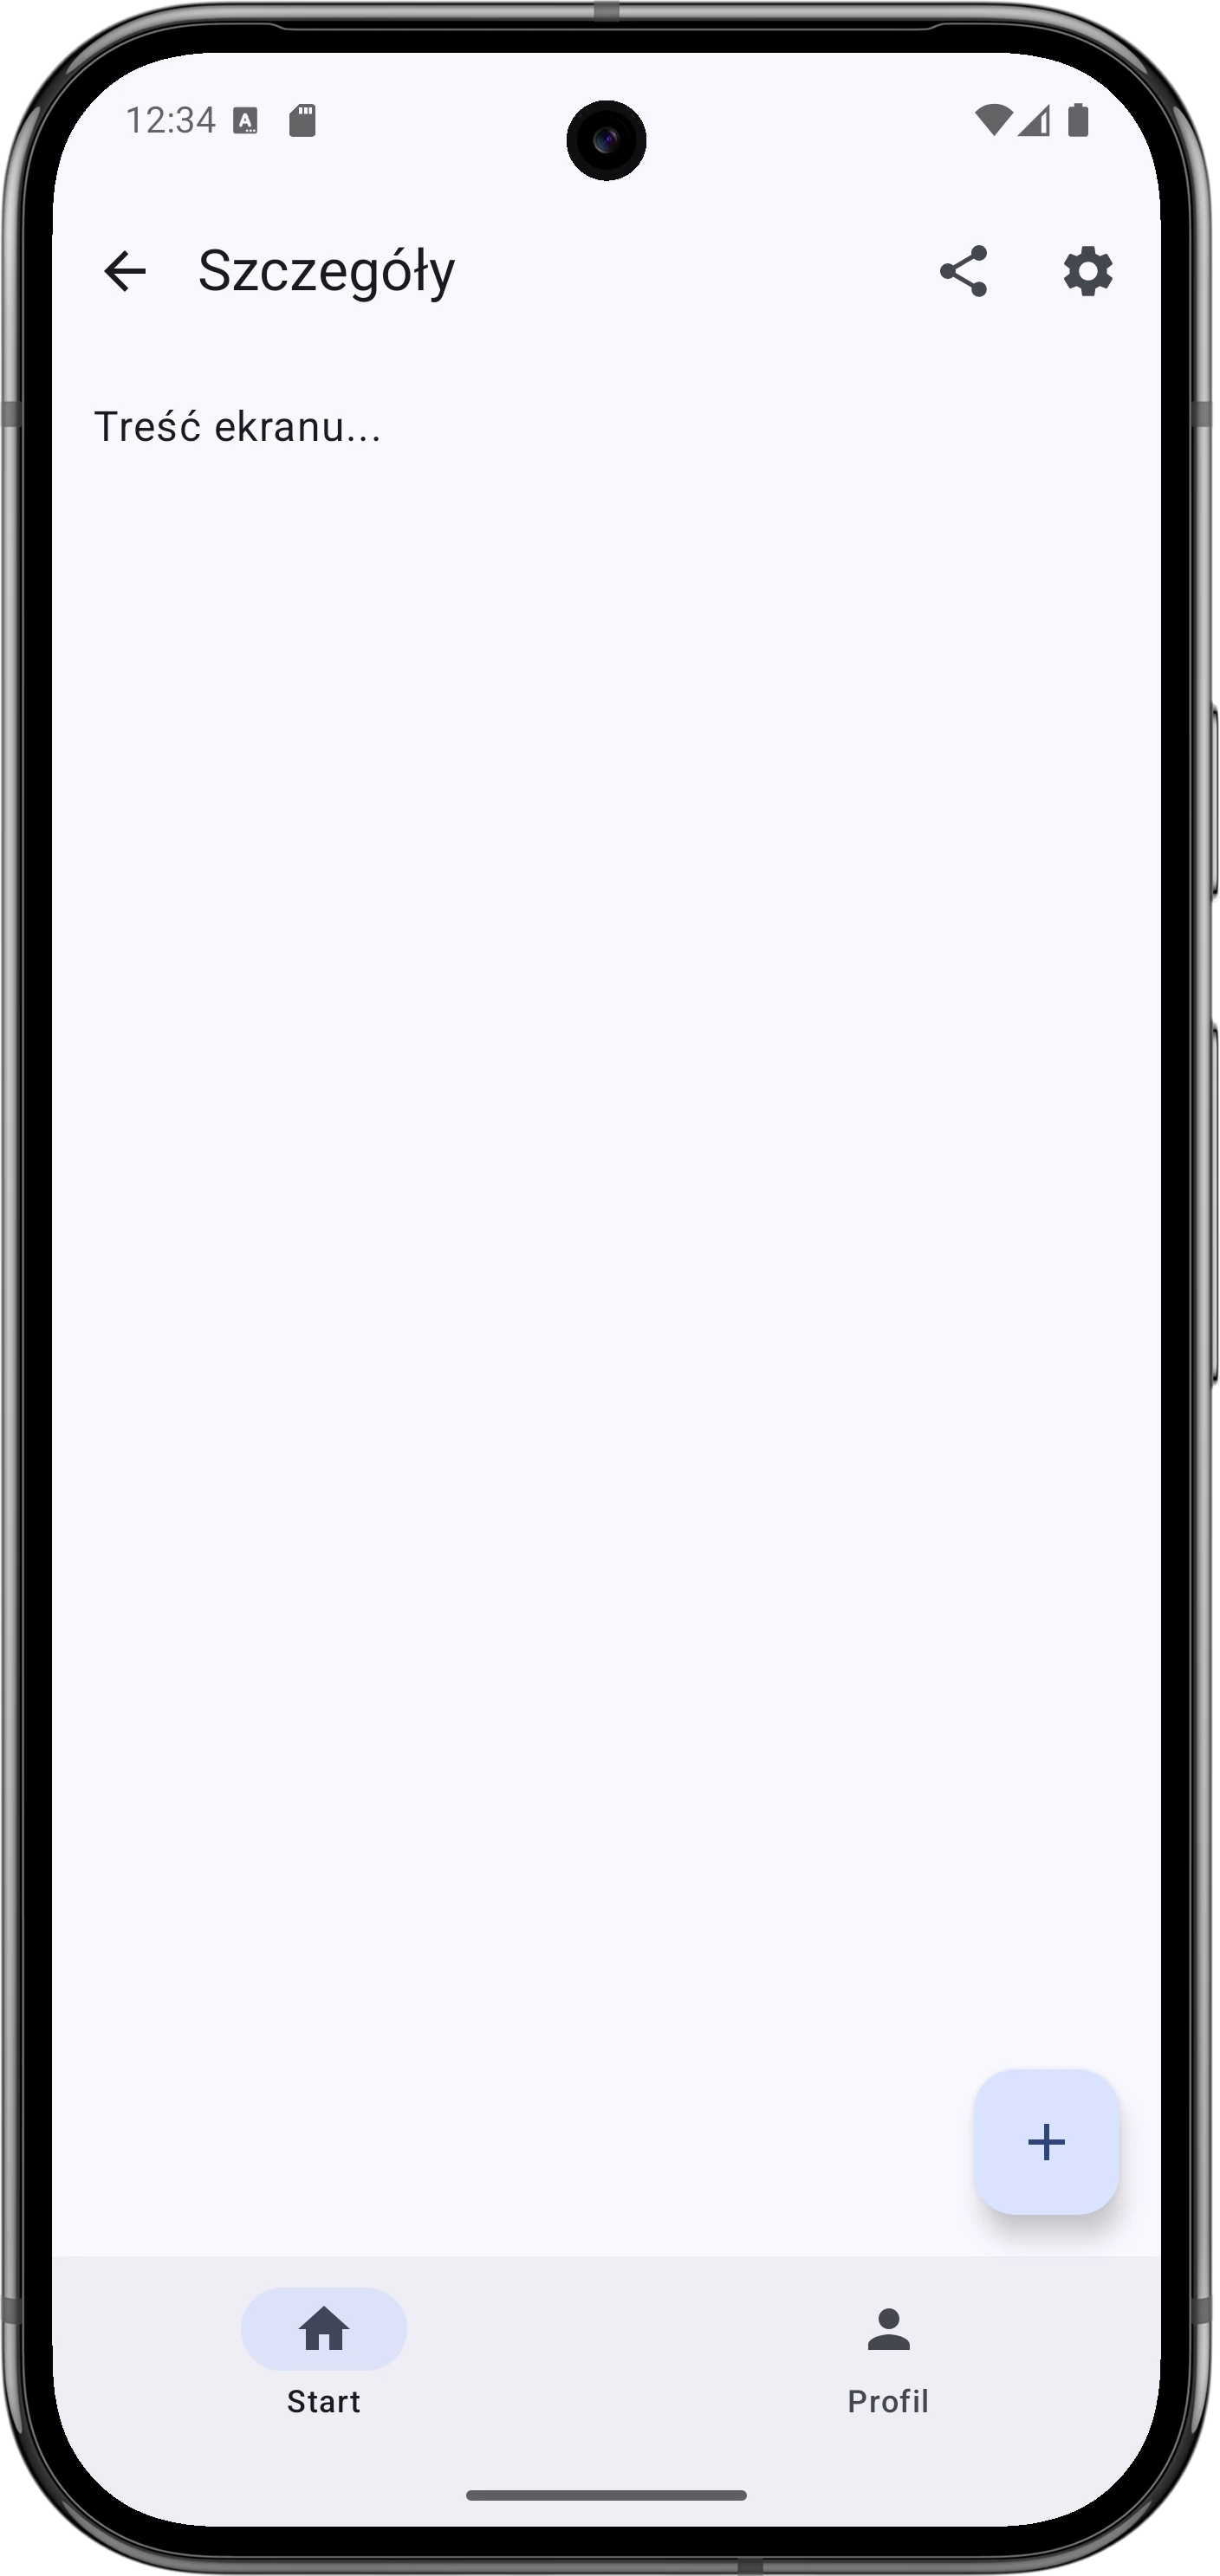


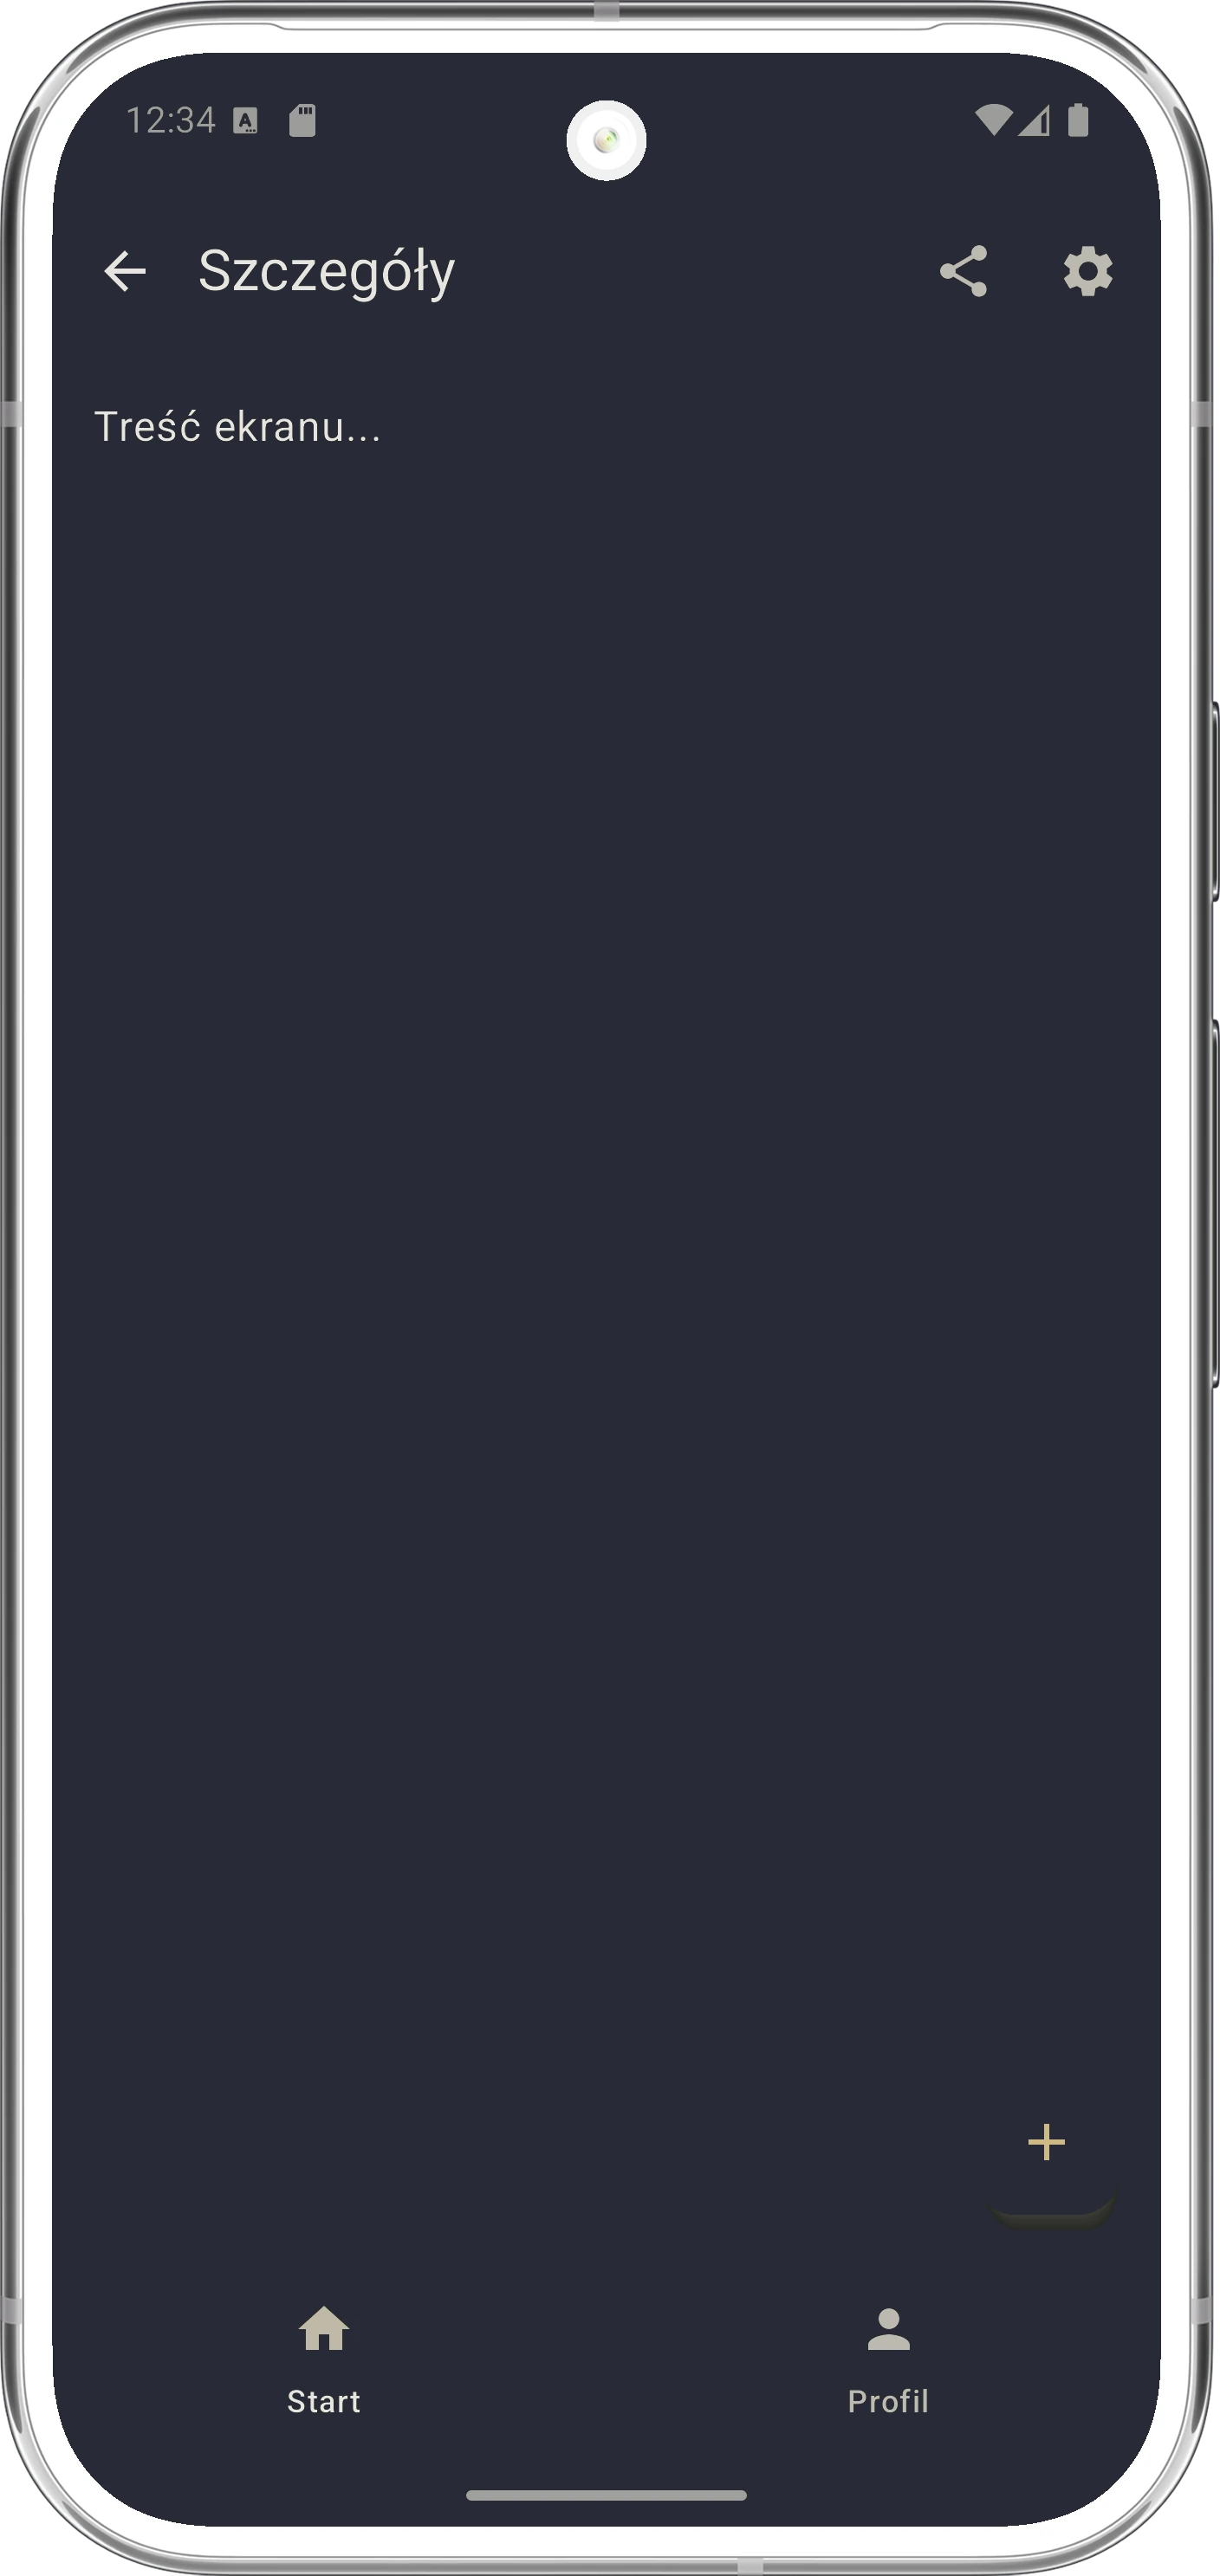
Lazy lists
In Compose, lists are handled with LazyColumn (vertical list) and LazyRow (horizontal list).
Why do we call them lazy?
- Regular
Column: Immediately renders all elements that you place inside it. If you add 1000 text elements, Compose creates 1000 nodes in memory, even if the user sees only the first 10. This is terrible for performance. LazyColumn: Renders only the elements currently visible on the screen. When you scroll the list, elements disappearing from the top are removed, and new elements appearing from the bottom are created on the fly.
To keep scrolling smooth, Compose maintains a small buffer, usually 1-2 elements, just outside the visible screen area. Thanks to this, when the user starts dragging, the system does not have to create a new element immediately.
With this strategy, we can display lists with tens of thousands of elements while using only as much memory as needed to display, for example, 10 of them.
val names = listOf("Anna", "Bob", "Charlie", "David")

LazyColumn {
    // 1. Single item
    item {
        Text("List header")
    }

    // 2. Many items from a collection
    items(names) { name ->
        Text("Hello, $name!")
    }

    // 3. Items with an index
    itemsIndexed(names) { index, name ->
        Text("Item $index: $name")
    }
}
State in collections (mutableStateListOf)
A standard Kotlin list (MutableList) is not observable by Compose. If you add an element to a regular list, the UI will not refresh.
For a list to be reactive, we must use mutableStateListOf.
@Composable
fun TodoList() {
    // WRONG: Changes will not refresh the UI
    // val list = remember { mutableListOf<String>() }

    // GOOD: Special observable list
    val list = remember { mutableStateListOf<String>() }

    Column {
        Button(onClick = { list.add("Task ${list.size + 1}") }) {
            Text("Add task")
        }

        LazyColumn {
            items(list) { task ->
                Text(task)
            }
        }
    }
}
Thanks to mutableStateListOf, every operation (add, remove, clear) automatically triggers recomposition of the UI fragments that use the list.
Many developers confuse different ways of creating lists in Compose.
val list = remember { mutableStateListOf<String>() }val list = mutableListOf<String>()val list = remember { mutableListOf<String>() }val list = remember { mutableStateOf(mutableListOf<String>()) }list.value.add("X")-> the UI will not refresh, because the reference did not change.list.value = mutableListOf("Y")-> the UI will refresh, because we changed the whole object.
This is the standard way. The list is remembered, so it survives recomposition, and observable, so a change in the list refreshes the UI.
No remember means that on every recomposition the list is created from scratch and reset. No State means that changes in the list do not refresh the UI.
The list survives recomposition thanks to remember, but it is not observable. You can add elements, but the UI will not show them until something else forces a screen refresh.
Here, the reference to the list is observable, not the list itself.
ListItem - standard list item
To build repeated elements inside LazyColumn, we often use the ListItem component. It has predefined slots, analogous to fields in a form, for content. This removes the need to manually arrange elements in a Row.
ListItem(
    headlineContent = { Text("Contact name") },
    supportingContent = { Text("Last message...") },
    leadingContent = { Icon(Icons.Default.Person, contentDescription = null) },
    trailingContent = { Checkbox(checked = false, onCheckedChange = {}) }
)
Main parameters:
headlineContent: Main text (title).supportingContent: Smaller supporting text below the title.leadingContent: Element at the beginning of the row, for example an icon or avatar.trailingContent: Element at the end of the row, for example a checkbox or date.

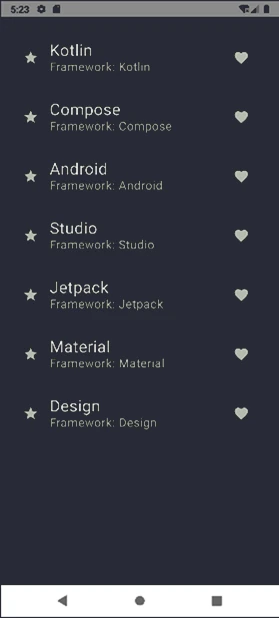
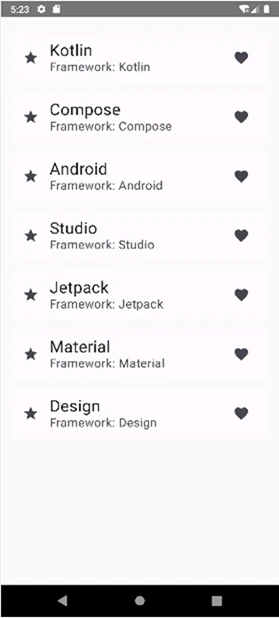

ListItem componentStickyHeader - pinned headers
In lists, we often need to group elements, for example contacts by letters A, B, C. The stickyHeader function allows us to pin a section header to the top edge of the screen. It remains visible until the whole section is scrolled out of view.
@OptIn(ExperimentalFoundationApi::class)
@Composable
fun GroupedList(contacts: Map<Char, List<String>>) {
    LazyColumn {
        contacts.forEach { (initial, names) ->
            stickyHeader {
                Text(
                    text = initial.toString(),
                    modifier = Modifier
                        .fillMaxWidth()
                        .background(Color.LightGray)
                        .padding(8.dp)
                )
            }

            items(names) { name ->
                Text(text = name, modifier = Modifier
                    .padding(16.dp))
            }
        }
    }
}
Notice that stickyHeader requires the @OptIn(ExperimentalFoundationApi::class) annotation, because it is a function from Compose Foundation and may change in future library versions.
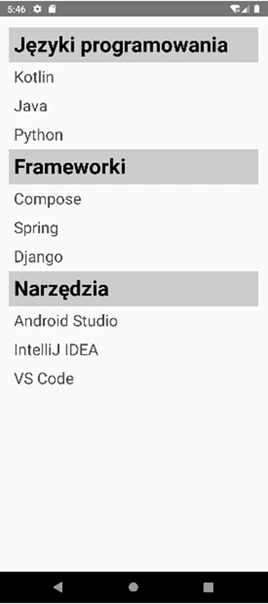


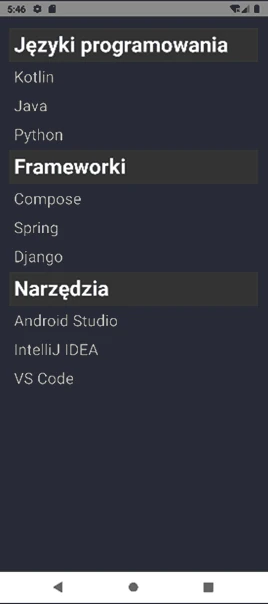
stickyHeader componentLazyVerticalGrid - grids
LazyVerticalGrid is used to display elements in a grid, for example a photo gallery. It requires defining the column layout:
LazyVerticalGrid(
    columns = GridCells.Adaptive(minSize = 120.dp), // Responsive columns
    // or columns = GridCells.Fixed(3) // Fixed 3 columns
) {
    items(100) { photoId ->
        PhotoItem(photoId)
    }
}
A regular grid (LazyVerticalGrid) arranges elements in equal rows. However, if our elements have different heights, for example notes in Google Keep or photos on Pinterest, empty spaces will appear.
The solution is LazyVerticalStaggeredGrid. It places elements one under another in a column, adjusting them to minimize empty space.
LazyVerticalStaggeredGrid(
    columns = StaggeredGridCells.Adaptive(minSize = 150.dp),
    verticalItemSpacing = 4.dp,
    horizontalArrangement = Arrangement.spacedBy(4.dp)
) {
    items(photos) { photo ->
        // Photos may have different ratios (heights)
        PhotoCard(photo)
    }
}


LazyVerticalGrid and LazyVerticalStaggeredGrid componentsThis component is ideal for displaying content with varied length, such as product cards with descriptions or photo galleries with different proportions.
In Jetpack Compose, navigation is fully declarative and is based on the Navigation Compose library. The entire navigation flow happens inside a single Activity, where we simply replace the displayed @Composable components depending on the current application state.
Basic Navigation Elements
The navigation system consists of three main components:
- NavController: the "GPS system". This is the central object that manages the navigation stack (Back Stack). It knows where you are and how to reach the destination. You use it to call
navigate()orpopBackStack(). - NavHost: the "navigation screen". This UI container displays the current position (map/route view) based on the state of the
NavController. - NavGraph: the "map of the whole area". It defines all available screens (destinations) and the possible connections between them.
To use Navigation Compose, we must add the appropriate dependency to the build.gradle file. This library is not part of the standard Compose starter set.
dependencies {
    implementation("androidx.navigation:navigation-compose:<version_number>")
}
After synchronizing the project, we can create a NavController. We usually do this in the main component of our application (for example inside Scaffold) by using rememberNavController().
@Composable
fun AppNavigation() {
    val navController = rememberNavController()

    NavHost(navController = navController, startDestination = "home") {

        // Definition of the "home" screen
        composable("home") {
            HomeScreen(
                onProfileClick = { navController.navigate("profile") }
            )
        }

        // Definition of the "profile" screen
        composable("profile") {
            ProfileScreen()
        }
    }
}
Analysis of the code above:
rememberNavController(): Creates and remembers an instance ofNavHostController. This object survives recomposition (thanks toremember) and is responsible for controlling navigation. It should be passed toNavHost.NavHost: This is the container where screens are swapped. It works like a picture frame.navController: Connects this host with the controller.startDestination: Specifies which screen should be shown first when the application starts (the start screen).composable("route"): This function defines a single node in the navigation graph.- It connects a unique route identifier (for example "home") with a specific Composable view (
HomeScreen). - This is where we decide what to display when the user navigates to a given address.
In the example above, we use simple strings ("home", "profile") as route identifiers (Routes). This works similarly to URLs in a browser.
A good practice is to define routes as objects, for example with a sealed class.
// Route definition
sealed class Screen(val route: String) {
    data object Home : Screen("home")
    data object Profile : Screen("profile")
    data object Settings : Screen("settings")
}

// Usage in NavHost
NavHost(navController, startDestination = Screen.Home.route) {
    composable(Screen.Home.route) { /* ... */ }
    composable(Screen.Profile.route) { /* ... */ }
}
Passing Data (Arguments)
Because routes in Compose Navigation are modeled after URLs, we pass arguments in the path.
If an argument is required (for example a user ID in a profile screen), we add it to the path: "profile/{userId}".
// 1. Route definition with a parameter
composable(
    route = "profile/{userId}",
    arguments = listOf(navArgument("userId") { type = NavType.StringType })
) { backStackEntry ->
    // 2. Reading the argument
    val userId = backStackEntry.arguments?.getString("userId")
    UserProfile(id = userId)
}

// 3. Navigation call
navController.navigate("profile/123")
Key elements:
arguments: A list of expected parameters. Navigation Compose must know that{userId}is more than just a text fragment - that it is a variable.navArgument: Configuration of a single parameter. Here we specify the type (for exampleNavType.StringType,IntType) and optionally a default value (defaultValue) or whether the argument may be null (nullable).backStackEntry: An object representing an entry on the navigation stack. It stores the state of the screen, including the parsed arguments. This is where we read the passed value from, similarly toIntent.extrasin the old system.UserProfile: A regular@Composablefunction that acceptsidas a parameter. Notice that it knows nothing about navigation. It does not know whetheridcame from a URL or from a constant. This is a good practice: it decouples the view from the navigation mechanism.
If an argument is optional, we use syntax known from HTTP queries: "search?query={text}".
composable(
    route = "search?query={text}",
    arguments = listOf(
        navArgument("text") {
            defaultValue = ""
            nullable = true
        }
    )
) { /* ... */ }
Complete Example
@Composable
fun ArgumentNavigationDemo() {
    val navController = rememberNavController()

    NavHost(navController = navController, startDestination = "list") {

        // Screen 1: item list
        composable("list") {
            Column(
                modifier = Modifier.fillMaxSize(),
                horizontalAlignment = Alignment.CenterHorizontally,
                verticalArrangement = Arrangement.Center
            ) {
                Text(
                    text = "Choose an item:",
                )
                Spacer(modifier = Modifier.height(16.dp))

                Button(onClick = { navController.navigate("details/1") }) {
                    Text("Show details of item #1")
                }
                Spacer(modifier = Modifier.height(8.dp))
                Button(onClick = { navController.navigate("details/42") }) {
                    Text("Show details of item #42")
                }
            }
        }

        // Screen 2: details screen receiving an ID
        composable(
            route = "details/{itemId}",
            arguments = listOf(navArgument("itemId") { type = NavType.IntType })
        ) { backStackEntry ->
            val id = backStackEntry.arguments?.getInt("itemId")

            Column(
                modifier = Modifier.fillMaxSize(),
                horizontalAlignment = Alignment.CenterHorizontally,
                verticalArrangement = Arrangement.Center
            ) {
                Text(
                    text = "Received ID: $id",
                )
                Spacer(modifier = Modifier.height(16.dp))
                Button(onClick = { navController.popBackStack() }) {
                    Text("Go back to the list")
                }
            }
        }
    }
}
Navigation with a Bottom Bar (Scaffold + BottomBar)
Integrating navigation with a BottomBar requires connecting the state of the NavController with the bar view. We need to know which screen we are currently on in order to highlight the correct icon.
val navController = rememberNavController()
// Observe the current route (state)
val navBackStackEntry by navController.currentBackStackEntryAsState()
val currentRoute = navBackStackEntry?.destination?.route

Scaffold(
    bottomBar = {
        NavigationBar {
            NavigationBarItem(
                selected = currentRoute == Screen.Home.route,
                onClick = {
                    navController.navigate(Screen.Home.route) {
                        // Important flags for bottom navigation:
                        // 1. Avoid creating multiple copies of the same screen on the stack
                        popUpTo(navController.graph.startDestinationId) {
                            saveState = true
                        }
                        // 2. Restore screen state (for example scroll position) when returning
                        restoreState = true
                        // 3. Do not create a new instance if we are already there
                        launchSingleTop = true
                    }
                },
                icon = { Icon(Icons.Default.Home, contentDescription = null) },
                label = { Text("Home") }
            )
        }
    }
) { innerPadding ->
    NavHost(
        navController = navController,
        startDestination = Screen.Home.route,
        modifier = Modifier.padding(innerPadding)
    ) {
        composable(Screen.Home.route) { HomeScreen() }
        // ... other screens
    }
}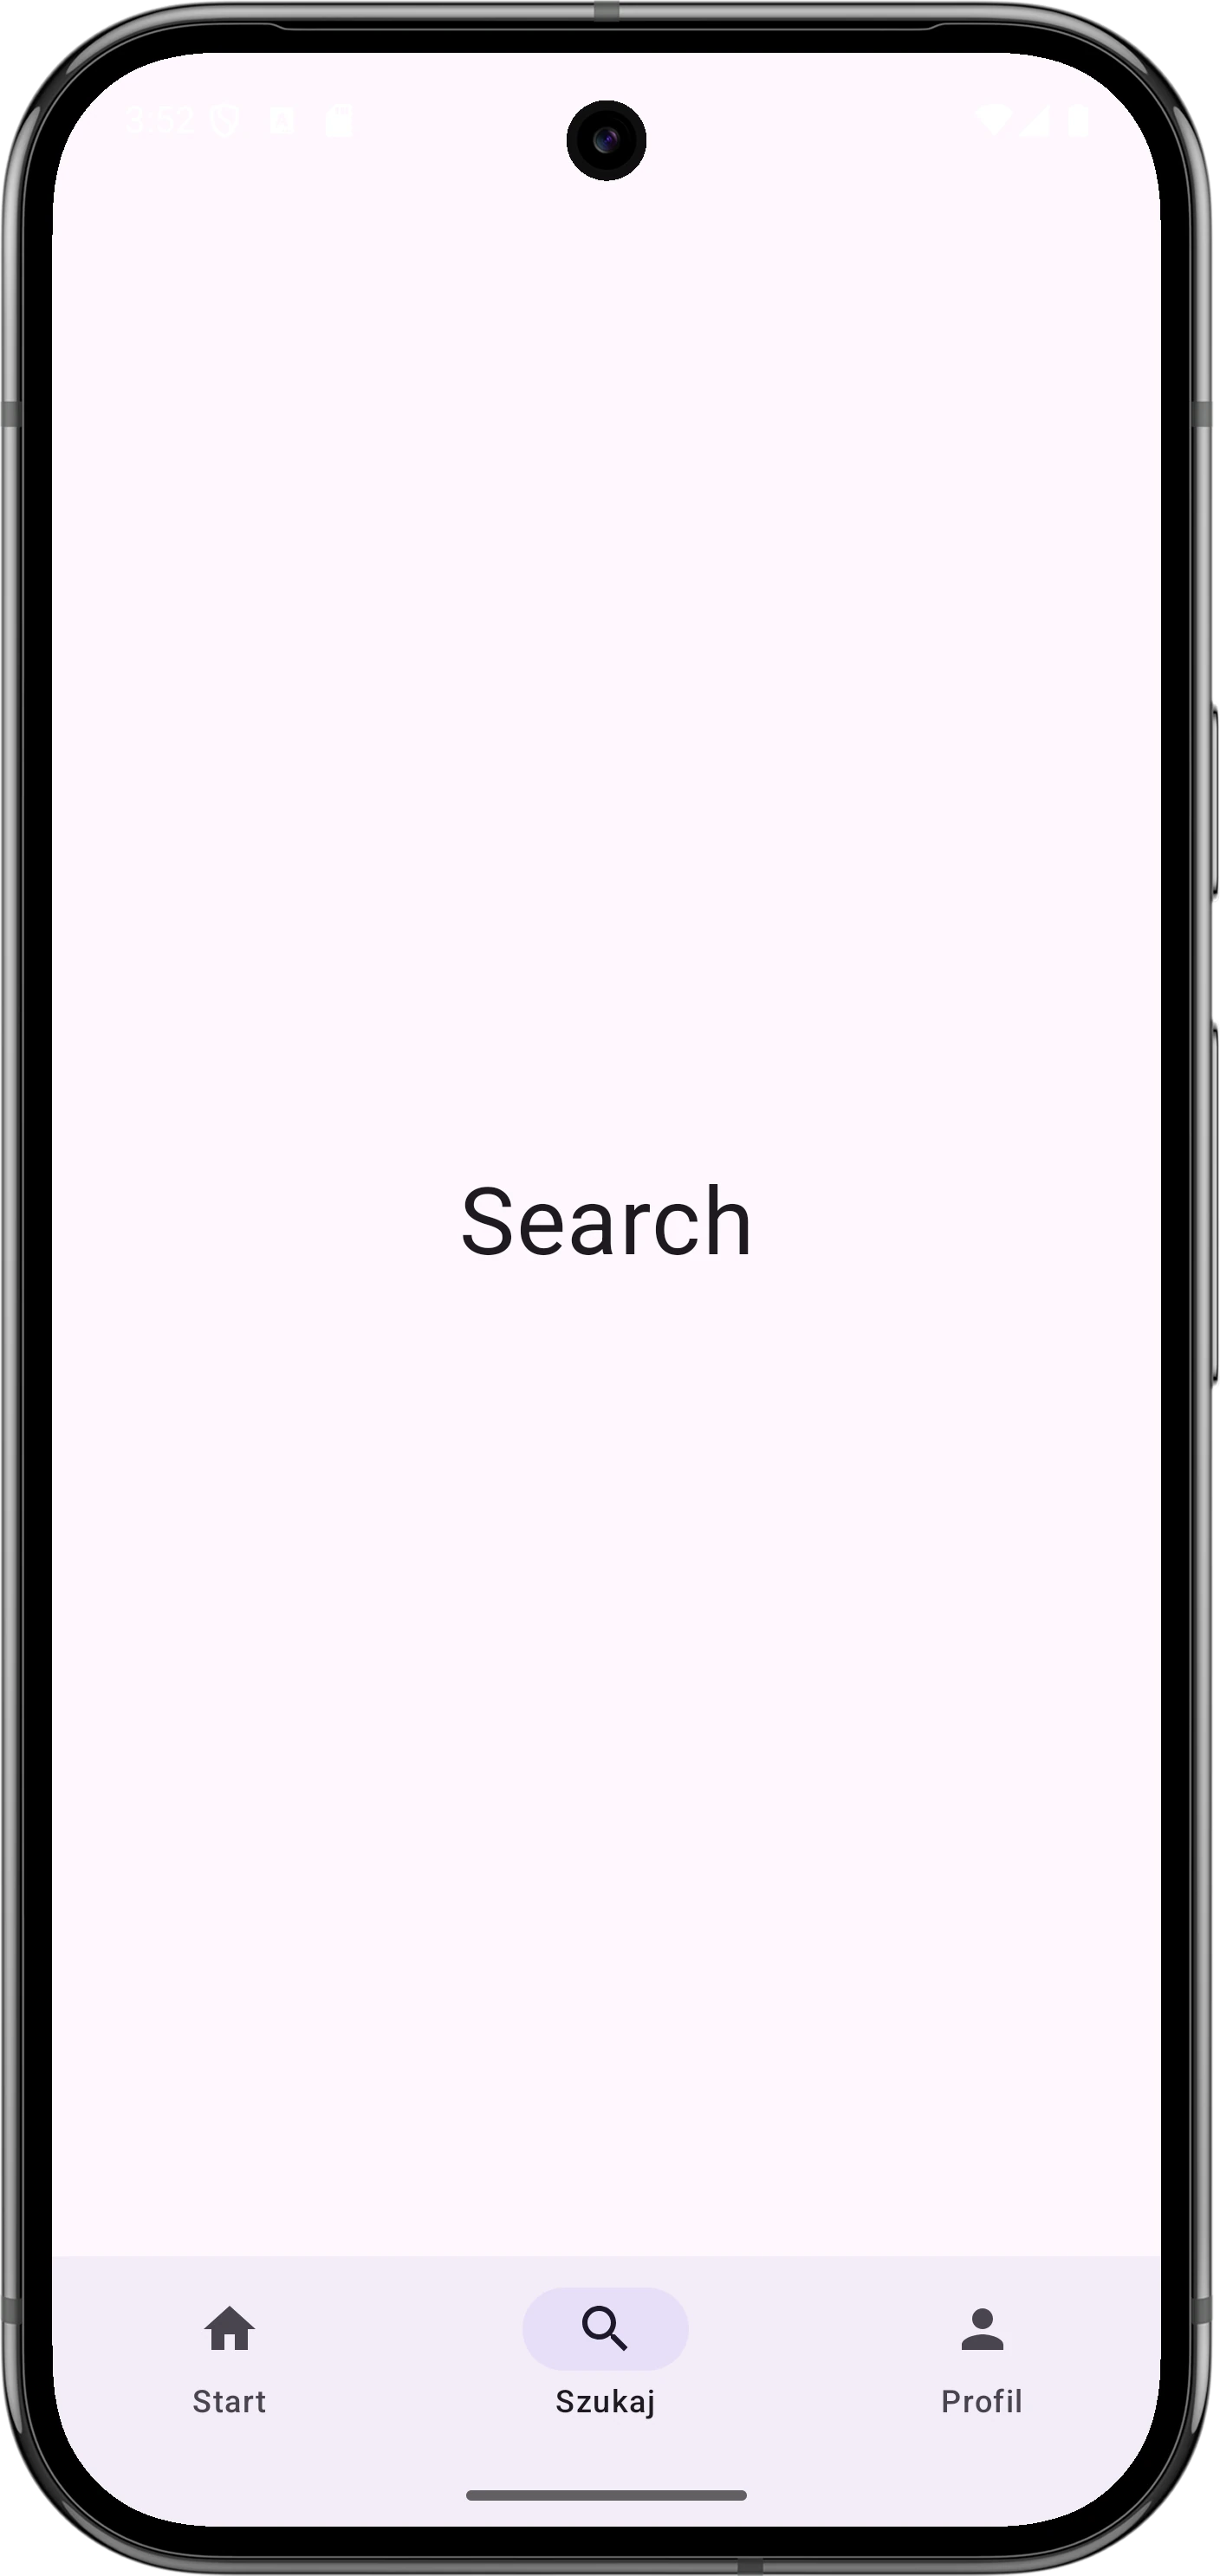
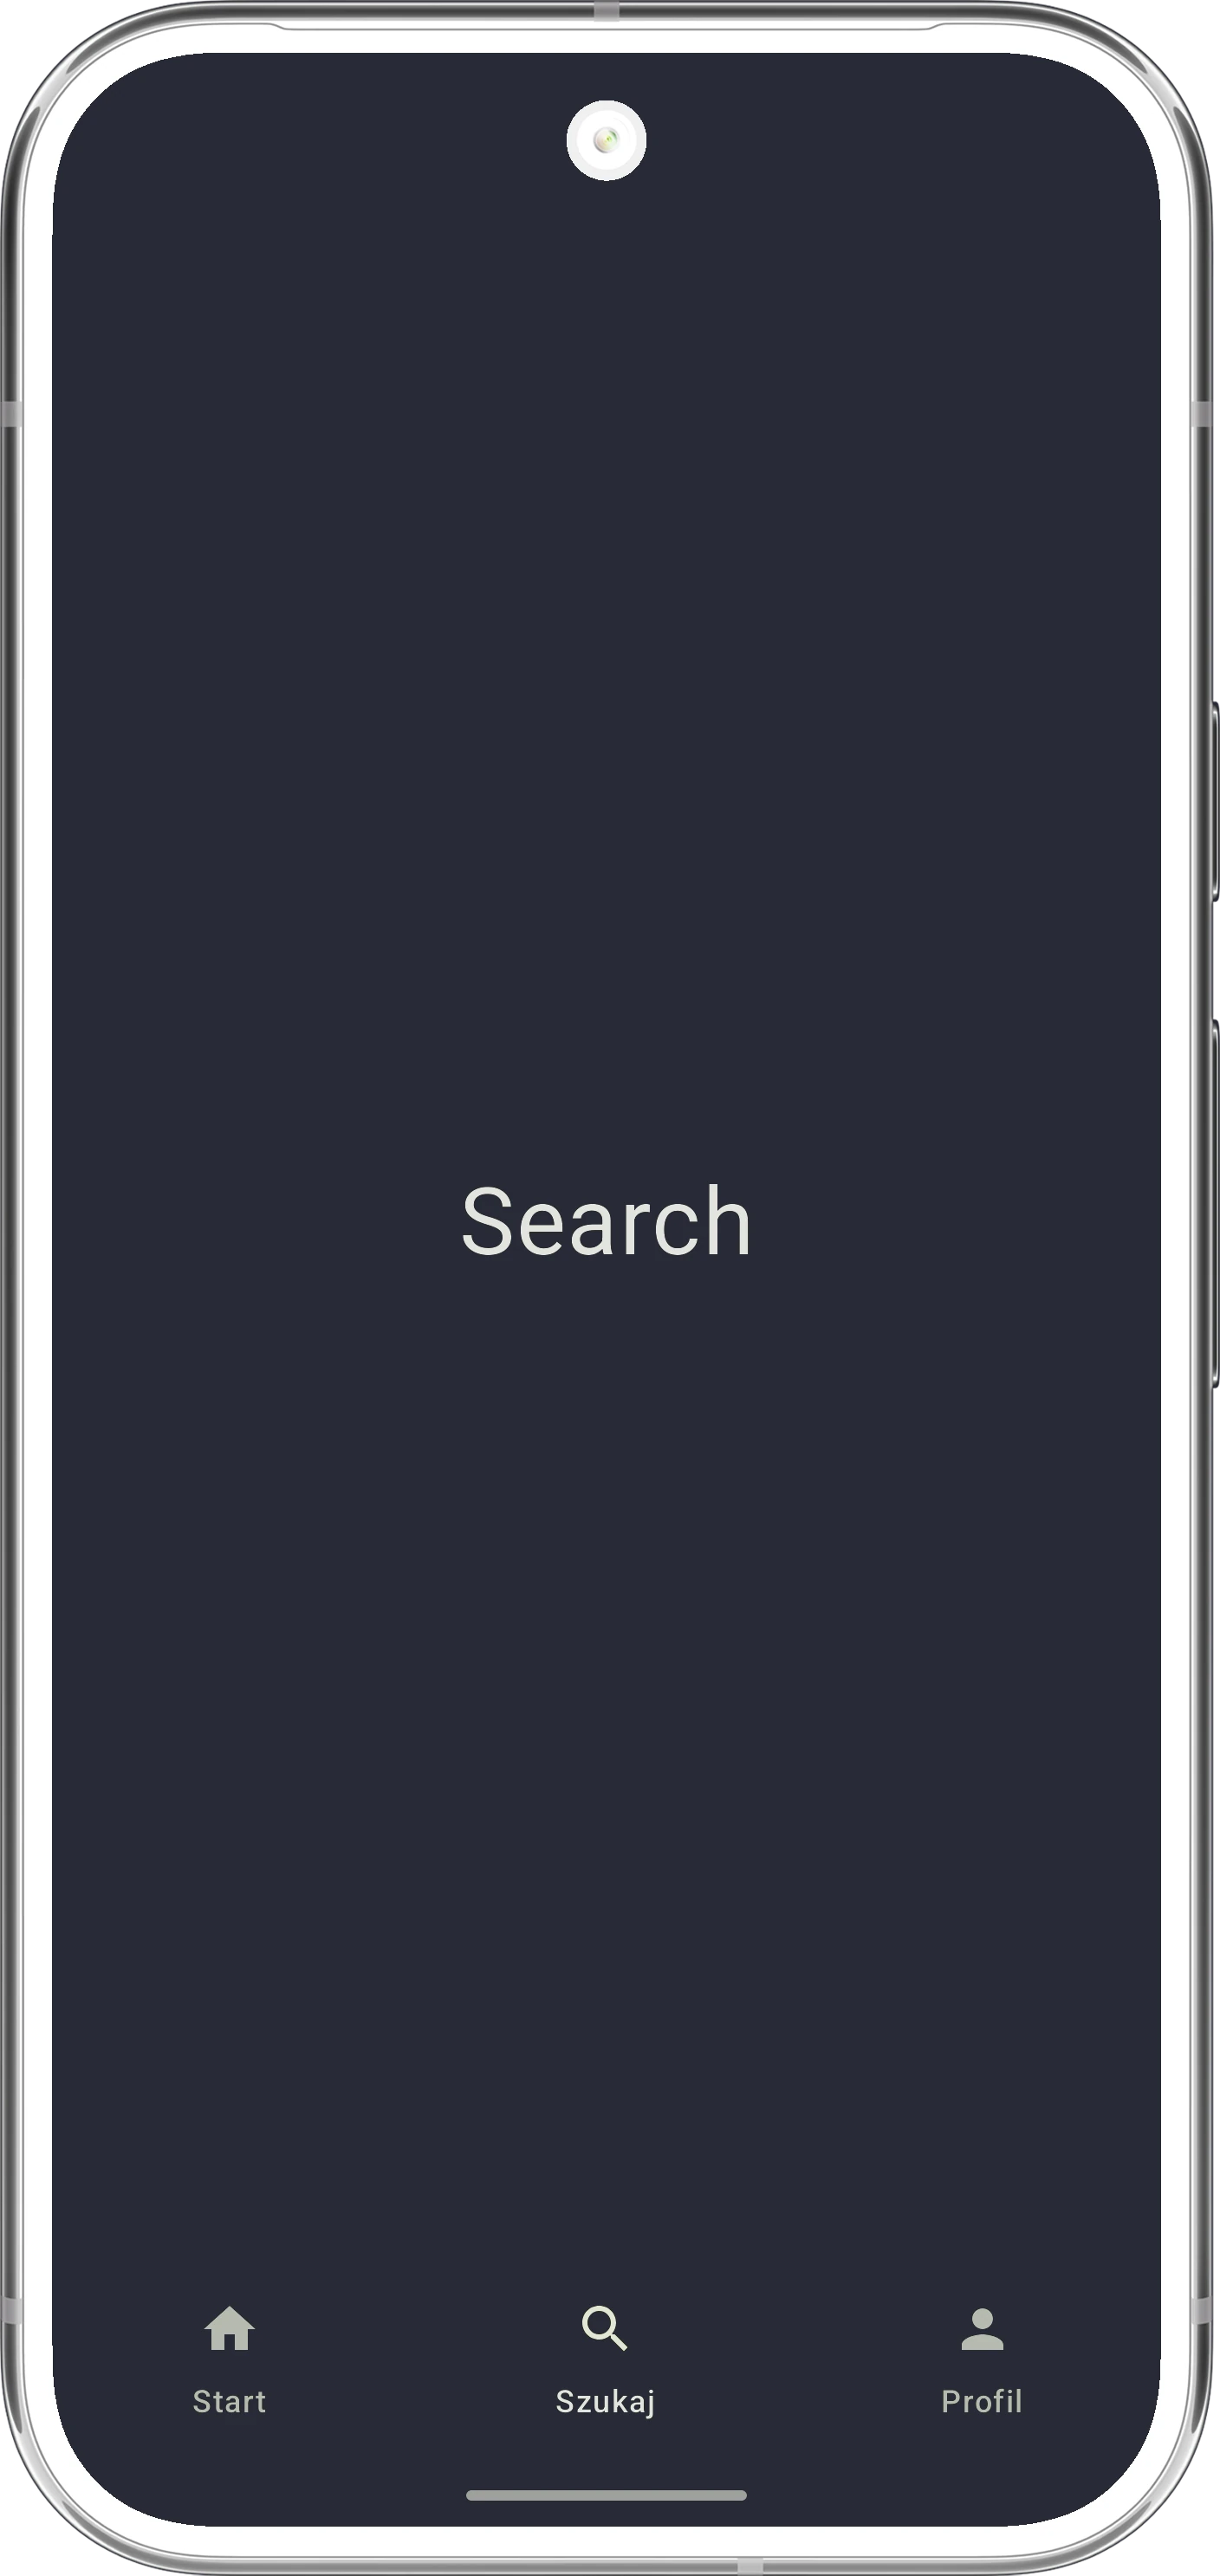


The flags popUpTo, saveState, restoreState, and launchSingleTop are important for correct bottom navigation behavior ("Bottom Navigation Patterns"). They provide intuitive behavior of the Back button and preserve the state of forms or lists when switching tabs.
In software engineering, we often encounter recurring problems. Instead of reinventing the wheel, we use proven solutions called design patterns. They are universal, abstract recipes for solving specific architectural problems. Patterns are usually divided into three groups:
- Creational: They concern object creation mechanisms, for example Singleton, Builder, Factory.
- Structural: They concern composing objects and classes into larger structures, for example Adapter, Decorator.
- Behavioral: They concern communication and responsibility distribution between objects, for example Observer, Strategy.
In this chapter, we will discuss selected patterns that are especially important in the Kotlin and Android ecosystem.
Singleton
Singleton is a creational pattern that guarantees that a given class has only one instance in the entire system and provides a global access point to it.
In Kotlin, creating a Singleton is extremely simple thanks to the object keyword. The compiler automatically generates code that ensures only one instance of this class is created, in a thread-safe way.
// The simplest Singleton in Kotlin
object DatabaseConnection {
    val url = "jdbc:mysql://localhost:8801/db"

    fun connect() {
        println("Connecting to $url")
    }
}

// Usage
DatabaseConnection.connect()
Properties of object:
- Lazy initialization: The object is created only when it is first accessed, for example
DatabaseConnection.connect(). - Thread safety: Kotlin, running on the JVM, guarantees that static initialization is safe. We do not have to worry about thread races.
- No public constructor: There is no way to manually create a second instance.
Sometimes we need more control over instance creation, for example when initialization requires parameters provided at application runtime or when we want to delay the creation of a heavy object.
If Singleton initialization requires arguments, for example Context in Android, the object keyword is not enough because it cannot accept constructor parameters. In that case, we use a companion object inside a regular class and the by lazy delegate.
class NetworkClient private constructor(val baseUrl: String) {

    companion object {
        // Lazy initialization - the code in this block runs only once,
        // on the first use of the 'instance' property.
        // By default this is thread-safe.
        val instance: NetworkClient by lazy {
            NetworkClient("https://api.example.com")
        }
    }
}
In cases where by lazy is not enough, for example when we want to reset the Singleton or have very unusual initialization logic, we use the Double-Checked Locking pattern. It checks whether the instance exists twice: first without a lock for speed, and then inside a synchronized block for safety.
Here is an implementation example for a Retrofit client, used for API communication:
class RetrofitClient private constructor() {

    companion object {
        // @Volatile ensures that a value change is immediately visible
        // to all threads, bypassing the CPU cache
        @Volatile
        private var instance: Retrofit? = null

        fun getInstance(): Retrofit {
            // First check, without locking - fast
            val currentInstance = instance
            if (currentInstance != null) {
                return currentInstance
            }

            // Locking with synchronized - allows only one thread at a time
            synchronized(this) {
                // Second check, inside the lock
                val i2 = instance
                if (i2 != null) {
                    return i2
                } else {
                    // Instance creation
                    val created = Retrofit.Builder()
                        .baseUrl("https://api.example.com")
                        .build()

                    instance = created
                    return created
                }
            }
        }
    }
}
Although in Kotlin object or the by lazy delegate is usually enough, and by lazy also uses synchronization mechanisms under the hood, understanding Double-Checked Locking is important for knowing how these mechanisms work internally.
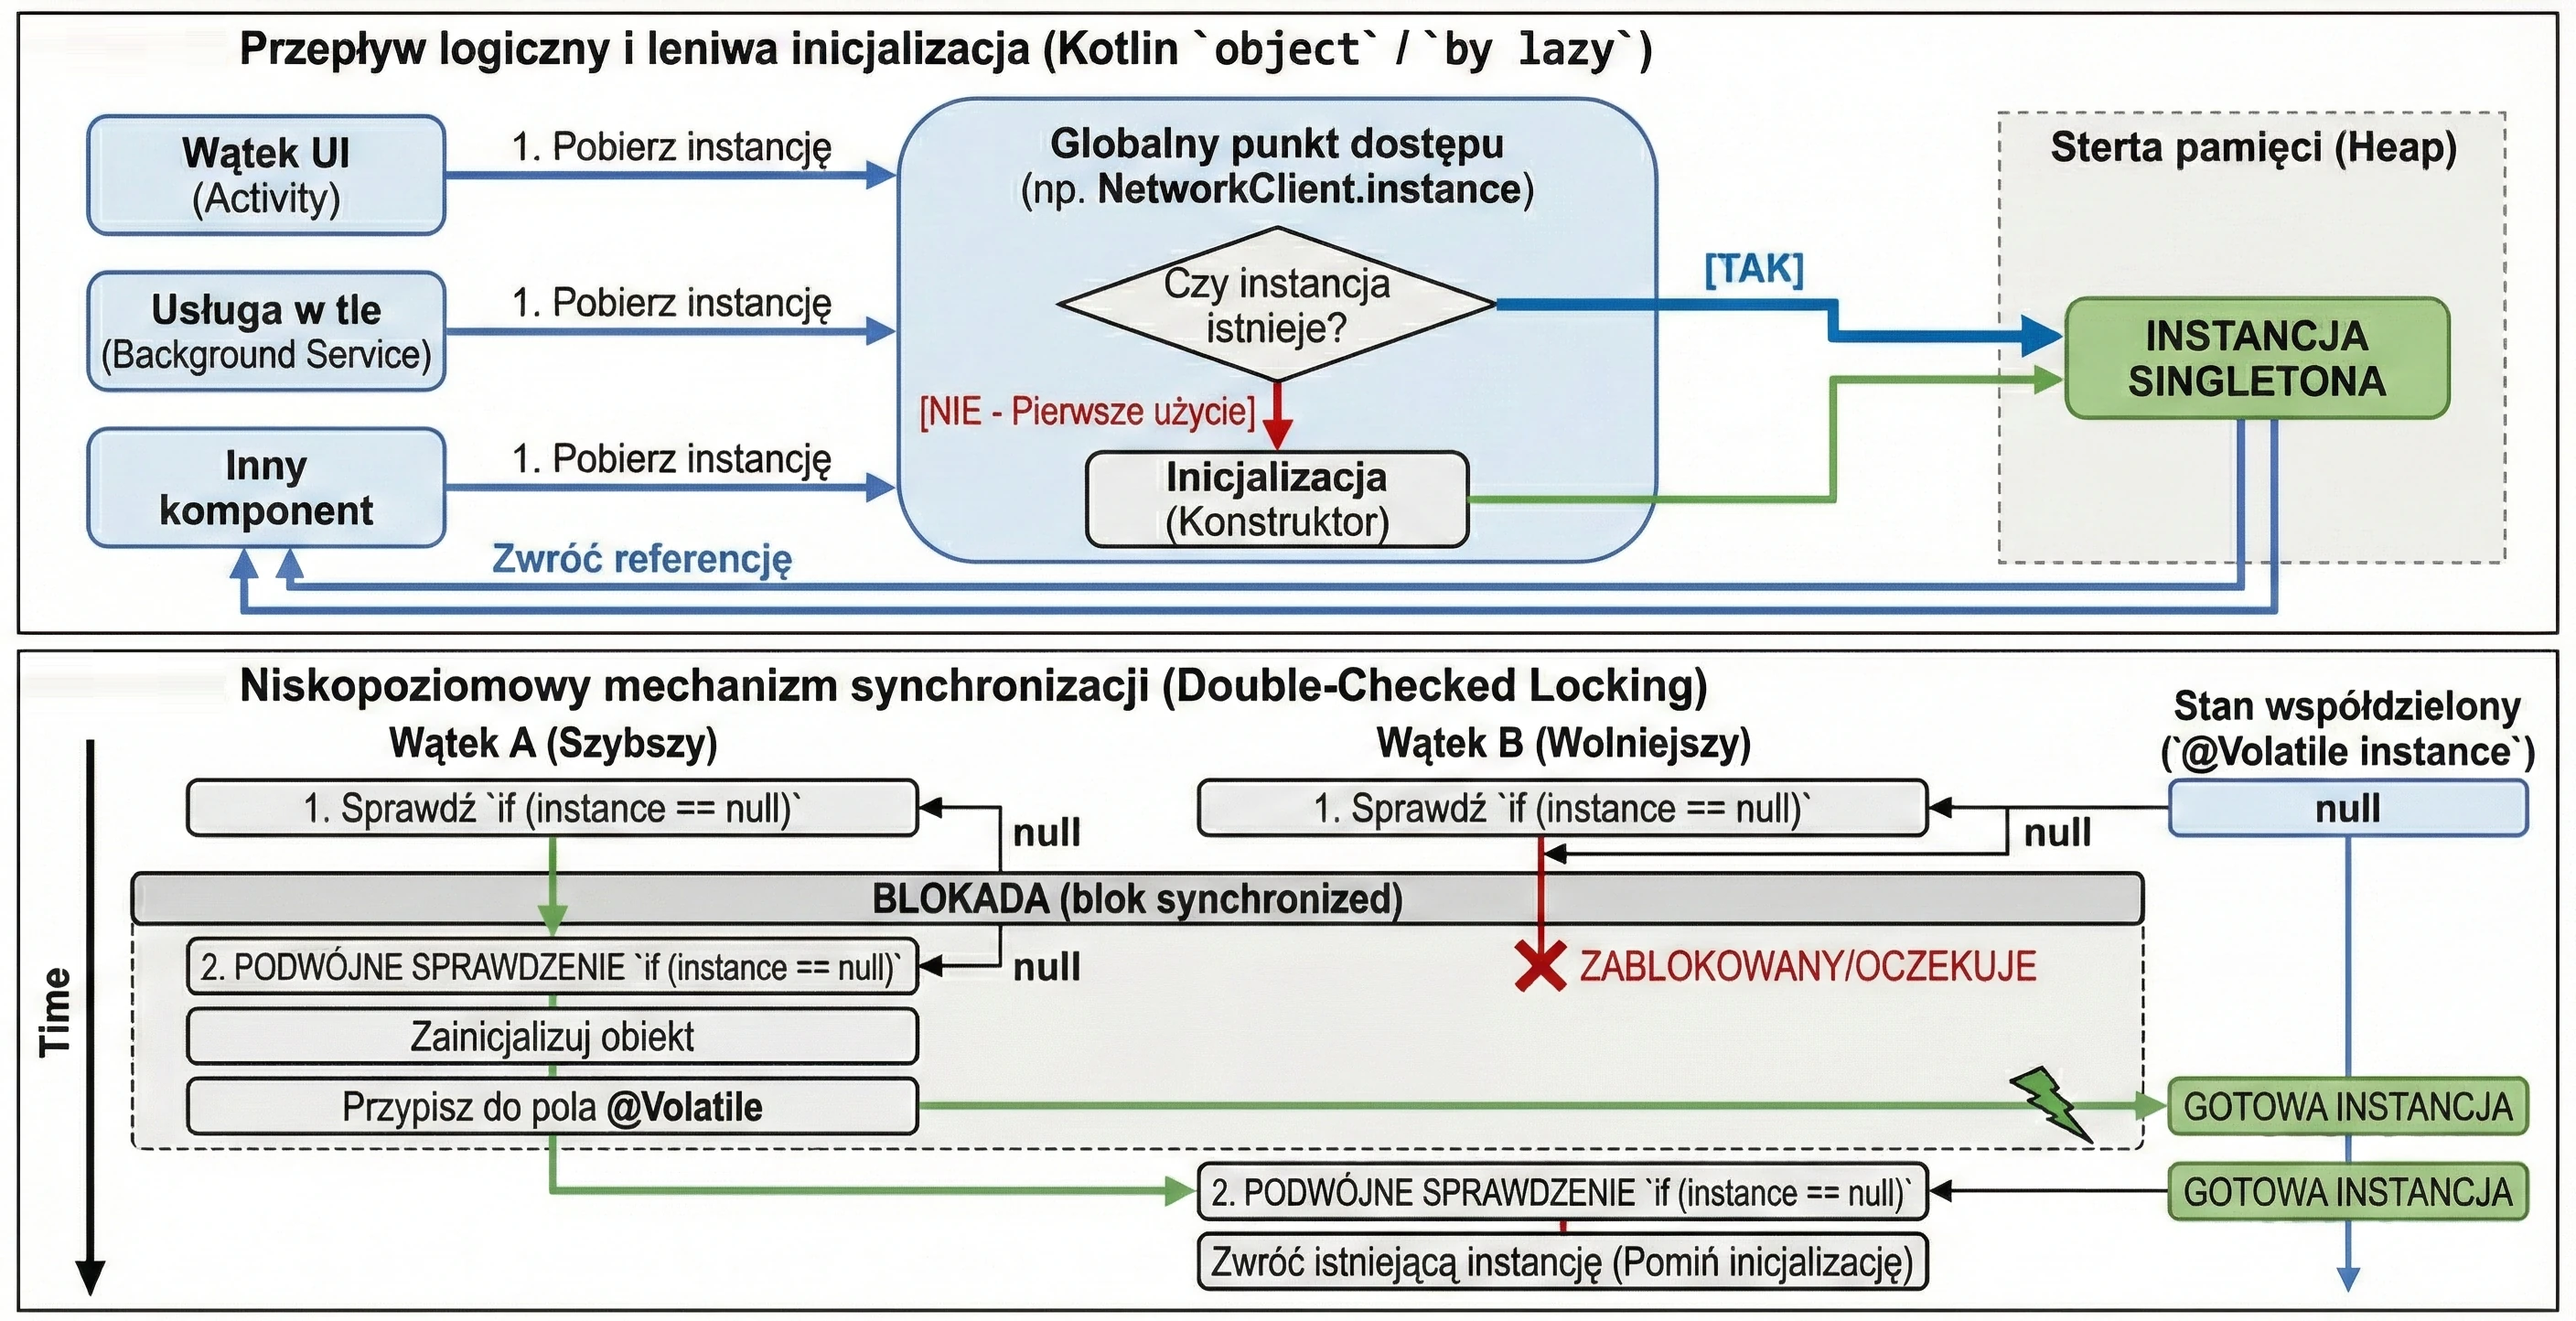
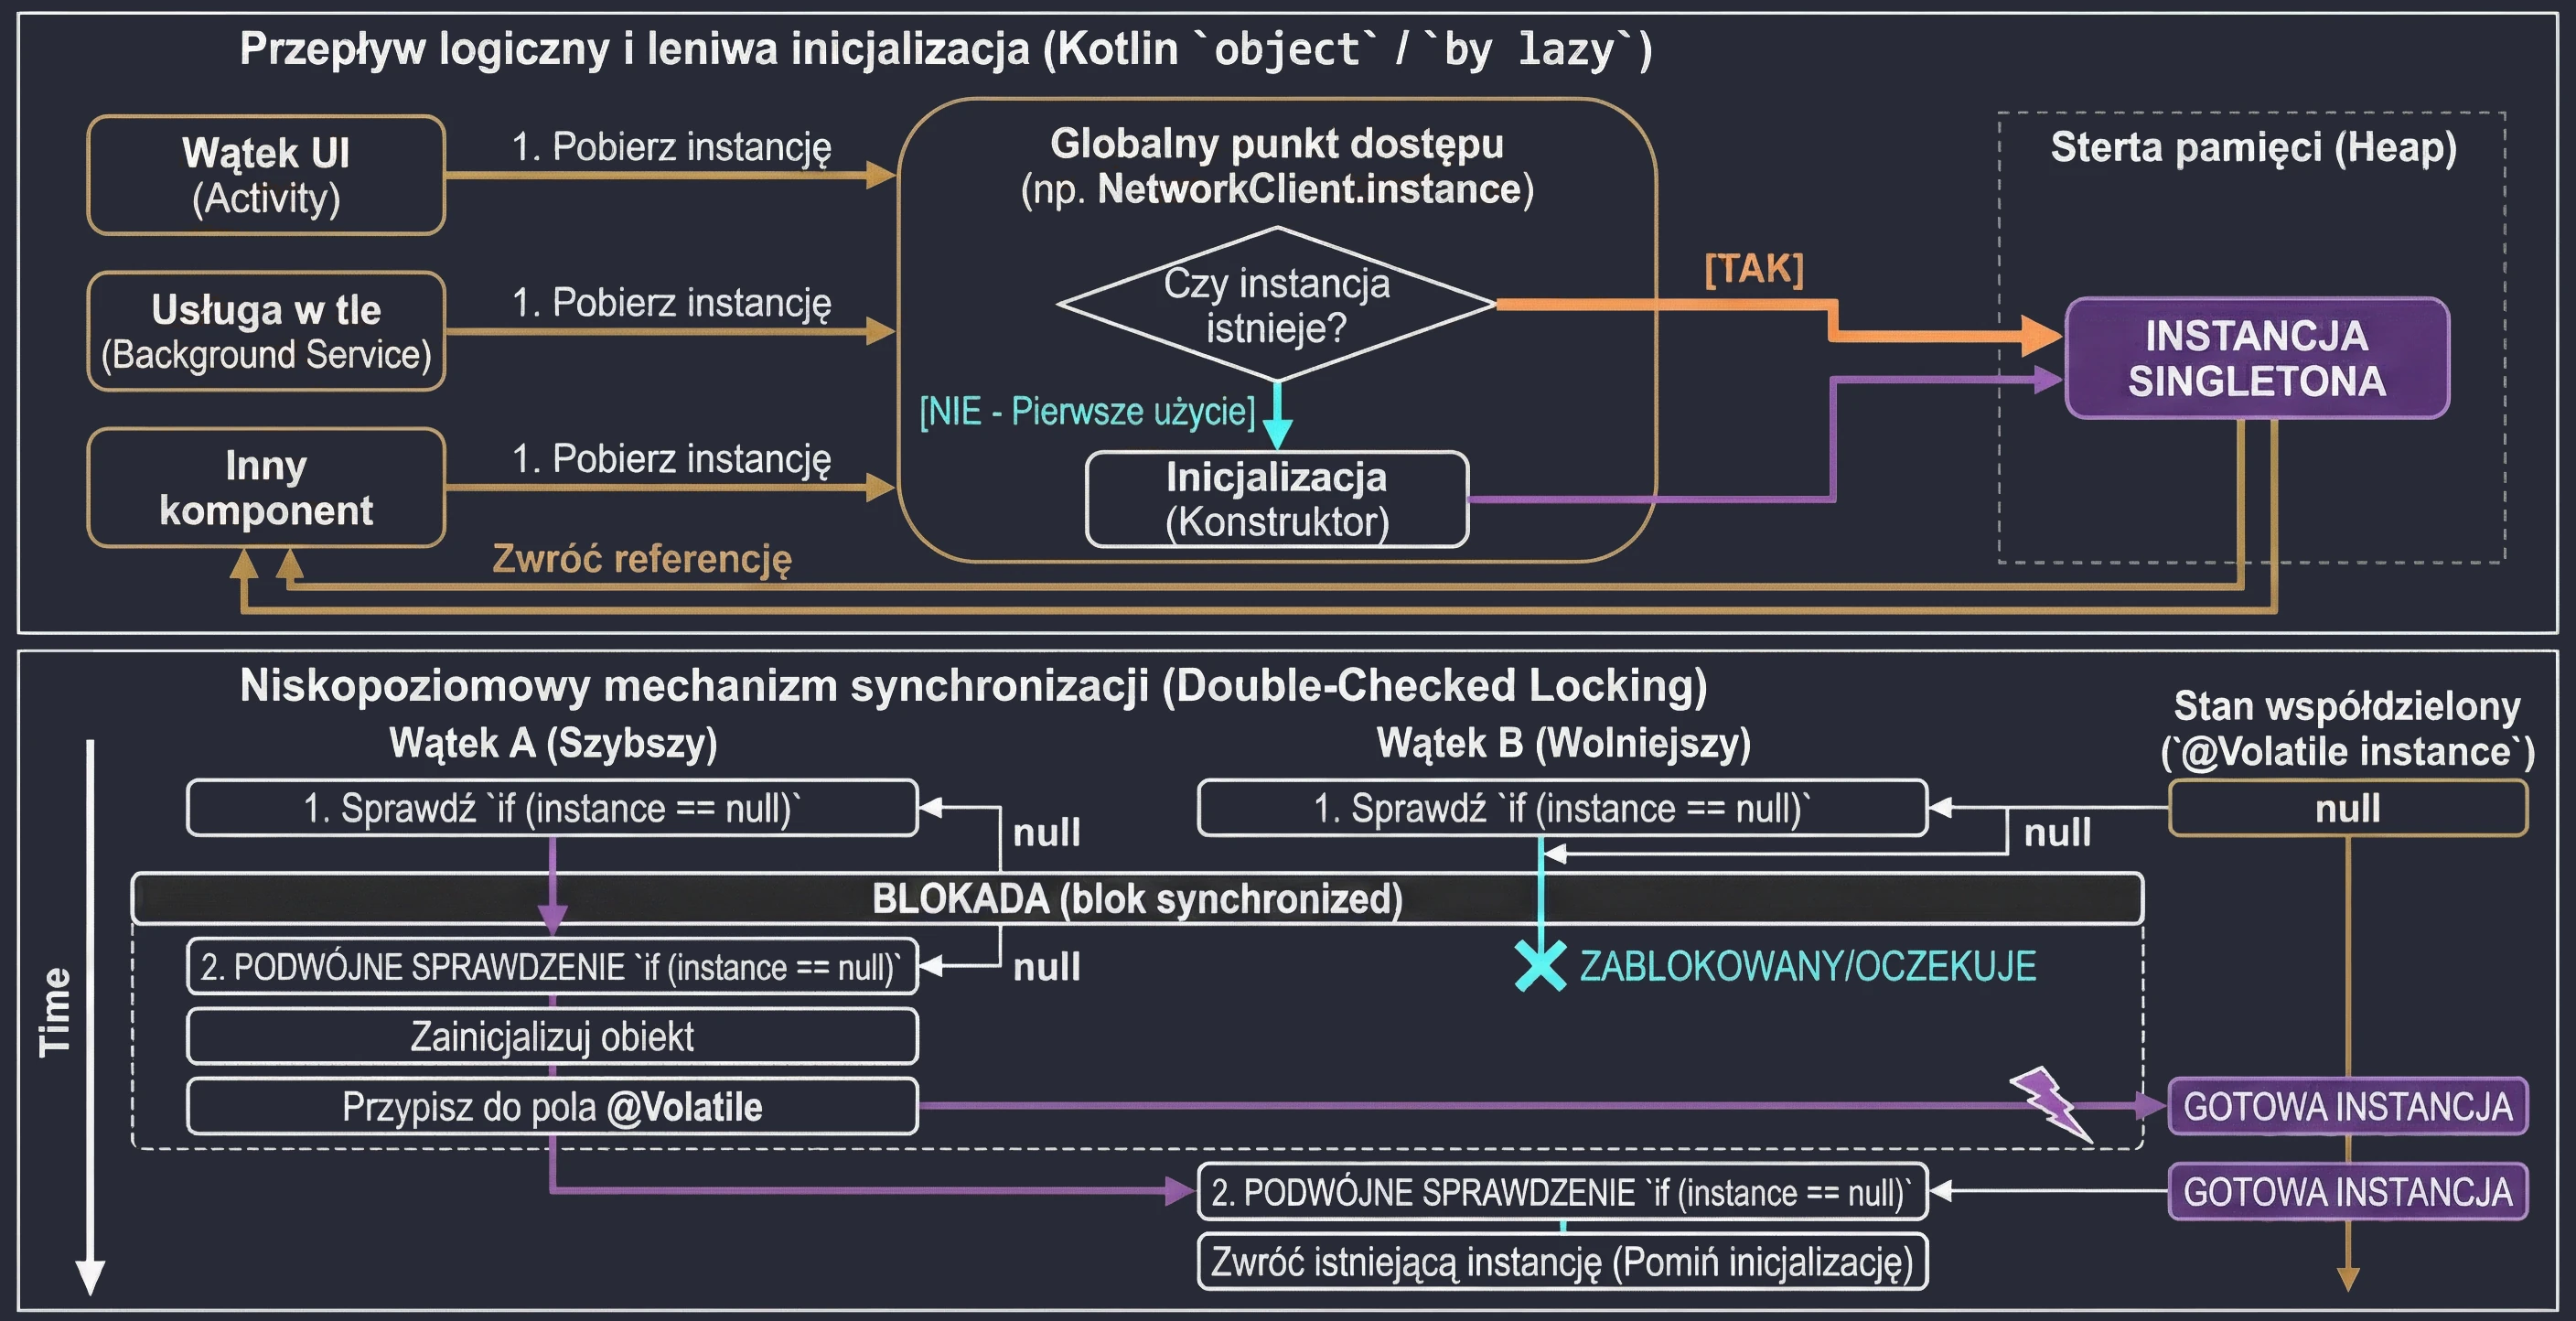
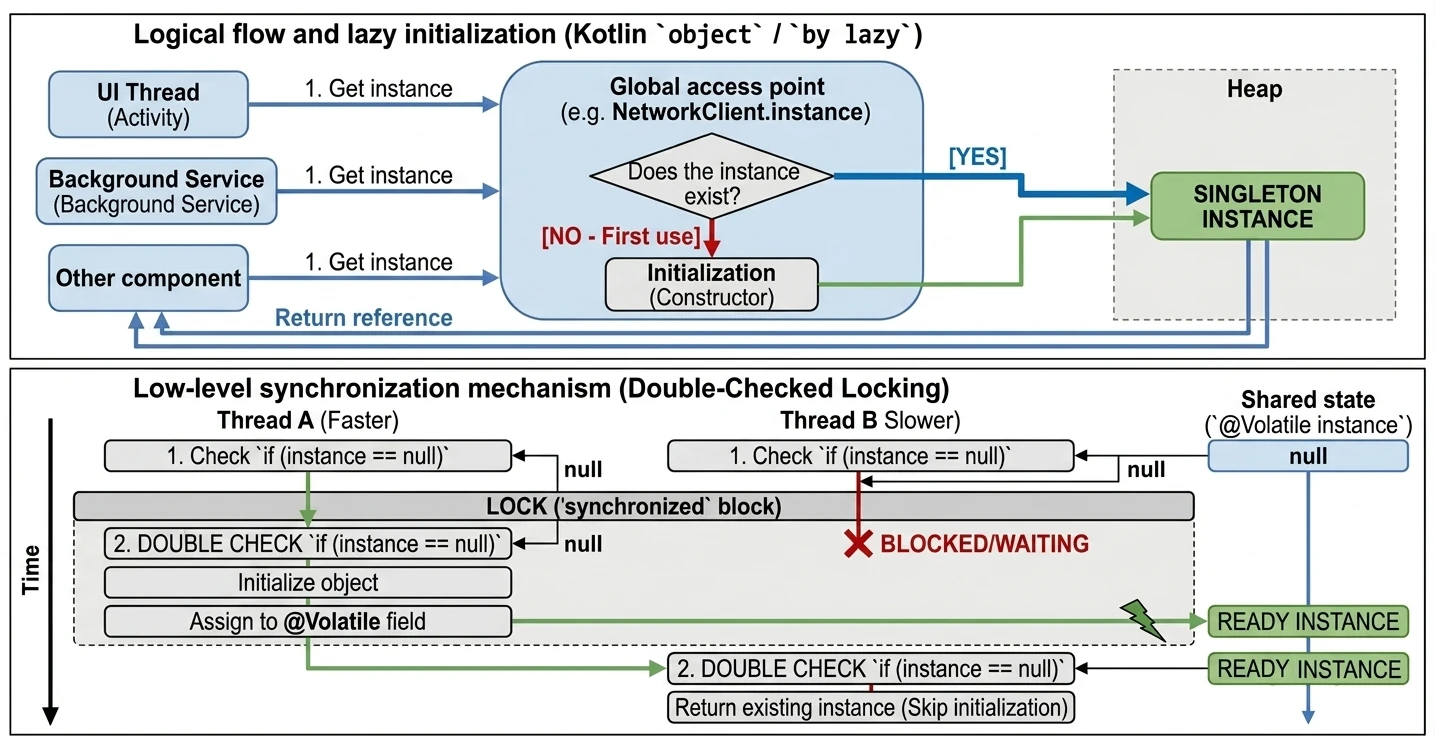
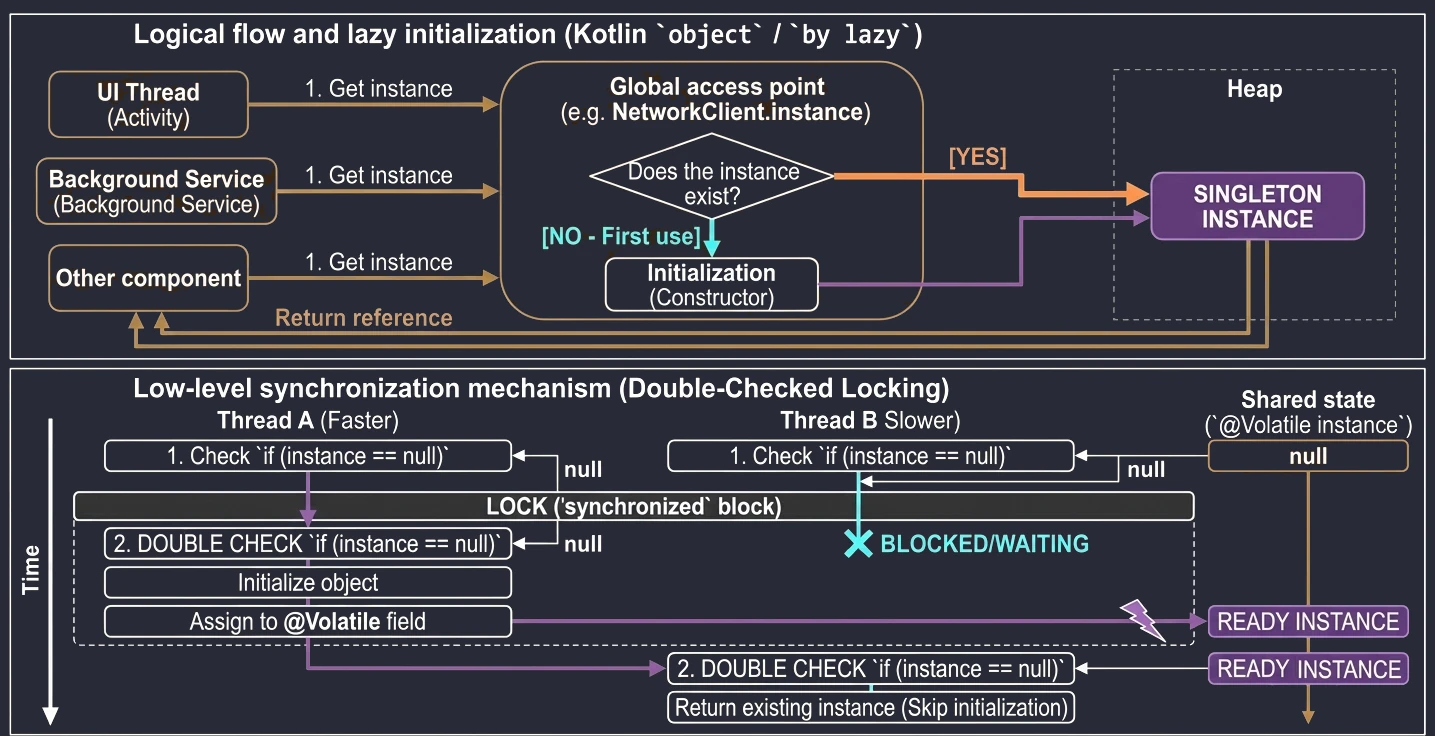
Builder
The Builder pattern is used to construct complex objects step by step. It separates the construction process from the object representation. It is especially useful when an object has many optional configuration parameters.
Thanks to named arguments and default values, implementing the Builder pattern in Kotlin is very simple.
// Instead of a Builder: default parameters
data class Pizza(
    val size: String = "Medium",
    val cheese: Boolean = true,
    val pepperoni: Boolean = false,
    val mushrooms: Boolean = false
)

// Usage
val myPizza = Pizza(
    size = "Large",
    pepperoni = true
)
However, if configuration is more complex and requires validation or side operations, we can use the apply function to simulate a Builder:
class NotificationBuilder {
    var title: String = ""
    var body: String = ""

    fun build(): Notification {
        require(title.isNotEmpty()) { "Title cannot be empty" }
        return Notification(title, body)
    }
}

// Usage
val notification = NotificationBuilder().apply {
    title = "Hello"
    body = "World"
}.build()
Classic Implementation (Java Style)
Even though Kotlin gives us better tools, as Android developers we often use libraries written in Java or in a Java-like style, and those libraries use the classic Builder pattern. It is worth knowing this pattern so we can use them effectively.
Properties of the classic Builder:
- It has a private constructor of the main class, for example
Notification. - It has a static inner
Builderclass. - Setter methods return
this, the Builder object, which enables method chaining. - It has a
build()method that creates the final object.
Example, Java style written with Kotlin syntax:
class Pizza private constructor(val size: String, val cheese: Boolean) {

    class Builder {
        private var size: String = "Medium" // default value
        private var cheese: Boolean = false

        // The method returns 'Builder', enabling chaining
        fun setSize(size: String): Builder {
            this.size = size
            return this
        }

        fun setCheese(cheese: Boolean): Builder {
            this.cheese = cheese
            return this
        }

        fun build(): Pizza {
            return Pizza(size, cheese)
        }
    }
}

// Usage, familiar to Java and Android SDK developers
val pizza = Pizza.Builder()
    .setSize("Large")
    .setCheese(true)
    .build()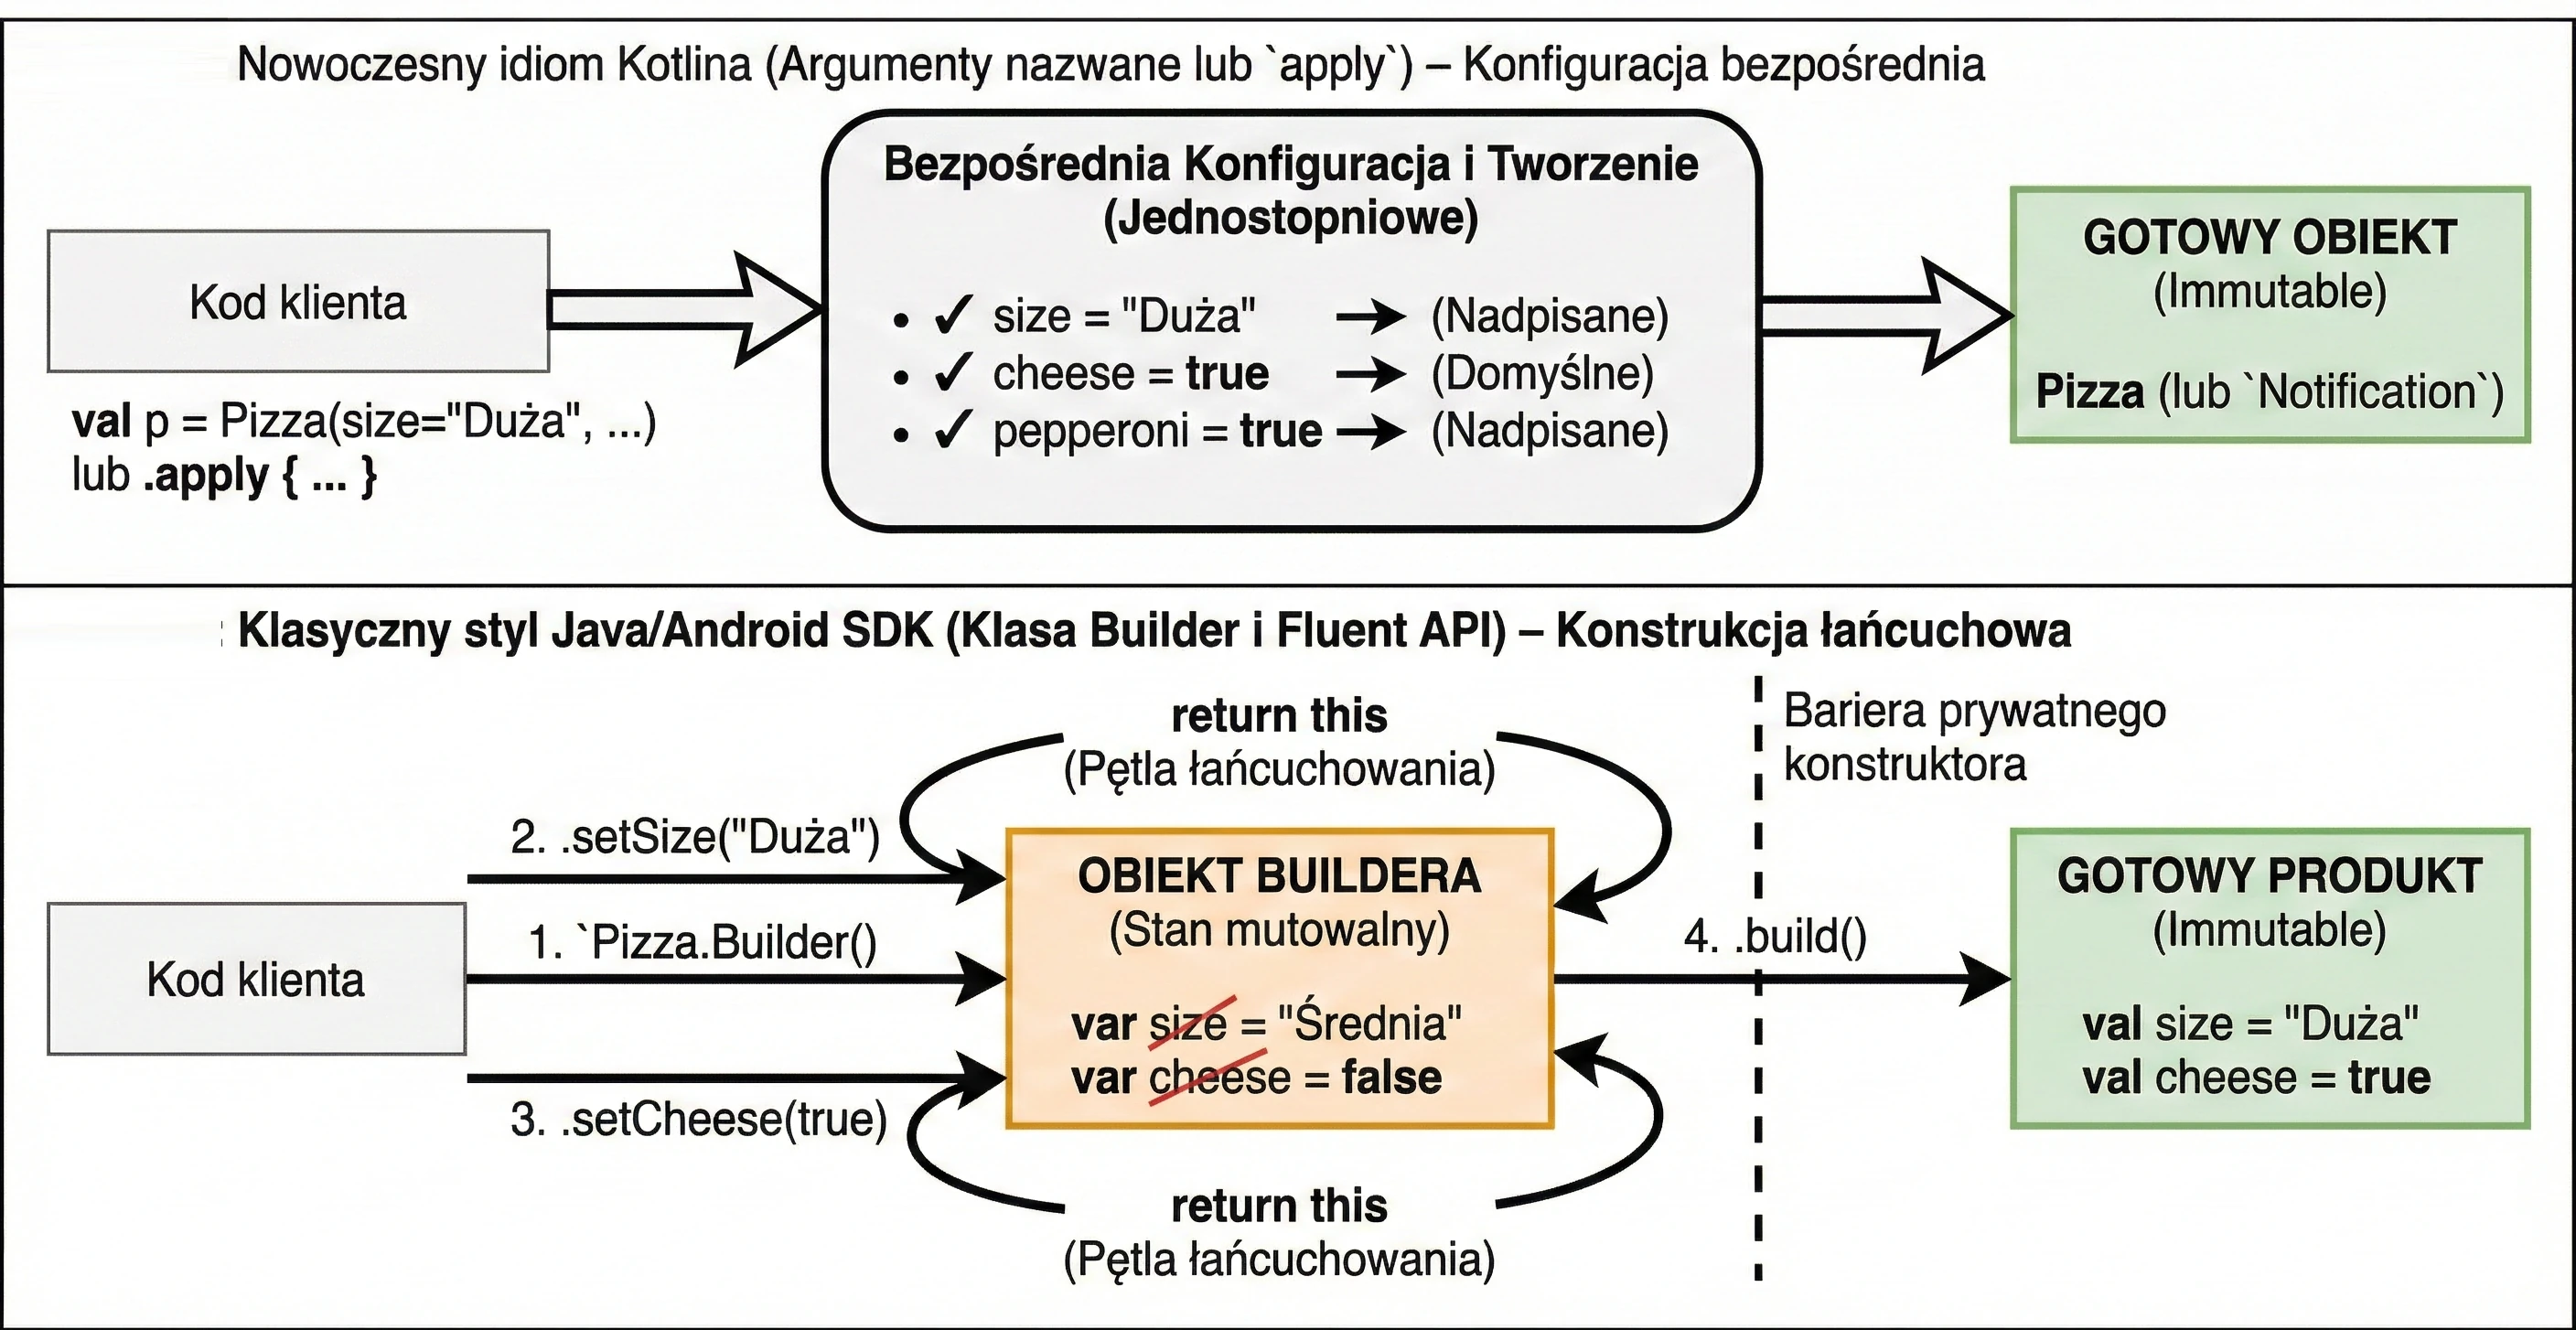
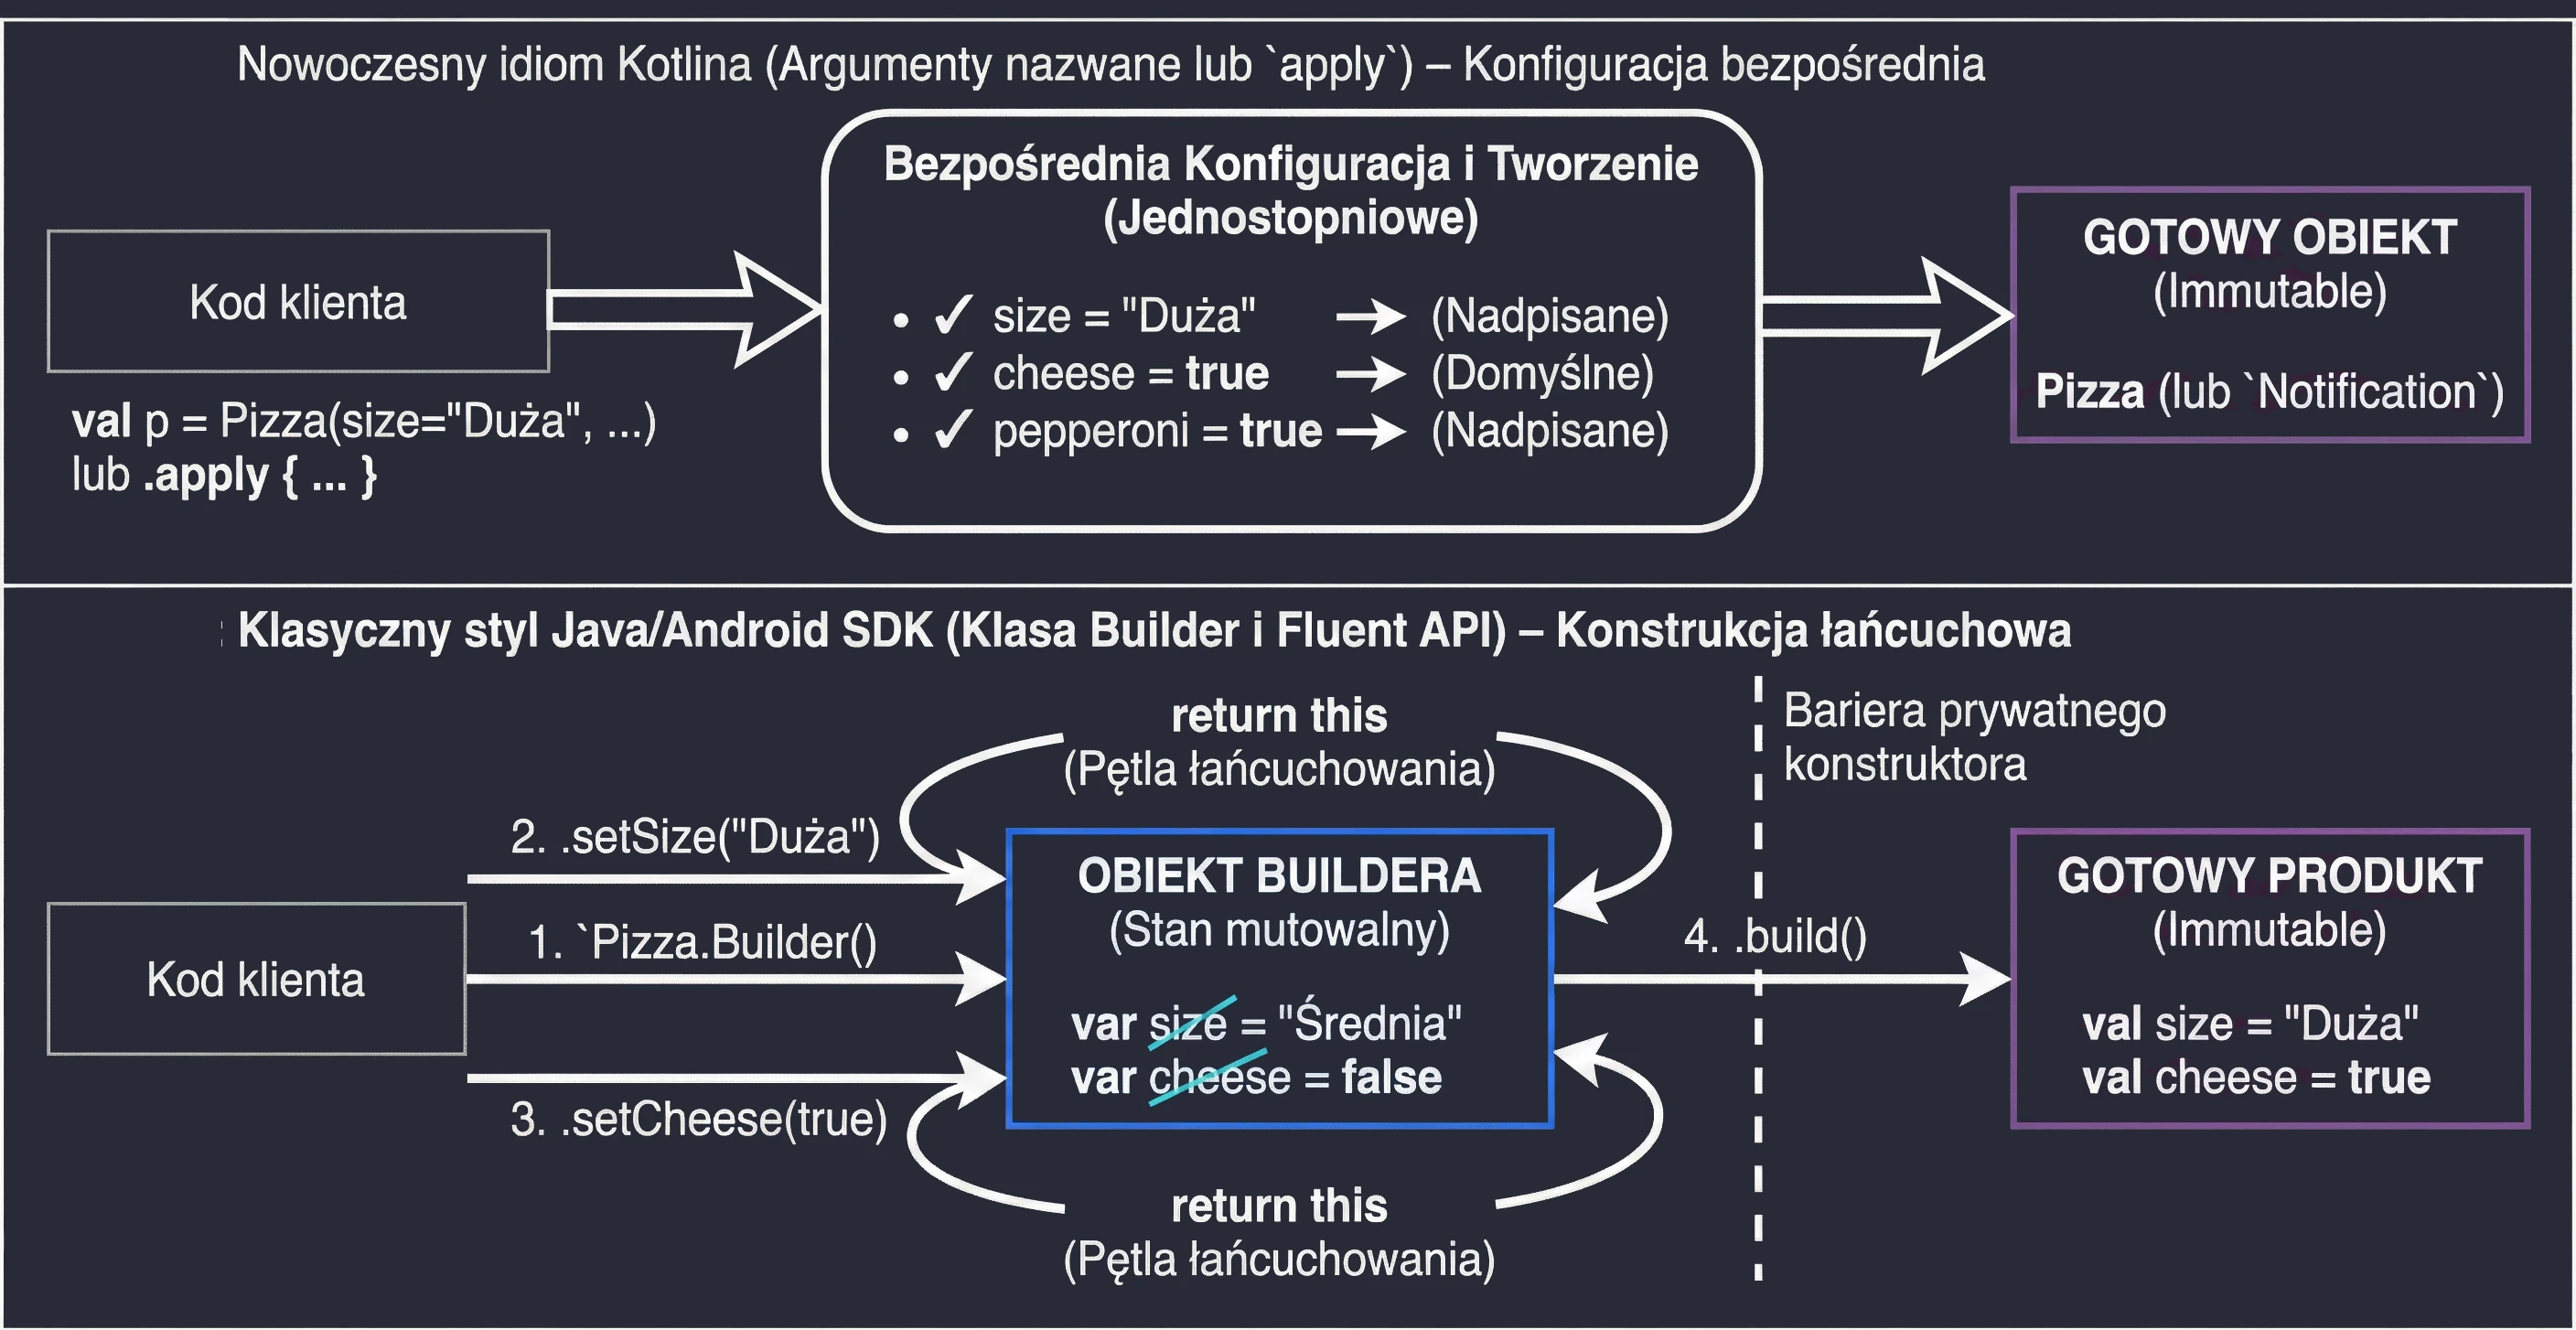
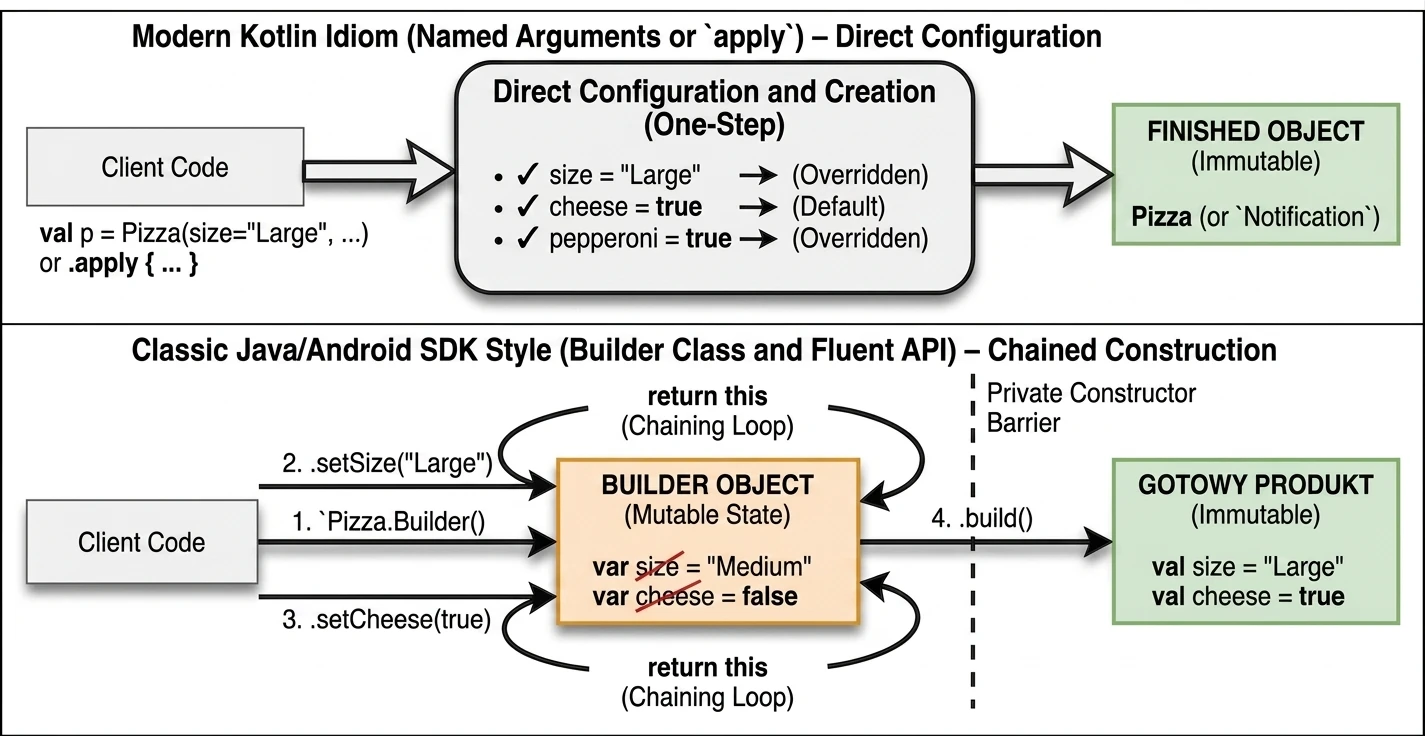
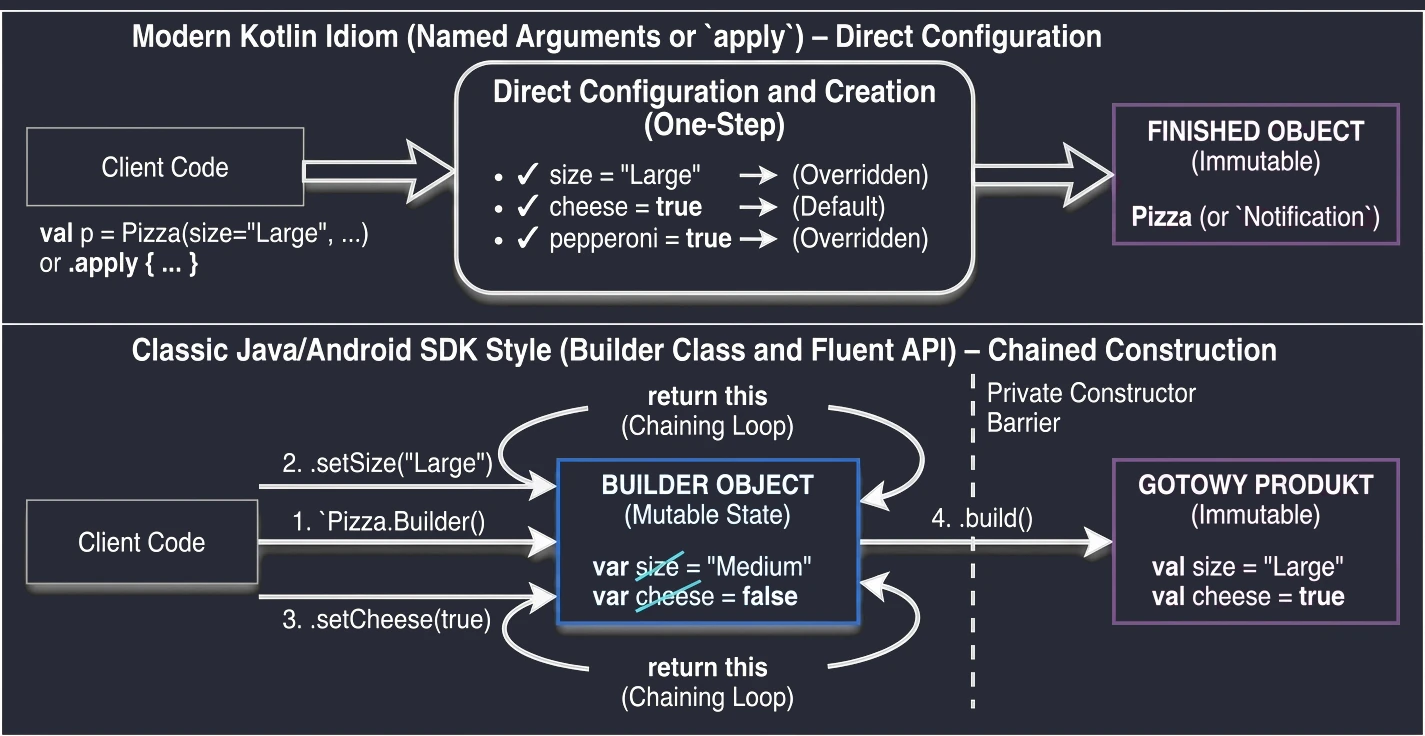
Builder classFactory
The Factory pattern, or Factory Method, is one of the most commonly used creational patterns. It is used to create objects without exposing the creation logic to the client and without coupling client code to a concrete implementation class.
Instead of calling a constructor directly, for example new ConsoleLogger(), the client asks the factory to provide an object that satisfies a given interface. This gives us:
- Hiding complex creation logic: If an object requires many dependencies, for example configuration or file access, the factory hides this code in one place. As a result, the client does not need to know how to create the object, only what it wants to receive. This also makes later changes easier, following the Open-Closed Principle: changing the way an object is constructed does not require changes in the code that uses it.
- Returning different implementations: A factory method can return any subclass depending on parameters, for example
FileLoggerin production orConsoleLoggerin debug builds.
In Kotlin, the idiomatic way to implement simple factories is to use a companion object:
interface Logger {
    fun log(message: String)
}

class ConsoleLogger : Logger {
    override fun log(message: String) = println(message)
}

class FileLogger : Logger {
    override fun log(message: String) { /* write to a file */ }
}

class LoggerFactory {
    companion object {
        fun create(type: String): Logger = when(type) {
            "file" -> FileLogger()
            else -> ConsoleLogger()
        }
    }
}

// Usage
val logger = LoggerFactory.create("console")
We can also use the invoke operator so the factory looks like a constructor:
companion object {
    operator fun invoke(type: String): Logger { ... }
}
// Usage: val logger = LoggerFactory("console")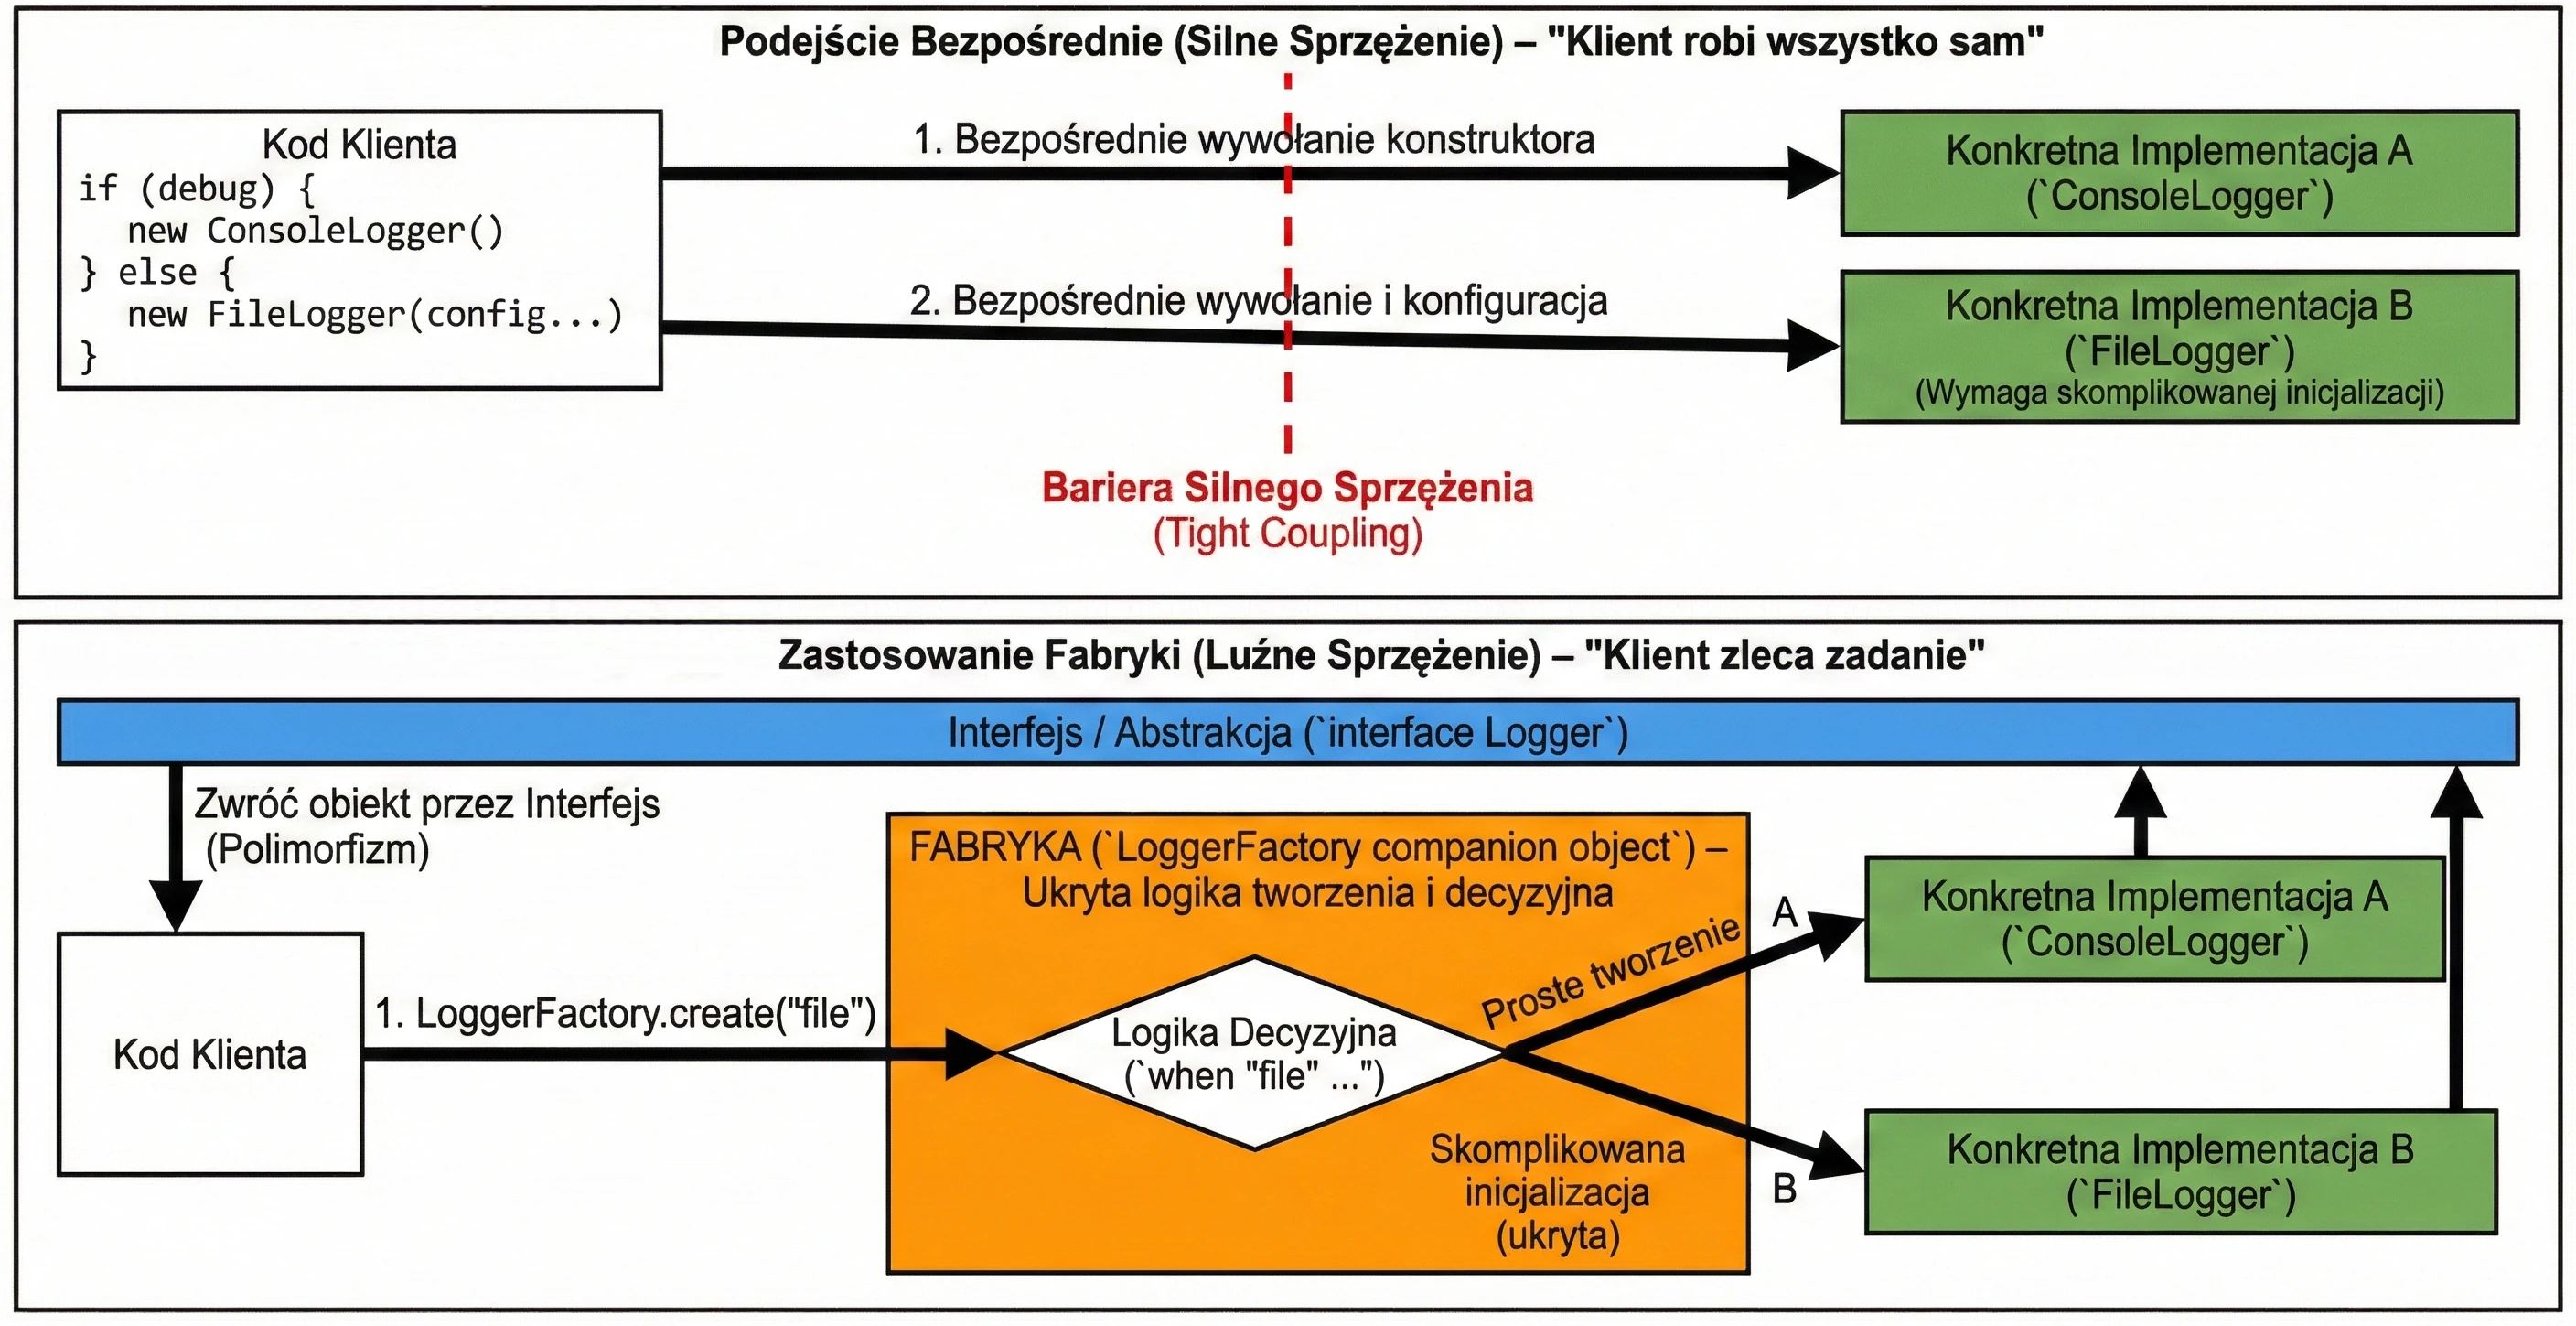
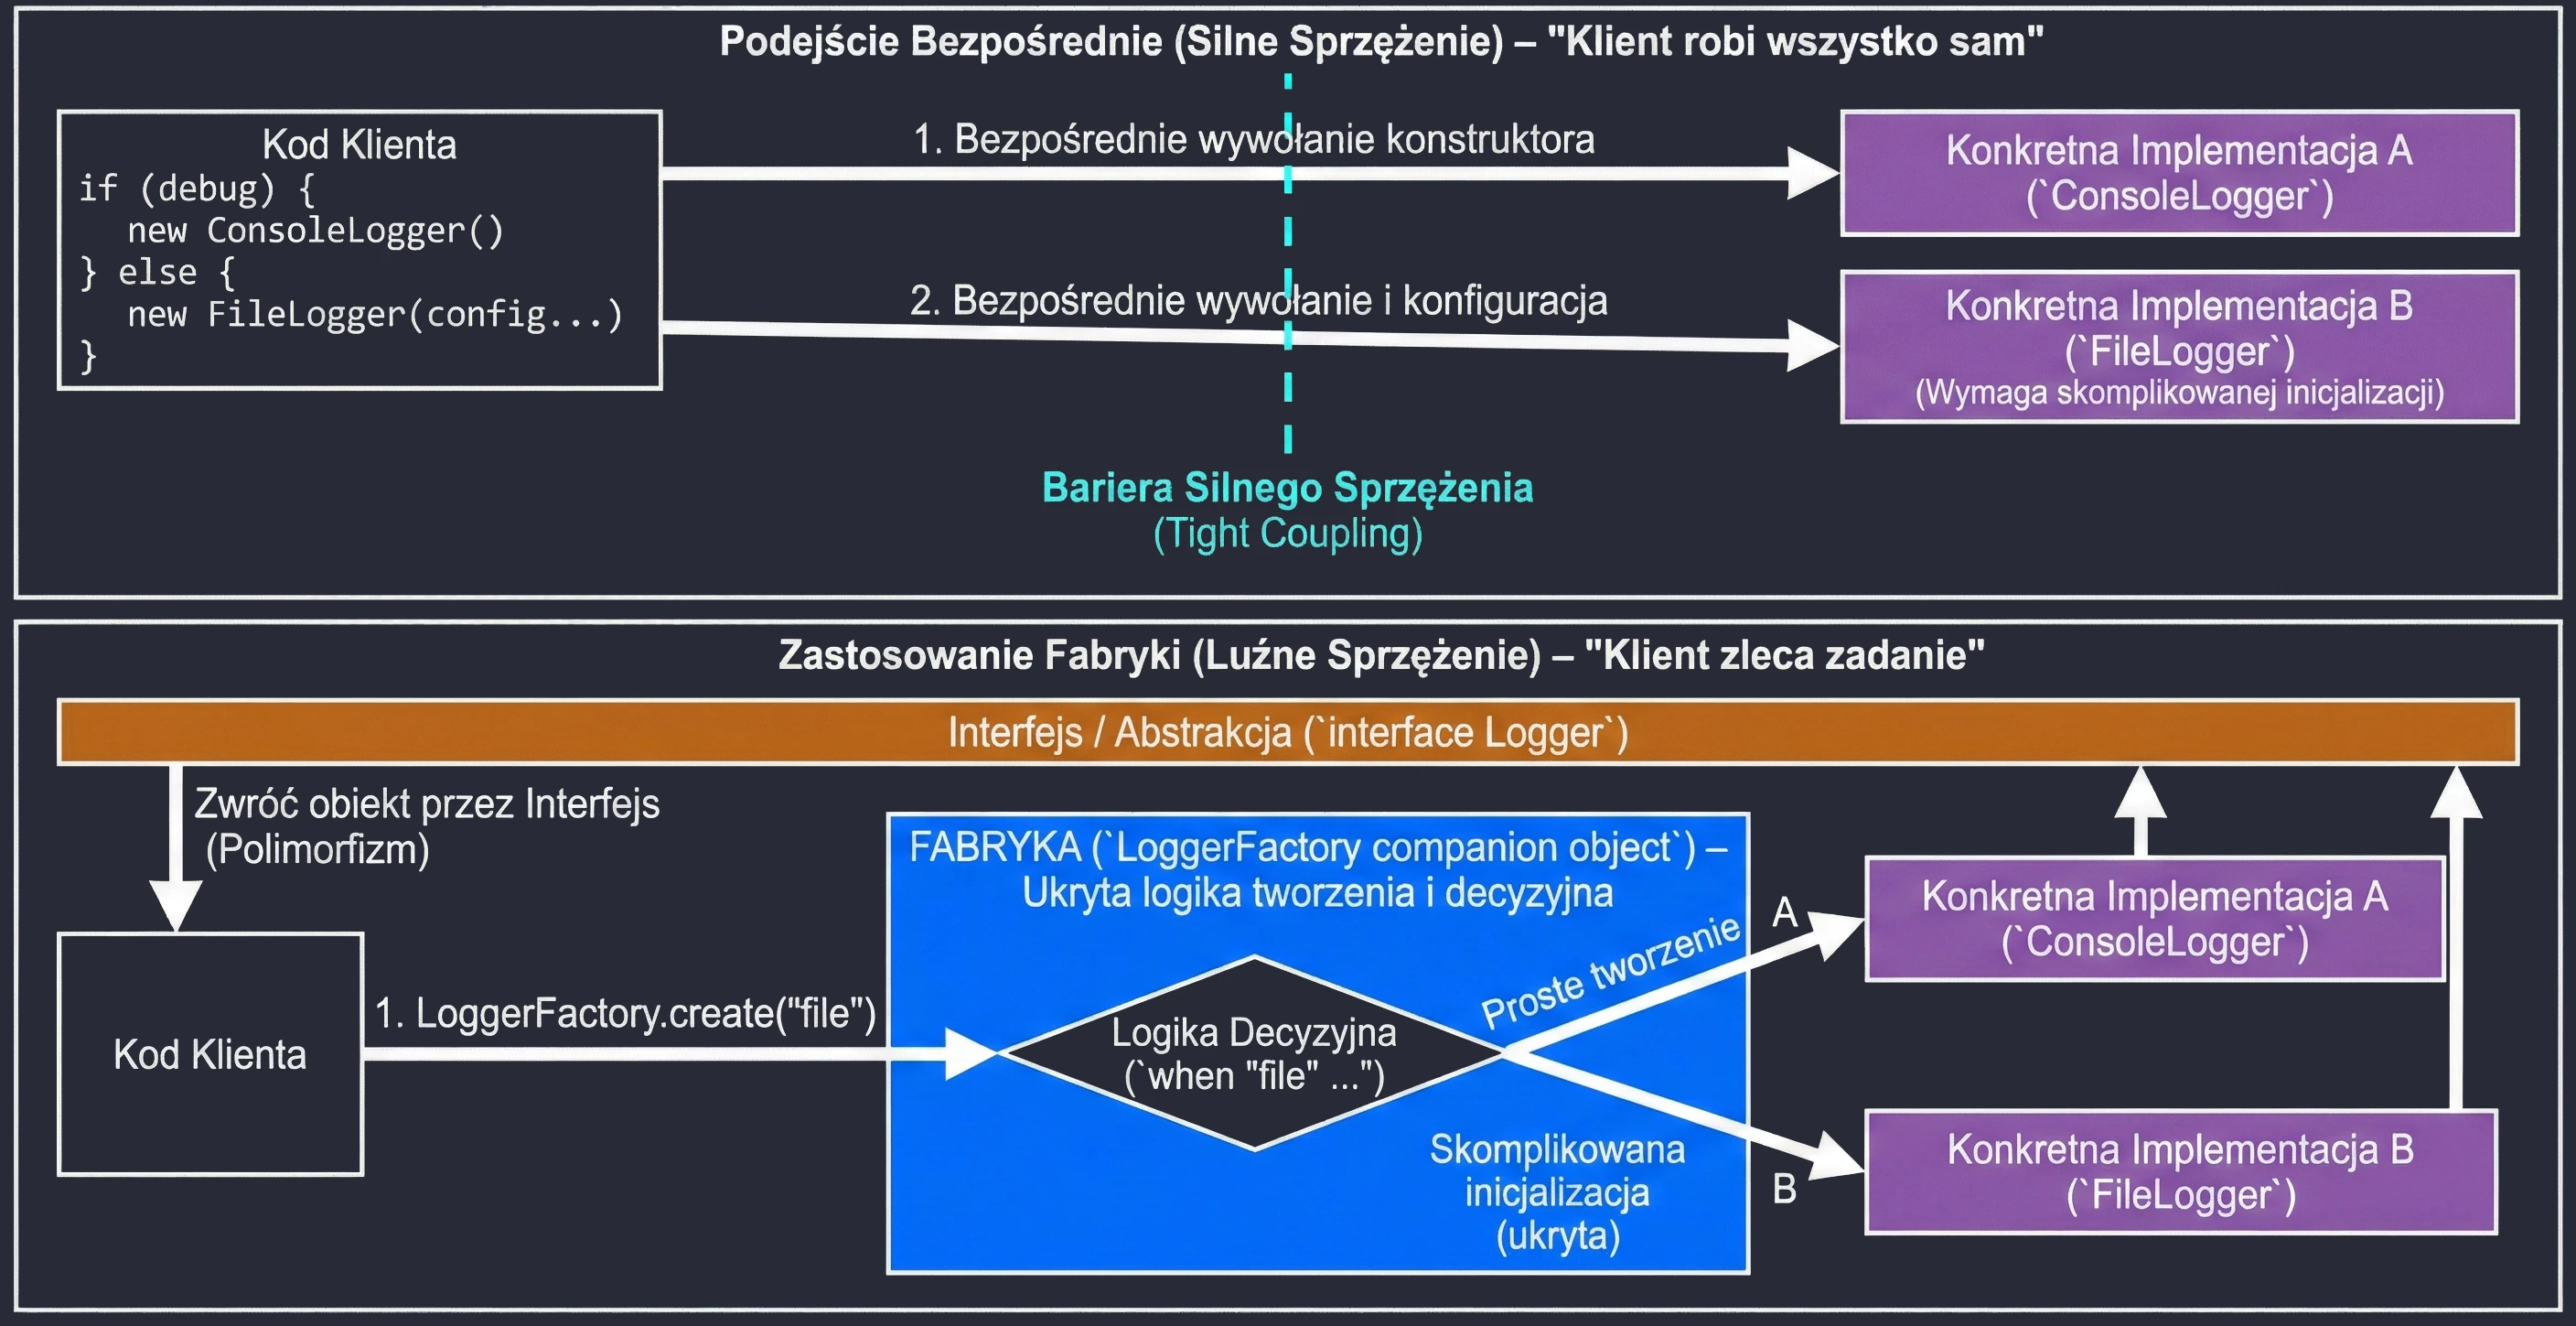
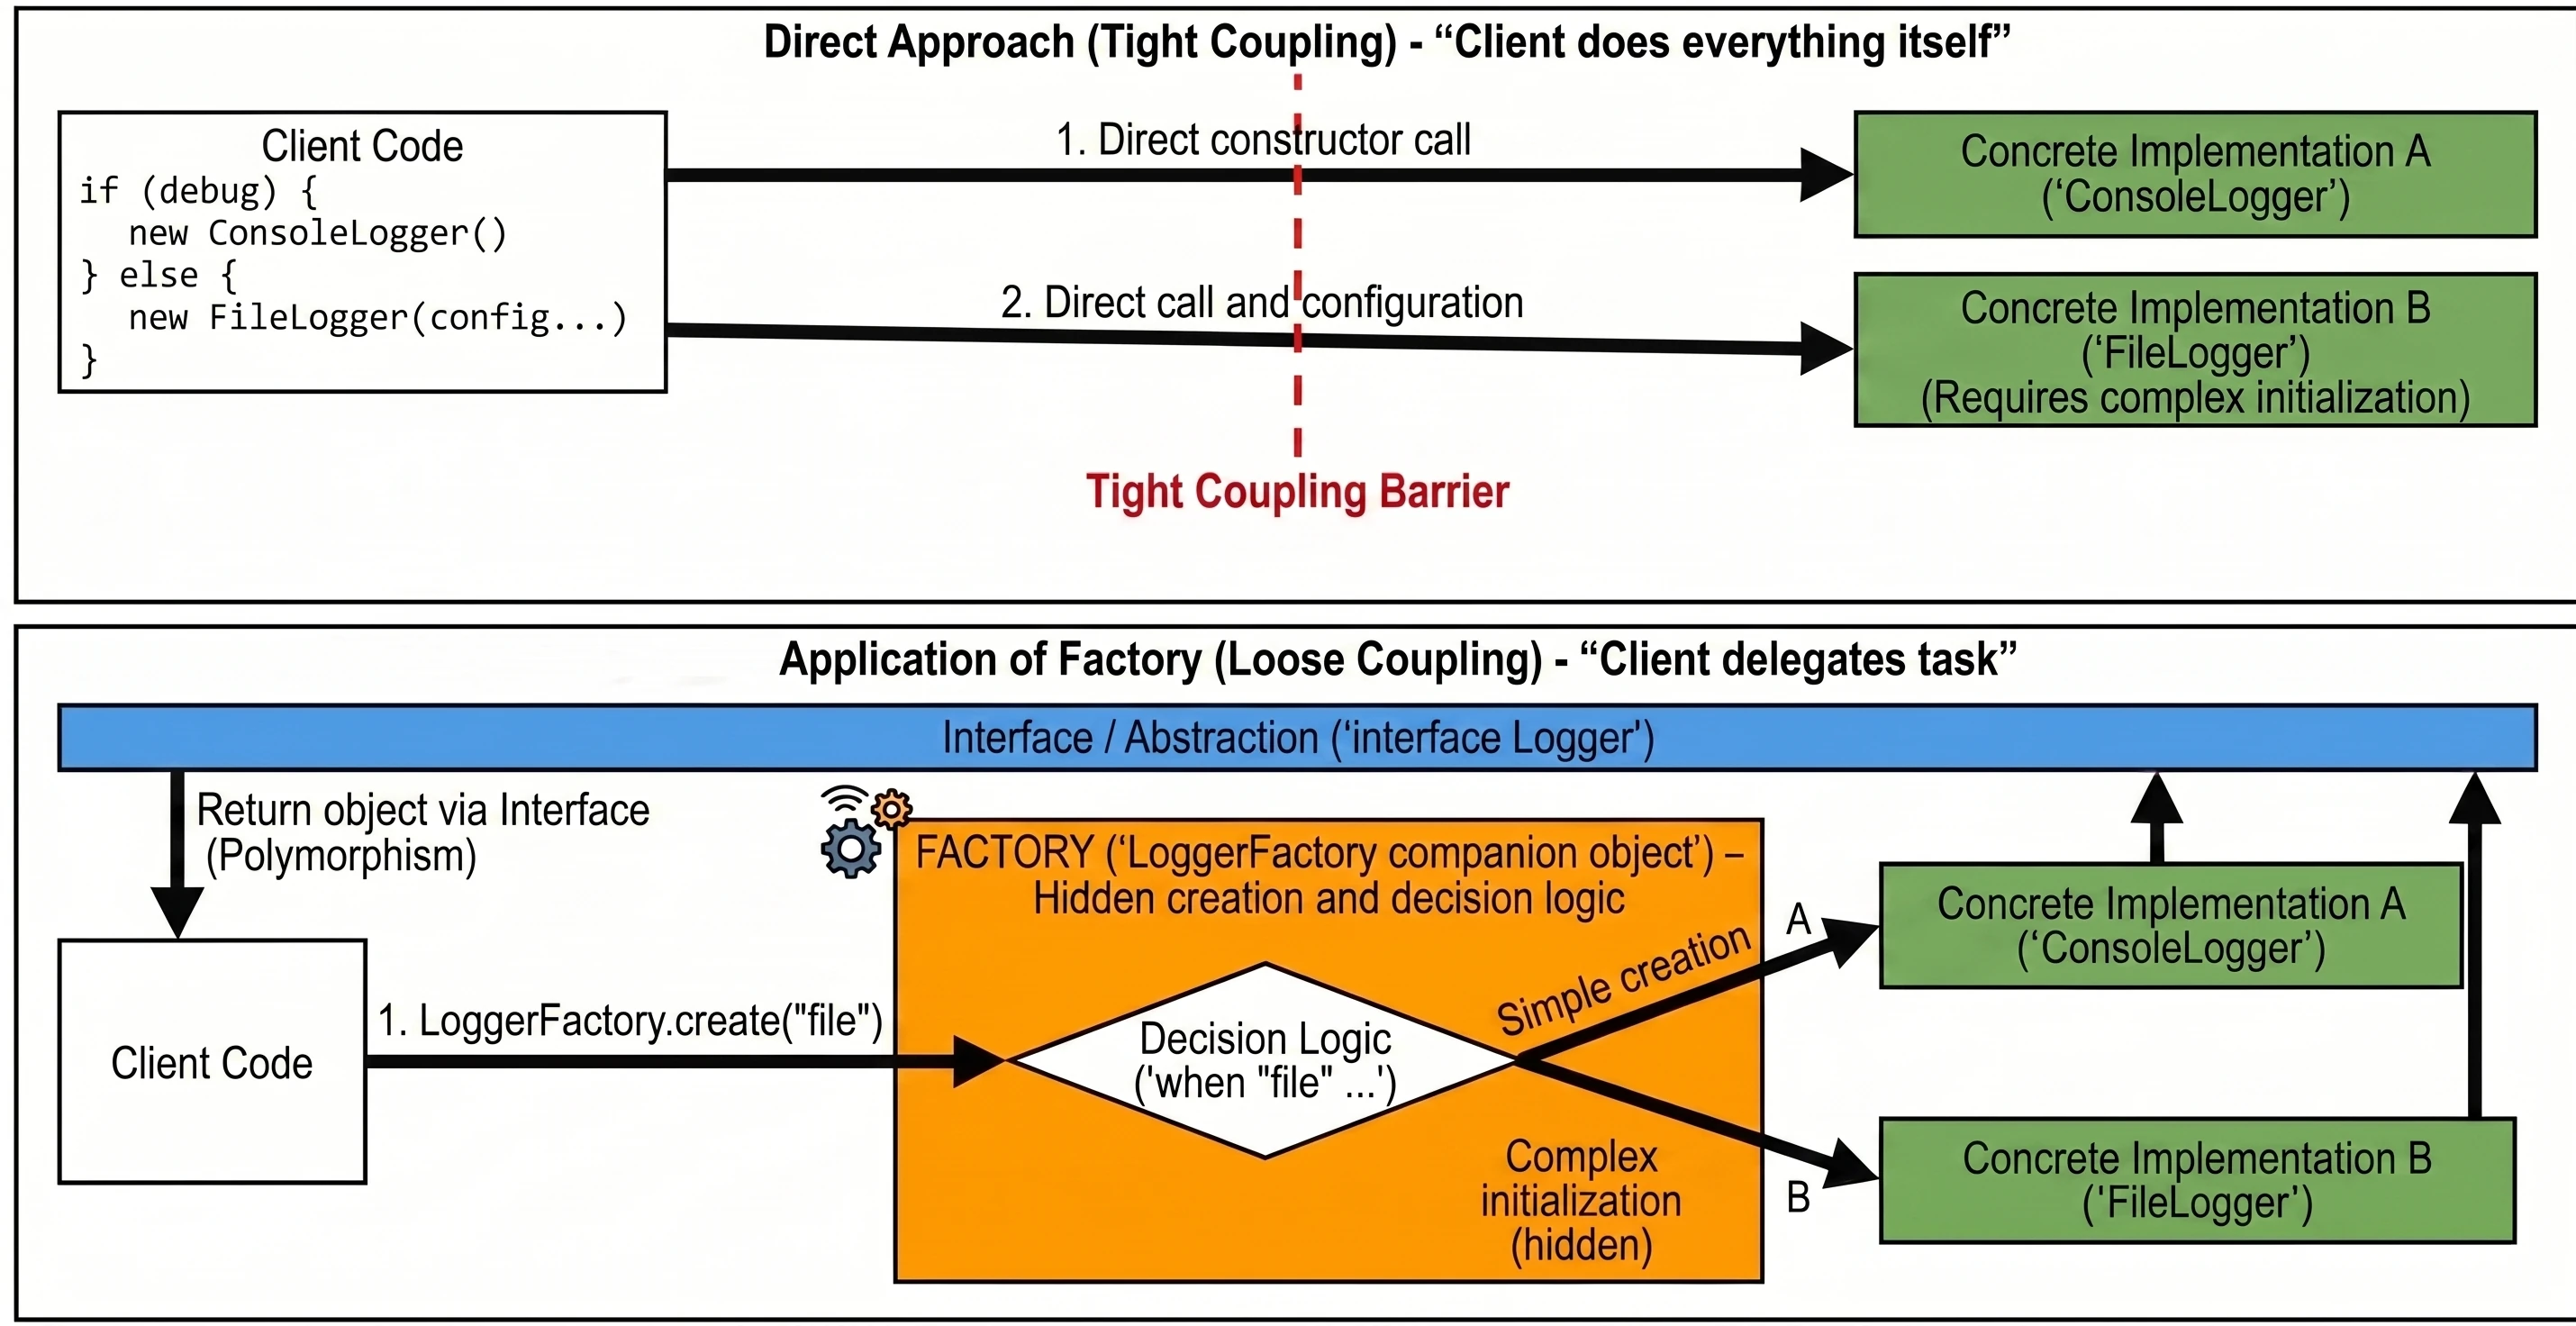
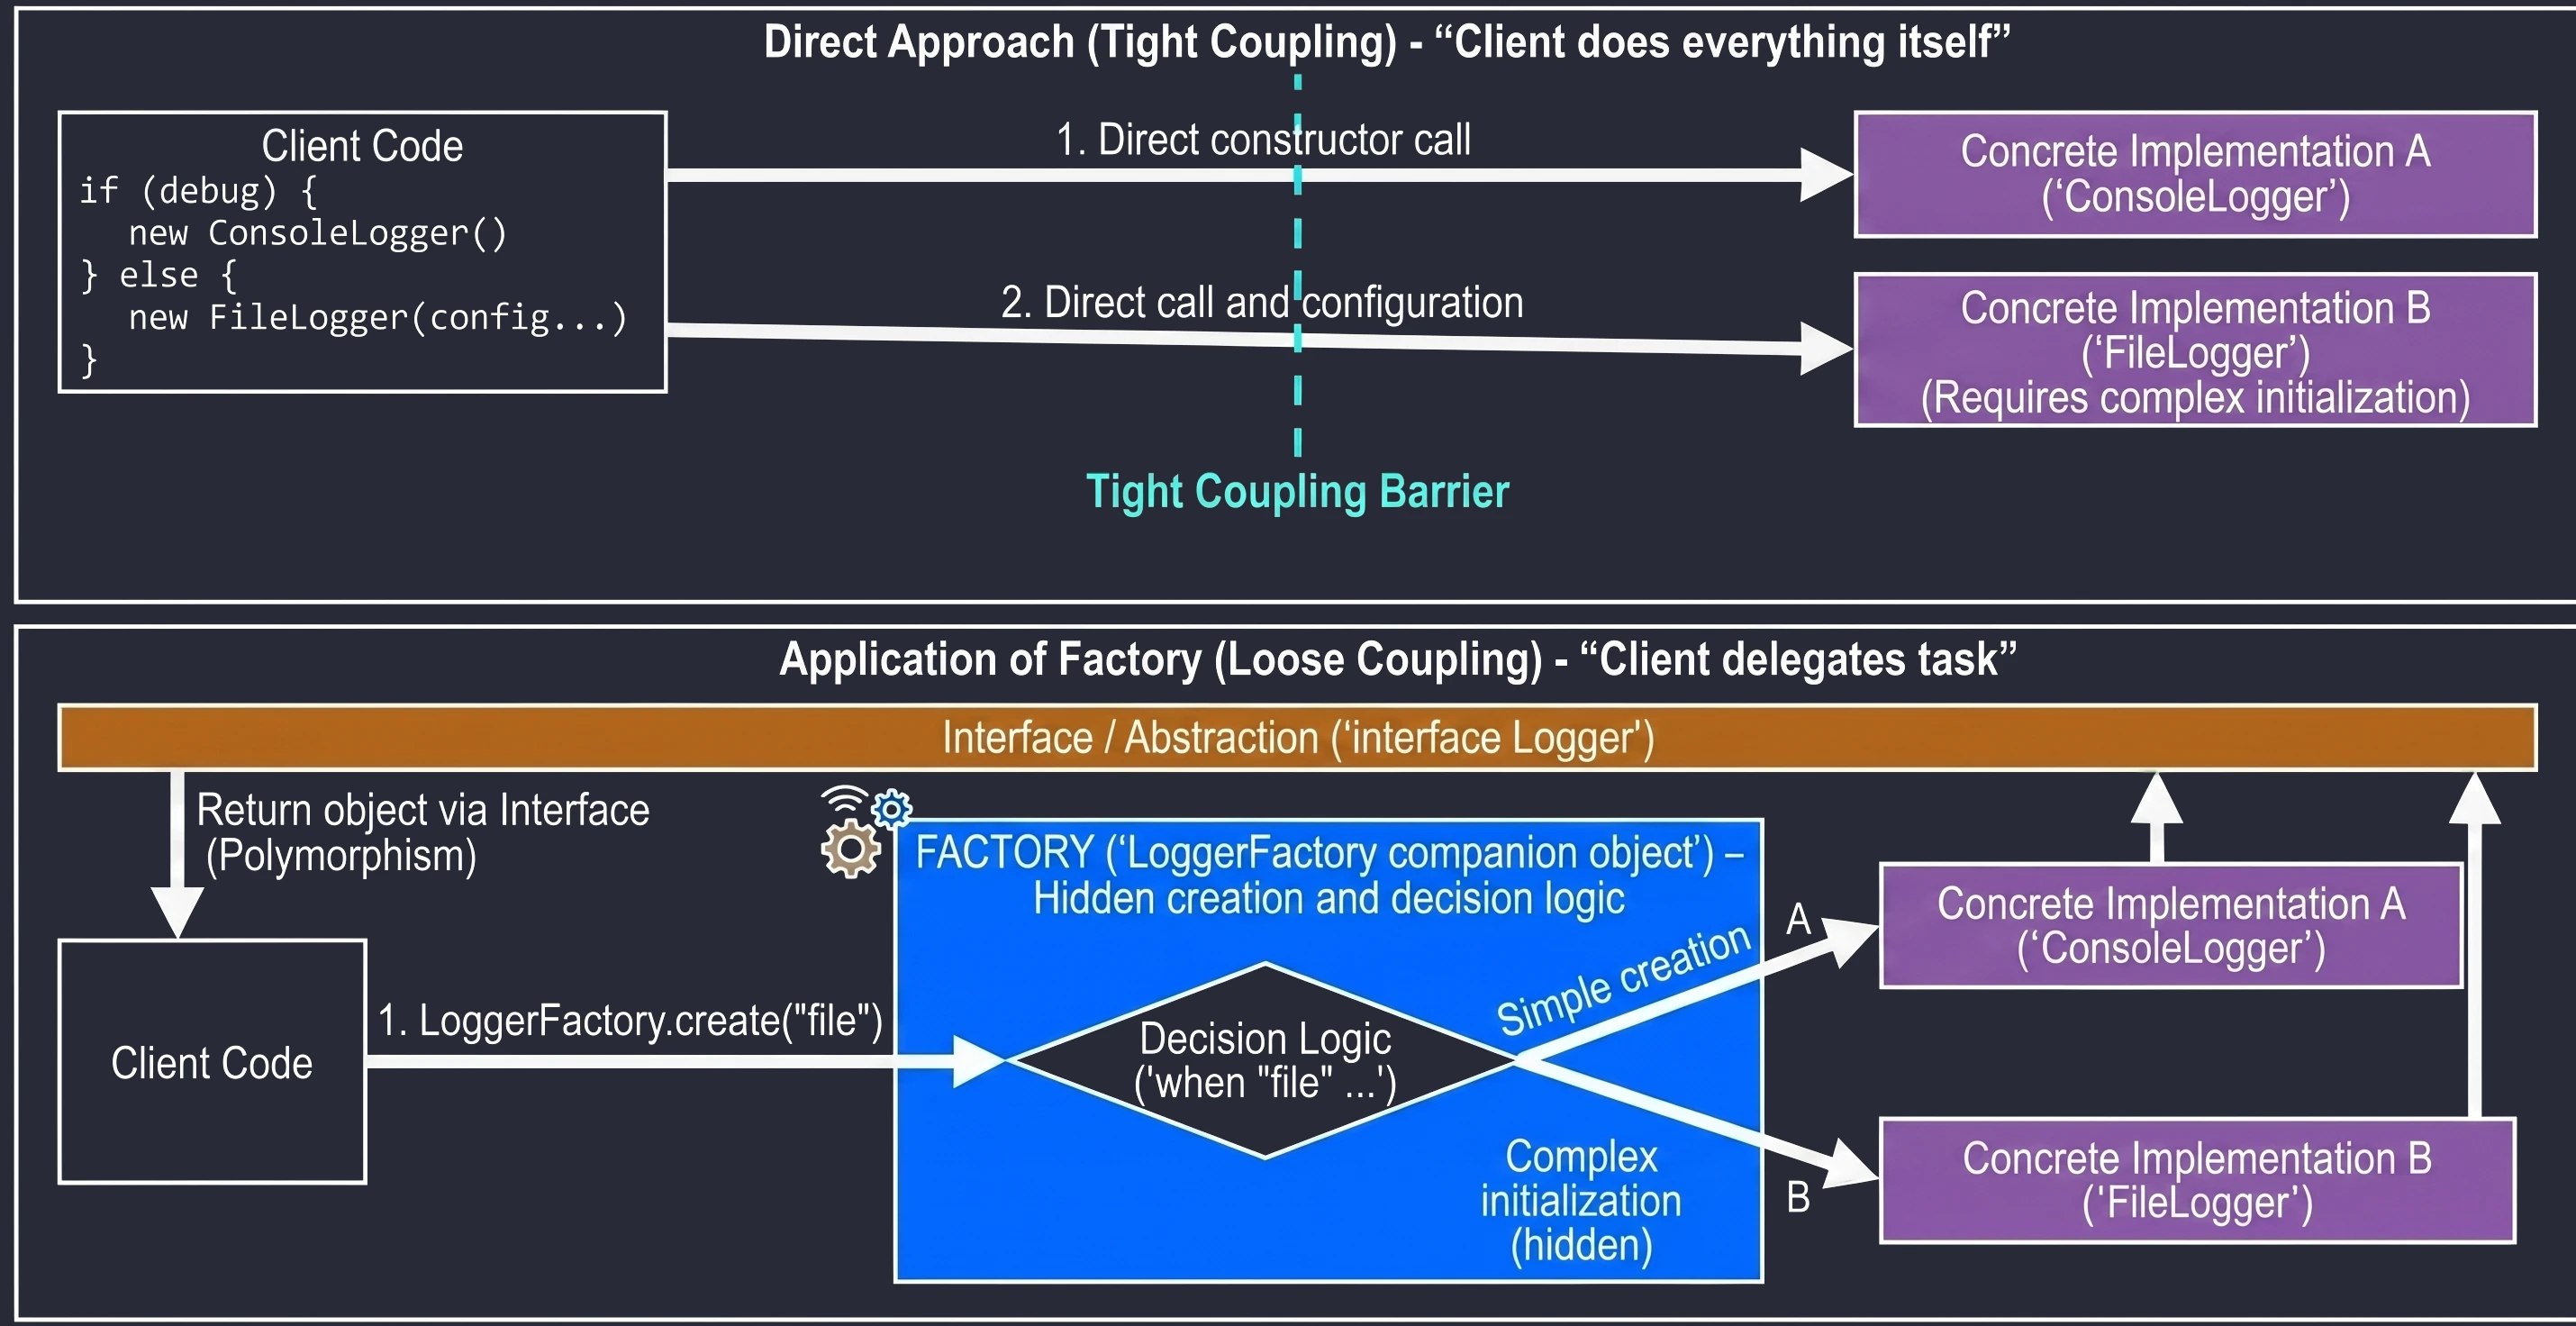
Repository
Repository is one of the more important architectural patterns in mobile application development. It is used to abstract data sources and acts as a mediator between the application domain and the data layer.
The view layer (View/ViewModel) should not know where the data comes from - whether from a local database such as Room, a REST API such as Retrofit, or system files. It should only ask for data and receive it, usually as a Flow or a suspend function. The Repository decides whether to return cached data for speed or fetch fresh data from the network for freshness. It works like a facade, hiding the complexity of I/O operations from the rest of the application.
Benefits of the Repository Pattern
- Single Source of Truth (SSOT): The Repository manages data and keeps it consistent, for example by fetching from an API and saving to a local database.
- Testability: It is easy to replace a real repository with a fake in unit tests.
- Decoupling: Changing the API library, for example from Retrofit to Ktor, does not require UI code changes.
// Interface, the contract
interface UserRepository {
    suspend fun getUser(id: String): User
}

// Concrete implementation
class UserRepositoryImpl(
    private val api: ApiService,
    private val database: UserDao
) : UserRepository {

    override suspend fun getUser(id: String): User {
        // 1. Check whether the user is in the local database cache
        val cachedUser = database.getUser(id)
        if (cachedUser != null) {
            return cachedUser
        }

        // 2. If not, fetch from the API
        val networkUser = api.fetchUser(id)

        // 3. Save to the database for the future
        database.saveUser(networkUser)

        return networkUser
    }
}
With this approach, the ViewModel simply calls repository.getUser("123") and does not worry about caching logic or network handling.
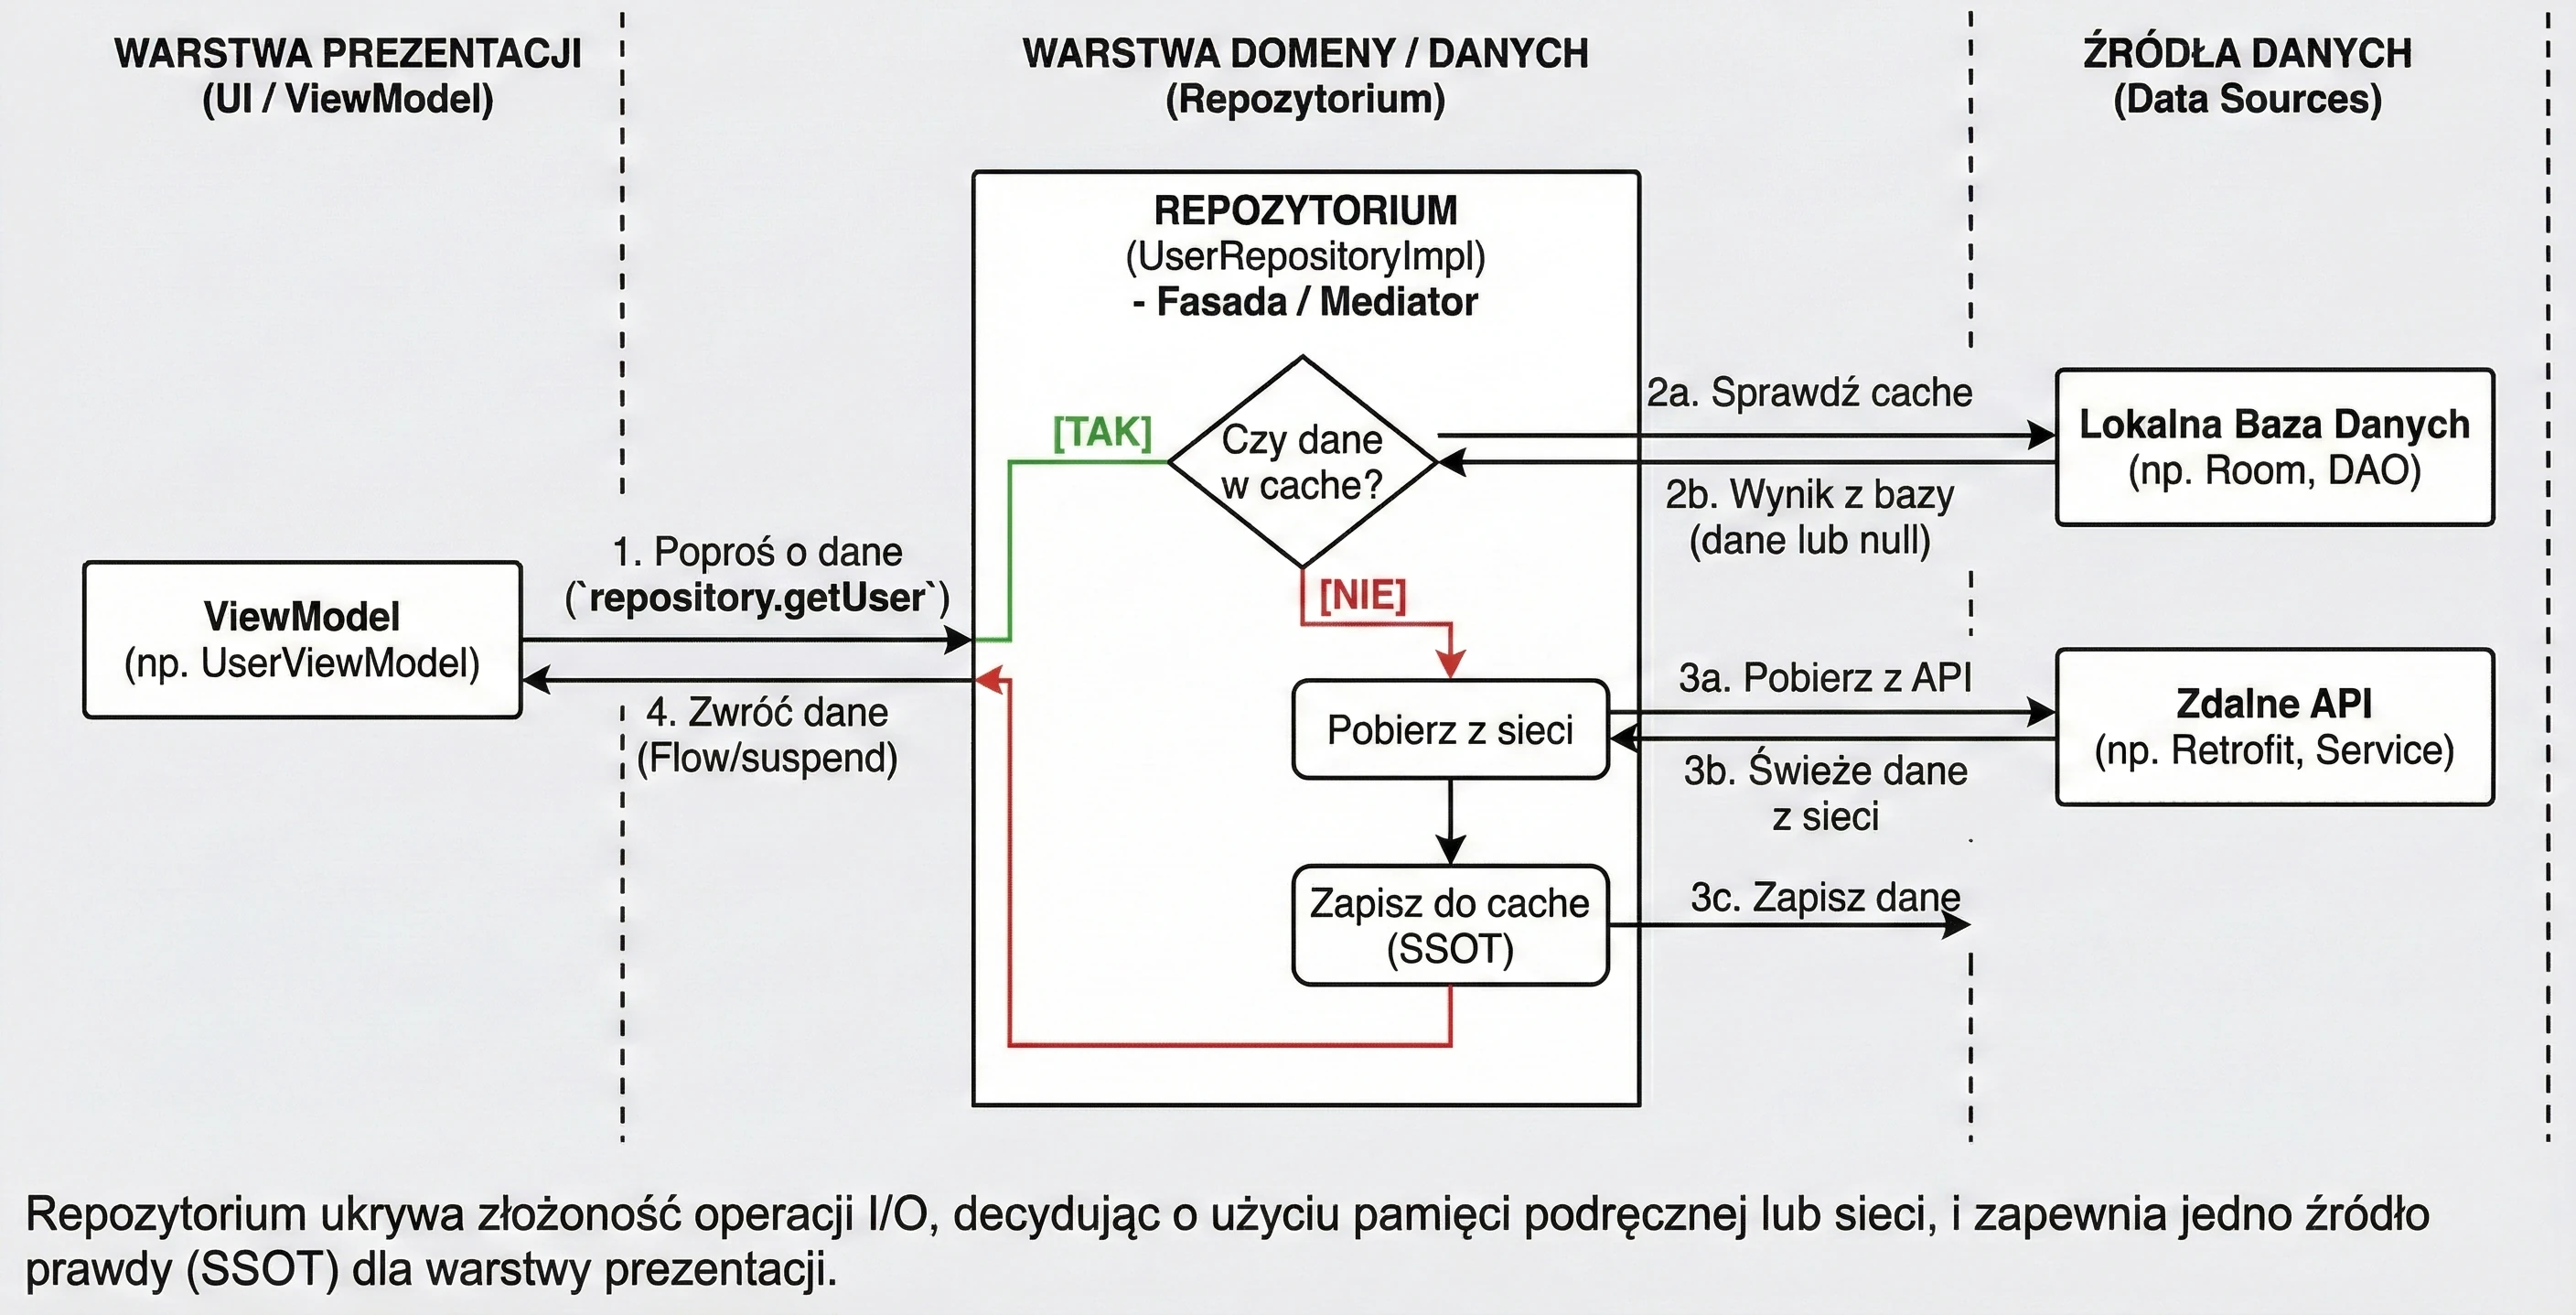

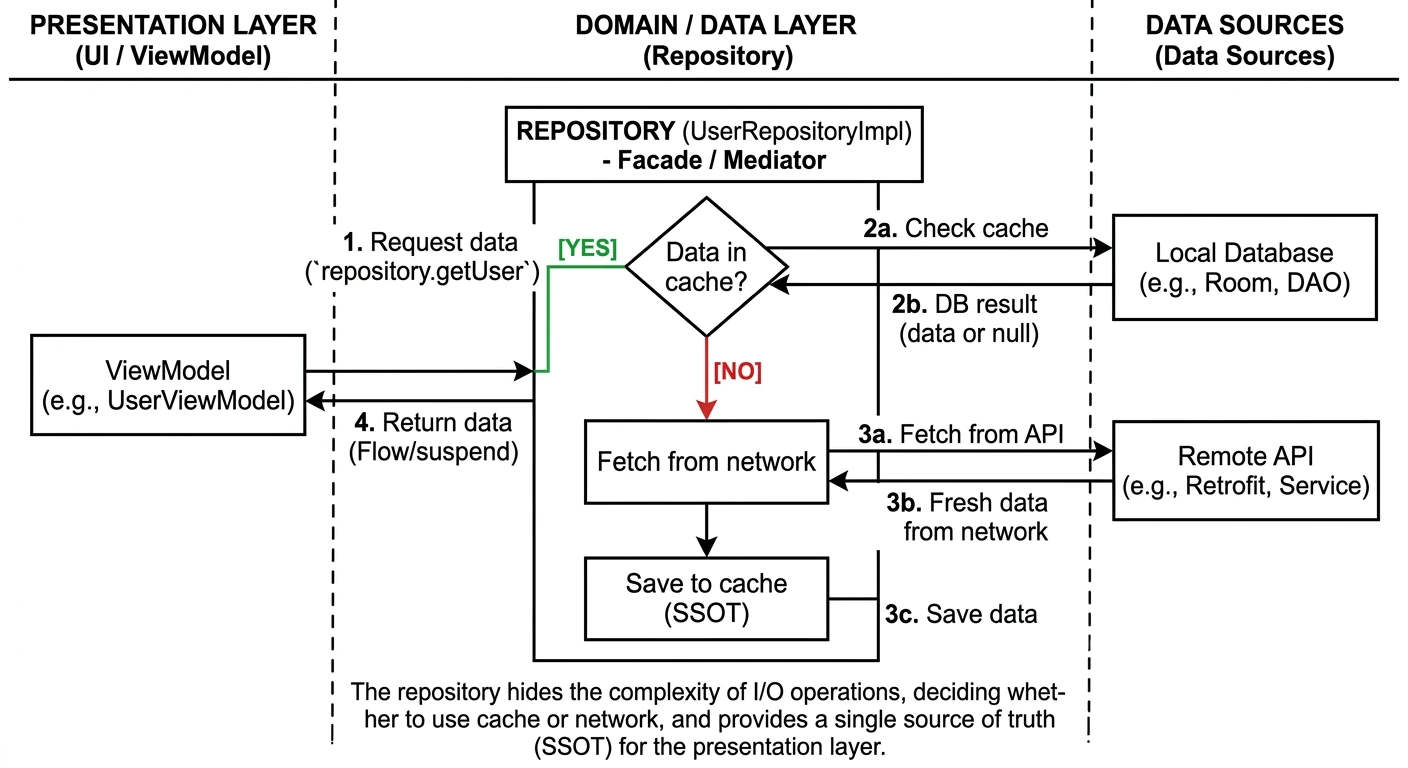
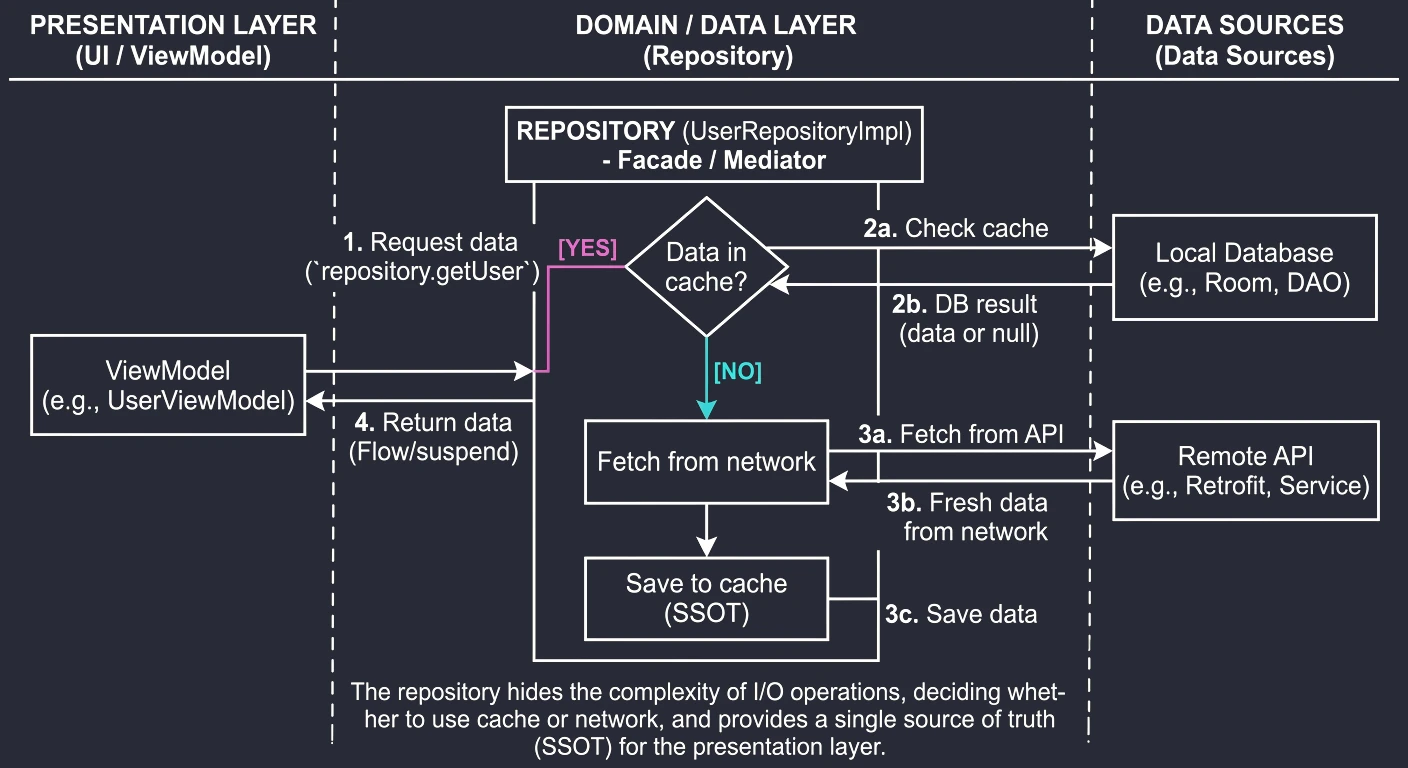
Annotations and Processing (Annotation Processing)
Annotations, for example @Override, @Composable, @GET, are metadata attached to code. By themselves, they do not change how a program runs, but they can be read by the compiler or by other tools.
Why do we use them at all?
- Code generation: This is the most important use in Android. Libraries such as Room for databases or Hilt for dependency injection read annotations and generate complex boilerplate code from them, so we do not have to write it manually.
- Configuration: Instead of XML or JSON files, we configure class behavior directly in code, for example
@GET("/users")in Retrofit says which endpoint to call. - Validation: The compiler can verify code correctness, for example
@Overridemakes sure that we are actually overriding a method.
In the Kotlin ecosystem, we have two main annotation processing technologies:
- KAPT (Kotlin Annotation Processing Tool):
- An older solution.
- It is based on Java Annotation Processing (APT).
- It requires generating Java "stubs" for Kotlin code.
- KSP (Kotlin Symbol Processing):
- A native solution for Kotlin.
- It does not generate Java stubs -> it is faster than KAPT.
- It understands Kotlin-specific constructs, for example
internalandsealed class. - Recommended for libraries such as Room, Moshi, and Hilt.
Stubs are generated Java files that contain only class and method declarations from Kotlin code, without function bodies. They are needed so annotation processors written for Java can "understand" Kotlin code. Stub generation is expensive and slows down compilation.
Analogy: Imagine that you write a book in Polish (Kotlin), but your editor (annotation processor) speaks only English (Java). Stubs are like a summary or table of contents translated into English - the editor does not see the full content, but knows the chapters (classes) and subsections (methods).
Example KSP usage in build.gradle:
plugins {
    id("com.google.devtools.ksp") version "1.9.0-1.0.13"
}
In the previous chapter, we learned creational patterns (Singleton, Builder, Factory), which help create objects. Now we will focus on behavioral patterns. They concern communication between objects, responsibility distribution, and the ways objects cooperate with each other.
In the world of Android and Jetpack Compose, where reactivity and data flow are central, behavioral patterns play a very important role.
Observer
Observer is one of the most important patterns in mobile programming. It defines a subscription mechanism that allows many objects (Observers) to observe another object (Subject) and react to its changes.
Imagine that you have a screen displaying currency exchange rates. These data change over time. Without Observer, the screen would have to constantly ask the server or database: "Has anything changed?" (so-called polling). Worse, after fetching new data, we would have to manually call a method that updates the UI, for example updateUI().
Instead of asking, the screen registers or subscribes to notifications. When the exchange rate changes, the data source (Subject) notifies all interested observers by itself.
In Android history, we have had many implementations of this pattern:
- Callbacks / Listeners: For example
OnClickListener,TextWatcher. This is the classic form, where we pass an interface whose method will be called after an event. - LiveData: An object that stores data, is aware of the lifecycle (Activity/Fragment), and notifies observers only when the view is active.
- StateFlow / SharedFlow (Kotlin Coroutines): The current standard. Data streams that we listen to with
collect.
In Jetpack Compose, the whole system is based on observing state (State<T>). When the state value changes, Compose automatically notifies @Composable functions and redraws, or recomposes, the interface.
Example: Classic Observer vs StateFlow
Let us look at how this pattern evolved in Kotlin and Android.
1. Older Kotlin approach (Listener/Callback) This requires manually defining an interface and managing a list of listeners.
// Interface definition, the Observer
interface UserListener {
    fun onUserUpdated(newName: String)
}

// Data source, the Subject
class UserRepository {
    private val listeners = mutableListOf<UserListener>()

    fun addListener(listener: UserListener) = listeners.add(listener)

    fun updateUser(name: String) {
        // Notify everyone
        listeners.forEach { it.onUserUpdated(name) }
    }
}
2. Newer Kotlin approach (StateFlow) Instead of a listener list, we use a data stream that always has the current value.
class UserViewModel {
    // Subject, mutable
    private val _userName = MutableStateFlow("John")

    // Observer interface, read-only
    val userName: StateFlow<String> = _userName.asStateFlow()

    fun updateName(name: String) {
        _userName.value = name // Automatically notify subscribers
    }
}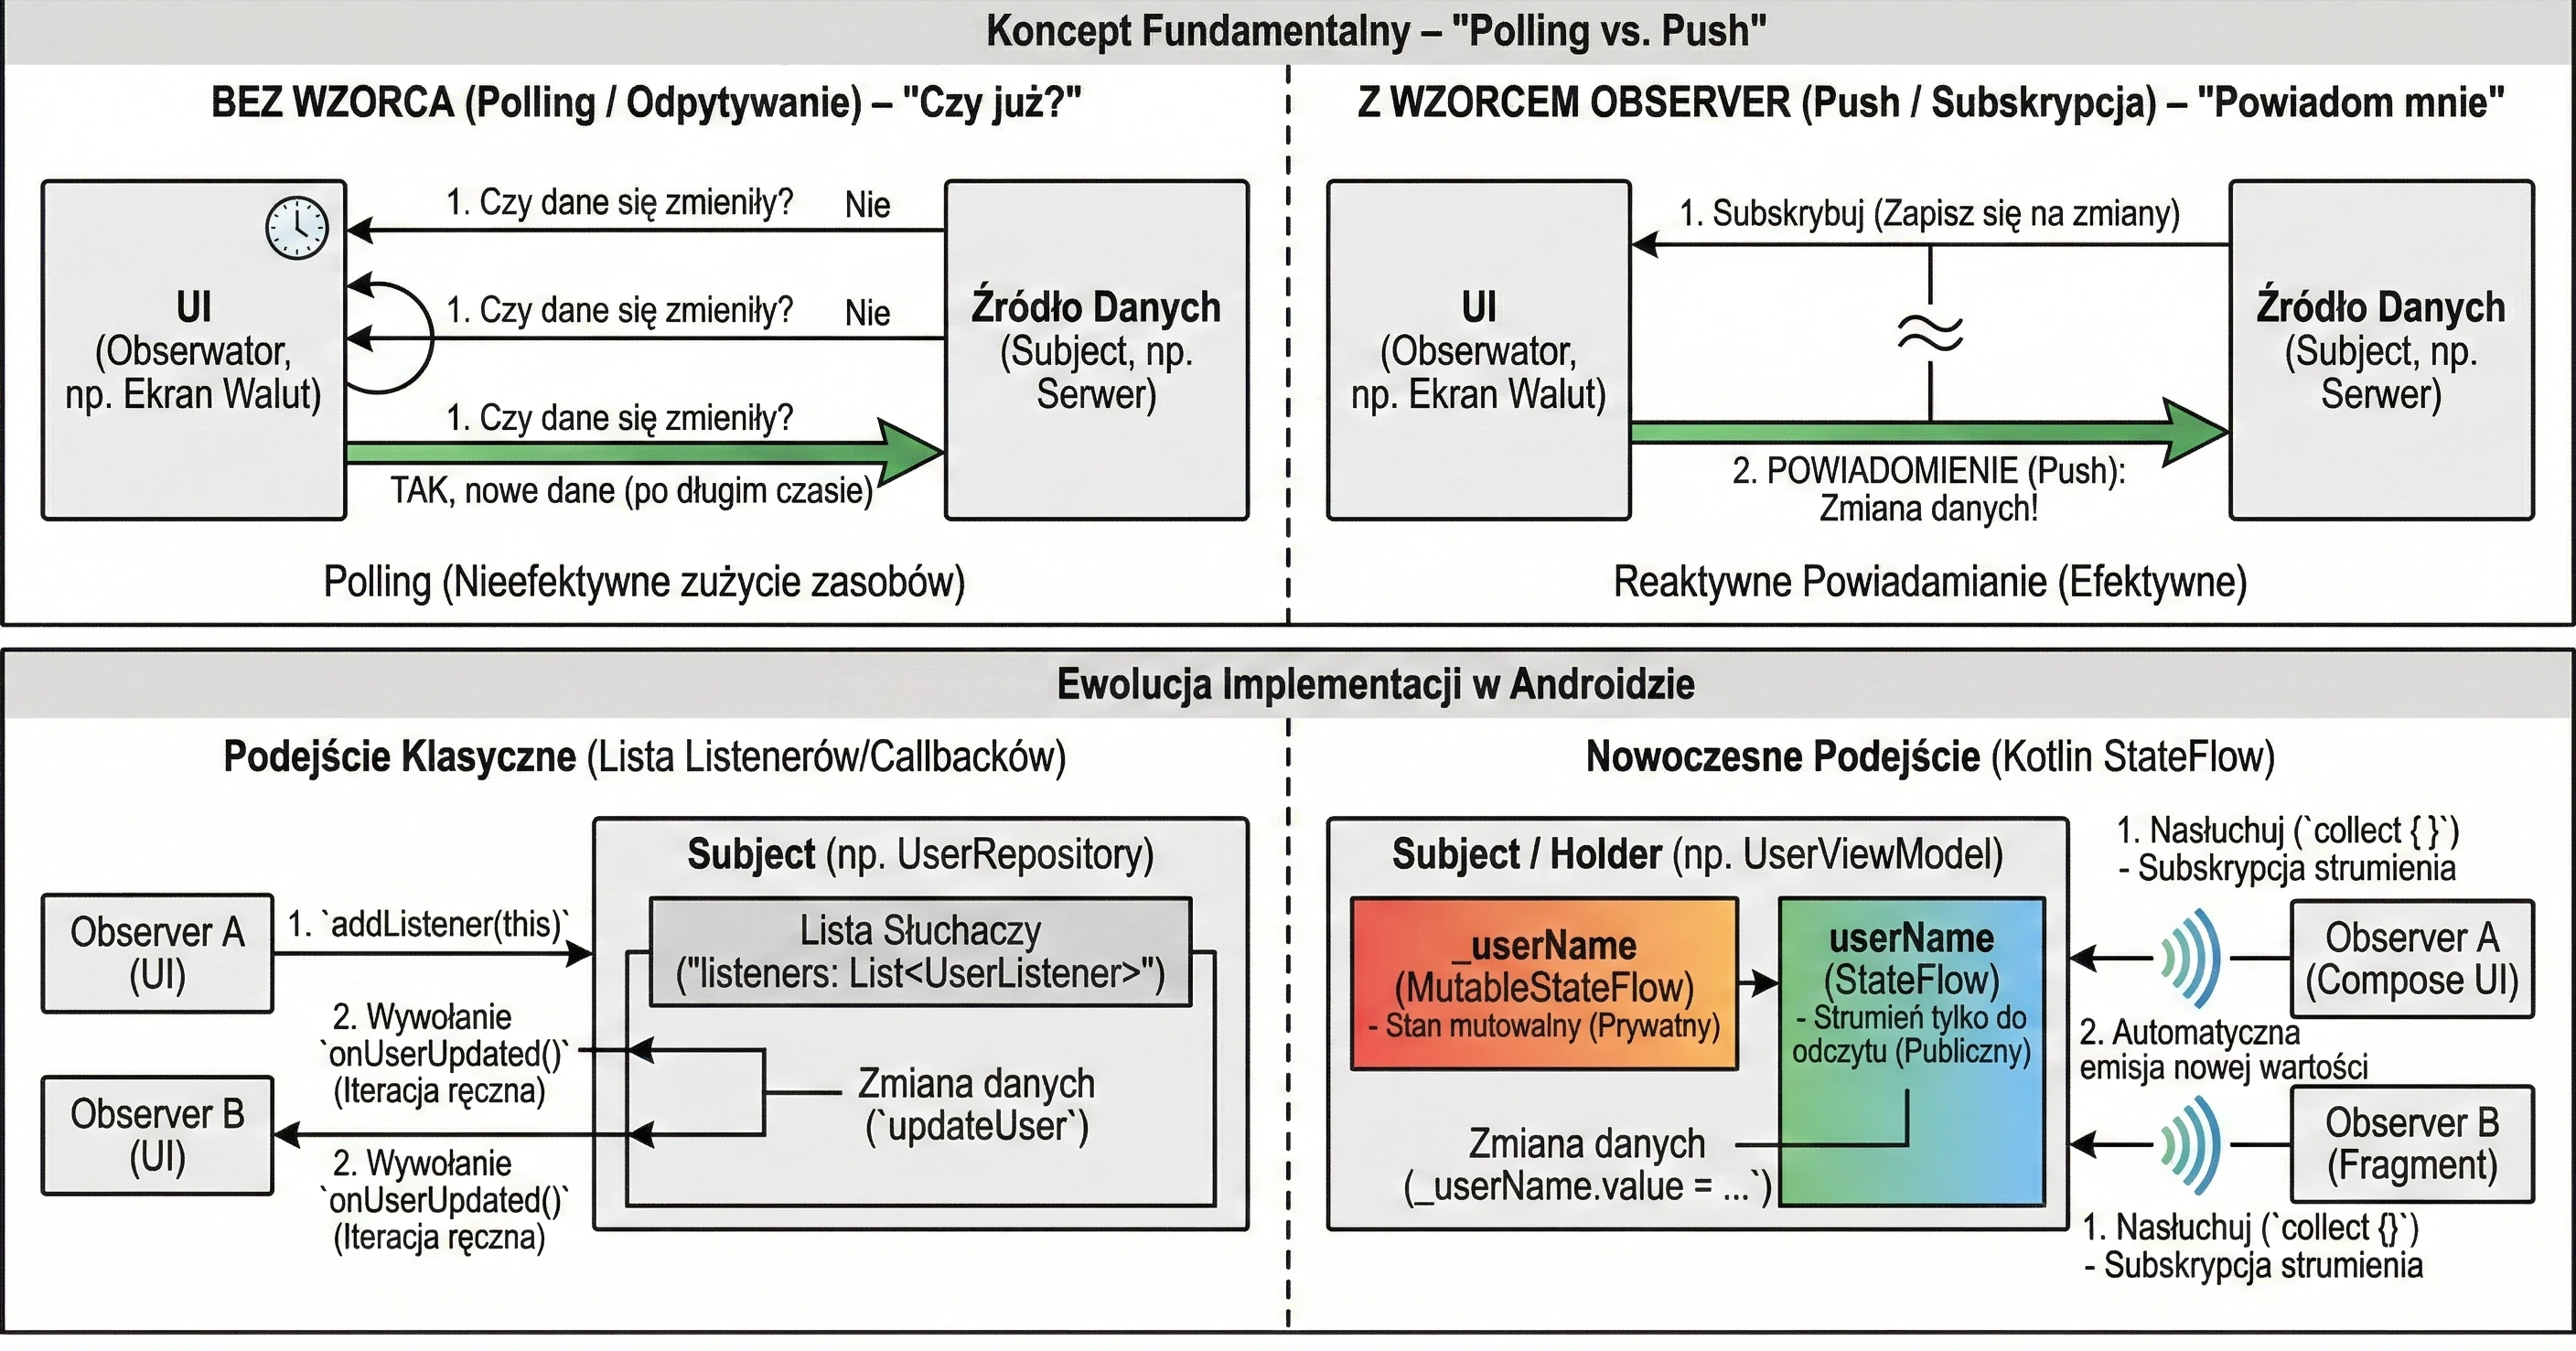
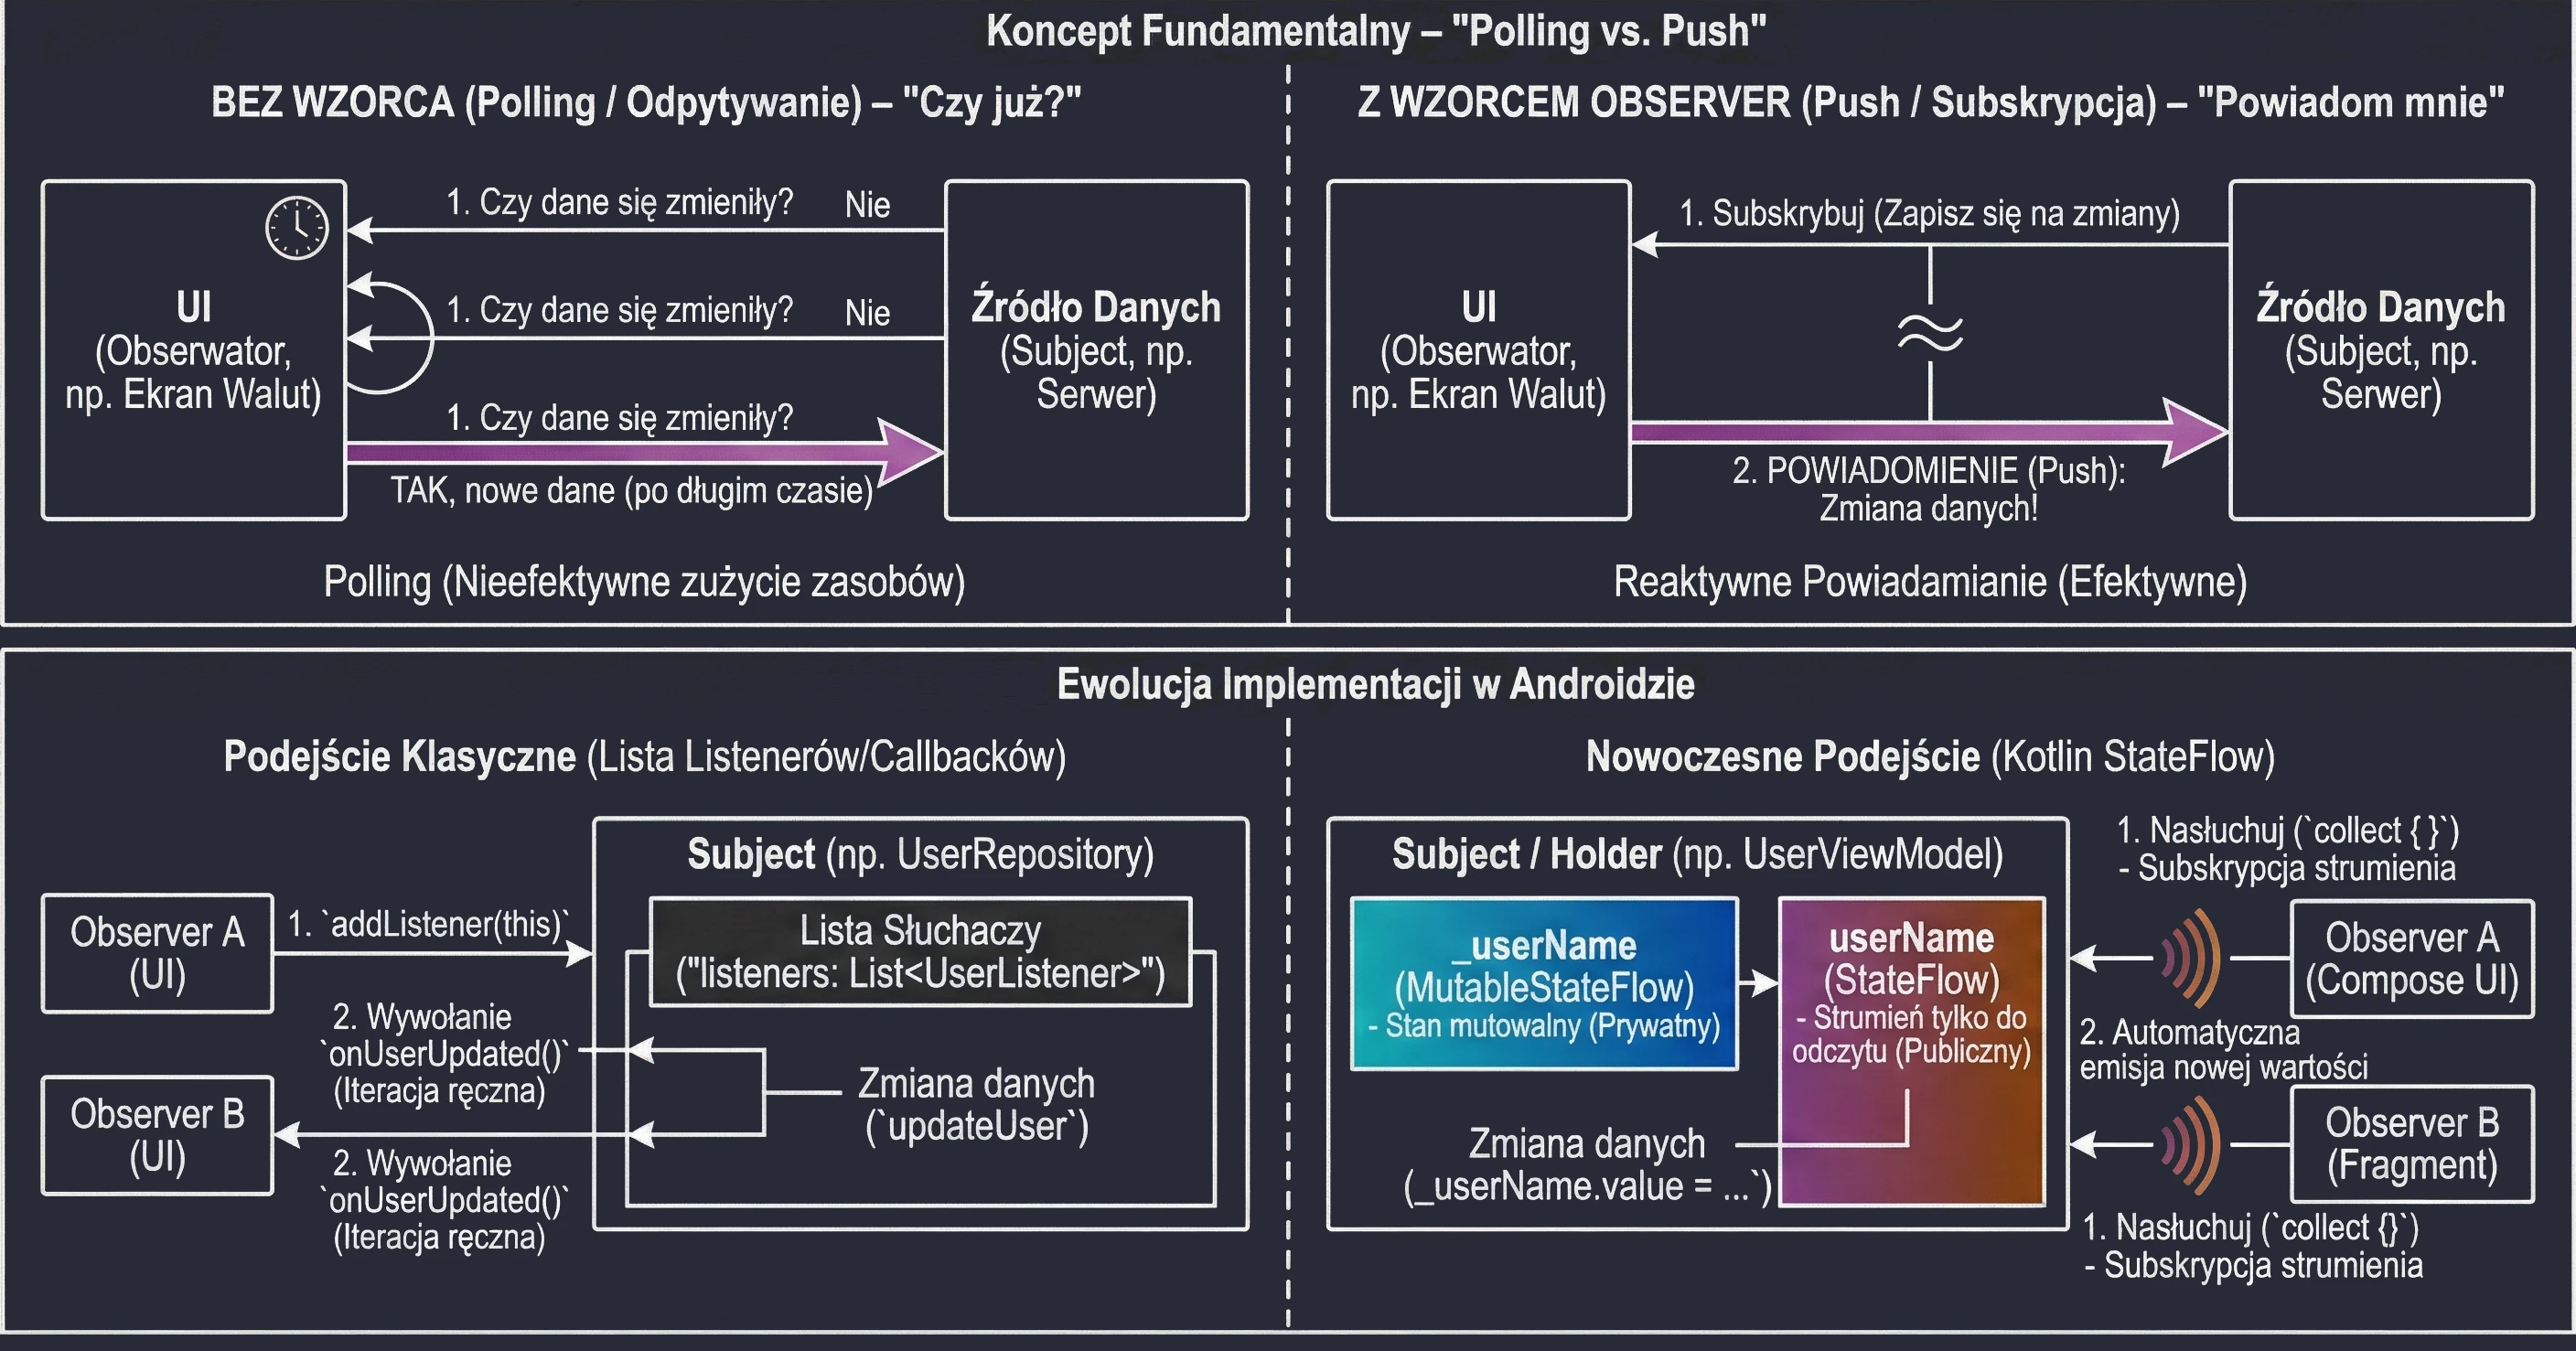
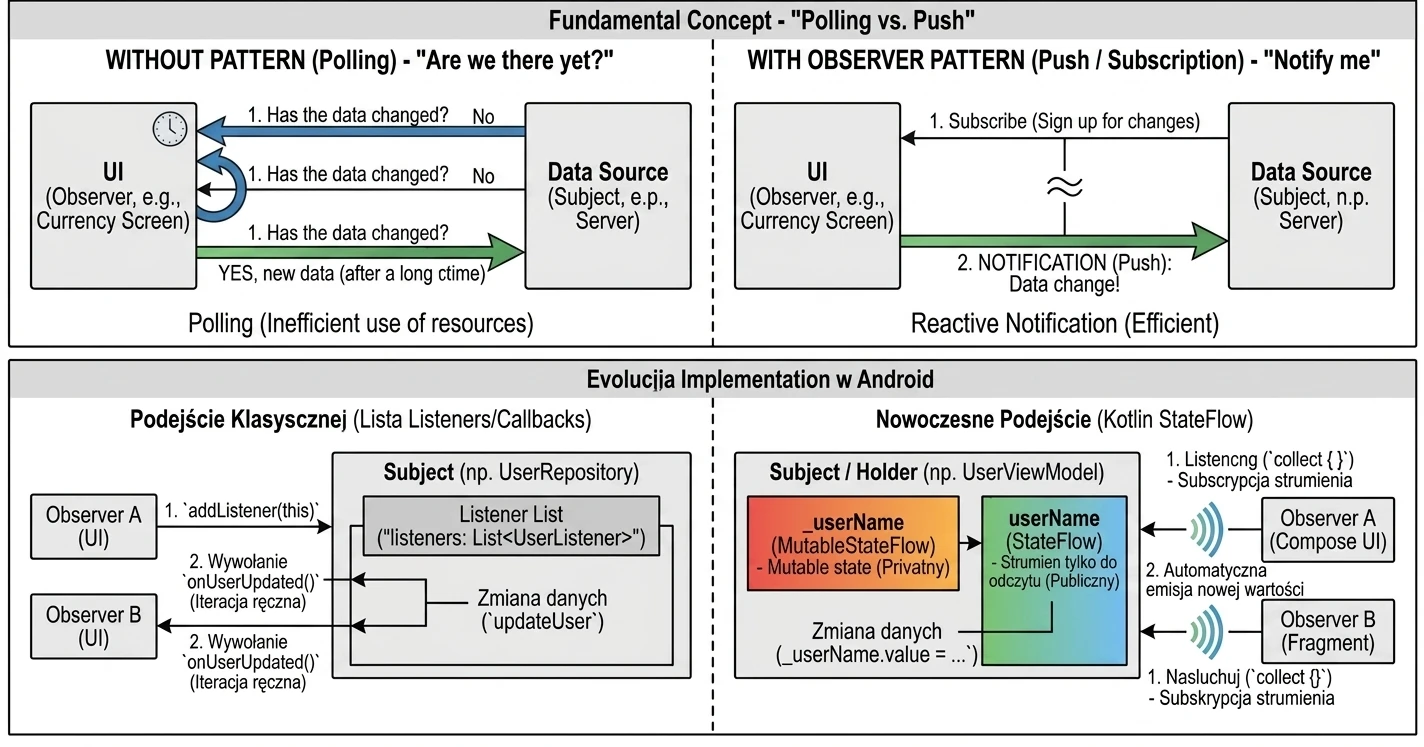
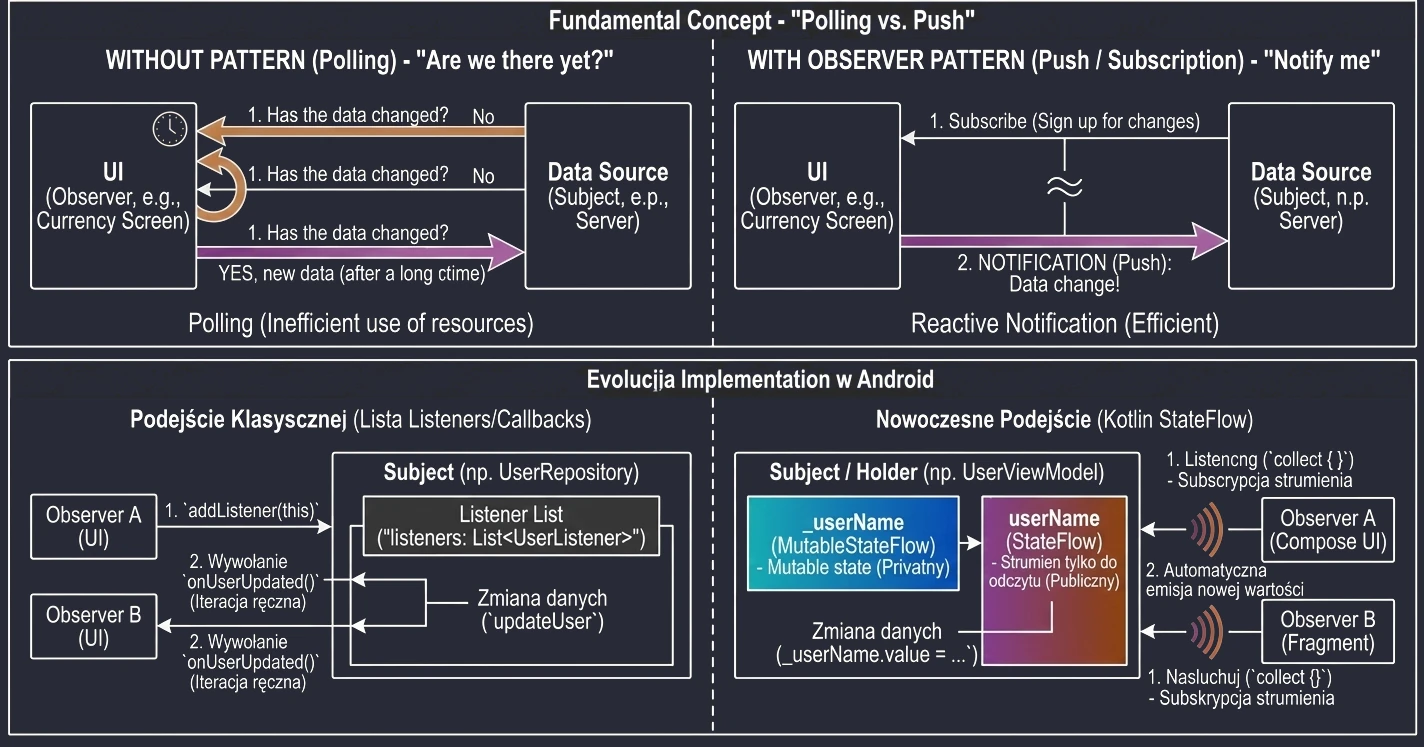
State
The State pattern allows an object to change its behavior depending on its internal state. This lets us avoid gigantic if-else or switch/when statements scattered throughout the code.
In applications (MVVM/MVI), we often model screen state as separate classes, usually a sealed class or sealed interface.
// Definition of possible screen states
sealed interface ScreenState {
    object Loading : ScreenState
    data class Success(val data: List<String>) : ScreenState
    data class Error(val message: String) : ScreenState
}

// Handling in the UI, Jetpack Compose
@Composable
fun MyScreen(state: ScreenState) {
    when (state) {
        is ScreenState.Loading -> CircularProgressIndicator()
        is ScreenState.Success -> Text("Data: ${state.data}")
        is ScreenState.Error -> Text("Error: ${state.message}", color = Color.Red)
    }
}
With this approach, the view is dumb: it only displays what the state tells it to display. The logic of transitions between states, for example after fetching data go from Loading to Success, is located in the ViewModel.
State Pattern vs State in Compose
It is worth distinguishing:
- State pattern: An architectural approach to modeling behavior, for example with a
sealed class. - Compose State: A library mechanism (
mutableStateOf) used to store data whose changes force the view to refresh.
We often use them together: the ViewModel holds a StateFlow<ScreenState>, and Compose observes it and converts it into State<ScreenState> to control the view.
Strategy
Strategy lets us define a family of algorithms, wrap them in separate classes or functions, and swap them at runtime. The client using the strategy does not need to know how the algorithm works internally.
We can have a SortStrategy interface, with concrete implementations such as BubbleSortStrategy, QuickSortStrategy, and so on. The user chooses a sorting method from a list, and the calling code simply calls strategy.sort(list).
In Kotlin: Functions as Strategies
In Kotlin, functions are first-class citizens, so a strategy can simply be a lambda:
fun processNumbers(numbers: List<Int>, filterStrategy: (Int) -> Boolean): List<Int> {
    return numbers.filter(filterStrategy)
}

// Usage of different strategies on the fly
val nums = listOf(1, 2, 3, 4, 5)
val evens = processNumbers(nums) { it % 2 == 0 } // Strategy: even numbers
val bigs = processNumbers(nums) { it > 3 }       // Strategy: greater than 3
This greatly simplifies the code.
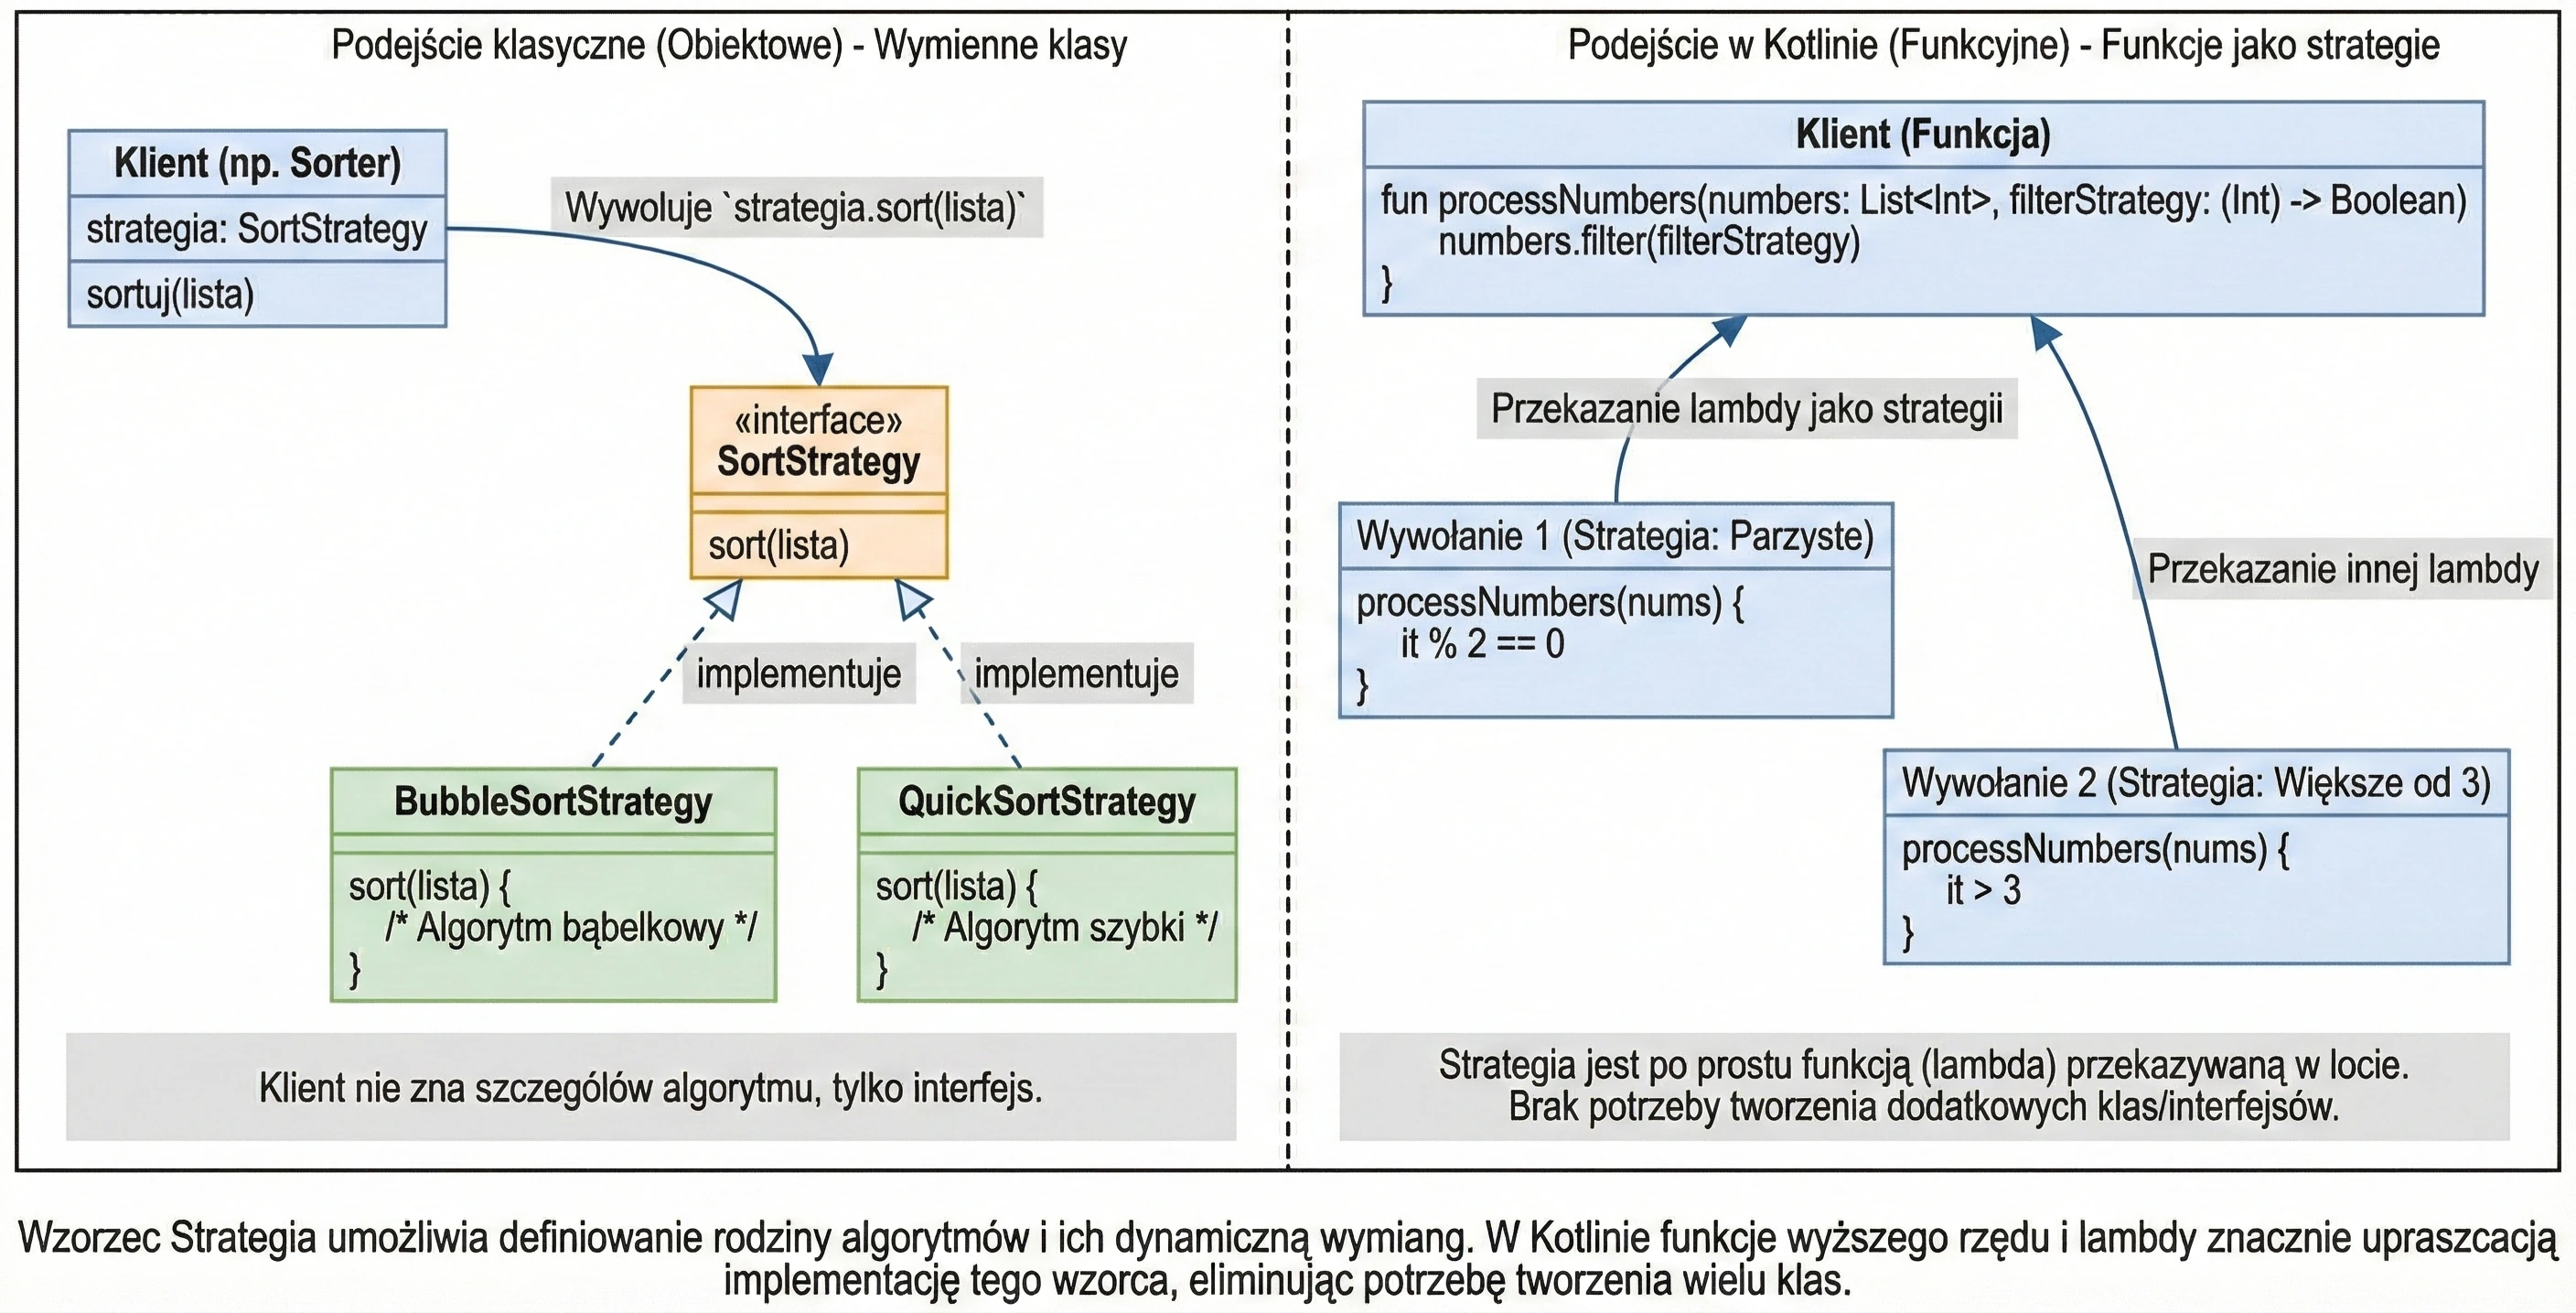
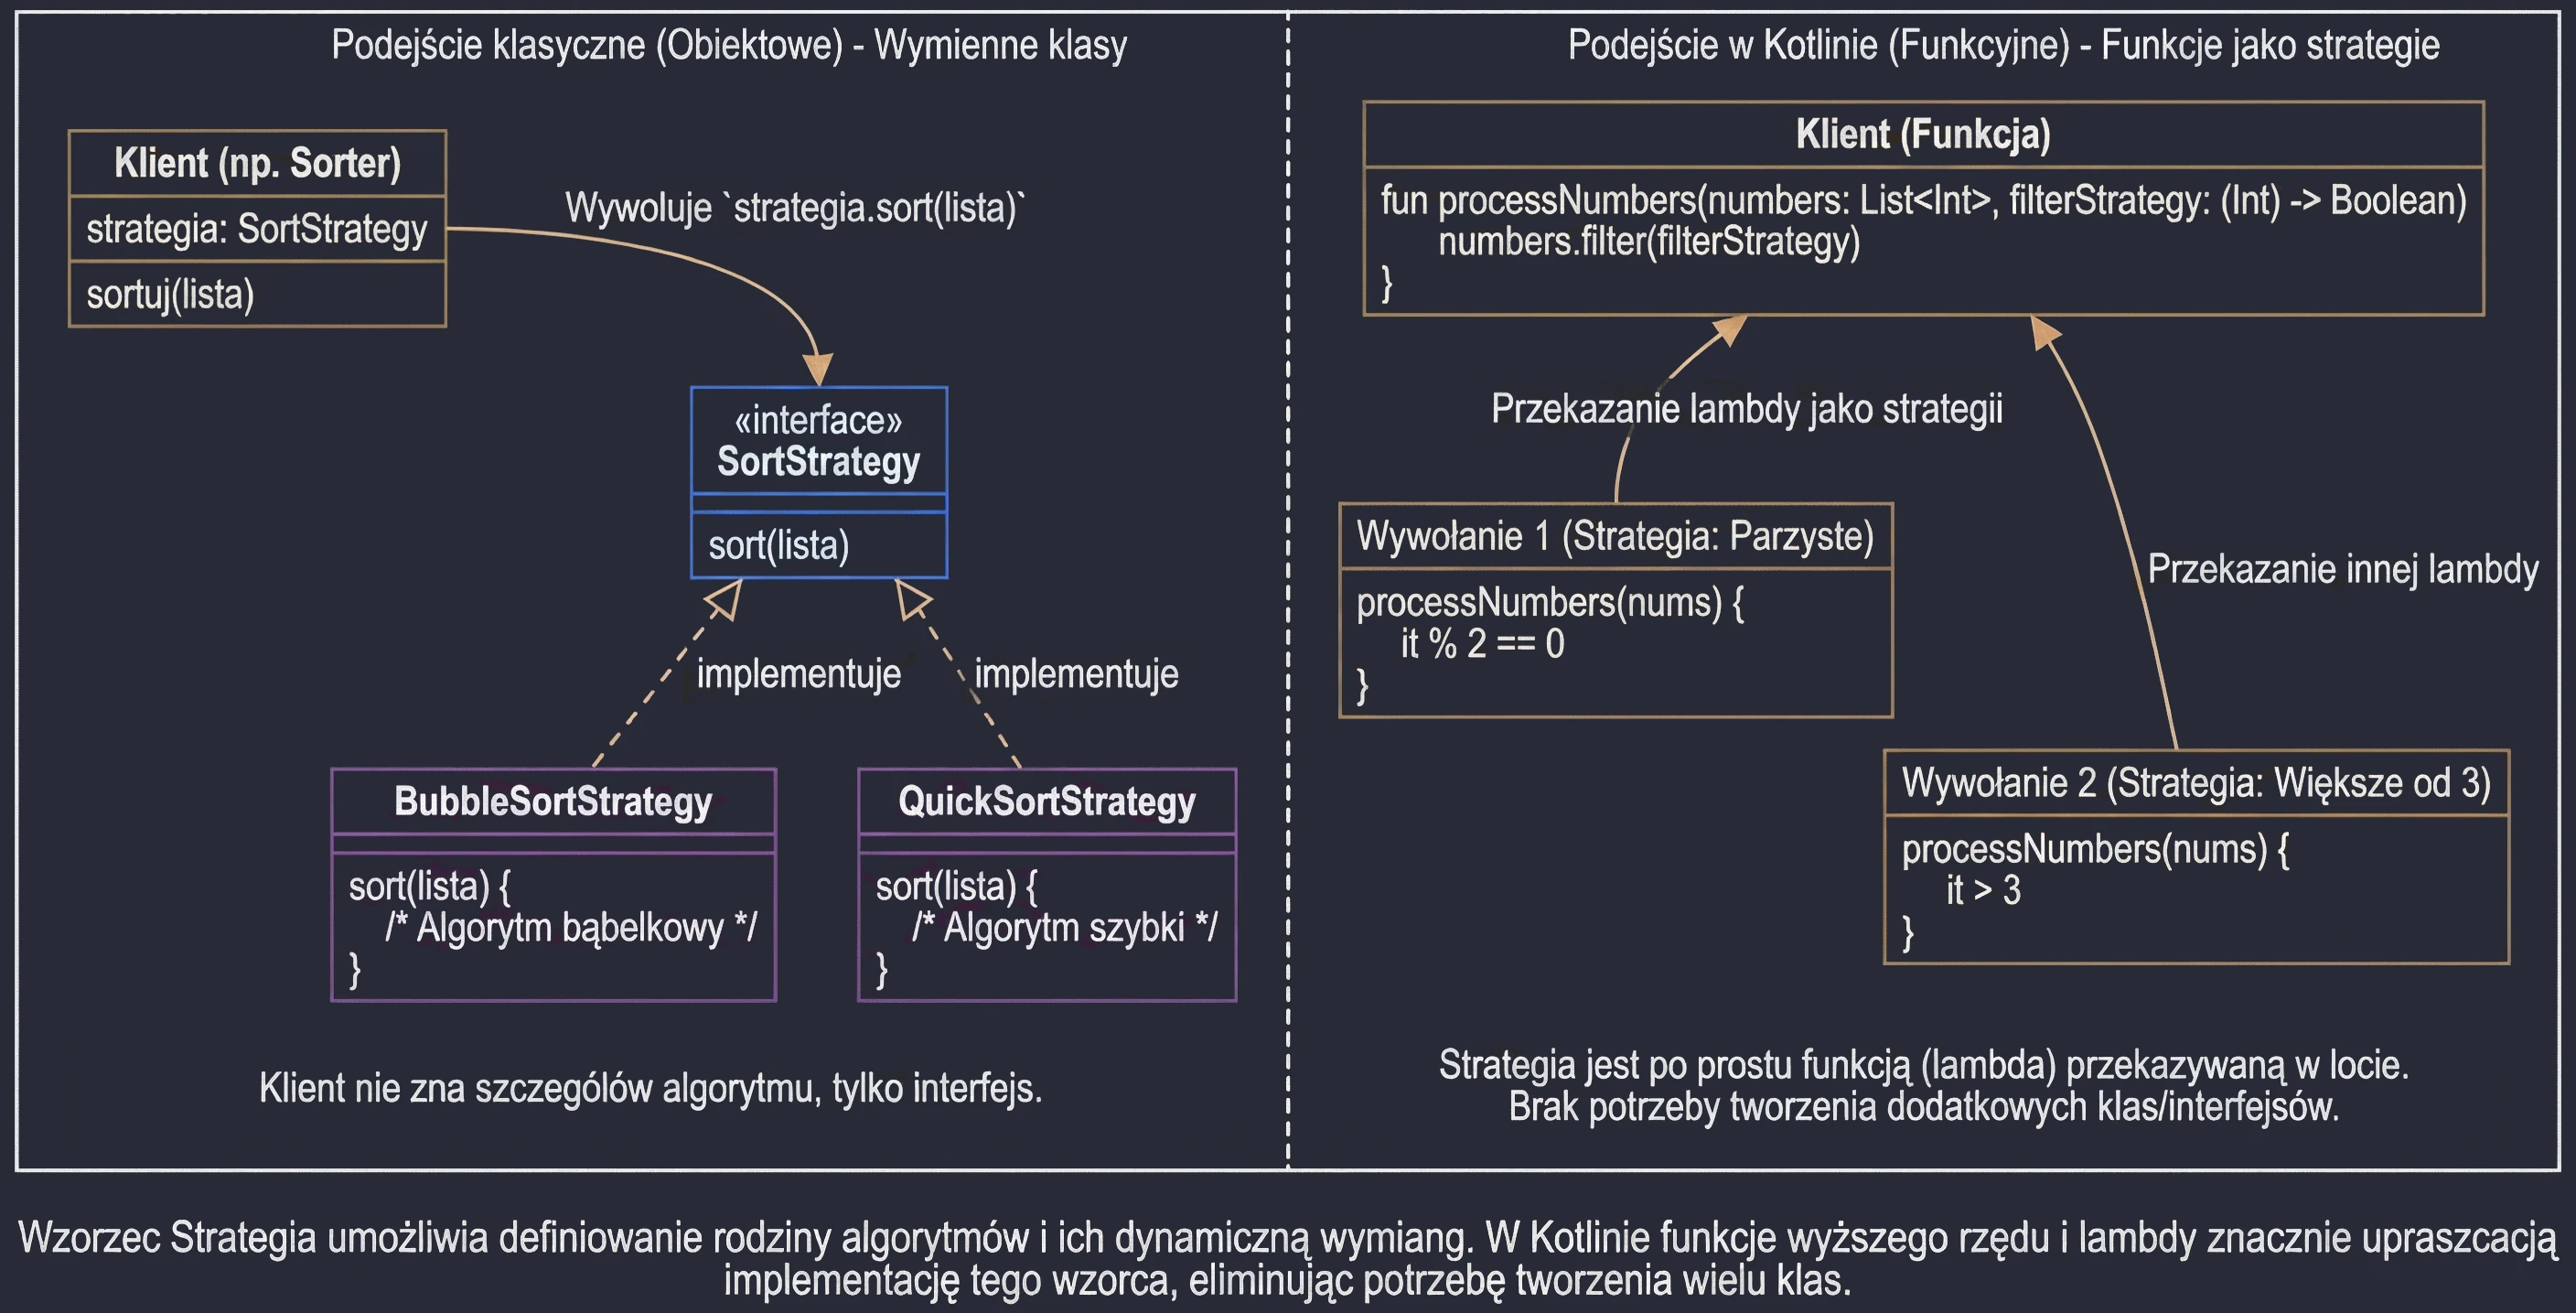
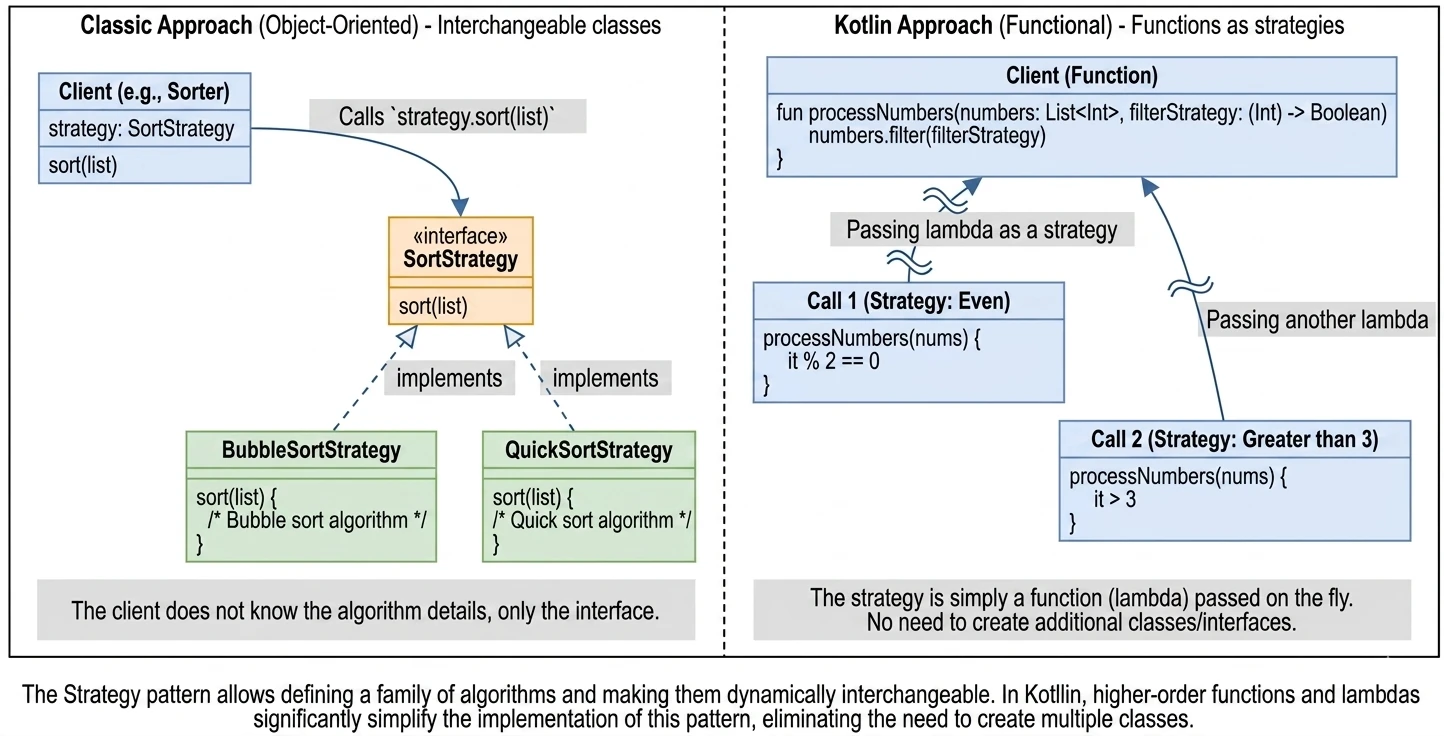
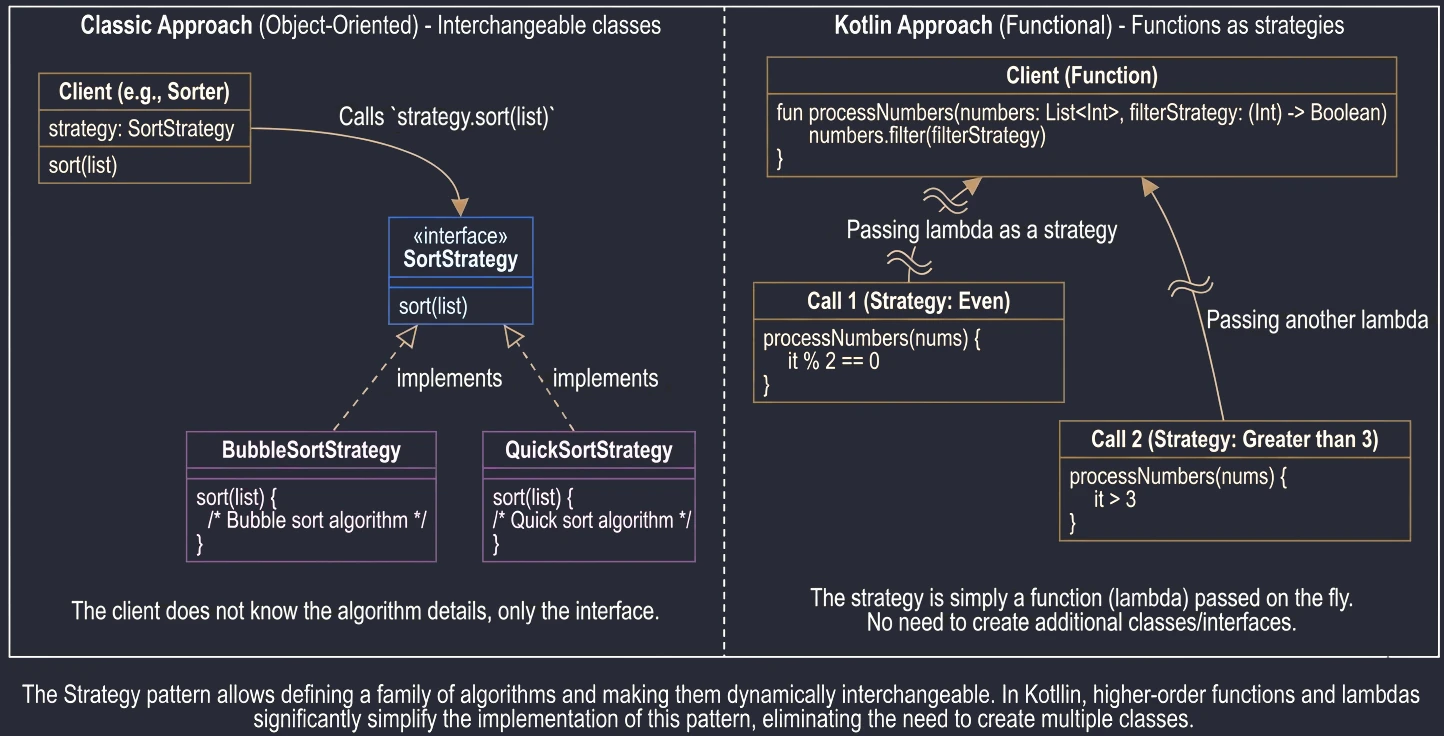
Mediator
Mediator is a pattern used to reduce coupling between many classes. Instead of objects communicating each with each other, creating a dependency network like spaghetti, they communicate only with the Mediator. The Mediator decides what to do with that.
Similarly, airplanes (components) do not talk directly to each other, for example Hello Boeing, I am landing. They talk to the tower (Mediator). The tower knows about all airplanes and controls traffic, preventing collisions.
If you have a complex form where changing CheckBox A affects the visibility of Field B, and typing text into C disables Button D, then instead of writing logic inside every UI element, for example onCheckedChange in a CheckBox changing the visibility of Field B, it is better to use a Mediator, for example a ViewModel.
All events go to the ViewModel (Mediator), it updates the State, and the State goes back to the View. UI components do not know about each other - they only know about the Mediator.
Example: Registration Form
In this example, RegistrationViewModel acts as the Mediator. The text fields and the button do not know about each other. The Register button becomes active only when the username is valid, but the Mediator decides this.
// Form state
data class RegistrationState(
    val username: String = "",
    val isButtonEnabled: Boolean = false
)

// Mediator, the ViewModel
class RegistrationViewModel : ViewModel() {
    // We use mutableStateOf instead of Flow, simpler for beginners
    var state by mutableStateOf(RegistrationState())
        private set // Private setter, only the ViewModel can change this

    fun onUsernameChange(newName: String) {
        // Mediation logic: changing the name affects the button
        val isValid = newName.length >= 3
        state = state.copy(
            username = newName,
            isButtonEnabled = isValid
        )
    }

    fun onRegisterClick() {
        println("Registering user: ${state.username}")
    }
}

// View, the Colleagues
@Composable
fun RegistrationScreen(viewModel: RegistrationViewModel) {
    val state = viewModel.state

    Column {
        // Component A: text field
        TextField(
            value = state.username,
            onValueChange = { viewModel.onUsernameChange(it) },
            label = { Text("Username") }
        )

        // Component B: button, depends on A but indirectly
        Button(
            onClick = { viewModel.onRegisterClick() },
            enabled = state.isButtonEnabled // Mediator decision
        ) {
            Text("Register")
        }
    }
}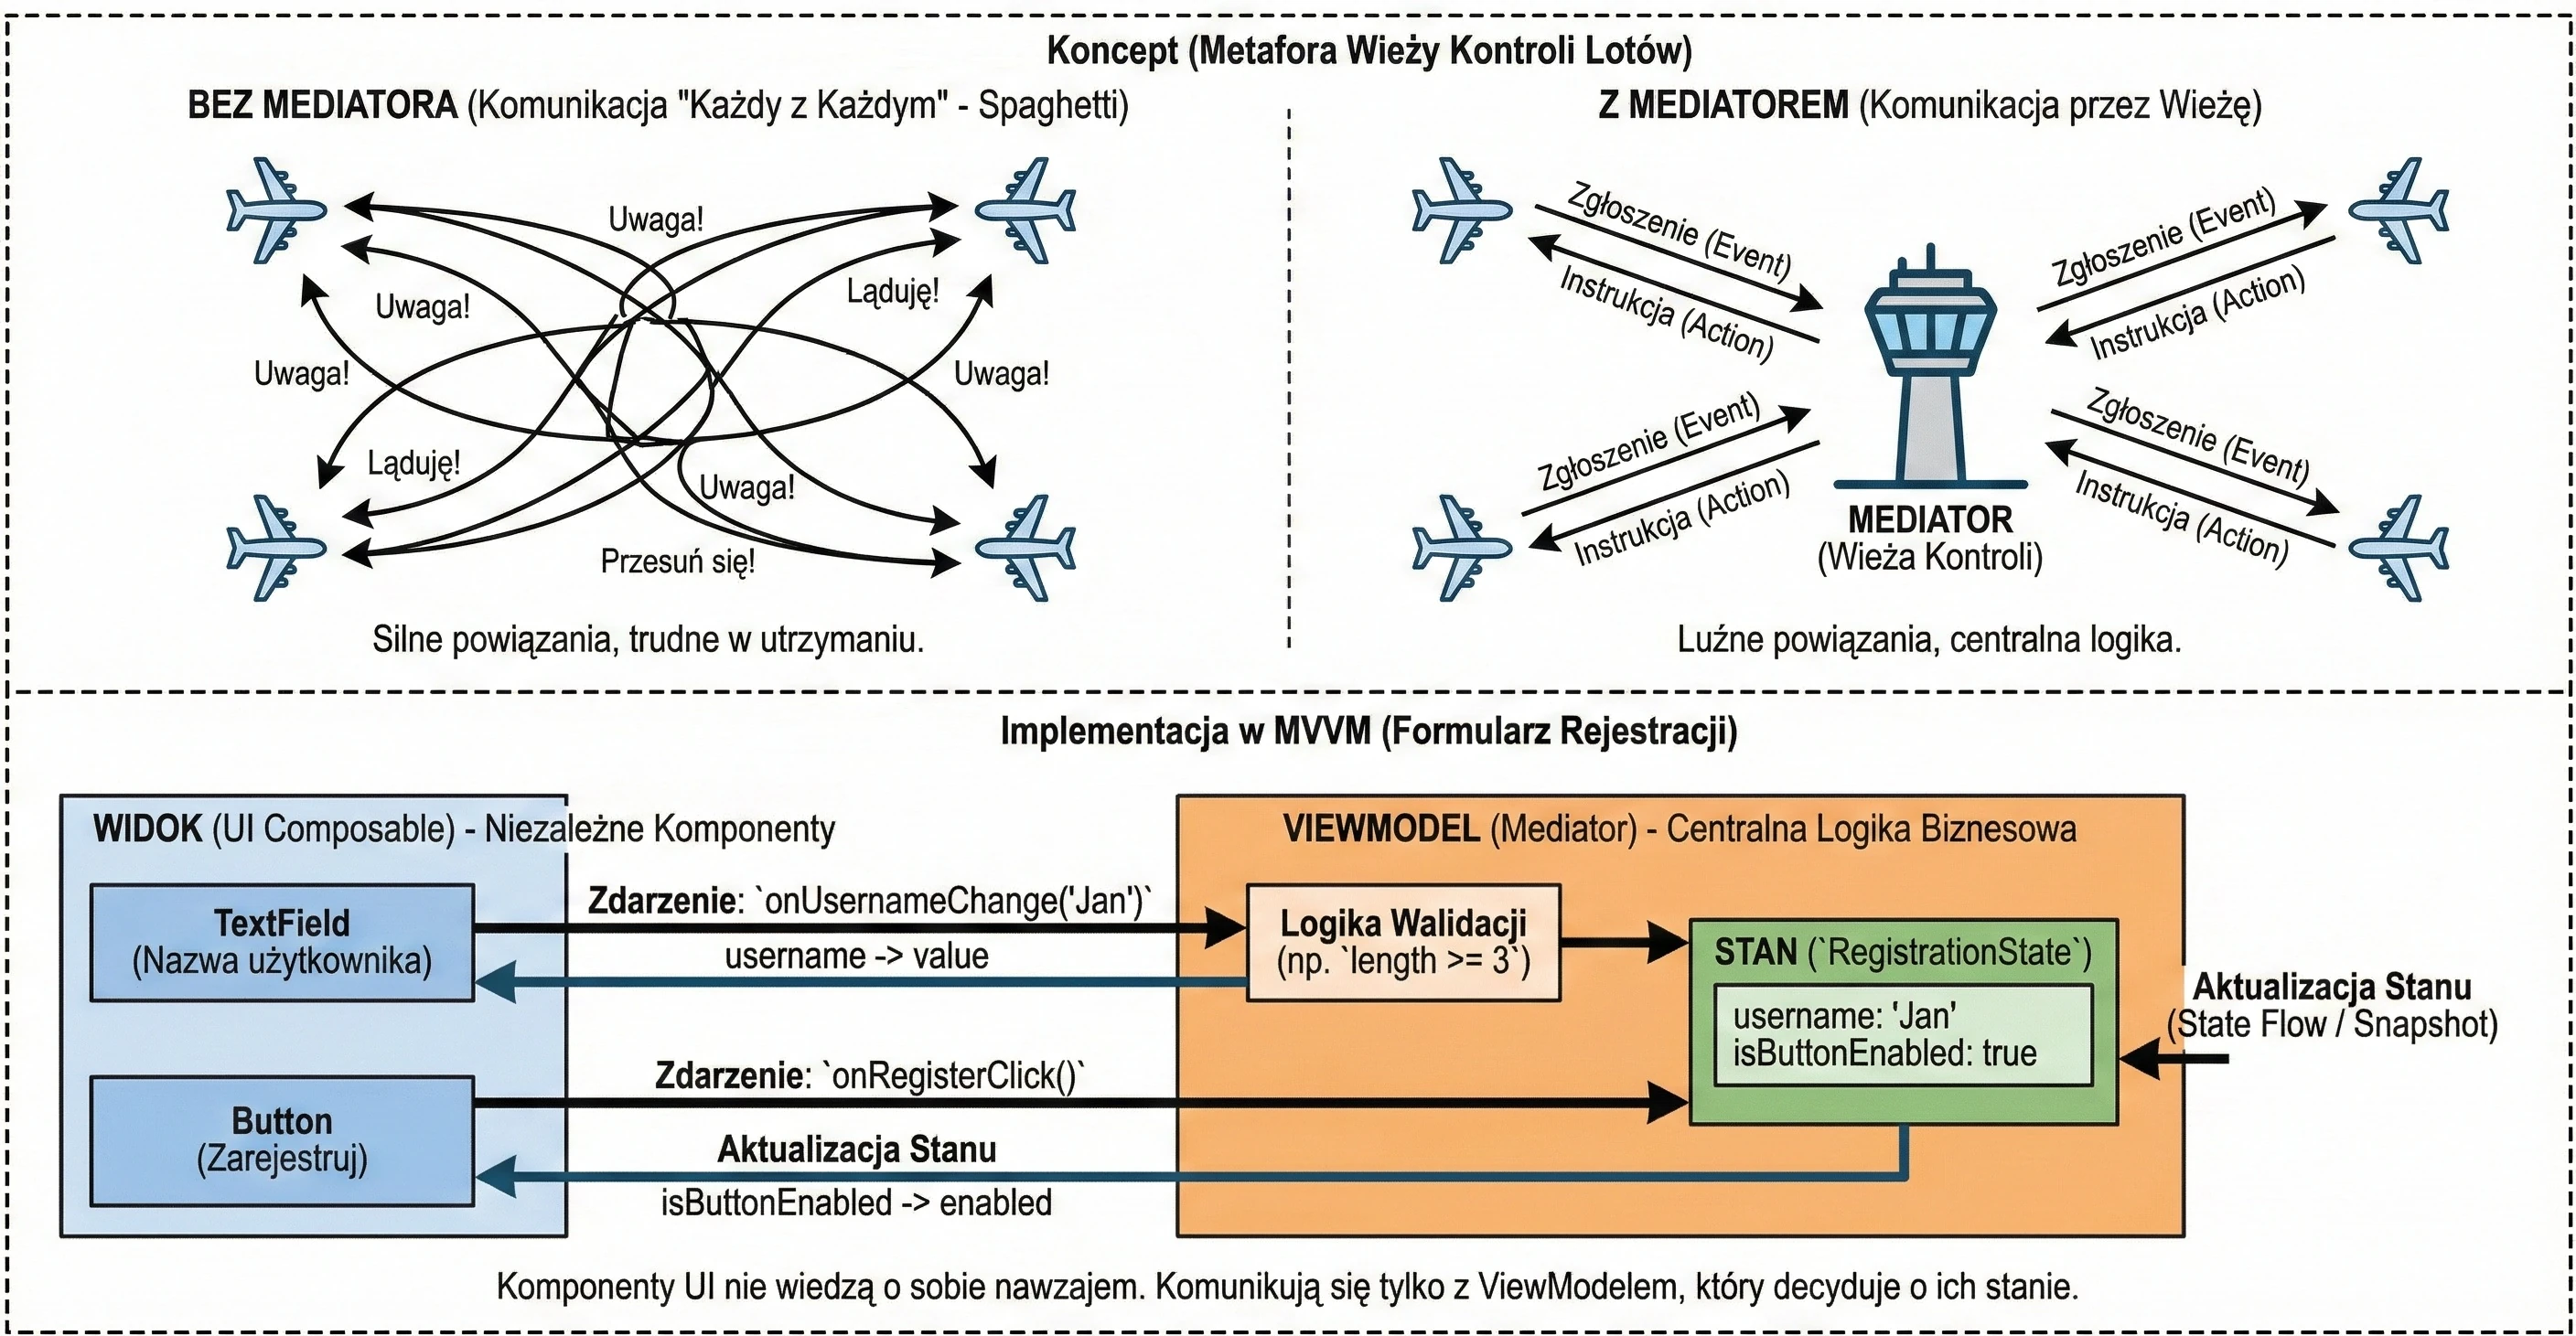
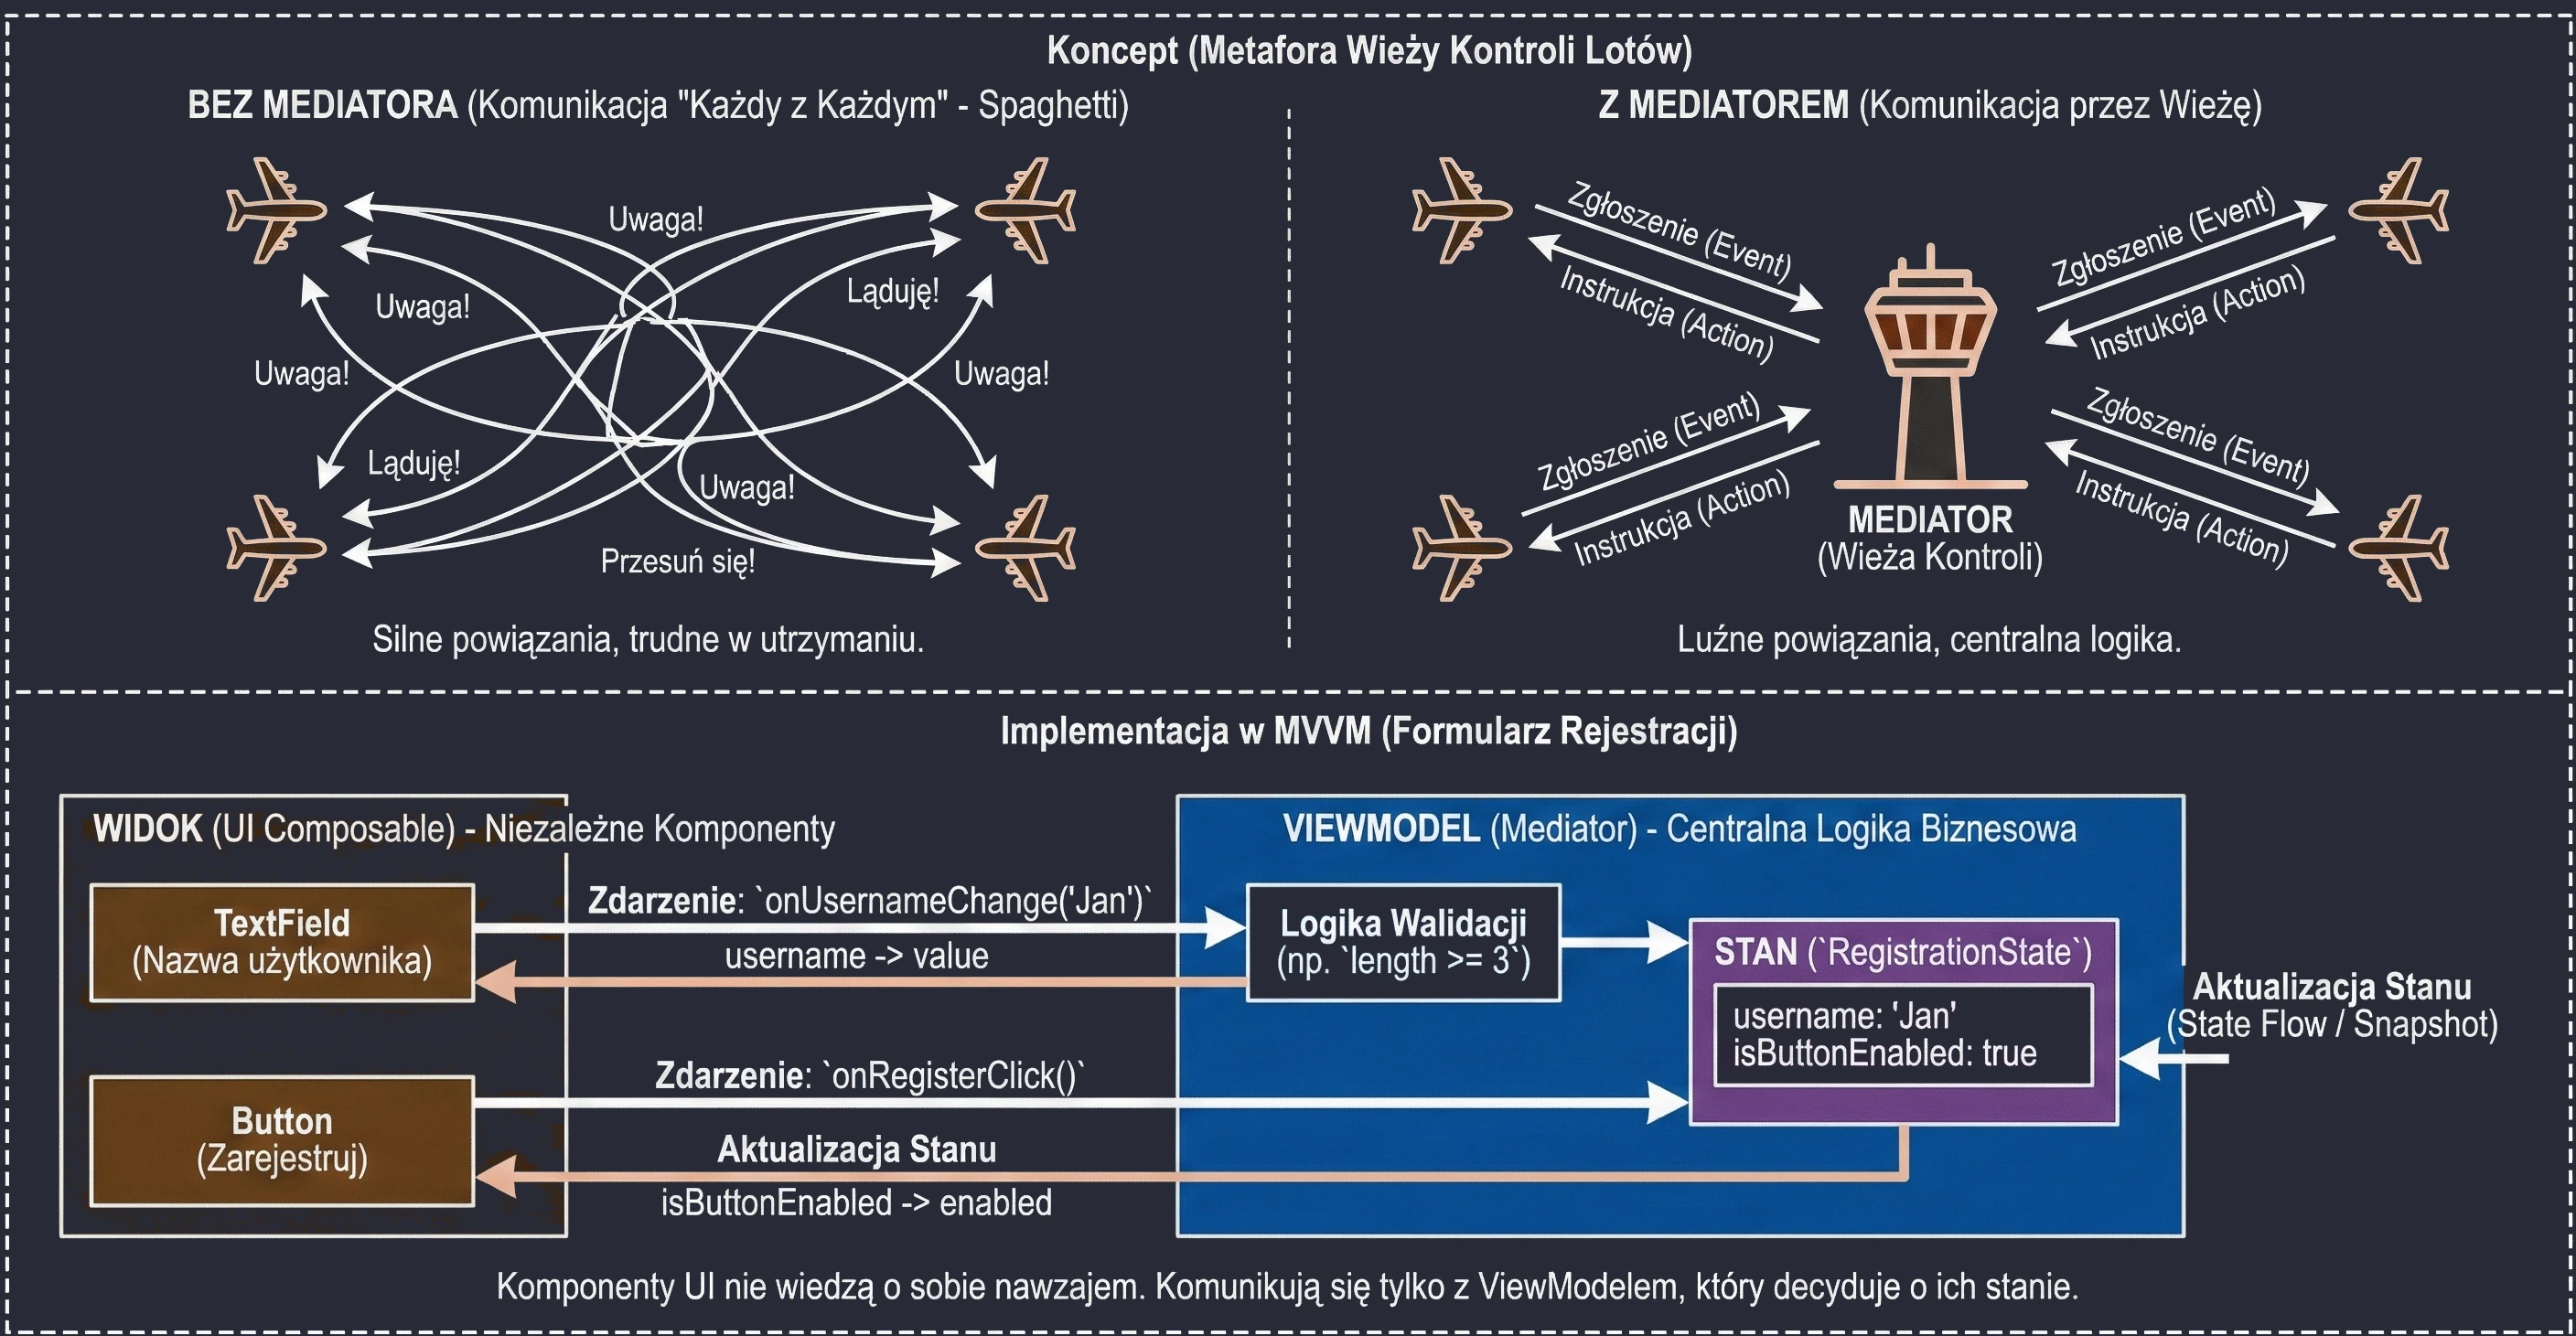

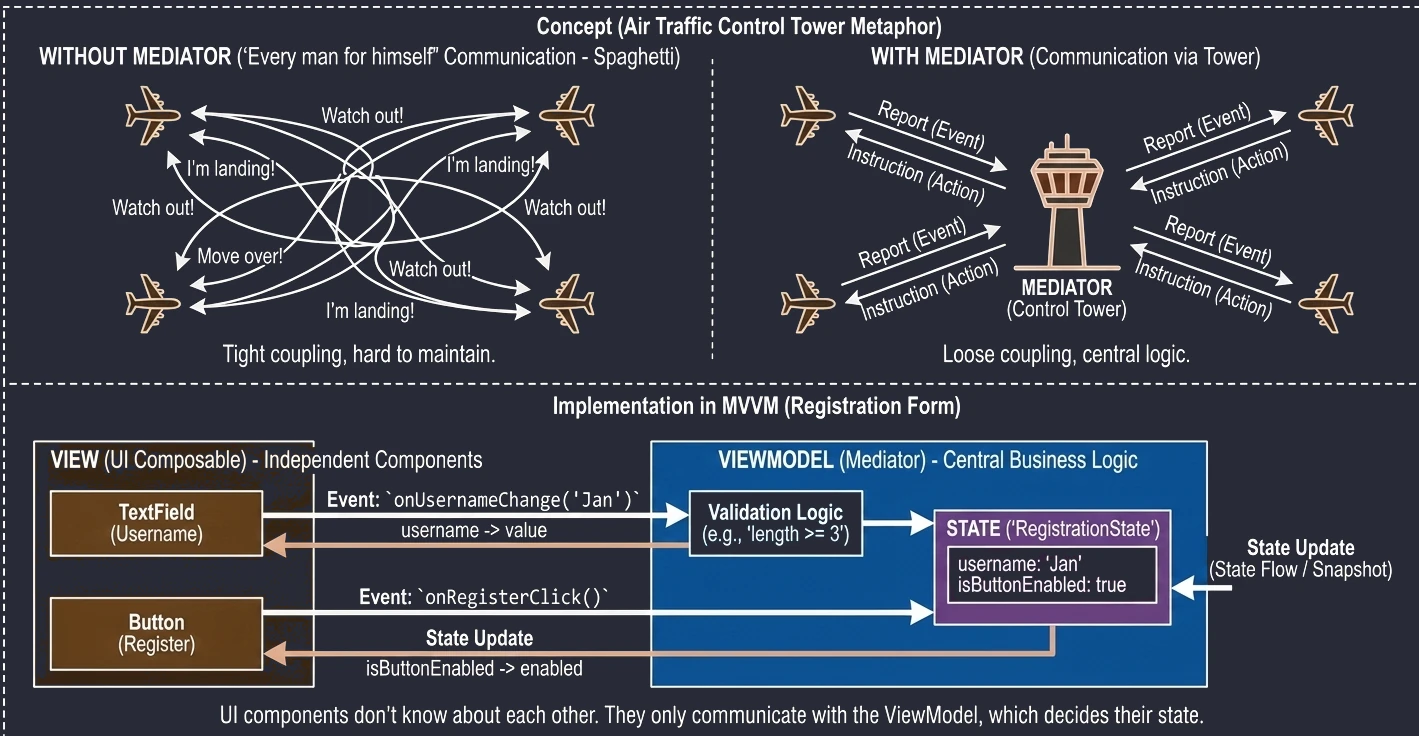
We may encounter a hybrid architecture when building an Android application. This does not mean web-based applications such as Flutter or React Native, but combining Jetpack Compose with classic, older Android system components such as AppWidgets, meaning home screen widgets.
Android widgets, the ones placed on the home screen, are still based on RemoteViews and XML. The Compose-related library available for this area is currently at an early stage of development (Jetpack Glance, discussed later in this chapter). For this reason, we need to know how to communicate between these two worlds.
Hybrid Application Architecture
Assume that we are creating a simple counter. We want:
- The application (Activity) to be written in Jetpack Compose.
- The widget on the home screen to be a classic AppWidget.
- The counter state to be shared: a change in the application updates the widget, and a change in the widget updates the application.
To achieve this, we need a Single Source of Truth. In this simple case, SharedPreferences are a good fit.
SharedPreferences
SharedPreferences is a mechanism for storing simple key-value data in an XML file. Here we discuss its basic features and usage; in the next semester, we will learn more advanced techniques.
- It supports simple types:
boolean,float,int,long,String,Set<String>. - It works synchronously, meaning read/write blocks the thread unless we use
apply(). - It allows listening for changes with
OnSharedPreferenceChangeListener.
// Get an instance
val prefs = context.getSharedPreferences("AppPrefs", Context.MODE_PRIVATE)

// Write, edit -> put -> apply
prefs.edit()
    .putInt("count", 5)
    .apply() // Asynchronous write

// Read
val count = prefs.getInt("count", 0) // 0 is the default value
Integration with Jetpack Compose
Compose is reactive: it refreshes when State changes. SharedPreferences are not State, so we need to create a bridge. We will use DisposableEffect for this.
What Is a Side Effect?
By design, @Composable functions should be pure and deterministic. This means that for the same input data, they always generate the same UI appearance without changing anything in their environment.
Any operations that go beyond this model, for example database communication, starting a timer, playing a sound, or registering a listener, are called side effects. If we placed such code directly in the function body, it would run on every screen refresh (recomposition), leading to bugs and memory leaks.
DisposableEffect
This is a safe side-effect handling mechanism that lets us run code when a component enters the composition tree and, crucially, clean it up when it leaves. It is ideal for registering and unregistering listeners.
@Composable
fun CounterScreen(context: Context) {
    // 1. State in Compose
    var count by remember { mutableStateOf(0) }

    val prefs = context.getSharedPreferences("AppPrefs", Context.MODE_PRIVATE)

    // 2. Side effect: listening for SharedPreferences changes
    DisposableEffect(Unit) {
        val listener = SharedPreferences.OnSharedPreferenceChangeListener { sharedPreferences, key ->
            if (key == "count") {
                // When the file changes, update Compose state
                count = sharedPreferences.getInt("count", 0)
            }
        }

        // Register the listener, onStart
        prefs.registerOnSharedPreferenceChangeListener(listener)

        // Initial read
        count = prefs.getInt("count", 0)

        // Cleanup, onStop/onDispose
        onDispose {
            prefs.unregisterOnSharedPreferenceChangeListener(listener)
        }
    }

    // 3. UI
    Text(text = "Counter: $count")
}
Thanks to this, when an external process, for example a Widget, changes the value in SharedPreferences, our Compose screen refreshes automatically.
App Widgets
Widgets run in the System process (Launcher), not in our application. Therefore, they have very limited UI capabilities: only basic views such as TextView, Button, and ImageView.
Because a widget lives on another application's screen, the Launcher, we do not have direct access to its views. We cannot write findViewById or composeView.setContent. Instead, we must prepare a package describing the appearance (RemoteViews) and send it to the system (AppWidgetManager).
To know when to send such a package, for example when the user has added a widget to the screen, we need a notification mechanism. This role is handled by AppWidgetProvider.
BroadcastReceiver and AppWidgetProvider
BroadcastReceiver is one of the four main Android components, next to Activity, Service, and ContentProvider. It is used to receive messages (intents) sent by the system or by other applications, for example "Battery low" or "Wi-Fi enabled". It runs in the background, but only briefly, just long enough to handle the event.
AppWidgetProvider is simply a special BroadcastReceiver prepared for handling the widget lifecycle. It receives intents such as APPWIDGET_UPDATE, APPWIDGET_DELETED, and so on.
Note: Although the class name contains the word Provider, AppWidgetProvider is not a ContentProvider. ContentProvider is used to share data with other applications, for example a contacts database, while AppWidgetProvider is used to receive system events (Broadcasts).
class CounterWidget : AppWidgetProvider() {

    // Called when the widget needs to be refreshed,
    // for example every 30 minutes or on demand
    override fun onUpdate(context: Context, appWidgetManager: AppWidgetManager, appWidgetIds: IntArray) {
        for (appWidgetId in appWidgetIds) {
            updateAppWidget(context, appWidgetManager, appWidgetId)
        }
    }
}

fun updateAppWidget(context: Context, appWidgetManager: AppWidgetManager, appWidgetId: Int) {
    val prefs = context.getSharedPreferences("AppPrefs", Context.MODE_PRIVATE)
    val count = prefs.getInt("count", 0)

    // Build a view for another process, RemoteViews
    val views = RemoteViews(context.packageName, R.layout.widget_counter)
    views.setTextViewText(R.id.widget_text, count.toString())

    // Handle click, PendingIntent -> BroadcastReceiver
    val intent = Intent(context, CounterReceiver::class.java).apply {
        action = "INCREMENT"
    }
    // PendingIntent allows another application, the Launcher,
    // to run our Intent
    val pendingIntent = PendingIntent.getBroadcast(
        context, 0, intent, PendingIntent.FLAG_UPDATE_CURRENT or PendingIntent.FLAG_IMMUTABLE
    )

    views.setOnClickPendingIntent(R.id.widget_button_plus, pendingIntent)

    // Send the view to the manager
    appWidgetManager.updateAppWidget(appWidgetId, views)
}
PendingIntent is a token that we pass to another application, for example the Launcher, allowing it to perform an action on our behalf even when our application is killed.
In the example above, clicking the button on the widget through the Launcher sends a Broadcast to our CounterReceiver class.
Closing the Loop (CounterReceiver)
The final piece of the puzzle. CounterReceiver receives a signal from the widget, changes data in SharedPreferences, and forces the widget to refresh.
class CounterReceiver : BroadcastReceiver() {
    override fun onReceive(context: Context, intent: Intent) {
        if (intent.action == "INCREMENT") {
            val prefs = context.getSharedPreferences("AppPrefs", Context.MODE_PRIVATE)
            val current = prefs.getInt("count", 0)

            // 1. Save the new value, this will trigger the listener in Compose
            prefs.edit().putInt("count", current + 1).apply()

            // 2. Manually refresh the widget,
            // because AppWidgetProvider does not listen to Prefs automatically
            // ... code that gets an AppWidgetManager instance
            // and calls updateAppWidget ...
        }
    }
}
Flow Summary
- The user taps "+" on the Widget.
- The Launcher uses
PendingIntent-> sends theINCREMENTBroadcast. CounterReceiverreceives the Broadcast -> increments the counter inSharedPreferences.SharedPreferencesnotifies listeners.DisposableEffectin Compose receives the change -> updates the application UI.CounterReceiverforces the Widget to refresh -> updates the widget UI.
This is an example of event-driven architecture, where different independent components communicate through shared state.
Jetpack Glance
The traditional approach with RemoteViews is cumbersome: it requires XML, has a limited API, and uses different syntax than the rest of the application written in Compose. Google's answer to this problem is the Jetpack Glance library.
Glance is a framework that lets us build widget interfaces, and Wear OS tiles, using syntax known from Jetpack Compose.
Note: Under the hood, Glance still generates RemoteViews. It is only a layer, or compiler, that translates Compose code into instructions understood by the system process. Thanks to this, we get the benefits of Compose, such as declarative UI and state, while preserving compatibility with the widget mechanism.
Example: Counter in Glance
Notice how much this code resembles a regular Compose application. There is no XML and no RemoteViews.
class CounterGlanceWidget : GlanceAppWidget() {

    // State definition, using Preferences from DataStore or file-based storage
    override val stateDefinition = PreferencesGlanceStateDefinition

    @Composable
    override fun Content() {
        // Reading state, similar to collectAsState
        val prefs = currentState<Preferences>()
        val count = prefs[intPreferencesKey("count")] ?: 0

        Column(
            modifier = GlanceModifier
                .fillMaxSize()
                .background(Color.White),
            horizontalAlignment = Alignment.Horizontal.CenterHorizontally,
            verticalAlignment = Alignment.Vertical.CenterVertically
        ) {
            Text(
                text = "Counter: $count",
                style = TextStyle(fontSize = 20.sp)
            )

            Button(
                text = "Increment",
                onClick = actionRunCallback<IncrementActionCallback>()
            )
        }
    }
}

// Action handling, instead of BroadcastReceiver
class IncrementActionCallback : ActionCallback {
    override suspend fun onAction(
        context: Context,
        glanceId: GlanceId,
        parameters: ActionParameters
    ) {
        updateAppWidgetState(context, glanceId) { prefs ->
            val current = prefs[intPreferencesKey("count")] ?: 0
            prefs[intPreferencesKey("count")] = current + 1
        }
        CounterGlanceWidget().update(context, glanceId)
    }
}
Key Differences
- Modifier: We use
GlanceModifier, not the regularModifier. - Actions: Instead of
PendingIntent, we have safer typed callbacks (actionRunCallback). - Components: These are not the same components as in
androidx.compose.material. They are special versions, for exampleandroidx.glance.text.Textandandroidx.glance.Button, adapted to the limitations ofRemoteViews.
Glance is the future of widget development, eliminating most of the boilerplate code associated with AppWidgetProvider.