HTML Manuscript
W01 - Course organization and Compose navigation
Basic course information
Course organization
The course covers a total of 75 hours of student workload, including 15 hours of lectures (one 45-minute lecture per week) and 30 hours of laboratory classes. An additional 30 hours are assigned to independent student work, which is required for self-study, project preparation and extending the material covered in class. The course is worth 3 ECTS credits.
During the course, teaching materials available at https://github.com/RafLew84/ProgUM are used. Required and recommended references:
- Kotlin language documentation (https://kotlinlang.org/docs/home.html)
- official mobile application programming courses available on Android Developers (https://developer.android.com/courses).
Assessment rules
- The laboratory part is passed by obtaining a positive grade from the assignment lists.
- There are 6 assignment lists planned for the course.
- Each list receives a separate grade.
- It is not necessary to pass all lists to obtain a positive laboratory grade. It is allowed to miss or fail one list; this list receives a grade of 2.0.
- Each list specifies the number of points required for a given grade.
- Each list has a submission deadline.
- For each week of delay, the received grade is reduced by 1.0.
- Lists are submitted during laboratory classes.
- For each list, the instructor asks 4 questions.
- Points for a list are awarded based on the correctness of task implementation and the oral answer.
- The final grade is the arithmetic mean of all grades from the lists.
- A grade of 3.0 requires an average of at least 3.0.
- During laboratory classes, three unexcused absences are allowed.
Course topics
- Assessment rules, course topics, advanced navigation.
- Introduction to multithreading: coroutines. The main thread.
- Coroutines. Concurrency, parallelism and asynchronicity.
- Fundamentals of application architecture: MVx patterns (MVC, MVP, MVVM).
- Reactive state management: Flow, StateFlow, SharedFlow.
- Advanced state management: withContext, StateIn, ShareIn, FlowOn, combine.
- Coroutines: channels - asynchronous data exchange between coroutines.
- Saving data to a file: SharedPreferences, DataStore.
- SQLite database + ROOM: Entity, Dao, Database, CRUD, asynchronous operations.
- Working with external data sources: Retrofit2, asynchronous operations.
- Dependency injection: Dagger, Hilt.
- Clean architecture - domain layer and the Use Case pattern.
- Single Source of Truth pattern - offline caching strategy.
- Cloud backend: introduction to Firebase and Firestore.
Android Studio - Starting and configuring a project - Review
During the course, we create projects in Android Studio, in Kotlin, with the interface built in Jetpack Compose (without XML views). The simplest way to start is the wizard: New Project -> Empty Activity. Set Language: Kotlin, Minimum SDK: 28+ and accept the settings. This template creates a ready project with a correct Compose configuration and an example setContent { ... } block.
NOTE!!! Do not use Empty Views Activity - it starts a project based on views, where the UI is defined in XML files.
Adding dependencies
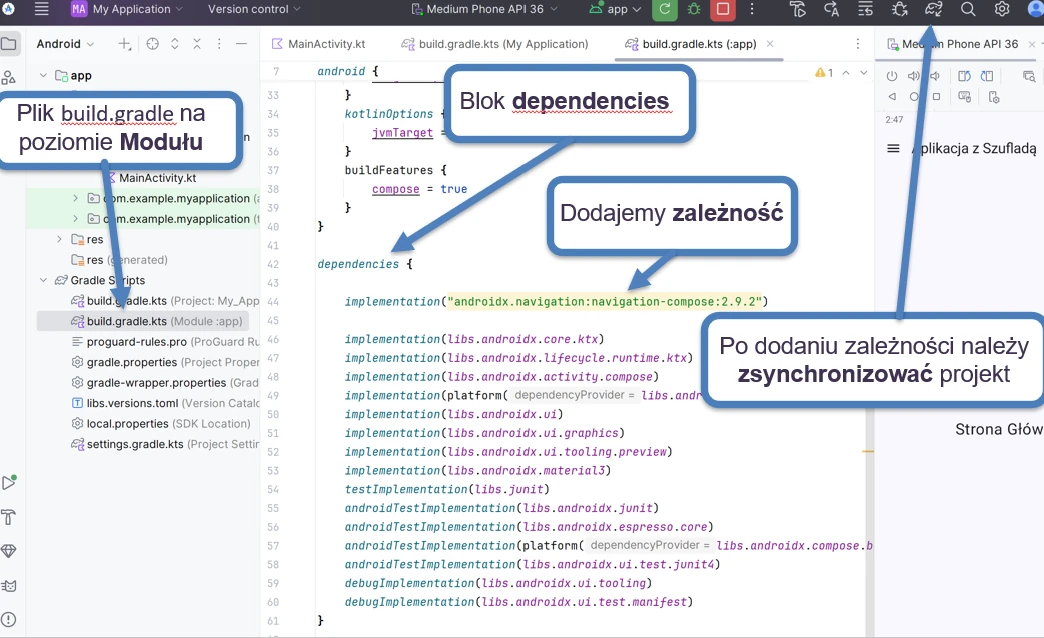
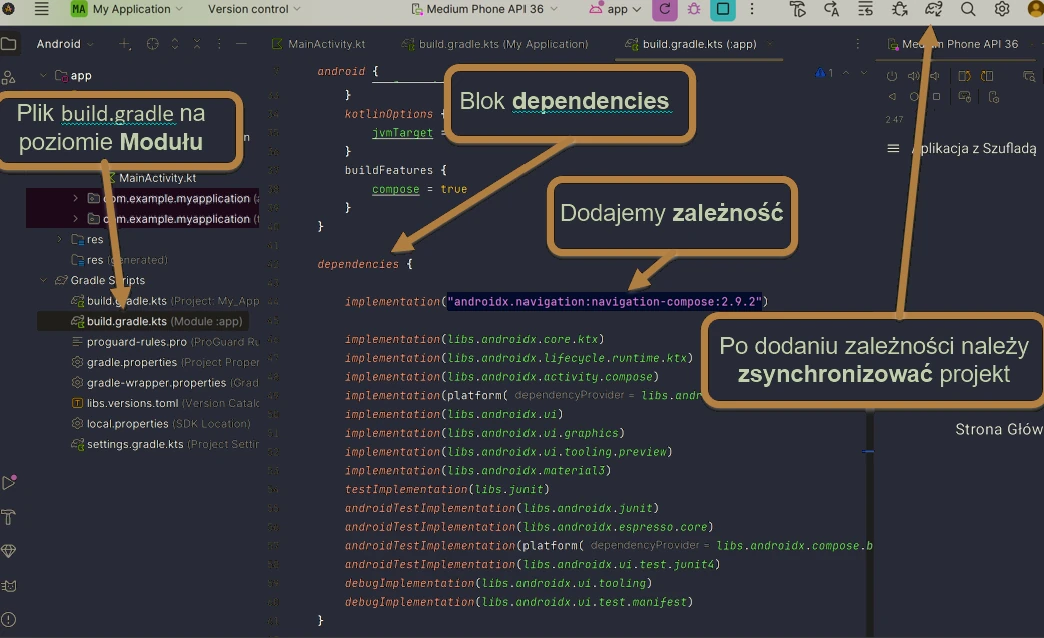
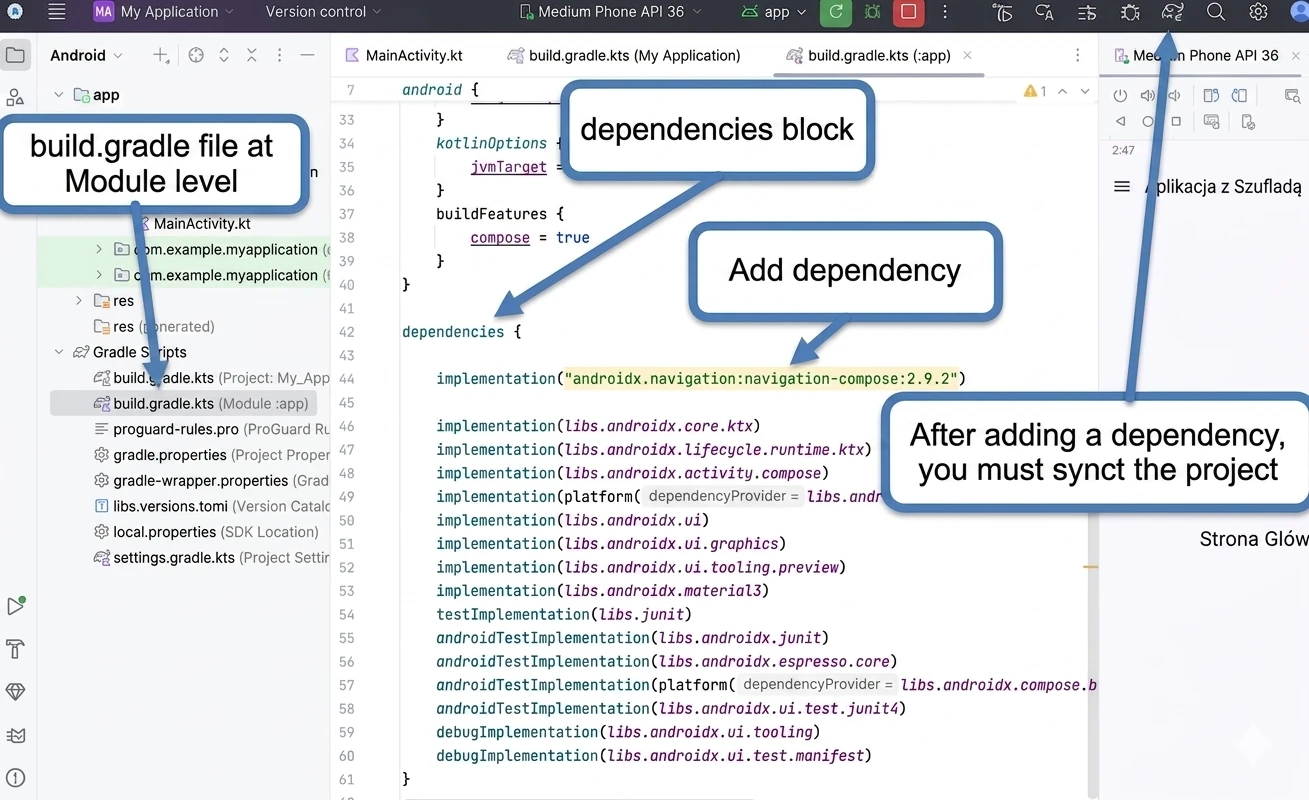
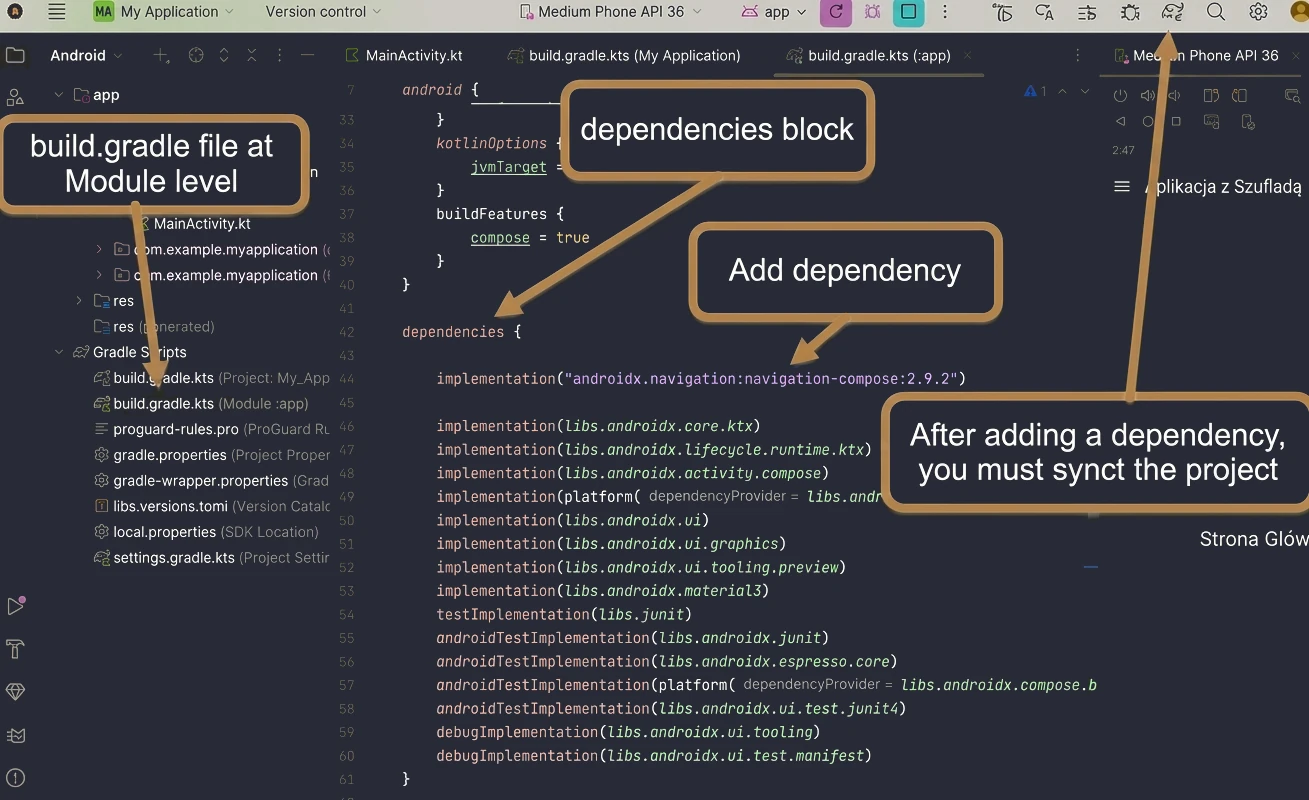
All dependencies are added in the dependencies { ... } block of the build.gradle(.kts)(Module:App) file. Example file:
NOTE!!!! DO NOT COPY CONFIGURATION FILES - they contain information UNIQUE TO YOUR PROJECT!!!!
plugins {
    alias(libs.plugins.android.application)
    alias(libs.plugins.kotlin.android)
    alias(libs.plugins.kotlin.compose)
}

android {
    namespace = "com.example.test"
    compileSdk = 36

    defaultConfig {
        applicationId = "com.example.test"
        minSdk = 28
        targetSdk = 36
        versionCode = 1
        versionName = "1.0"

        testInstrumentationRunner = "androidx.test.runner.AndroidJUnitRunner"
    }

    buildTypes {
        release {
            isMinifyEnabled = false
            proguardFiles(
                getDefaultProguardFile("proguard-android-optimize.txt"),
                "proguard-rules.pro"
            )
        }
    }
    compileOptions {
        sourceCompatibility = JavaVersion.VERSION_11
        targetCompatibility = JavaVersion.VERSION_11
    }
    kotlinOptions {
        jvmTarget = "11"
    }
    buildFeatures {
        compose = true
    }
}

dependencies {
    // add dependencies here

    implementation(libs.androidx.core.ktx)
    implementation(libs.androidx.lifecycle.runtime.ktx)
    implementation(libs.androidx.activity.compose)
    implementation(platform(libs.androidx.compose.bom))
    implementation(libs.androidx.ui)
    implementation(libs.androidx.ui.graphics)
    implementation(libs.androidx.ui.tooling.preview)
    implementation(libs.androidx.material3)
    testImplementation(libs.junit)
    androidTestImplementation(libs.androidx.junit)
    androidTestImplementation(libs.androidx.espresso.core)
    androidTestImplementation(platform(libs.androidx.compose.bom))
    androidTestImplementation(libs.androidx.ui.test.junit4)
    debugImplementation(libs.androidx.ui.tooling)
    debugImplementation(libs.androidx.ui.test.manifest)
}
NOTE!!! Remember to run project synchronization (Fig. 1.1) after any change in files from the gradle directory.
Navigation drawer
In this part, we focus on the practical implementation of navigation in a Jetpack Compose application. Assuming familiarity with the basic building blocks, namely NavHost and NavController, we will look at how to integrate them with advanced Material 3 components such as the navigation drawer.
Let us analyze code that implements one of the most common navigation patterns in mobile applications: the navigation drawer, also known as the hamburger menu (Fig. 1.2).
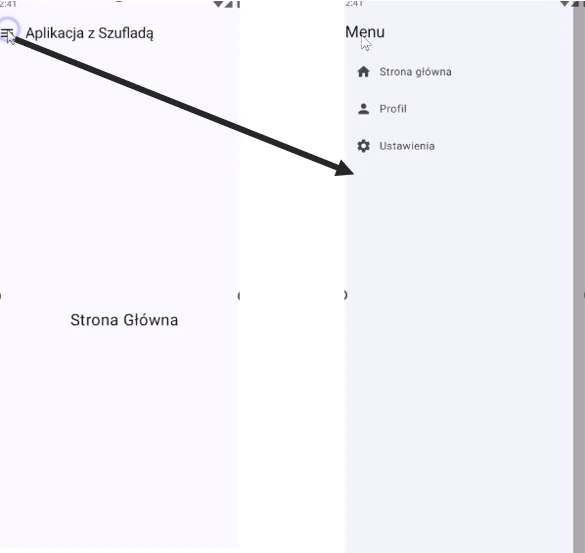

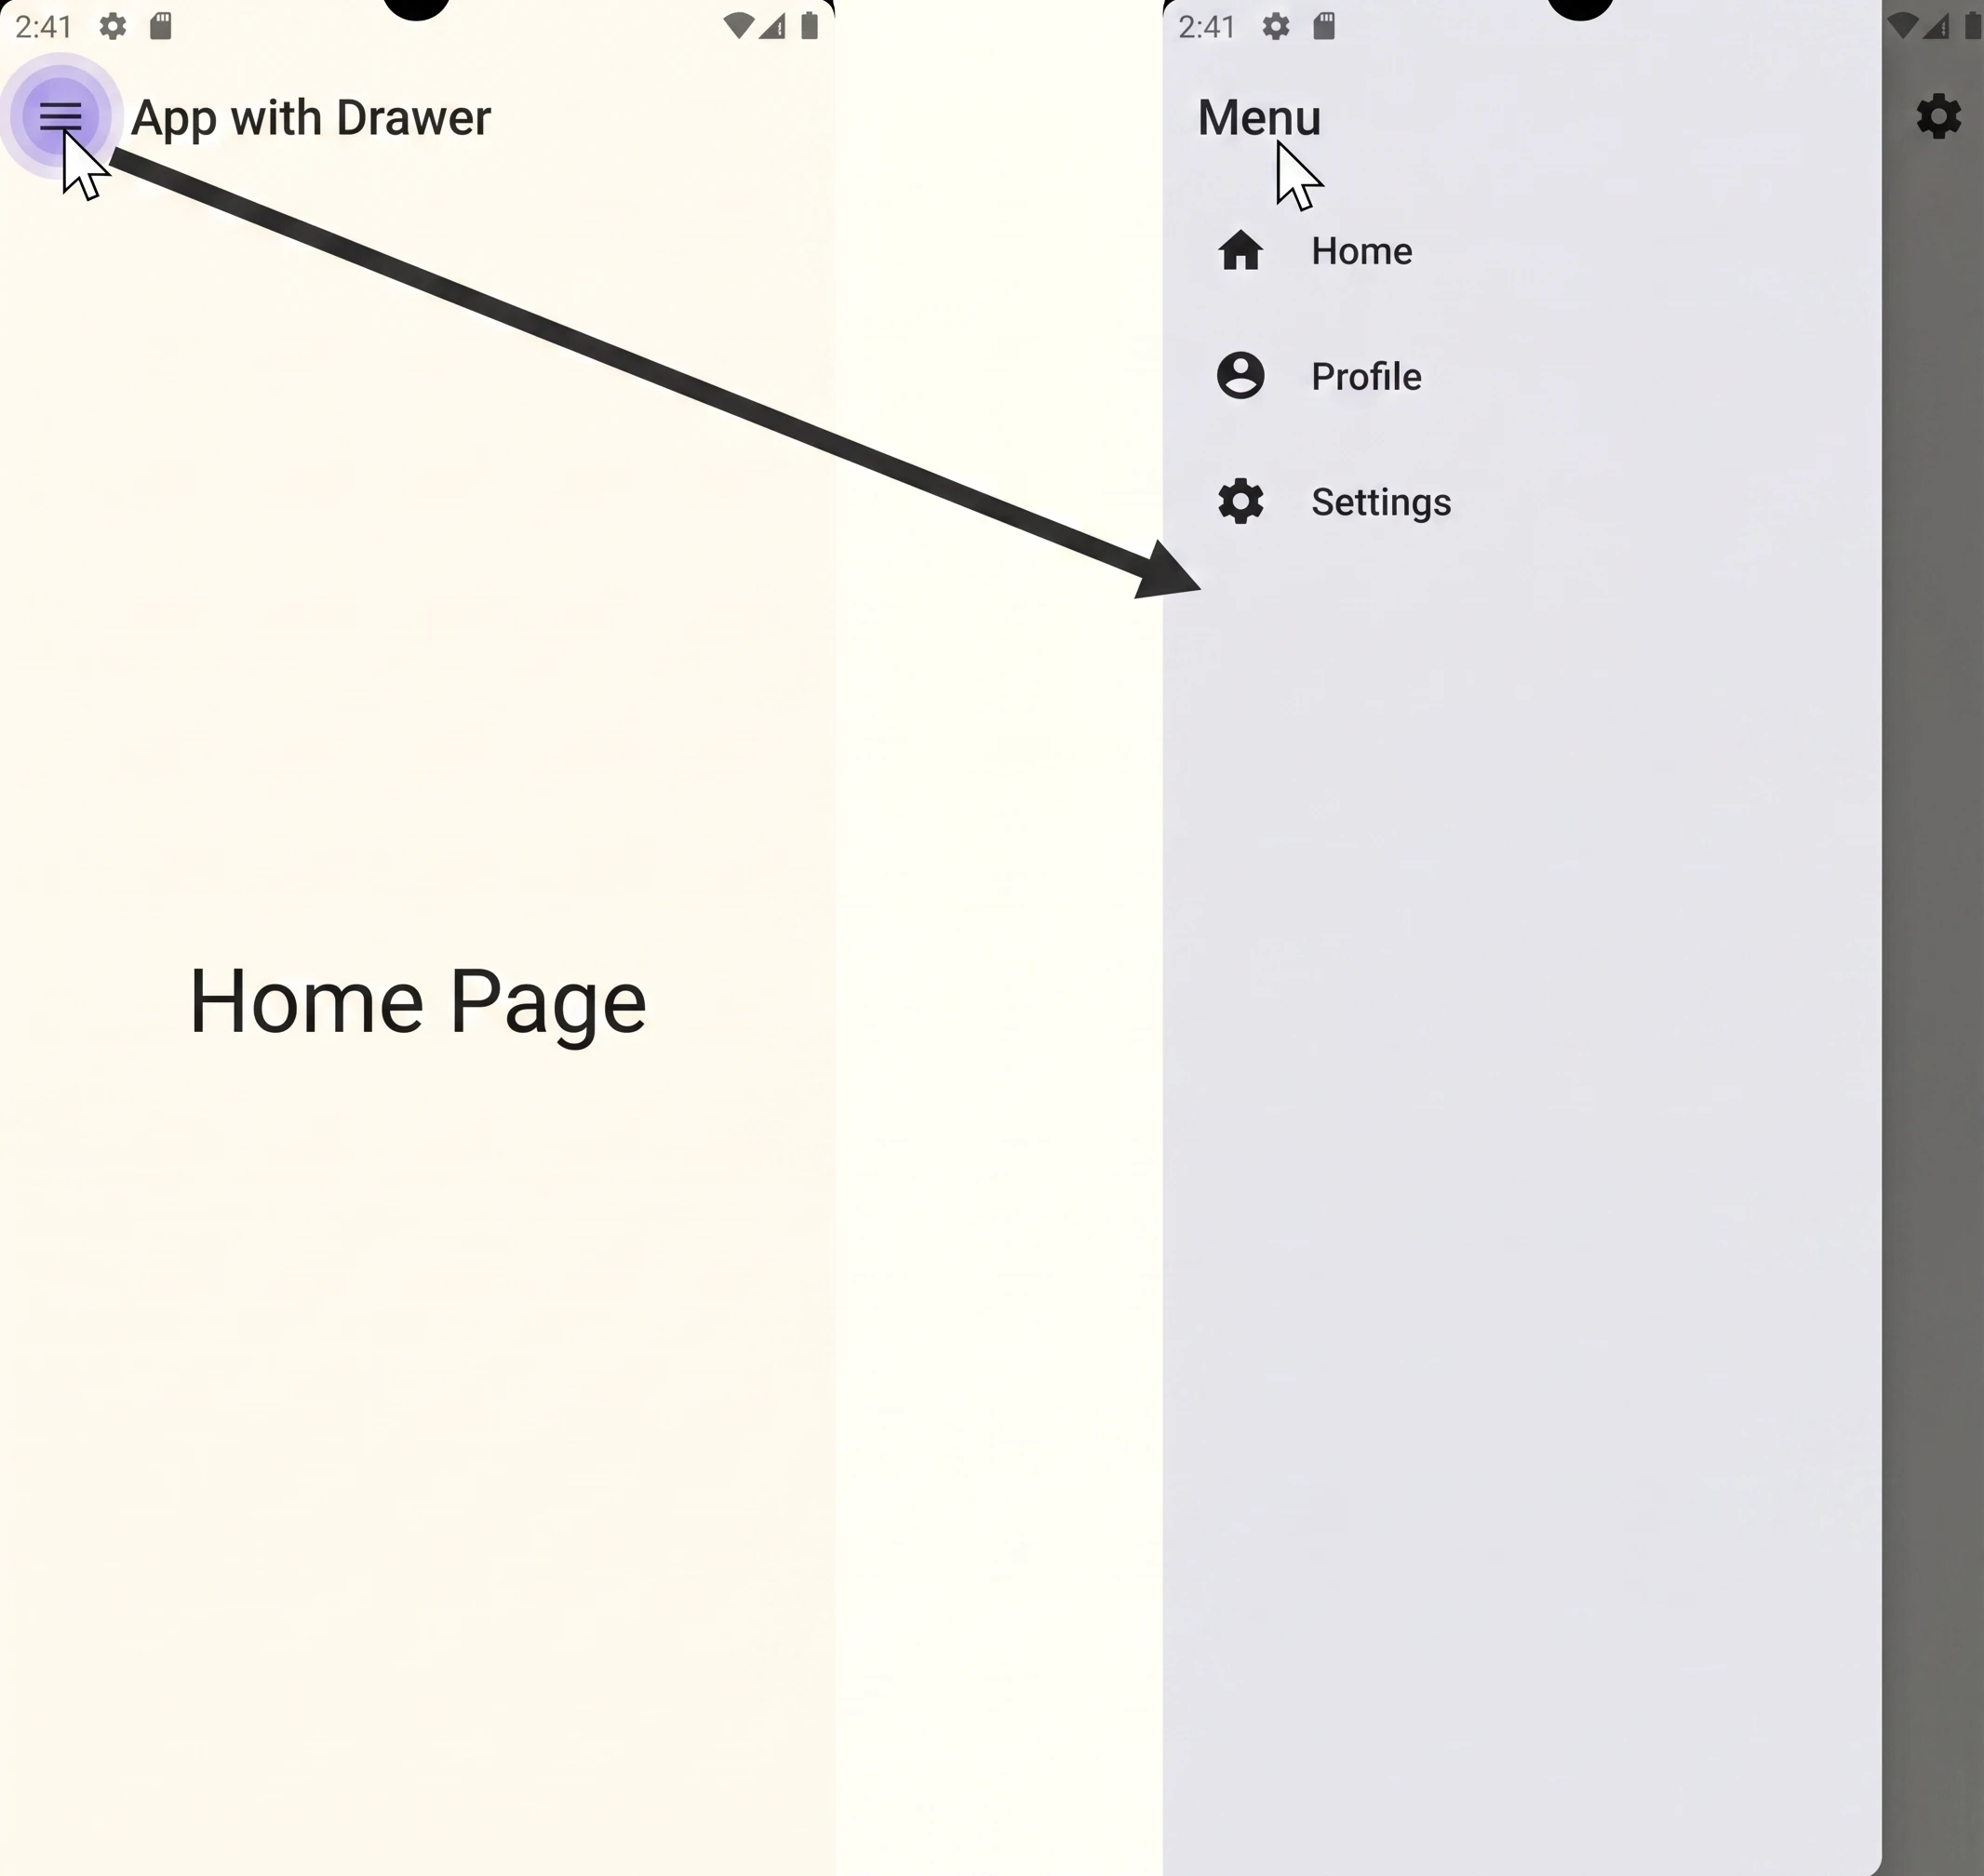
The attached code is a complete, although minimal, application demonstrating how to combine Jetpack Navigation, Scaffold and ModalNavigationDrawer. Let us go through its key elements step by step.
To work with compose navigation, we need to add the appropriate dependency to the project.
dependencies {
    implementation("androidx.navigation:navigation-compose:2.9.2")
}
The first element is the centralization of navigation routes in the data object AppDestinations object.
data object AppDestinations {
    const val HOME = "home"
    const val PROFILE = "profile"
    const val SETTINGS = "settings"
}
Centralization provides type safety and makes refactoring easier, because we change a route name in one place.
In the application, we nest several components. The hierarchy is as follows:
@OptIn(ExperimentalMaterial3Api::class)
@Composable
fun MainApp() {
    val navController = rememberNavController()
    val drawerState = rememberDrawerState(initialValue = DrawerValue.Closed)
    val scope = rememberCoroutineScope()

    ModalNavigationDrawer(
        drawerState = drawerState,
        drawerContent = {
            DrawerContent(navController = navController, drawerState = drawerState)
        }
    ) {
        Scaffold(
            topBar = {
                TopAppBar(
                    title = { Text("App with a drawer") },
                    navigationIcon = {
                        IconButton(onClick = {
                            scope.launch { drawerState.apply { if (isClosed) open() else close() } }
                        }) { Icon(Icons.Filled.Menu, contentDescription = "Menu") }
                    }
                )
            }
        ) { paddingValues ->
            NavHost(
                navController = navController,
                startDestination = AppDestinations.HOME,
                modifier = Modifier.padding(paddingValues)
            ) {
                composable(AppDestinations.HOME) { HomeScreen() }
                composable(AppDestinations.PROFILE) { ProfileScreen() }
                composable(AppDestinations.SETTINGS) { SettingsScreen() }
            }
        }
    }
}ModalNavigationDrawer: This is the top-level component that manages the logic of showing and hiding the sliding drawer. It accepts two key parameters:drawerState: the drawer state (open/closed).drawerContent: a composable function defining the content of the drawer itself (DrawerContent).Scaffold: Placed insideModalNavigationDrawer,Scaffoldprovides the standard screen structure. In this case, we use it to define thetopBar(the top app bar).NavHost: Finally, insideScaffold, we place ourNavHost. It manages the actual replacement of screen content (HomeScreen, ProfileScreen, etc.). Note the key connection:modifier = Modifier.padding(paddingValues). We pass the padding (paddingValues) obtained fromScaffold, which ensures that our content is not covered by theTopAppBar.
In the MainApp function, we can see three key state variables.
val navController = rememberNavController()
val drawerState = rememberDrawerState(initialValue = DrawerValue.Closed)
val scope = rememberCoroutineScope()
The first two are straightforward: one manages the navigation stack, while the other manages the drawer state. But why do we need scope?
The answer lies in the nature of drawerState. The methods drawerState.open() and drawerState.close() are suspend functions; more about such functions will appear in later chapters. They cannot simply be called from any place; they must run inside a coroutine. Changing drawerState automatically causes recomposition and visually opens the drawer.
{scope.launch { drawerState.apply { if (isClosed) open() else close() } }})Let us move to navigation management from inside the drawer. In the MainApp function, we added ModalNavigationDrawer, which has the drawerContent parameter. We pass the DrawerContent function as this parameter. Let us inspect its body:
@OptIn(ExperimentalMaterial3Api::class)
@Composable
fun DrawerContent(navController: NavController, drawerState: DrawerState) {
    val scope = rememberCoroutineScope()

    ModalDrawerSheet {
        Column(modifier = Modifier.padding(16.dp)) {
            Text("Menu", style = MaterialTheme.typography.headlineSmall)
            Spacer(modifier = Modifier.height(16.dp))

            NavigationDrawerItem(
                icon = { Icon(Icons.Default.Home, contentDescription = "Home screen") },
                label = { Text("Home screen") },
                selected = false,
                onClick = {
                    navController.navigate(AppDestinations.HOME)
                    scope.launch { drawerState.close() }
                }
            )
            NavigationDrawerItem(
                icon = { Icon(Icons.Default.Person, contentDescription = "Profile") },
                label = { Text("Profile") },
                selected = false,
                onClick = {
                    navController.navigate(AppDestinations.PROFILE)
                    scope.launch { drawerState.close() }
                }
            )
            NavigationDrawerItem(
                icon = { Icon(Icons.Default.Settings, contentDescription = "Settings") },
                label = { Text("Settings") },
                selected = false,
                onClick = {
                    navController.navigate(AppDestinations.SETTINGS)
                    scope.launch { drawerState.close() }
                }
            )
        }
    }
}
Inside ModalDrawerSheet, we define the elements displayed in the drawer as NavigationDrawerItem. This component follows the same slot-based layout pattern. It defines slots where elements can be inserted (icon, label, divider), which simplifies building the whole layout. After clicking an item in the drawer, we perform two actions:
- Navigate: We call
navController.navigate()to change the content ofNavHost. - Close the drawer: We launch a coroutine (
scope.launch) to calldrawerState.close().
As we can see, navigation in Jetpack Compose is much more than simply calling navController.navigate(). It is a deliberate integration of the navigation controller with other UI components, such as ModalNavigationDrawer. An important element is understanding how to manage multiple states (navController, drawerState) and how to handle asynchronous calls (the suspend functions used to open and close the drawer) with the appropriate tools, such as rememberCoroutineScope.
In the next lectures, we will go deeper into coroutines, which are the foundation of this example.
Full example code
class MainActivity : ComponentActivity() {
    override fun onCreate(savedInstanceState: Bundle?) {
        super.onCreate(savedInstanceState)
        enableEdgeToEdge()
        setContent {
            MyApplicationTheme {
                MainApp()
            }
        }
    }
}

data object AppDestinations {
    const val HOME = "home"
    const val PROFILE = "profile"
    const val SETTINGS = "settings"
}

@Composable
fun HomeScreen() {
    Box(
        modifier = Modifier.fillMaxSize(),
        contentAlignment = Alignment.Center
    ) {
        Text("Home screen", fontSize = 24.sp)
    }
}

@Composable
fun ProfileScreen() {
    Box(
        modifier = Modifier.fillMaxSize(),
        contentAlignment = Alignment.Center
    ) {
        Text("User profile", fontSize = 24.sp)
    }
}

@Composable
fun SettingsScreen() {
    Box(
        modifier = Modifier.fillMaxSize(),
        contentAlignment = Alignment.Center
    ) {
        Text("Settings", fontSize = 24.sp)
    }
}

@OptIn(ExperimentalMaterial3Api::class)
@Composable
fun MainApp() {
    val navController = rememberNavController()
    val drawerState = rememberDrawerState(initialValue = DrawerValue.Closed)
    val scope = rememberCoroutineScope()

    ModalNavigationDrawer(
        drawerState = drawerState,
        drawerContent = {
            DrawerContent(navController = navController, drawerState = drawerState)
        }
    ) {
        Scaffold(
            topBar = {
                TopAppBar(
                    title = { Text("App with a drawer") },
                    navigationIcon = {
                        IconButton(onClick = {
                            scope.launch { drawerState.apply { if (isClosed) open() else close() } }
                        }) { Icon(Icons.Filled.Menu, contentDescription = "Menu") }
                    }
                )
            }
        ) { paddingValues ->
            NavHost(
                navController = navController,
                startDestination = AppDestinations.HOME,
                modifier = Modifier.padding(paddingValues)
            ) {
                composable(AppDestinations.HOME) { HomeScreen() }
                composable(AppDestinations.PROFILE) { ProfileScreen() }
                composable(AppDestinations.SETTINGS) { SettingsScreen() }
            }
        }
    }
}


@OptIn(ExperimentalMaterial3Api::class)
@Composable
fun DrawerContent(navController: NavController, drawerState: DrawerState) {
    val scope = rememberCoroutineScope()

    ModalDrawerSheet {
        Column(modifier = Modifier.padding(16.dp)) {
            Text("Menu", style = MaterialTheme.typography.headlineSmall)
            Spacer(modifier = Modifier.height(16.dp))

            NavigationDrawerItem(
                icon = { Icon(Icons.Default.Home, contentDescription = "Home screen") },
                label = { Text("Home screen") },
                selected = false,
                onClick = {
                    navController.navigate(AppDestinations.HOME)
                    scope.launch { drawerState.close() }
                }
            )
            NavigationDrawerItem(
                icon = { Icon(Icons.Default.Person, contentDescription = "Profile") },
                label = { Text("Profile") },
                selected = false,
                onClick = {
                    navController.navigate(AppDestinations.PROFILE)
                    scope.launch { drawerState.close() }
                }
            )
            NavigationDrawerItem(
                icon = { Icon(Icons.Default.Settings, contentDescription = "Settings") },
                label = { Text("Settings") },
                selected = false,
                onClick = {
                    navController.navigate(AppDestinations.SETTINGS)
                    scope.launch { drawerState.close() }
                }
            )
        }
    }
}
Nested navigation
Let us move to the second example, where we will explore the idea of creating nested navigation graphs.
Assume that our application has more than three simple screens. Almost every commercial application has at least two separate flows:
- Authentication flow: login, registration, password reset.
- Main application flow: home screen, profile, settings, etc.
The problem is that these two flows have completely different rules. Most importantly, when the user logs in successfully, they should move to the home screen, and the entire authentication flow should disappear from history. Pressing the Back button on the home screen should not return to the login screen, but should close the application. This can be achieved with nested navigation.
Let us analyze a simple example that shows this solution. Instead of treating NavHost as one large container, we treat it as a folder that can contain both individual files (screens) and other folders (nested graphs).
Instead of using raw strings directly in the code, a good practice is to create an object that stores all routes in one place:
data object AppDestinations {
    // Graphs
    const val AUTH_GRAPH = "auth_graph"
    const val MAIN_APP_GRAPH = "main_app_graph"

    // Authentication screens
    const val LOGIN = "login"
    const val REGISTER = "register"
    const val FORGOT_PASSWORD = "forgot_password"

    // Main application screens
    const val WELCOME = "welcome"
    const val PROFILE = "profile"
}
Notice that our application will have two main subgraphs: AUTH_GRAPH and MAIN_APP_GRAPH.
Let us look at the main NavHost in SimpleNestedNavApp. It is strikingly simple:
NavHost(
    navController = navController,
    startDestination = AppDestinations.AUTH_GRAPH
) {
    // Authentication graph (login, registration, etc.)
    authGraph(navController)

    // Main application graph after login
    mainAppGraph(navController)
}
Notice:
startDestinationis not a screen. It isAUTH_GRAPH, meaning the entire nested graph. The application starts by entering the authentication folder.- Inside
NavHost, there is not a singlecomposable()defining a screen. Instead, there are only two functions (authGraphandmainAppGraph) that define whole groups of screens.
The main NavHost does not need to know anything about the login screen or the profile screen; it only needs to know about the existence of the authentication flow and the main flow.
As the application grows, NavHost becomes harder to read. The solution is to split it into nested graphs using extension functions for NavGraphBuilder:
fun NavGraphBuilder.authGraph(navController: NavController) {
    navigation(
        startDestination = AppDestinations.LOGIN,
        route = AppDestinations.AUTH_GRAPH
    ) {
        composable(AppDestinations.LOGIN) {
            LoginScreen(navController) }
        composable(AppDestinations.REGISTER) {
            RegisterScreen(navController) }
        composable(AppDestinations.FORGOT_PASSWORD) {
            ForgotPasswordScreen(navController) }
    }
}

fun NavGraphBuilder.mainAppGraph(navController: NavController) {
    navigation(
        startDestination = AppDestinations.WELCOME,
        route = AppDestinations.MAIN_APP_GRAPH
    ) {
        composable(AppDestinations.WELCOME) {
            WelcomeScreen(navController) }
        composable(AppDestinations.PROFILE) {
            ProfileScreen(navController) }
    }
}
Understanding this block is essential:
fun NavGraphBuilder.authGraph(...): This is pure code organization. Instead of clutteringNavHost, we group the logic in a separate function.navigation(...): This is the actual constructor of a nested graph.route = AppDestinations.AUTH_GRAPH: We give the entire folder a name. Now we can navigate to it.startDestination = AppDestinations.LOGIN: We define which screen is the default inside this graph.
mainAppGraph has the same structure and groups the WELCOME and PROFILE screens.
We have two separate worlds: AUTH_GRAPH and MAIN_APP_GRAPH. How do we jump from one to the other and, most importantly, clean up after ourselves?
Let us look at the navigateToMainApp() function, called after successful login:
fun NavController.navigateToMainApp() {
    this.navigate(AppDestinations.MAIN_APP_GRAPH) {
        popUpTo(AppDestinations.AUTH_GRAPH) {
            inclusive = true
        }
    }
}
This is the most important code fragment in the whole example. Let us break it down:
navigate(AppDestinations.MAIN_APP_GRAPH): We say navigate to the main graph.NavControllerautomatically directs us to that graph'sstartDestination, which isWELCOME.popUpTo(AppDestinations.AUTH_GRAPH): This is the cleanup command. It moves up the back stack until it findsAUTH_GRAPH.inclusive = true: AfterAUTH_GRAPHis found on the stack, it is removed as well.
Let us trace the execution. The user clicks Log in. Then NavController:
- finds the
AUTH_GRAPHgraph on the back stack, - removes
LOGIN, REGISTER, FORGOT_PASSWORDandAUTH_GRAPHitself from the stack, - adds
MAIN_APP_GRAPHwith theWELCOMEscreen to the stack.
The back stack is clean. It contains only MAIN_APP_GRAPH. If the user presses the Back button now, they will not return to the login screen. They will leave the application. We have achieved exactly the flow users expect.
Nested navigation is a fundamental organization tool in every application that has more than one logical flow. As we saw in the code, this pattern provides three key benefits:
- Organization: it groups related screens.
- Modularity: it keeps the main
NavHostclean and lets us define flows in separate functions. - Back stack control: it allows navigation between entire flows and removes them from history with one command.
Full example code
class MainActivity : ComponentActivity() {
override fun onCreate(savedInstanceState: Bundle?) {
super.onCreate(savedInstanceState)
enableEdgeToEdge()
setContent {
NestedComposeGraphTheme {
SimpleNestedNavApp()
}
}
}
}
data object AppDestinations {
// Graphs
const val AUTH_GRAPH = "auth_graph"
const val MAIN_APP_GRAPH = "main_app_graph"
// Authentication screens
const val LOGIN = "login"
const val REGISTER = "register"
const val FORGOT_PASSWORD = "forgot_password"
// Main application screens
const val WELCOME = "welcome"
const val PROFILE = "profile"
}
@Composable
fun SimpleNestedNavApp() {
val navController = rememberNavController()
NavHost(
navController = navController,
startDestination = AppDestinations.AUTH_GRAPH
) {
// Authentication graph (login, registration, etc.)
authGraph(navController)
// Main application graph after login
mainAppGraph(navController)
}
}
fun NavGraphBuilder.authGraph(navController: NavController) {
navigation(
startDestination = AppDestinations.LOGIN,
route = AppDestinations.AUTH_GRAPH
) {
composable(AppDestinations.LOGIN) {
LoginScreen(navController) }
composable(AppDestinations.REGISTER) {
RegisterScreen(navController) }
composable(AppDestinations.FORGOT_PASSWORD) {
ForgotPasswordScreen(navController) }
}
}
fun NavGraphBuilder.mainAppGraph(navController: NavController) {
navigation(
startDestination = AppDestinations.WELCOME,
route = AppDestinations.MAIN_APP_GRAPH
) {
composable(AppDestinations.WELCOME) {
WelcomeScreen(navController) }
composable(AppDestinations.PROFILE) {
ProfileScreen(navController) }
}
}
@Composable
fun LoginScreen(navController: NavController) {
Column(
modifier = Modifier.fillMaxSize().padding(16.dp),
verticalArrangement = Arrangement.Center,
horizontalAlignment = Alignment.CenterHorizontally
) {
Text("Login", fontSize = 28.sp)
Spacer(Modifier.height(24.dp))
Button(onClick = { navController.navigateToMainApp() }) {
Text("Log in")
}
Spacer(Modifier.height(12.dp))
Button(onClick = { navController.navigate(AppDestinations.REGISTER) }) {
Text("Go to registration")
}
Spacer(Modifier.height(12.dp))
TextButton(onClick = { navController.navigate(AppDestinations.FORGOT_PASSWORD) }) {
Text("I forgot my password")
}
}
}
@Composable
fun RegisterScreen(navController: NavController) {
Column(
modifier = Modifier.fillMaxSize().padding(16.dp),
verticalArrangement = Arrangement.Center,
horizontalAlignment = Alignment.CenterHorizontally
) {
Text("Registration", fontSize = 28.sp)
Spacer(Modifier.height(24.dp))
Button(onClick = { navController.navigateToMainApp() }) {
Text("Register and log in")
}
Spacer(Modifier.height(12.dp))
TextButton(onClick = { navController.popBackStack() }) {
Text("Back to login")
}
}
}
@Composable
fun ForgotPasswordScreen(navController: NavController) {
Column(
modifier = Modifier.fillMaxSize().padding(16.dp),
verticalArrangement = Arrangement.Center,
horizontalAlignment = Alignment.CenterHorizontally
) {
Text("Password reset", fontSize = 24.sp, textAlign = TextAlign.Center)
Spacer(Modifier.height(24.dp))
Button(onClick = { navController.popBackStack() }) {
Text("Back")
}
}
}
@Composable
fun WelcomeScreen(navController: NavController) {
Column(
modifier = Modifier.fillMaxSize().padding(16.dp),
verticalArrangement = Arrangement.Center,
horizontalAlignment = Alignment.CenterHorizontally
) {
Text("Welcome to the app! 🎉", fontSize = 28.sp)
Spacer(Modifier.height(24.dp))
Button(onClick = { navController.navigate(AppDestinations.PROFILE) }) {
Text("View my profile")
}
}
}
@Composable
fun ProfileScreen(navController: NavController) {
Column(
modifier = Modifier.fillMaxSize().padding(16.dp),
verticalArrangement = Arrangement.Center,
horizontalAlignment = Alignment.CenterHorizontally
) {
Text("Profile screen 🧑💻", fontSize = 28.sp)
Spacer(Modifier.height(24.dp))
Button(onClick = { navController.popBackStack() }) {
Text("Back to the welcome screen")
}
}
}
fun NavController.navigateToMainApp() {
this.navigate(AppDestinations.MAIN_APP_GRAPH) {
popUpTo(AppDestinations.AUTH_GRAPH) {
inclusive = true
}
}
}The frozen UI problem and callback hell - the main thread
Before we go deeper into what coroutines are, we need to understand the fundamental problem that Android developers have had to deal with since the early days of the platform. This problem comes from one key concept: the Main Thread.
Every Android application you run lives and dies inside one main process. Inside that process there is one extremely important thread, known as the Main Thread or the UI Thread.
This thread is responsible for everything the user sees and interacts with:
- Drawing the interface: updating views and calling
@Composablefunctions. - Handling events: reacting to clicks, scrolling and text input.
- Animations: smoothly moving elements on the screen.
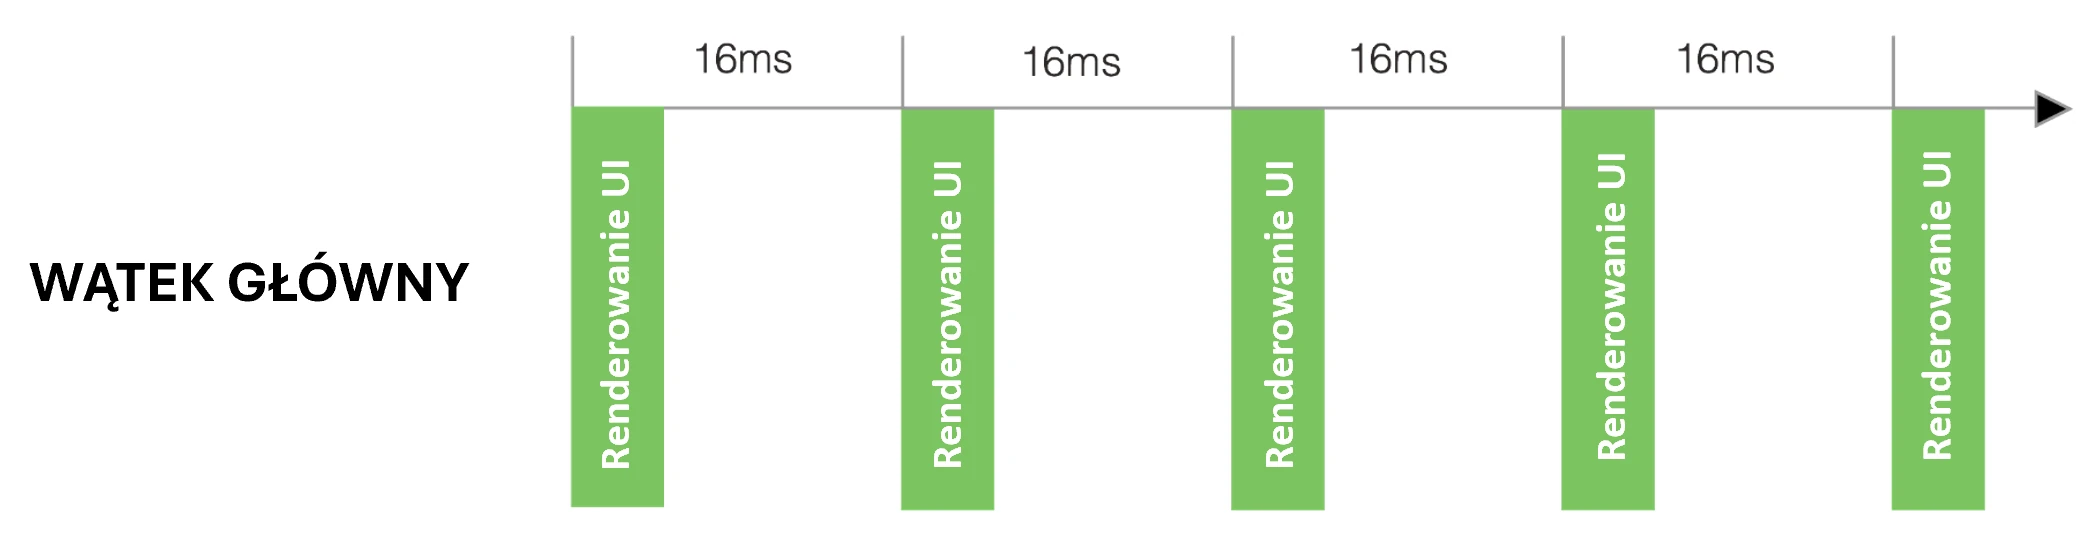
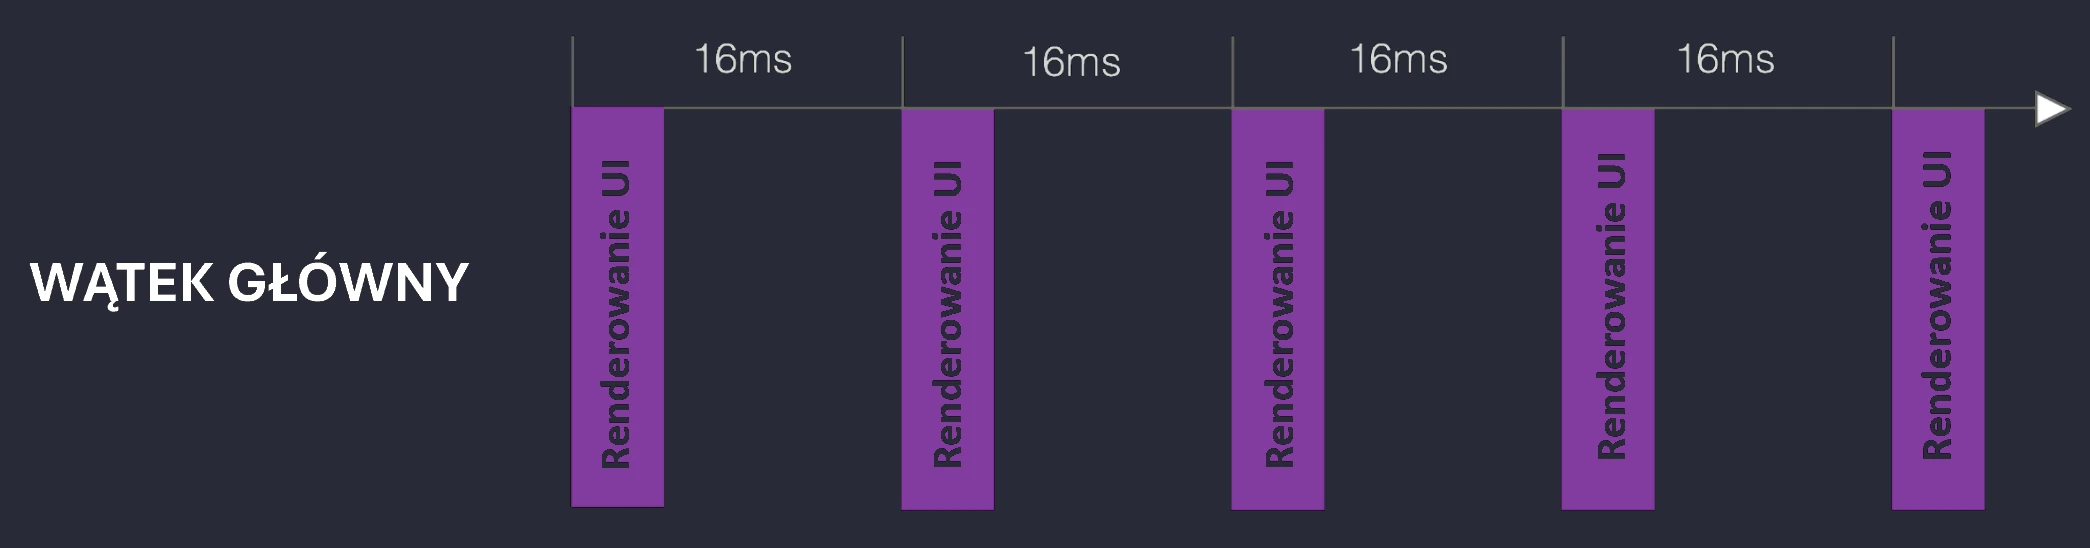
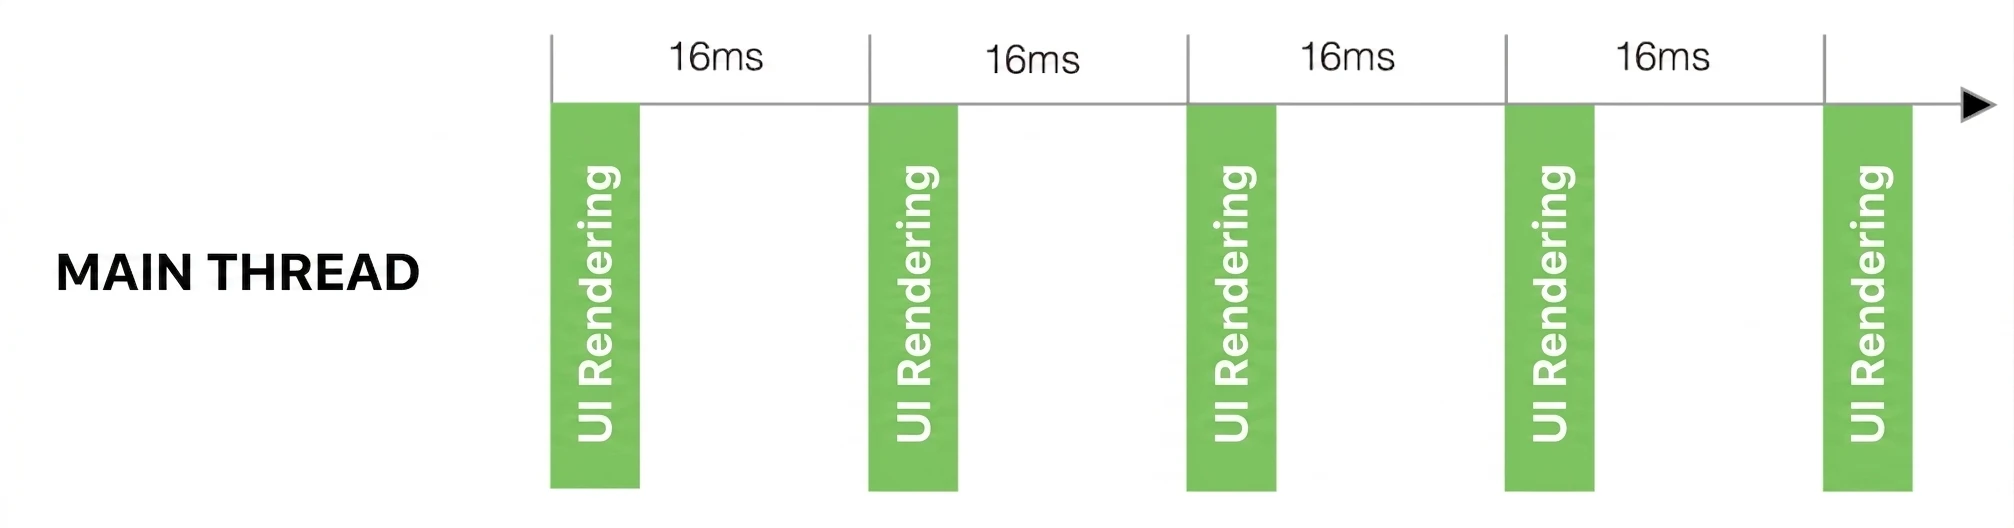
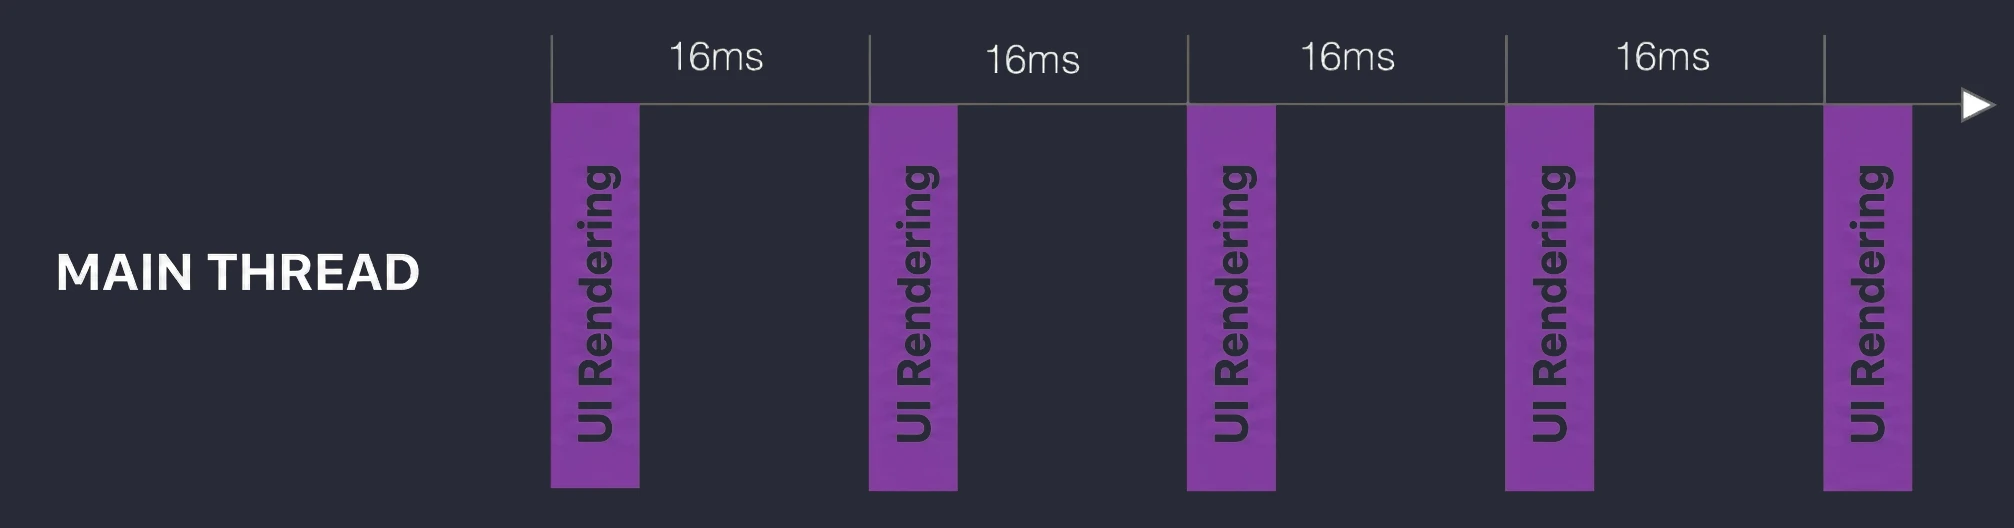
The UI thread is essentially an infinite event loop that must run at least at 60 frames per second (newer devices can refresh at 144 Hz). If it ever stops working, even for a fraction of a second, the user immediately notices it. The application stutters and lags. On 60 Hz screens, we have about 16 ms to perform all operations, including UI rendering (Fig. 2.1).
Let us analyze an example:
class MainActivity : ComponentActivity() {
    override fun onCreate(savedInstanceState: Bundle?) {
        super.onCreate(savedInstanceState)
        enableEdgeToEdge()
        setContent {
            AnrappTheme {
                BlockingUiDemoScreen()
            }
        }
    }
}

@Composable
fun BlockingUiDemoScreen() {
    var statusText by remember { mutableStateOf("Press the button to start the operation.") }

    Column(
        modifier = Modifier
            .fillMaxSize()
            .padding(24.dp).background(Color.Cyan),
        horizontalAlignment = Alignment.CenterHorizontally,
        verticalArrangement = Arrangement.Center
    ) {
        Text(
            text = "UI thread blocking demonstration",
        )
        Spacer(modifier = Modifier.height(50.dp))

        Text(
            text = statusText,
            fontSize = 18.sp,
            textAlign = TextAlign.Center,
            modifier = Modifier.height(80.dp)
        )
        Spacer(modifier = Modifier.height(20.dp))

        Button(
            onClick = {
                statusText = "Operation started..."

                try {
                    Thread.sleep(10000)
                } catch (e: InterruptedException) {
                }

                statusText = "Operation completed!"
            },
            modifier = Modifier.fillMaxWidth()
        ) {
            Text("Run a 10-second blocking operation")
        }
        Spacer(modifier = Modifier.height(40.dp))

        var sliderPosition by remember { mutableStateOf(0f) }
        Slider(
            value = sliderPosition,
            onValueChange = { sliderPosition = it }
        )
    }
}
Notice that the UI contains a button and a slider. Inside the button's onClick function we have the following code:
Button(
    onClick = {
        statusText = "Operation started..."

        try {
            Thread.sleep(10000)
        } catch (e: InterruptedException) {
        }

        statusText = "Operation completed!"
    },
    modifier = Modifier.fillMaxWidth()
) {
    Text("Run a 10-second blocking operation")
}
We call Thread.sleep(10000), which blocks the UI thread for 10 seconds. During this time:
- The button will not show its click animation.
- Other animations on the screen will be frozen.
- If the user interacts with the screen in any way, they will receive no response.
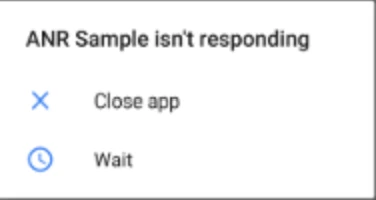
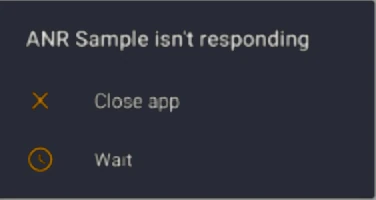
The Android operating system quickly notices that our application is not responding to events. After a few seconds it displays the message Application Not Responding (ANR) (Fig. 2.2).


All long-running operations, such as downloading data from the network, reading from a database or performing complex calculations, must run in the background.
For years, before coroutines appeared, background work meant manual thread management. If a developer wanted to download data from the network after clicking a button, the plan had to look like this:
- In
onClick(UI thread): create a new manualThreadobject. - In the
run()method of the new thread (background thread): perform the time-consuming network operation. - After the operation finishes: obtain the result, for example user data.
- Problem: you cannot update the UI, for example a
TextView, from this background thread. Doing so will crash the application. - Solution: create a
Handlerobject associated with the UI thread. - Use
handler.post {... }to send the result back to the UI thread, which is the only thread allowed to update the interface safely.
This process was complicated, but it became even worse when operations depended on one another. Imagine downloading user data, then using it to download the user's photo, and finally saving it in a database:
button.setOnClickListener(v -> {
    // 1. Move to the background to fetch the user
    new Thread(() -> {
        User user = api.fetchUser("123");

        // 2. Move to the background again to fetch the photo
        new Thread(() -> {
            ProfilePicture pic = api.fetchPicture(user.getPictureUrl());

            // 3. Move to the background one more time to save it in the database
            new Thread(() -> {
                database.save(pic);

                // 4. Return to the UI thread to show success
                mainThreadHandler.post(() -> {
                    imageView.setImage(pic);
                    textView.setText("Done!");
                });
            }).start();
        }).start();
    }).start();
});
What we see above is callback hell. The code becomes a pyramid of nested calls. It is practically unreadable, impossible to test, and error handling at every step becomes a nightmare.
This is the problem that led to a revolution. We needed a way to write asynchronous code that looked like simple synchronous code, without callbacks and without manually managing threads.
Coroutines
Introduction
After identifying the fundamental problem of blocking the Main Thread, the natural question is: What is the alternative?. For years, many solutions were tried, but Kotlin introduced the model that revolutionized Android programming: coroutines.
To understand their power, we need to define precisely what they are and what they are not.
The most common definition you will encounter says that a coroutine is a lightweight thread. This is a useful simplification, because it helps us understand that coroutines, like threads, can perform some work in the background. However, this comparison is also misleading because it hides their most important property. NOTE!!! - A coroutine is not a thread.
A better and more precise definition is: a suspendable computation.
Think of a coroutine not as a worker, but as a task or a unit of work that can be stopped (suspended) at any moment and resumed later, without blocking the worker (thread) that executes it.
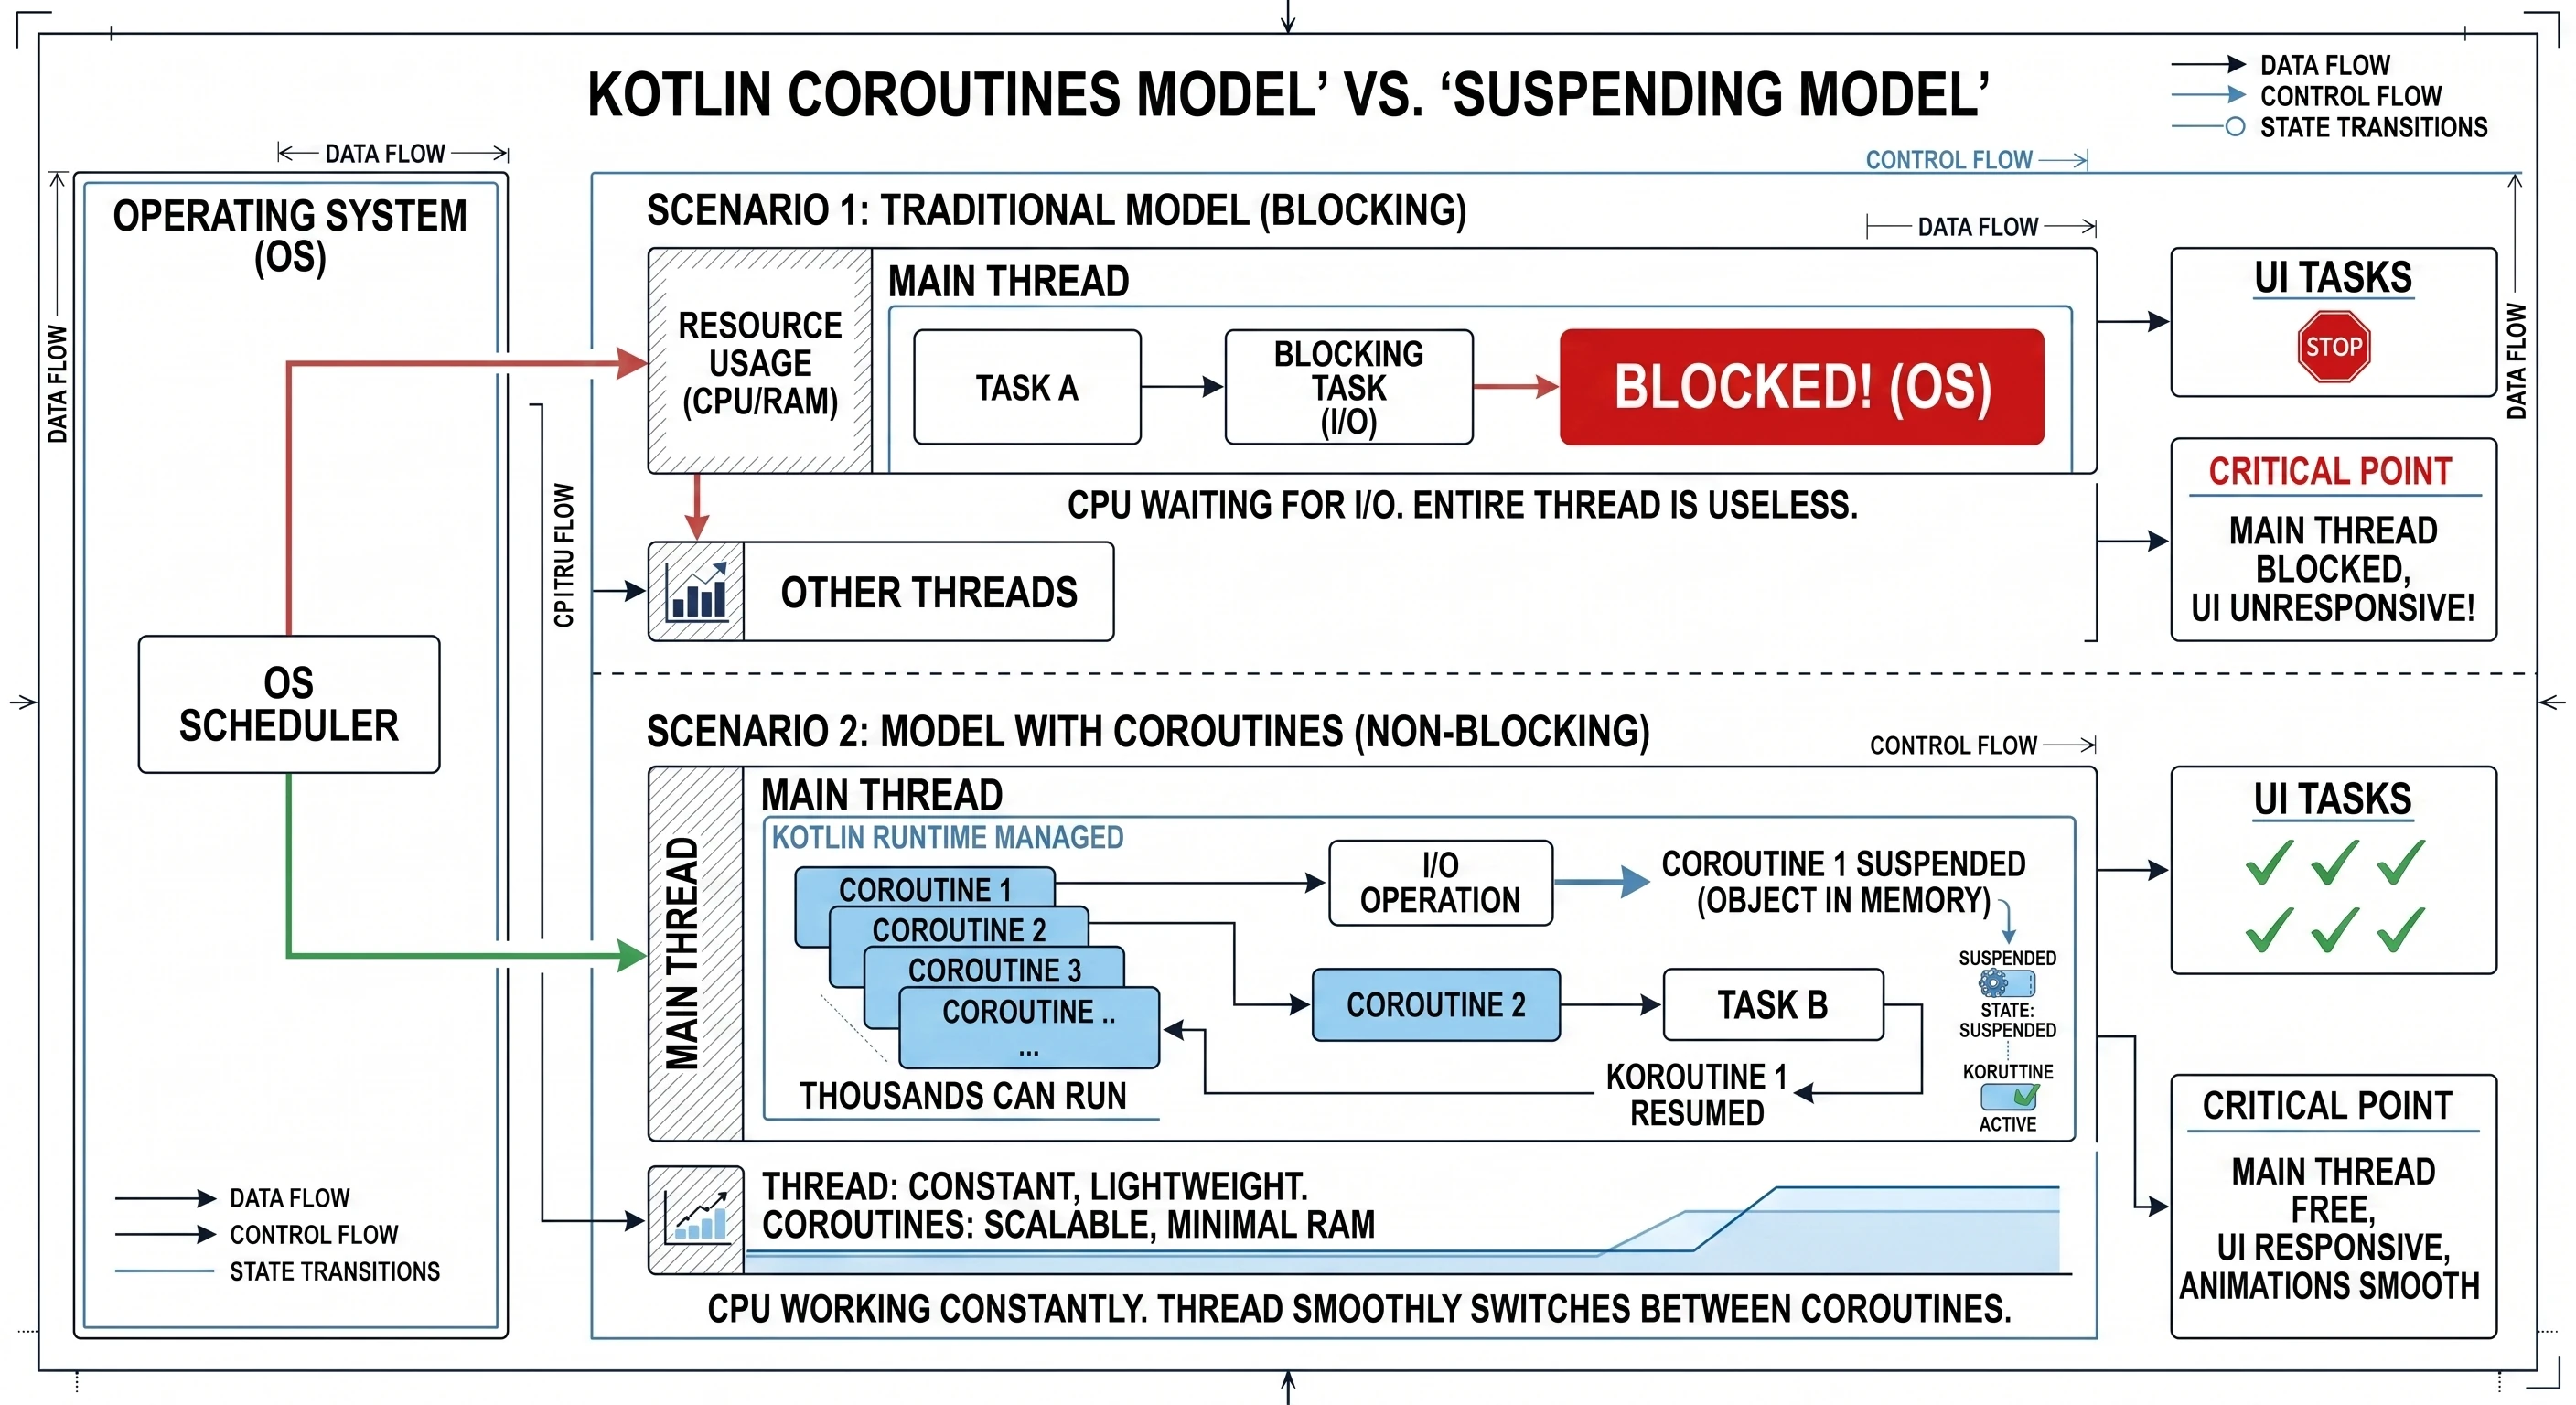
Key difference: coroutine versus thread
- A Thread is managed by the Operating System (OS). It is heavy; creating and maintaining it consumes significant system resources. Switching between threads is costly for the CPU because the system must save the state of one thread and load the state of another.
- A Coroutine is managed by the Kotlin runtime. It is lightweight; in practice, it is an object in memory that tracks the state of a running task. Thousands, or even millions, of coroutines can be launched and managed by a single thread. Switching between coroutines is almost free.
A coroutine is not a thread. A coroutine runs on a thread.
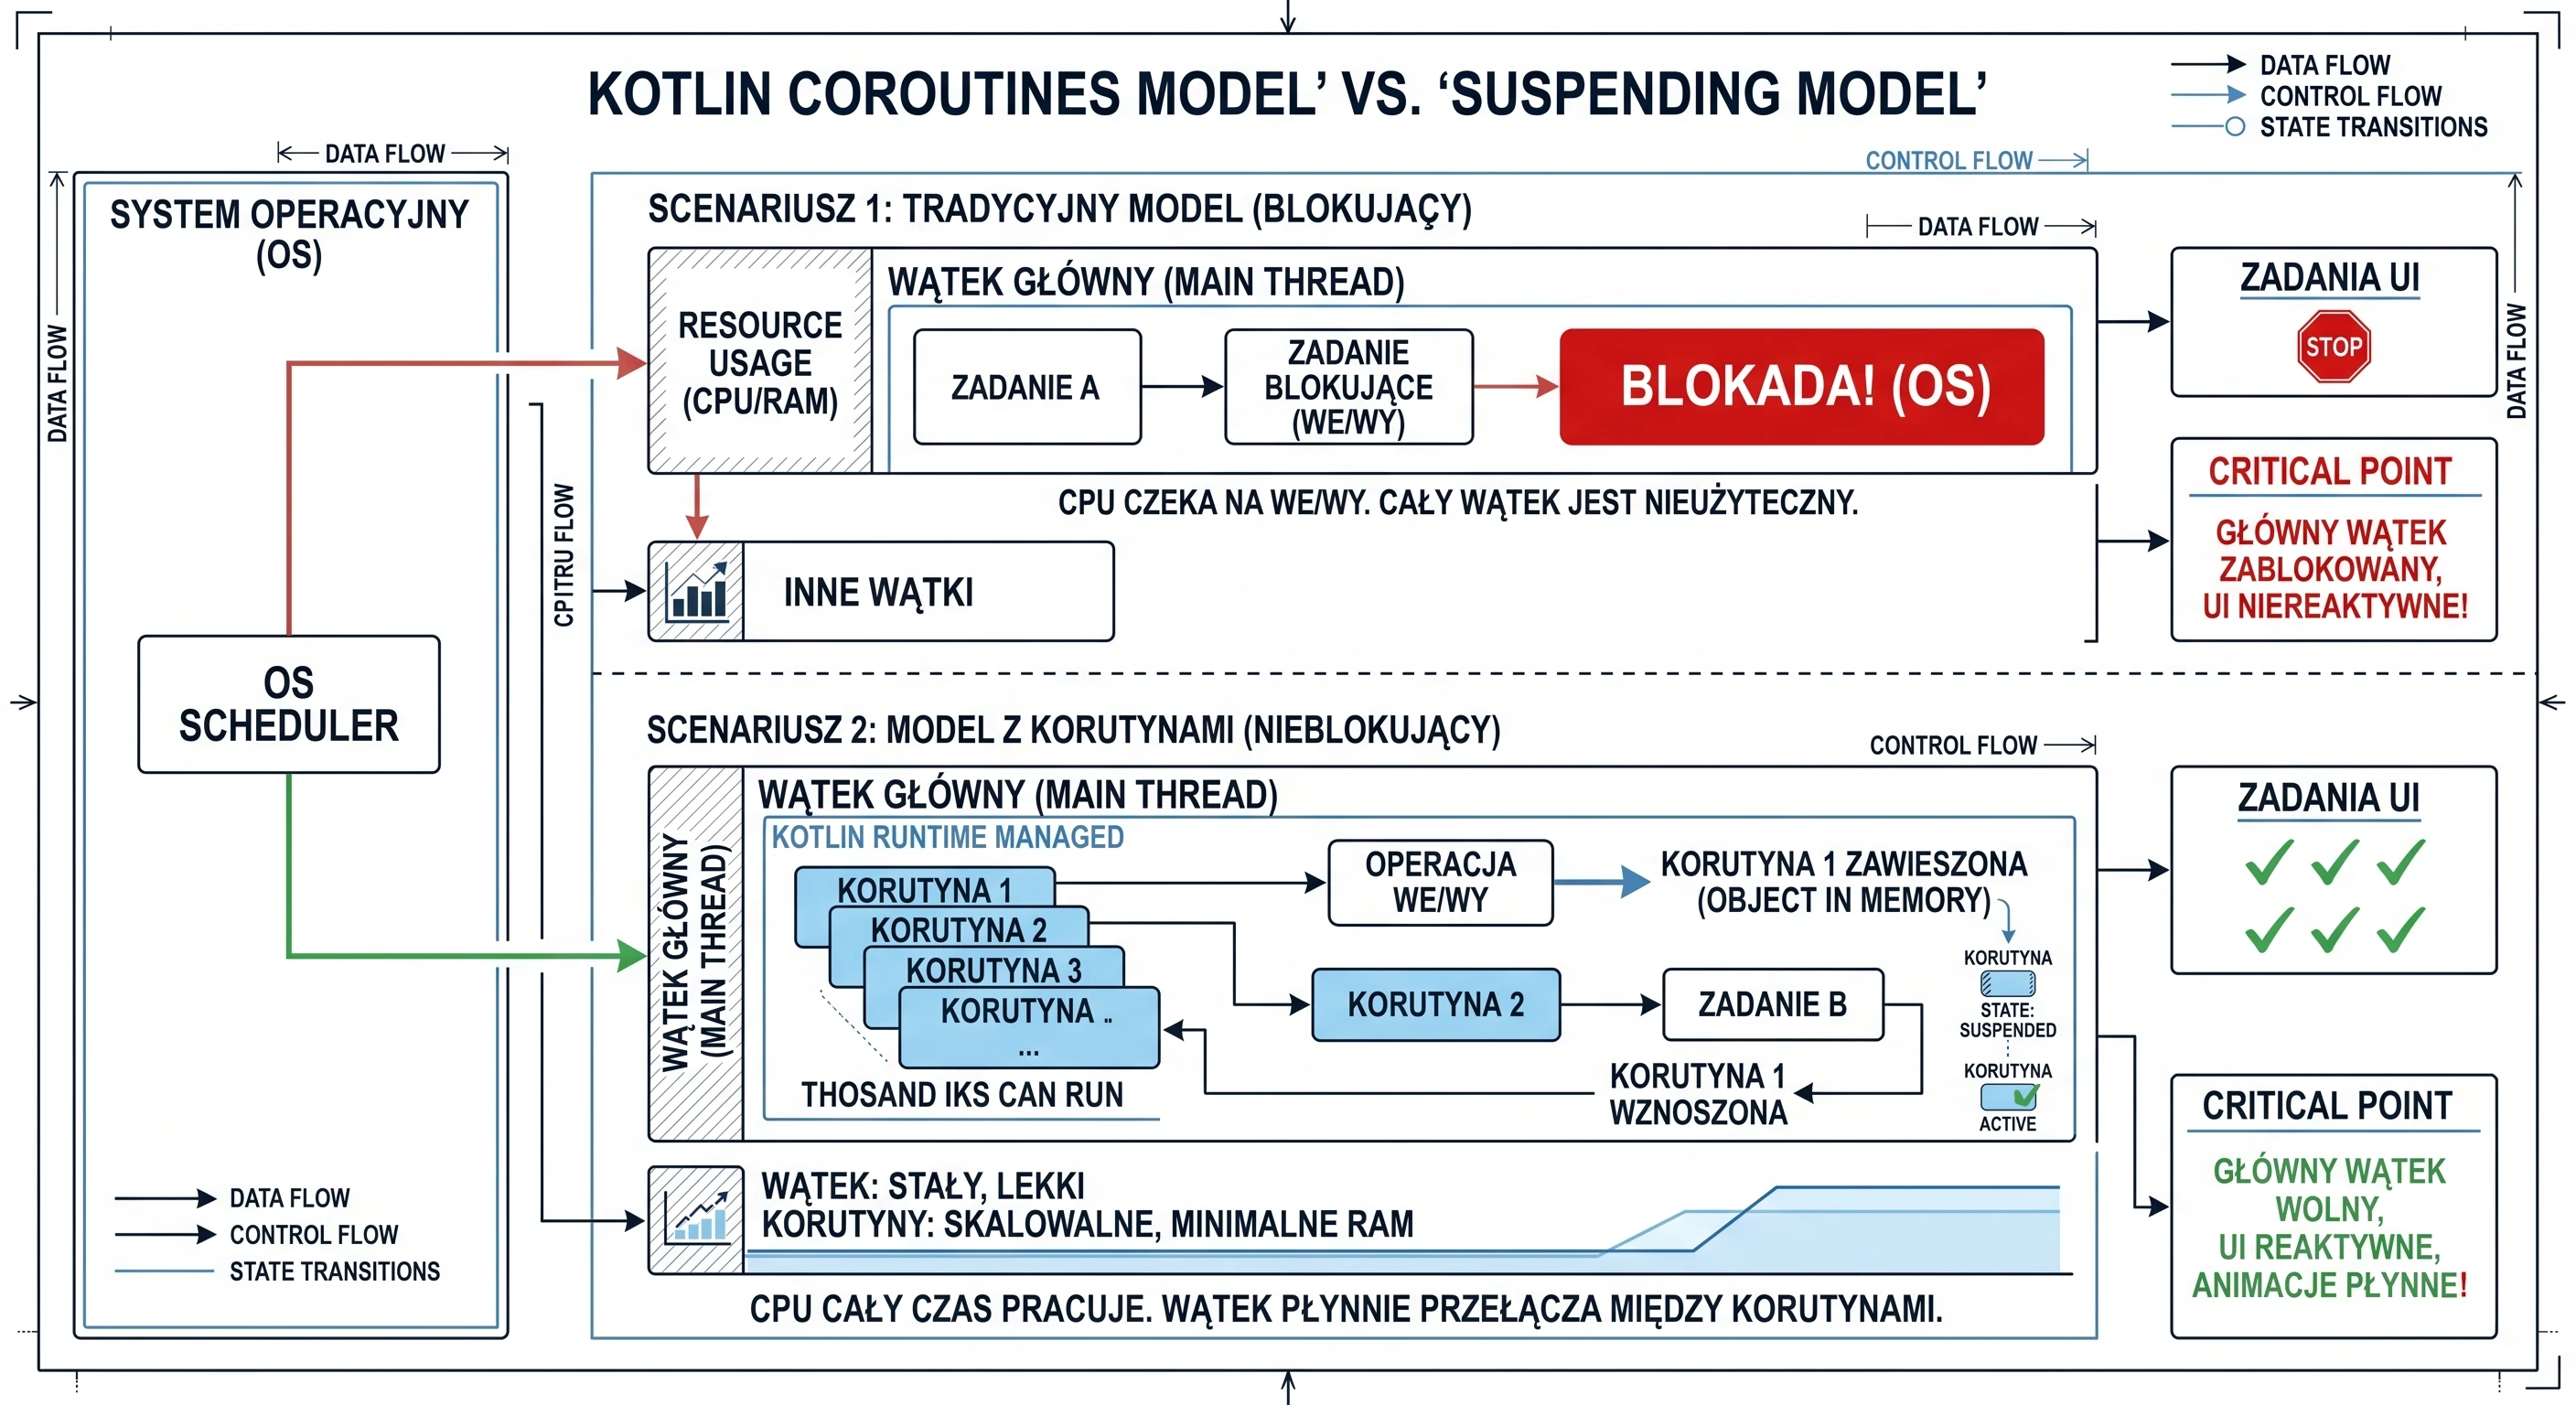
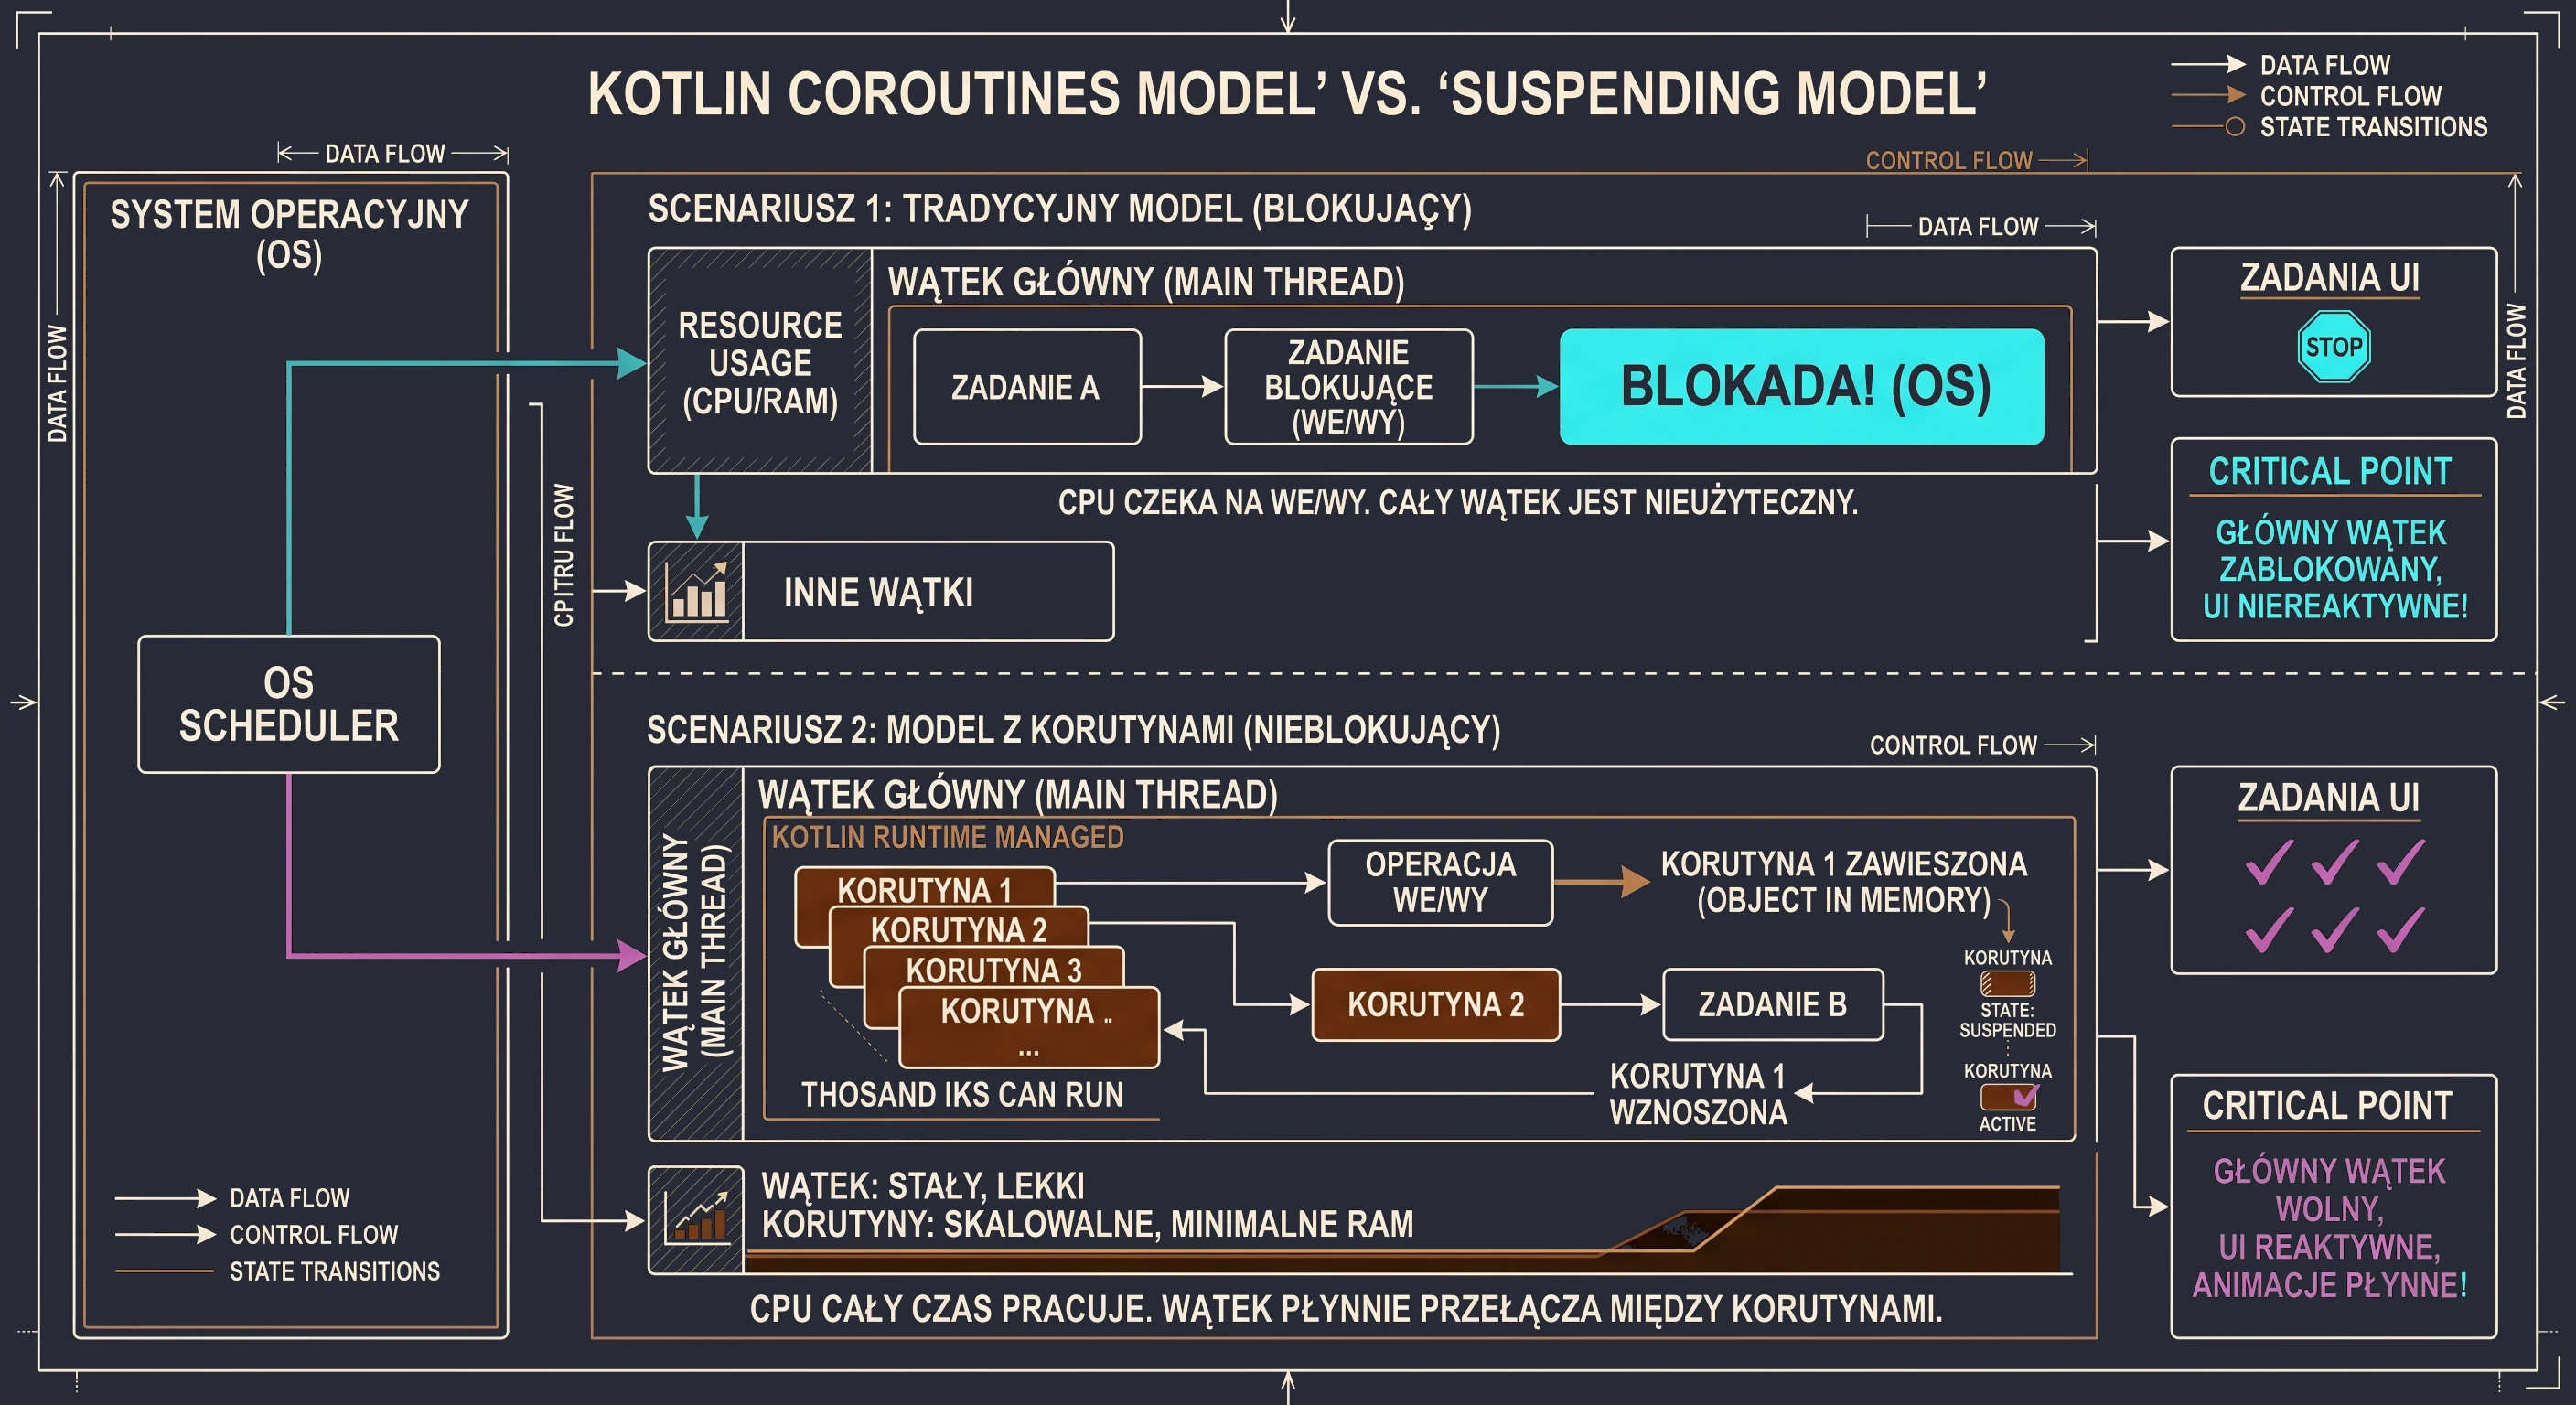
Imagine a kitchen (our application) and a cook (a thread).
Scenario 1: The cook as a traditional thread (blocking model). The cook (UI thread) takes a recipe (task). The first step says: Boil water for 5 minutes. The cook turns on the stove and then stands idle for 5 minutes, staring at the pot. During that time, chaos spreads through the kitchen. The phone rings (user interaction), new guests arrive (animations), but the cook is blocked. They cannot do anything else until the water boils. This is exactly what Thread.sleep() does.
Scenario 2: The cook with coroutines (non-blocking model). The same cook (the same UI thread) takes the same recipe, now represented as a coroutine. The recipe says: Boil water for 5 minutes. The cook starts boiling the water (initiates an I/O operation), then suspends the recipe and puts it aside. Since their hands are free, they immediately move to another task, for example chopping vegetables (handling a click) or seasoning a salad (drawing an animation). When, after 5 minutes, the kettle whistles (the background operation has completed), the cook resumes the first recipe and continues from where it stopped.
In this model, one cook (one thread) juggles many recipes (coroutines) at the same time and never wastes time waiting idly. Let us add here that what we call suspension is not a pause of all work. It is a pause of this specific coroutine on this specific thread. We will explain in a moment who actually performs the work of boiling the water.
Worker thread
We need to clarify what the recipe is in our analogy. It is an entity that we call a function whose execution can be suspended, namely suspend fun.
suspend fun relates to a coroutine in the same way that a class relates to an instance of that class; we can have many instances of the same class:
suspend funis a definition or a blueprint. It is only a definition of steps to execute. By itself, it does nothing. It is not active. It does not have a state such as running or suspended.- A coroutine is an instance or active execution of that blueprint. It is created when you take a
suspend fun(or anysuspendcode block) and actually run it. A coroutine has a state: active, suspended or cancelled. It is the worker that performs the steps from the blueprint.
When you write scope.launch {... } in code (we will explain scope shortly), this launch code block, called a coroutine builder, creates and starts a new coroutine, a new instance of work. This new, live coroutine starts executing the code inside the {...} block. It can work as follows:
- The coroutine (instance) calls a
suspend fun(blueprint). - This
suspend fun, for exampledelay, tells the coroutine: I need to wait for 1 second now. You can suspend me. - The coroutine (instance) moves to the suspended state. It releases the cook (thread), which can do something else, for example handle the UI.
- After 1 second,
delaycompletes. - The coroutine (instance) is resumed on any free thread and continues from the next line.
The suspend keyword does not mean that the function automatically runs on a background thread. It only means that the function can be suspended. If you perform an expensive operation inside a suspend function, for example heavy mathematical calculations, without explicitly switching the dispatcher (we will discuss dispatchers later), you will still block the calling thread; in this case, the UI thread.
Returning to the question: who boils the water when the cook goes to chop vegetables?
In this analogy, the cook is our UI thread (main thread), which we do not want to block with long operations. But the cook is not the only worker in the kitchen. There are also kitchen assistants (worker/background threads). Our analogy now looks like this:
- The head chef (UI thread) takes the recipe (coroutine). They read the first step: Boil water for 5 minutes, for example fetch data from the network, which is done by a
suspend fun. - The head chef does not boil the water personally. That would waste their valuable time because they must handle the UI.
- Instead, they call a kitchen assistant. They give the assistant a pot of water and say: Put this on the stove (perform the network operation). When it boils, let me know.
- The assistant goes and actually does the work. They watch the pot, meaning they wait for the network response.
- Immediately after giving the instruction, the head chef (UI thread) suspends (
suspend) this recipe and puts it aside with a note: waiting for water from the assistant. - Because their hands are free, the head chef (UI thread) immediately starts chopping vegetables (handles a click) and seasoning a salad (draws an animation).
- After 5 minutes, the assistant (IO thread) finishes the work. They run to the head chef and say: The water for recipe no. 5 is ready!; the callback signal returns to the main thread.
- The head chef (UI thread), as soon as they finish chopping the salad, takes suspended recipe no. 5 and resumes (
resume) it from the next step.
CoroutineScope
A cook cannot work in a vacuum; they need a kitchen, a space prepared for handling the cook's tasks and equipped with assistants. The kitchen is the environment in which recipes are executed. Similarly, you cannot simply launch a coroutine in the air; you must launch it inside some CoroutineScope. We create and start a new coroutine with the launch method, and we can do this only on a CoroutineScope; for example, scope.launch{}. Then we are saying: I want this recipe (coroutine) to be executed in this kitchen (scope).
Every kitchen (CoroutineScope) has its own rules and resources. These rules are represented by an object of type CoroutineContext. It has a set of attributes for this particular kitchen. The two most important elements in this context are:
Job(shift manager): the component responsible for lifecycle.Dispatcher(head chef of chefs): the component responsible for assigning work.
The Dispatcher, which is part of the CoroutineContext of a given kitchen, has its own assistants (its own thread pool). A Dispatcher is essentially a scheduling strategist. It says on which thread, or thread pool, a given recipe (coroutine) should be executed at a given moment. There are several main head chefs (dispatchers) we can choose:
Dispatchers.Main: This chef has only one specialized cook under them: the UI thread. Every task you give to this dispatcher will be executed only by that one thread. It is ideal for updating the interface.Dispatchers.IO: This chef manages a large shared thread pool, a pool of cooks optimized for input/output tasks such as network and disk operations. When you give it 100 recipes (coroutines), it distributes them efficiently among the available cooks in its pool.Dispatchers.Default: This chef also manages a thread pool, but it is optimized for CPU-intensive tasks, for example sorting a huge list.
When a coroutine (recipe) launched on Dispatchers.IO must wait for a network response (it suspends), it returns the assistant (thread) back to the pool so that the assistant can handle another task. When the network response comes back, the coroutine is resumed and gets any free assistant (thread) from the Dispatchers.IO pool to continue its work. A coroutine does not own a thread pool. A coroutine uses the thread pool provided by its Dispatcher.
The second key element of CoroutineScope is Job; in our analogy, it corresponds to the shift manager. It tracks all coroutines currently being cooked in a given scope (kitchen). It acts as a parent for all coroutines launched in that scope. When you launch a coroutine with launch, this function returns a Job object.
val job = scope.launch {... }Job is the only way to find out what is happening with a coroutine. It works like an interactive order ticket in a restaurant. It stores the current state of the recipe execution:
- New: the order has been accepted but has not started yet.
- Active: the cook is working on it or waiting for the water.
- Completed: the dish is ready.
- Cancelled: the customer left, so we throw the ingredients away.
- Thanks to
Job, you can ask programmatically:job.isActive(are we still working?) orjob.isCancelled.
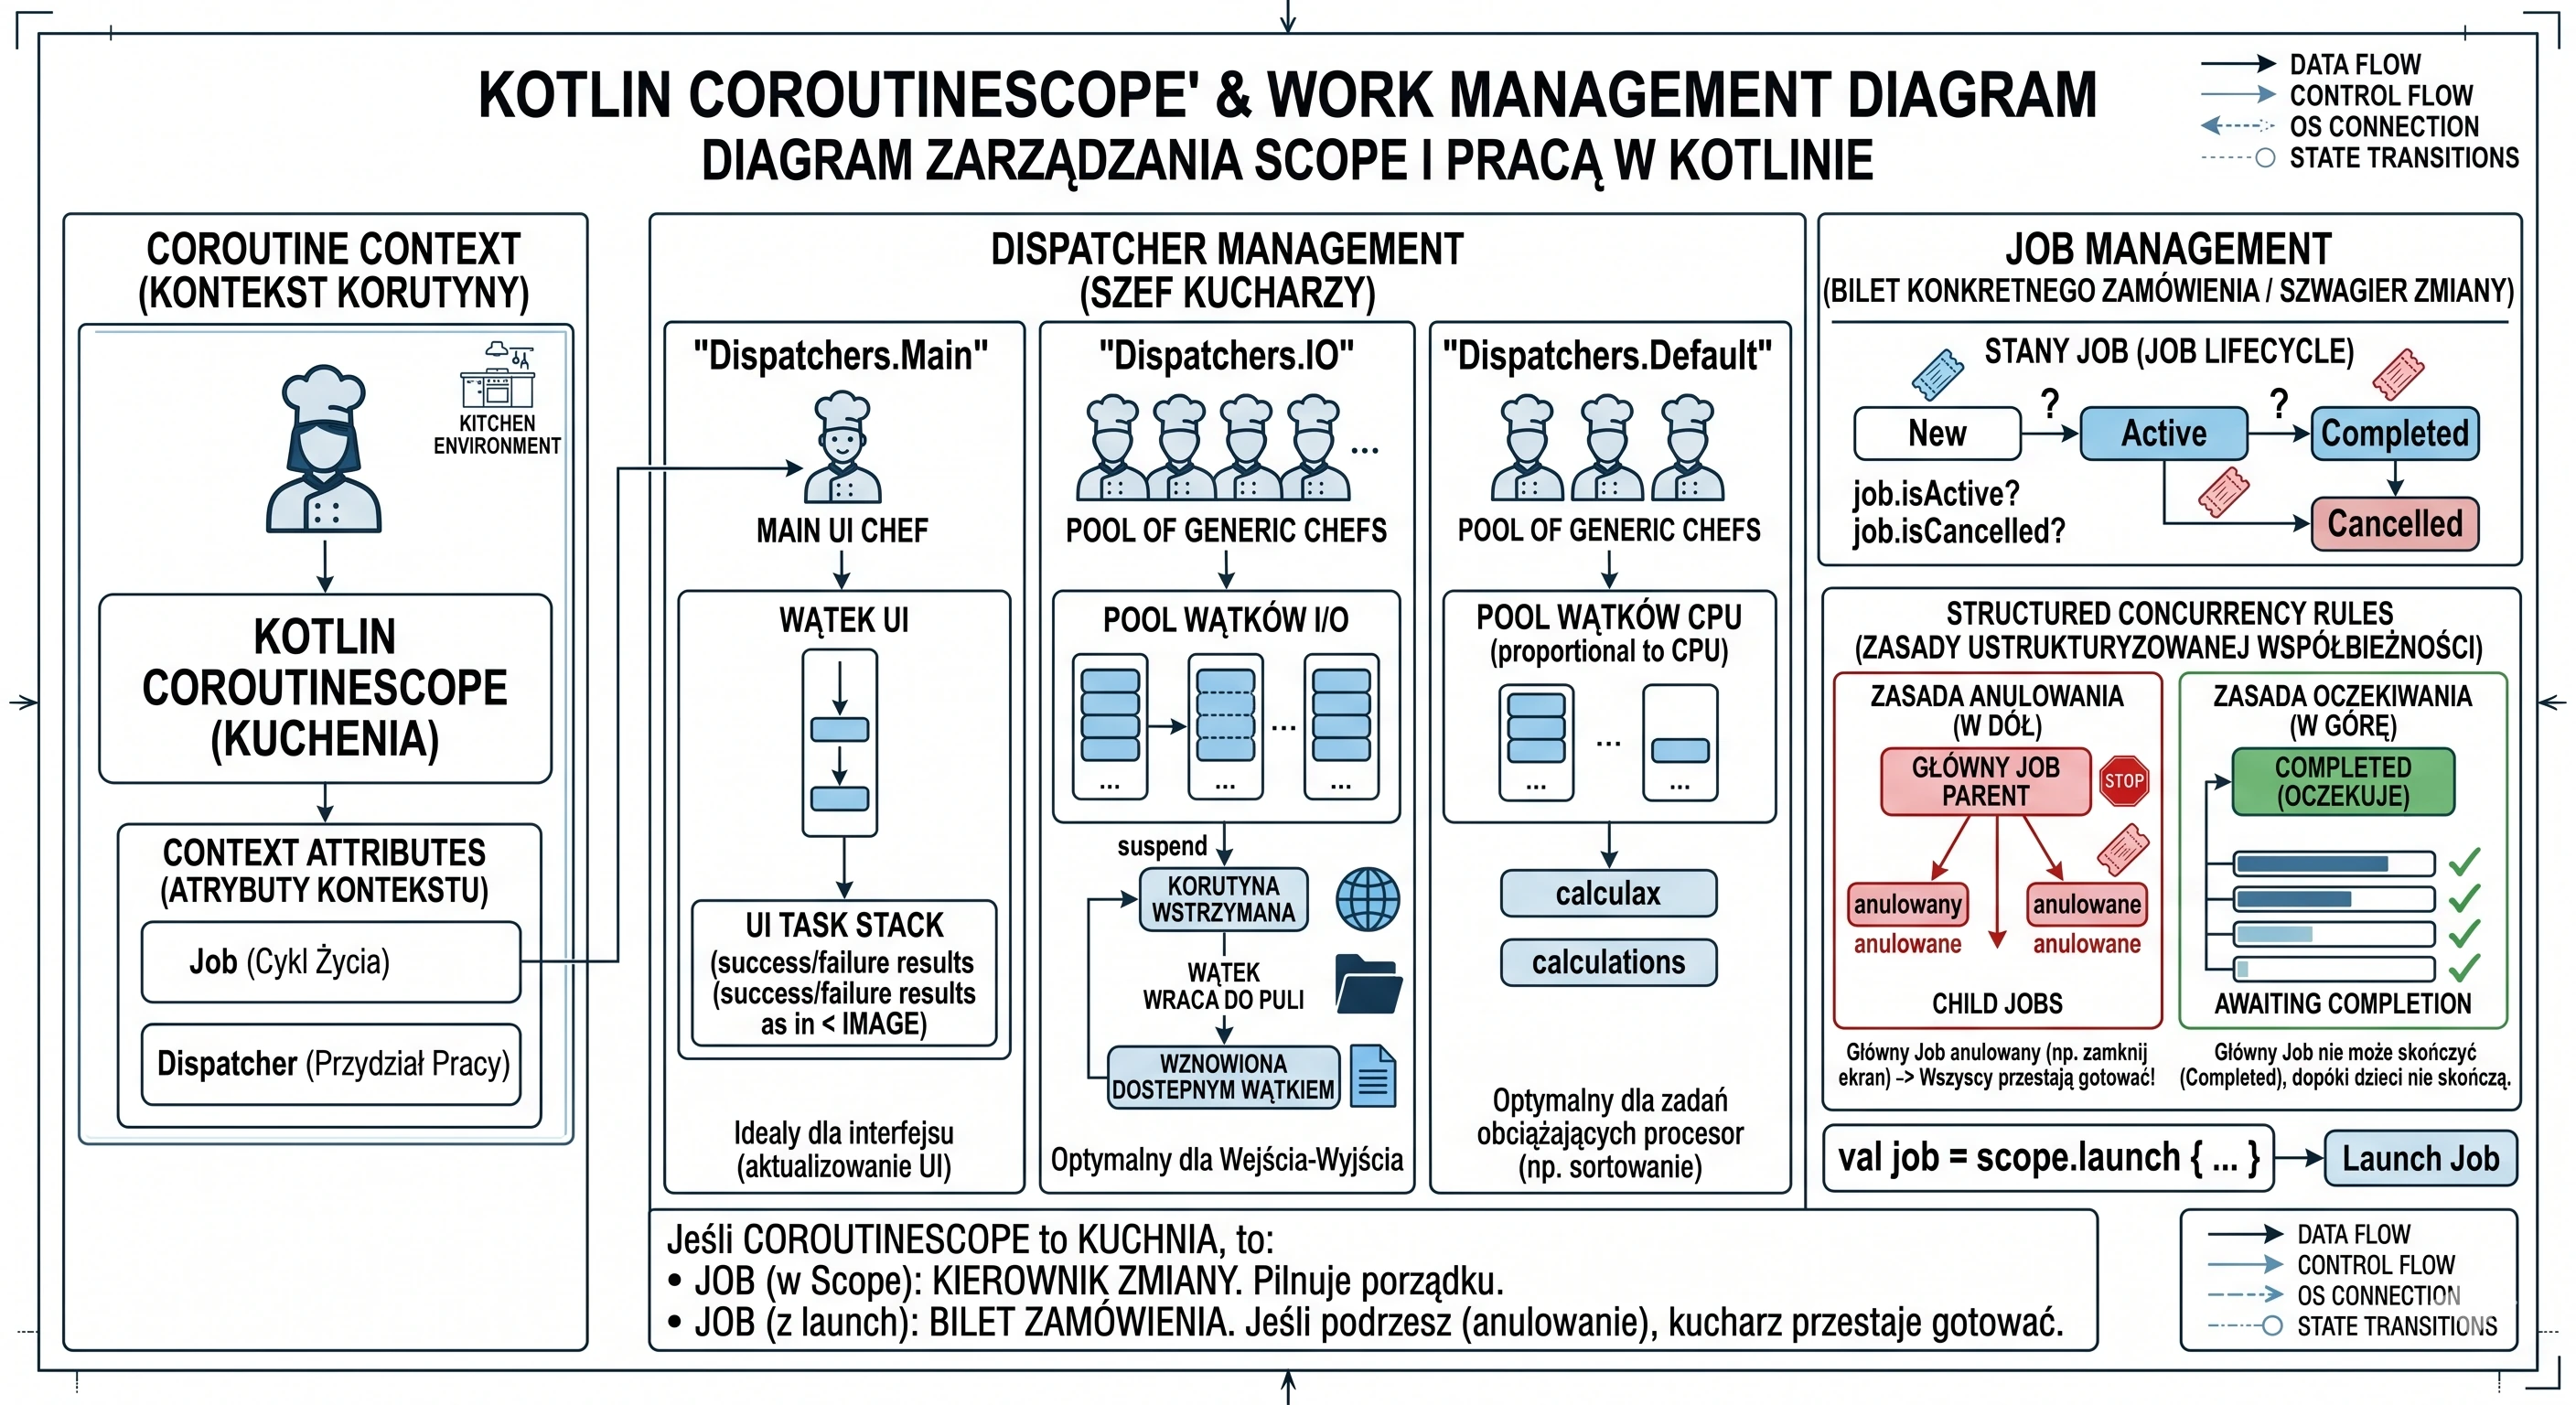
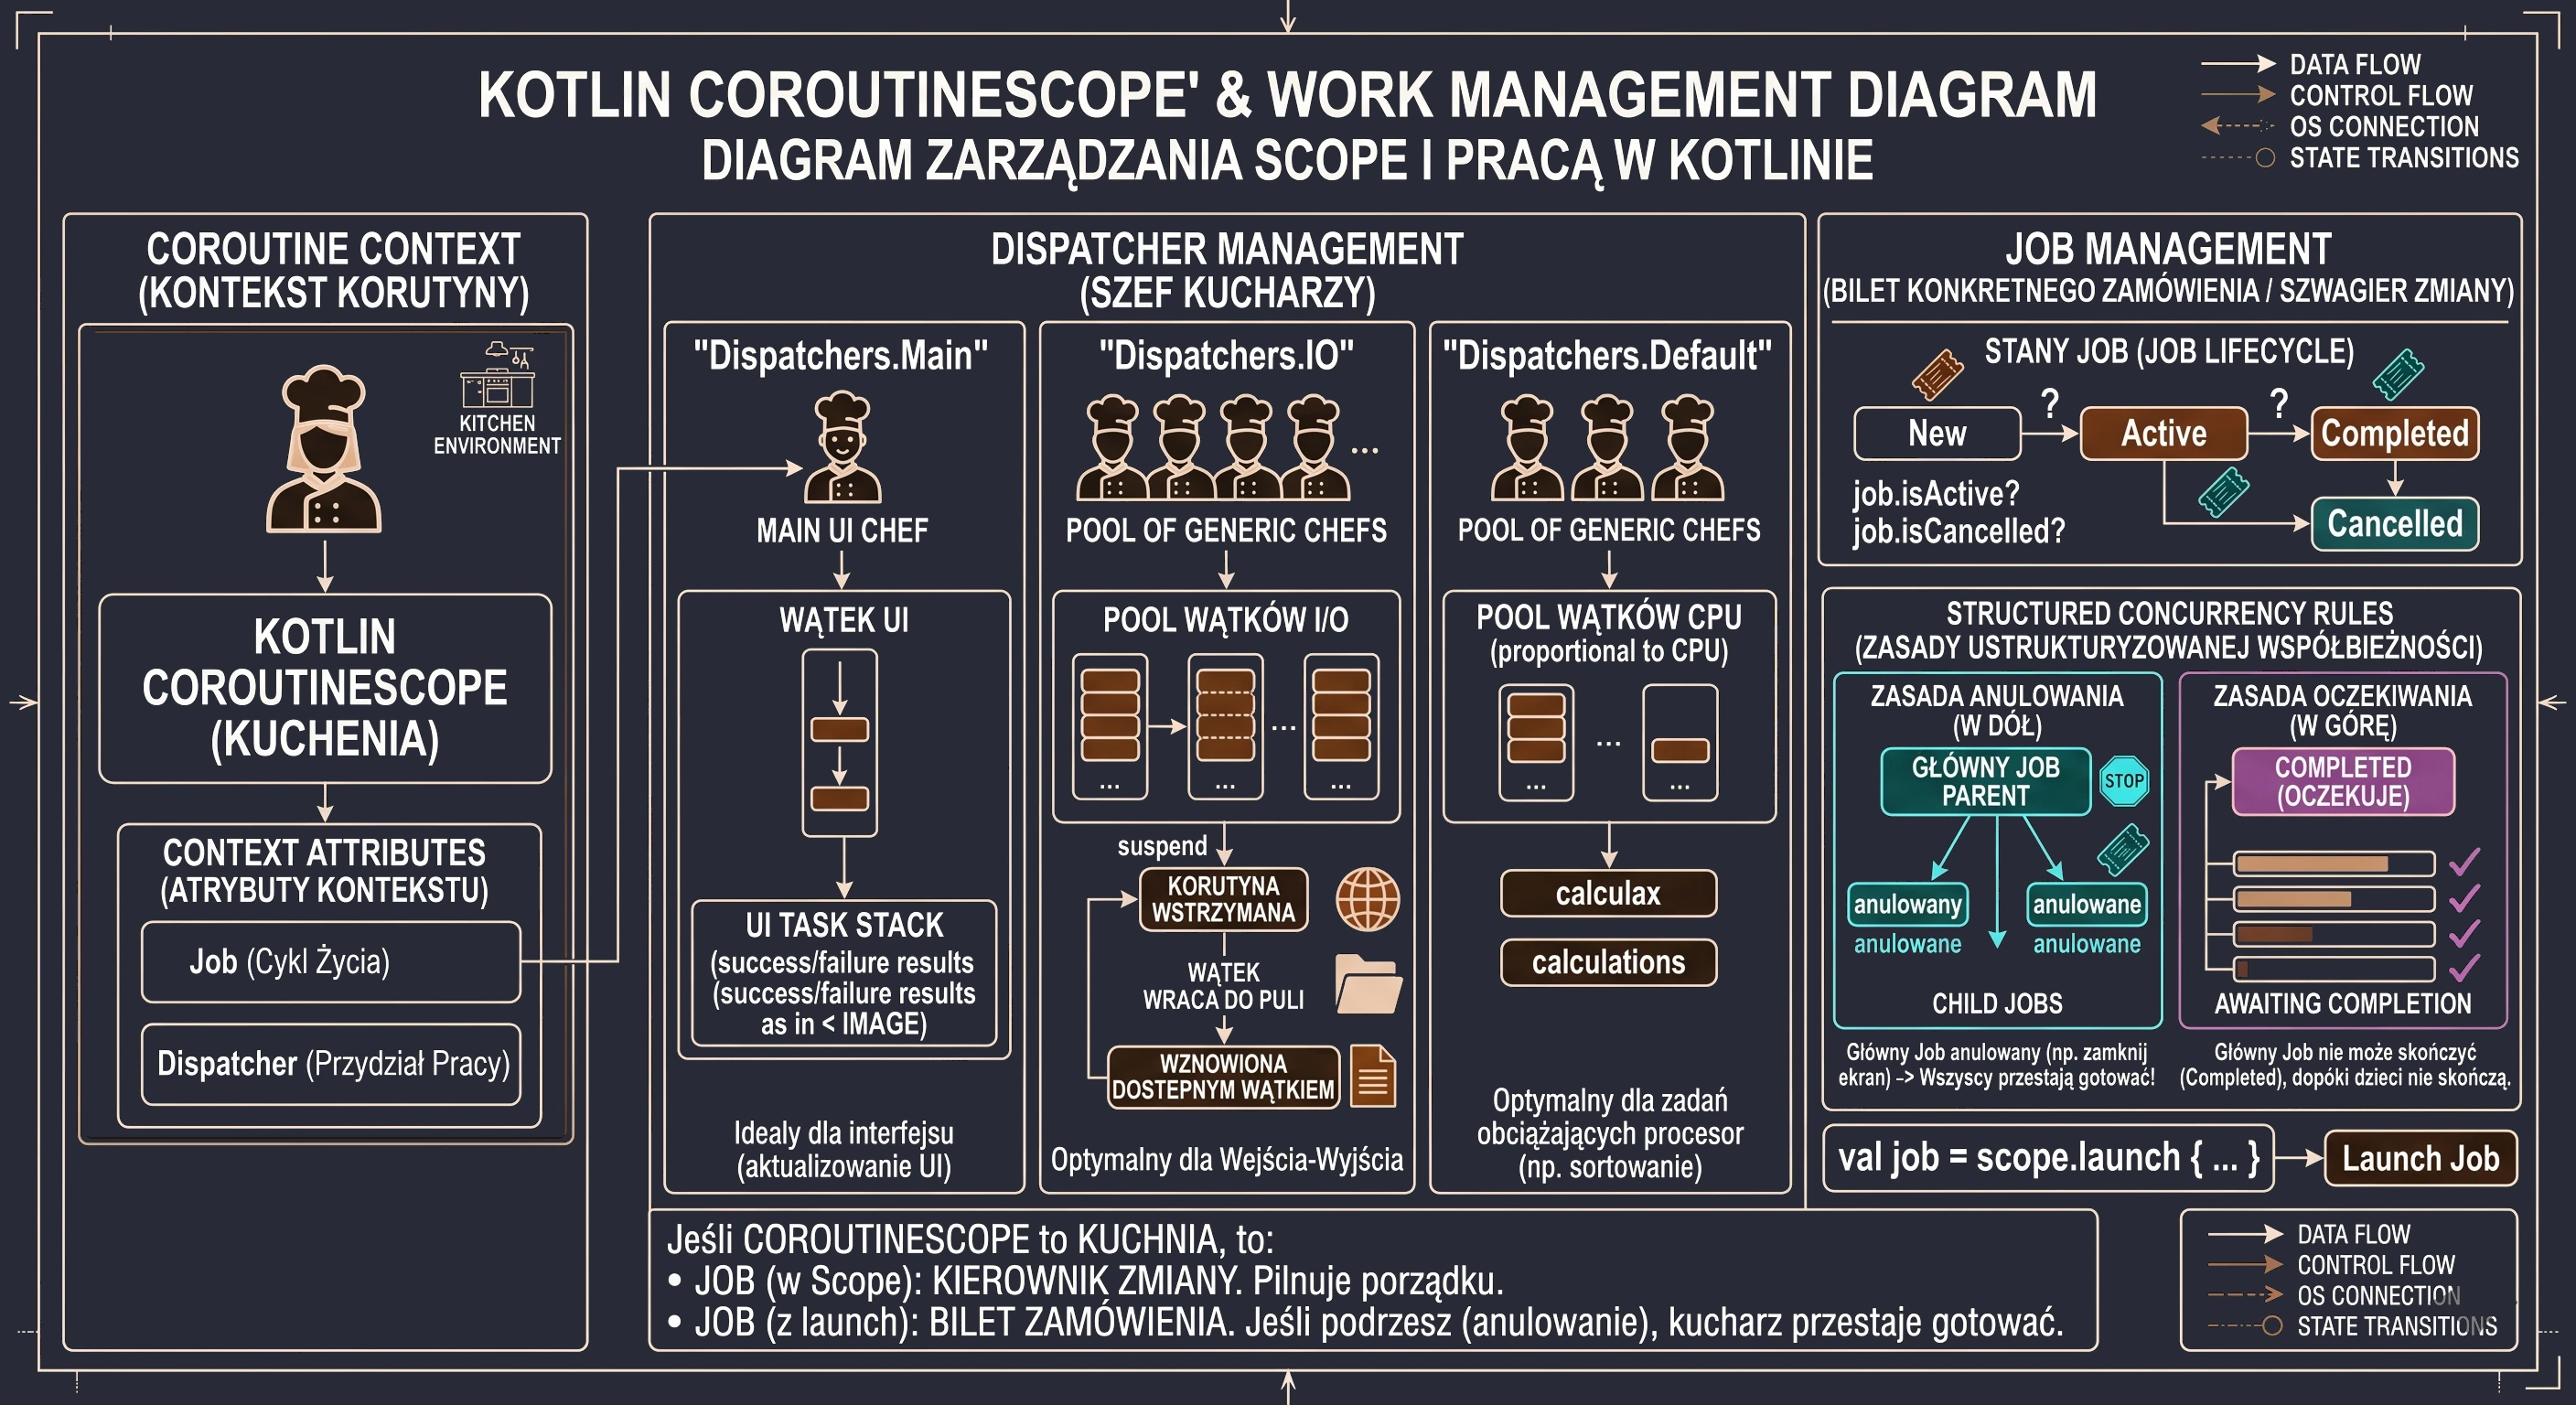
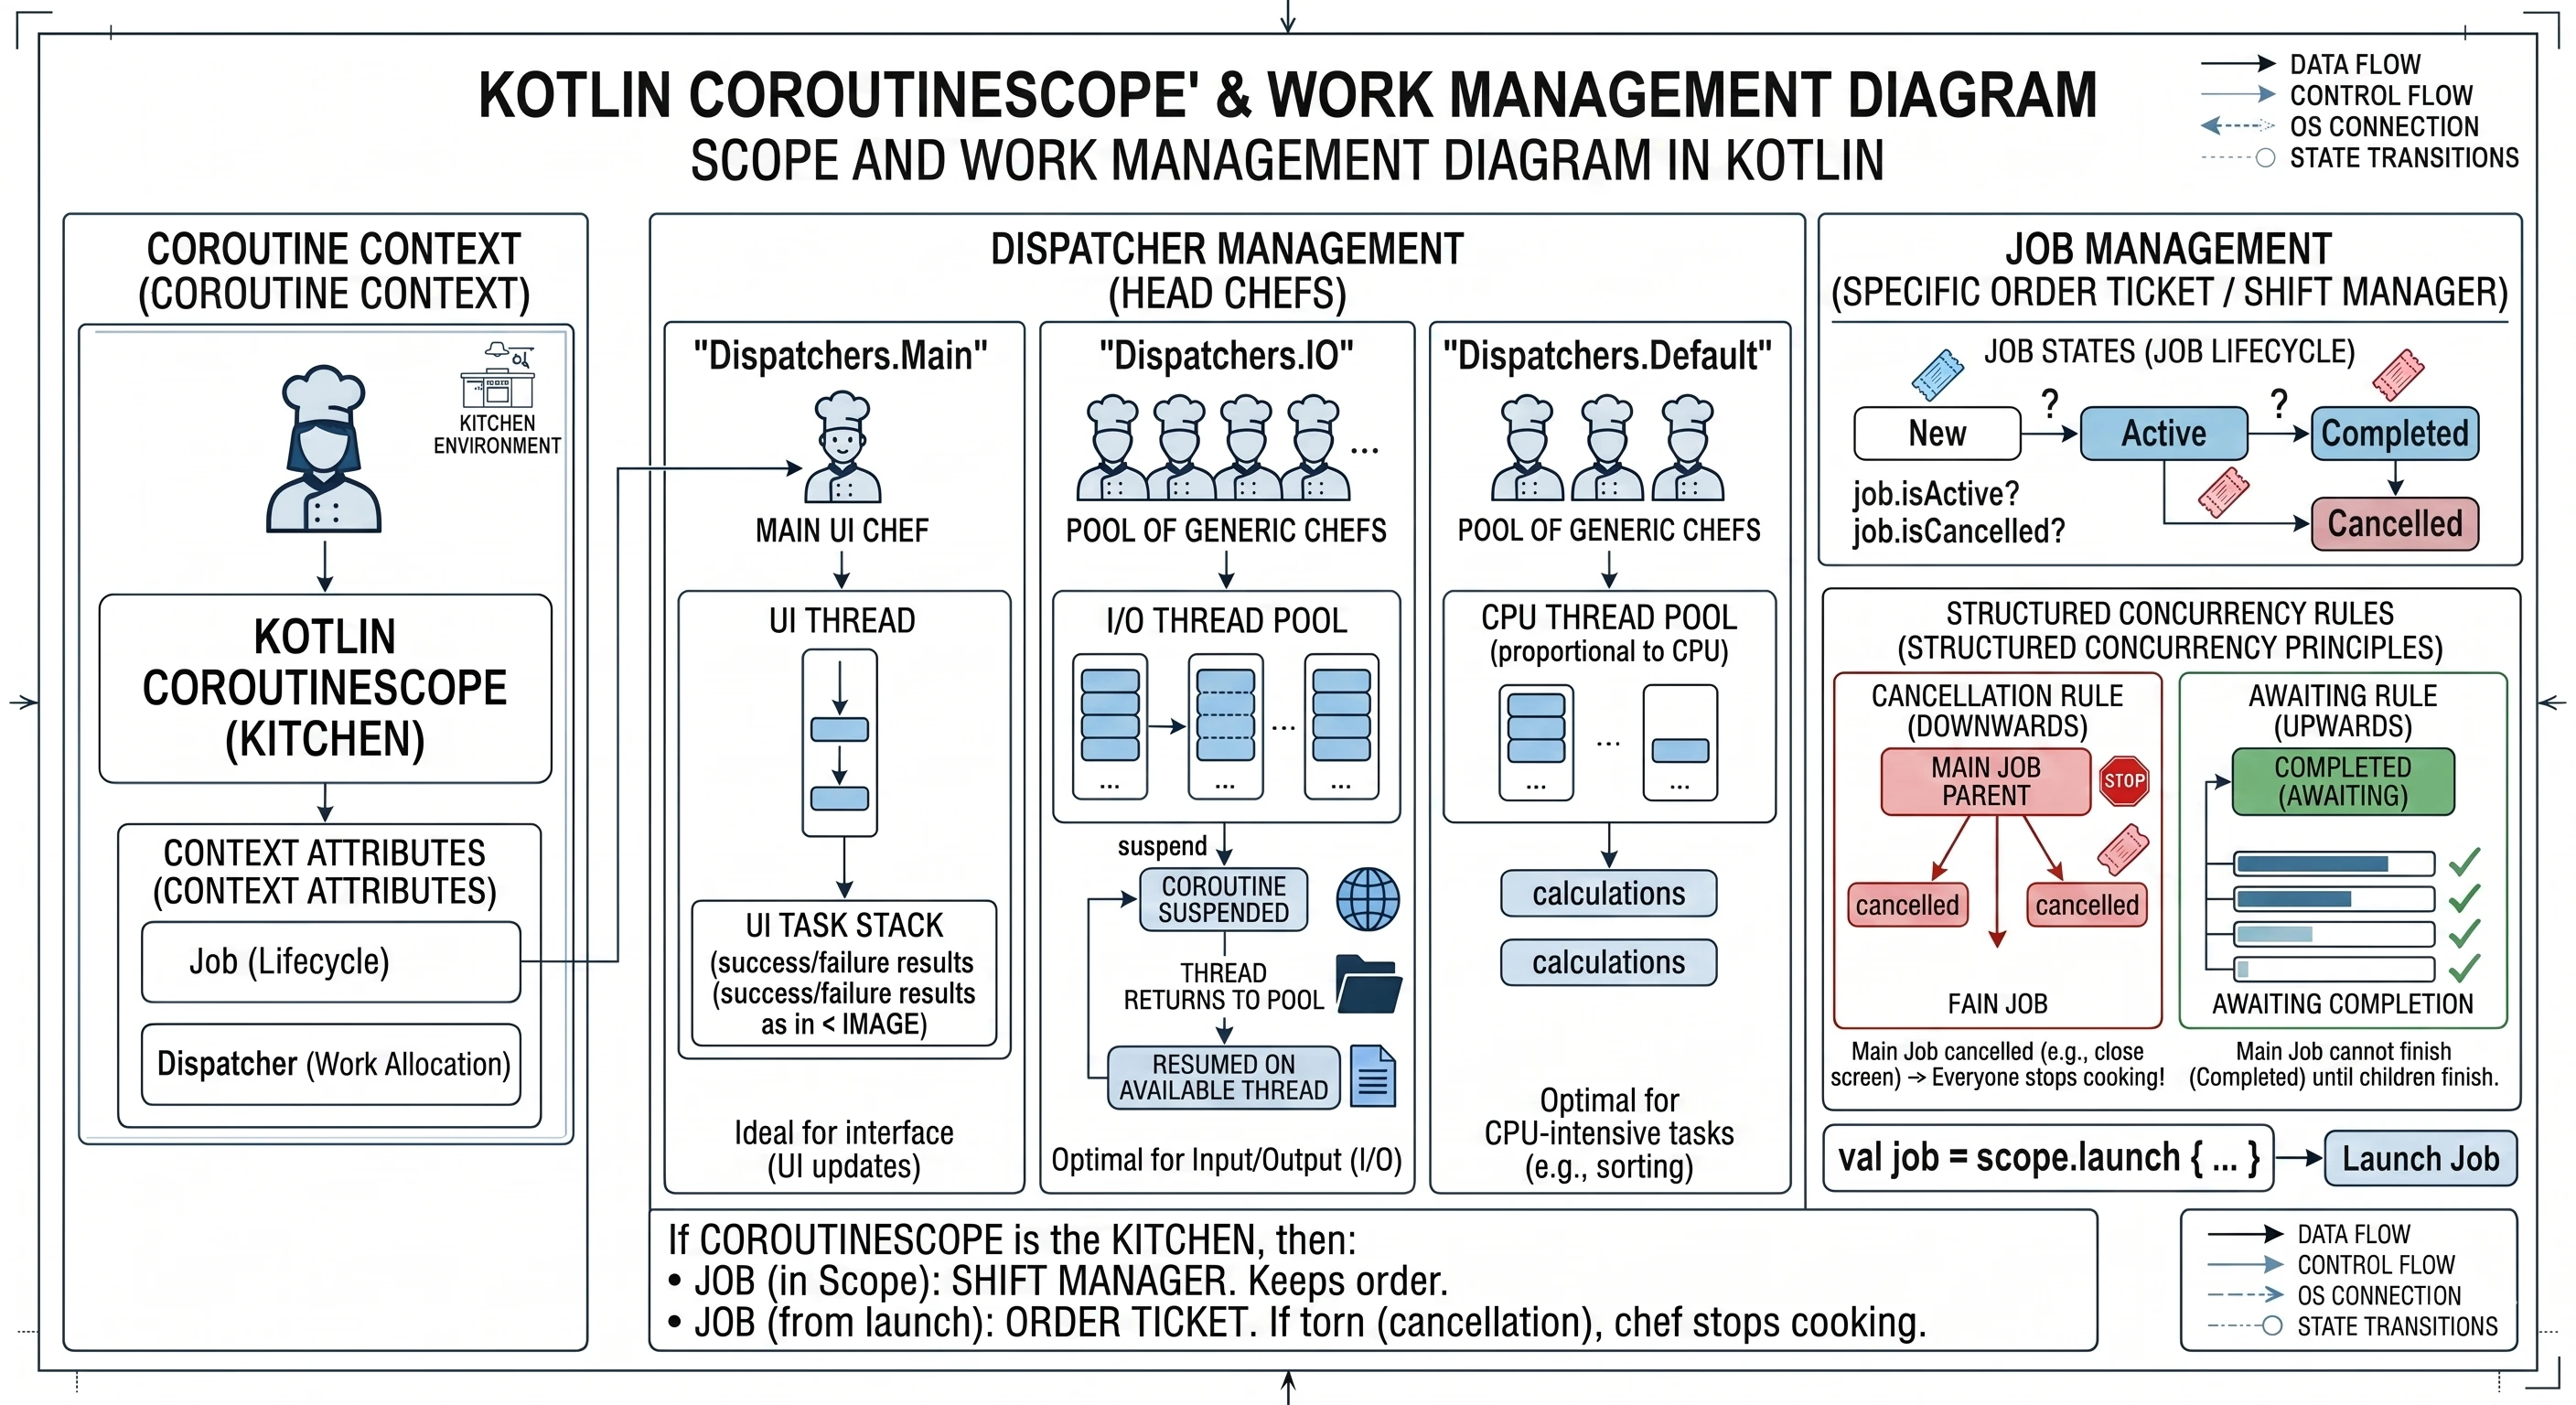
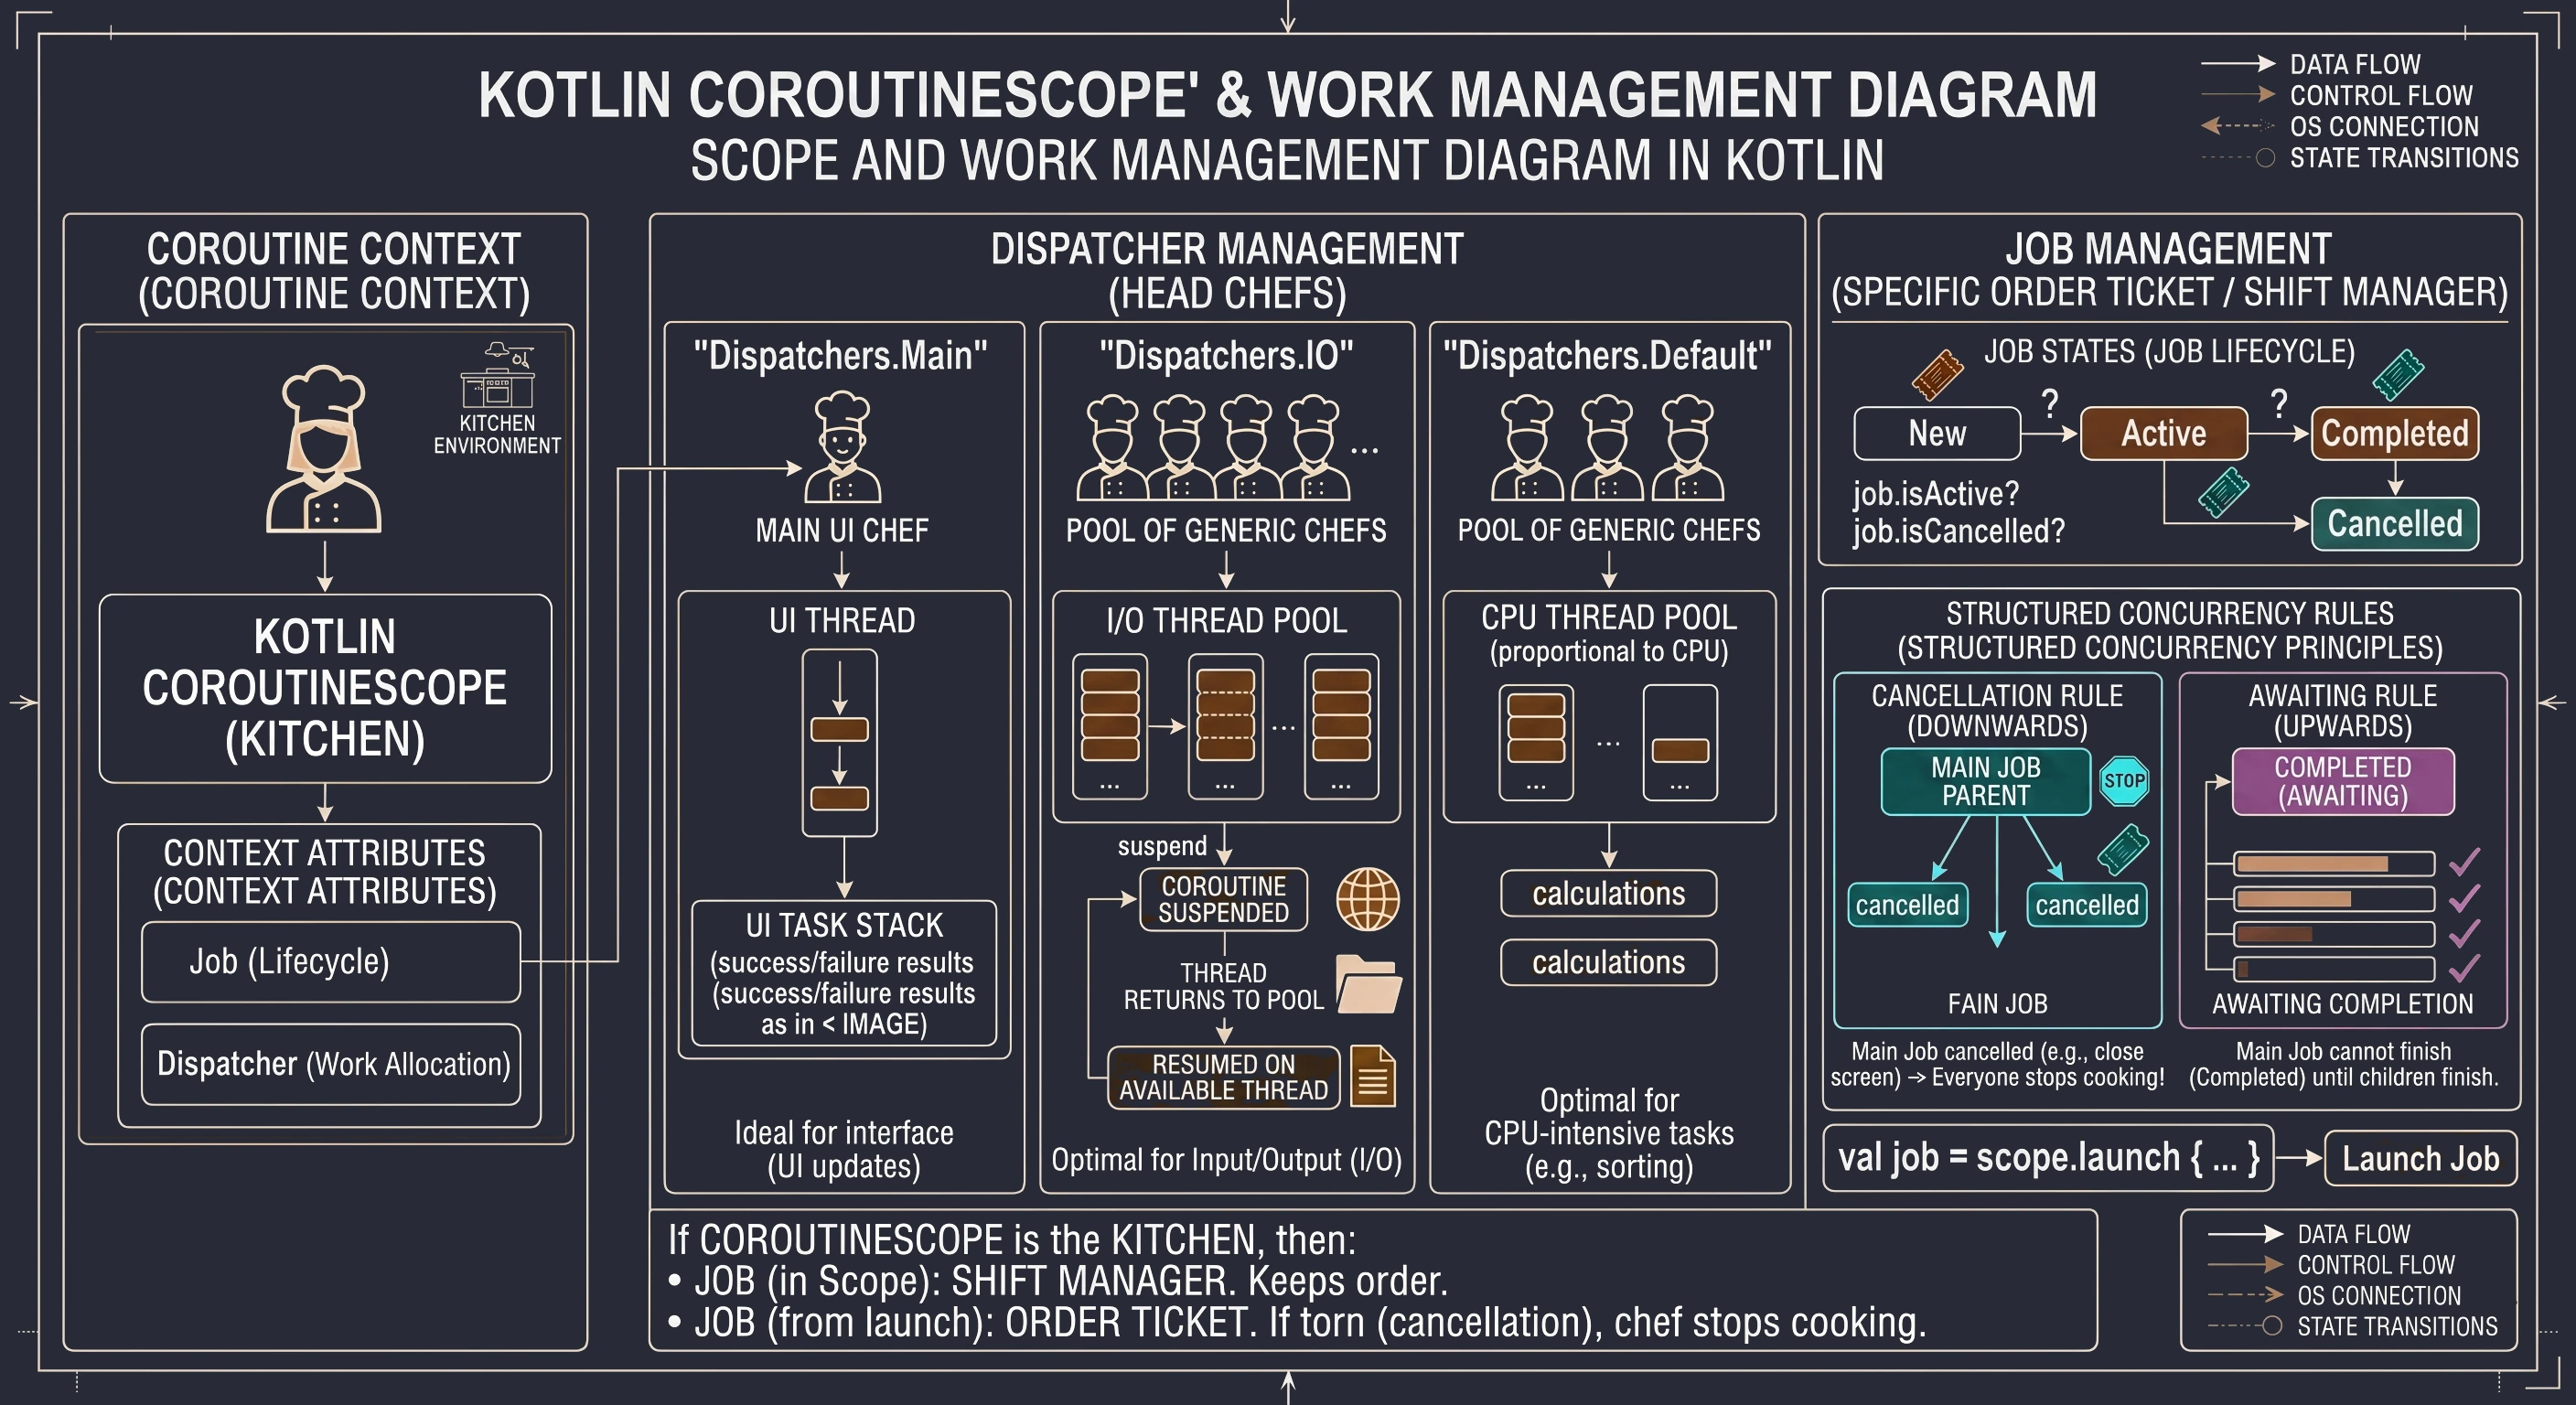
In the world of coroutines, every Job can have a parent and children. When you create a CoroutineScope, it contains a main Job (shift manager). When you call launch in this Scope, a new Job is created and automatically becomes a child of the main Job. This creates an unbreakable dependency tree. Two strict rules of structured concurrency apply here:
- Cancellation rule (downward): If you cancel the parent, for example by closing the screen and cancelling its
coroutineScope, all children are automatically cancelled. The shift manager says: We are closing the kitchen!, so all cooks immediately stop preparing their dishes. Nobody stays at work after hours. - Waiting rule (upward): The parent cannot complete its work until all children finish. The shift manager cannot go home until the last assistant finishes washing the dishes.
Summary in our analogy: If CoroutineScope is the kitchen, then:
Jobin the scope is the shift manager. It makes sure nobody works when the restaurant is closed.Jobreturned bylaunchis the ticket of a specific order. It is pinned to the shift manager's cork board. If the manager removes the ticket from the board and tears it up (cancellation), the cook immediately stops working on it.
Solving the ANR problem
Let us return to the example from the beginning of the chapter. In the previous version, when we clicked the button that called Thread.sleep(10000), the entire application froze. The slider stopped working, buttons did not react, and after a while the system displayed an ANR error. Let us implement code that solves this problem. We will start by adding a recipe, meaning a suspend function.
// Change 1: the 'suspend' keyword
suspend fun fetchDataFromServer(): String {
    println("Coroutine:...")
    // Change 2: 'delay' instead of 'Thread.sleep'
    delay(10000) // delay is also a suspend function
    println("Coroutine:...")
    return "Data downloaded successfully!"
}
What we call suspension is not a pause of all work. It is a pause of this specific coroutine on this specific thread.
Thread.sleeptells the UI thread: Stand still and do nothing for 10 seconds.delaytells the UI thread: I am putting this task on the shelf for 10 seconds. You go handle something else, for example draw the slider. We will return to this later.
Inside the Composable function (CoroutineSolutionScreen), a new line appears:
val scope = rememberCoroutineScope()This is required because the button's onClick function is a regular function; it is not suspend. We cannot directly call fetchDataFromServer or delay from it. We need a gate or a bridge that allows us to enter the asynchronous world. That bridge is a CoroutineScope associated with the lifecycle of this screen.
It is worth noting that the CoroutineScope obtained through rememberCoroutineScope() in Jetpack Compose uses Dispatchers.Main by default, more precisely Main.immediate. This means that the code inside launch runs on the main thread.

The scope returned by rememberCoroutineScope() is tightly connected with the point in the composition where it was called. If the user leaves this screen and the component is removed from the UI tree, the scope is automatically cancelled. As a result, all operations still running inside it, for example our 10-second data download, are immediately interrupted, preventing memory leaks and wasted resources.
Inside onClick, we see:
Button(onClick = {
statusText = "Operation started..." // 1. Immediate UI update

scope.launch { // 2. Start the coroutine (fire-and-forget)
        val result = fetchDataFromServer() // 3. Suspension point
        statusText = result // 4. Resume and update the UI
    }
})
What happens here step by step?
- The user clicks.
- The text changes to "Operation started...".
scope.launchcreates a new coroutine.- The coroutine enters
fetchDataFromServer, reachesdelay(10000)and suspends. - The UI thread is free. During these 10 seconds, the main thread handles moving the slider, animations and other clicks.
- After 10 seconds, the coroutine wakes up, assigns the result to
resultand updatesstatusText.
| Feature | Old version (Thread.sleep) | New version (delay + coroutines) |
|---|---|---|
| Button reaction | The button remains pressed and frozen. | The button clicks normally and shows the ripple animation. |
| Slider | Blocked. It cannot be moved. | Smooth. You can move it during the entire 10-second wait. |
| UI thread | Blocked. The cook stands over the pot. | Free. The cook set a timer and chops vegetables. |
| ANR risk | Very high; the system will kill the application. | Zero; the application remains responsive. |
| Code style | Sequential, line by line. | Sequential. Despite asynchronicity, the code is just as easy to read. |
Structured concurrency
Previously, we learned how to start background tasks (put water on the stove) without blocking the kitchen. But what happens when preparing a dish requires performing several actions at the same time, and we must be sure that all of them are complete before serving the meal?
This is where the join() function helps. It is one of the foundations of synchronization in the coroutine world.
Imagine that you are the head chef (parent coroutine). You need to prepare the main dish: steak with vegetables. You will not do everything yourself.
- You call Assistant 1: Fry the meat! (this will take 2 seconds).
- You call Assistant 2: Cook the vegetables! (this will take 3 seconds).
Both assistants start working at the same time (concurrency). The main coroutine is free and can handle other matters. But it cannot serve the dish until everything is ready. We perform this waiting with join().
Let us look at code that simulates this situation:
// 1. The head chef (parent) starts work
scope.launch {
    logs.add("Head chef (parent): Let's start!")

    // 2. Assign a task to Assistant 1 (Child 1)
    val jobMieso = launch {
        delay(2000) // Simulate frying
        logs.add("Cook 1: Meat fried (2s).")
    }

    // 3. Assign a task to Assistant 2 (Child 2)
    val jobWarzywa = launch {
        delay(3000) // Simulate cooking
        logs.add("Cook 2: Vegetables ready (3s).")
    }

    logs.add("Head chef: Tasks assigned, scope is waiting for completion...")

    // 4. Synchronization: the head chef waits for the results
    jobWarzywa.join()
    jobMieso.join()

    // 5. Final step
    logs.add("Head chef: Everyone finished! The dish can be served.")
}
In this example, we can see coordination of child tasks. The whole process starts when the parent coroutine, our metaphorical head chef, launches subtasks using the launch function. This is a kind of order ticket that gives us a unique handle to a specific coroutine that is currently running. In our case, we create two such handles: jobMieso and jobWarzywa, which become children of the main coroutine launched in the scope.
Both tasks start almost at the same time, which means that we do not wait to start cooking the vegetables until the meat is ready. As a result, the total operation time is not the sum of individual task times (5 seconds), but the duration of the longest task (3 seconds). However, this independence of subtasks creates a synchronization problem: what if the head chef finishes their work earlier than the assistants? Without proper control, the log message The dish can be served would appear immediately after assigning the tasks. In our metaphor, that would mean serving the customer an empty plate before the ingredients have been cooked.
The solution to this race condition is the join() function. Technically, it is a suspend function used to synchronize coroutine lifecycles. When the parent coroutine encounters jobWarzywa.join(), its execution is suspended. It is important to clearly distinguish suspension from blocking: the thread executing this coroutine is not blocked and can perform other system operations during that time. The join mechanism puts the calling coroutine into a waiting state that lasts until the observed Job reaches a terminal state (Completed or Cancelled). Only when the child task actually finishes does the state machine resume the parent coroutine from the next line of code. By explicitly calling join() on both Job objects, we implement the contract of structured concurrency: the parent consciously coordinates the work of its children and guarantees that no operation finishes too early, which preserves data consistency and makes the application flow predictable.


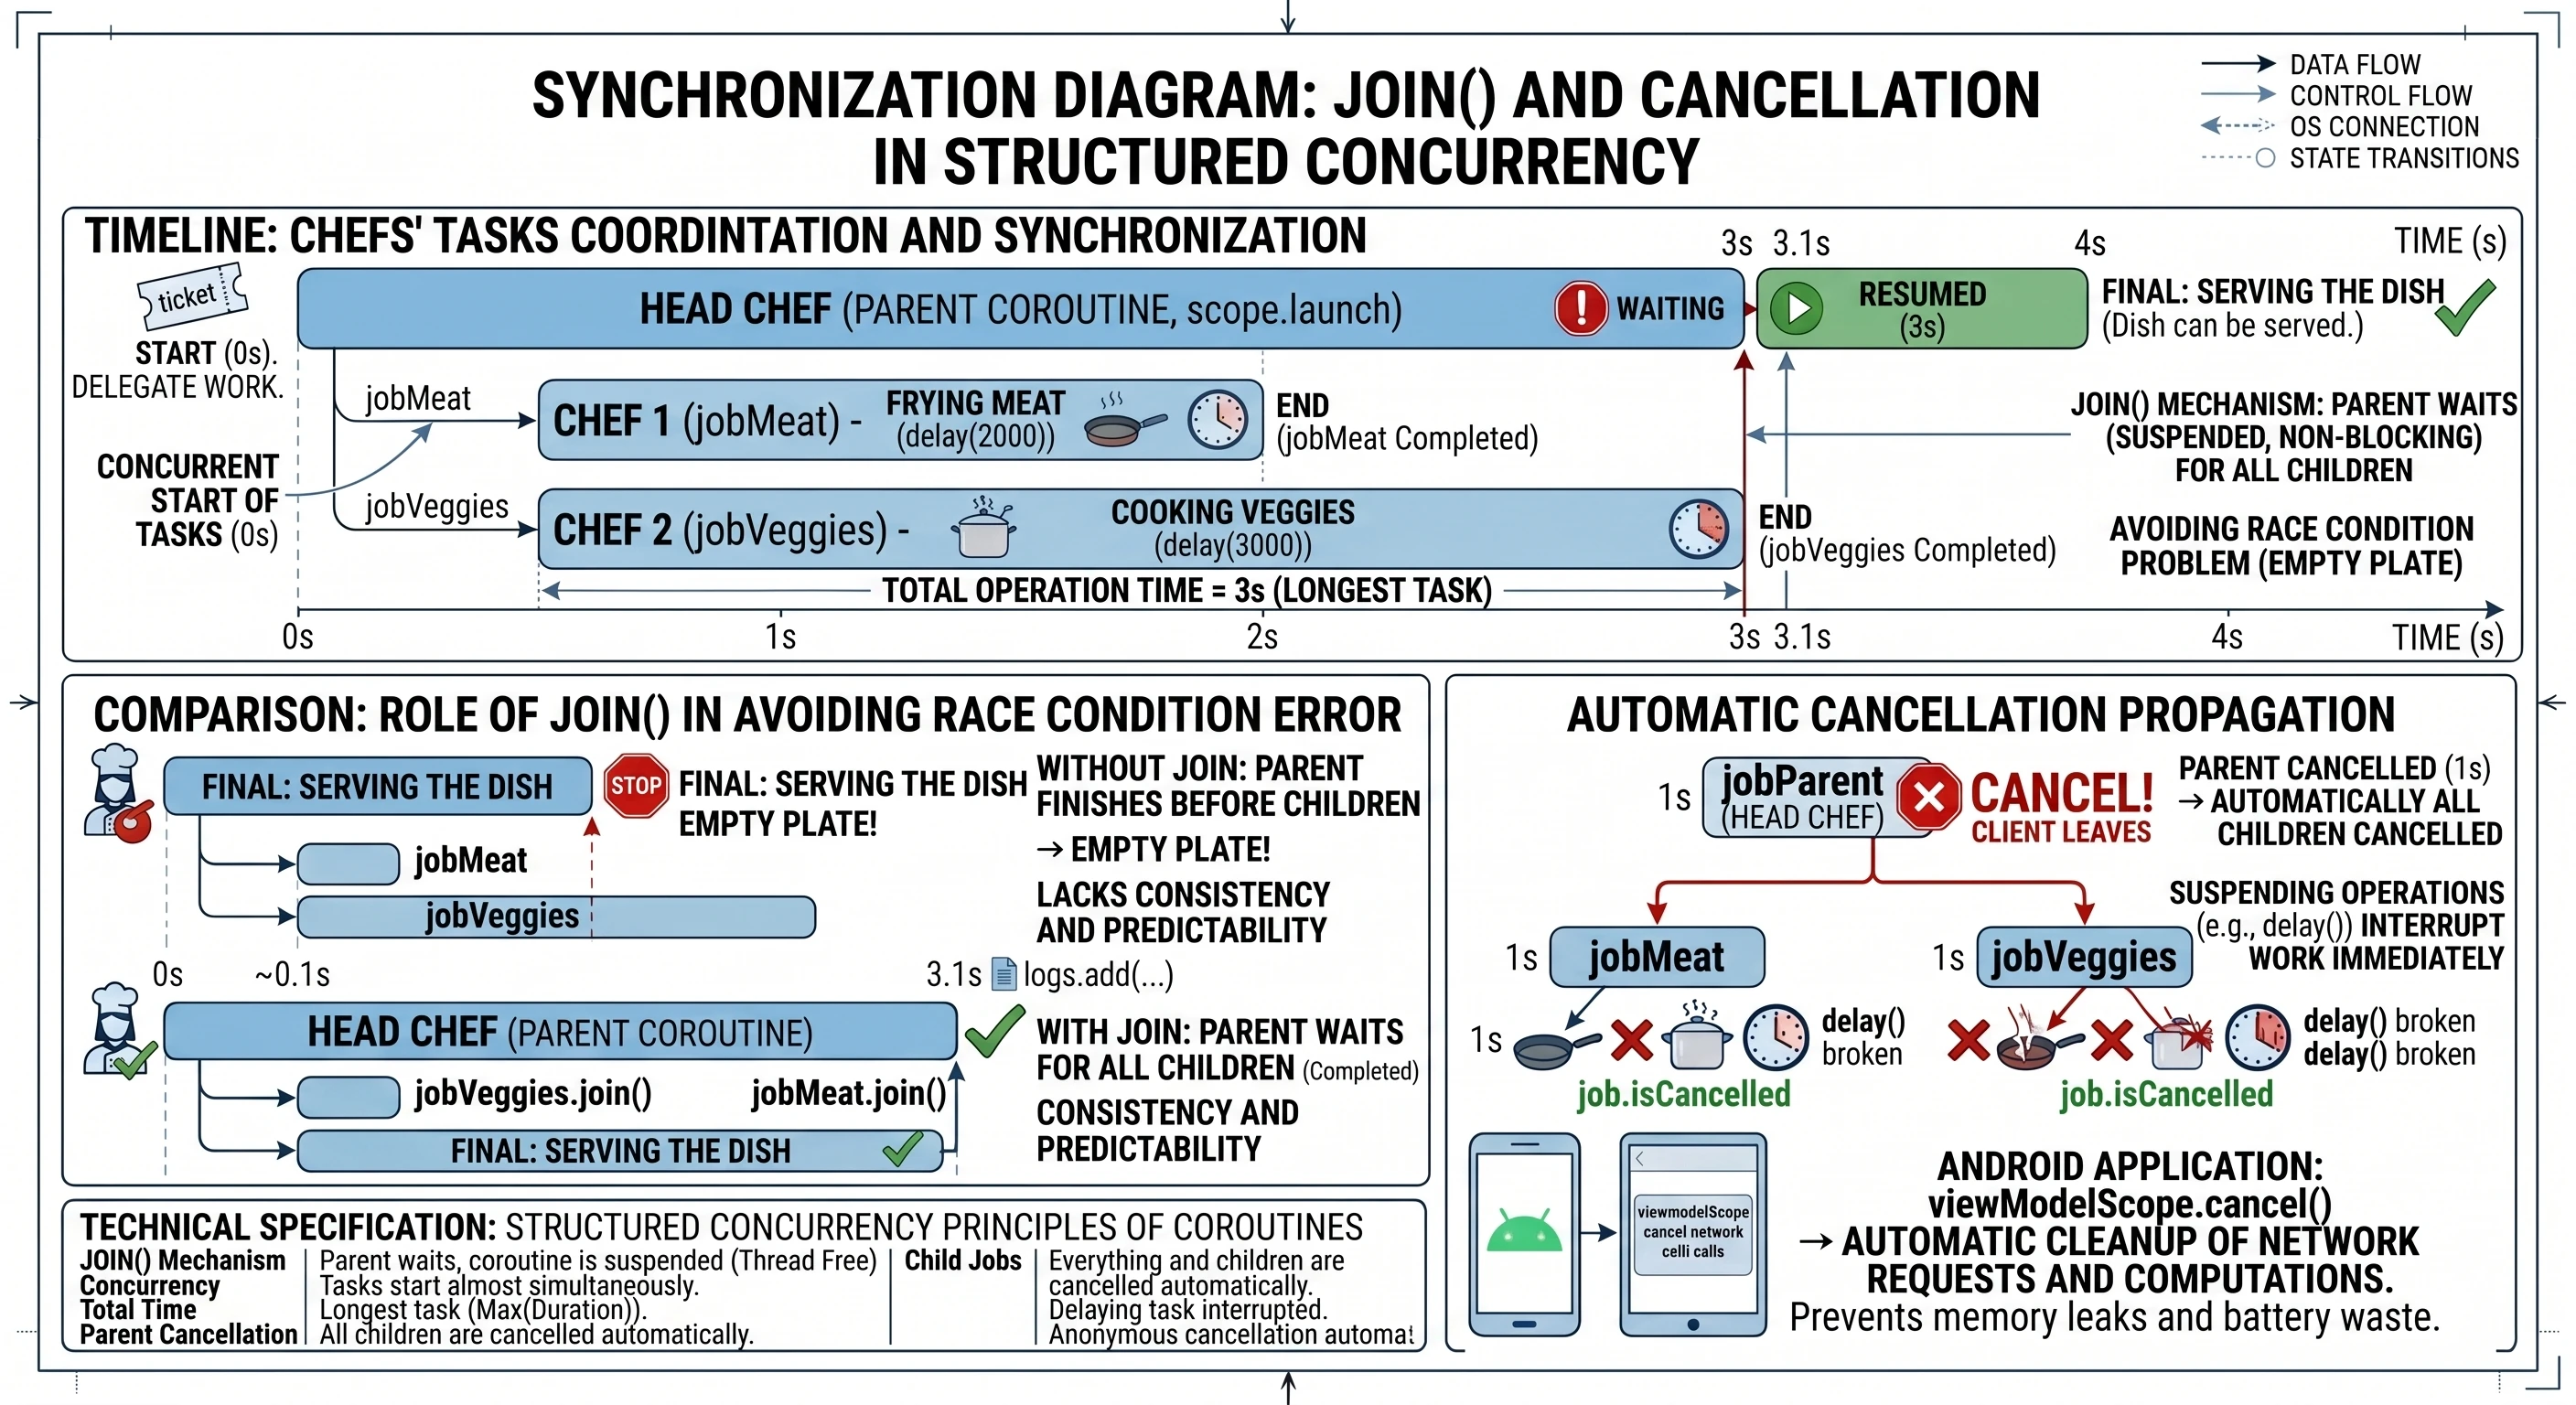
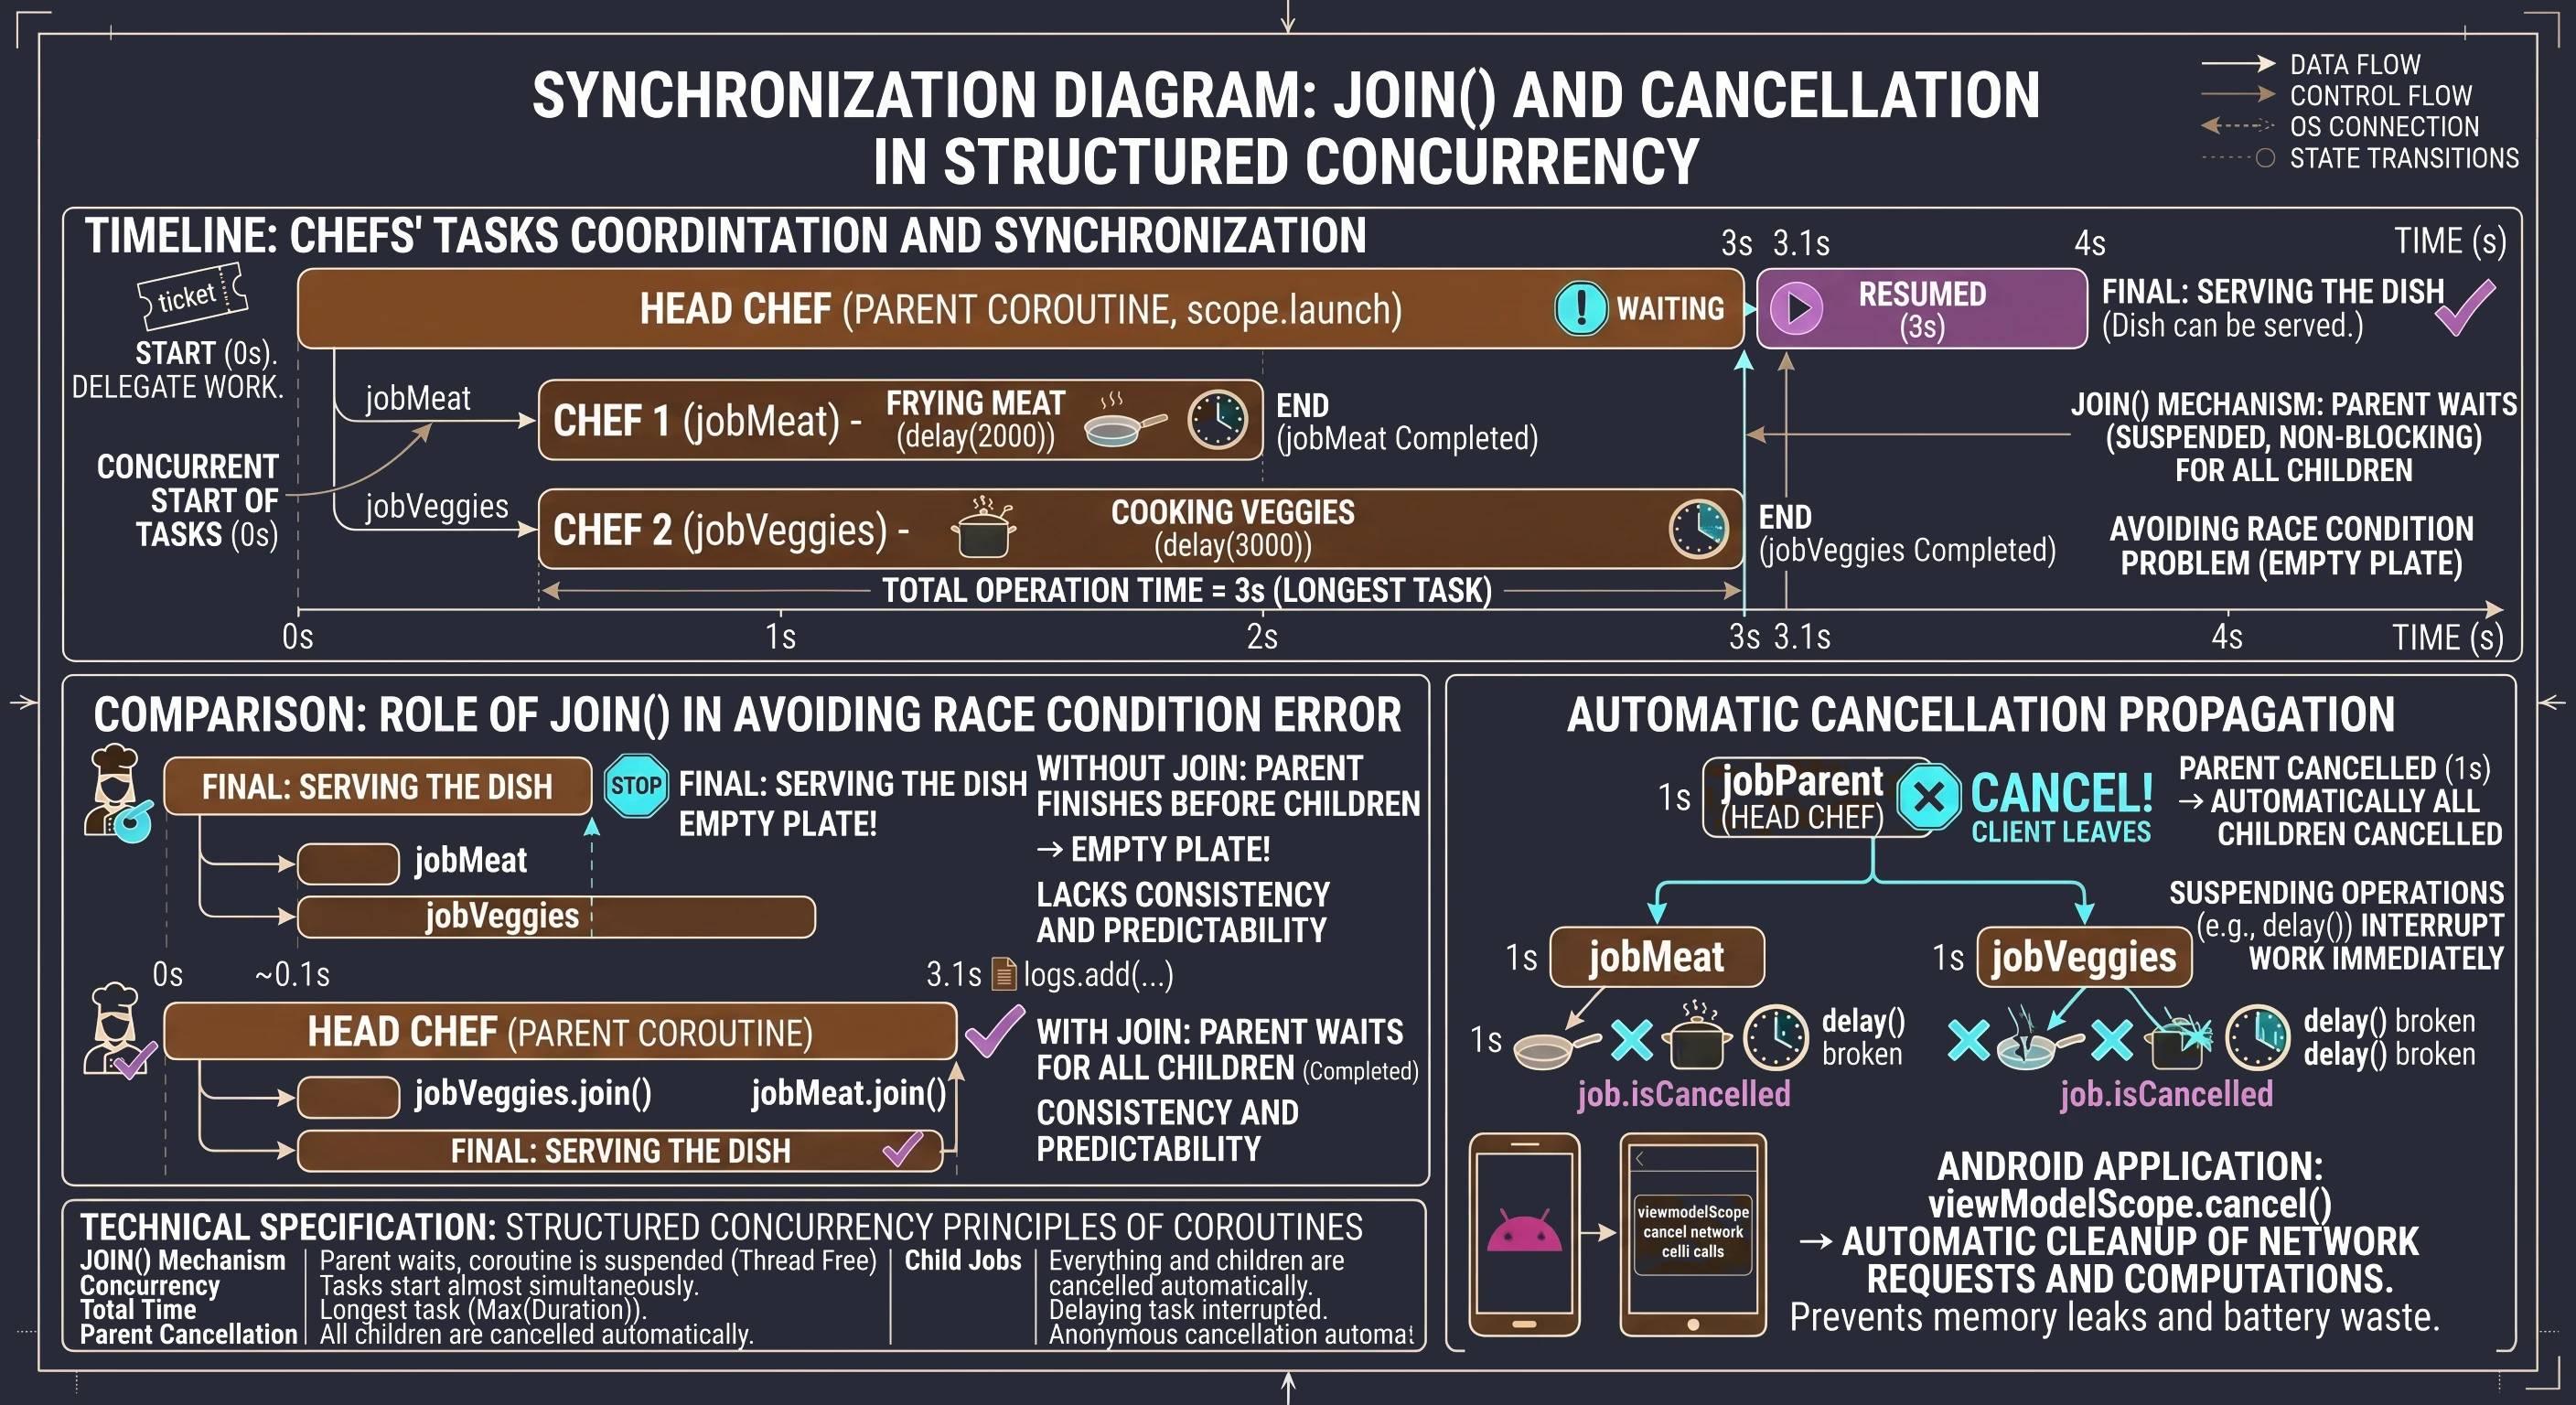
It is worth pausing on the aspect that makes structured concurrency safe: automatic cancellation propagation. We mentioned it earlier, but let us discuss it again.
Imagine that our head chef (parent) receives information that the customer cancelled the order and is leaving the restaurant. In the world of structured concurrency, the chef does not have to run around the kitchen and personally ask every assistant to stop working. Calling job.cancel() on the parent coroutine automatically sends the cancellation signal to all children (jobMieso, jobWarzywa). If the assistants are executing suspend functions, such as delay, they will stop immediately.
In Android application programming, this mechanism is extremely important. When the user closes a screen (Activity), the scope associated with it (viewModelScope or lifecycleScope) is cancelled. Thanks to the parent-child hierarchy, all ongoing network requests or background calculations are cleaned up automatically. This prevents memory leaks and avoids wasting battery on processes whose result nobody will ever see.
Receiving results: the async and await mechanism
Although the launch function is extremely useful, it has one important limitation: it works in a fire-and-forget mode. It returns a Job object, which allows us to check whether work is still running or to cancel it, but it does not allow us to extract any value from inside. In the real world, we do not always want only to assign a task; often we need the worker to bring us something, for example a specific ingredient from storage. For such tasks, we use the async function.
Analogy: courier and empty box
Before analyzing code, let us use an analogy of ordering a package:
- async: This is the moment when you click Buy now. The store does not give you the product immediately, but it gives you a tracking number; this is our
Deferredobject. - Deferred: This is a metaphorical empty box. The box physically exists (we have a reference to it in code), but we cannot use its contents yet because they are still on the way.
- await(): This is the moment when we wait for the courier's bell. If the courier has already arrived, we receive the contents immediately. If the courier is still on the way, we suspend our other actions and wait until the box is unpacked.
Practical example: mysterious password generator
Consider the implementation of a screen that simulates a complex process of generating a secure password. This process takes 3 seconds and must return the result directly to the UI state variable.
@Composable fun PasswordGeneratorScreen() {
    var password by remember { mutableStateOf("...") }
    val scope = rememberCoroutineScope()

    // Function simulating heavy background computation
    suspend fun generatePassword(): String {
        delay(3000) // Simulate work
        return "Kotlin-Is-Super-Secure-123"
    }

    Column(
        modifier = Modifier.fillMaxSize().padding(16.dp),
        horizontalAlignment = Alignment.CenterHorizontally,
        verticalArrangement = Arrangement.Center
    ) {
        Text("Mysterious password generator", style = MaterialTheme.typography.headlineSmall)
        Spacer(Modifier.height(20.dp))

        Button(onClick = {
            password = "Generating..."

            // Launch the parent coroutine (operation skeleton)
            scope.launch {
                // 1. Assign the task (async) - we immediately get the Deferred 'box'
                val deferredPassword: Deferred<String> = async { generatePassword() }

                // 2. Wait (await) - the coroutine suspends here for 3 seconds
                val result = deferredPassword.await()

                // 3. After 3 seconds, the coroutine resumes with the ready result
                password = result
            }
        }) {
            Text("Generate password")
        }

        Spacer(Modifier.height(20.dp))
        Text(password, fontSize = 20.sp, fontFamily = FontFamily.Monospace)
    }
}
In the code above, the key moment is the button click. We call scope.launch to enter the world of concurrency. Inside it, two things happen. First, the line async { generatePassword() } does not block code execution. The async function immediately returns an object of type Deferred<String>. If we checked the value of deferredPassword at that moment, we would only learn that the task is in progress. Second, calling deferredPassword.await() is an instruction for the coroutine mechanism: Stop this specific coroutine here and wait until deferredPassword delivers the value. What is extremely important is that the UI thread remains free. The user sees the text Generating..., but the application is not frozen; during this time, the system can handle other events.
When generatePassword() finishes and returns a String, await() unpacks it and assigns it to the result variable. Only then does the last line execute: password = result, which triggers recomposition of the interface and displays the password.
Bridge between worlds: runBlocking
All functions we have learned so far, namely launch and async, require an existing scope (CoroutineScope) to work. However, there are situations in which we must wait until the coroutine world finishes its work before allowing the outside, blocking world to move on. This is what runBlocking is for. As the name suggests, it is a function that blocks the current thread on which it was called until all coroutines inside its block are completed.
Imagine asynchronous code flow as a river: coroutines flow freely without disturbing one another. runBlocking is like a dam that we build across the river.
- The water (thread) stops flowing past the dam.
- The whole stream is stopped until the work inside the dam is complete.
- Only when the last coroutine inside the
runBlockingblock finishes does the dam open, and the thread can continue executing the next lines of code below the block.
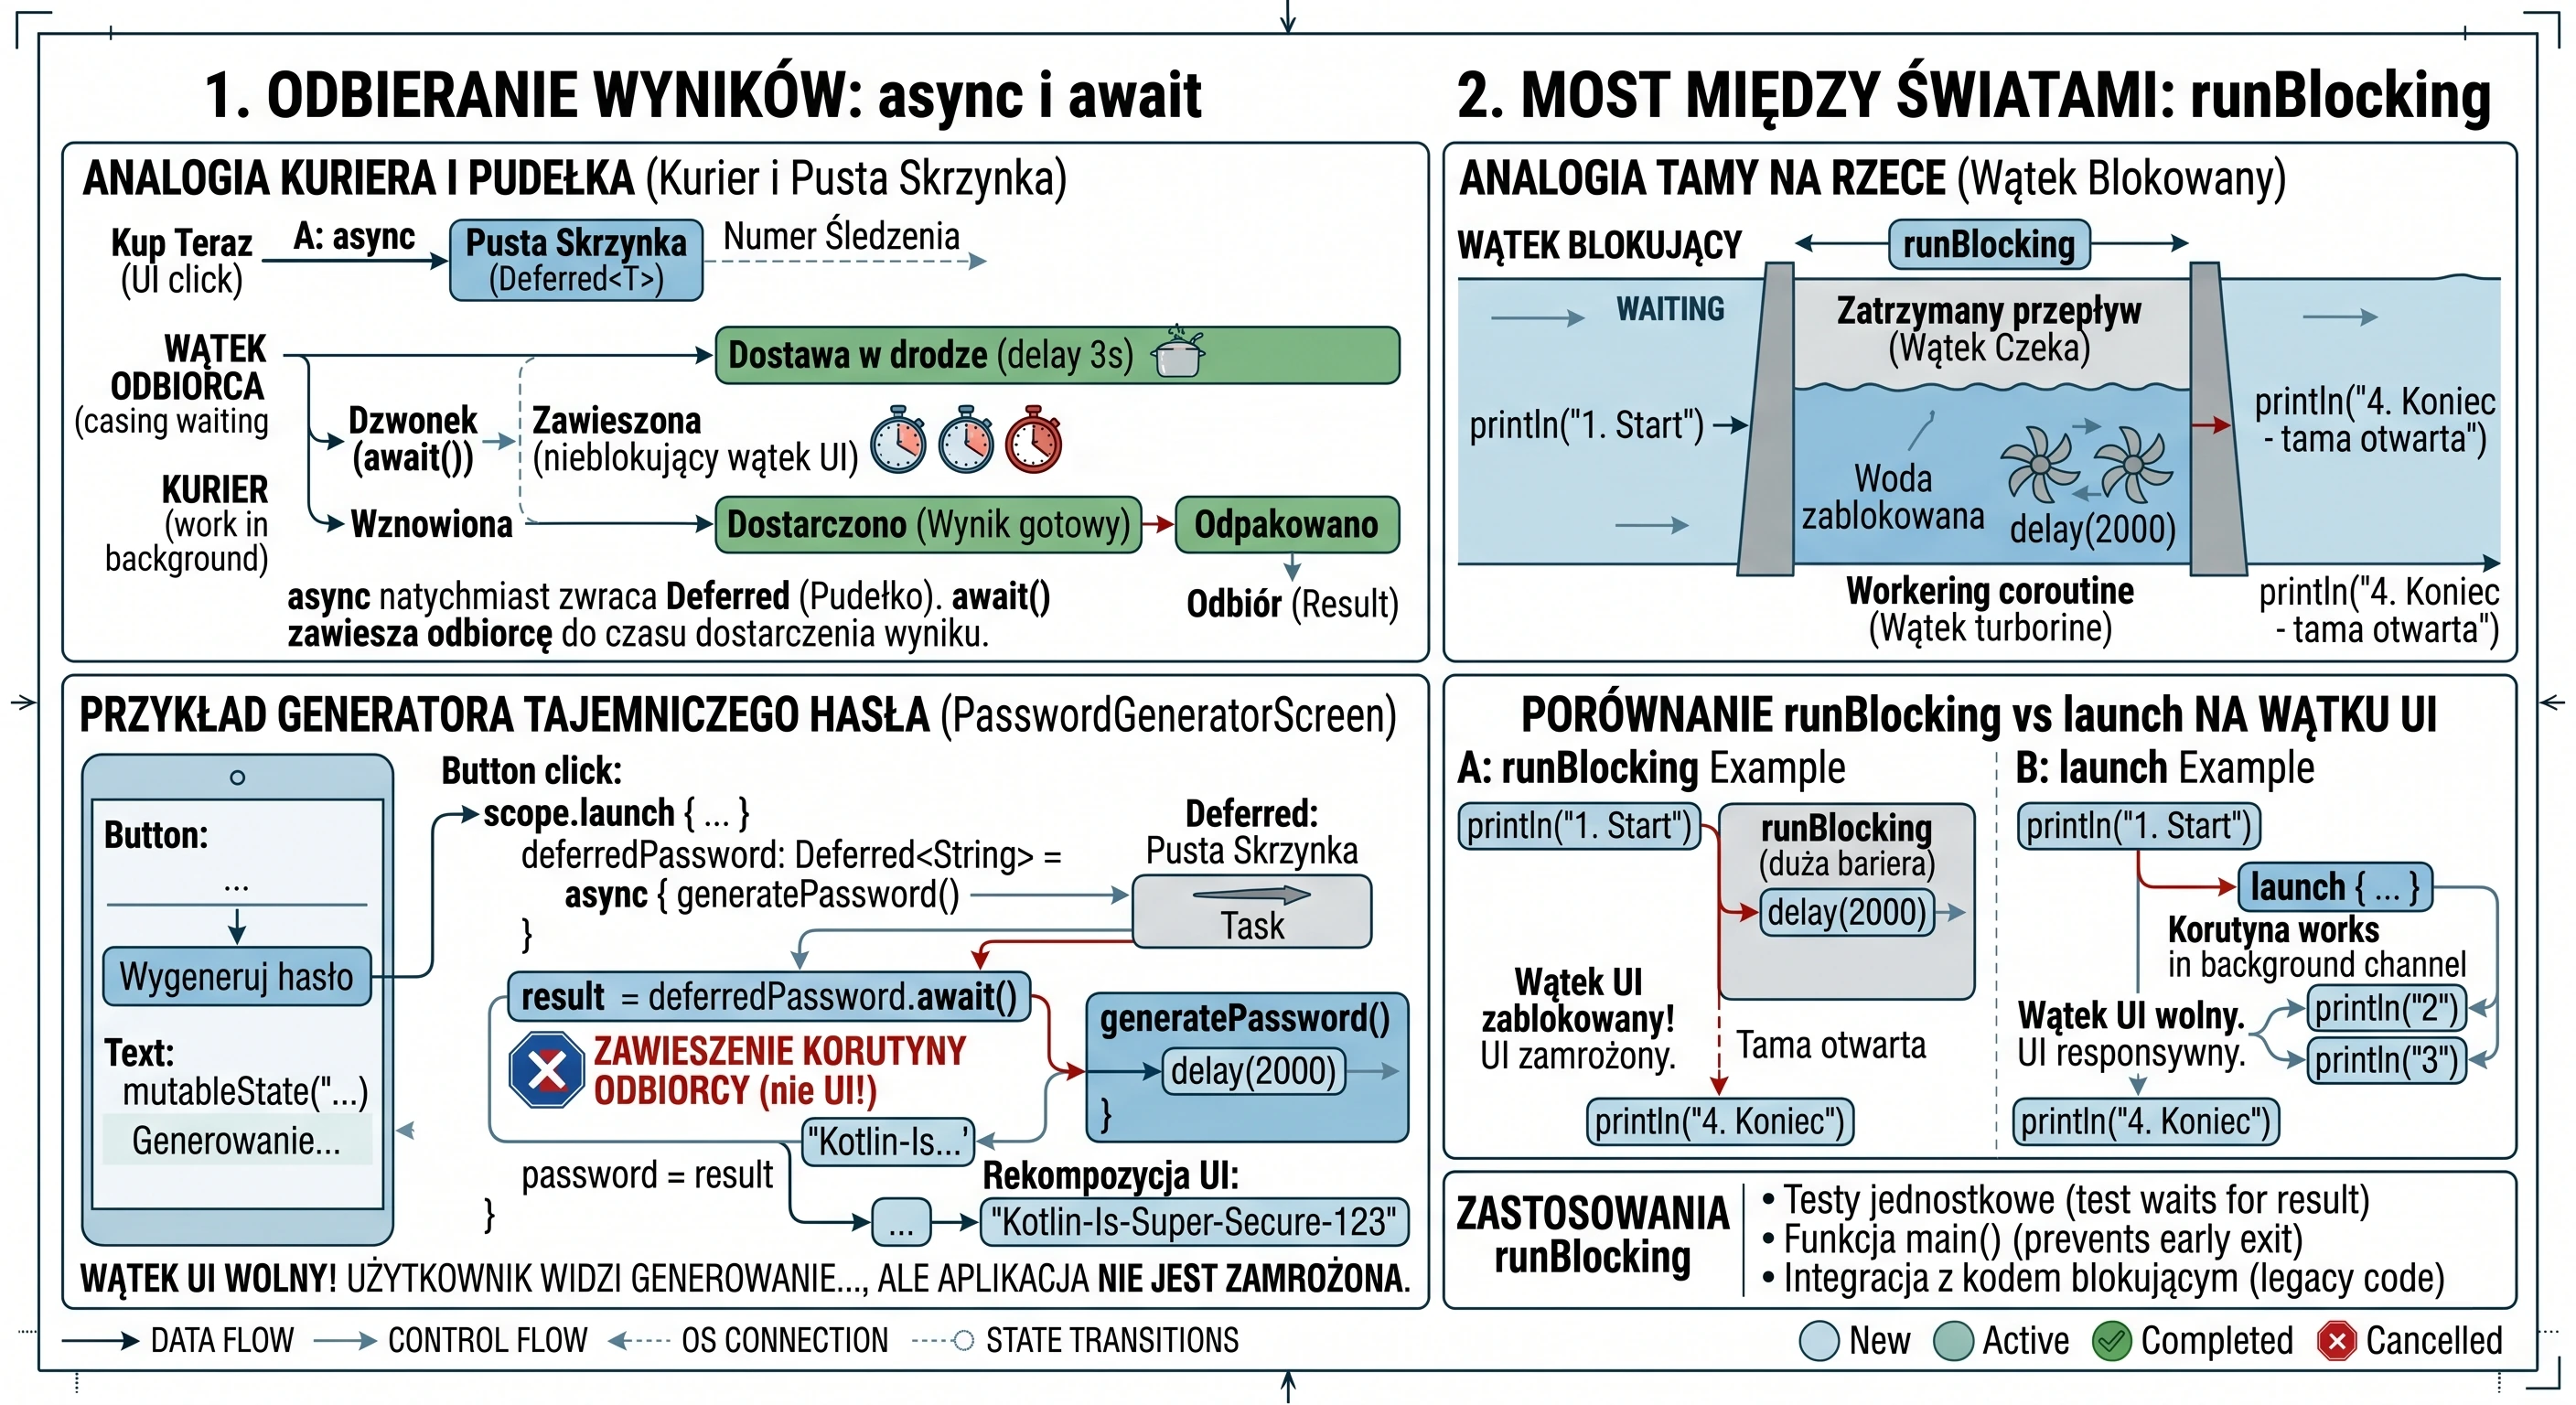
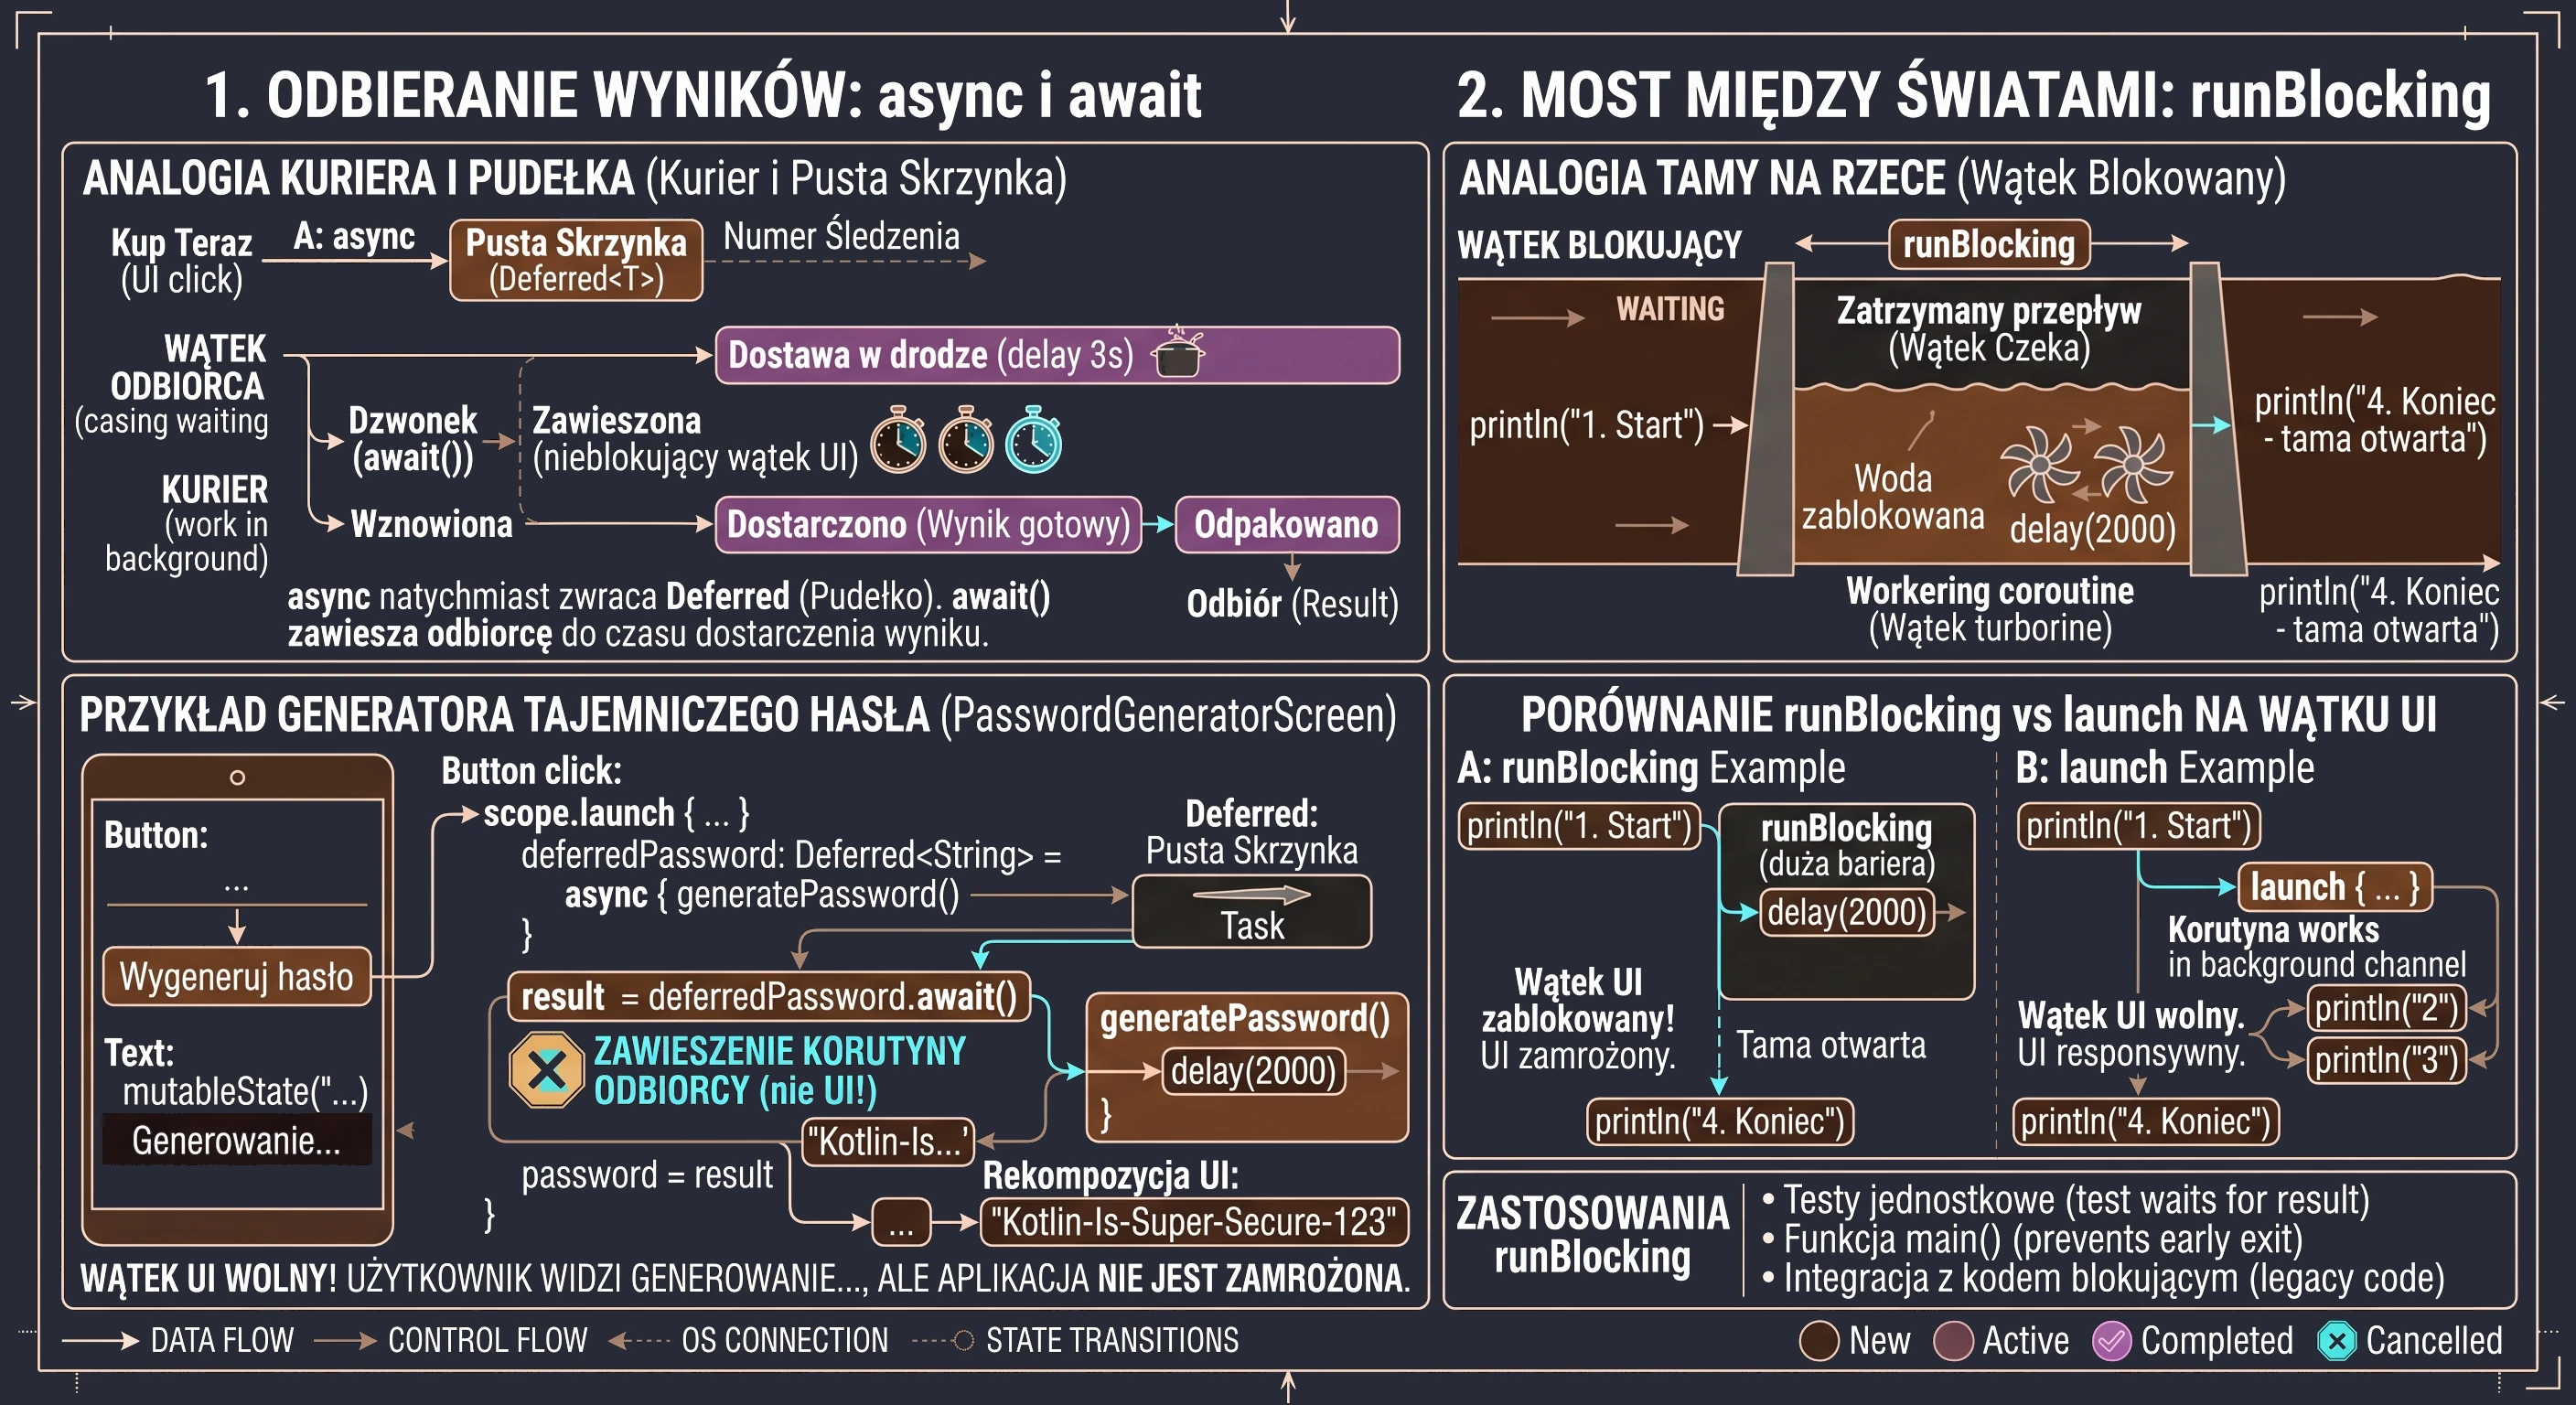
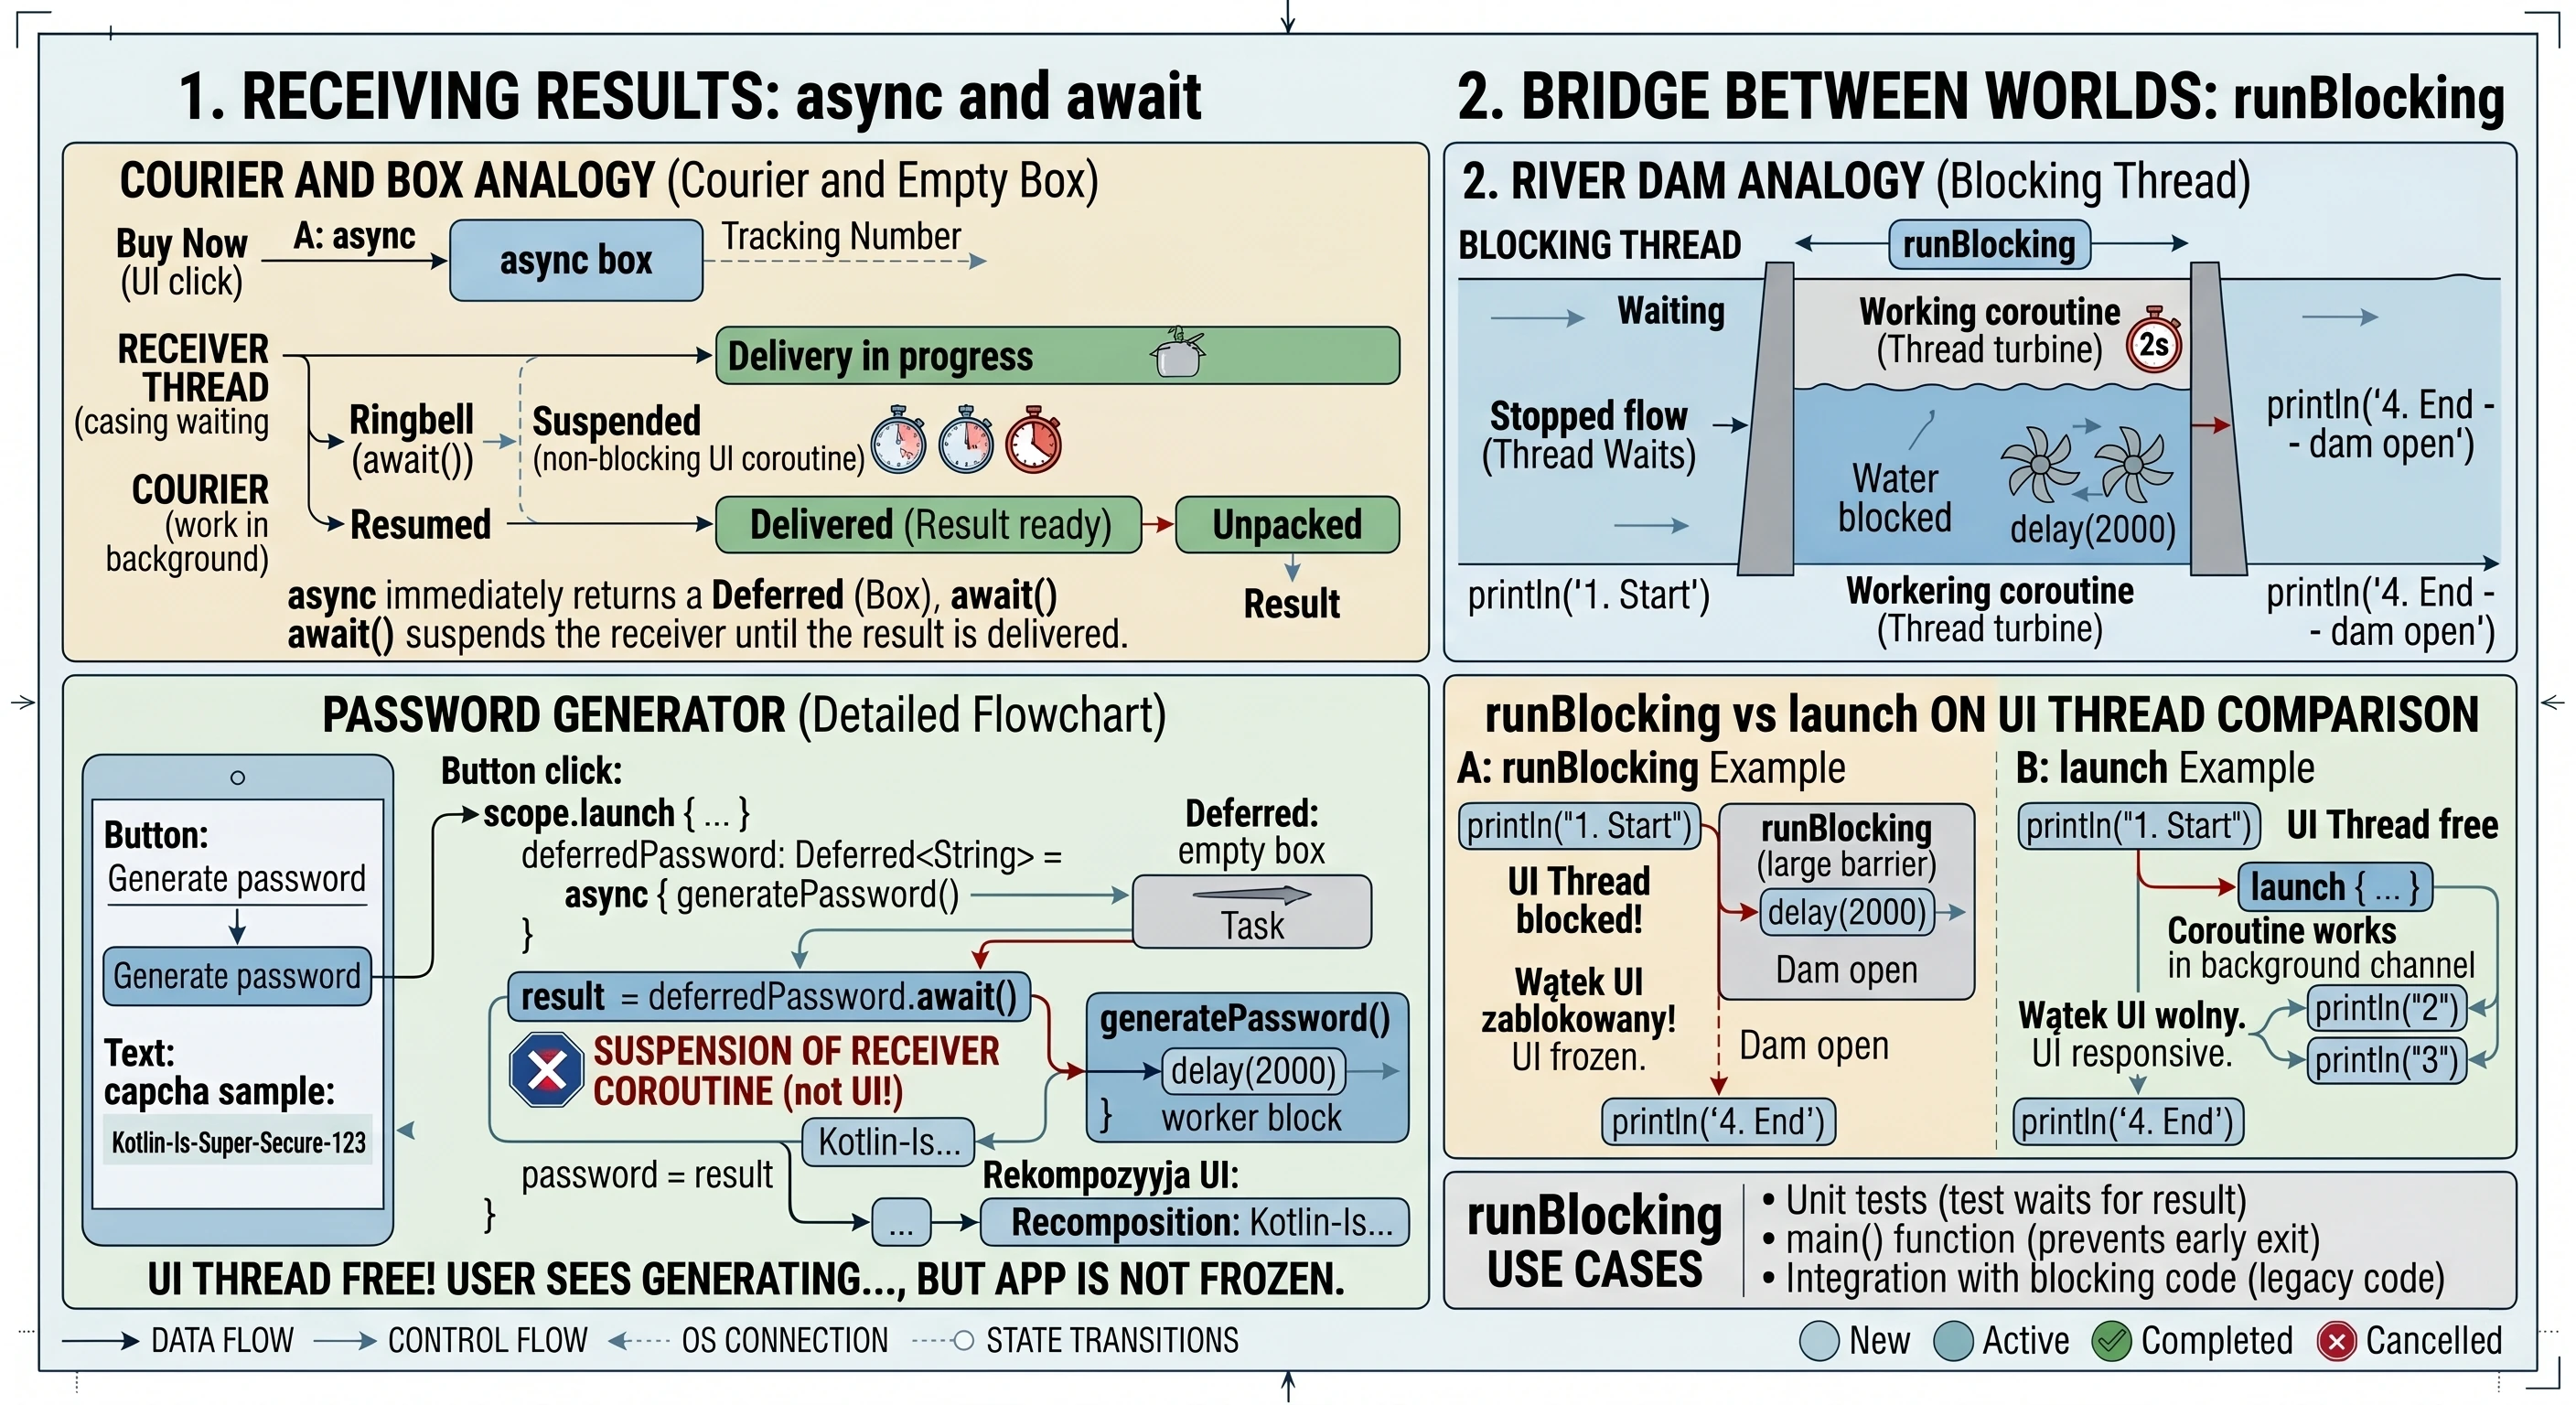
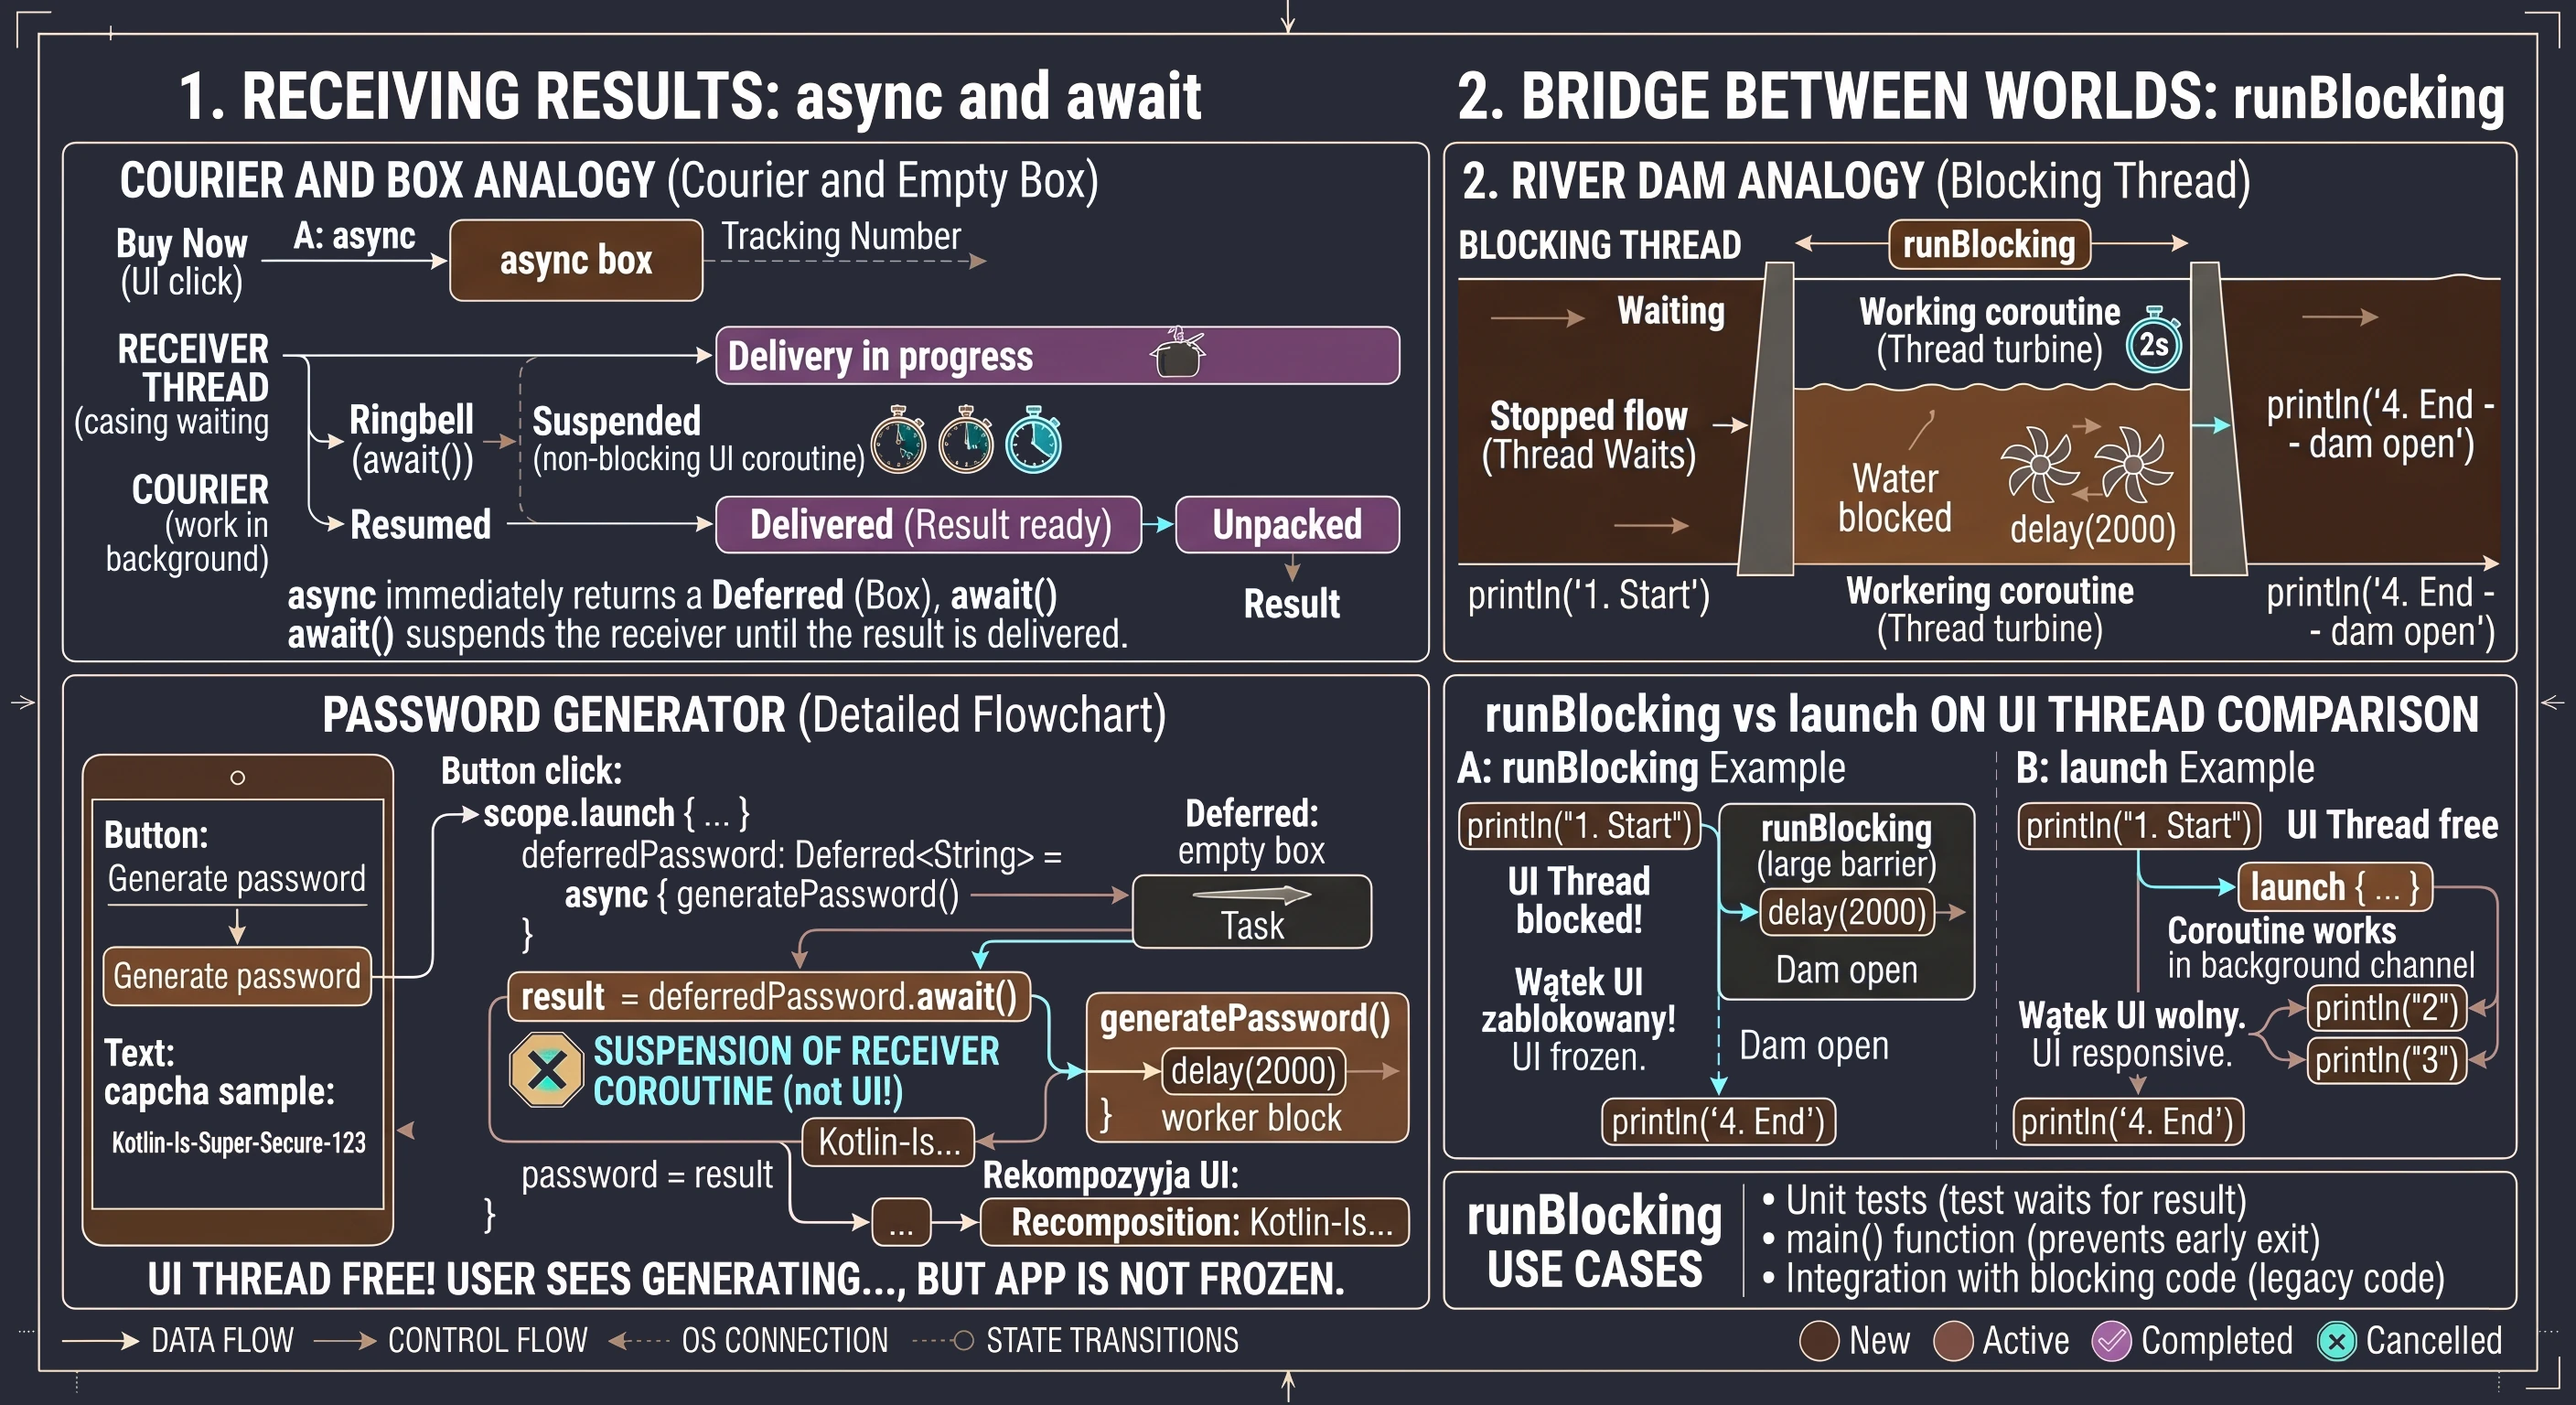
Use cases
Because runBlocking blocks the thread, calling it on the UI thread will immediately freeze the user interface for the entire duration of the operation inside the block. This brings us back to the exact problem coroutines were meant to solve.
So when is it useful?
- Unit tests: In tests, we want the test process to wait for the result of an asynchronous operation before checking the result correctness (assertion).
- main() function: In simple Kotlin console programs, when we need to stop the program from closing until coroutines finish their work.
- Integration with blocking code: When we must call asynchronous code inside a library that does not support coroutines and requires an immediate return value.
Comparison of mechanisms
The following example shows how runBlocking affects program flow compared with launch.
fun runBlockingExample() {
    println("1. Program start")

    // This block will stop the thread for 2 seconds!
    runBlocking {
        println("2. Inside runBlocking - start")
        delay(2000)
        println("3. Inside runBlocking - end")
    }

    println("4. Program end - this line waited for the dam")
}
In the code above, the text 4. Program end will appear only after 2 seconds. If we used launch instead of runBlocking in an appropriate scope, the text 4 would appear immediately after 2, because the river would continue flowing while the coroutine worked next to it.
The problem of monolithic code
At the beginning of working with Jetpack Compose, a natural instinct is to write all code inside a @Composable function. If UI is just a function, why not also put network data fetching or business logic inside it?
Let us look at code that works, but breaks software engineering principles. We call this anti-pattern "God Composable": a function that knows and does everything.
// STEP 1: naive code
@Composable
fun UserProfileScreen() {
    // UI state + logic in one place
    var userData by remember { mutableStateOf("Loading...") }
    val scope = rememberCoroutineScope() // Scope tied to the UI lifecycle

    Column {
        Button(onClick = {
            // Network operation directly in the UI
            scope.launch {
                try {
                    val user = api.getUser() // Simulate fetching (2 seconds)
                    userData = user.name.uppercase() // Business logic
                } catch (e: Exception) {
                    userData = "Error!"
                }
            }
        }) {
            Text("Fetch data")
        }
        Text(userData)
    }
}
We run the application, click the button and the data is fetched. Everything looks great until we rotate the phone. When the configuration changes, for example when the screen rotates, Android destroys and recreates the activity. The remember function loses its memory. A user who was waiting for data suddenly sees the initial Loading... screen again.
We already know the solution to this problem from the previous semester. Let us try to fix the code:
// rememberSaveable
var userData by rememberSaveable { mutableStateOf("Loading...") }
Does this solve the problem? Only superficially and only in trivial cases. When we try to apply this in a larger application, we encounter three critical problems that rememberSaveable will not solve:
- Coroutine death:
rememberCoroutineScopeis tightly tied to the view. If you rotate the screen while data is being fetched, for example on slow WiFi, the old view dies and the coroutine is cancelled with it. The download is interrupted halfway through. A new screen is created, but it knows nothing about the previous screen fetching anything. The user clicks, waits and gets nothing. - Memory limitations (Bundle):
rememberSaveablestores data in the systemBundle. It is intended for small data, such as text and numbers. If we try to store a list of 500 JSON objects fetched from an API, the application will throw aTransactionTooLargeExceptionand close. - Testability: How do we test whether a surname is correctly converted to uppercase? In the current code, it is impossible without running an emulator, because the logic is cemented inside the button.
We conclude that a Composable function is not the right place to store data or perform operations. We need a place that:
- Survives screen rotation, unlike
rememberSaveable. - Allows coroutines to finish work even when the view is destroyed.
- Has no data size limit, unlike
Bundle.
To understand why architecture is needed, let us use a construction analogy:
- Building a doghouse (no architecture): You can do it yourself. If you hammer a nail in the wrong place, it is easy to fix. These are small, simple applications.
- Building a skyscraper (with architecture): Here you need a plan. The electrician (data layer) does not paint walls, and the painter (UI layer) does not install gas pipes. In a large project, if a Composable handles API logic, it is like a painter trying to repair an elevator.
Therefore, we need a construction manager who keeps the plans in an office, safe from renovation work, and coordinates the tasks. The component we will introduce shortly will play that role.
Evolution of architectural patterns
Now that we know putting everything into one bag ("God Composable") is not a good solution, we need to think about how to divide an application. In software engineering, this problem is not new. Over decades, many different approaches to this issue have emerged. One of them is the MVx family of patterns, which differ in how the data layer communicates with the visual layer.
To understand the differences between them, we will use simple analogies.
MVC (Model-View-Controller)
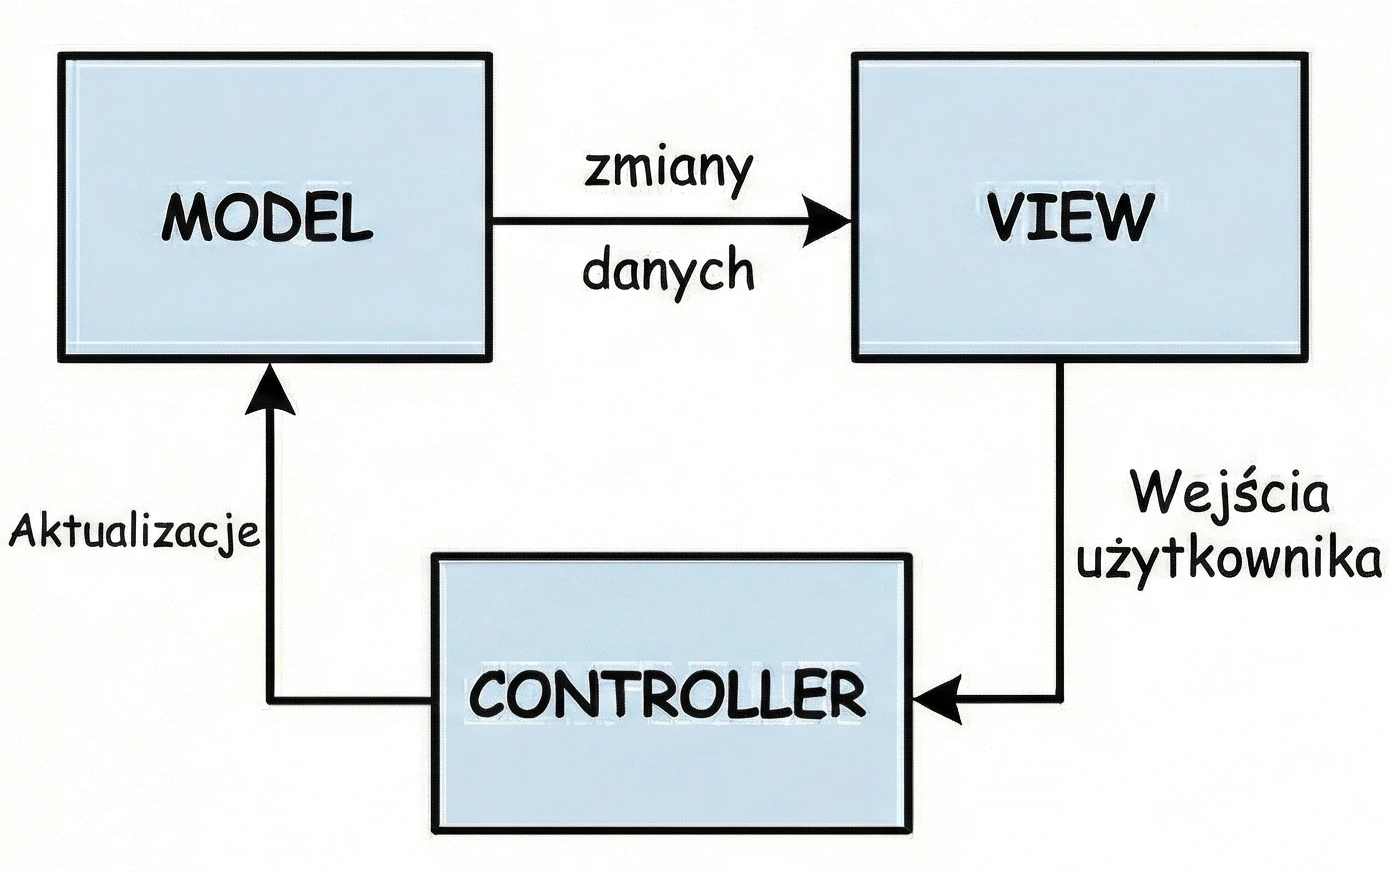
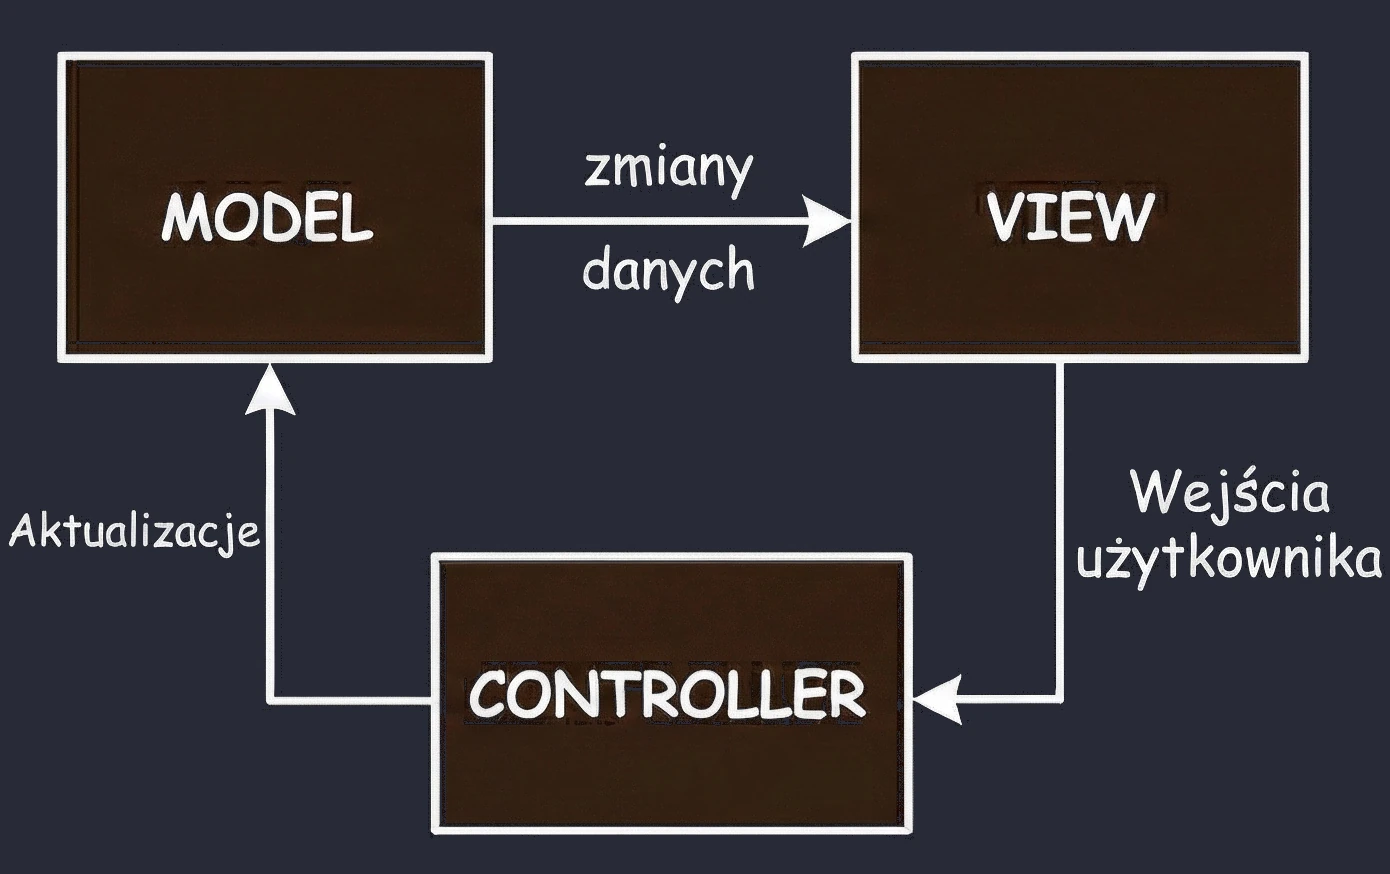
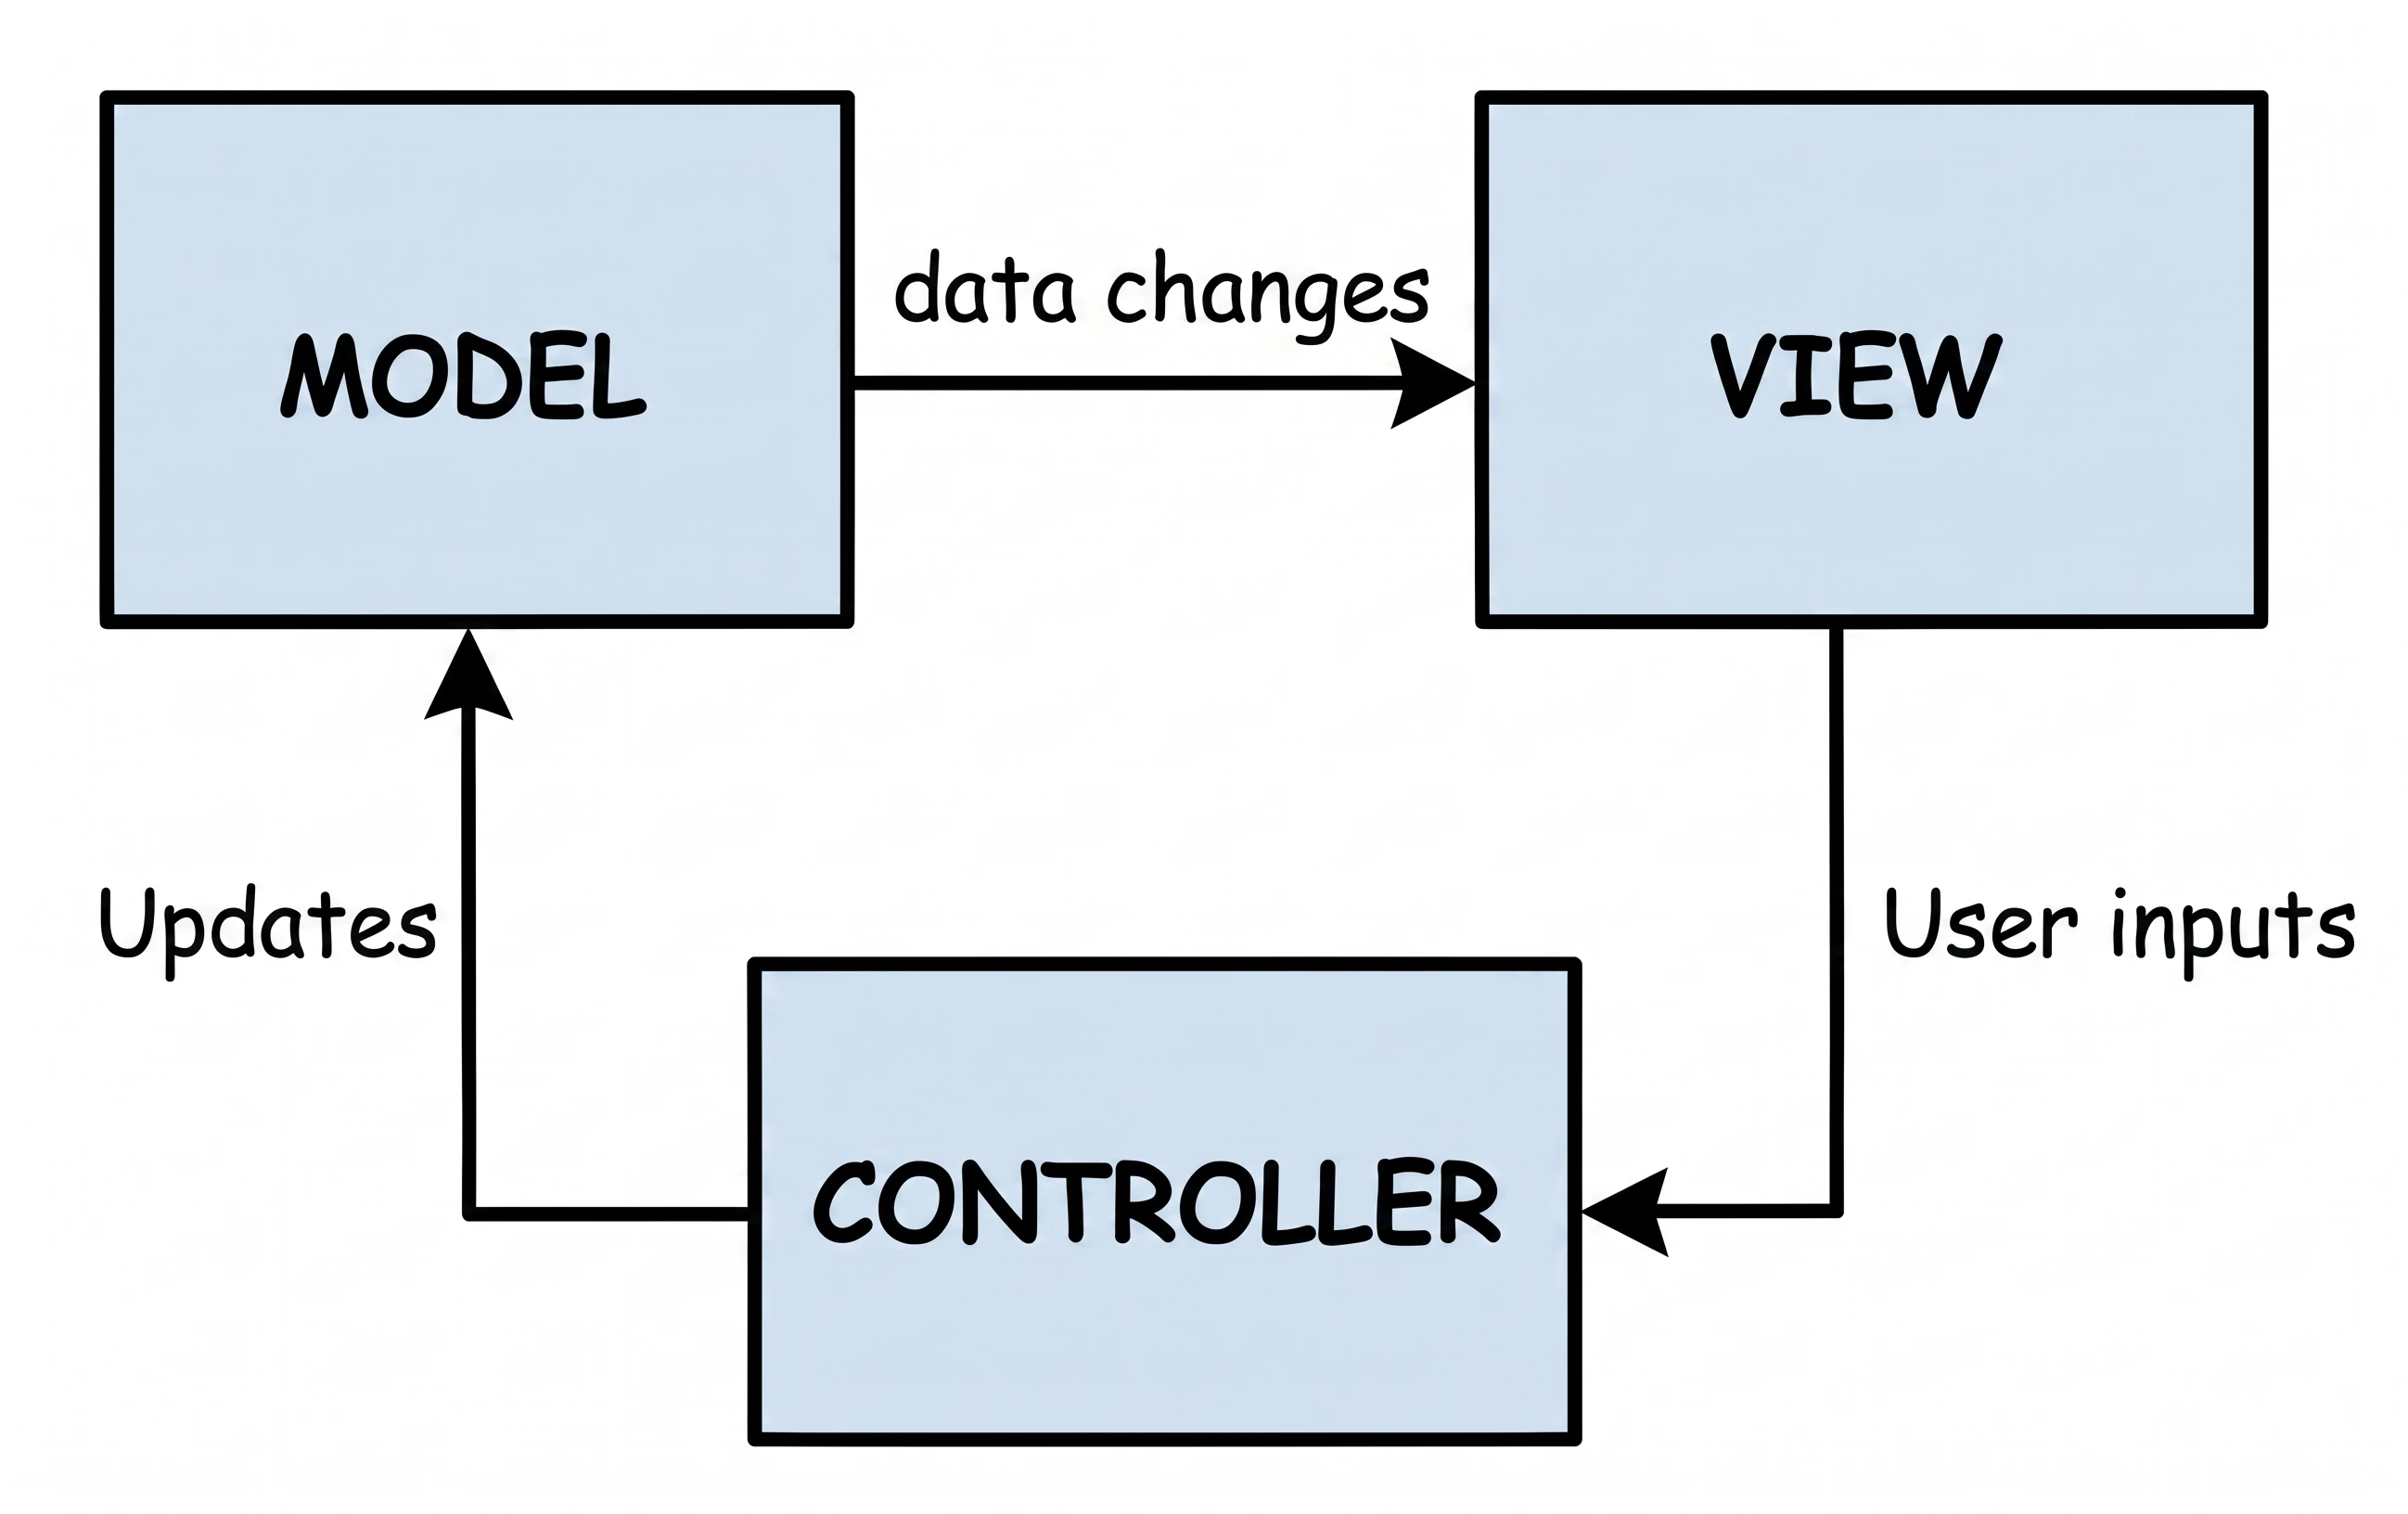
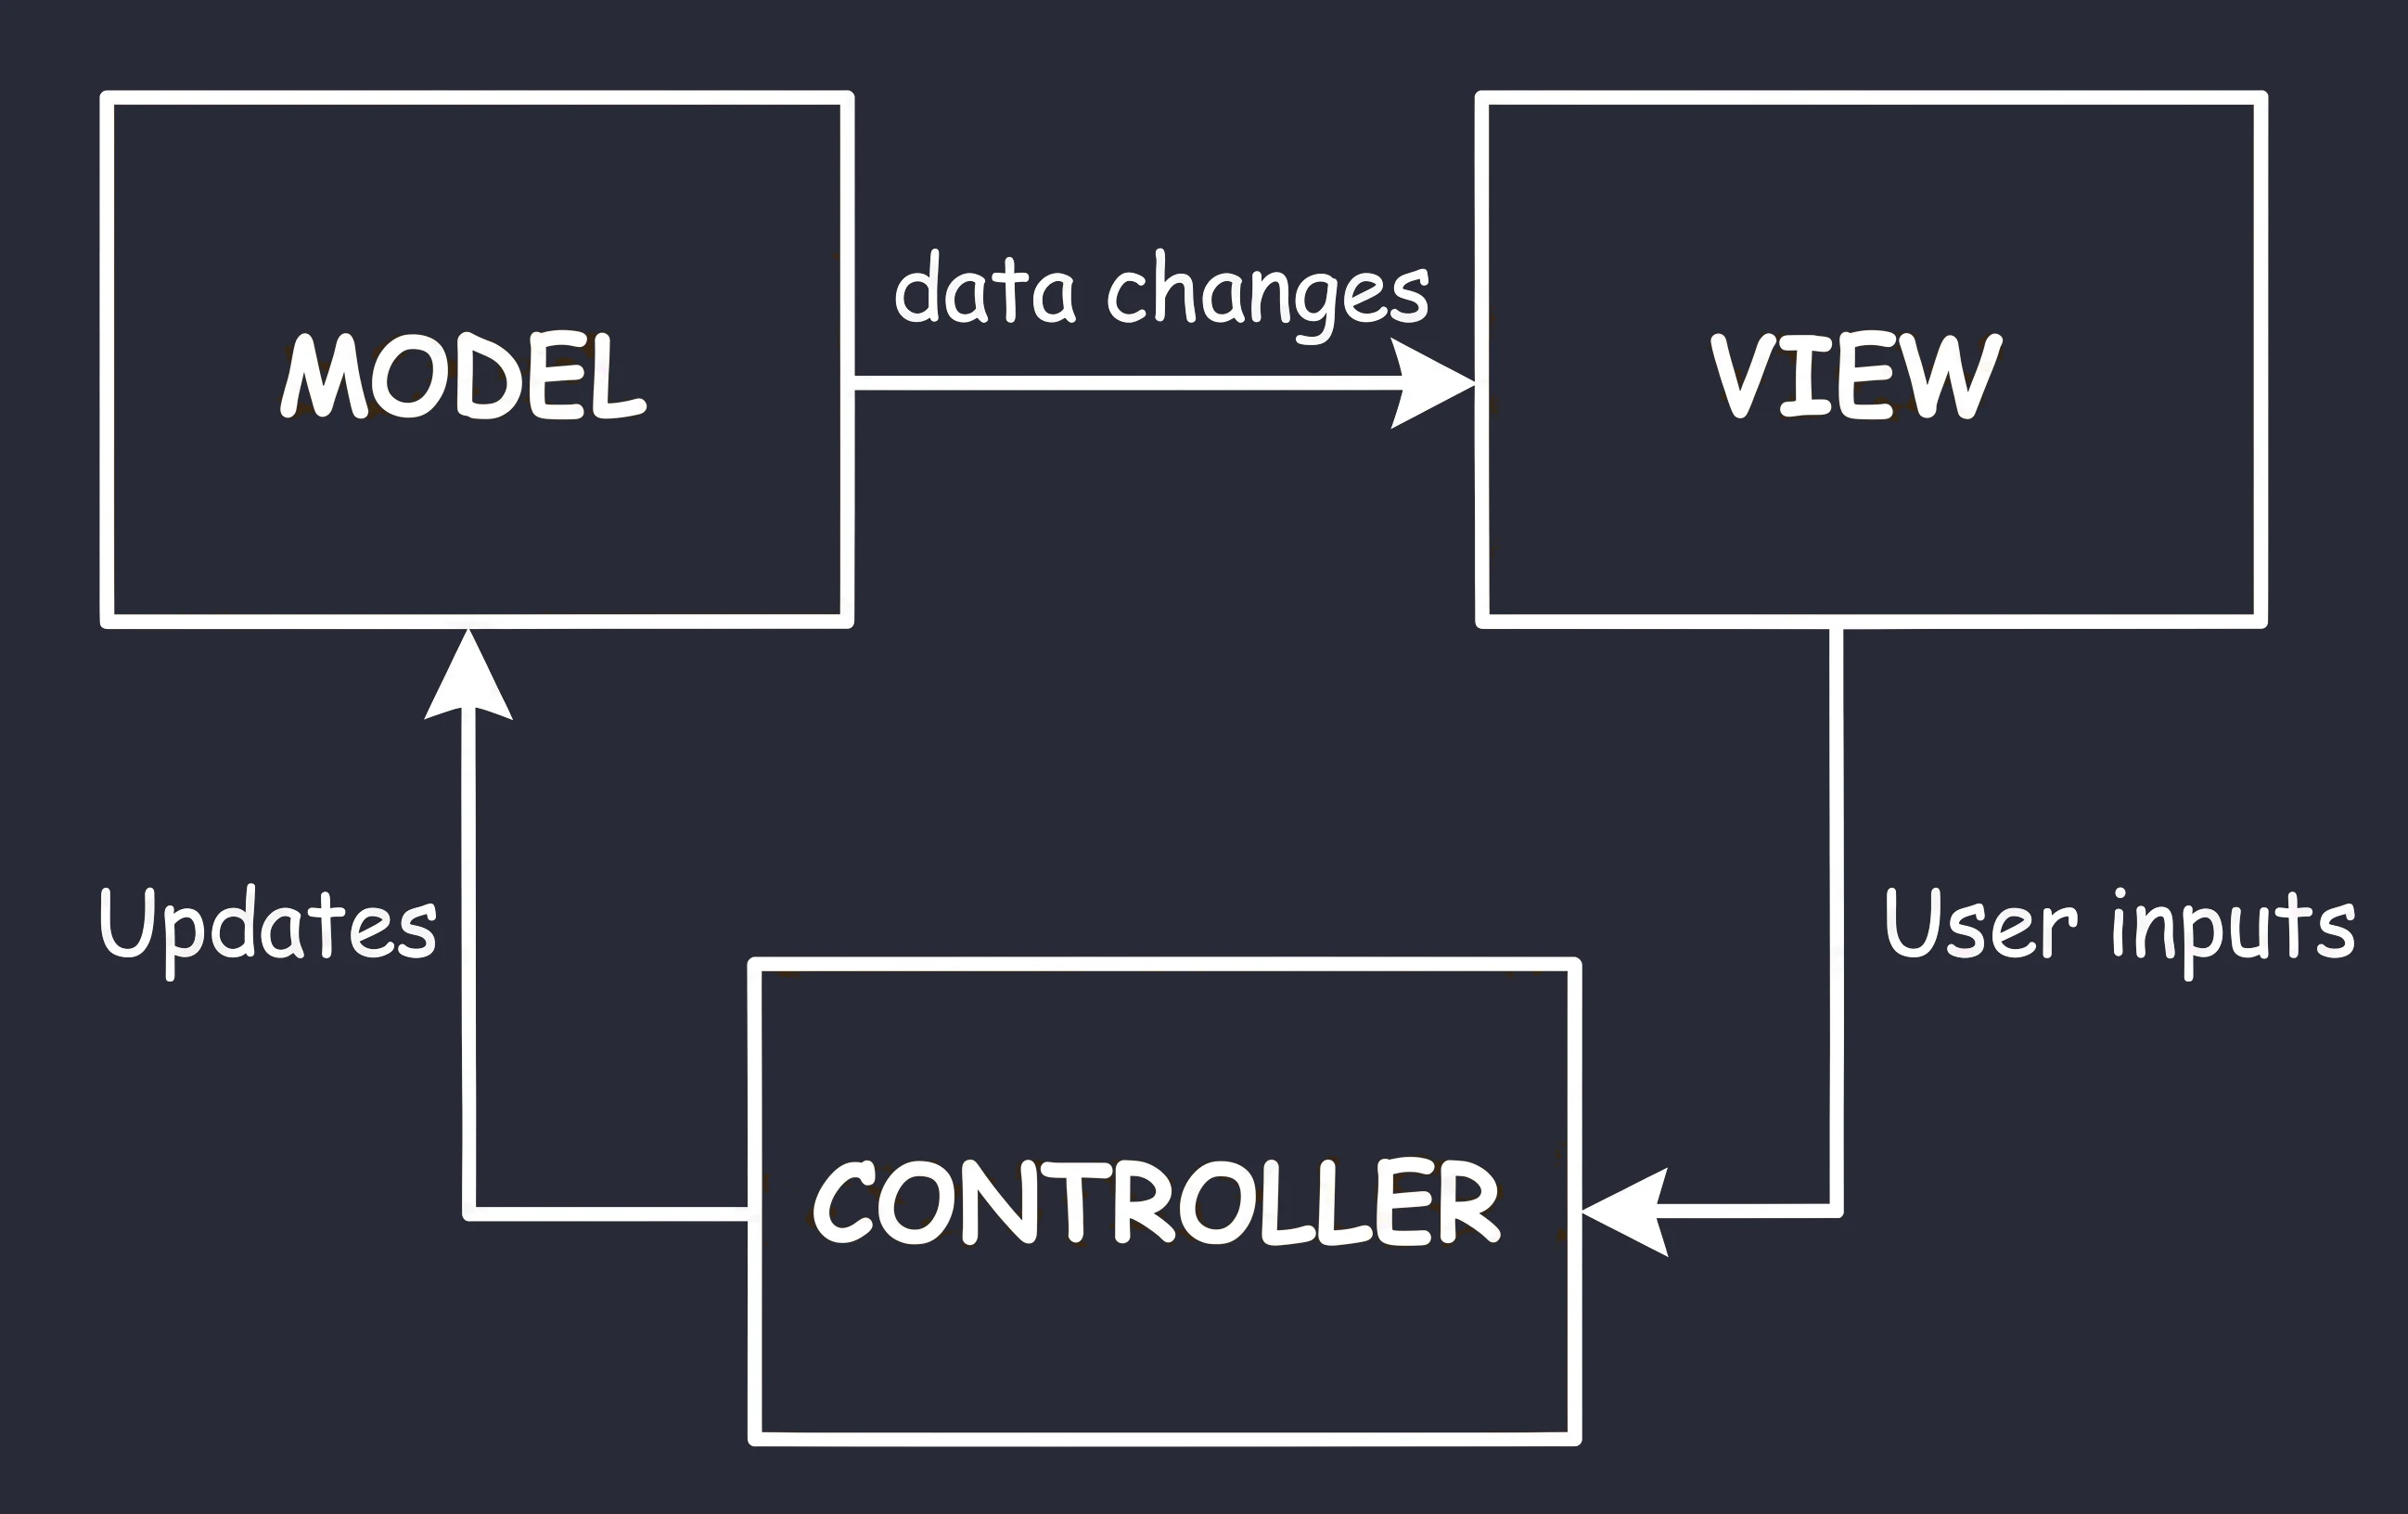
This is the oldest approach, which can be compared to visiting a traditional shop where the seller hands you the product.
- You (View): You stand in front of the counter. You see the product, but you are passive; you cannot take it yourself.
- Seller (Controller): The seller controls the process. You say: I would like bread (interaction).
- Storage room (Model): The seller goes to the back room, checks stock and takes the product.
Conclusion: In this setup, the seller (Controller) decides everything. The seller must know what the storage room looks like and decides what to show the customer. The seller must also be able to point to the specific customer who should receive the product.
MVP (Model-View-Presenter)
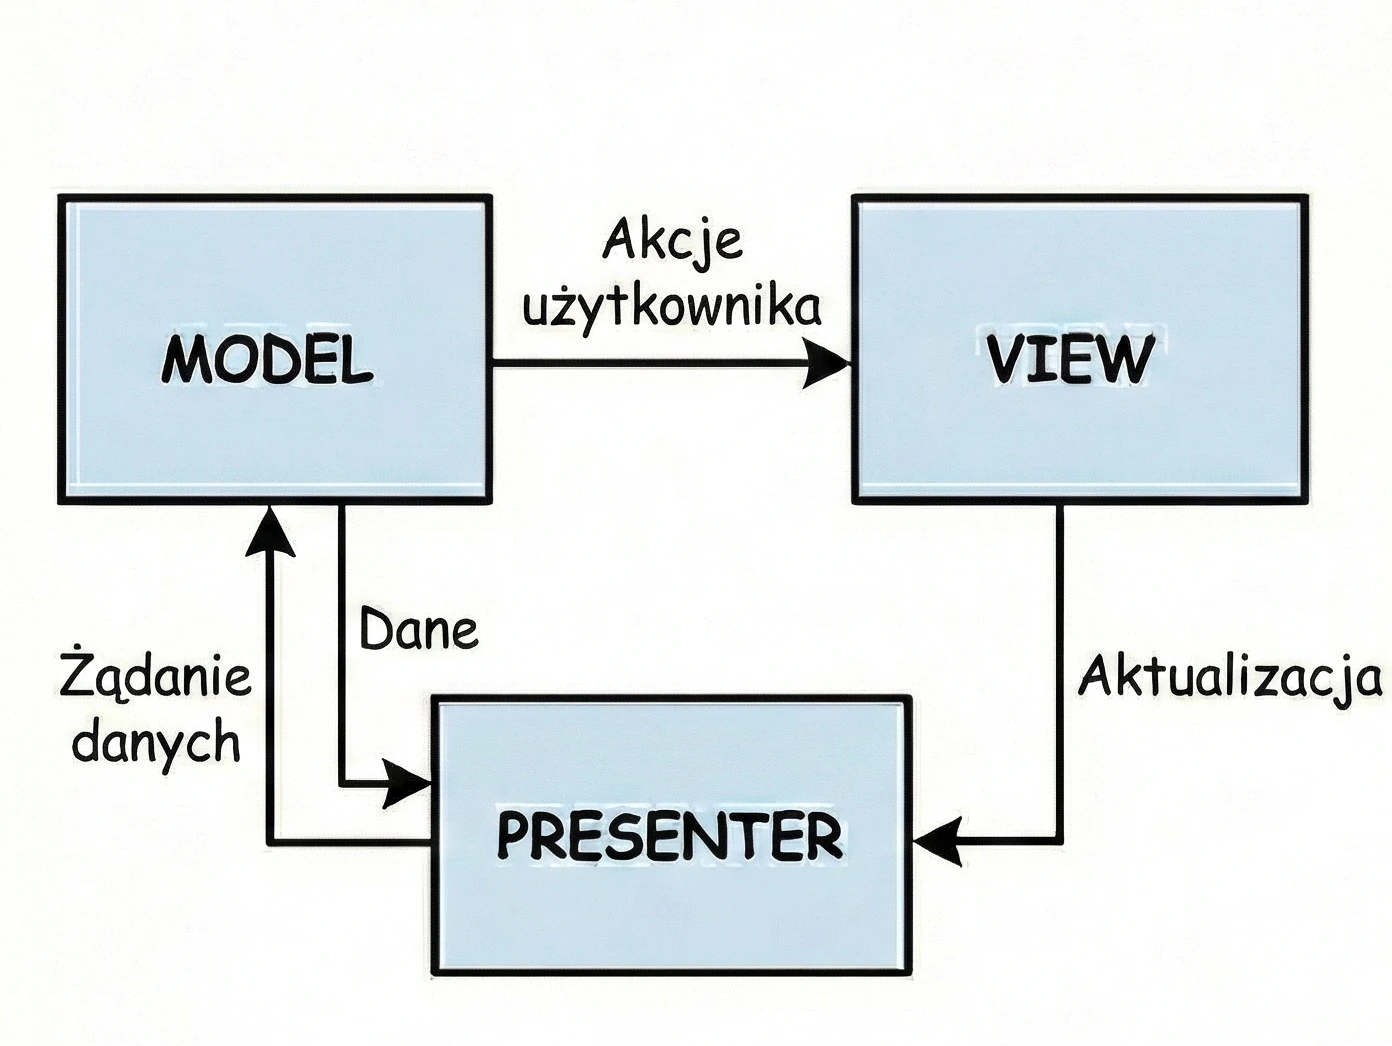

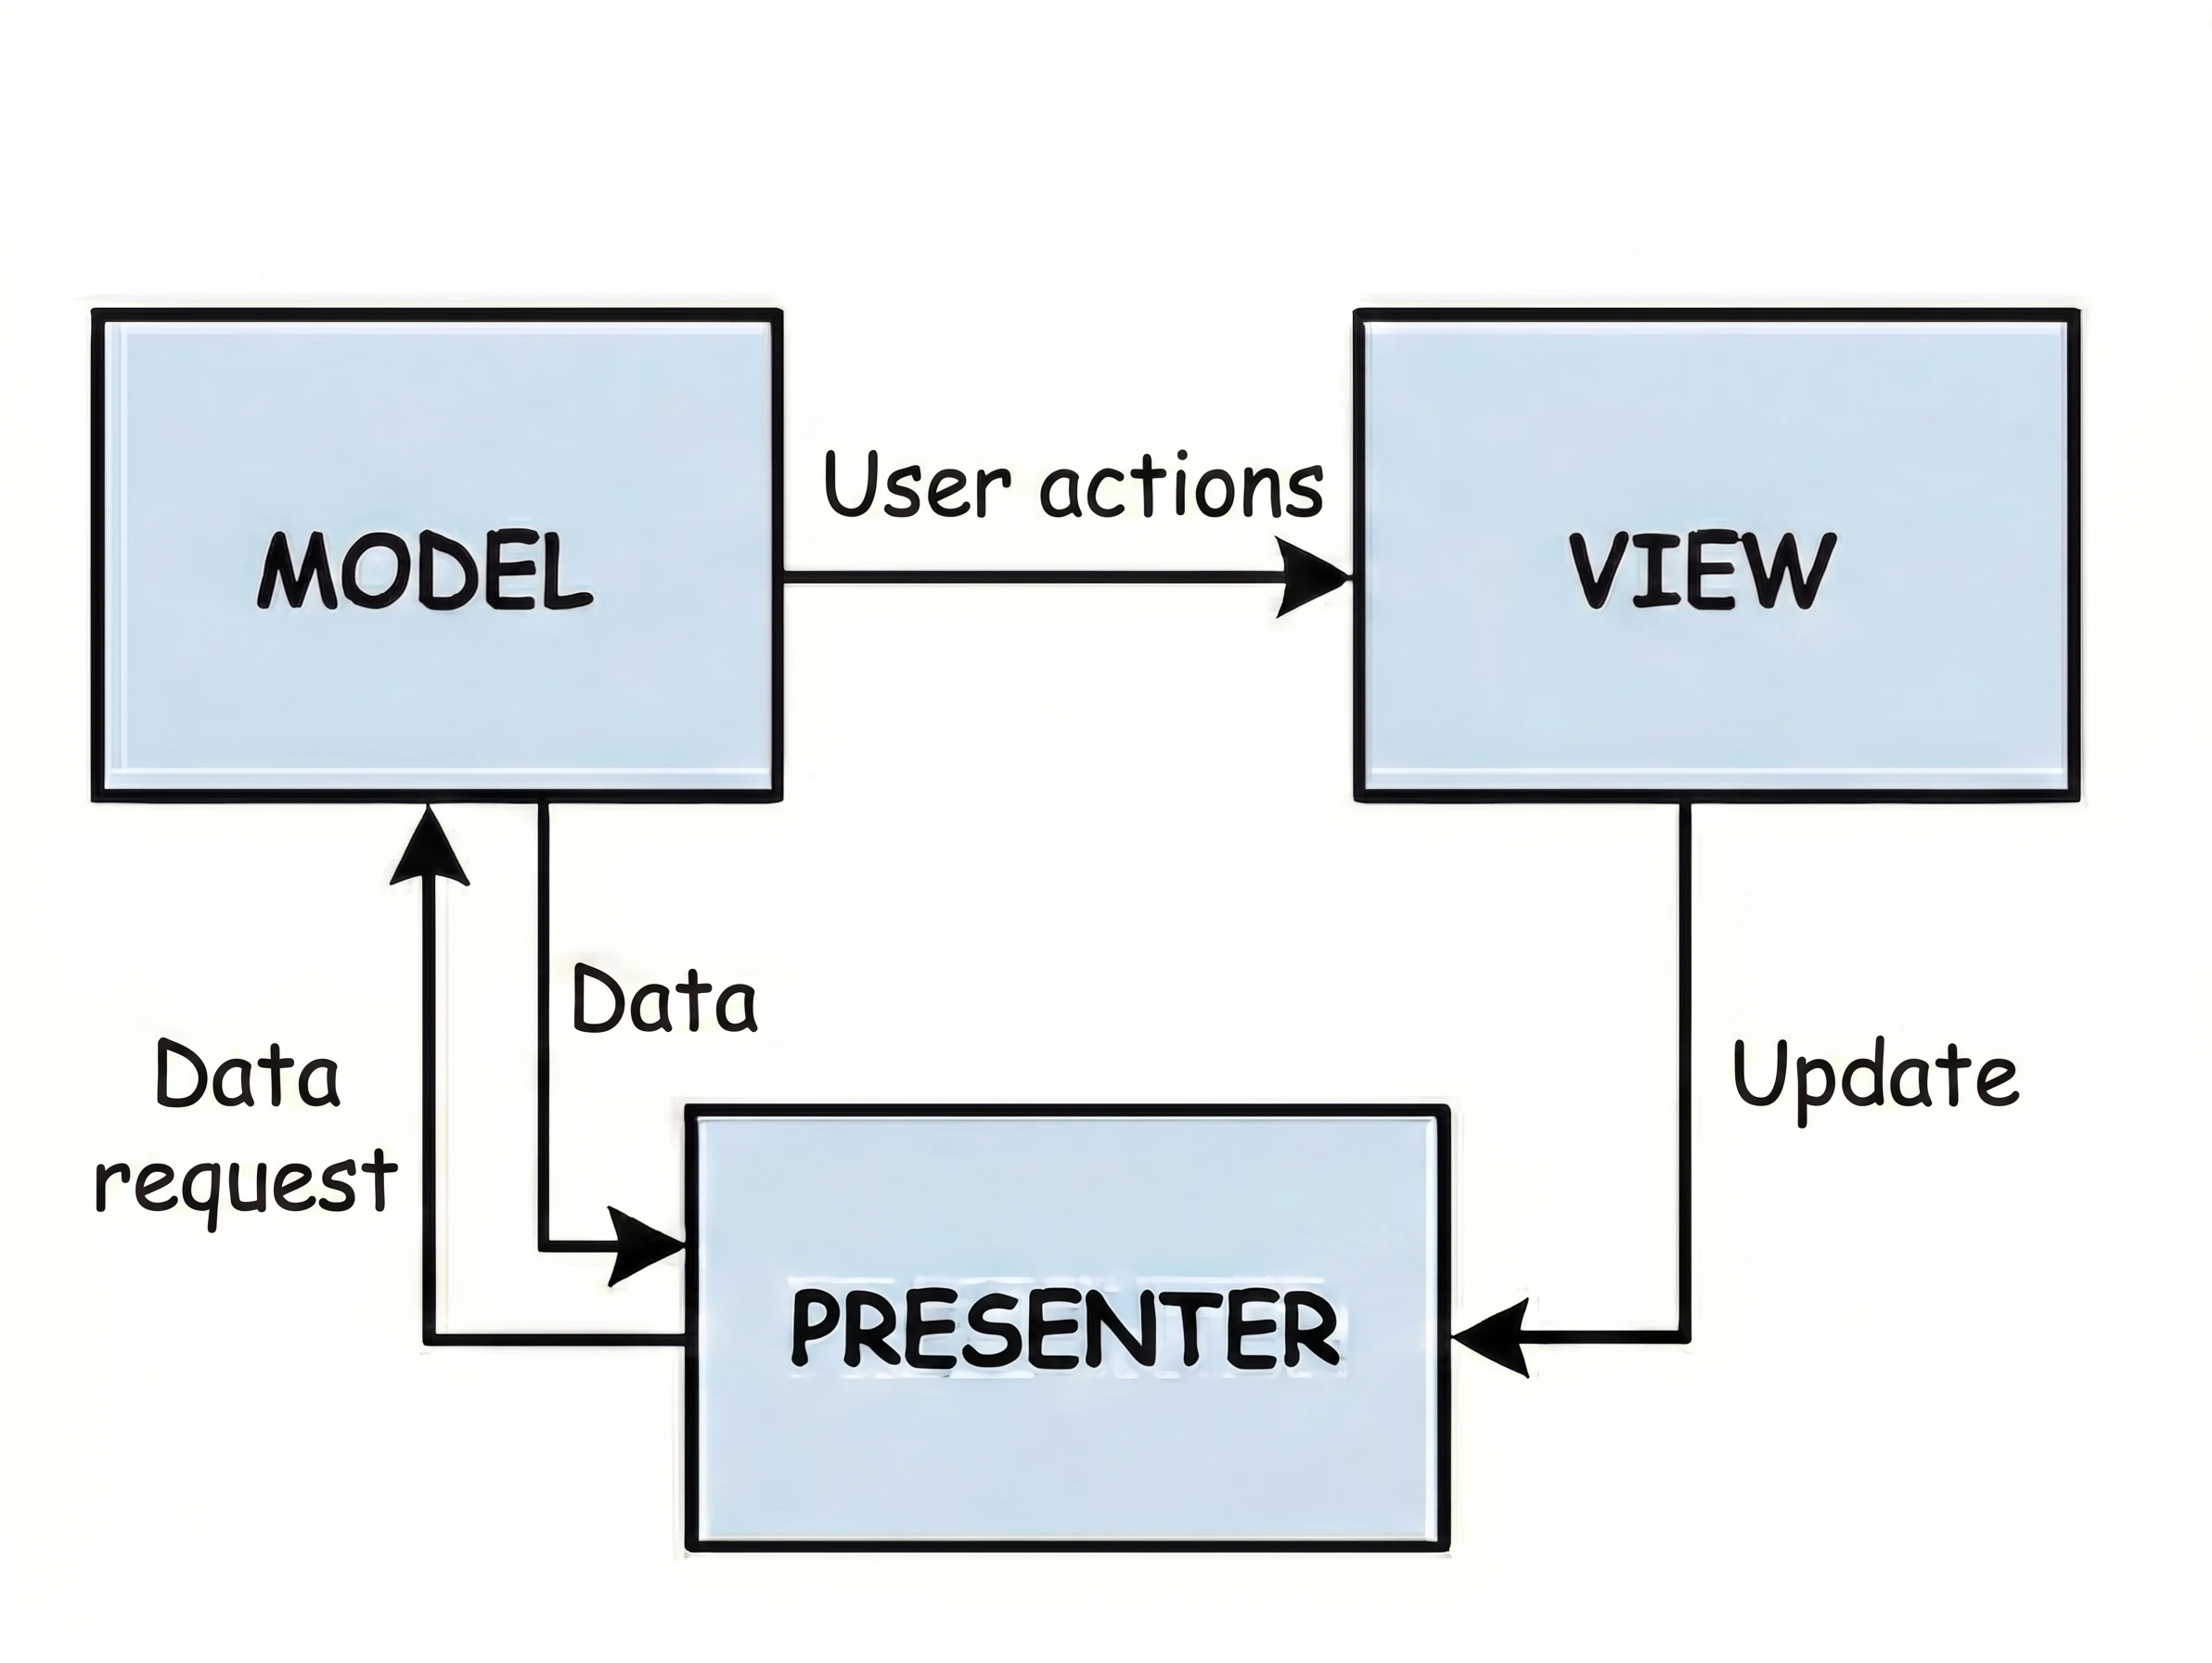
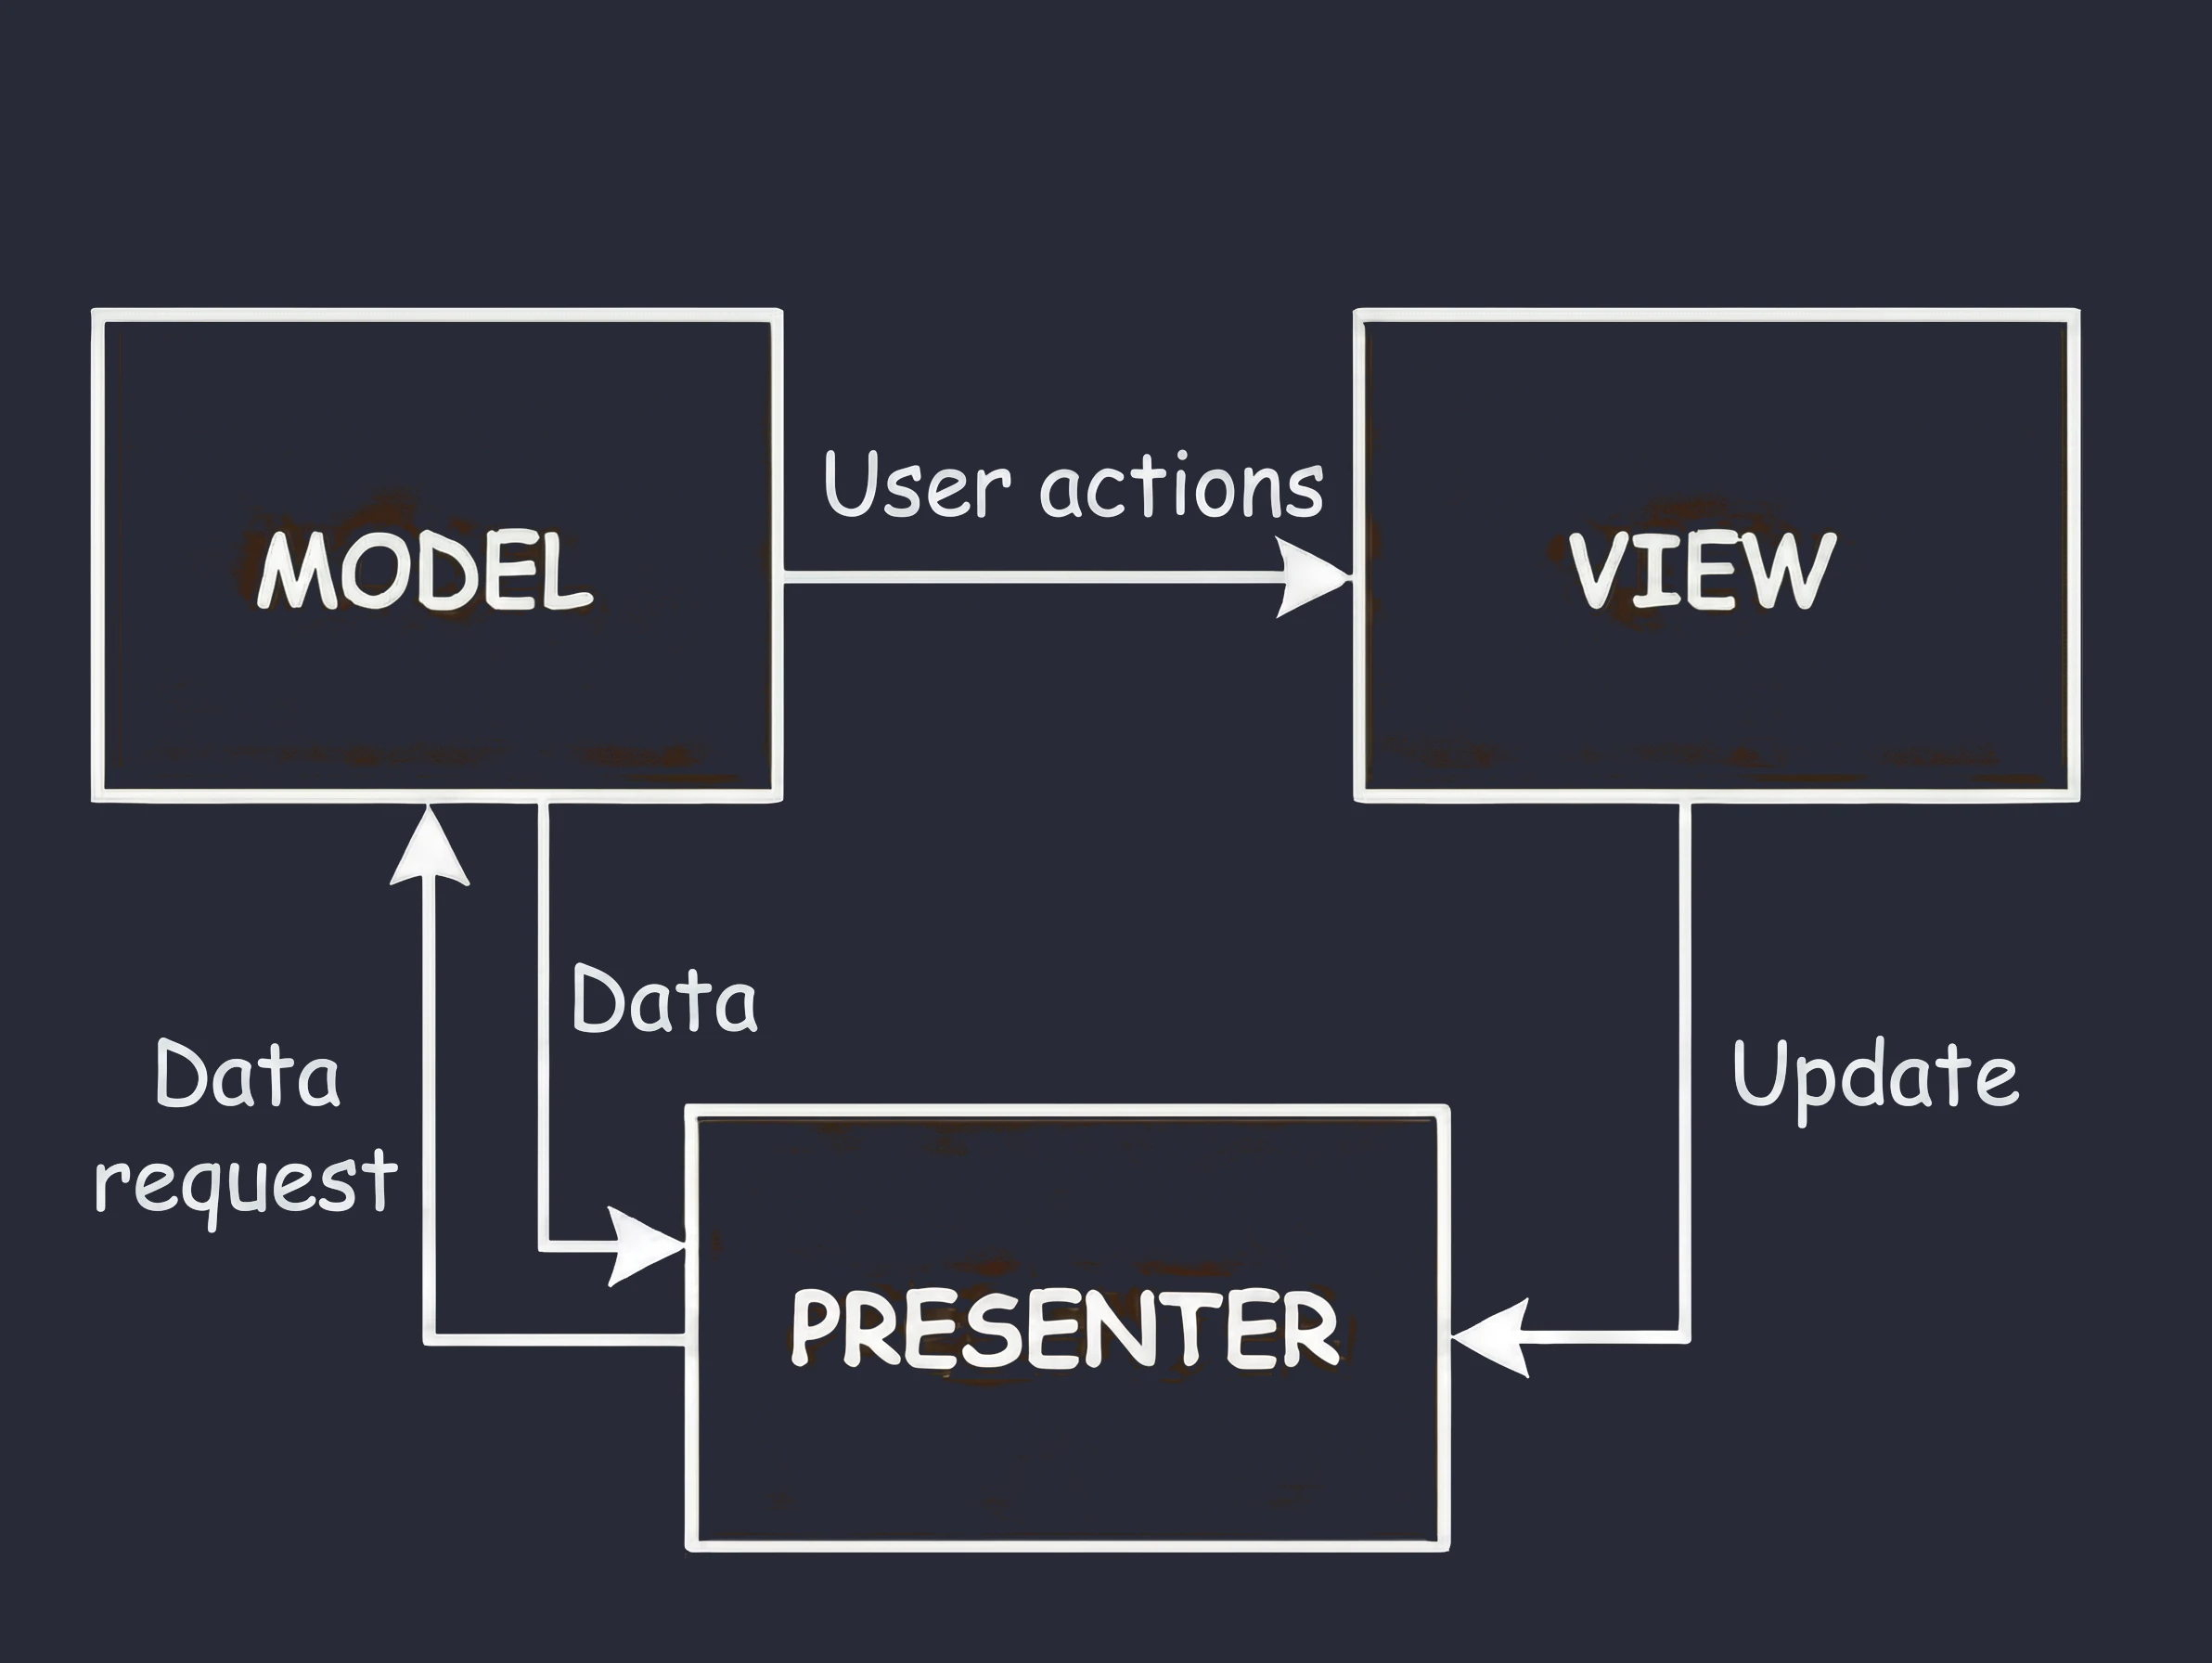
This is the second variant from the MVx pattern family.
- Customer at the table (View): You sit and wait. You do not know and do not care what happens in the kitchen.
- Waiter (Presenter): The waiter takes the order and goes to the kitchen (Model).
- Key feature: The waiter comes back from the kitchen and personally places the plate on your table.
In code, this means that the Presenter (waiter) holds a reference to the View (customer). It calls a specific method on it, for example view.showDinner(). Problem: This is a rigid 1:1 connection. The waiter must know the exact table. If the customer goes to the restroom (screen rotation/view destruction), and the waiter returns with the plate and tries to place it on an empty seat, an error occurs (NullPointerException); the customer must be available.
MVVM (Model-View-ViewModel)
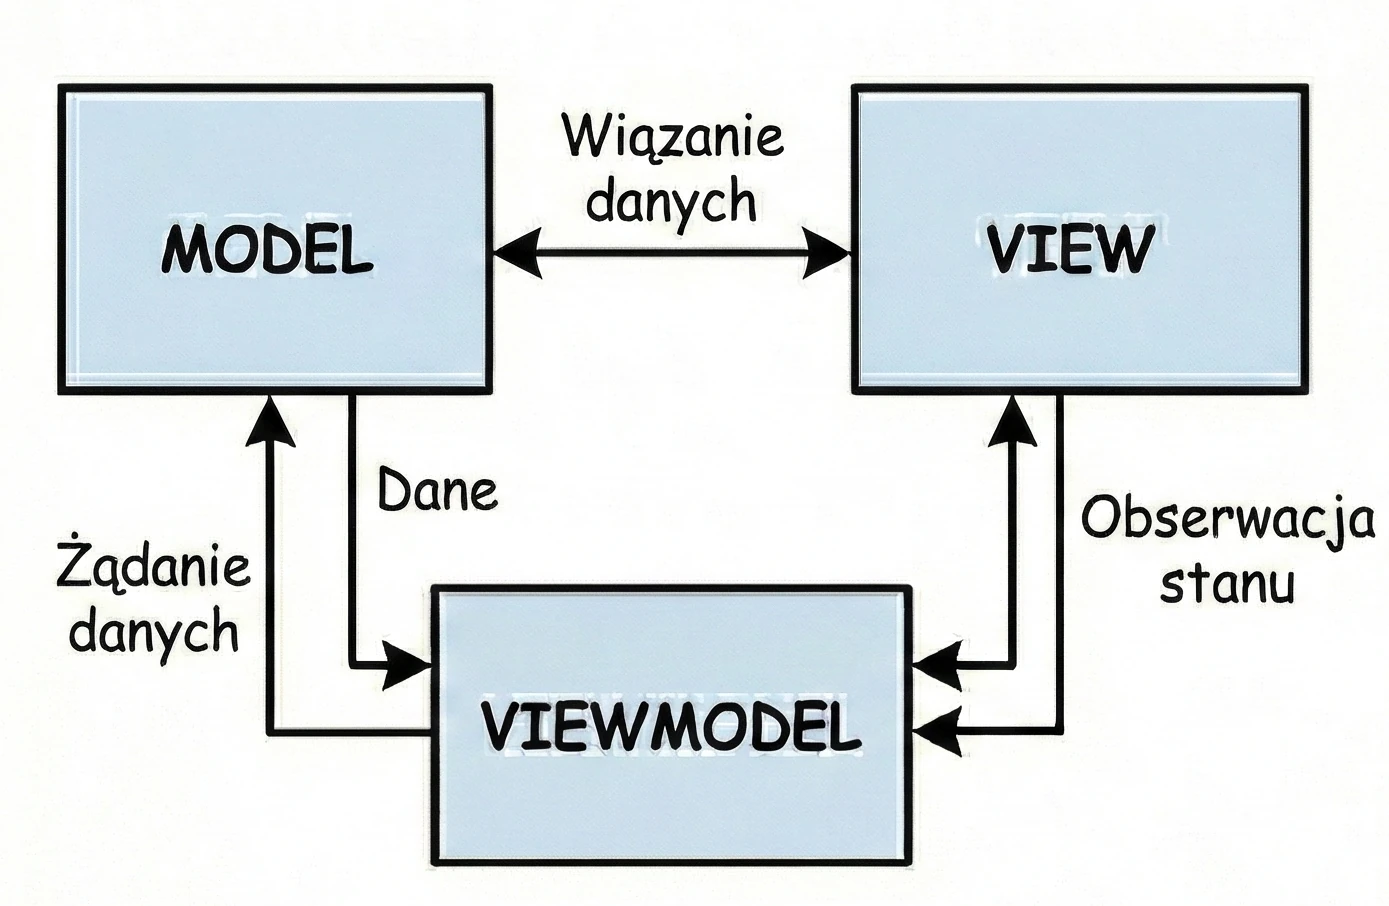
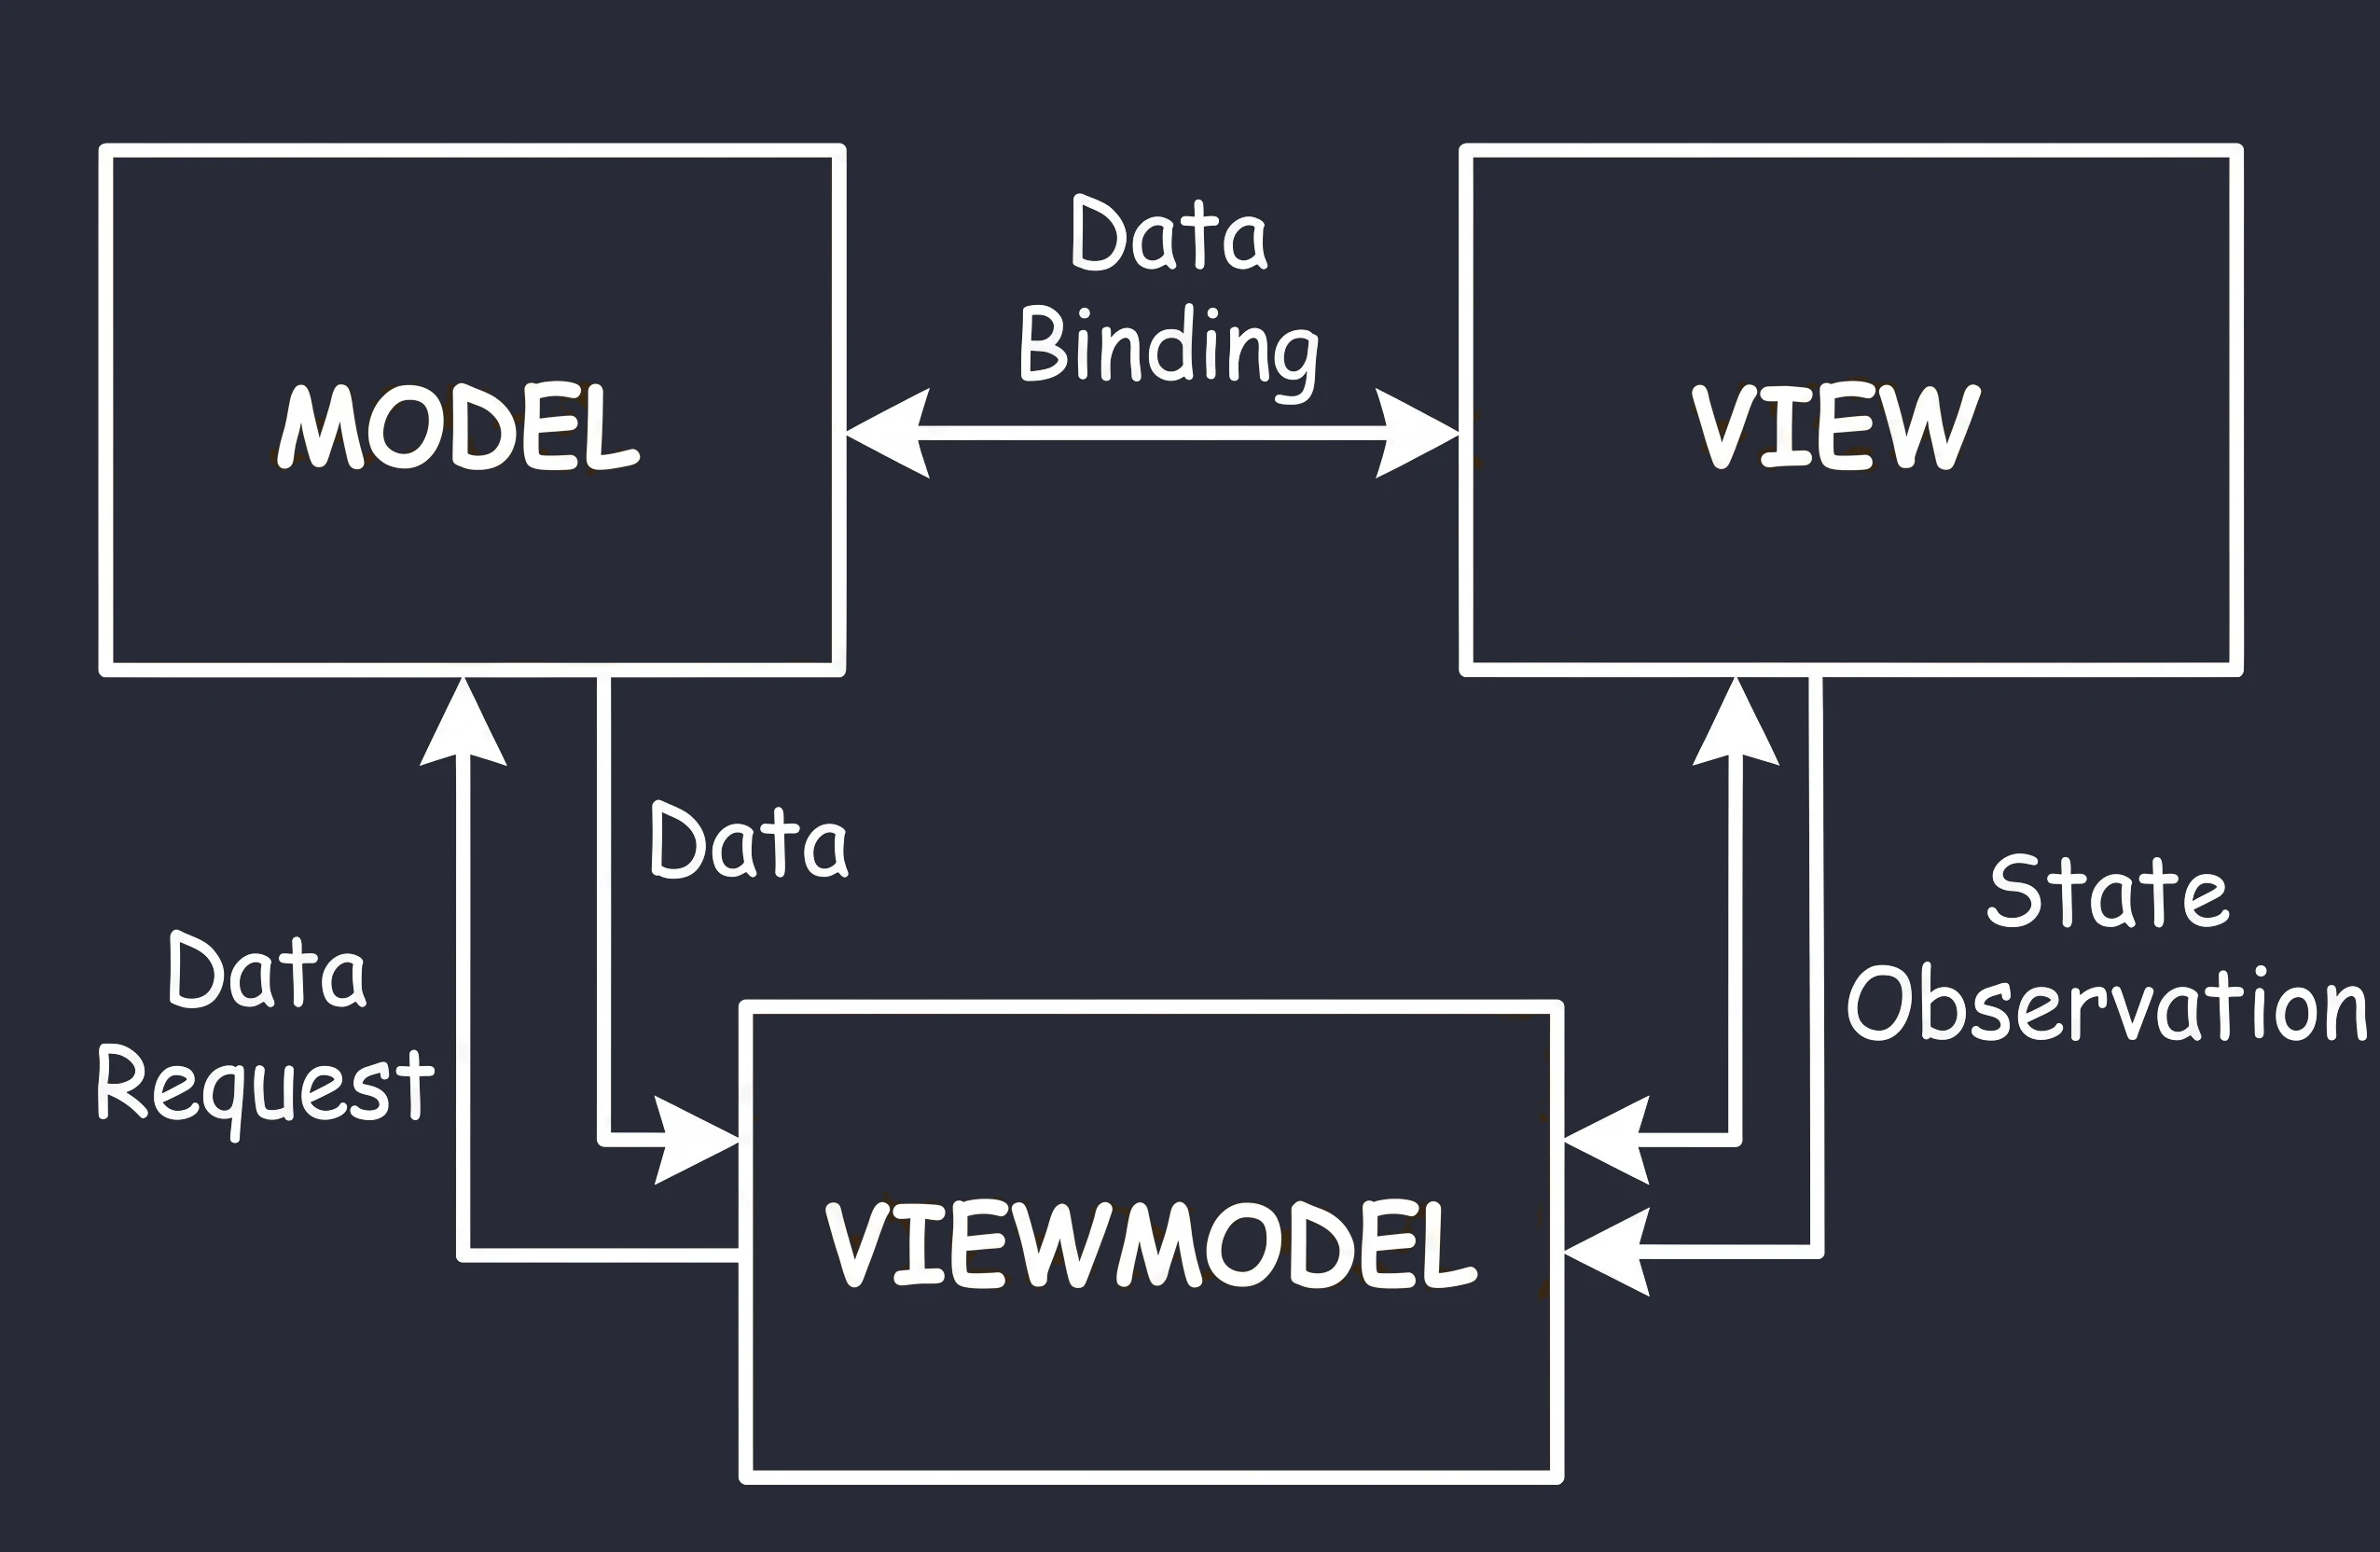
This approach is commonly used in modern Android development.
- User (View): The user approaches the machine and presses a button (sends an event).
- Coffee machine (ViewModel): It receives the signal, grinds coffee, fetches water and communicates with the Repository/Model.
- Result (State): The machine places a cup of coffee in the pickup tray (state emission).
Key difference - reactivity: the machine does not care who takes the cup.
- The machine only exposes state.
- If nobody is standing in front of the machine, the cup (data) simply waits in the tray.
- If the user leaves (rotates the screen) and a new one comes in (the
Activityis recreated), the cup of coffee is still there. The new view simply looks into the tray and sees the ready drink.
In Compose, this tray is represented by data streams such as StateFlow. The ViewModel updates StateFlow, while the View (Composable) only observes changes. This solves our screen rotation problem: the ViewModel keeps the drink, regardless of what happens to the customer.
MVI (Model-View-Intent)
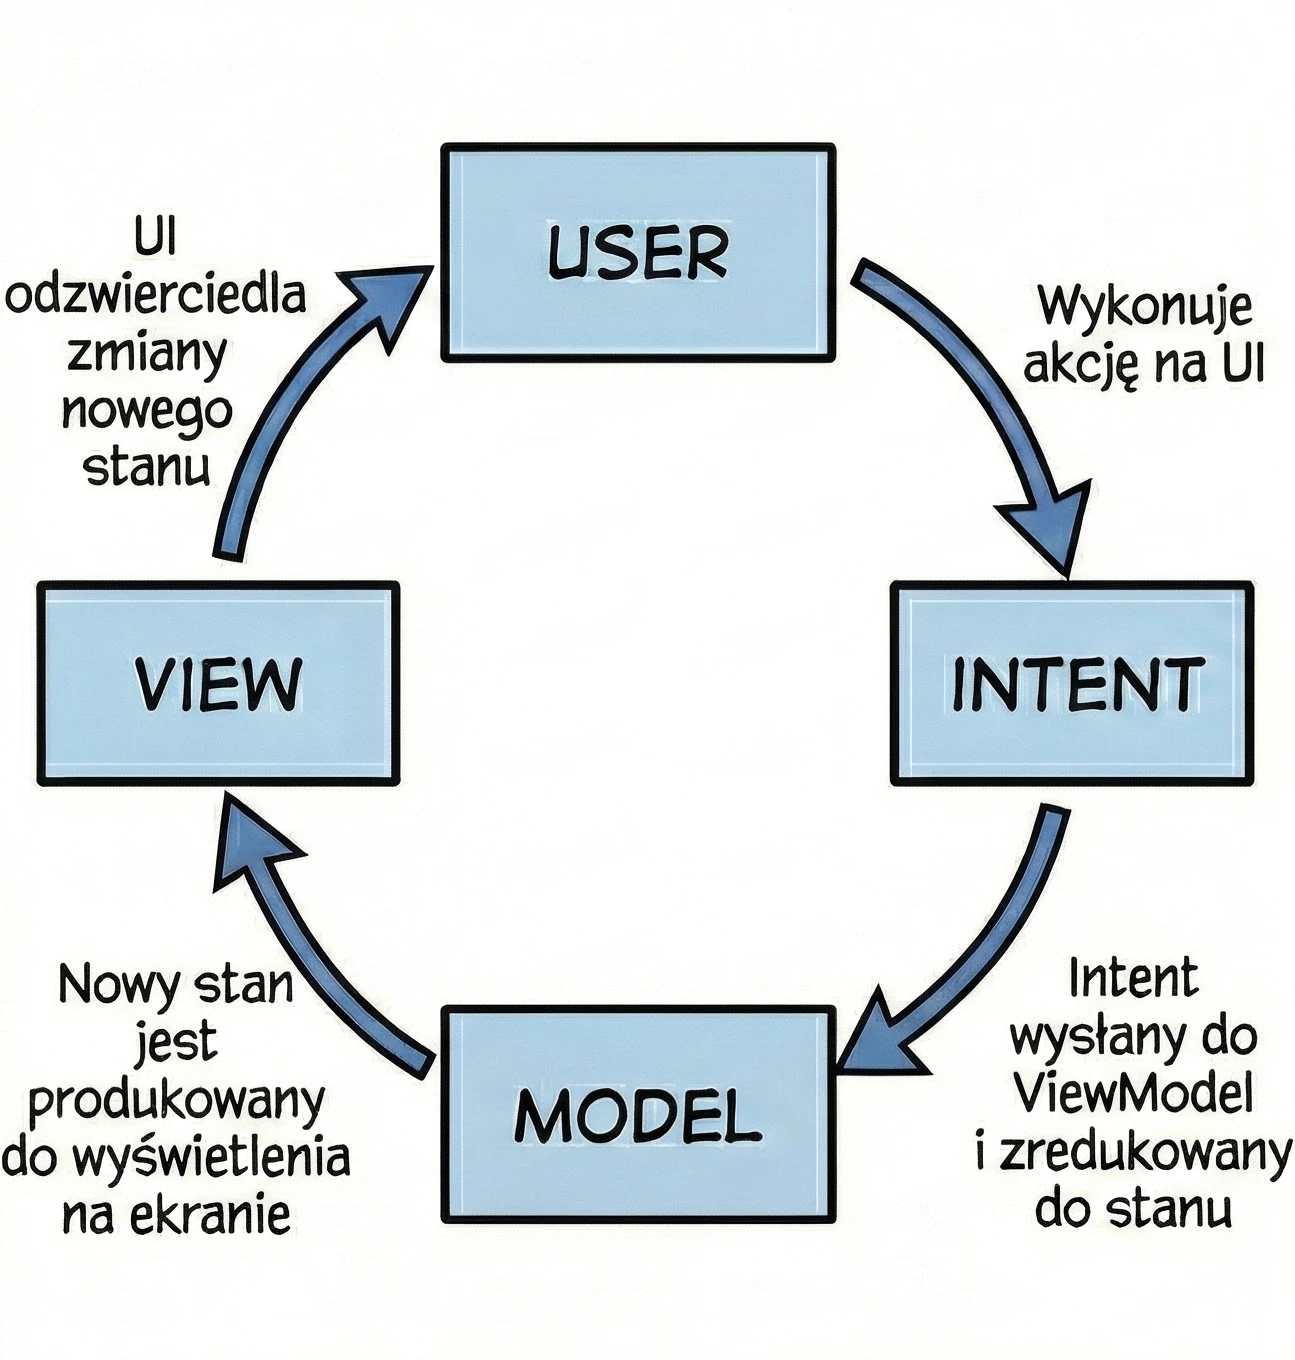
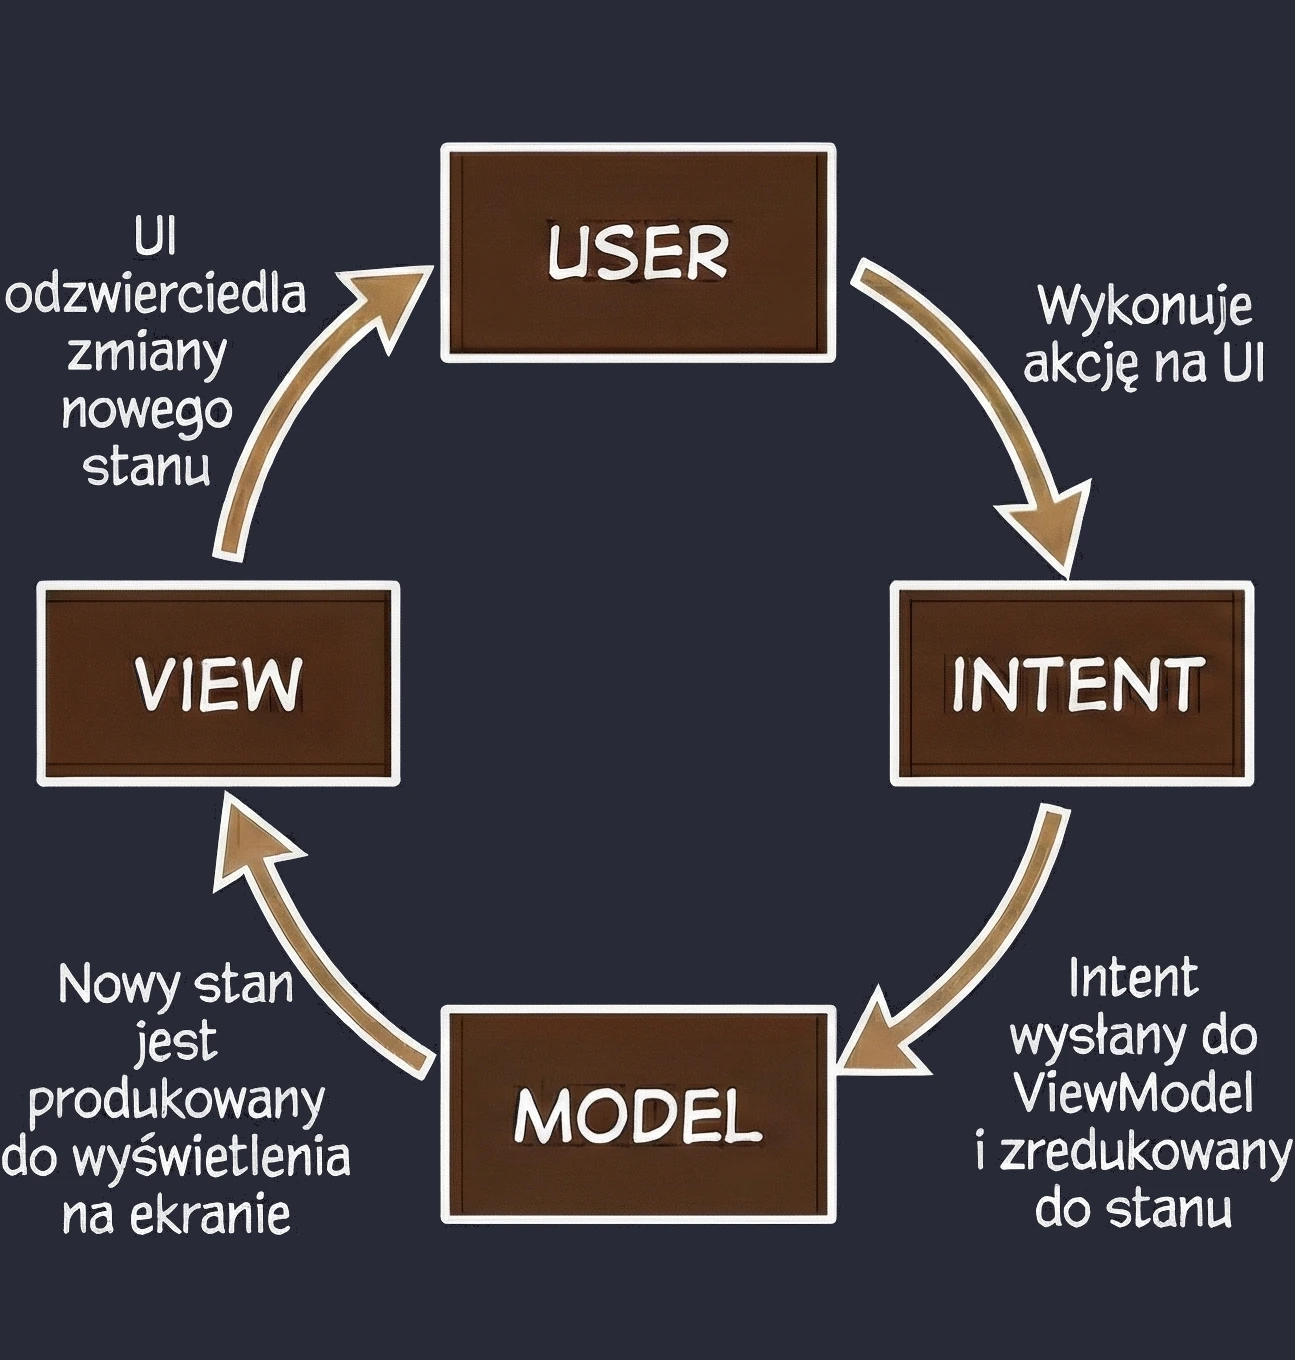

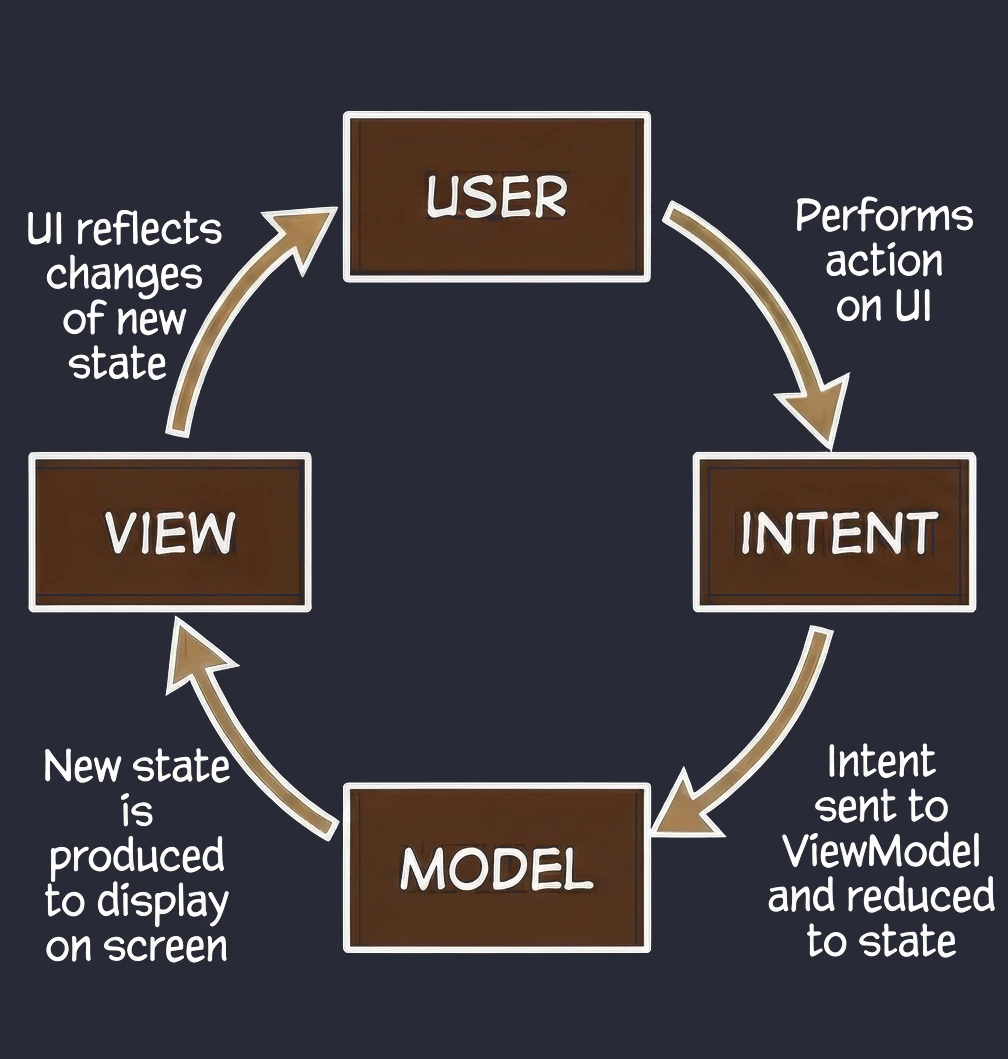
This is an evolution of MVVM that puts strict emphasis on unidirectional data flow.
- View (kiosk screen): Displays the current order state. It is read-only.
- Intent (intention/action): When you click Add fries, you do not directly change the order. You send the system an intent saying: "The user wants to add fries".
- Model (system): The system takes your current receipt, takes your intent, processes them and outputs a completely new, updated receipt (State).
Key feature - cyclicity and immutability: Unlike MVVM, where a ViewModel can have many different data streams (separate name, separate list, separate errors), in MVI we aim to have one state object, for example OrderUiState. In our metaphor: you cannot take a pen and add fries to a printed receipt. You must send a request, and the system prints a new, updated receipt for you. This makes the application predictable; we always know what led to the current screen state.
We naturally move toward MVI by using a single StateFlow<UiState> in the ViewModel.
MVVM implementation: technical analysis
In this section, we will analyze an implementation of the MVVM pattern using a simple example. We will focus on layer separation and the mechanism of preserving state during configuration changes.
The ViewModel class acts as a state manager. Note the backing property pattern, which provides full data encapsulation.
class WordViewModel : ViewModel() {
    // 1. Internal state (mutable) - private
    // We use mutableStateListOf, which is an implementation of SnapshotStateList.
    // This lets Compose track changes and trigger recomposition.
    private val _words = mutableStateListOf("Hello", "World", "Jetpack")

    // 2. Public state (immutable) - read-only
    // The view sees only List<String>. It cannot modify it directly.
    // This enforces unidirectional data flow.
    val words: List<String> get() = _words

    // 3. Public interface (actions/events)
    // The only way to change state is to call a method in the ViewModel.
    fun addWord(newWord: String) {
        _words.add(newWord)
    }

    fun clearList() {
        _words.clear()
    }
}
Using mutableStateListOf instead of a standard List is critical for reactivity. In Jetpack Compose, the system does not observe standard Java/Kotlin collections. Compose types, such as State<T>, implement the Observer pattern and automatically notify subscribers (Composable functions) about changes.
The View (Composable) becomes a so-called passive view. It does not own logical state; it only renders what the ViewModel provides.
@Composable
fun WordScreen(
    // Dependency injection
    // The viewModel() function uses ViewModelProvider to obtain an instance.
    viewModel: WordViewModel = viewModel()
) {
    Column {
        // State observation
        LazyColumn {
            items(viewModel.words) { word ->
                Text(text = word, style = MaterialTheme.typography.headlineSmall)
            }
        }

        // Event delegation
        Button(onClick = {
            viewModel.addWord("New word")
        }) {
            Text("Add item")
        }
    }
}
To use the viewmodel() function, we need to add the appropriate dependency to the dependencies block in the project configuration file.
implementation("androidx.lifecycle:lifecycle-viewmodel-compose:2.9.2")The key advantage of ViewModel is that it survives screen rotation. This does not happen magically, but follows from the architectural lifecycle of Android components.
We can think of a ViewModel as a scoped singleton.
- ViewModelStore: Each Activity has a
ViewModelStoreobject. It is a map (HashMap) that stores ViewModel instances. - Configuration change, for example rotation:
- Reconstruction (re-attach):
- The provider checks the preserved
ViewModelStore. - It finds the existing
WordViewModelinstance there, the same one that existed before rotation. - It returns that instance to the new Activity.
When the user rotates the screen, the operating system destroys the Activity object and creates a new one. However, the ViewModelStore object associated with this activity is not destroyed. It is cached by the system in memory, in the NonConfigurationInstances object.
A new Activity instance starts. The viewModel() function asks ViewModelProvider for a WordViewModel instance.
Thanks to this mechanism, the data inside the ViewModel (our list of words) remains intact in RAM even though the UI layer has been completely rebuilt. The ViewModel dies only when the Activity is permanently finished, for example by pressing Back or calling finish(). This triggers onCleared() and clears the ViewModelStore.
Data layer: repository pattern
So far, our ViewModel has kept data in memory. In a larger application, data comes from external sources: an API (Retrofit), an SQL database (Room), files. This raises the question: Should the ViewModel know where the data comes from? According to the Separation of Concerns principle, absolutely not.
Let us return to the restaurant metaphor:
- ViewModel (waiter): It simply wants to receive a ready dish. It does not care whether the ingredients come from the market or from the fridge.
- Repository (kitchen/storage): This is where decisions are made about where to get the data from.
To decouple the ViewModel from a concrete data source, we use an interface.
// Contract: says WHAT can be ordered, but not HOW to obtain it
interface WordRepository {
    suspend fun getWords(): List<String>
}
In a simple example, a Repository may seem like an unnecessary layer, a mere "pass-through". However, in larger applications that we will build in later lectures, the Repository performs key functions:
- 1. Offline mode support (caching):
- Internet available: Fetch data from the API, save it in the local database (Room), and then return data from the database.
- No internet: Return data saved in the database from the previous session.
- 2. Data aggregation:
- 3. Mapping and data cleanliness:
This is the most important use case, called Single Source of Truth. The Repository can check: Do we have internet?.
For the ViewModel, this process is invisible; it simply asks for data and receives it, regardless of network state.
Often, one screen needs data from multiple sources. For example, a profile screen may need user data from the /user endpoint and a list of recent orders from the /orders endpoint. The Repository fetches both resources in parallel (using async), combines them into one UserProfile object and only then passes this ready product to the ViewModel.
APIs often return data in a technical (dirty) format, for example user_id_xq2, dates as timestamps, and so on. The Repository acts as a peeler; it transforms raw JSON objects (DTO - Data Transfer Object) into clean, readable domain objects that are easy to use in the UI.
The constructor-with-parameter problem: ViewModelFactory
We have reached the last technical challenge. We created WordRepository and want to pass it to our WordViewModel.
So we change the constructor:
class WordViewModel(private val repository: WordRepository) : ViewModel() { ... }And here a problem appears. When we call the standard function in Composable code: val viewModel: WordViewModel = viewModel(), the application will throw a RuntimeException.
By default, the library function viewModel() can create only objects with an empty constructor (without parameters). It works using reflection.
To understand this, imagine a car dealership:
- ViewModel without parameters (car on the lot): You walk in and say I would like a Passat. The seller gives you keys to a standard model parked outside. Simple and fast.
- ViewModel with Repository (special order): You say I would like a Passat, but with a V6 engine (Repository). The seller shrugs; there is no such car on the lot. They must send an order to the factory, specifying exactly how the car should be assembled.
In programming, this specification is the Factory pattern.
We must provide an instruction manual that tells the system: If someone asks you for WordViewModel, first create the Repository and then put it inside.
Today, we most often implement this using a companion object inside the ViewModel class:
class WordViewModel(private val repository: WordRepository) : ViewModel() {

    // ... ViewModel code ...

    // Factory definition (creation instruction)
    companion object {
        val Factory: ViewModelProvider.Factory = object : ViewModelProvider.Factory {
            @Suppress("UNCHECKED_CAST")
            override fun <T : ViewModel> create(modelClass: Class<T>): T {
                return WordViewModel(
                    // Manual dependency injection (Manual DI)
                    repository = NetworkWordRepository()
                ) as T
            }
        }
    }
}
The create method is where we take control over object creation. We, not the system, decide which repository implementation goes inside.
Now that we have our factory, we need to use it in the view. We change the call in the WordScreen function:
@Composable
fun WordScreen(
    // Pass the factory as the 'factory' parameter
    viewModel: WordViewModel = viewModel(factory = WordViewModel.Factory)
) {
    // ... the rest of the code is unchanged ...
}
Thanks to this small addition, Android knows how to construct our complex object while still preserving all lifecycle benefits of ViewModel, such as surviving screen rotation.
"Do we have to write this kind of boilerplate for every screen?" At this stage, yes. This is called Manual Dependency Injection. We need to understand how objects are connected to each other under the hood.
In Lecture 11, we will introduce the Hilt library. It will do exactly what we are now doing manually, but automatically, using a single @HiltViewModel annotation. Hilt will generate this factory code for us at compile time.
Full example code: WordApp
Below is the complete implementation of the example discussed in this chapter. The code combines all introduced elements: the Repository pattern (interface and implementation), ViewModel with state and coroutine support, Factory (ViewModelProvider.Factory), and the view layer in Jetpack Compose.
You can copy this code into a single file, for example WordApp.kt, in your project to test how MVVM architecture works.
// ---------------------------------------------------------
// 1. DATA LAYER (MODEL & REPOSITORY)
// ---------------------------------------------------------

// Contract (interface) - this is all the ViewModel knows about
interface WordRepository {
    suspend fun getWords(): List<String>
}

// Concrete implementation (network simulation)
class NetworkWordRepository : WordRepository {
    override suspend fun getWords(): List<String> {
        // Simulate network delay (2 seconds)
        delay(2000)
        return listOf("Architecture", "MVVM", "in", "Practice", "Is", "Great")
    }
}

// ---------------------------------------------------------
// 2. LOGIC LAYER (VIEWMODEL)
// ---------------------------------------------------------

class WordViewModel(private val repository: WordRepository) : ViewModel() {

    // Private state (mutable)
    private val _words = mutableStateListOf<String>("Click the button...")

    // Public state (read-only)
    val words: List<String> get() = _words

    // Function called by the View (event)
    fun loadData() {
        viewModelScope.launch {
            _words.clear()
            _words.add("Loading...")

            // Fetch data from the repository (coroutine suspension)
            val newWords = repository.getWords()

            _words.clear()
            _words.addAll(newWords)
        }
    }

    // Factory (ViewModel Factory) - instruction for creating a ViewModel with a parameter
    companion object {
        val Factory: ViewModelProvider.Factory = object : ViewModelProvider.Factory {
            @Suppress("UNCHECKED_CAST")
            override fun <T : ViewModel> create(modelClass: Class<T>): T {
                return WordViewModel(
                    repository = NetworkWordRepository() // Dependency injection
                ) as T
            }
        }
    }
}

// ---------------------------------------------------------
// 3. PRESENTATION LAYER (VIEW / COMPOSE)
// ---------------------------------------------------------

@Composable
fun WordScreen(
    // Inject the ViewModel using the Factory
    viewModel: WordViewModel = viewModel(factory = WordViewModel.Factory)
) {
    Column(modifier = Modifier.padding(16.dp)) {

        // Button triggering the action
        Button(onClick = { viewModel.loadData() }) {
            Text(text = "Fetch words from server")
        }

        // List displaying the state
        LazyColumn(modifier = Modifier.padding(top = 16.dp)) {
            items(viewModel.words) { word ->
                Text(text = "* $word")
            }
        }
    }
}
Streams
In the previous chapters, especially while discussing coroutines and MVVM, we learned how to fetch data using suspending functions (suspend). A typical function in our repository looked like this:
// Old approach: return and forget
suspend fun getUserNames(): List<String> {
    // 1. Send a request
    // 2. Wait for a response
    return listOf("Anna", "John", "Peter") // 3. Return the result and finish
}
This approach has one fundamental limitation: it is a one-shot operation. The function returns a result and finishes. If a new user ("Sophia") registers on the server later, our application does not know about it. The view displays outdated data until the user manually refreshes the screen.
Modern applications rarely operate on static data. Most features we use every day are processes spread over time:
- Chat: Messages arrive one after another.
- GPS: The location changes with each step the user takes.
- File download: We want to see progress (1%, 2%, ... 100%), not wait blindly until the end.
- Stock market/crypto: Prices change dozens of times per minute.
We need a mechanism that does not return one package of data, but opens a channel through which data can flow for as long as necessary.
The answer to this need is Flow. It is an asynchronous data stream that emits values sequentially.
The differences between a classic list and a stream are fundamental:
- List<T>: Data is available immediately, as a whole group at once. To get new data, you must call the function again.
- Flow<T>: Data is computed or fetched asynchronously and emitted one by one, or in groups, over time. The application listens for changes instead of asking for them repeatedly.
We might ask: "But we used mutableStateOf, and the UI also refreshed automatically. Why do we need Flow?". Although both mechanisms are reactive, they serve different purposes:
- mutableStateOf (UI state): This is a container for the current value used by the view. It tells Compose: redraw when this changes. It is tightly coupled to the UI layer. We should not use it in the data layer (Repository), because that would couple business logic to a UI library.
- Flow (data transport): This is a mechanism for sending data from lower layers (database, network) to the ViewModel. It is pure Kotlin, independent of Android. It provides operators such as
map,filterandcombine, which allow us to transform data in flight.
The architecture pattern therefore looks like this:
The repository provides a stream of changes (Flow), and the ViewModel converts it into stable state for the view (State).
Flow - cold stream
The basic Flow type in Kotlin is a so-called cold stream. This means that the code producing data, inside the flow { ... } block, is passive. It does not run until someone requests the data.
To understand this, imagine a movie on a streaming platform such as YouTube or Netflix.
- Flow definition (file on the server): The movie exists on YouTube servers. It has its script: video frames follow one another. However, the mere existence of the file does not make the movie play. The server does not waste resources sending data into empty space.
collectoperator (Play button): Data transmission starts only when the user clicks Play. In the world of Flow, the equivalent of that button is thecollect()function.- Viewer independence: This is the most important feature. If three users start the same movie:
- User A clicked "Play" one minute ago -> they see the 60th second of the movie.
- User B clicks "Play" now -> they see the 1st second of the movie, the beginning.
Each subscriber receives their own independent copy of the stream. The stream starts from zero for that subscriber.
Let us look at an example:
// 1. DEFINITION (recipe / movie on the server)
// This code does NOT run when the value is assigned to a variable!
val numberStream: Flow<Int> = flow {
    println("Stream started!")
    for (i in 1..3) {
        delay(1000) // Simulate work/download
        emit(i)     // Emit data (movie frame)
    }
}

// 2. USAGE (Subscriber 1)
scope.launch {
    println("Viewer 1 presses PLAY")
    numberStream.collect { value ->
        println("Viewer 1 received: $value")
    }
}

// 3. USAGE (Subscriber 2 - after a moment)
scope.launch {
    delay(1500)
    println("Viewer 2 presses PLAY")
    numberStream.collect { value ->
        println("Viewer 2 received: $value")
    }
}
Log output:
Viewer 1 presses PLAY
Stream started!
Viewer 1 received: 1
Viewer 2 presses PLAY
Stream started!  <-- Notice that it starts a second time!
Viewer 1 received: 2
Viewer 2 received: 1     <-- Viewer 2 receives the first value,
                              even though Viewer 1 is already further ahead
Let us inspect the output of our program. The logs reveal three mechanisms of Flow:
- Multiple starts (re-evaluation):
- Time independence:
- No memory (state):
Notice that the message "Stream started!" appears in the logs twice.
Conclusion: The code block passed to the flow { ... } builder is not a one-time initialization, like an object constructor. It is an instruction that runs from scratch for every subscriber.
If we placed an HTTP request inside that block, then with 10 subscribers we would execute 10 identical requests to the server.
When Viewer 1 is already watching and receives the number 2, Viewer 2 is only starting and receives 1.
Conclusion: Subscribers do not share progress. Each call to collect() creates a completely independent instance of the data flow. It is as if each viewer opened the same video file in a separate player window.
When Viewer 2 joins the stream, they have no access to data emitted earlier. A cold stream does not store history; it produces it live.
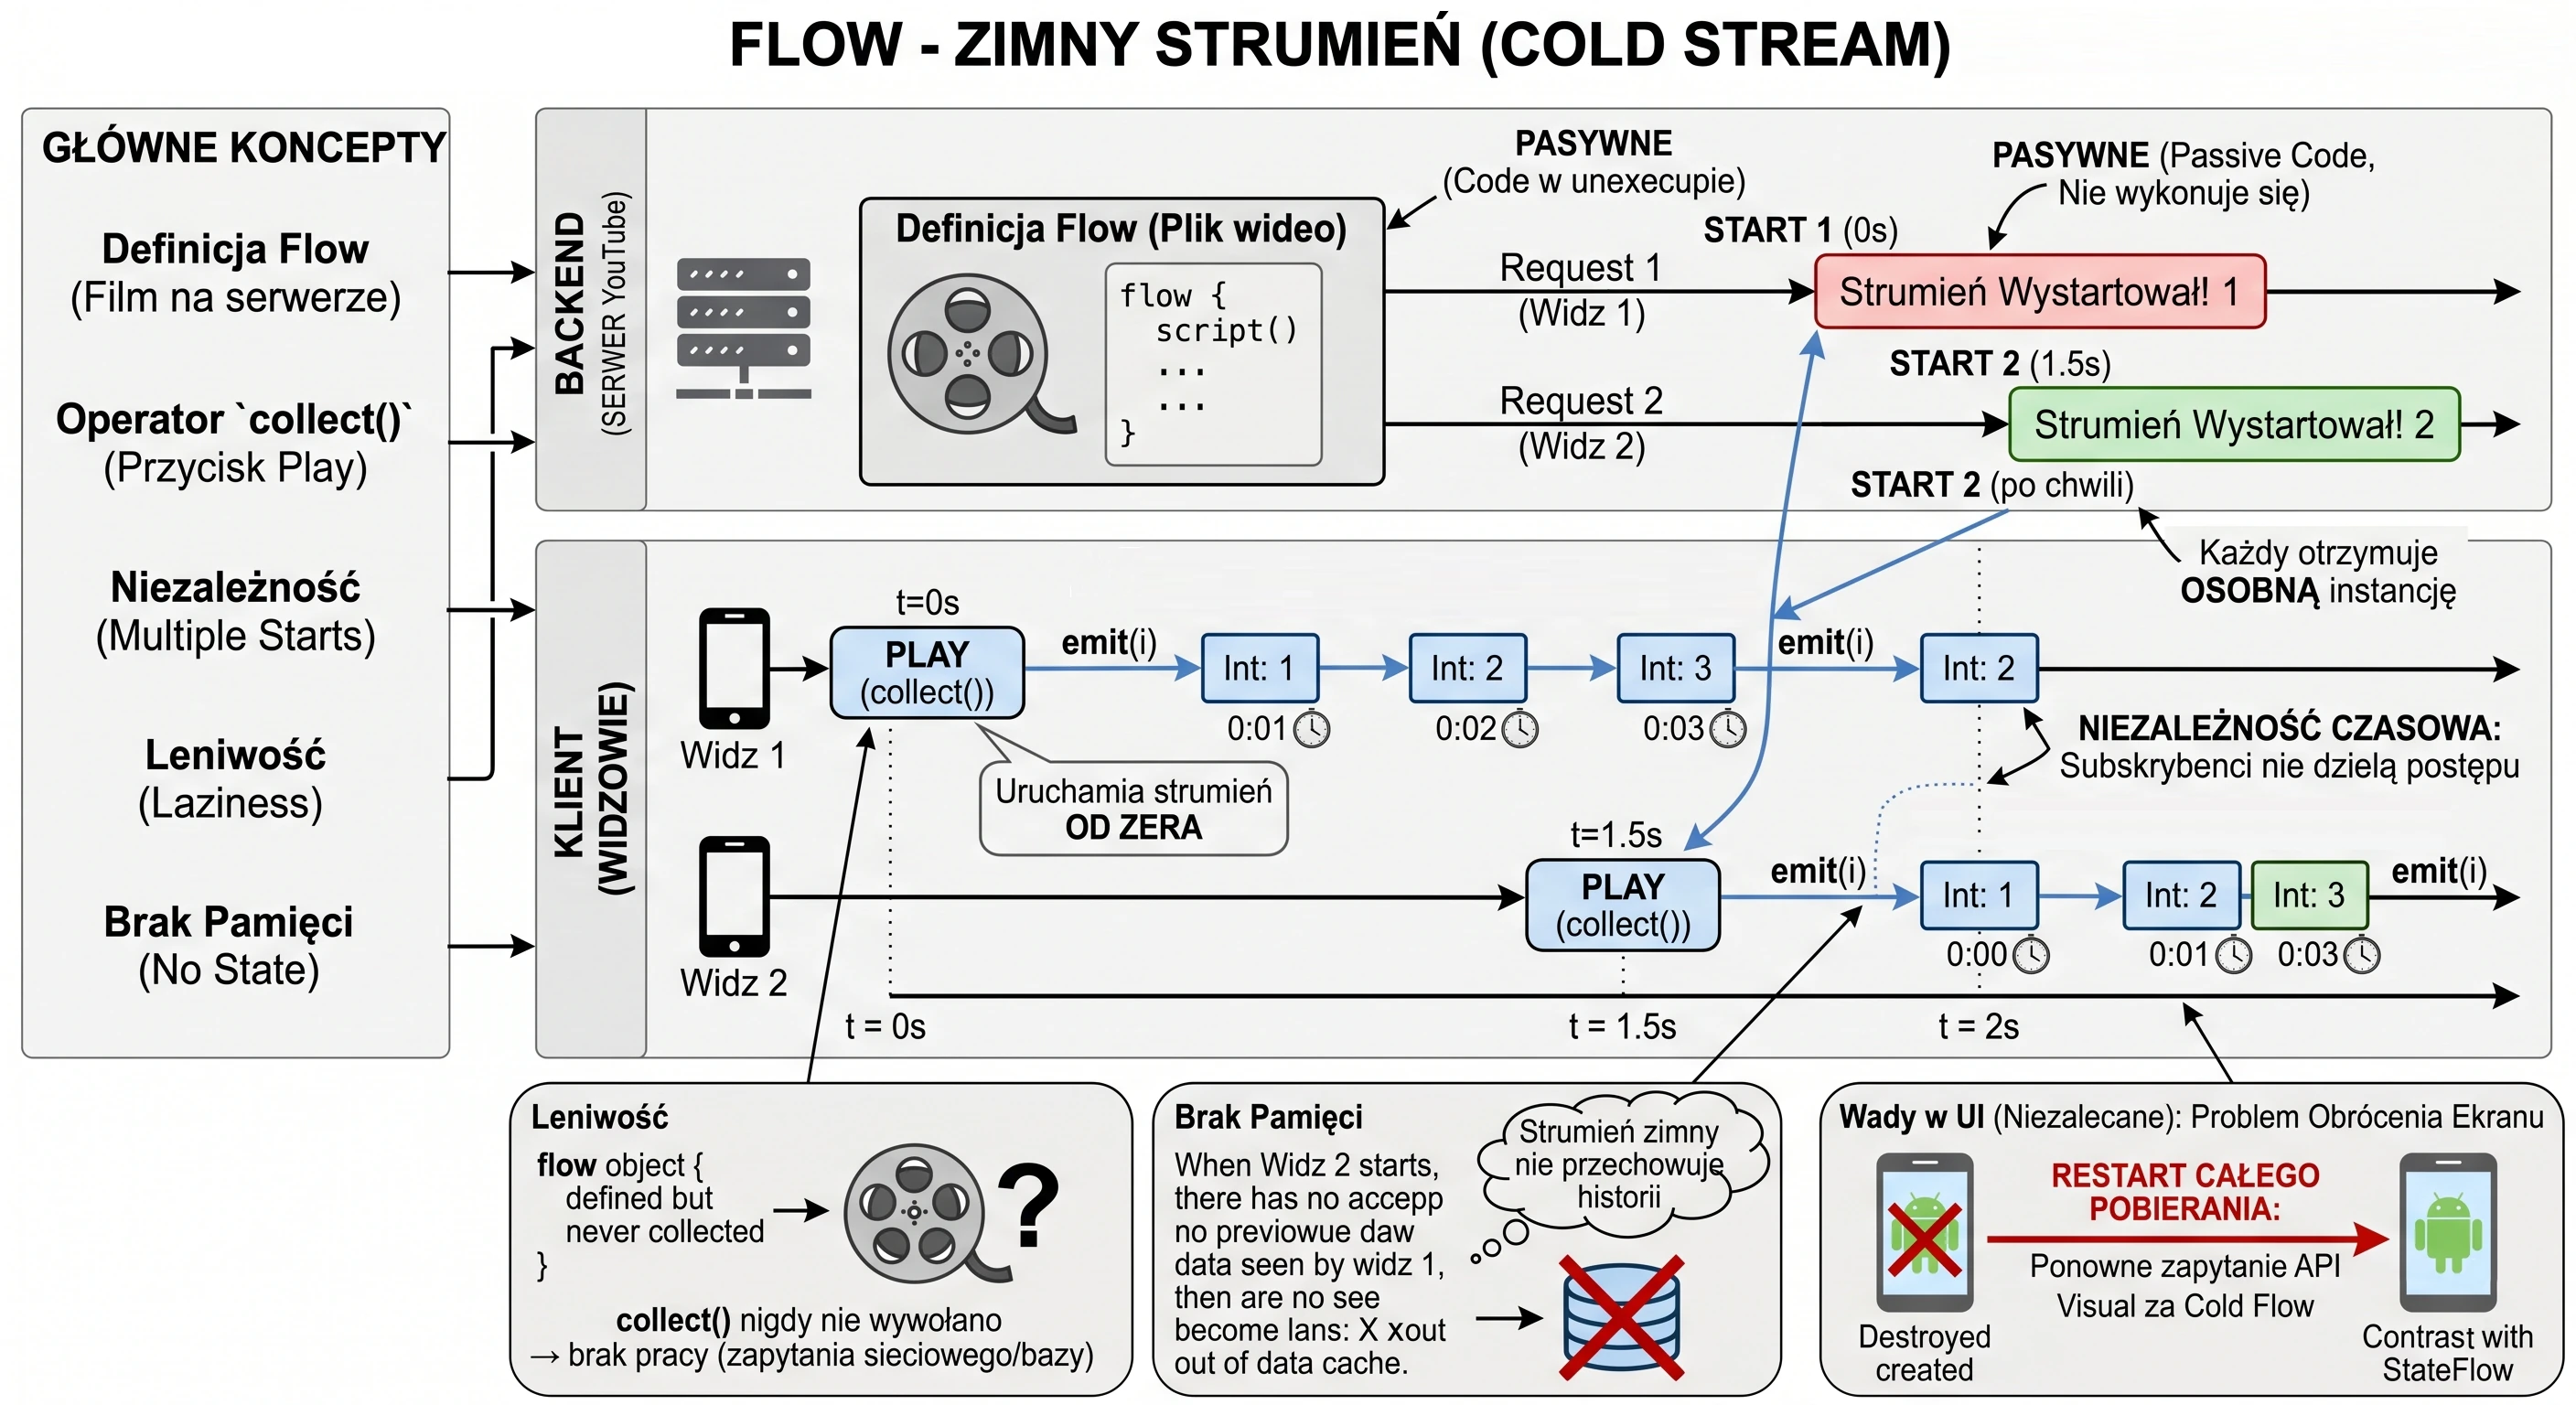
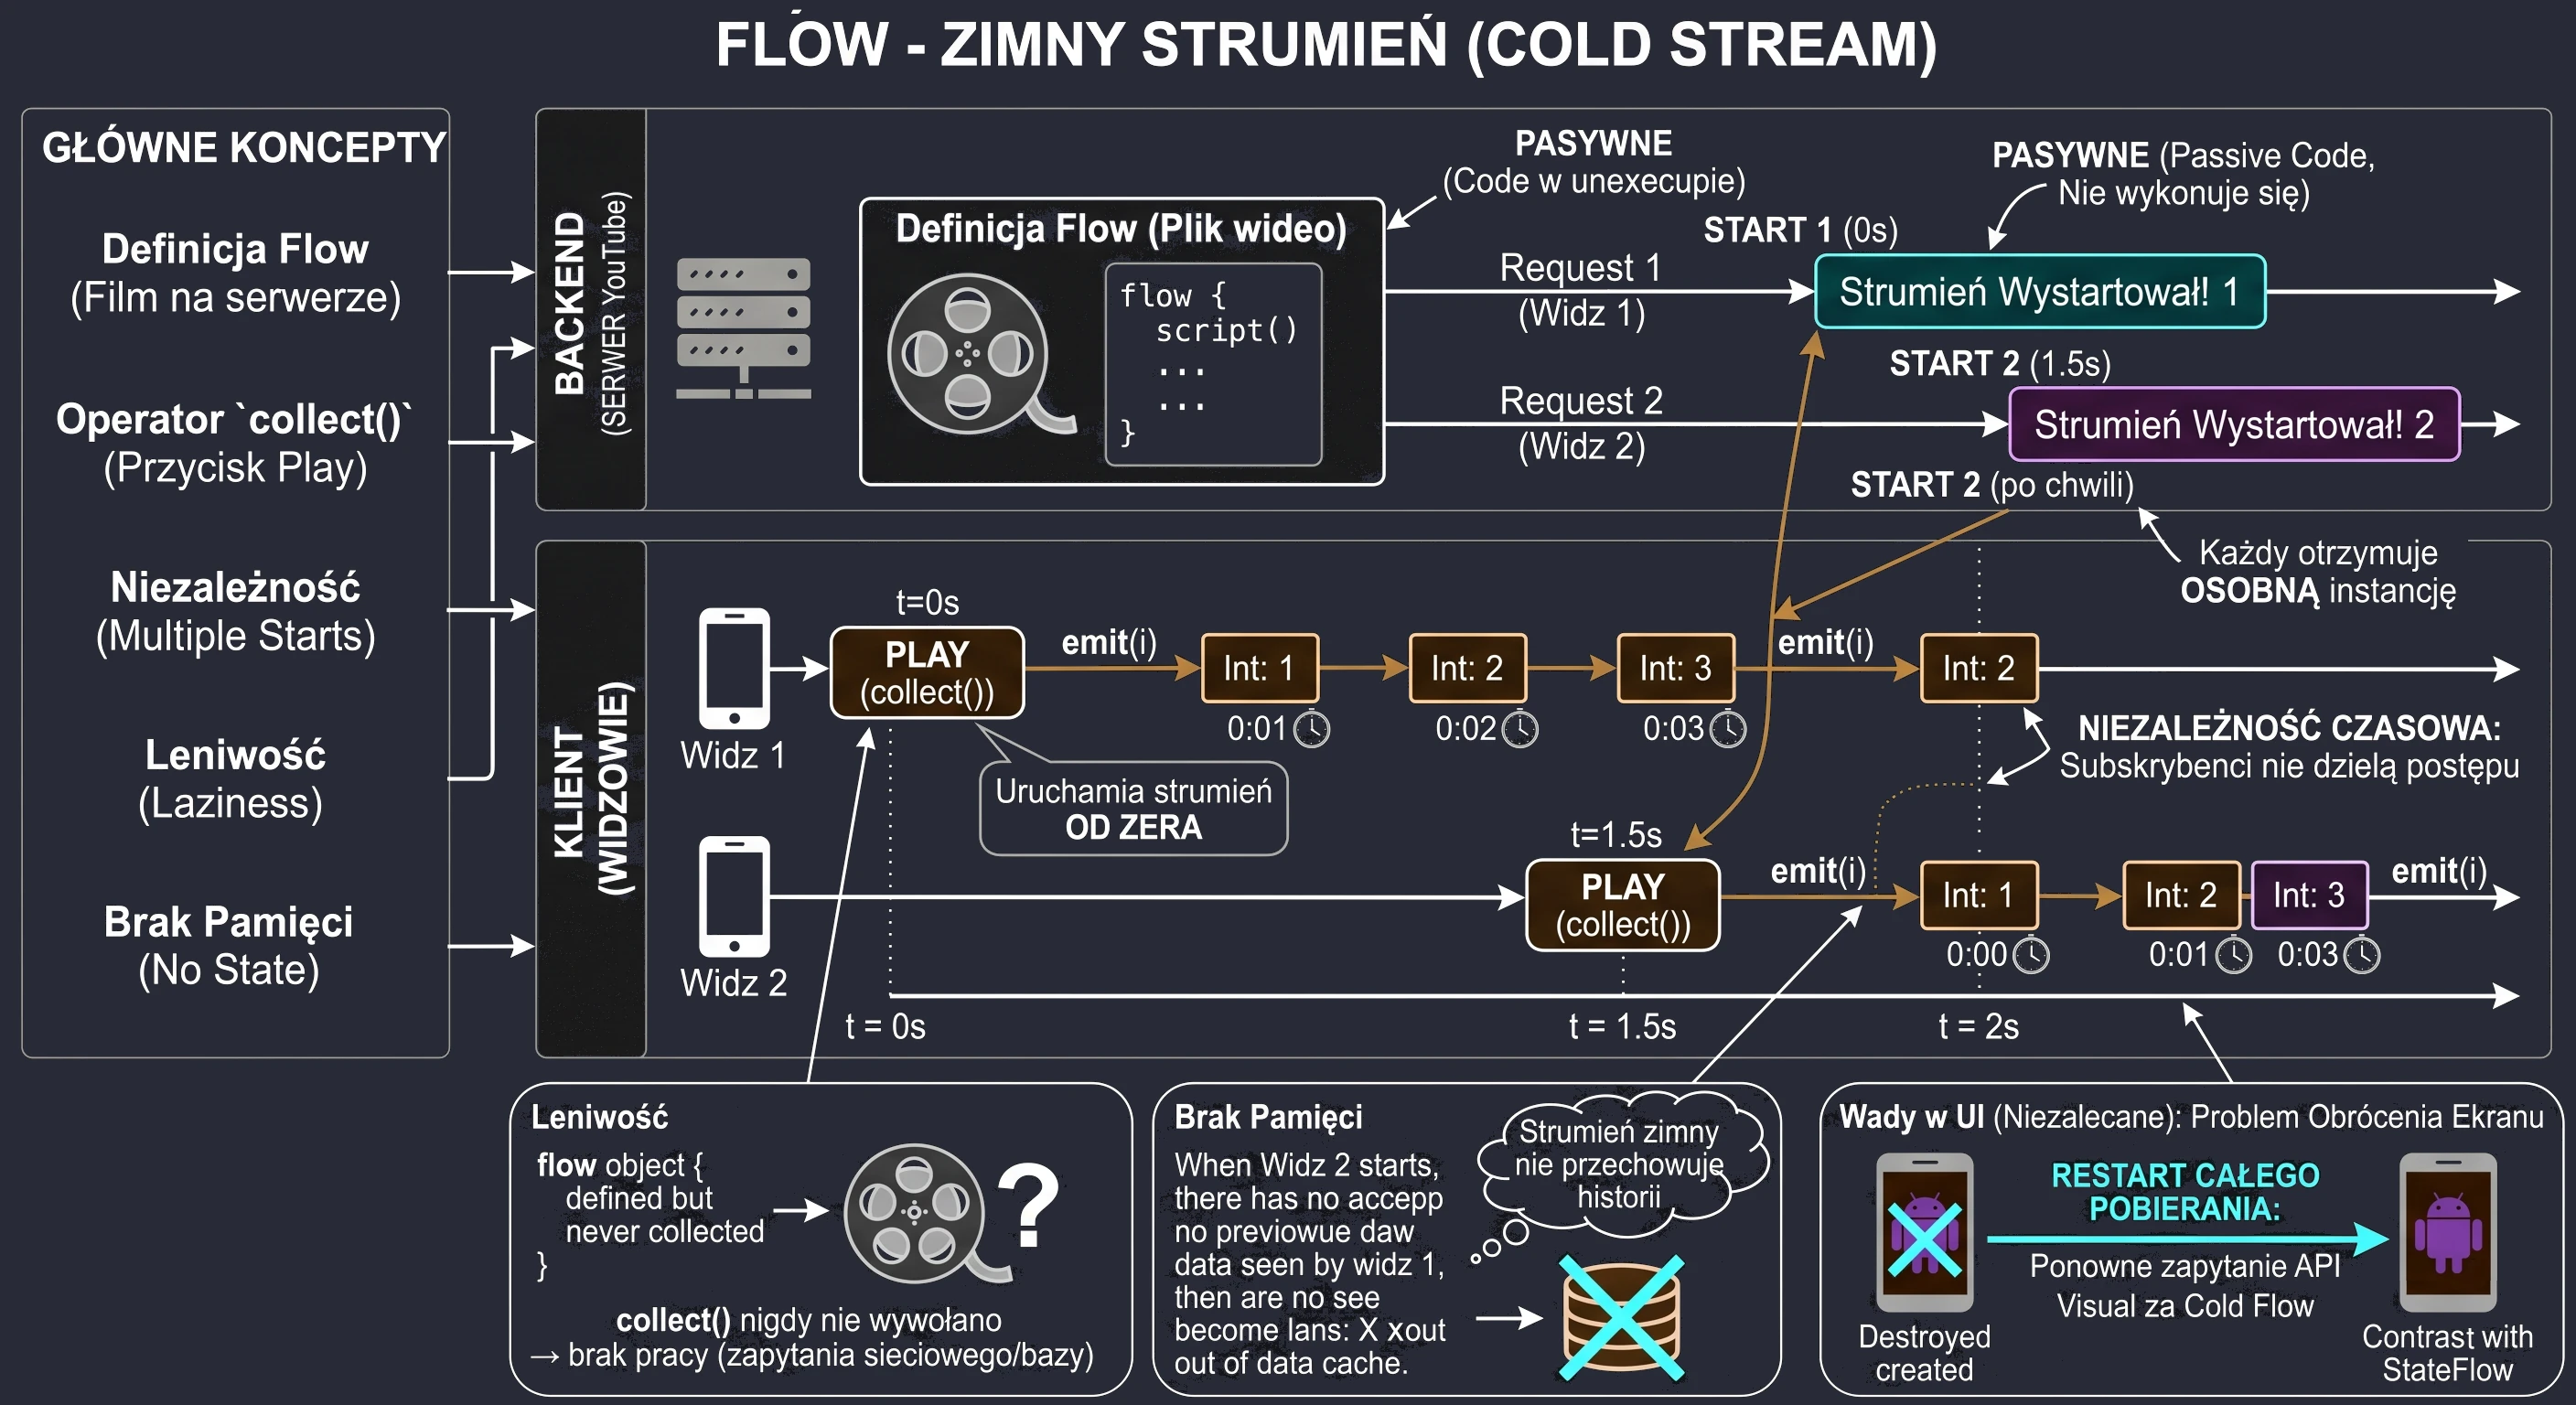
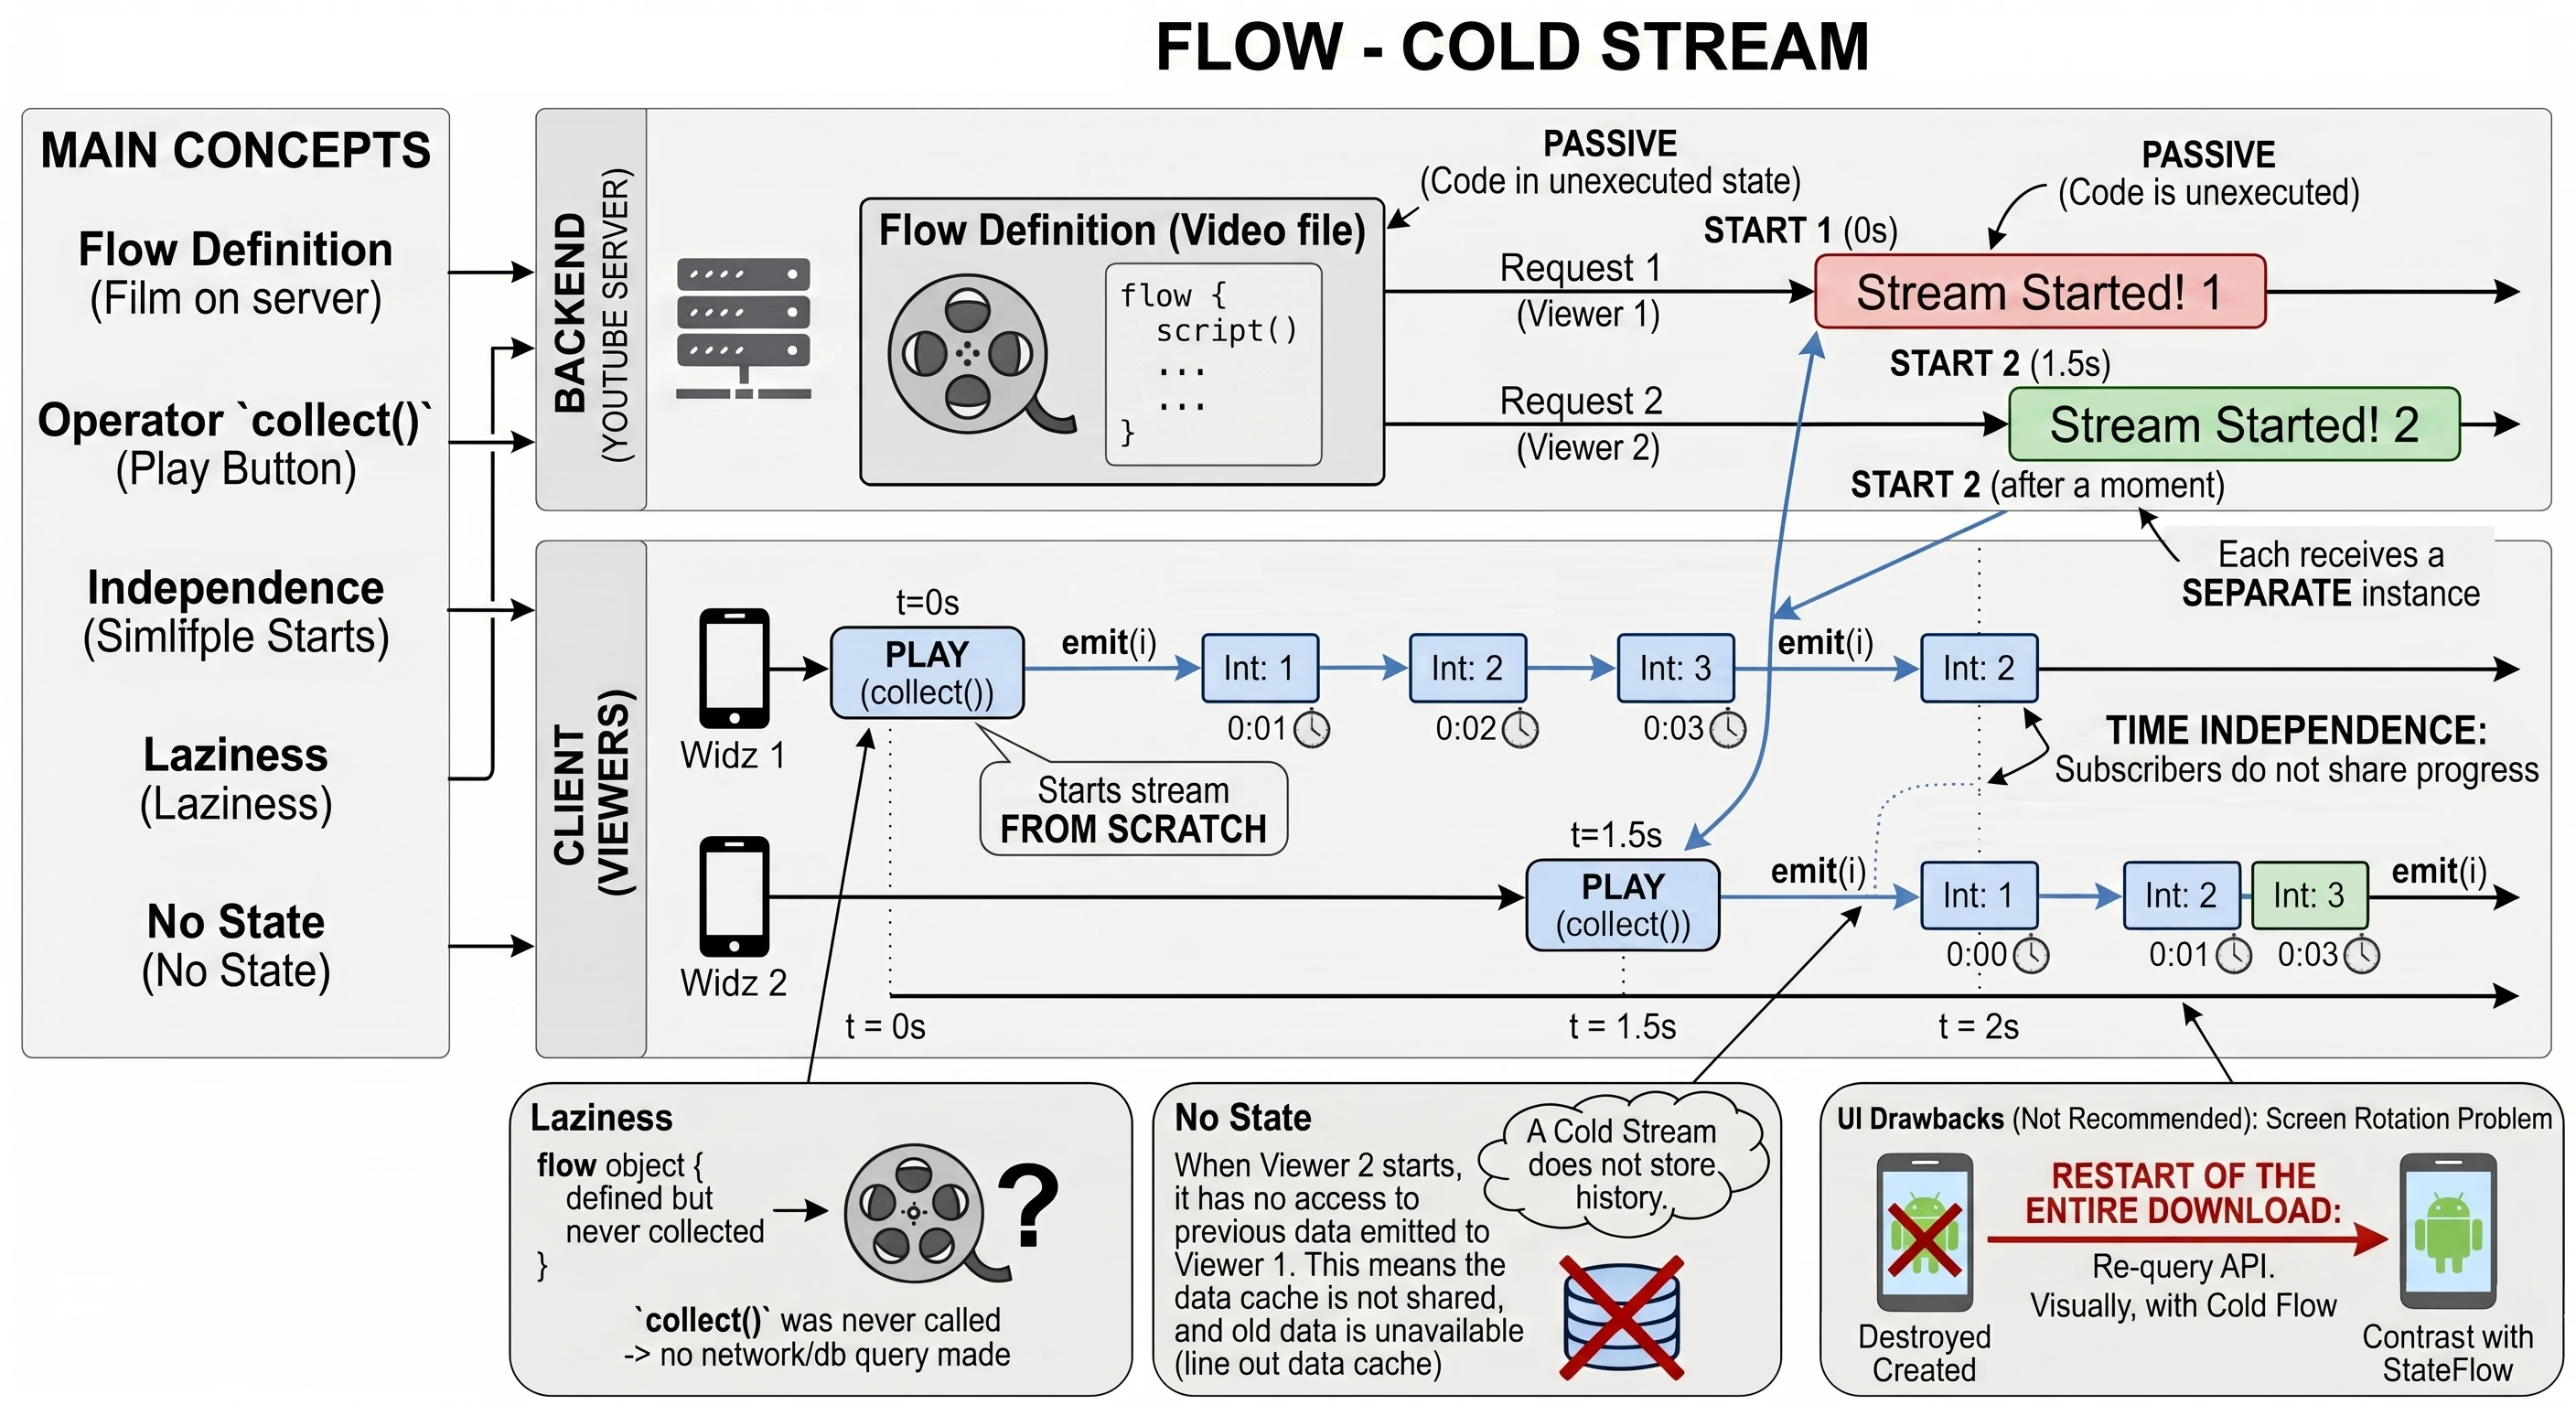
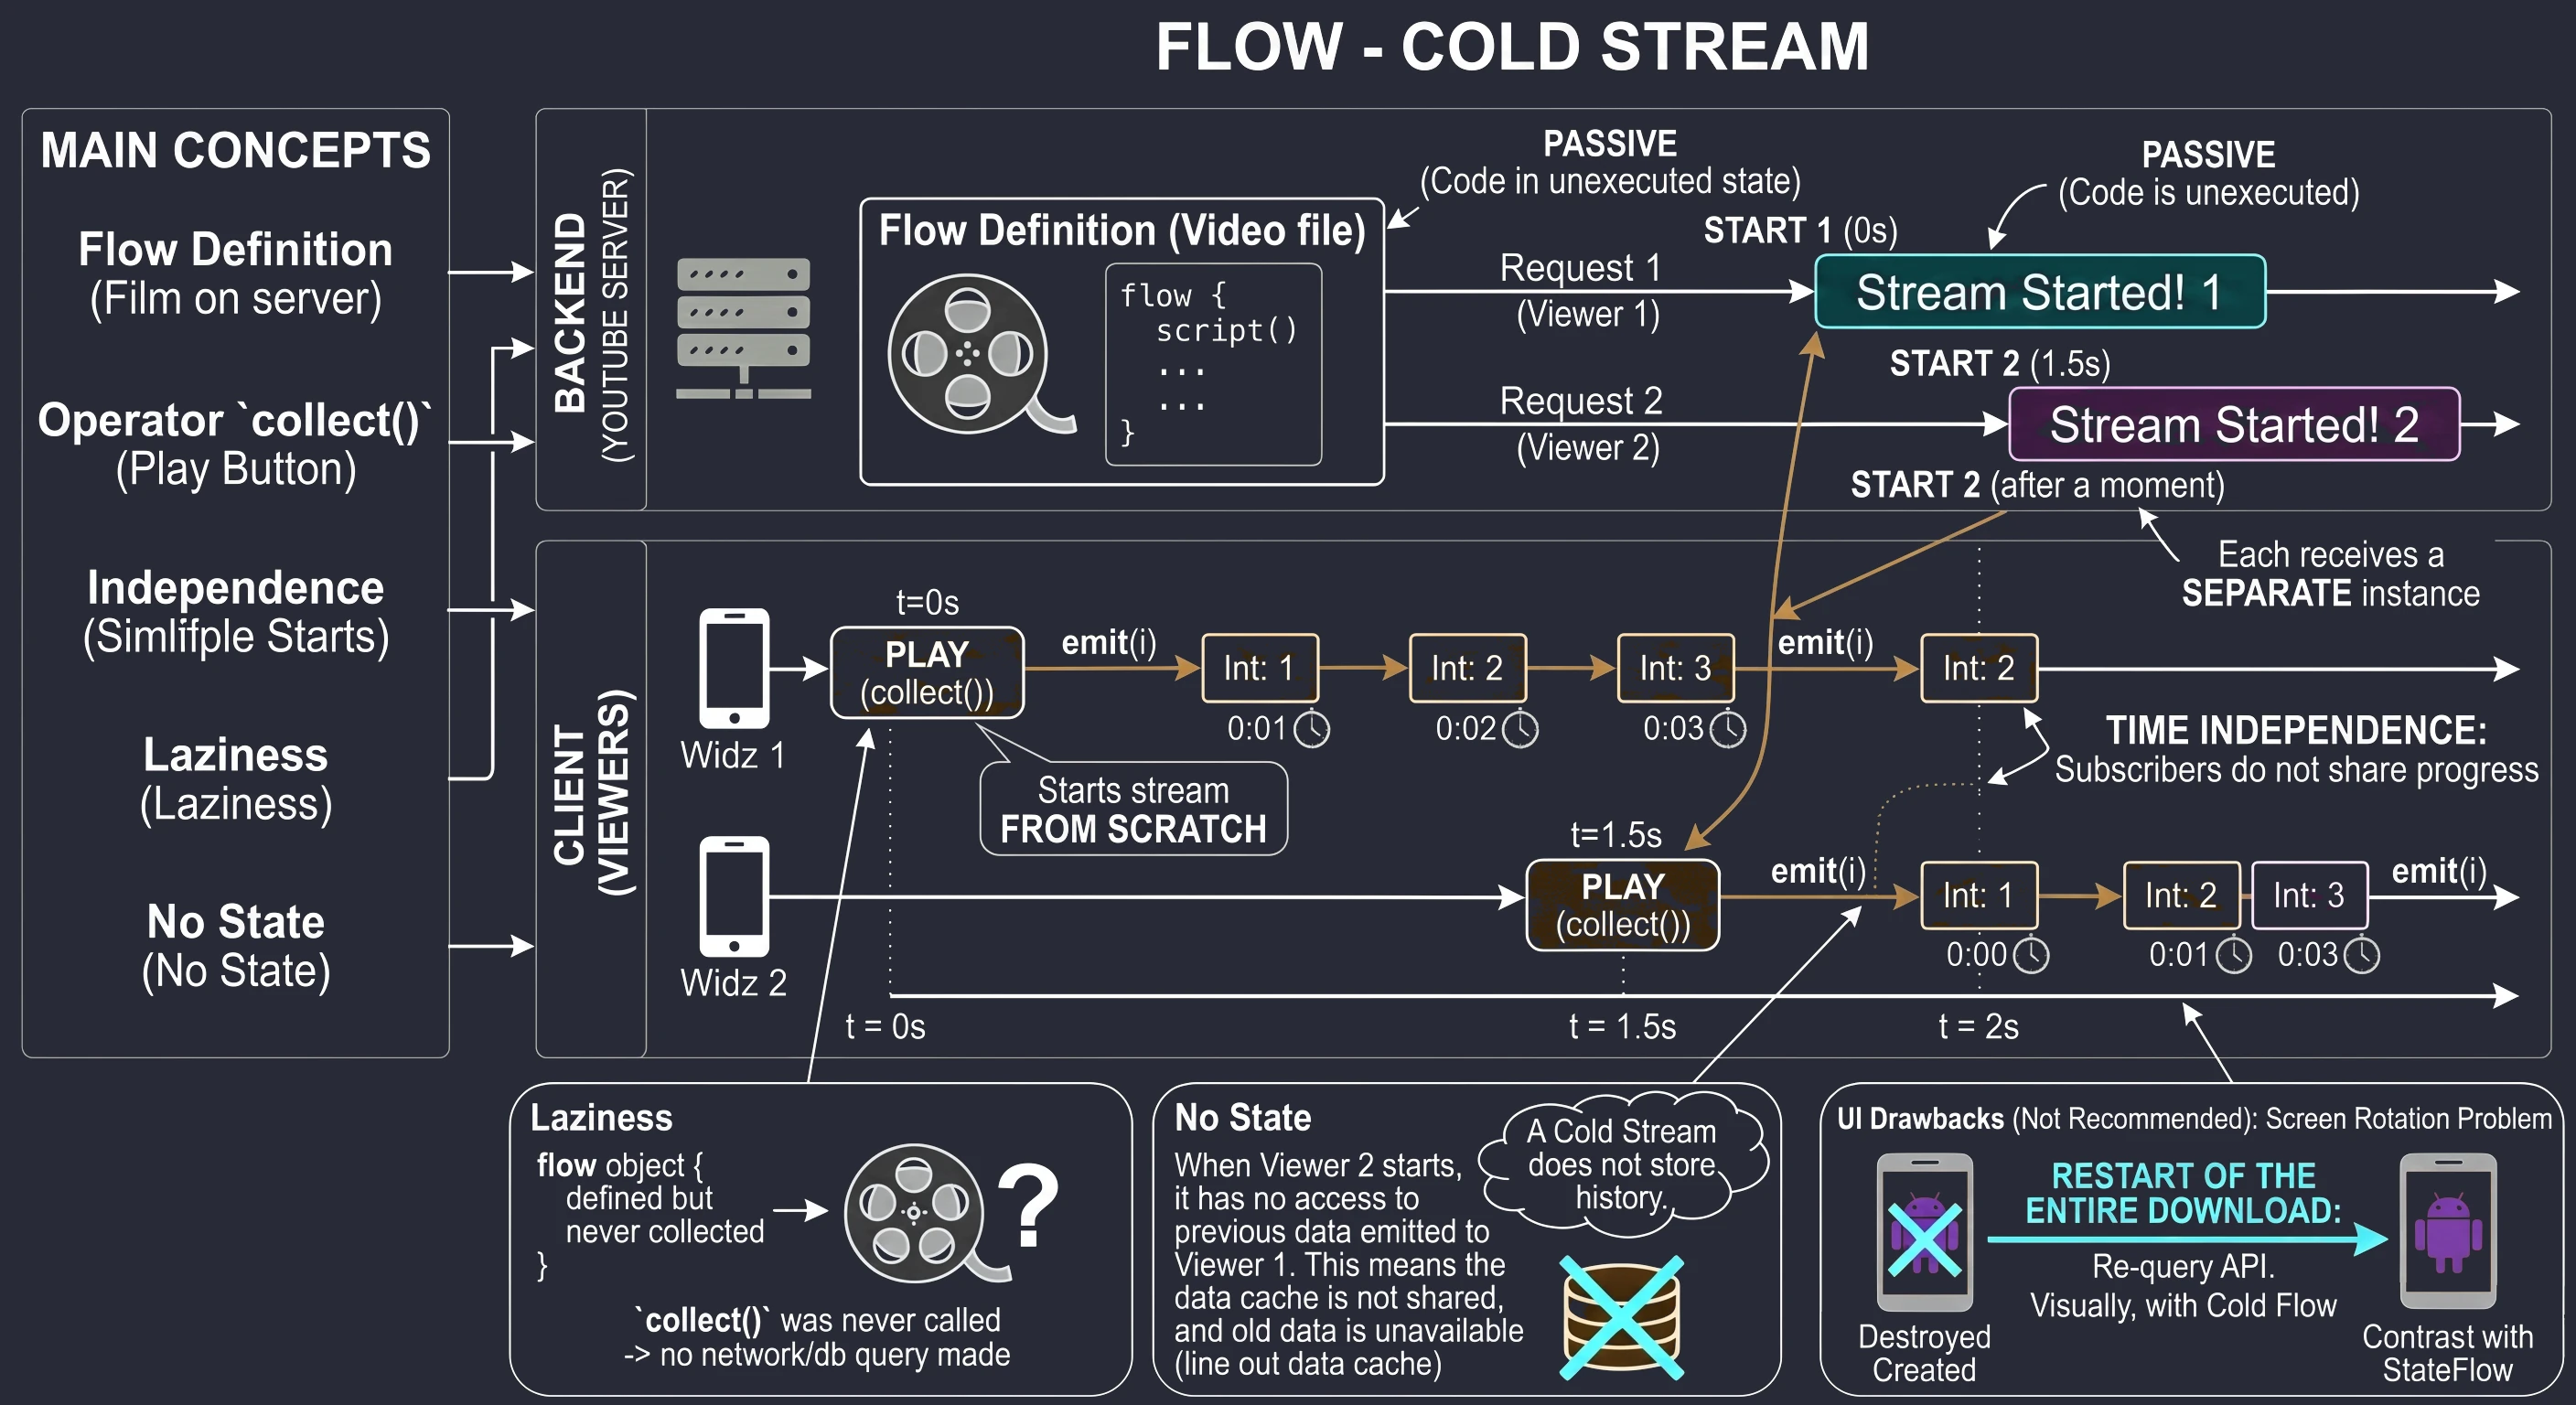
This behavior, restarting on each subscription, is very dangerous in the UI layer (View). Imagine that the user rotates the phone. Android destroys and recreates the activity.
- The old activity stops listening (
cancel). - The new activity starts listening (
collect).
With a regular Flow, this causes the entire data-fetching process to restart, for example another API request. To avoid this and keep data across screen rotations, we need a hot stream: StateFlow.
- Laziness: If you create a
Flowobject but never callcollect, the code insideflow { ... }never runs. No network or database request is sent.
Full example code
Below is complete code demonstrating the concept of a cold stream. The application lets us simulate new "viewers" (subscribers) joining the same data source.
The code visualizes logs on the screen, so we can see when the stream starts separately for each subscriber.
// 1. Cold Stream definition ("movie on the server")
// Notice: this function only returns a recipe for the stream. It does not start it.
fun numberStream(log: (String) -> Unit): Flow<Int> = flow {
    val time = SimpleDateFormat("HH:mm:ss", Locale.getDefault()).format(Date())
    log("[$time] Stream (re)starts!")

    for (i in 1..5) {
        delay(1000) // Simulate fetching a movie frame
        emit(i)     // Emit data
    }
}

@Composable
fun ColdStreamScreen() {
    // List of logs displayed on the screen
    val logs = remember { mutableStateListOf<String>() }
    // Helper for adding entries
    fun addLog(msg: String) = logs.add(msg)

    val scope = rememberCoroutineScope()

    Column(modifier = Modifier.padding(16.dp)) {
        Text("Cold Flow demonstration")

        Spacer(Modifier.height(16.dp))

        // Button simulating Viewer 1
        Button(onClick = {
            scope.launch {
                addLog("Viewer 1 clicks START")
                // collect() starts the stream FROM ZERO
                numberStream { msg -> addLog(msg) }.collect { value ->
                    addLog("  Viewer 1 watches: $value")
                }
            }
        }) {
            Text("Join as Viewer 1")
        }

        // Button simulating Viewer 2
        Button(onClick = {
            scope.launch {
                addLog("Viewer 2 clicks START")
                // collect() starts a SEPARATE stream instance
                numberStream { msg -> addLog(msg) }.collect { value ->
                    addLog("  Viewer 2 watches: $value")
                }
            }
        }) {
            Text("Join as Viewer 2")
        }

        Spacer(Modifier.height(16.dp))

        // Display logs
        LazyColumn {
            items(logs) { log ->
                Text(text = log)
            }
        }
    }
}
StateFlow - hot stream
We already know that regular Flow is a cold stream. This means that each subscription starts it from scratch. In the data layer, for example when downloading a file, this is often desired, but in the UI layer it becomes a serious problem. In the previous section we used Flow in the UI layer and considered the case of rotating the device. Because Flow is cold, the whole process starts again from the beginning. We need a stream that remembers the latest value and works independently of whether anyone is currently looking at the screen. This stream is StateFlow. It differs from a cold stream in two key ways:
- It exists independently of subscribers: It can produce data even when nobody receives it.
- It stores state (Replay = 1): It always remembers one latest emitted value. A new subscriber receives it immediately after connecting.
A good analogy for StateFlow is a live stream (Twitch):
- Streamer (ViewModel): Broadcasts a live stream. They play a game, while the score and health counters change in real time. The broadcast continues (data flows) regardless of whether there are 1000 viewers on the channel or 0.
- Viewer (View/UI):
- When a new viewer enters the channel, they do not watch the broadcast from the beginning, as with a YouTube video.
- They see what is happening right now, the current game state.
- If the viewer minimizes Twitch (the application goes to the background) and returns after a minute, they see the current action. What happened during that minute is gone, because we care about the live state.
- Shared image: All viewers watching the same channel see exactly the same state, for example the same stream image, at the same moment.
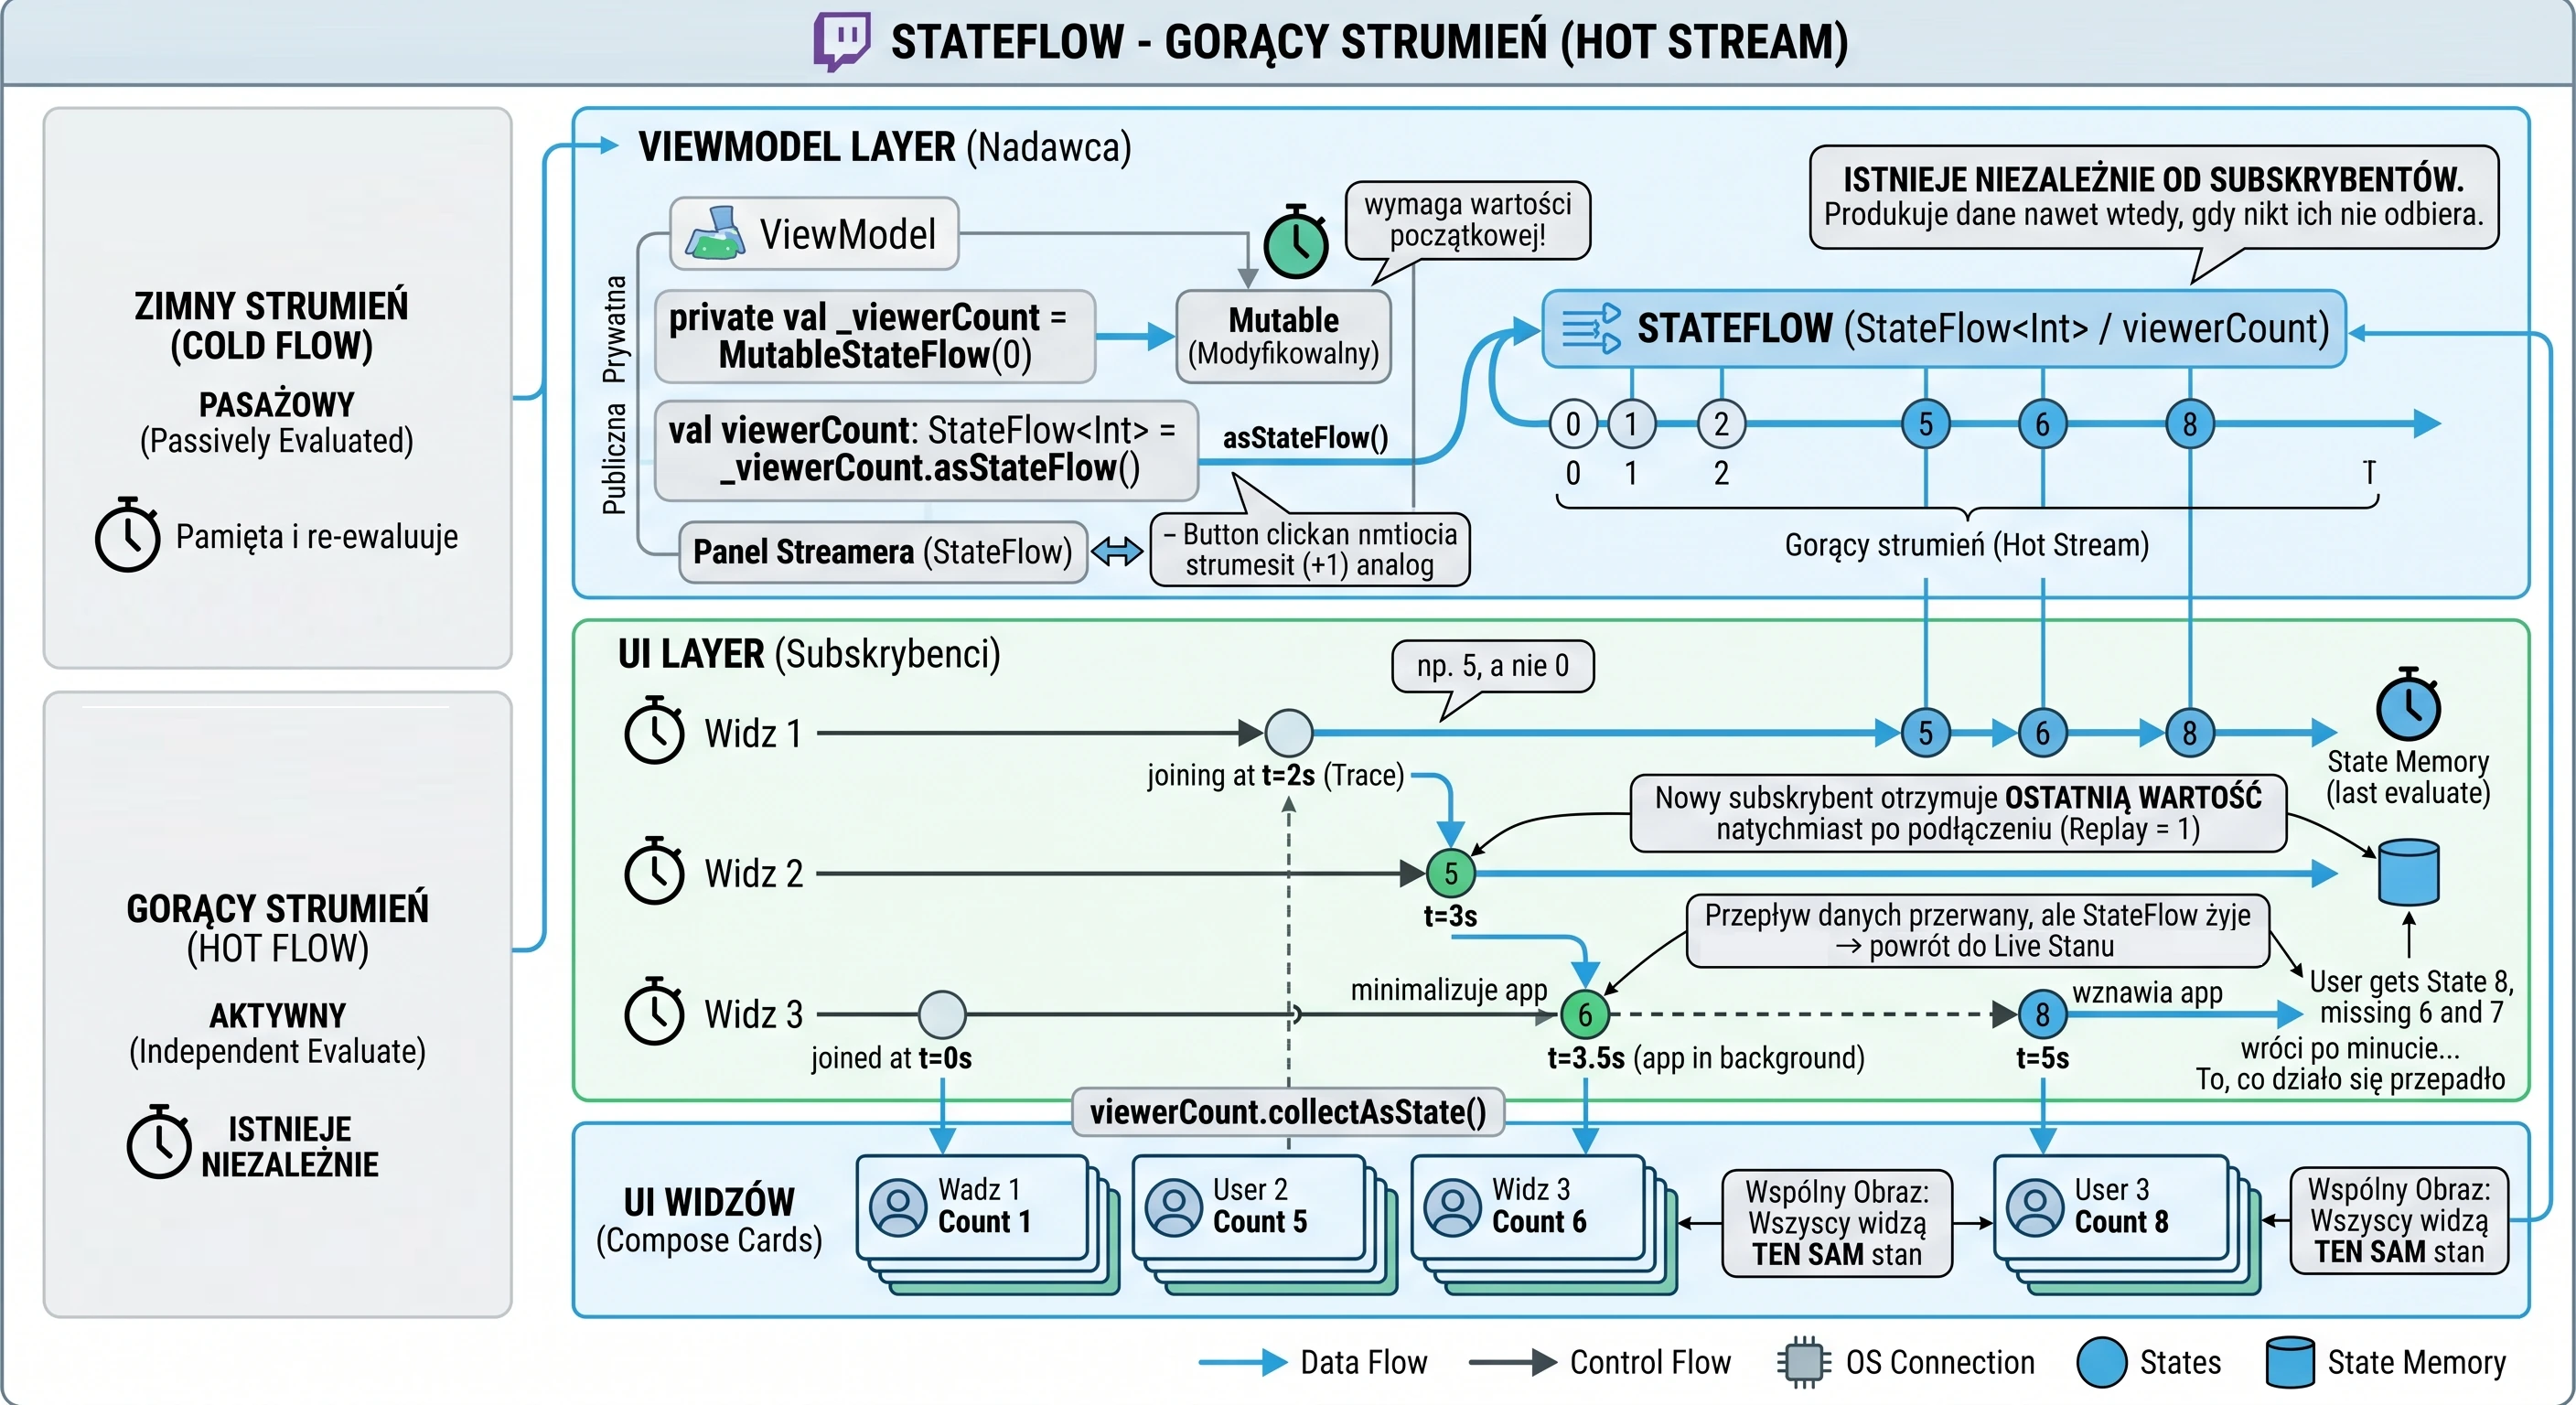
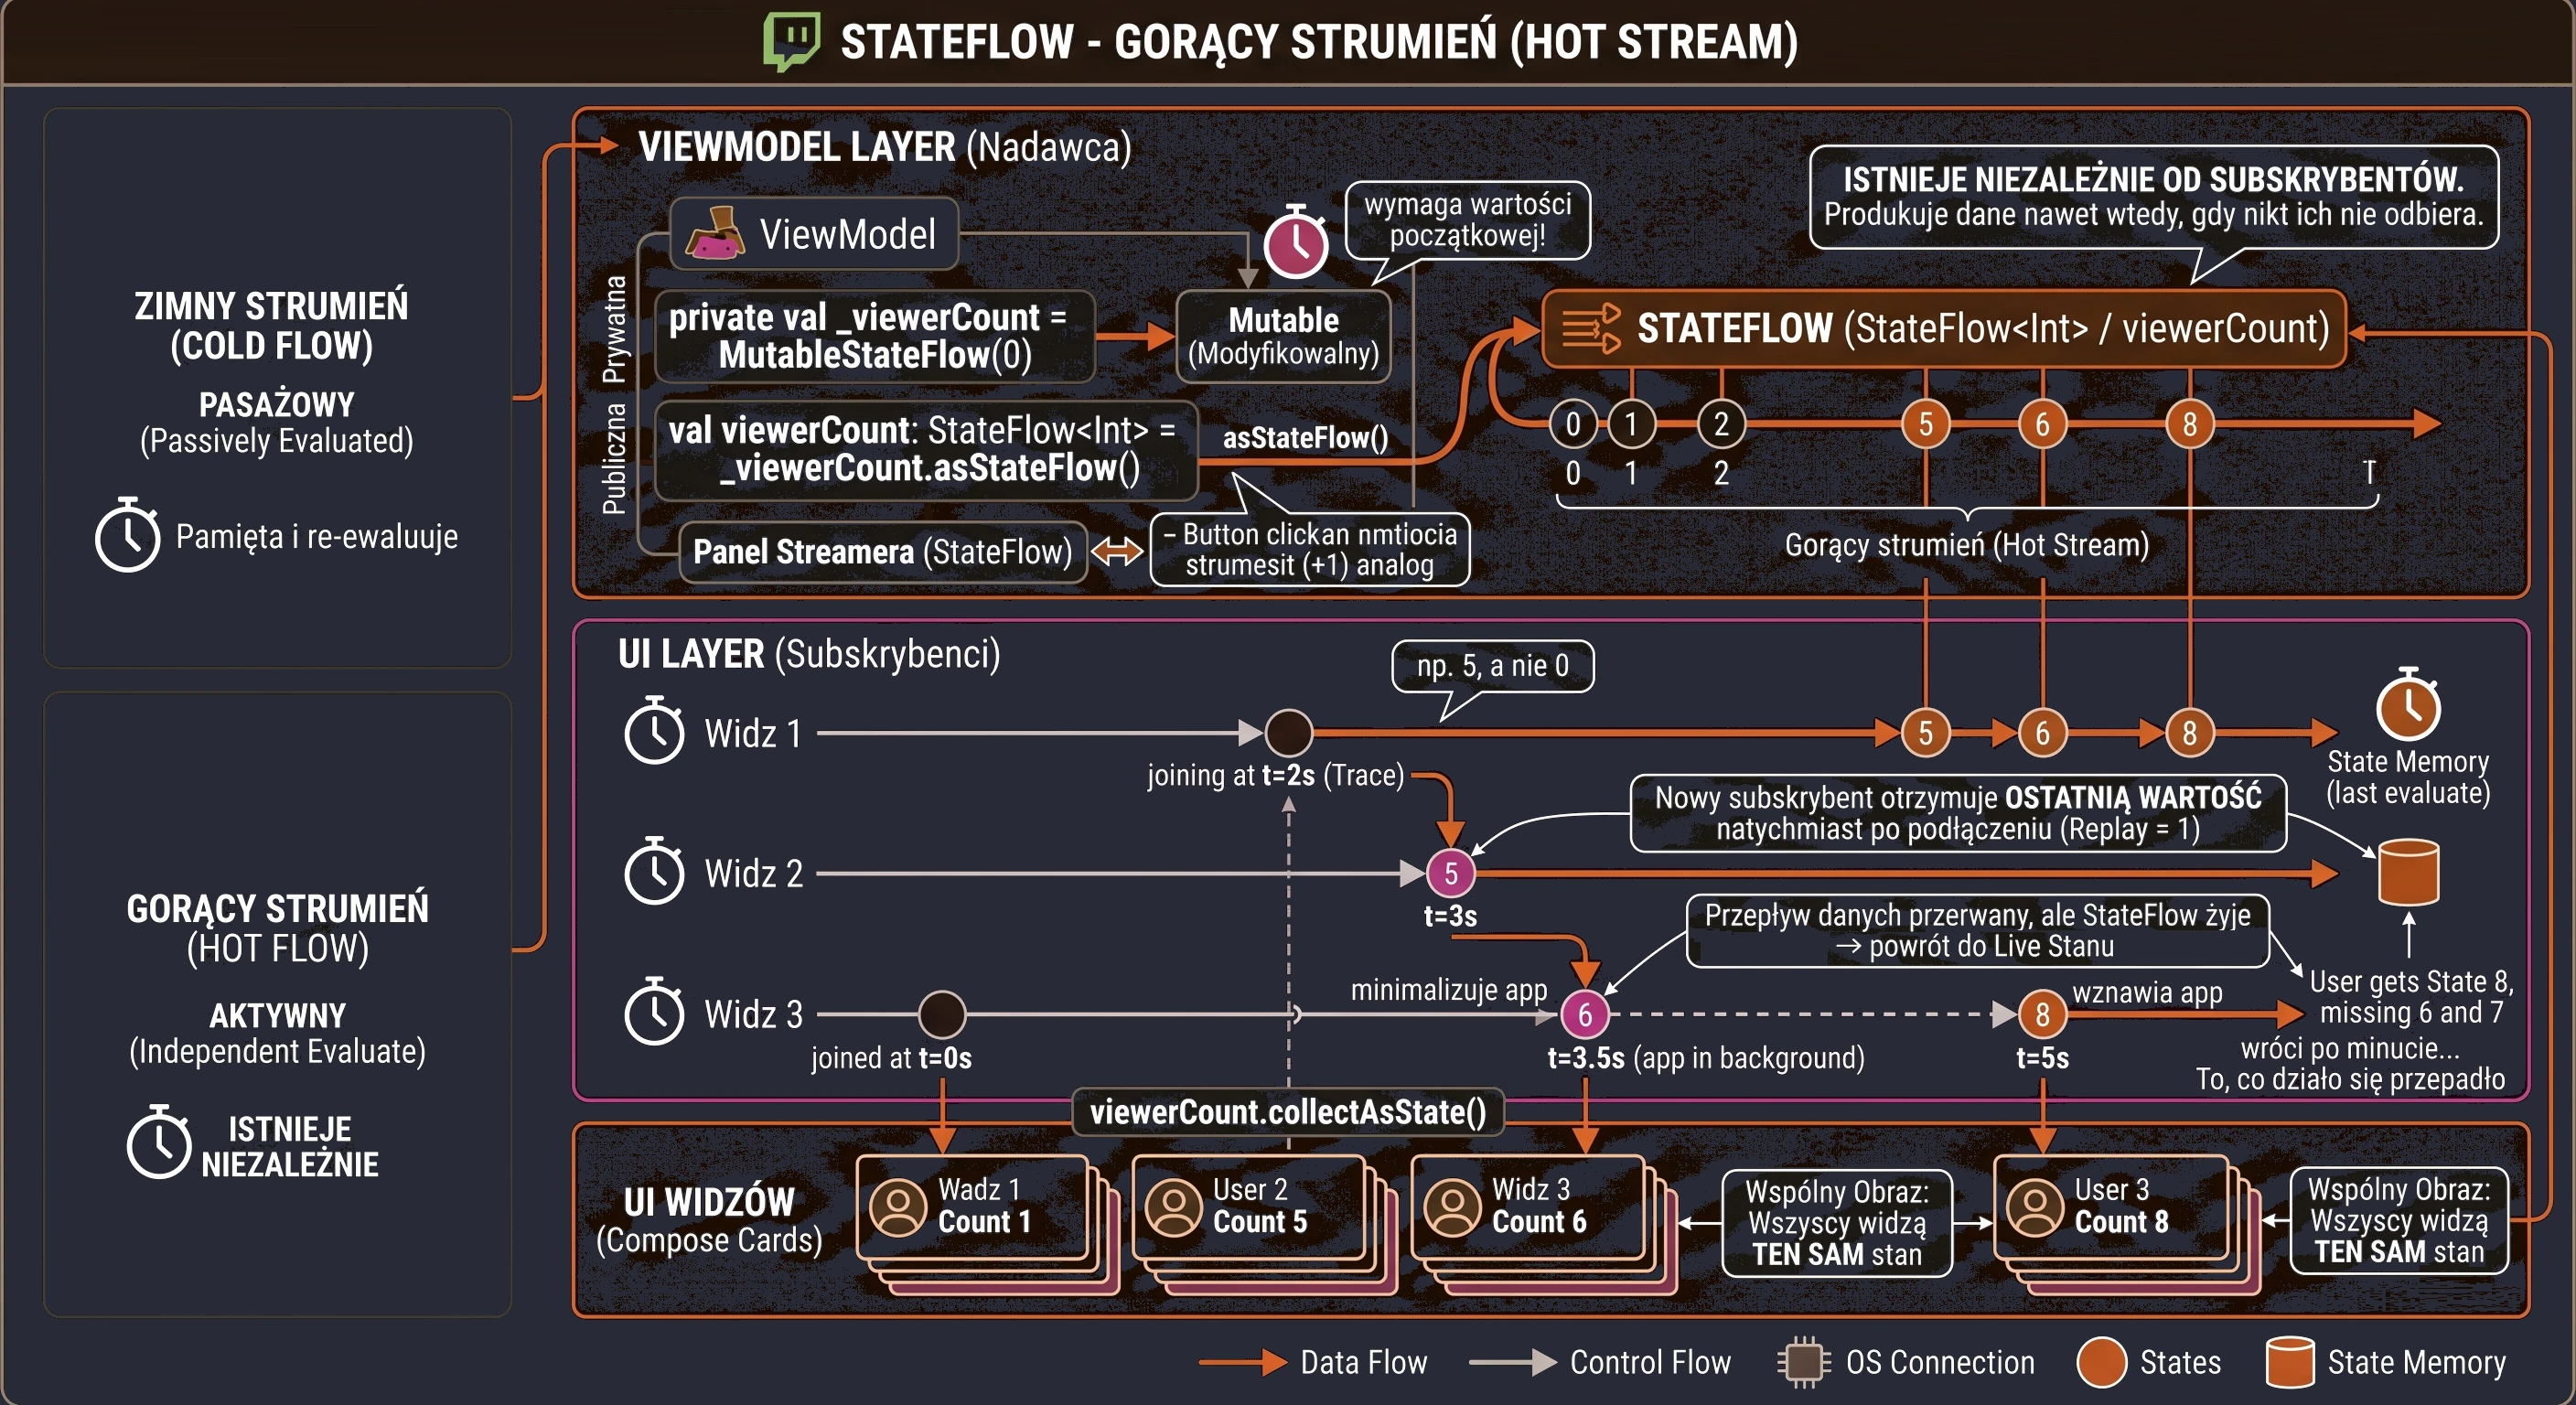
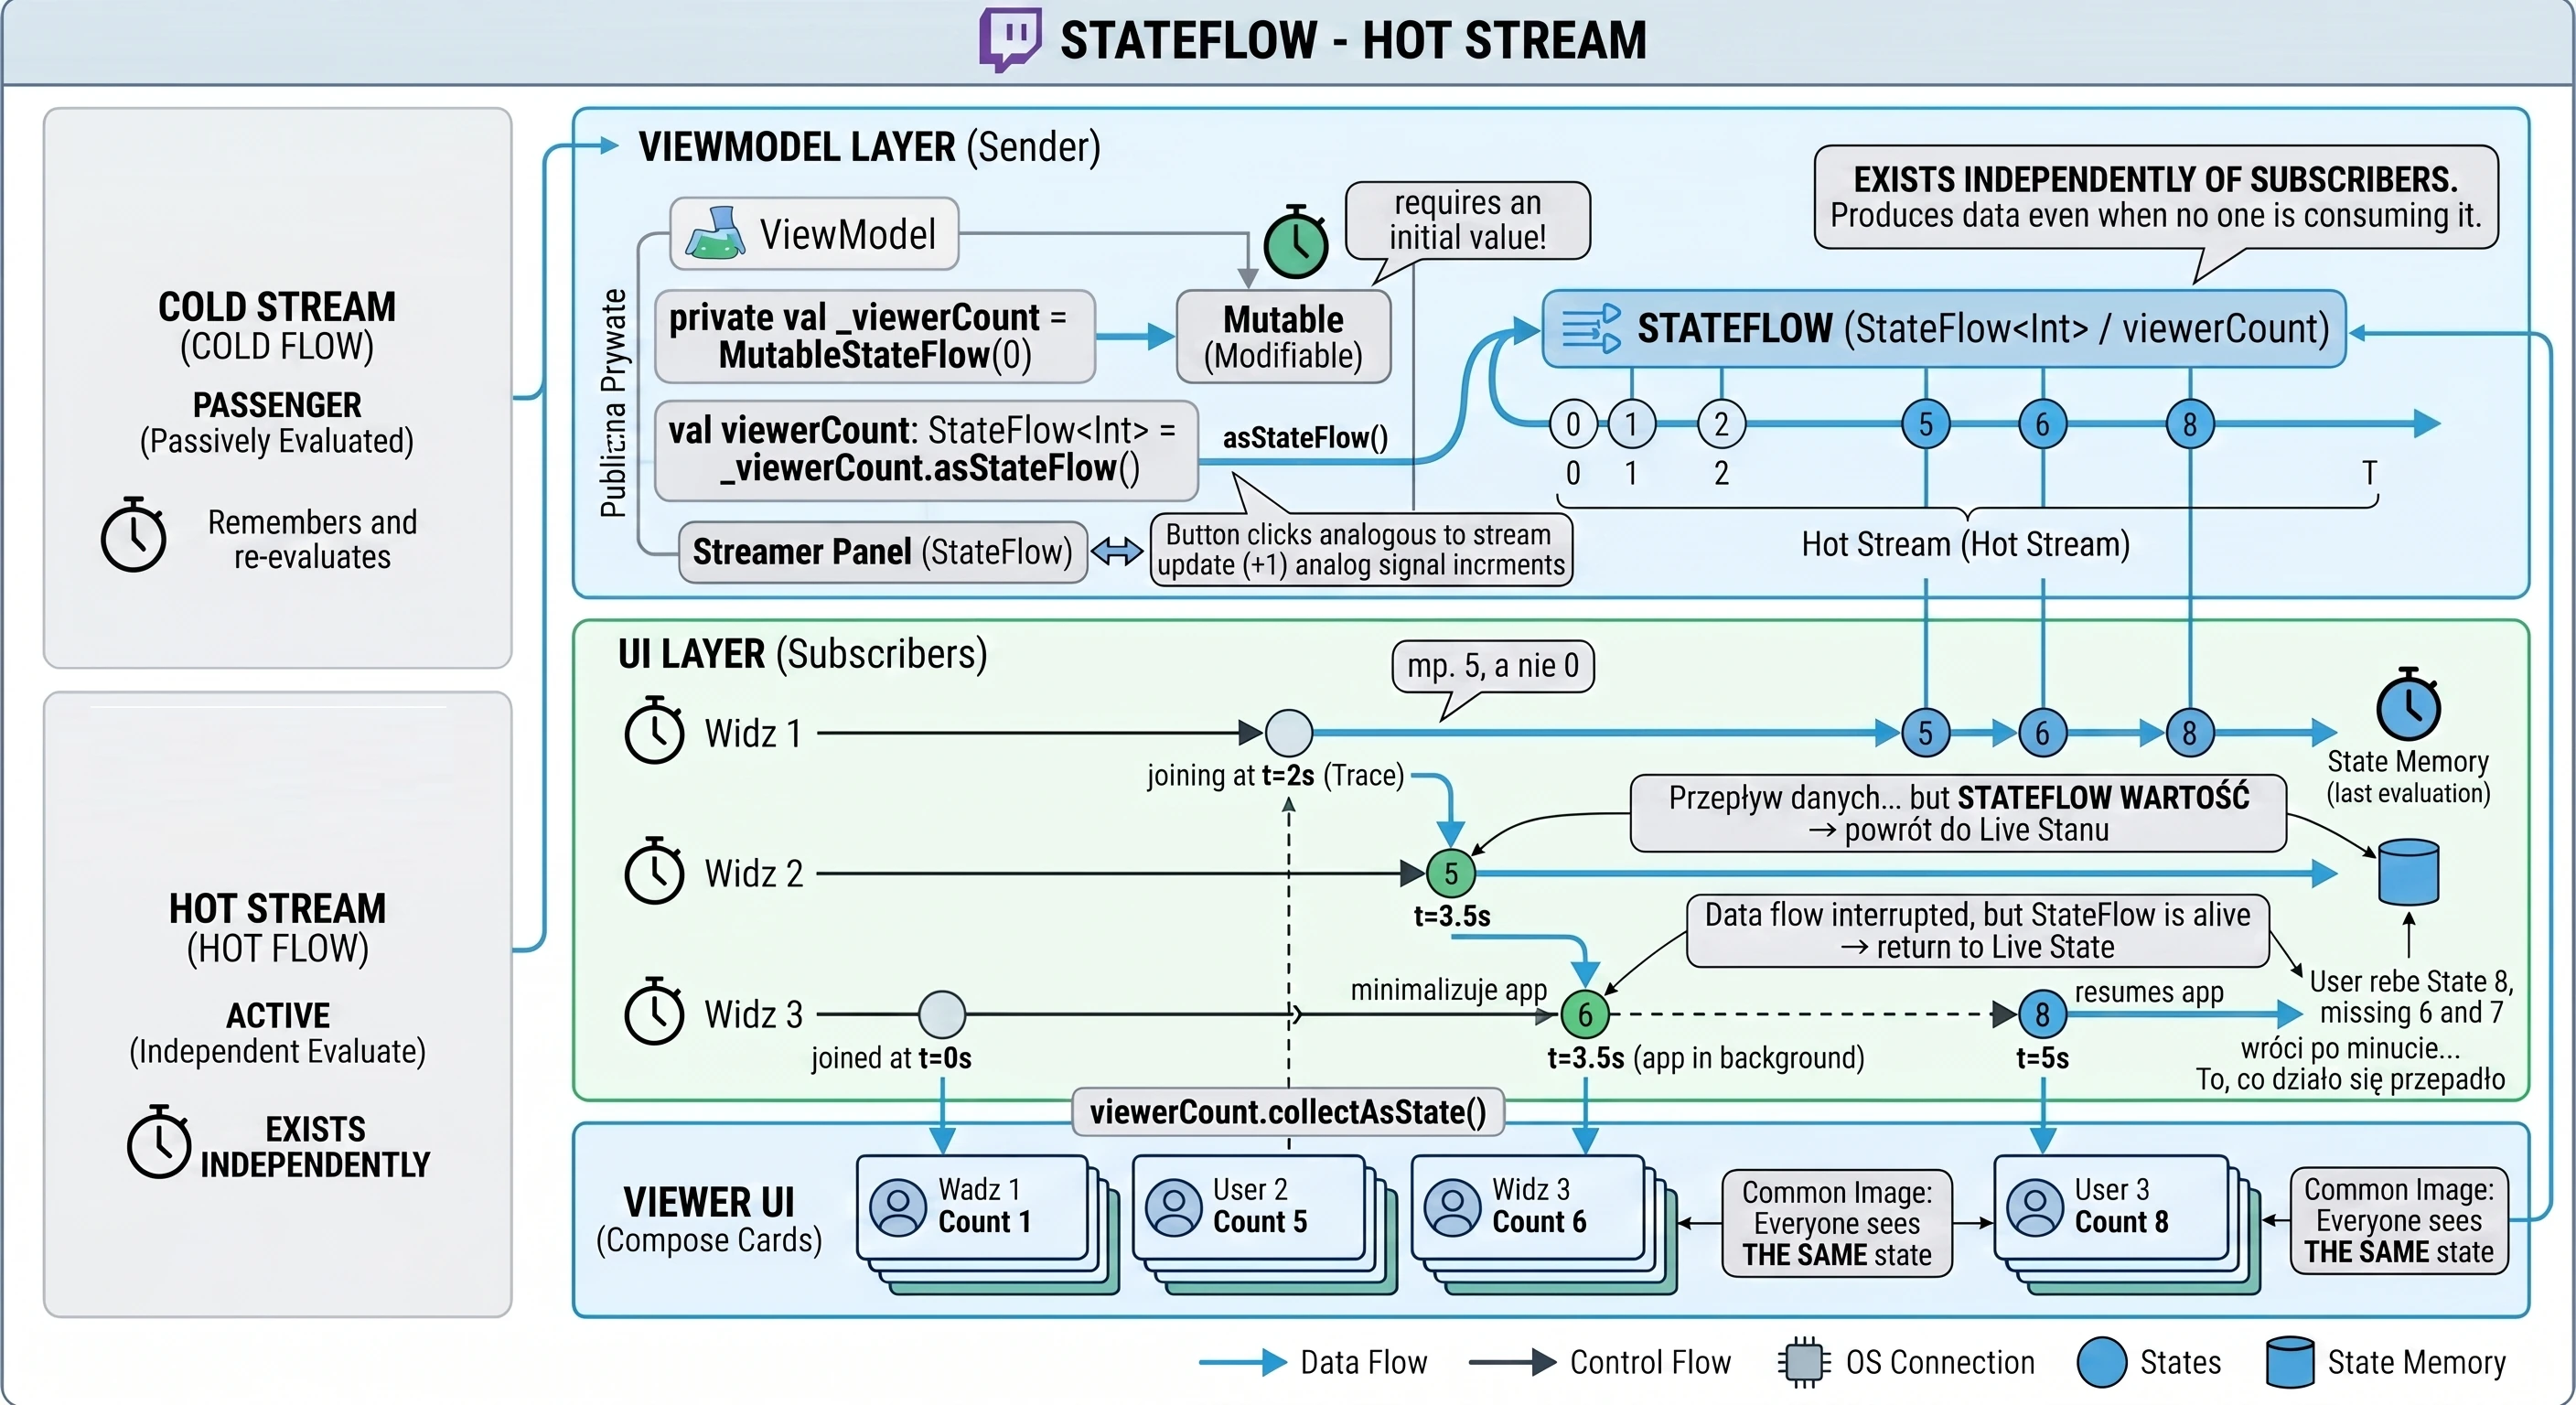
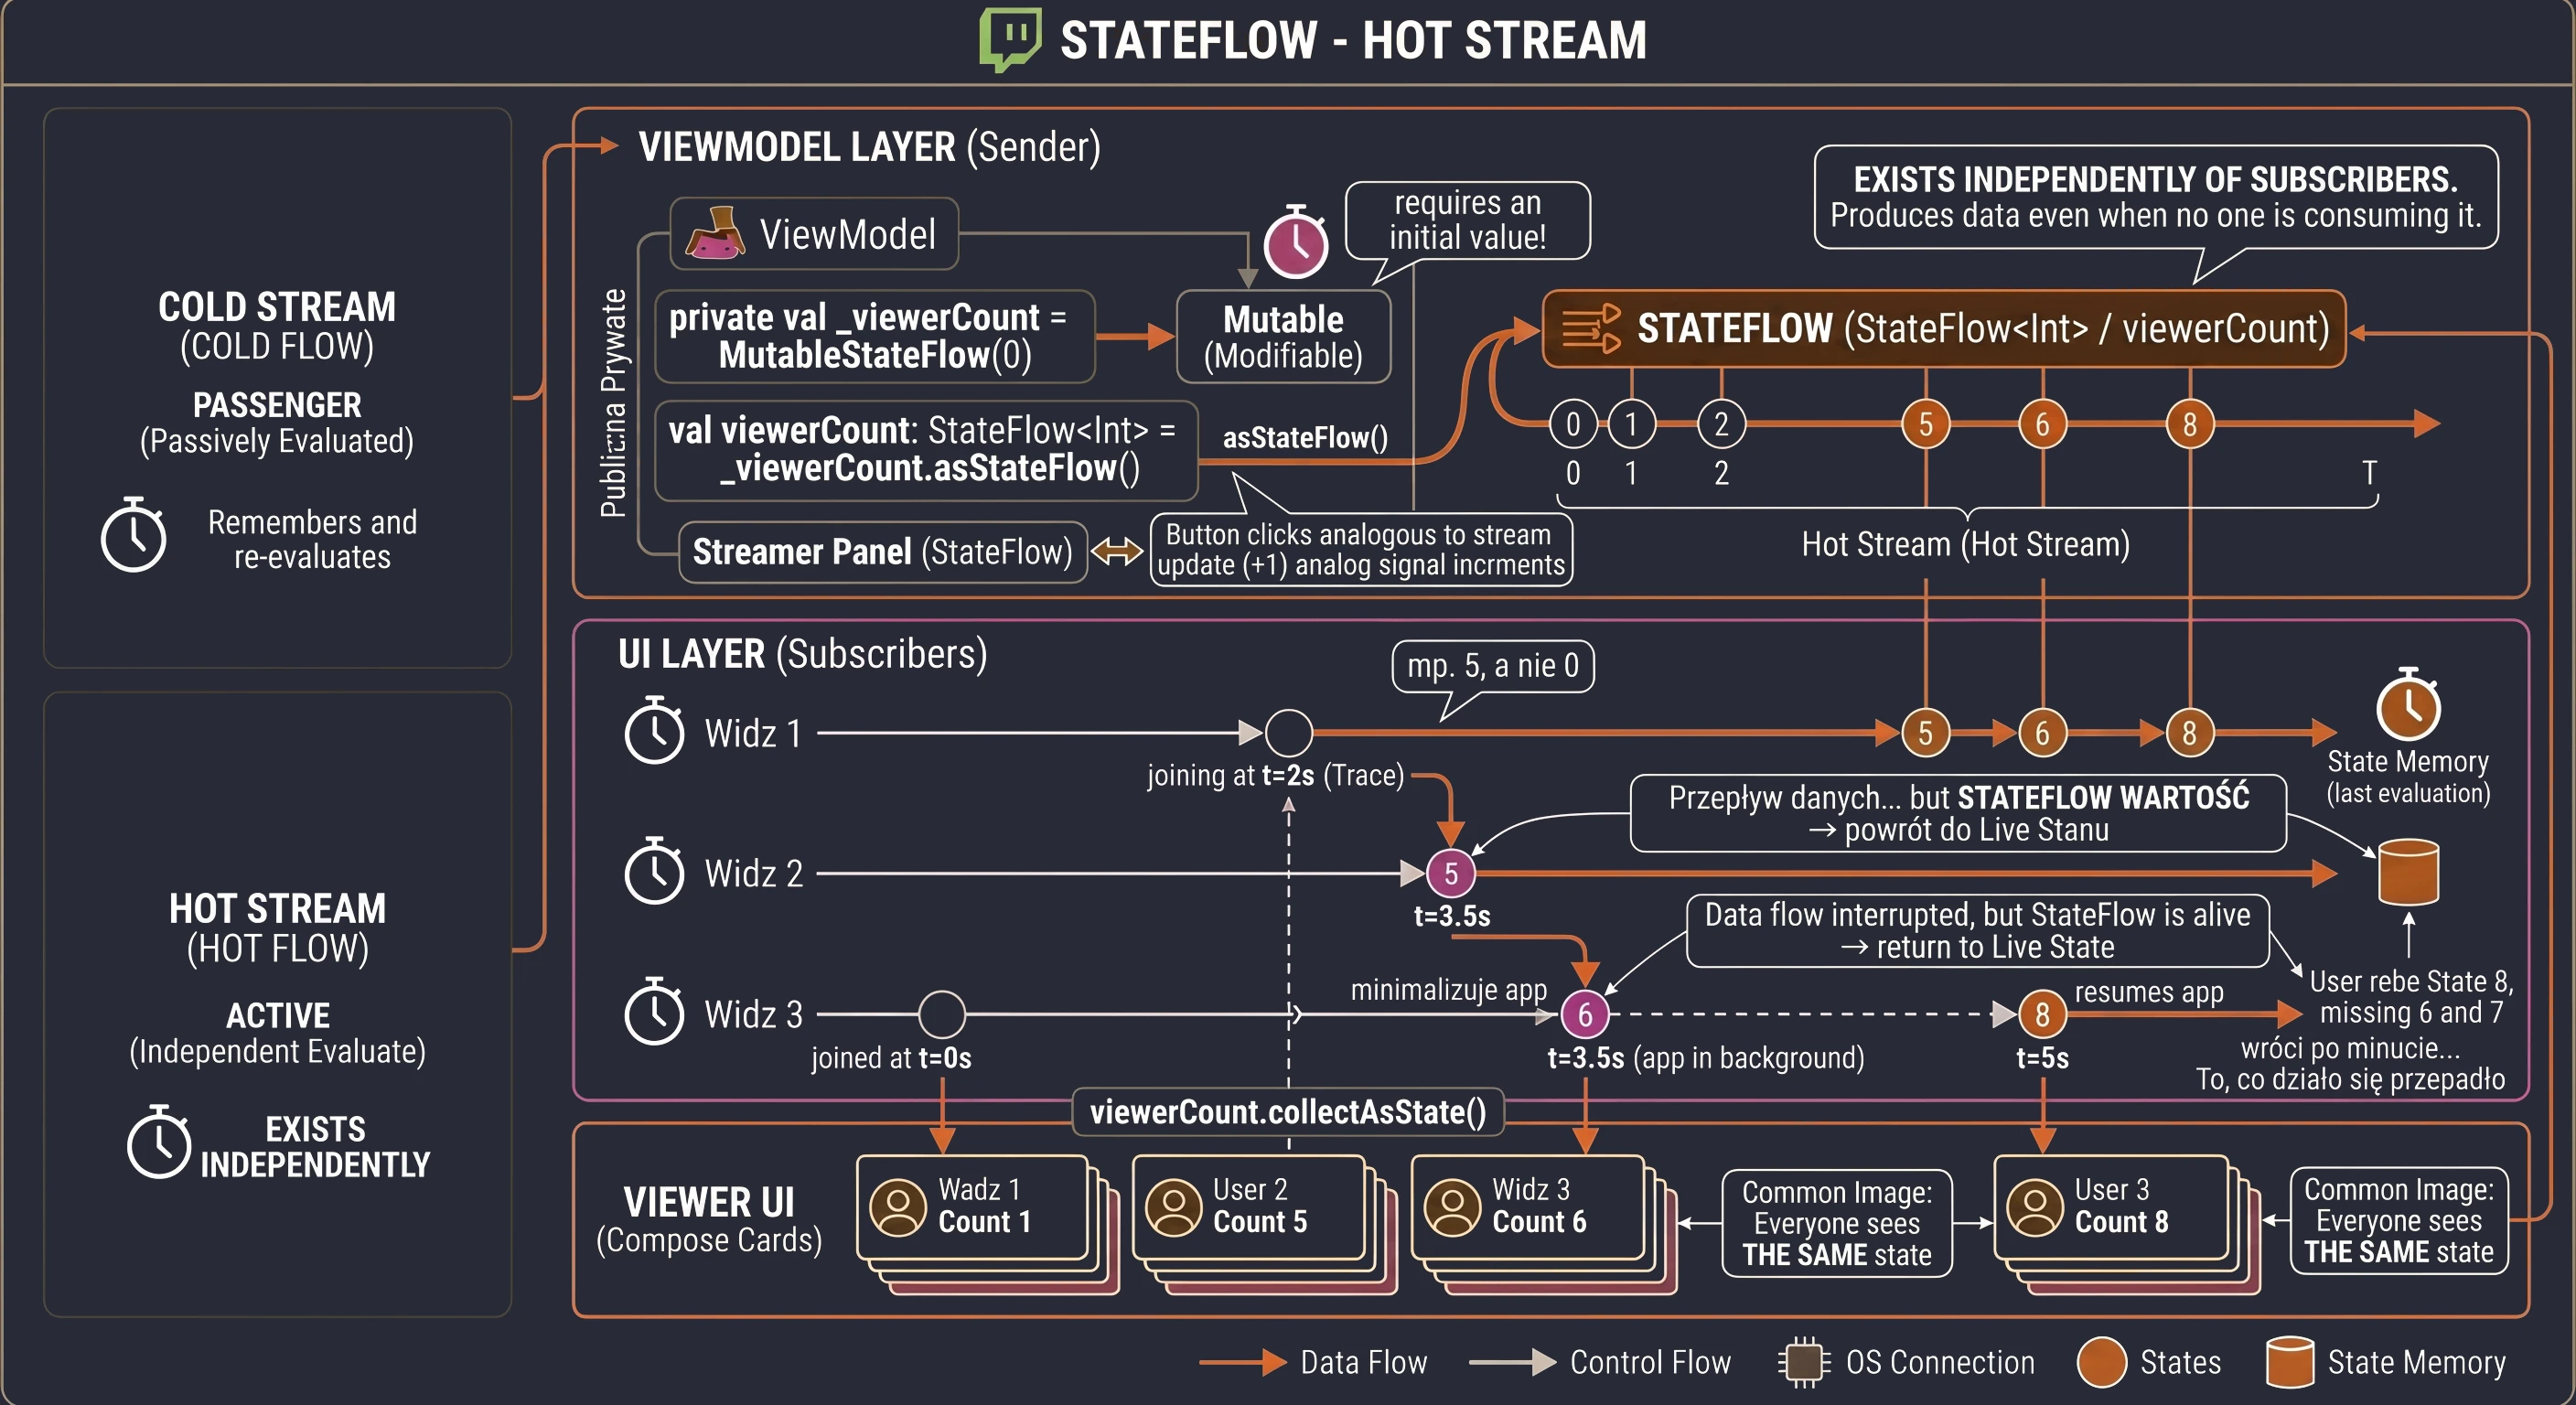
Let us move to an example:
class StreamerViewModel : ViewModel() {

    // 1. Private, mutable version (MutableStateFlow)
    // REQUIRES an initial value! The scoreboard must show something at startup, e.g. 0.
    private val _viewerCount = MutableStateFlow(0)

    // 2. Public, read-only version (StateFlow)
    val viewerCount: StateFlow<Int> = _viewerCount.asStateFlow()

    fun addViewer() {
        // State update is immediate
        _viewerCount.value += 1
    }
}
It is worth noting that MutableStateFlow requires an initial value in the constructor. This is logical: since StateFlow guarantees that it always has a value, like a scoreboard, it must have one from the moment it is created.
Full example code
The code below demonstrates how StateFlow works. We have a "Streamer" (ViewModel) that manages the viewer counter. Pay attention to the application behavior:
- Click Add viewer in the Streamer panel.
- Then click Join the stream as Viewer 1. You will see the current value, for example 5, not 0.
- Join as Viewer 2. They receive the same value as Viewer 1.
// --- 1. ViewModel (Streamer) ---
class StreamerViewModel : ViewModel() {
    // Internal state (hot stream, always has a value)
    private val _viewerCount = MutableStateFlow(0)

    // Public state (read-only)
    val viewerCount: StateFlow<Int> = _viewerCount.asStateFlow()

    fun addViewer() {
        _viewerCount.value += 1
    }
}

// --- 2. View (UI) ---
@Composable
fun StateFlowDemoScreen(
    viewModel: StreamerViewModel = viewModel()
) {
    Column(
        modifier = Modifier.fillMaxSize().padding(16.dp),
        horizontalAlignment = Alignment.CenterHorizontally
    ) {
        Text("Streamer panel (StateFlow)")

        Spacer(Modifier.height(16.dp))

        // Streamer control panel
        Card() {
            Column(
              modifier = Modifier.padding(16.dp),
              horizontalAlignment = Alignment.CenterHorizontally) {
                Text("You are the Streamer")
                Button(onClick = { viewModel.addViewer() }) {
                    Text("Add viewer (+1)")
                }
            }
        }

        Spacer(Modifier.height(32.dp))

        // Viewer simulation
        // Each ViewerScreen component independently subscribes
        // to THE SAME StateFlow
        ViewerScreen(viewModel, "Viewer 1")
        Spacer(Modifier.height(8.dp))
        ViewerScreen(viewModel, "Viewer 2")
    }
}

@Composable
fun ViewerScreen(viewModel: StreamerViewModel, viewerName: String) {
    // collectAsState() converts StateFlow into Compose State
    val count by viewModel.viewerCount.collectAsState()

    Card(modifier = Modifier.fillMaxWidth()) {
        Row(
            modifier = Modifier.padding(16.dp),
            verticalAlignment = Alignment.CenterVertically,
            horizontalArrangement = Arrangement.SpaceBetween
        ) {
            Text(viewerName, style = MaterialTheme.typography.bodyLarge)
            Text(
                text = "Sees counter: $count",
                style = MaterialTheme.typography.titleLarge
            )
        }
    }
}
SharedFlow: handling events
We now have StateFlow, in which we store state, such as the number of viewers. However, mobile applications often deal with situations that are not state, but events.
Examples of one-shot events:
- Displaying a network connection error message (Toast/Snackbar).
- Navigating to another screen after successful login.
- Triggering phone vibration.
Why is StateFlow not suitable here? Imagine that we use StateFlow to handle errors.
- An error occurs. We write it to StateFlow:
state.value = "Error". - The view displays a Toast with the error.
- The user rotates the phone.
- The view is recreated and subscribes to StateFlow.
- Because StateFlow remembers the latest value, the new view immediately receives Error and displays the Toast again.
Events should be consumed once and disappear. For example, we do not want a doorbell to ring forever every time we open the door. SharedFlow is used to handle such scenarios. It is also a hot stream, but by default it is configured to not remember history.
Let us return to our broadcast analogy. While the video image (StateFlow) must be continuous and available to everyone, notifications work differently.
- Donation alert (event): A message appears on the screen: Viewer1 donated 5 PLN.
- Present viewer (subscriber): Sees the message at the moment it appears.
- Absent viewer (application in the background): If the viewer is not in the room at the moment of the donation, then after returning they do not see the old alert.
It works like a doorbell: you hear it only when the courier presses it. If you come home an hour later, the doorbell does not suddenly start ringing to tell you that someone was there.
Let us look at an example. The differences compared with StateFlow are crucial:
class StreamerViewModel : ViewModel() {

    // 1. No initial value!
    // SharedFlow does not have to hold a value; it only pushes values through.
    // replay = 0 (default) -> new subscribers do NOT receive old events.
    private val _donations = MutableSharedFlow<String>(replay = 0)

    val donations = _donations.asSharedFlow()

    fun sendDonationAlert(message: String) {
        viewModelScope.launch {
            // 2. We use emit(), not .value
            // This is a suspending operation, because the buffer may be full
            _donations.emit(message)
        }
    }
}
replay = 0parameter:- In
StateFlow, this value is fixed at1, which is why state is restored after, for example, screen rotation. - In
SharedFlow, setting it to0guarantees that an event emitted at time $T_0$ will not be delivered to a subscriber that starts listening at time $T_1$. This prevents the bug of displaying messages again. - No
.valuefield: emit()is asuspendfunction:
This is an important configuration for one-shot events. This parameter defines how many latest values should be stored in memory for new subscribers.
Notice that SharedFlow has no value property. We can only wait for upcoming emissions. This enforces a purely reactive approach.
Unlike setting state.value = ..., the emit() method in SharedFlow is a suspending function. SharedFlow supports the backpressure mechanism. If subscribers cannot keep up with event processing and the internal buffer becomes full, the emit function suspends the producer coroutine until space becomes available in the buffer. This ensures thread safety and protects the application from being flooded with excessive data.
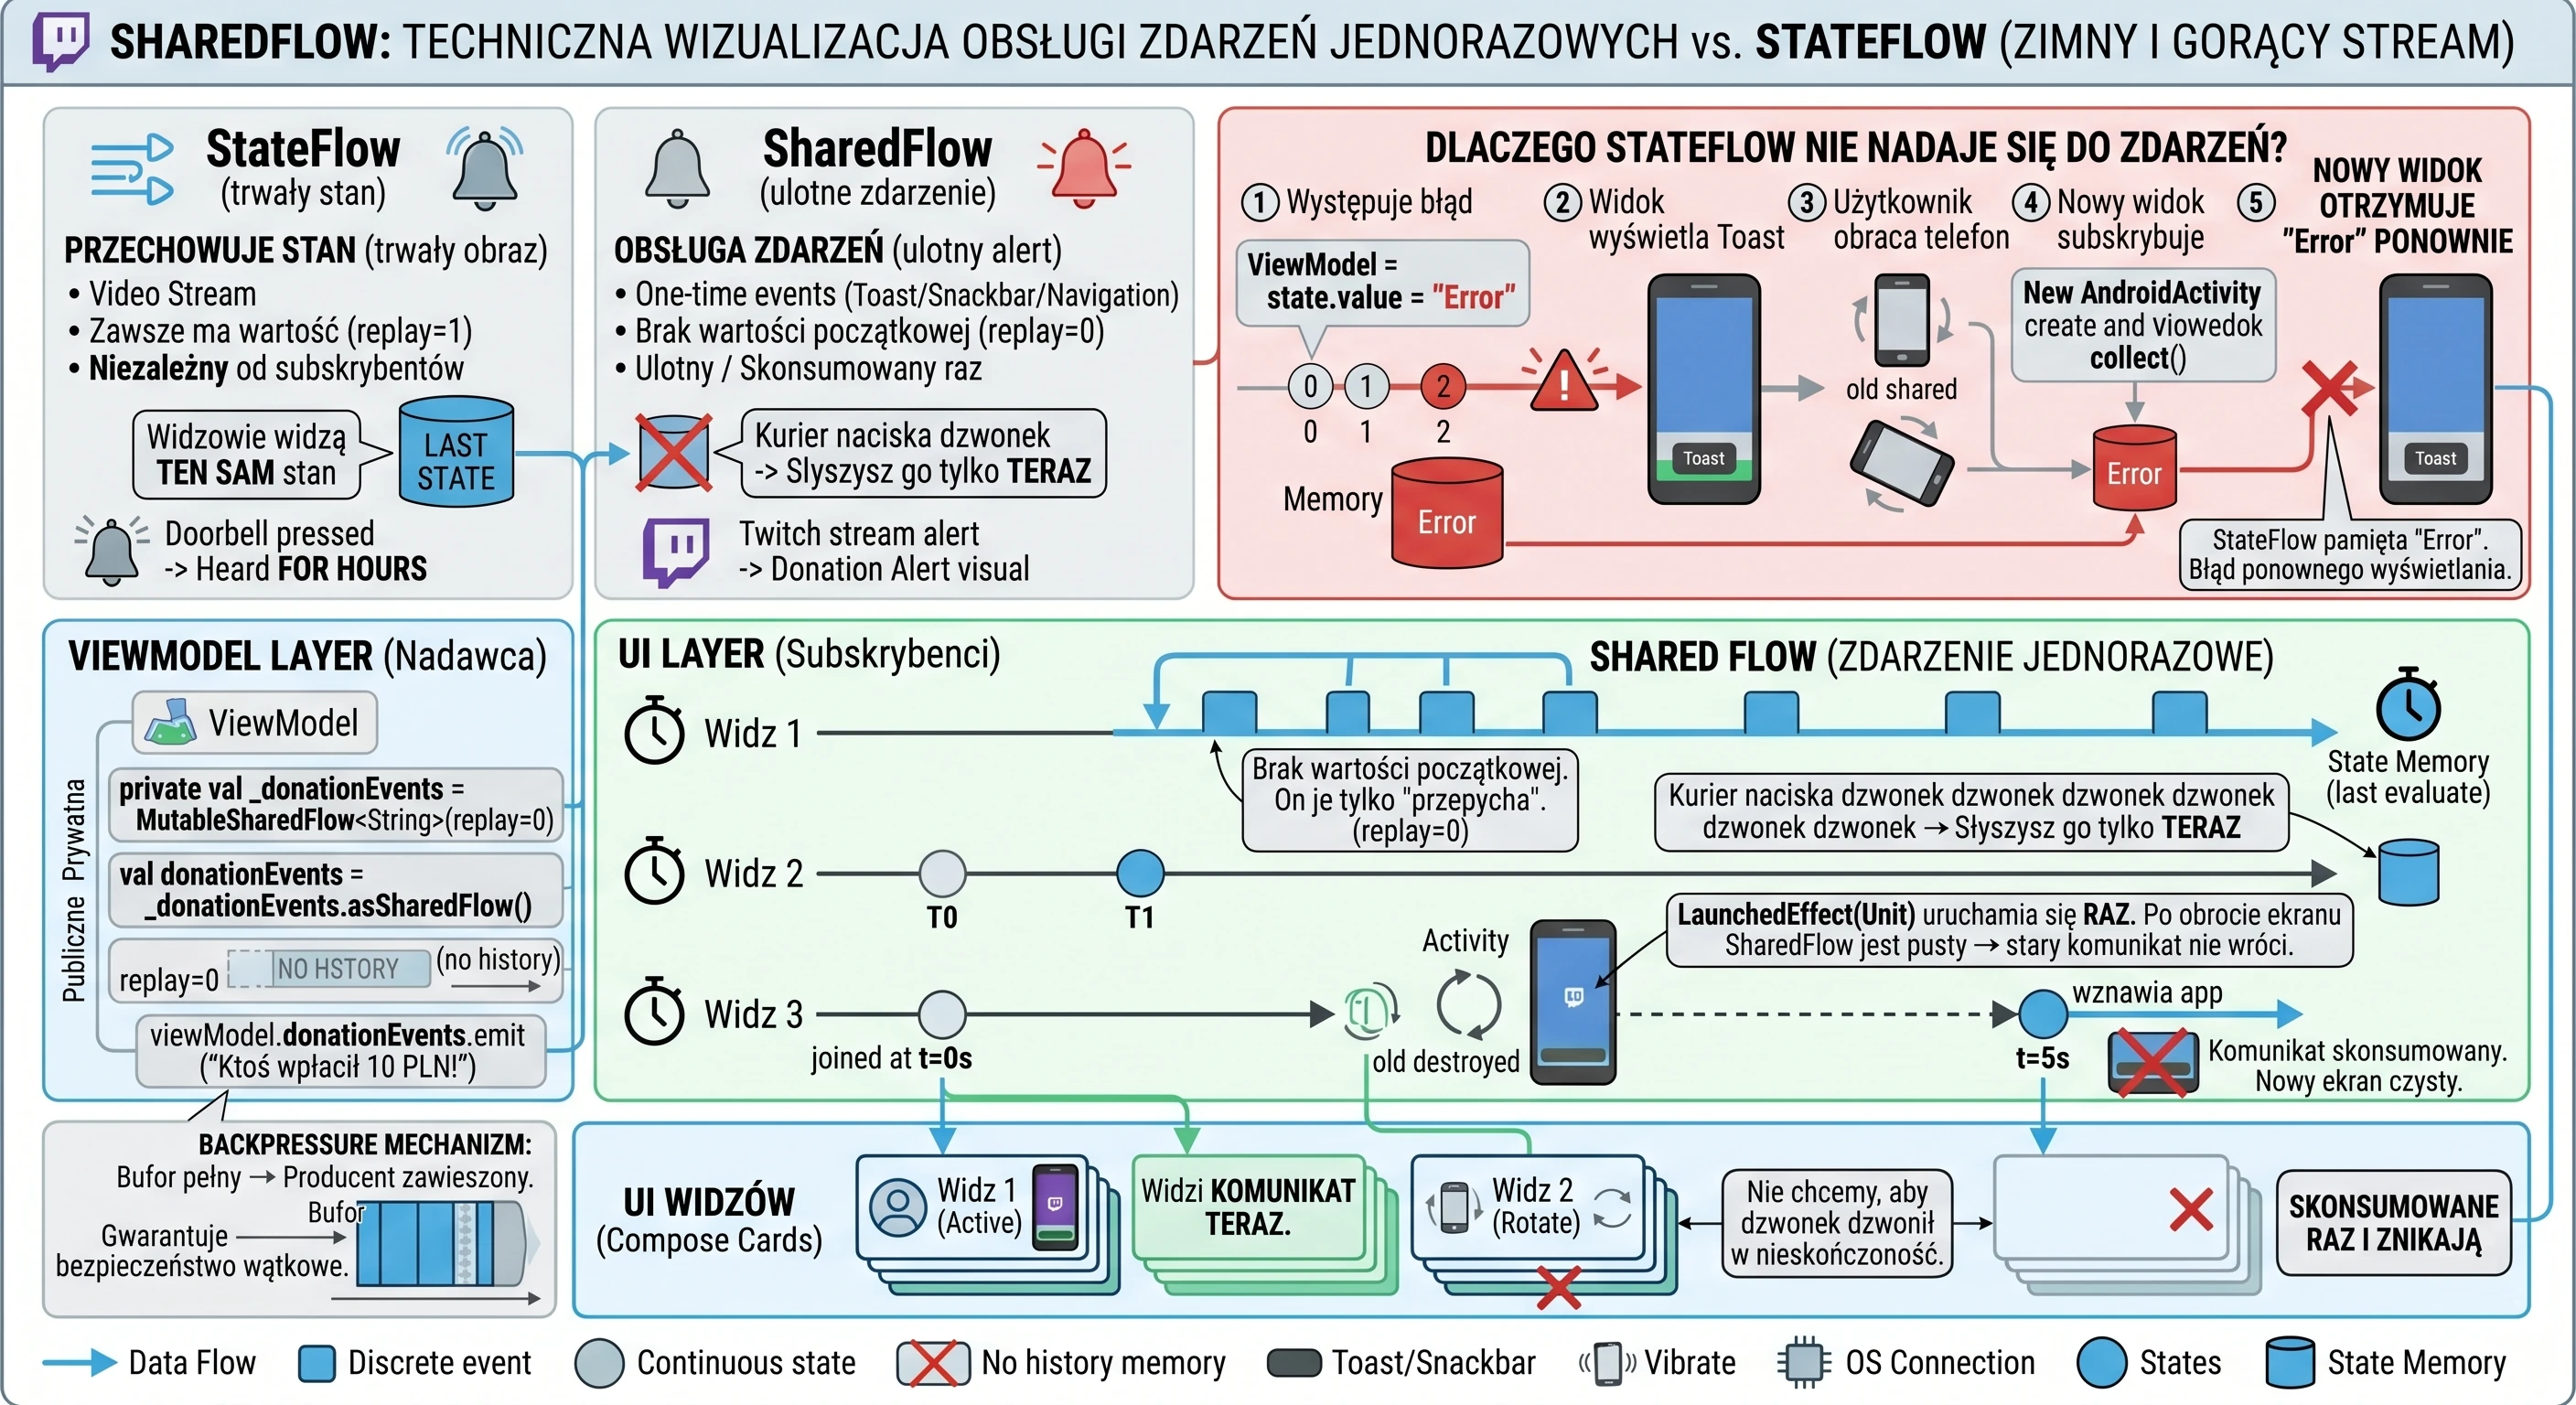
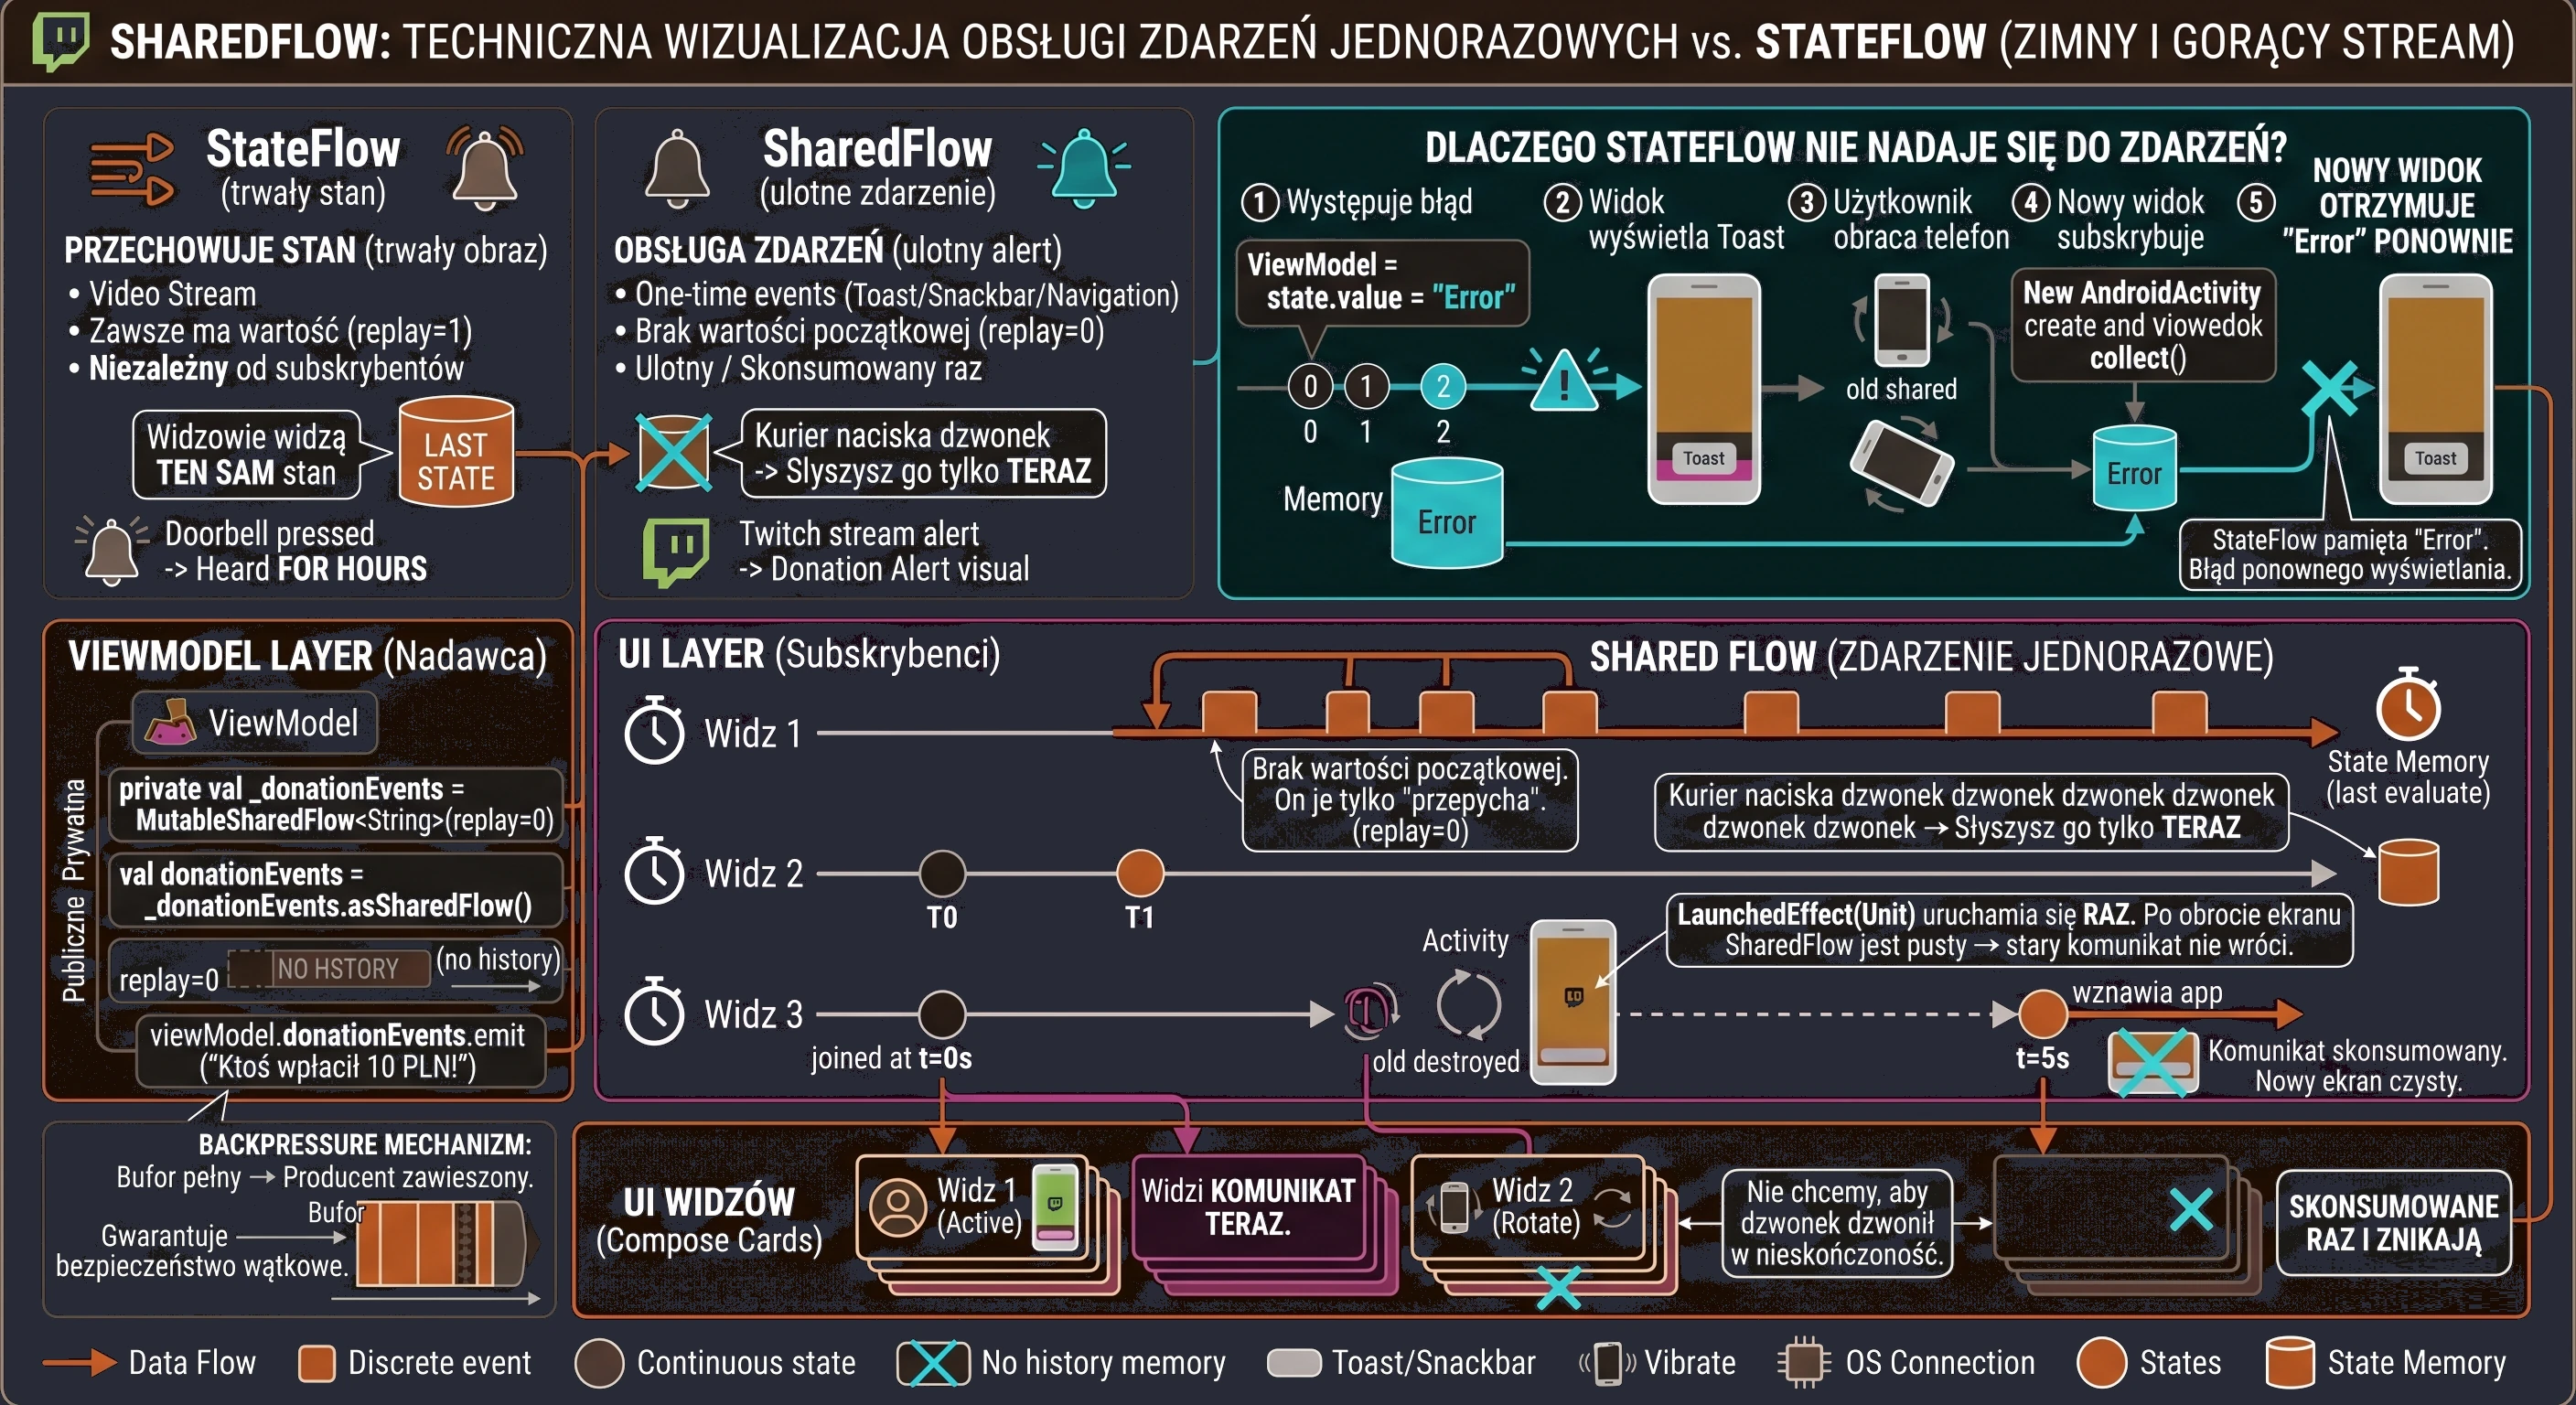
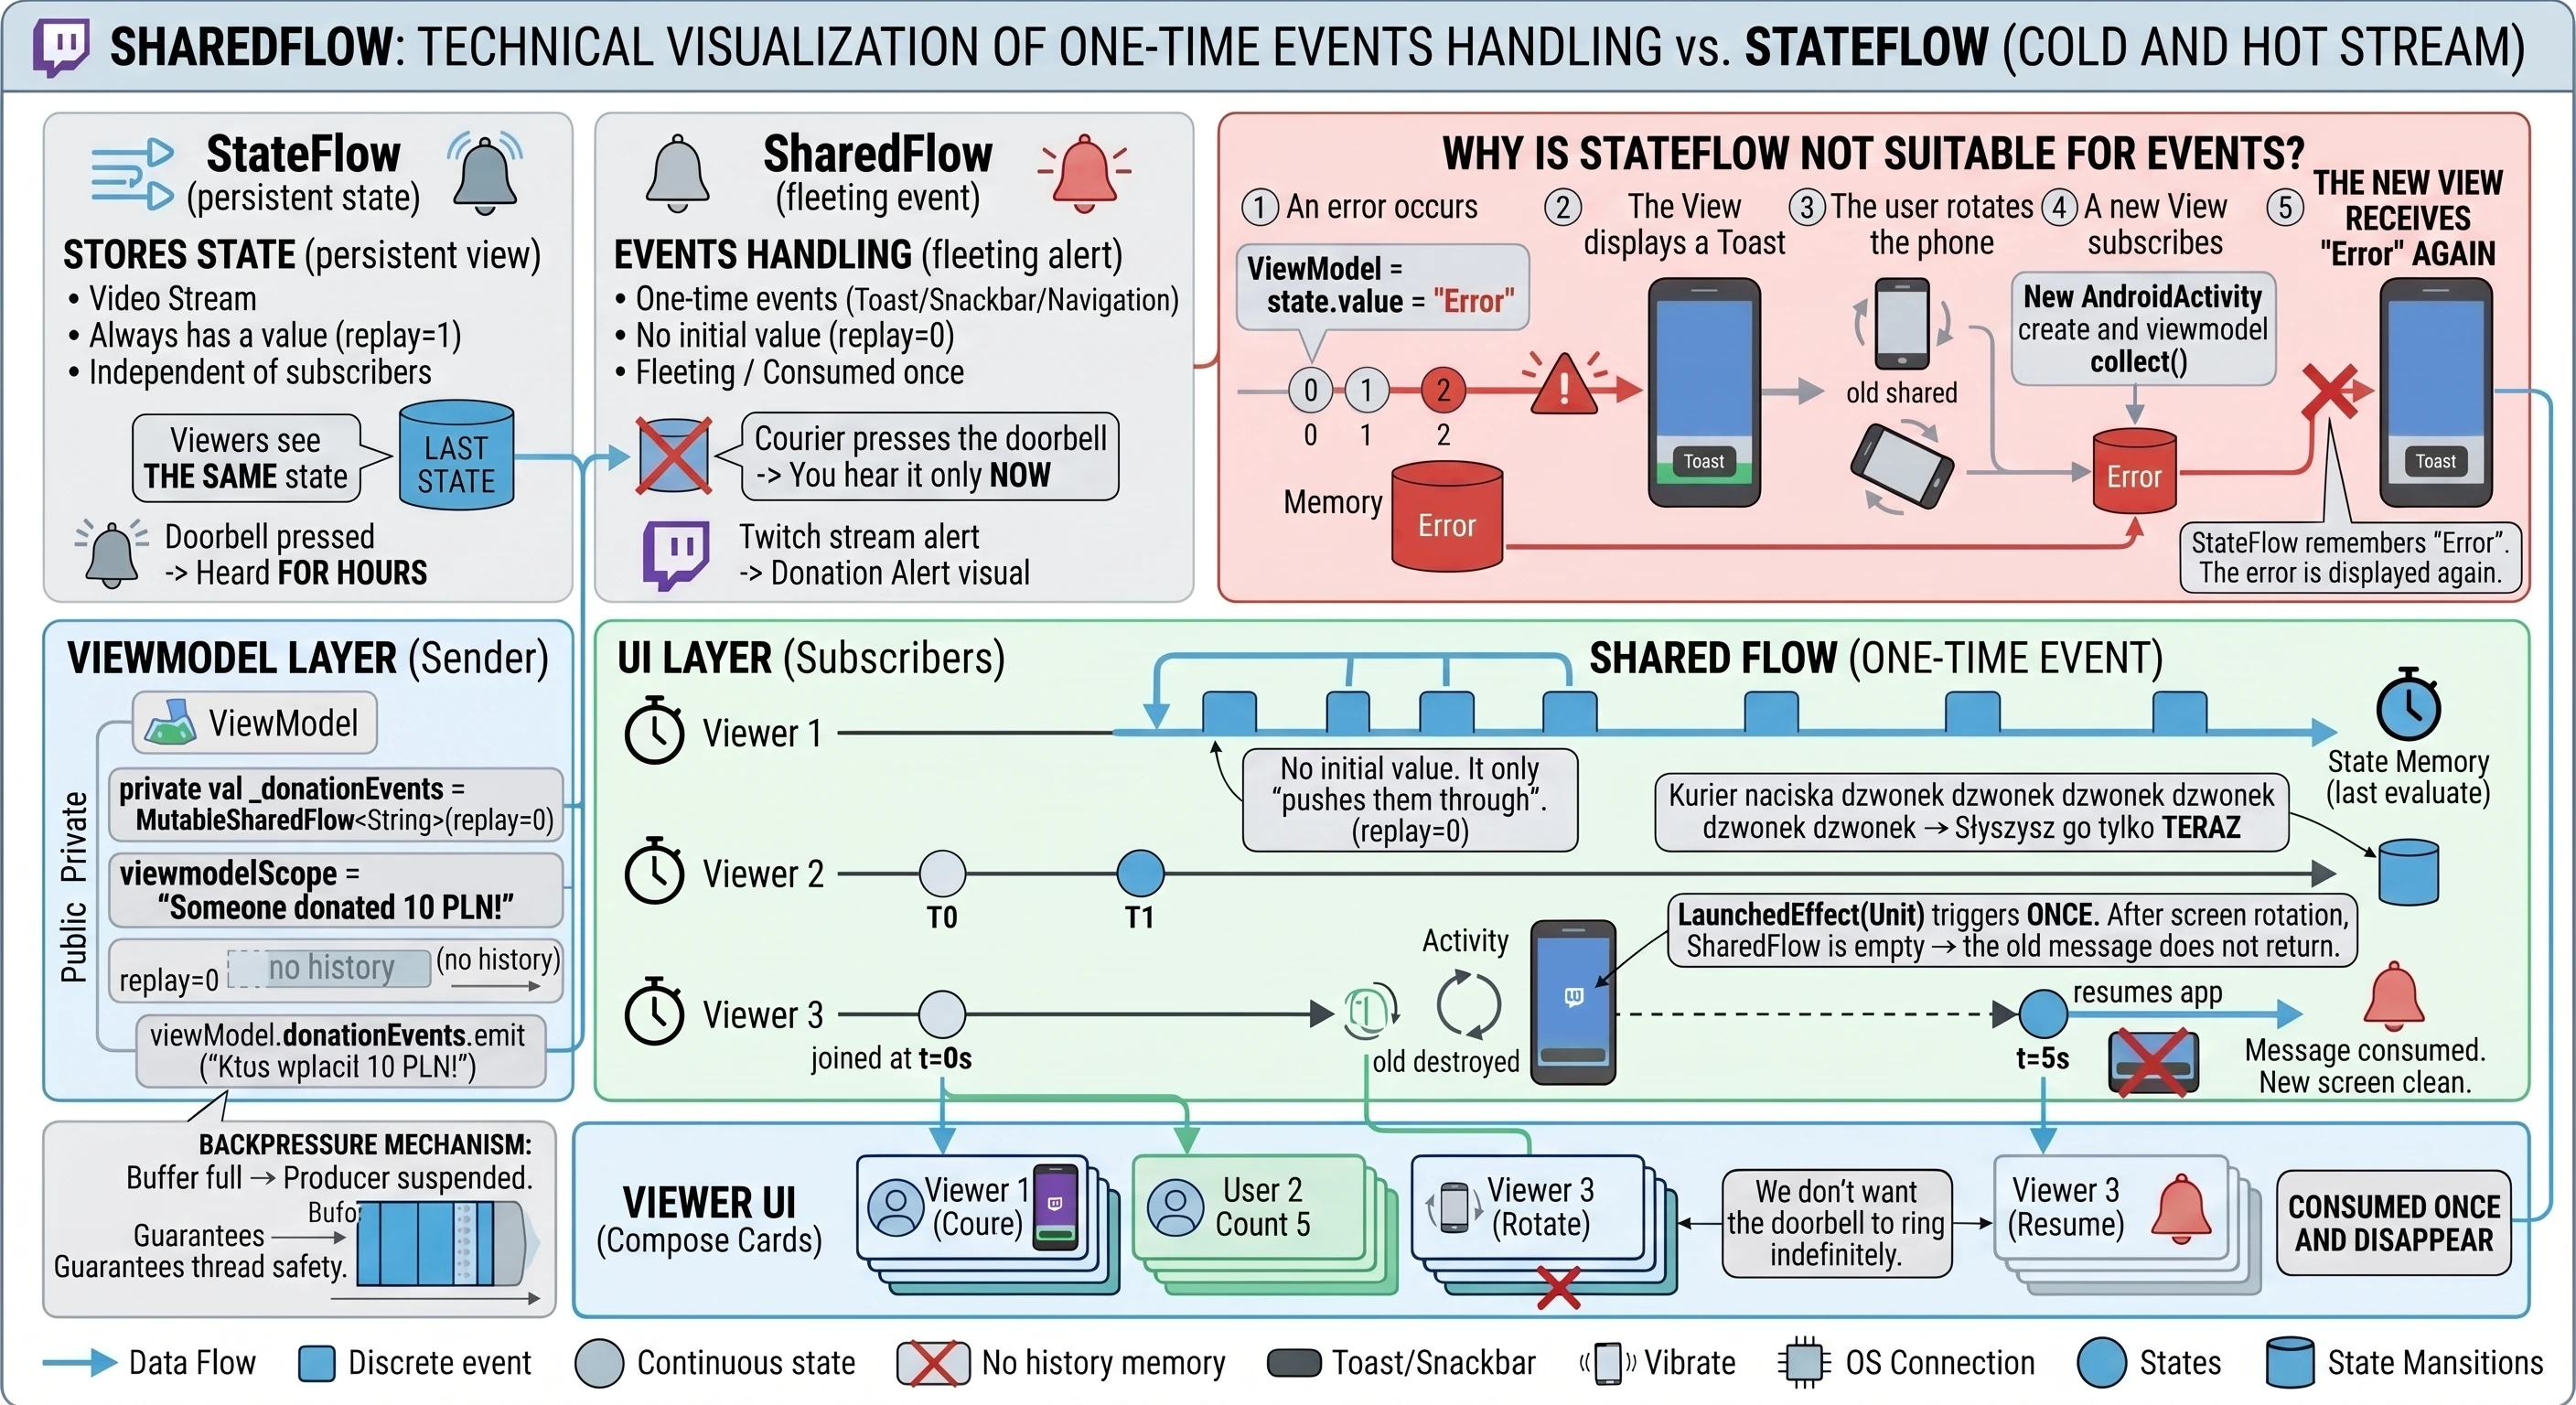
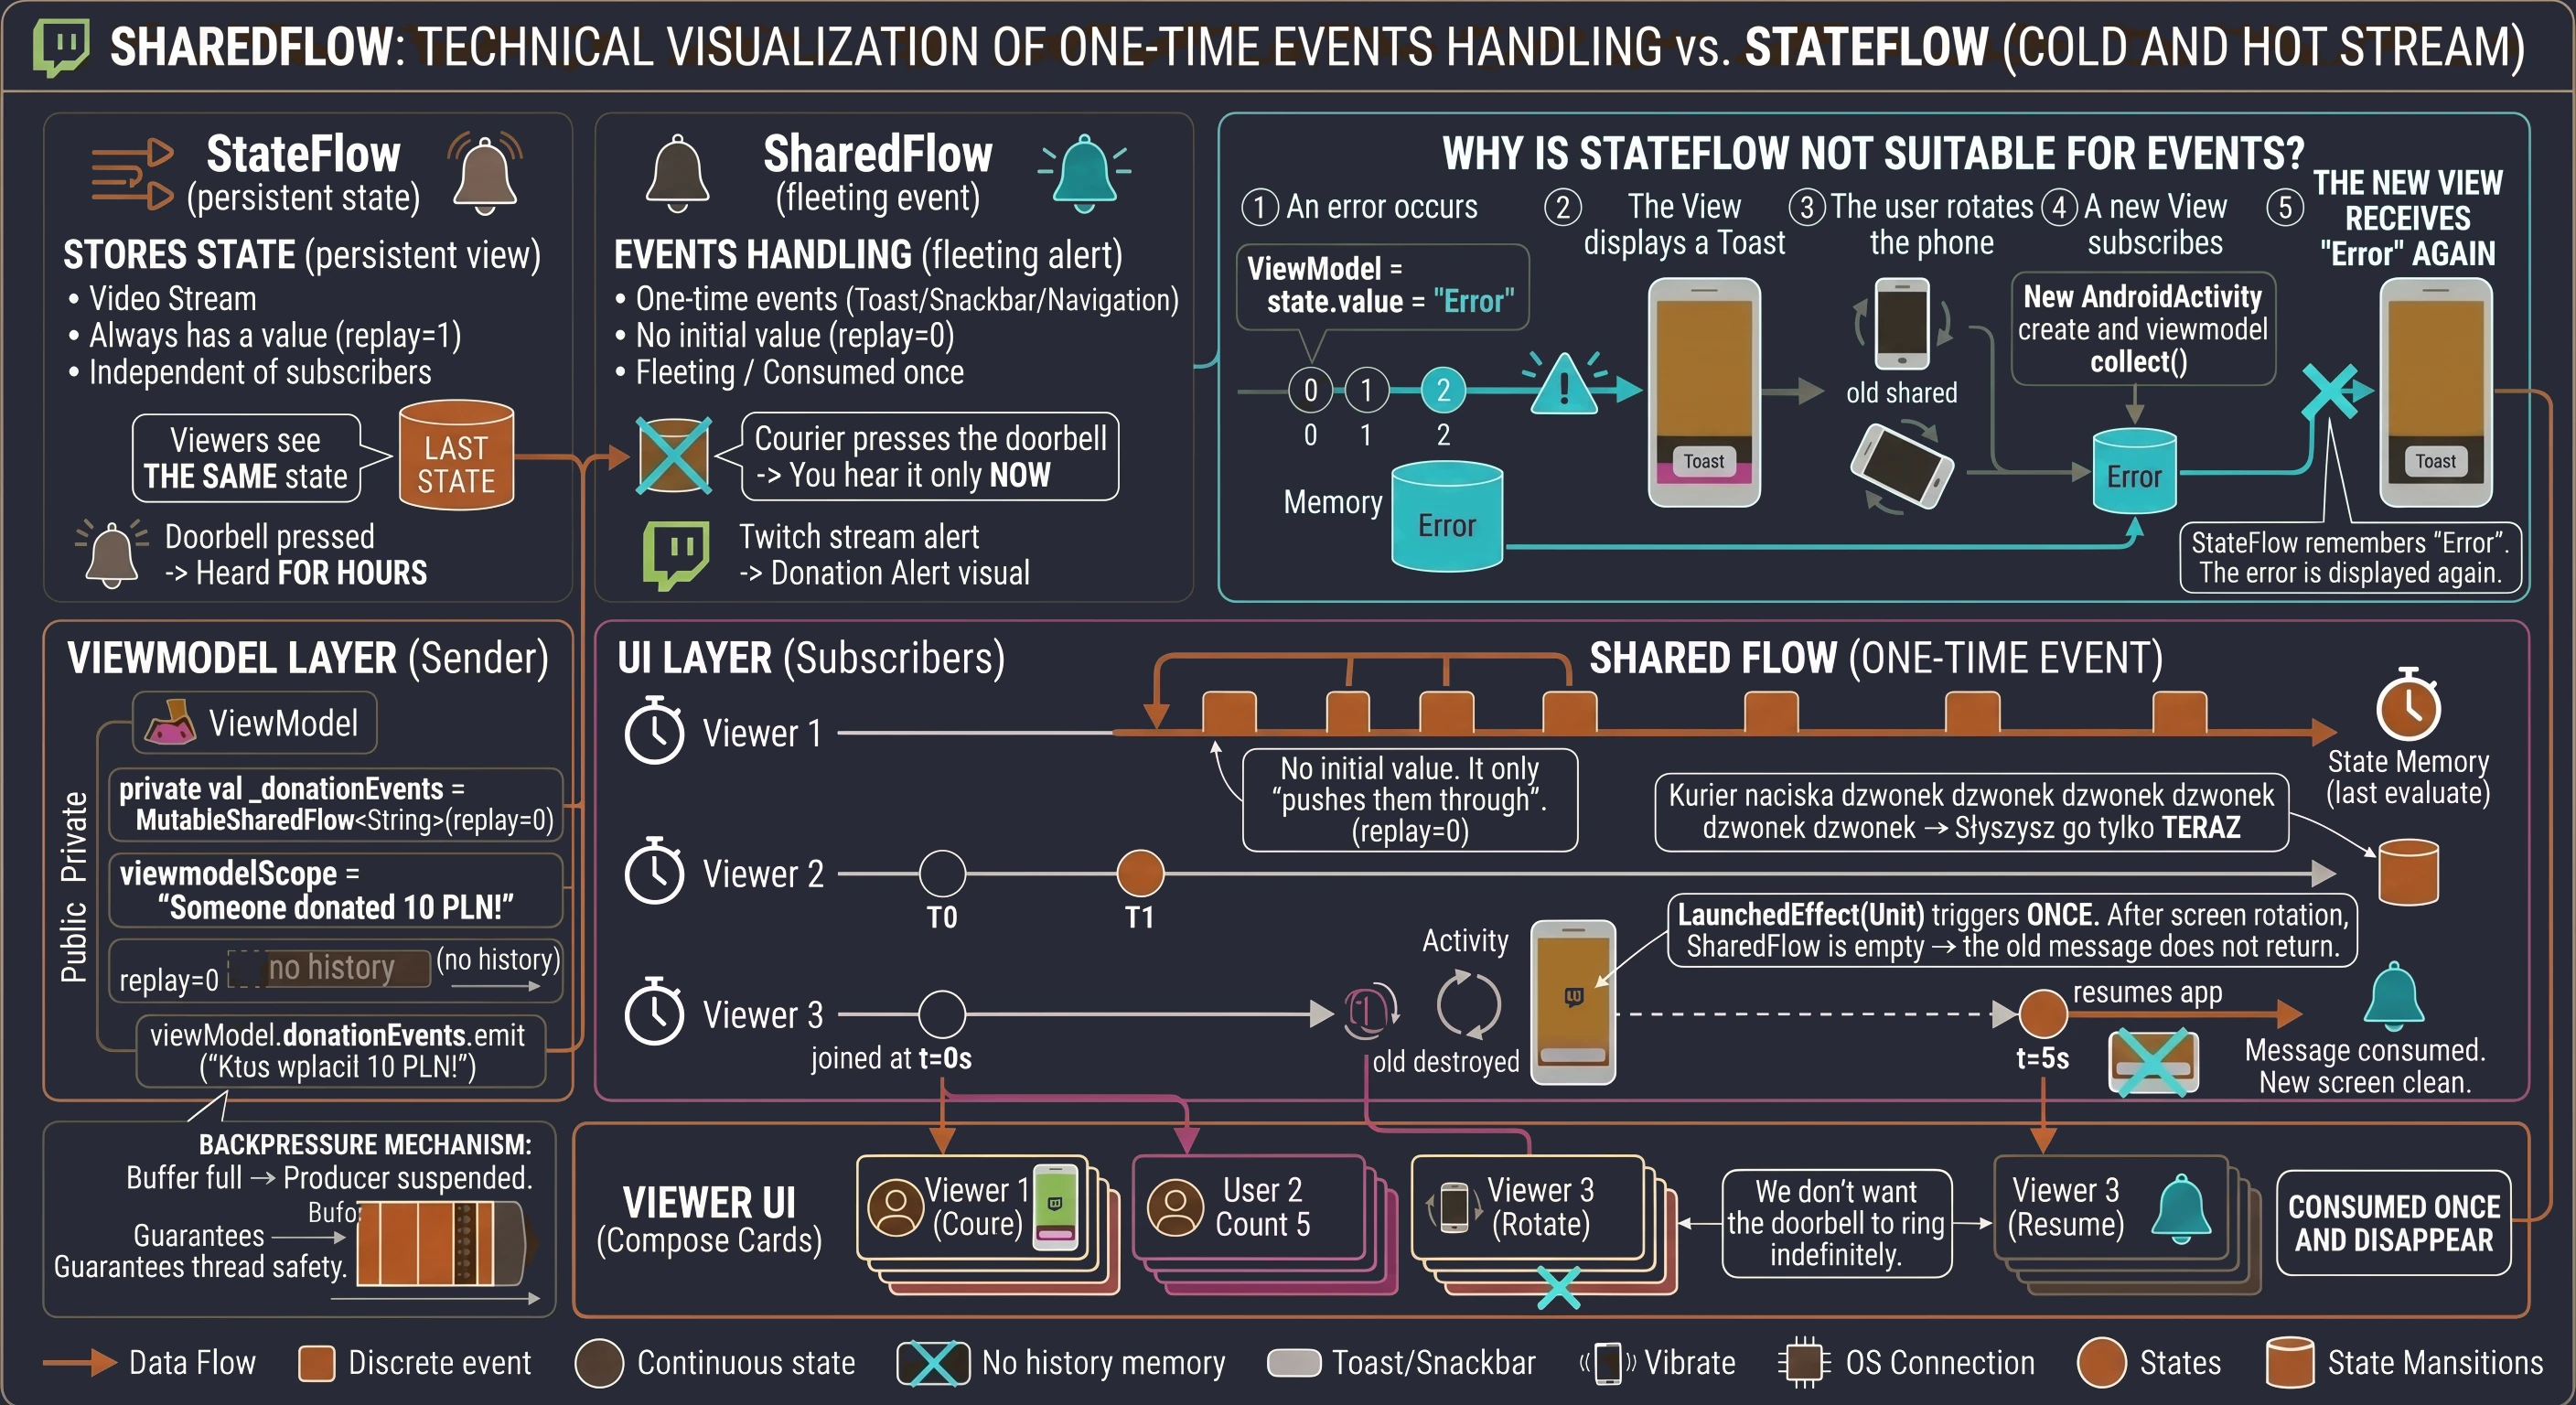
Full example code
The code below combines both worlds. We have StateFlow for the viewer counter (persistent) and SharedFlow for donation alerts (transient).
Pay attention to the use of LaunchedEffect in the view: this is a special Compose block used to handle one-shot coroutine events.
// --- ViewModel ---
class EventsViewModel : ViewModel() {
    // Events
    private val _donationEvents = MutableSharedFlow<String>()
    val donationEvents = _donationEvents.asSharedFlow()

    fun triggerDonation() {
        viewModelScope.launch {
            _donationEvents.emit("Someone donated 10 PLN!")
        }
    }
}

// --- View ---
@Composable
fun EventsDemoScreen(
    viewModel: EventsViewModel = viewModel(),
    snackbarHostState: SnackbarHostState // Component for showing Toasts/Snackbars
) {
    // Receiving events in Compose
    // LaunchedEffect(Unit) runs ONCE when entering the screen.
    // If you rotate the screen, it runs again,
    // but SharedFlow is empty (does not remember history),
    // so the old message will not appear.
    LaunchedEffect(Unit) {
        viewModel.donationEvents.collect { message ->
            // Reaction to the event: show Snackbar
            snackbarHostState.showSnackbar(message)
        }
    }

    Column(
        modifier = Modifier.fillMaxSize().padding(16.dp),
        horizontalAlignment = Alignment.CenterHorizontally
    ) {
        Text("Event handling (SharedFlow)")
        Spacer(Modifier.height(32.dp))

        Button(onClick = { viewModel.triggerDonation() }) {
            Text("Send donation (event)")
        }

        Spacer(Modifier.height(16.dp))
        Text("Click and watch the Snackbar. After screen rotation, the message will not return.",
             textAlign = TextAlign.Center)
    }
}
Summary
Choosing the right stream type is important for the correct functioning of an application. A common mistake is using StateFlow for everything, including events, which leads to repeated messages, or using regular Flow in the UI, which causes unnecessary restarts of network requests. The table below summarizes the most important differences using our multimedia analogies.
| Feature | Flow | StateFlow | SharedFlow |
|---|---|---|---|
| Metaphor | YouTube / VOD (playback from the beginning) | Twitch Video (live broadcast) | Twitch Chat (transient messages) |
| Type | Cold Starts on subscription | Hot Always active | Hot Always active |
| Memory (Replay) | None (history is created from scratch) | Always 1 (latest state) | Default 0 (configurable) |
| Initial value | No | Yes (required) | No |
| Use case | Data layer: Database (Room), network (Retrofit) | UI layer: Screen state, form data | UI layer: Toasts, navigation, signals |
When you write code and wonder which one to use, ask yourself these questions:
- Is this state that the view must always see, even after rotation? -> Use
StateFlow. - Is this a one-shot signal, for example "Logged in" or "Error"? -> Use
SharedFlow. - Are you fetching data from a database/network and processing it sequentially? -> Use regular
Flow.
Safe data collection in UI
Finally, we need to discuss performance. In Android, an application may be in the background, for example when the user switches to another app, but still be alive in memory.
If we use regular collect or collectAsState() in a Composable function, the stream subscription may remain active even when the application is in the background. This means that if the ViewModel keeps emitting data, for example GPS location, the application will process that data and consume battery even though the user does not see it. The recommended standard is to use collectAsStateWithLifecycle(), an extension function provided by the androidx.lifecycle:lifecycle-runtime-compose library.
This function is lifecycle-aware:
- When the application enters the
STOPPEDstate (background) -> it cancels the stream subscription, stopping data collection. - When the application returns to the
STARTEDstate (visible) -> it resumes the subscription and receives the latest state.
// Required dependency in build.gradle in the dependencies block:
// implementation("androidx.lifecycle:lifecycle-runtime-compose:...")

@Composable
fun UserProfileScreen(viewModel: UserViewModel) {
    // Less efficient:
    // val state = viewModel.uiState.collectAsState()

    // Standard:
    val state by viewModel.uiState.collectAsStateWithLifecycle()

    Text(text = "Hello, ${state.userName}!")
}
Thanks to this simple step, our application is not only reactive, but also battery-friendly for the user.
Back to basics
In the previous chapters we learned how to create coroutines, use launch, async, and synchronize tasks with join. Before we move on to more advanced architectural patterns, we need to clarify one of the most common misunderstandings about concurrency in Kotlin.
Let us return to the examples discussed in Chapter 3. We will analyze exactly which thread executes each line of code.
Look at the password generator. We used async, which strongly suggests asynchronous execution. But where does the work actually happen?
@Composable fun PasswordGeneratorScreen() {
    var password by remember { mutableStateOf("...") }
    // The default Compose scope uses Dispatchers.Main.immediate
    val scope = rememberCoroutineScope()

    // Function simulating heavy computation
    suspend fun generatePassword(): String {
        // We are still on the MAIN THREAD here!
        // delay only suspends the coroutine; it does not change the thread.
        delay(3000)
        return "Kotlin-Is-Super-Secure-123"
    }

    Column(...) {
        Button(onClick = {
            password = "Generating..."

            // 1. START: We are on the Main Thread (click handling)
            // launch without arguments inherits the context (here: Main)
            scope.launch {
                // 2. INSIDE THE COROUTINE: still Main Thread.

                // 3. ASYNC: starts a new coroutine, but
                // inherits the dispatcher from the parent (Main Thread).
                val deferredPassword: Deferred<String> = async {
                    generatePassword() // Function executed on Main Thread
                }

                // 4. AWAIT: suspends the parent coroutine (on Main Thread).
                // The UI is not blocked only because we used 'delay',
                // which is a non-blocking function.
                // If generatePassword() calculated hashes for 3 seconds (CPU),
                // the application would freeze (ANR).
                val result = deferredPassword.await()

                // 5. RESUME: still Main Thread. UI update.
                password = result
            }
        }) { Text("Generate password") }
    }
}
Conclusion: The whole operation, from the click, through async, to the result, happened on one and the same thread (Main). It worked smoothly only because delay is a suspending function. If we inserted real CPU work there, the UI would freeze.
The second example with cooks showed concurrency: doing two things at the same time. But does this mean parallelism, that is, using multiple CPU cores?
// 1. Head Chef (Parent)
// scope.launch uses Dispatchers.Main by default
scope.launch {
    // THREAD: Main Thread
    logs.add("Head chef (parent): We are starting")

    // 2. Assign task to Helper 1
    // launch inherits context -> Dispatchers.Main
    val jobMieso = launch {
        // THREAD: Main Thread
        // The coroutine suspends on the main thread, giving room to others
        delay(2000)
        logs.add("Cook 1: Meat fried (2s).")
    }

    // 3. Assign task to Helper 2
    // launch inherits context -> Dispatchers.Main
    val jobWarzywa = launch {
        // THREAD: Main Thread
        delay(3000)
        logs.add("Cook 2: Vegetables ready (3s).")
    }

    // THREAD: Main Thread
    logs.add("Head chef: Tasks assigned...")

    // 4. Synchronization
    // join() is a suspension point on Main Thread.
    // The parent coroutine "waits" (without blocking the thread) until children finish.
    jobWarzywa.join()
    jobMieso.join()

    // 5. Finale
    // THREAD: Main Thread
    logs.add("Head chef: Everyone is done!")
}
Conclusion: Even though we have three coroutines (Parent, Cook 1, Cook 2), all of them jump around the same main thread.
Of course, both launch and async accept an optional CoroutineContext argument, which lets us explicitly choose a dispatcher.
// We can force another thread at startup
scope.launch(Dispatchers.IO) {
    // Now we are on a background thread.
    // Good for writing to a file.
    saveToFile()

    // PROBLEM: We cannot safely touch the UI from here
    // textLabel.text = "Saved" // ERROR!
}
Although this is possible, in MVVM architecture we rarely use this approach directly in the UI layer. It causes problems with updating the interface, because we must manually return to the Main Thread, and it makes testing harder. Instead, we use an approach where the coroutine starts on the UI thread, so it can access the UI, and jumps to other threads only when necessary.
There are two main thread-switching patterns that we will discuss in this chapter:
- Imperative approach (
withContext): Used inside functions. We say: execute this block of code on another thread and return to me with the result. - Reactive approach (
flowOn): Used in streams. We say: all data above this point should be produced on another thread.
Imperative approach: function safety with withContext
Let us return to the problem of blocking the UI. We already know that calling a computationally expensive function inside viewModelScope.launch will block the screen.
The solution to this problem in the imperative approach is the withContext function:
- It accepts a
Dispatcheras an argument, for exampleDispatchers.DefaultorIO. - It suspends the current coroutine without blocking the thread from which it was called.
- It executes the code block on the selected dispatcher.
- After the work finishes, it resumes the coroutine on the original dispatcher.
- It returns the result of the last line of the code block, so it works like an expression.
This makes the code look sequential, even though complex thread switching happens underneath.
// Definition of a Main-Safe function (safe for UI)
suspend fun performHeavyCalculation(): Int {
    // 1. Change context to a computation thread
    return withContext(Dispatchers.Default) {
        // 2. Simulate heavy work (e.g. image processing)
        // This will not block the UI, even though 'sleep' normally blocks a thread.
        // Here we block a worker thread, not the main thread.
        Thread.sleep(2000)

        // 3. Calculate the result
        val result = 42 * 100

        // 4. Return the result (last line)
        result
    }
    // 5. Automatic return to the thread from which the function was called
}

// Usage in ViewModel
fun onCalculateClicked() {
    viewModelScope.launch { // Start on Main Thread
        _uiState.value = UiState.Loading // UI update

        // Call - here the coroutine "suspends" on Main Thread
        // The UI remains responsive (e.g. the loader keeps spinning)
        val result = performHeavyCalculation()

        // Return to Main Thread with the ready result
        _uiState.value = UiState.Success(result)
    }
}
Reactive approach: stream safety with flowOn
While withContext works very well for functions that enter and exit, the situation is more complex for streams (Flow). A stream is a pipeline through which data flows over time.
In Flow, the rule is: code inside the flow { ... } block runs in the same context in which collect() was called.
Because in Android we usually collect data (collect) in the view layer (Activity/Composable), which runs on the main thread, this means that by default the data producer would also run on the main thread.
// INCORRECT APPROACH
// Repository
val usersFlow = flow {
    // This runs on Main Thread if collect is called on Main!
    // This will freeze the UI on every database read.
    val data = database.readUsers() // Blocking IO operation
    emit(data)
}

// ViewModel / UI
viewModelScope.launch {
    // We collect on Main Thread (default in viewModelScope)
    usersFlow.collect { show(it) }
}
To change the thread on which data is produced, we use the flowOn operator. Its behavior is specific: it changes the execution context only for operators located above it, that is, upstream.
// CORRECT APPROACH
val usersFlow = flow {
    // 1. This runs on Dispatchers.IO
    val data = database.readUsers()
    emit(data)
}.map { users ->
    // 2. This also runs on Dispatchers.IO (because it is above flowOn)
    users.filter { it.isActive }
}.flowOn(Dispatchers.IO) // <--- CONTEXT-SWITCH BOUNDARY
.map { users ->
    // 3. This runs in the collector context (usually Main)
    // Because it is BELOW flowOn
    users.map { it.name }
}
Thanks to flowOn, we can safely execute database or network operations in the repository and deliver a result ready for display on the UI thread.
Comparing withContext and flowOn
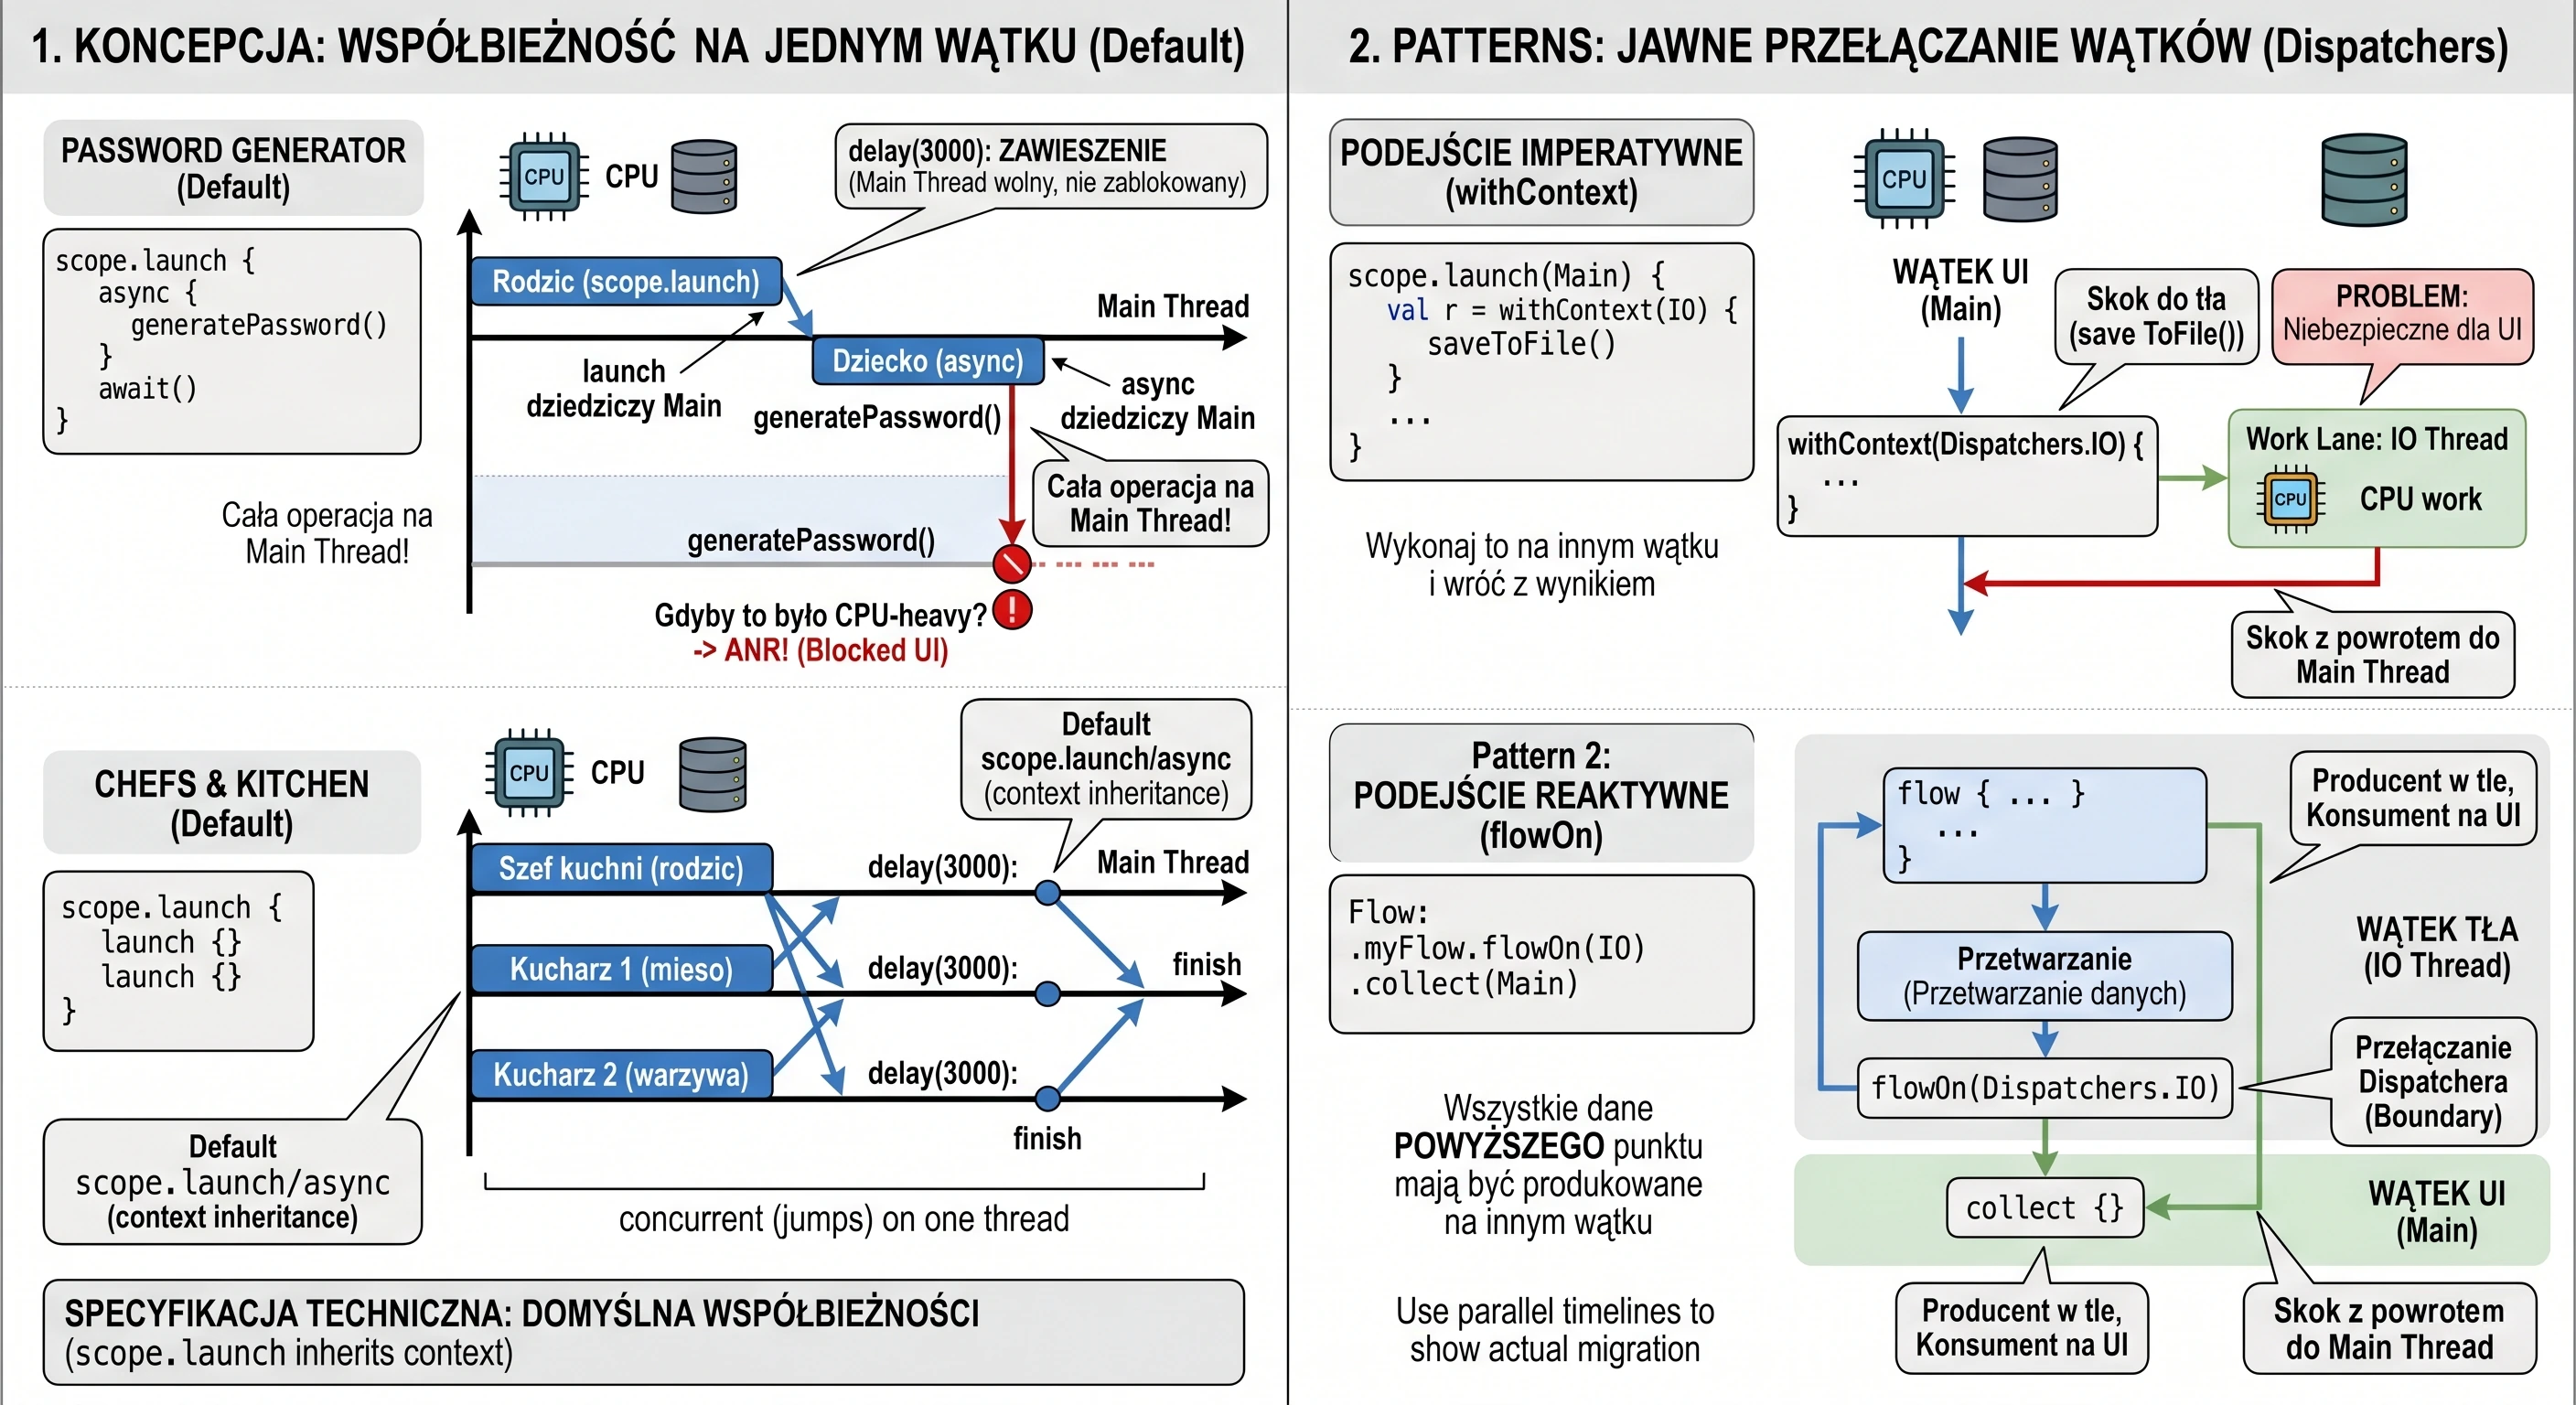
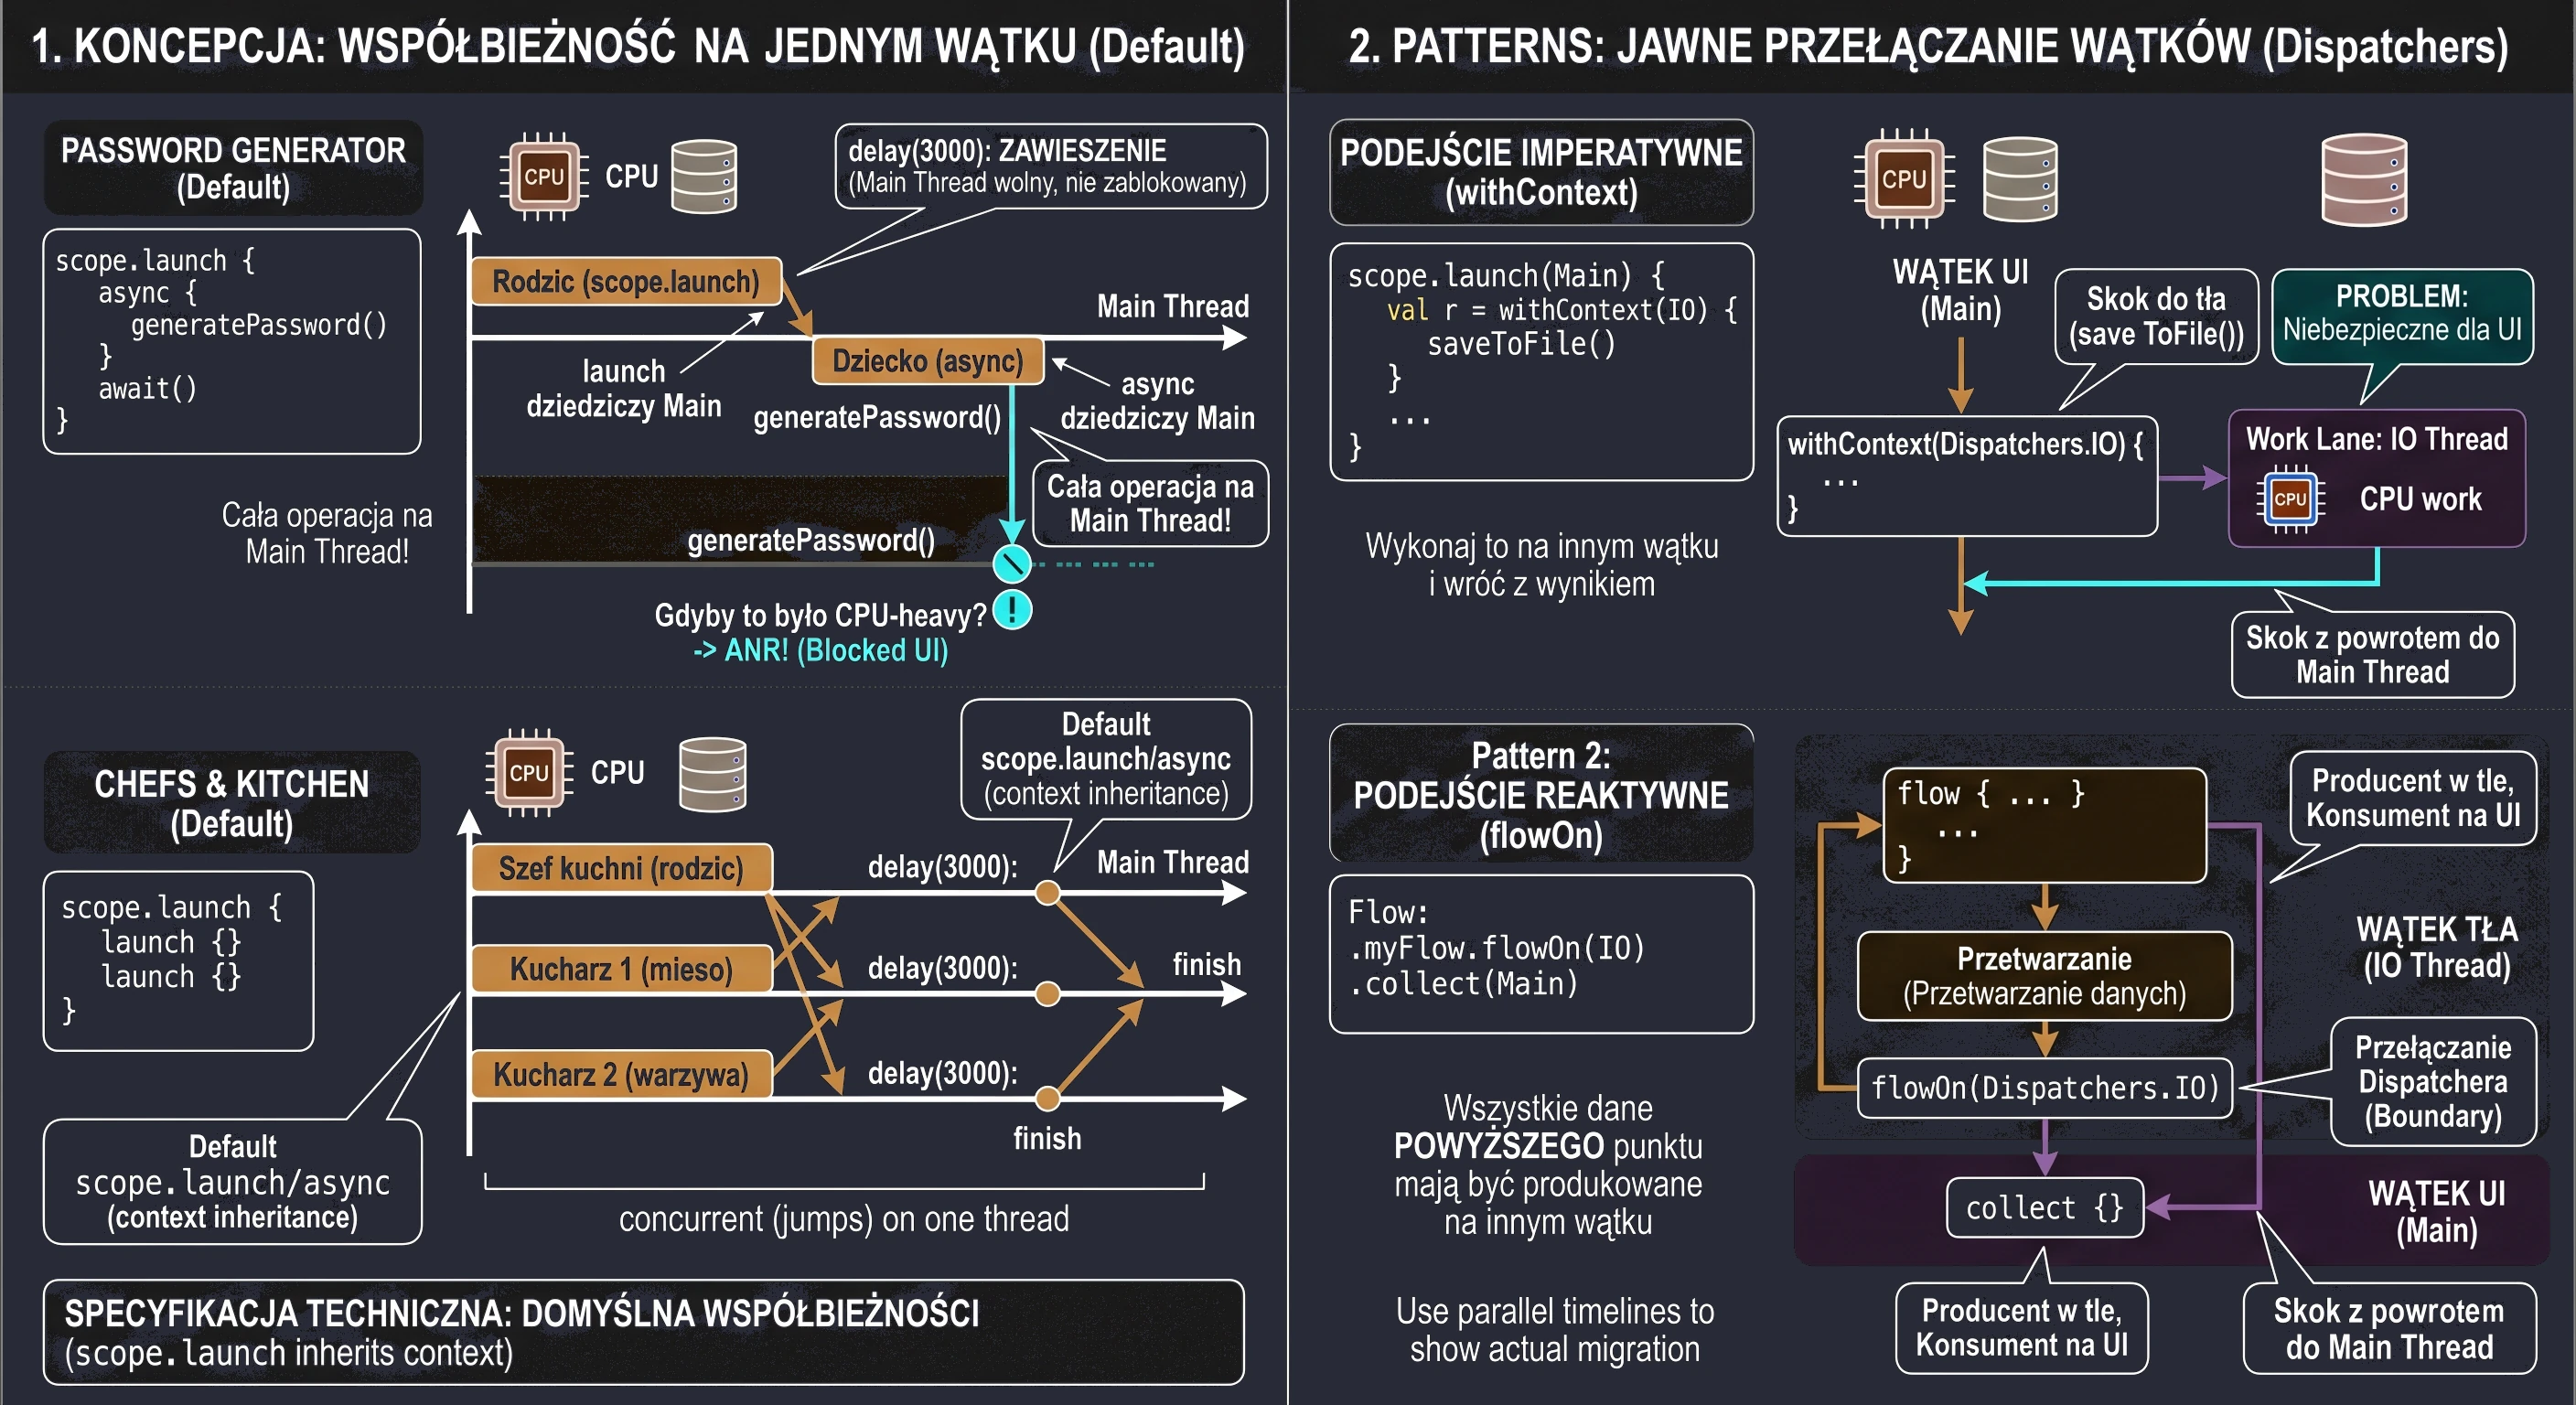
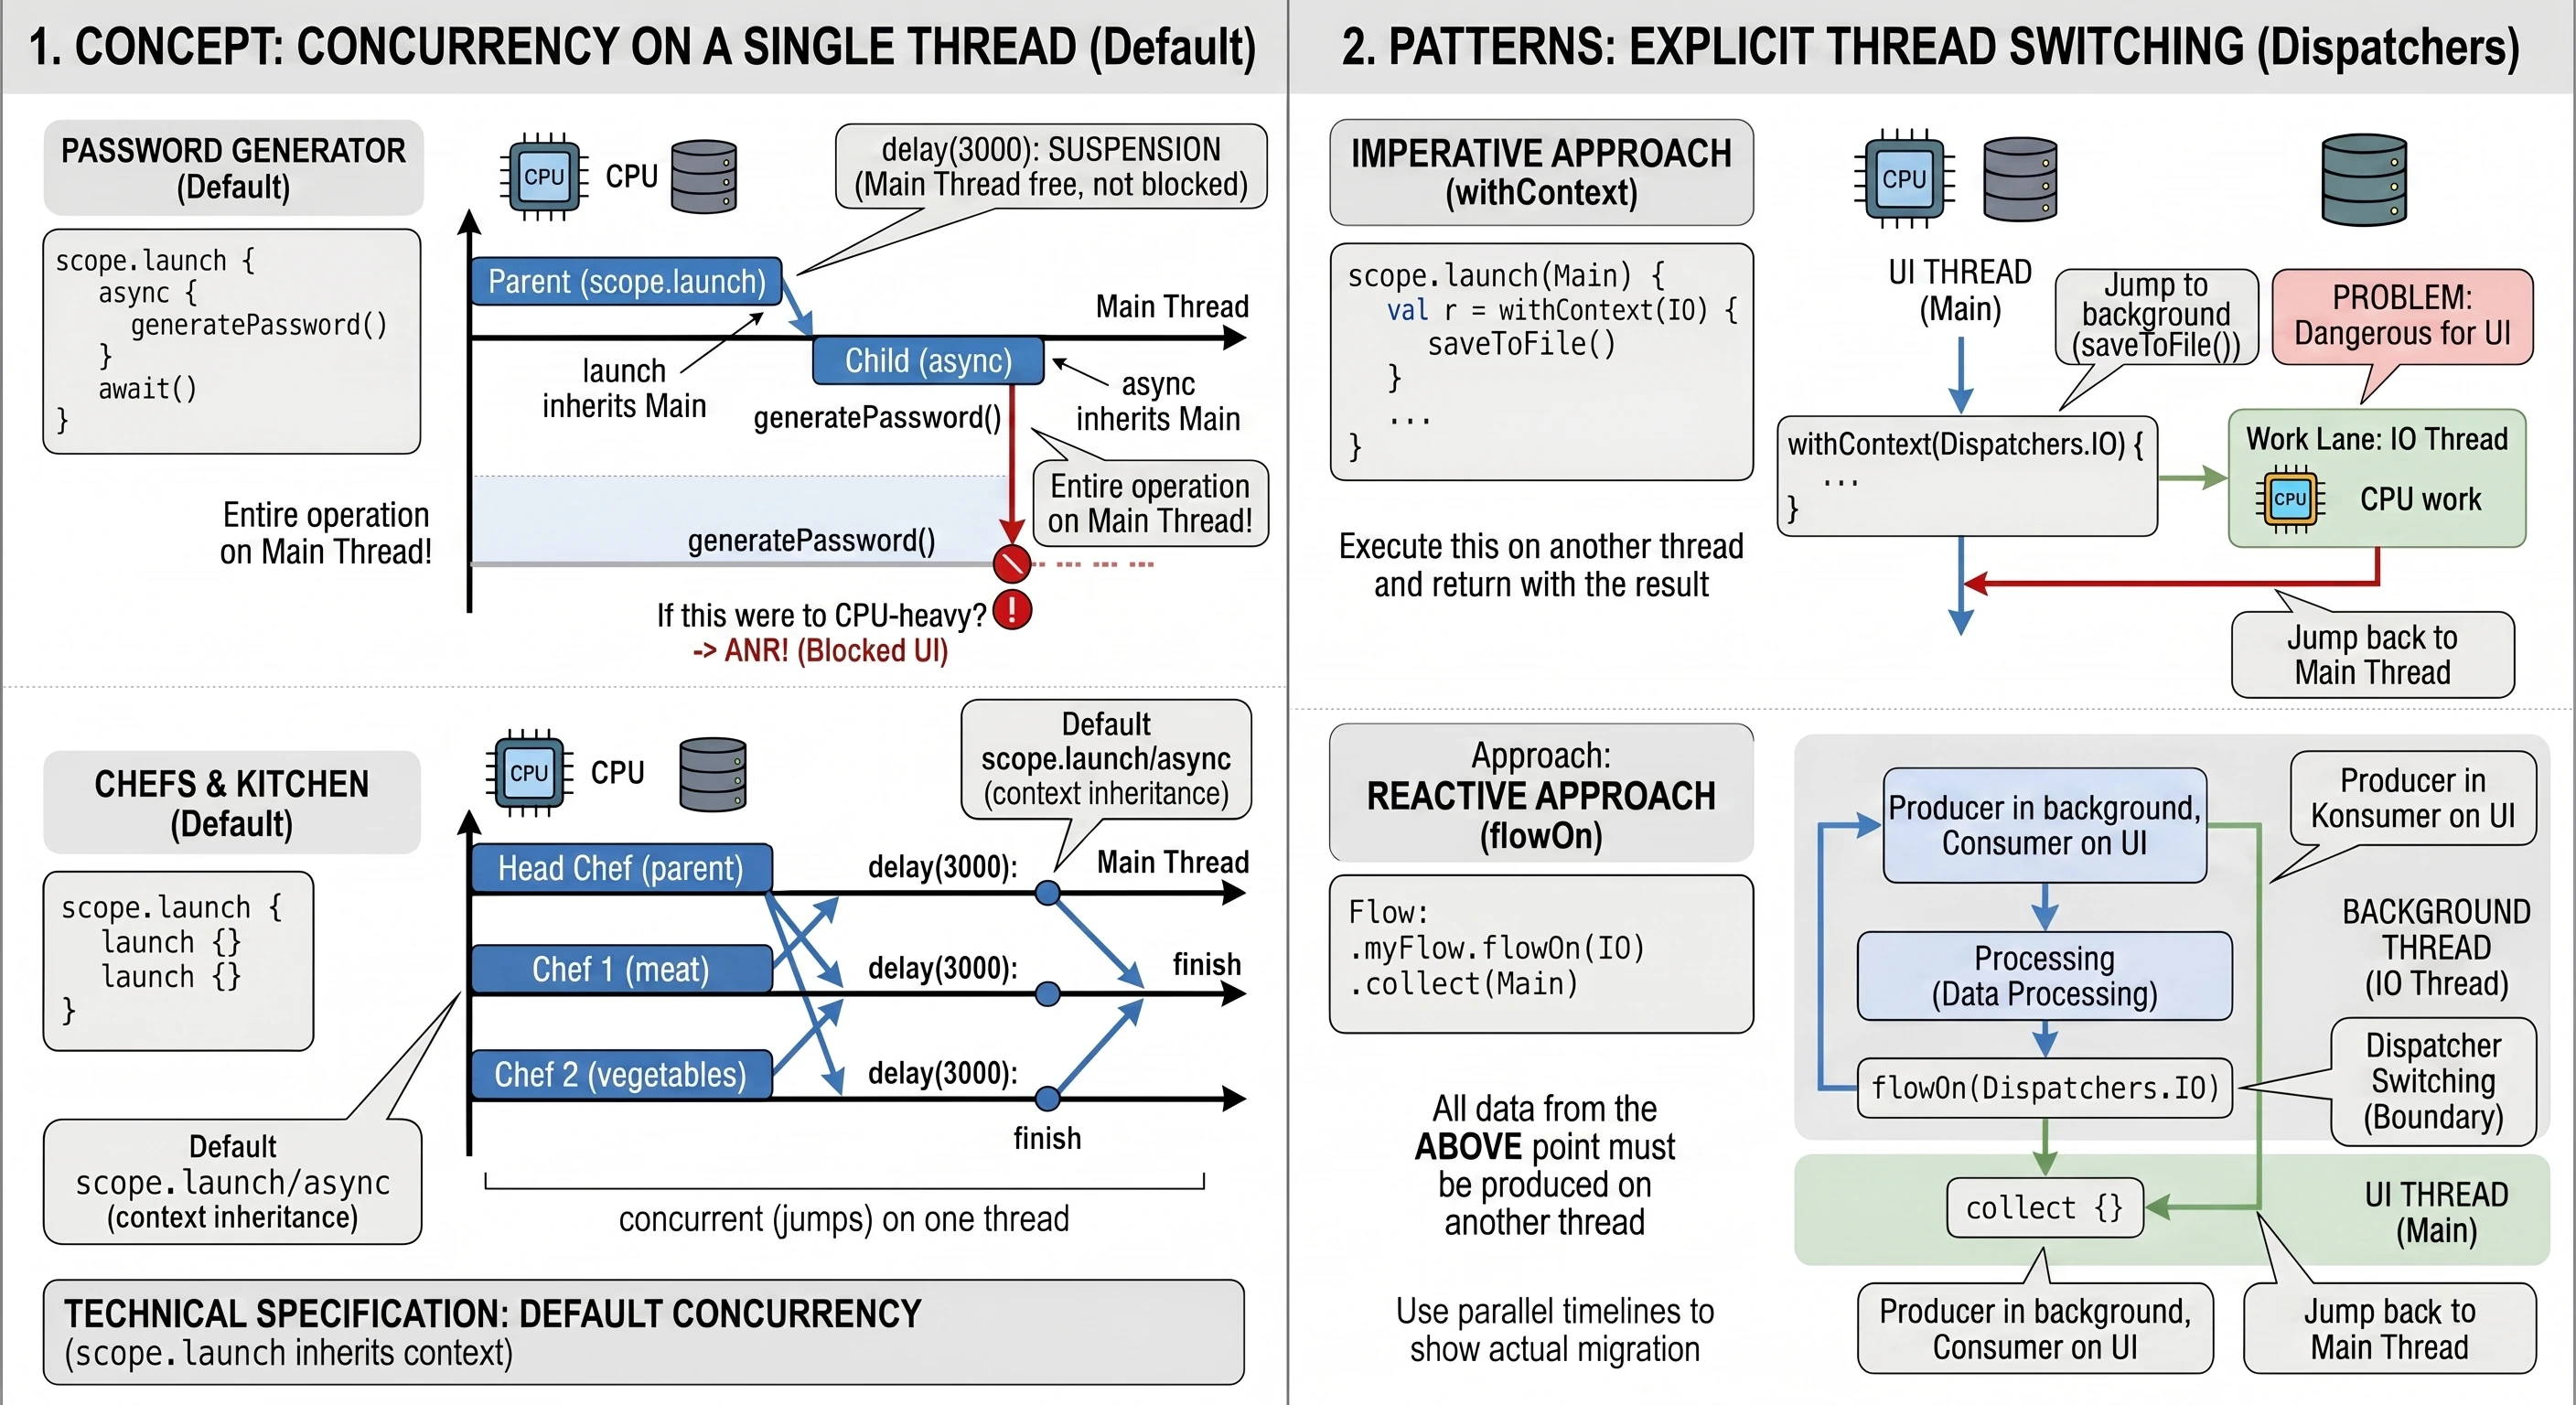
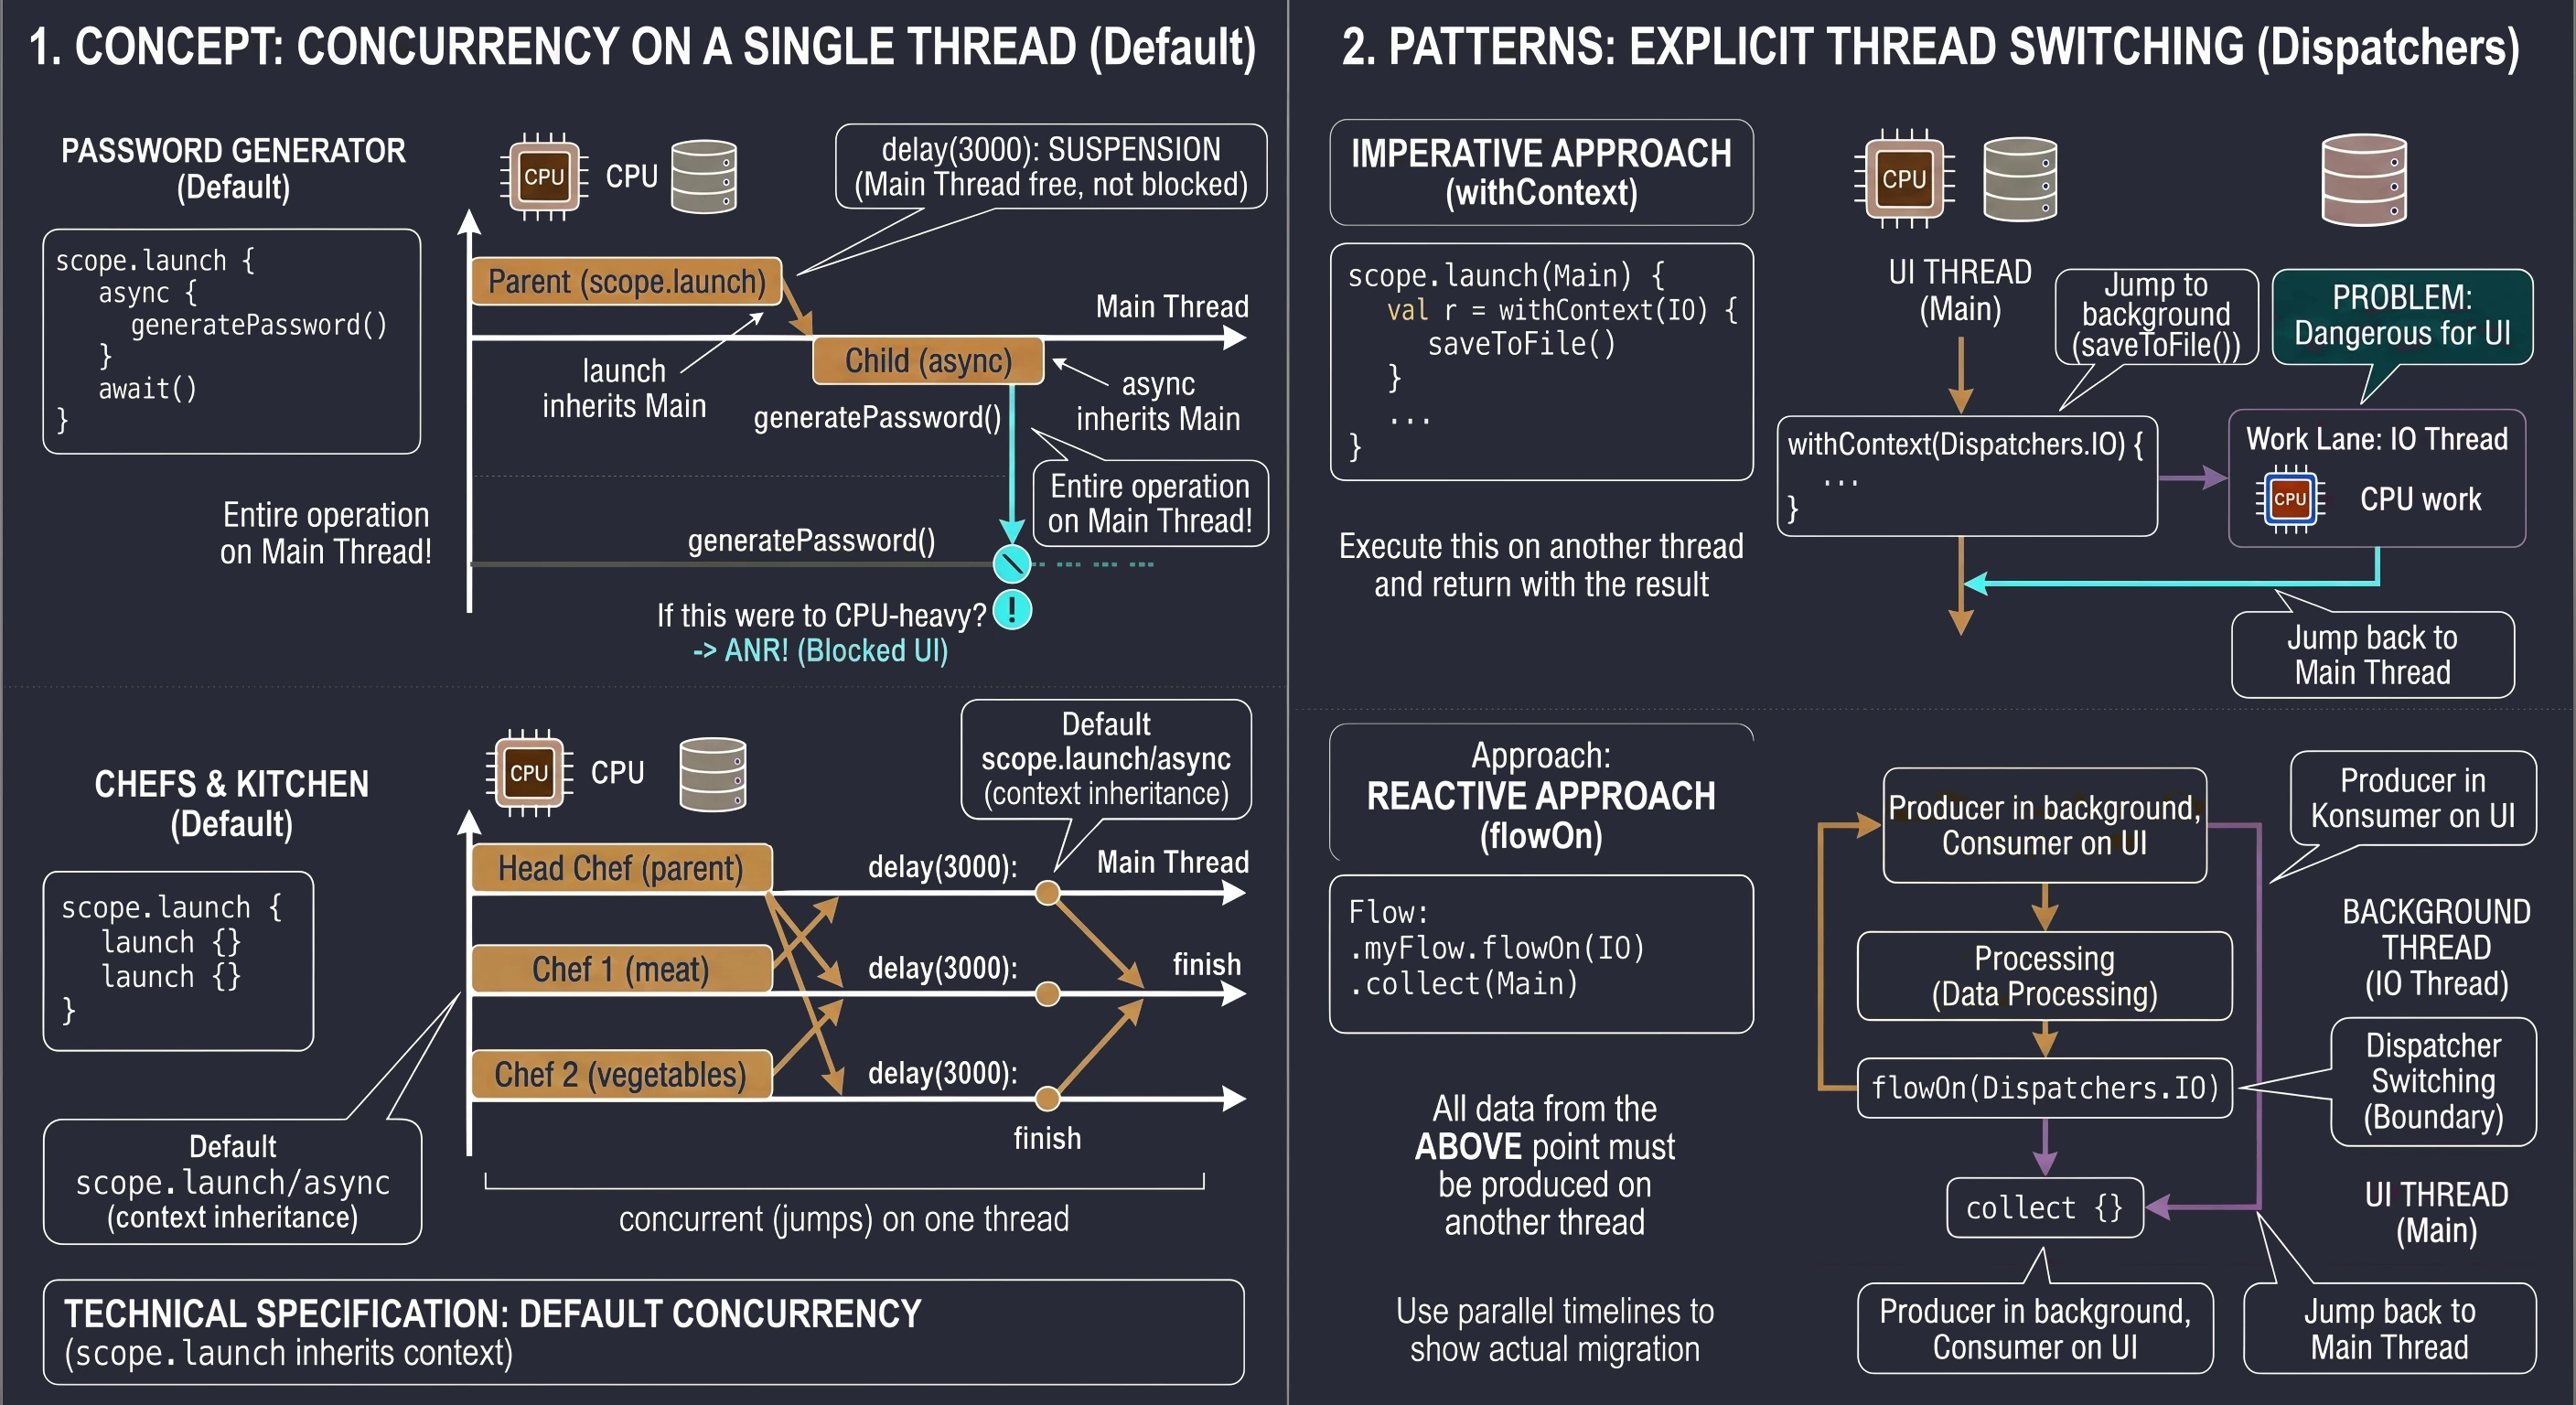
Let us summarize the differences between these two mechanisms:
| Feature | withContext | flowOn |
|---|---|---|
| Data type | Single result (T) | Data stream (Flow<T>) |
| Direction of change | Changes context for a code block here and now. | Changes context for the data source (upstream). |
| Safety | Must be called inside a suspend function. | Is an operator applied to a Flow object. |
| Use case | Short operations (e.g. sorting a list, writing to a file). | Long-running observation of data (e.g. from a Room database). |
Stream transformation
Before we learn the stateIn operator, we need to understand the architectural problem it solves. This requires recalling the fundamental difference between cold and hot streams and analyzing the Android application lifecycle.
In Chapter 5, we defined two types of streams. Let us now look at them from the perspective of performance:
- Cold stream (Flow): This is a recipe for data.
- It does not store data.
- The code inside the
flow { ... }block does not run until someone starts listening (collect). - Each new subscriber causes the producer code to run again from the beginning.
- Hot stream (StateFlow/SharedFlow): This is a ready meal on the table.
- It stores data (state) in memory.
- It produces data independently of whether anyone is listening.
- A new subscriber immediately receives the current state (a plate with food), without having to cook everything again.
In Android, a configuration change, such as screen rotation or switching between light and dark mode, causes the Activity to be completely destroyed and recreated. If the UI layer listens to a cold stream (regular Flow) coming directly from the repository, resources are wasted.
Let us follow this scenario step by step:
- The user opens a screen. The Activity calls
collect(). - Cold Flow starts: The repository connects to the database, executes an SQL query and processes the results. The data reaches the screen.
- The user rotates the screen.
- The old Activity is destroyed ->
collect()is cancelled. - The new Activity is created -> it calls a new
collect(). - Cold Flow starts FROM SCRATCH: The repository again connects to the database and again executes the same SQL query.
// --- REPOSITORY ---
// Cold stream - code inside runs on EVERY subscription
fun getTasks(): Flow<List<Task>> = flow {
    println("Fetching data from database...") // This logs on every rotation!
    val tasks = database.queryAll()
    emit(tasks)
}

// --- VIEWMODEL (INCORRECT APPROACH) ---
// ViewModel only forwards the cold stream
val tasksFlow = repository.getTasks() // This is still a cold Flow
MVVM architecture gives us an ideal place to solve this problem. The ViewModel survives device configuration changes.
Therefore, we need to:
- Fetch the data once (start the cold stream).
- Store the result in ViewModel memory (convert it into hot state).
- After rotation, the new Activity should receive data from ViewModel memory instead of hitting the repository.
The stateIn operator, discussed in the next section, is used for this transformation.
stateIn and shareIn operators
Now that we know we need to turn a cold stream (recipe) into a hot one (meal), Kotlin provides two dedicated operators for this: stateIn and shareIn.
The stateIn operator converts any Flow<T> into StateFlow<T>. Recall that StateFlow is an observable data container that always has a value. Therefore, this operator requires an initial value.
// ViewModel
val uiState: StateFlow<UiState> = repository.getDataStream()
    .map { data -> UiState.Success(data) } // Data transformation
    .stateIn(
        scope = viewModelScope, // 1. Where should the stream live?
        started = SharingStarted.WhileSubscribed(5000), // 2. When should it run?
        initialValue = UiState.Loading // 3. What should be shown first?
    )
The started parameter is crucial for saving resources. The most commonly used Android strategy is SharingStarted.WhileSubscribed(5000).
- Behavior: Keep the connection to the source (upstream) as long as someone is listening in the UI.
- Timeout (5000 ms): If the number of subscribers drops to zero, for example because the user rotated the screen and the old Activity disappeared, do not close the connection immediately. Wait 5 seconds.
A configuration change is often almost instantaneous. The old Activity disappears (subscribers = 0), and a moment later the new Activity appears (subscribers = 1).
- Thanks to the 5s delay, the stream does not notice this short break. The database connection is not closed, and the new Activity immediately receives data from memory.
- If, however, the user presses Home and leaves the application for more than 5 seconds, the stream is stopped and resources are released, for example a network connection is closed.
The shareIn operator converts Flow<T> into SharedFlow<T>. We use it for data that has an event character, not a state character. Examples include notifications, toasts and navigation signals.
Differences compared with stateIn:
- It does not require an initial value, because events do not have to exist at startup.
- It allows the
replayparameter to be configured, defining how many old events should be remembered for new subscribers.
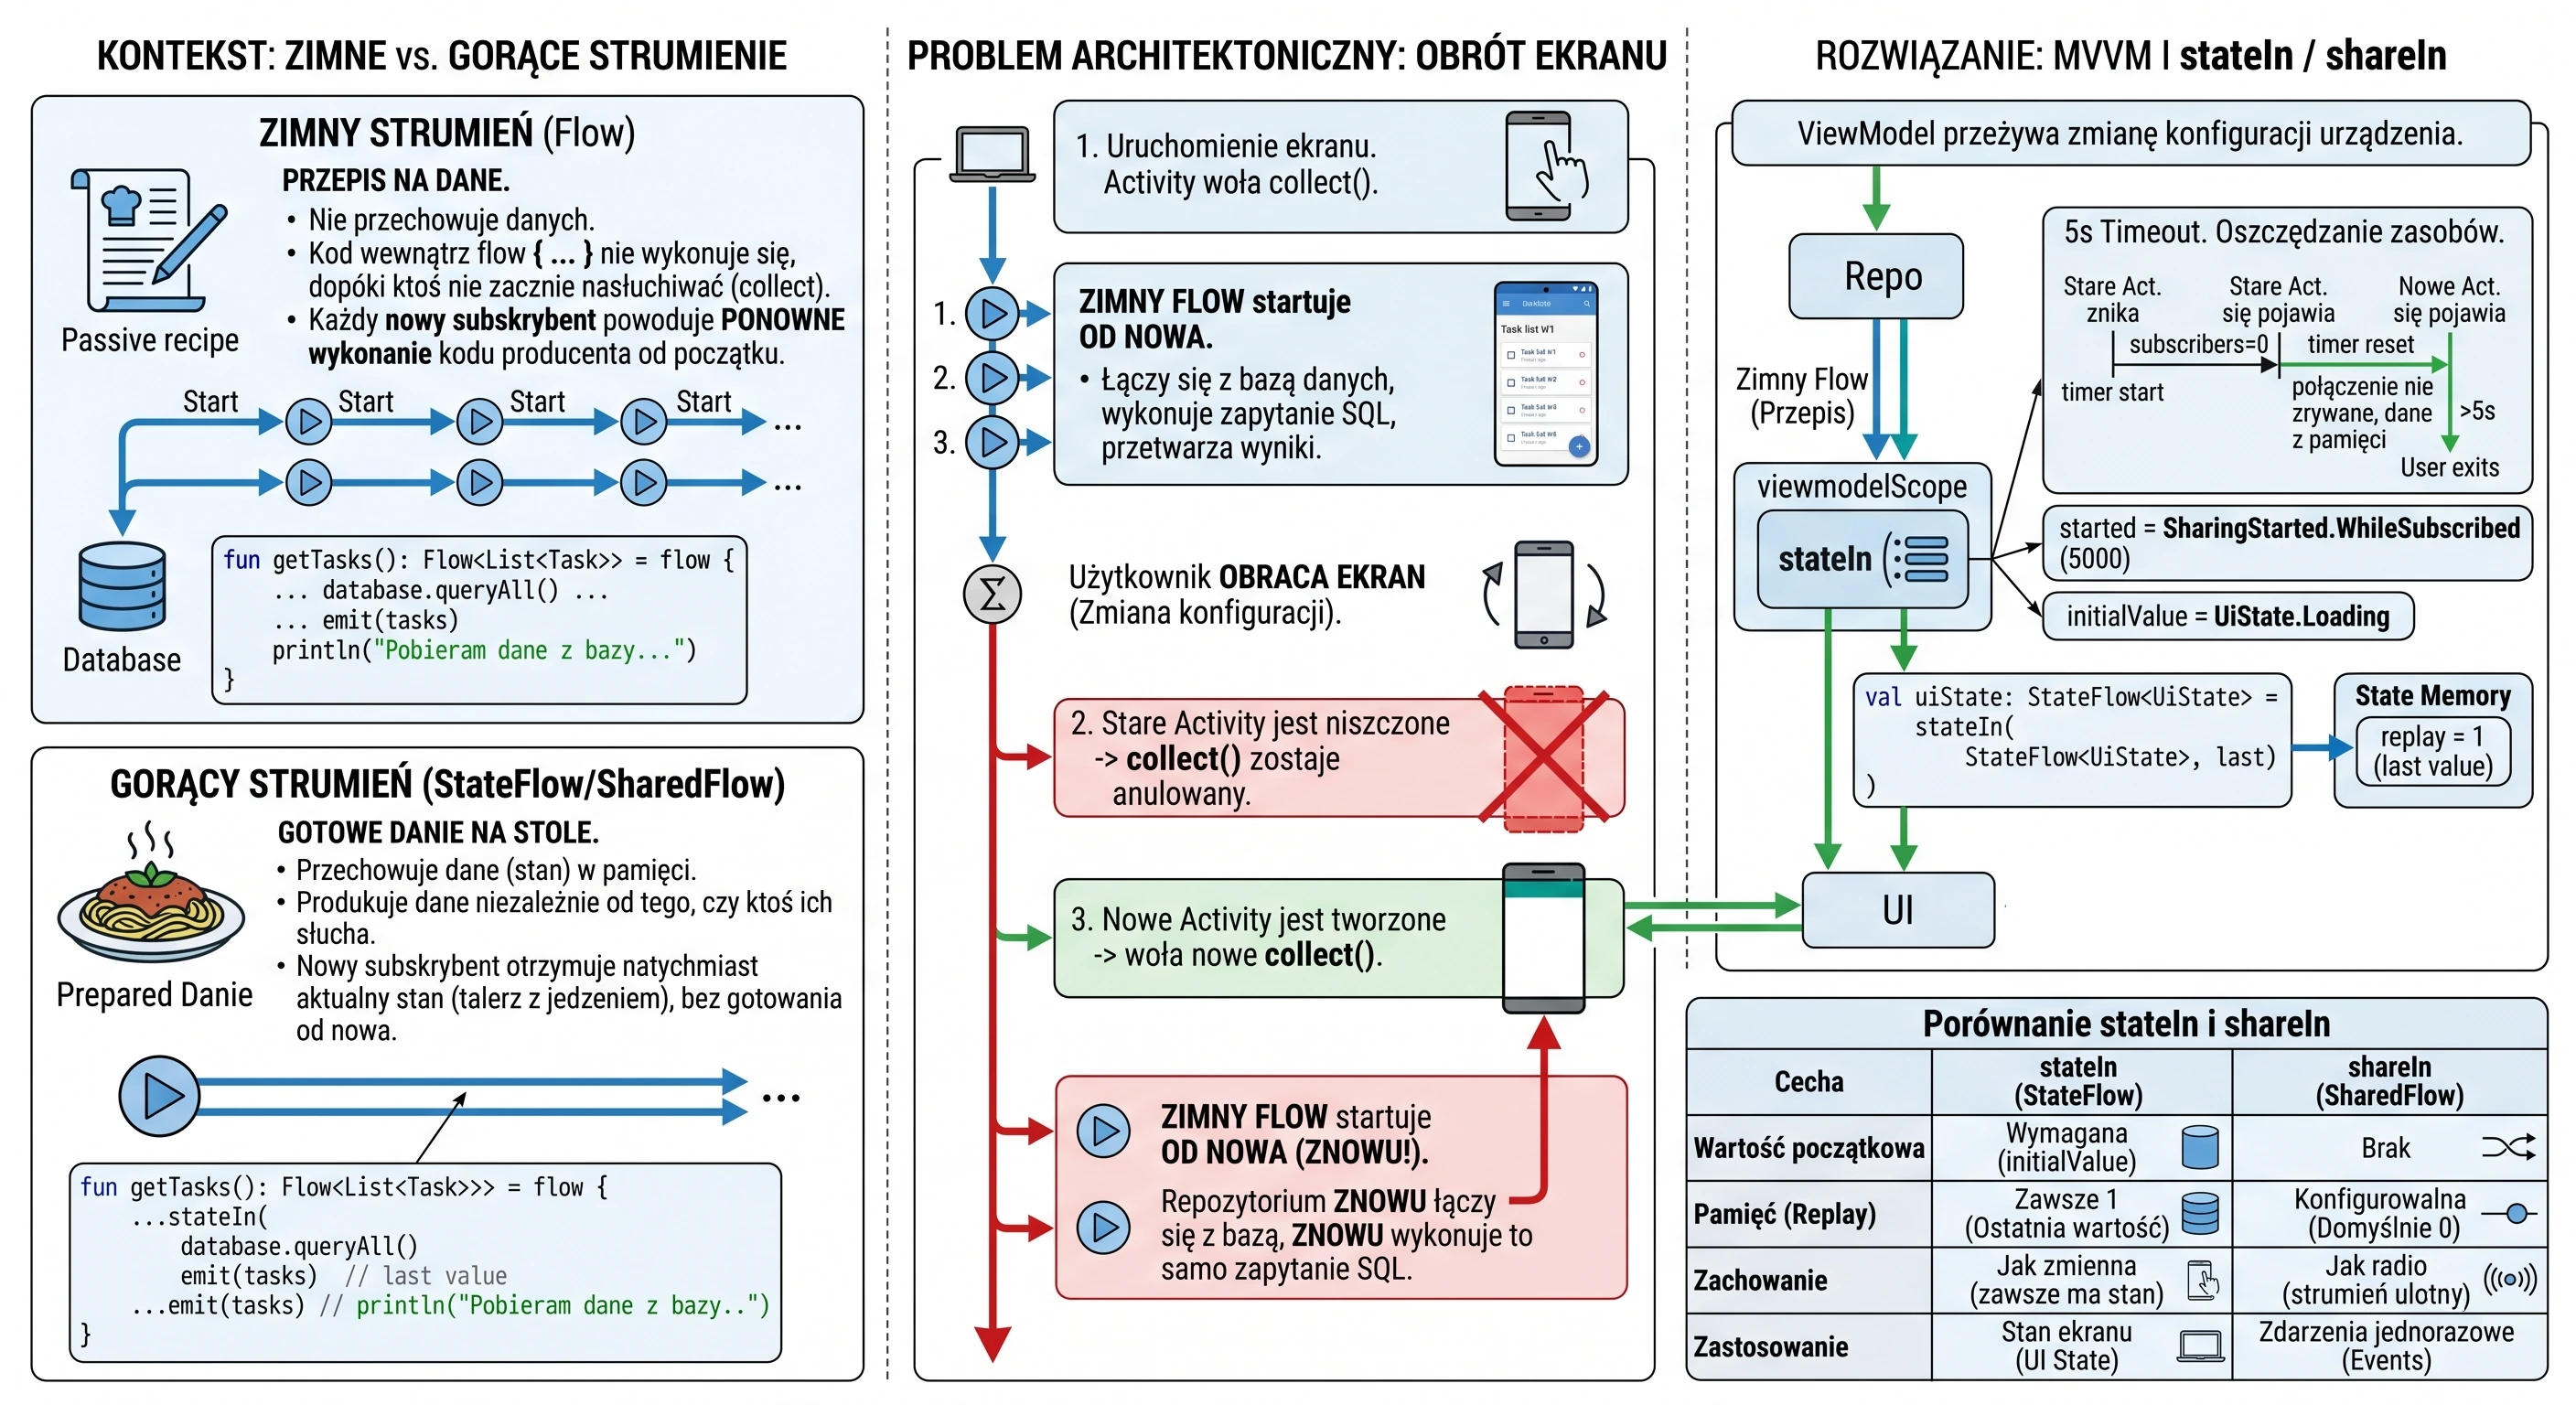
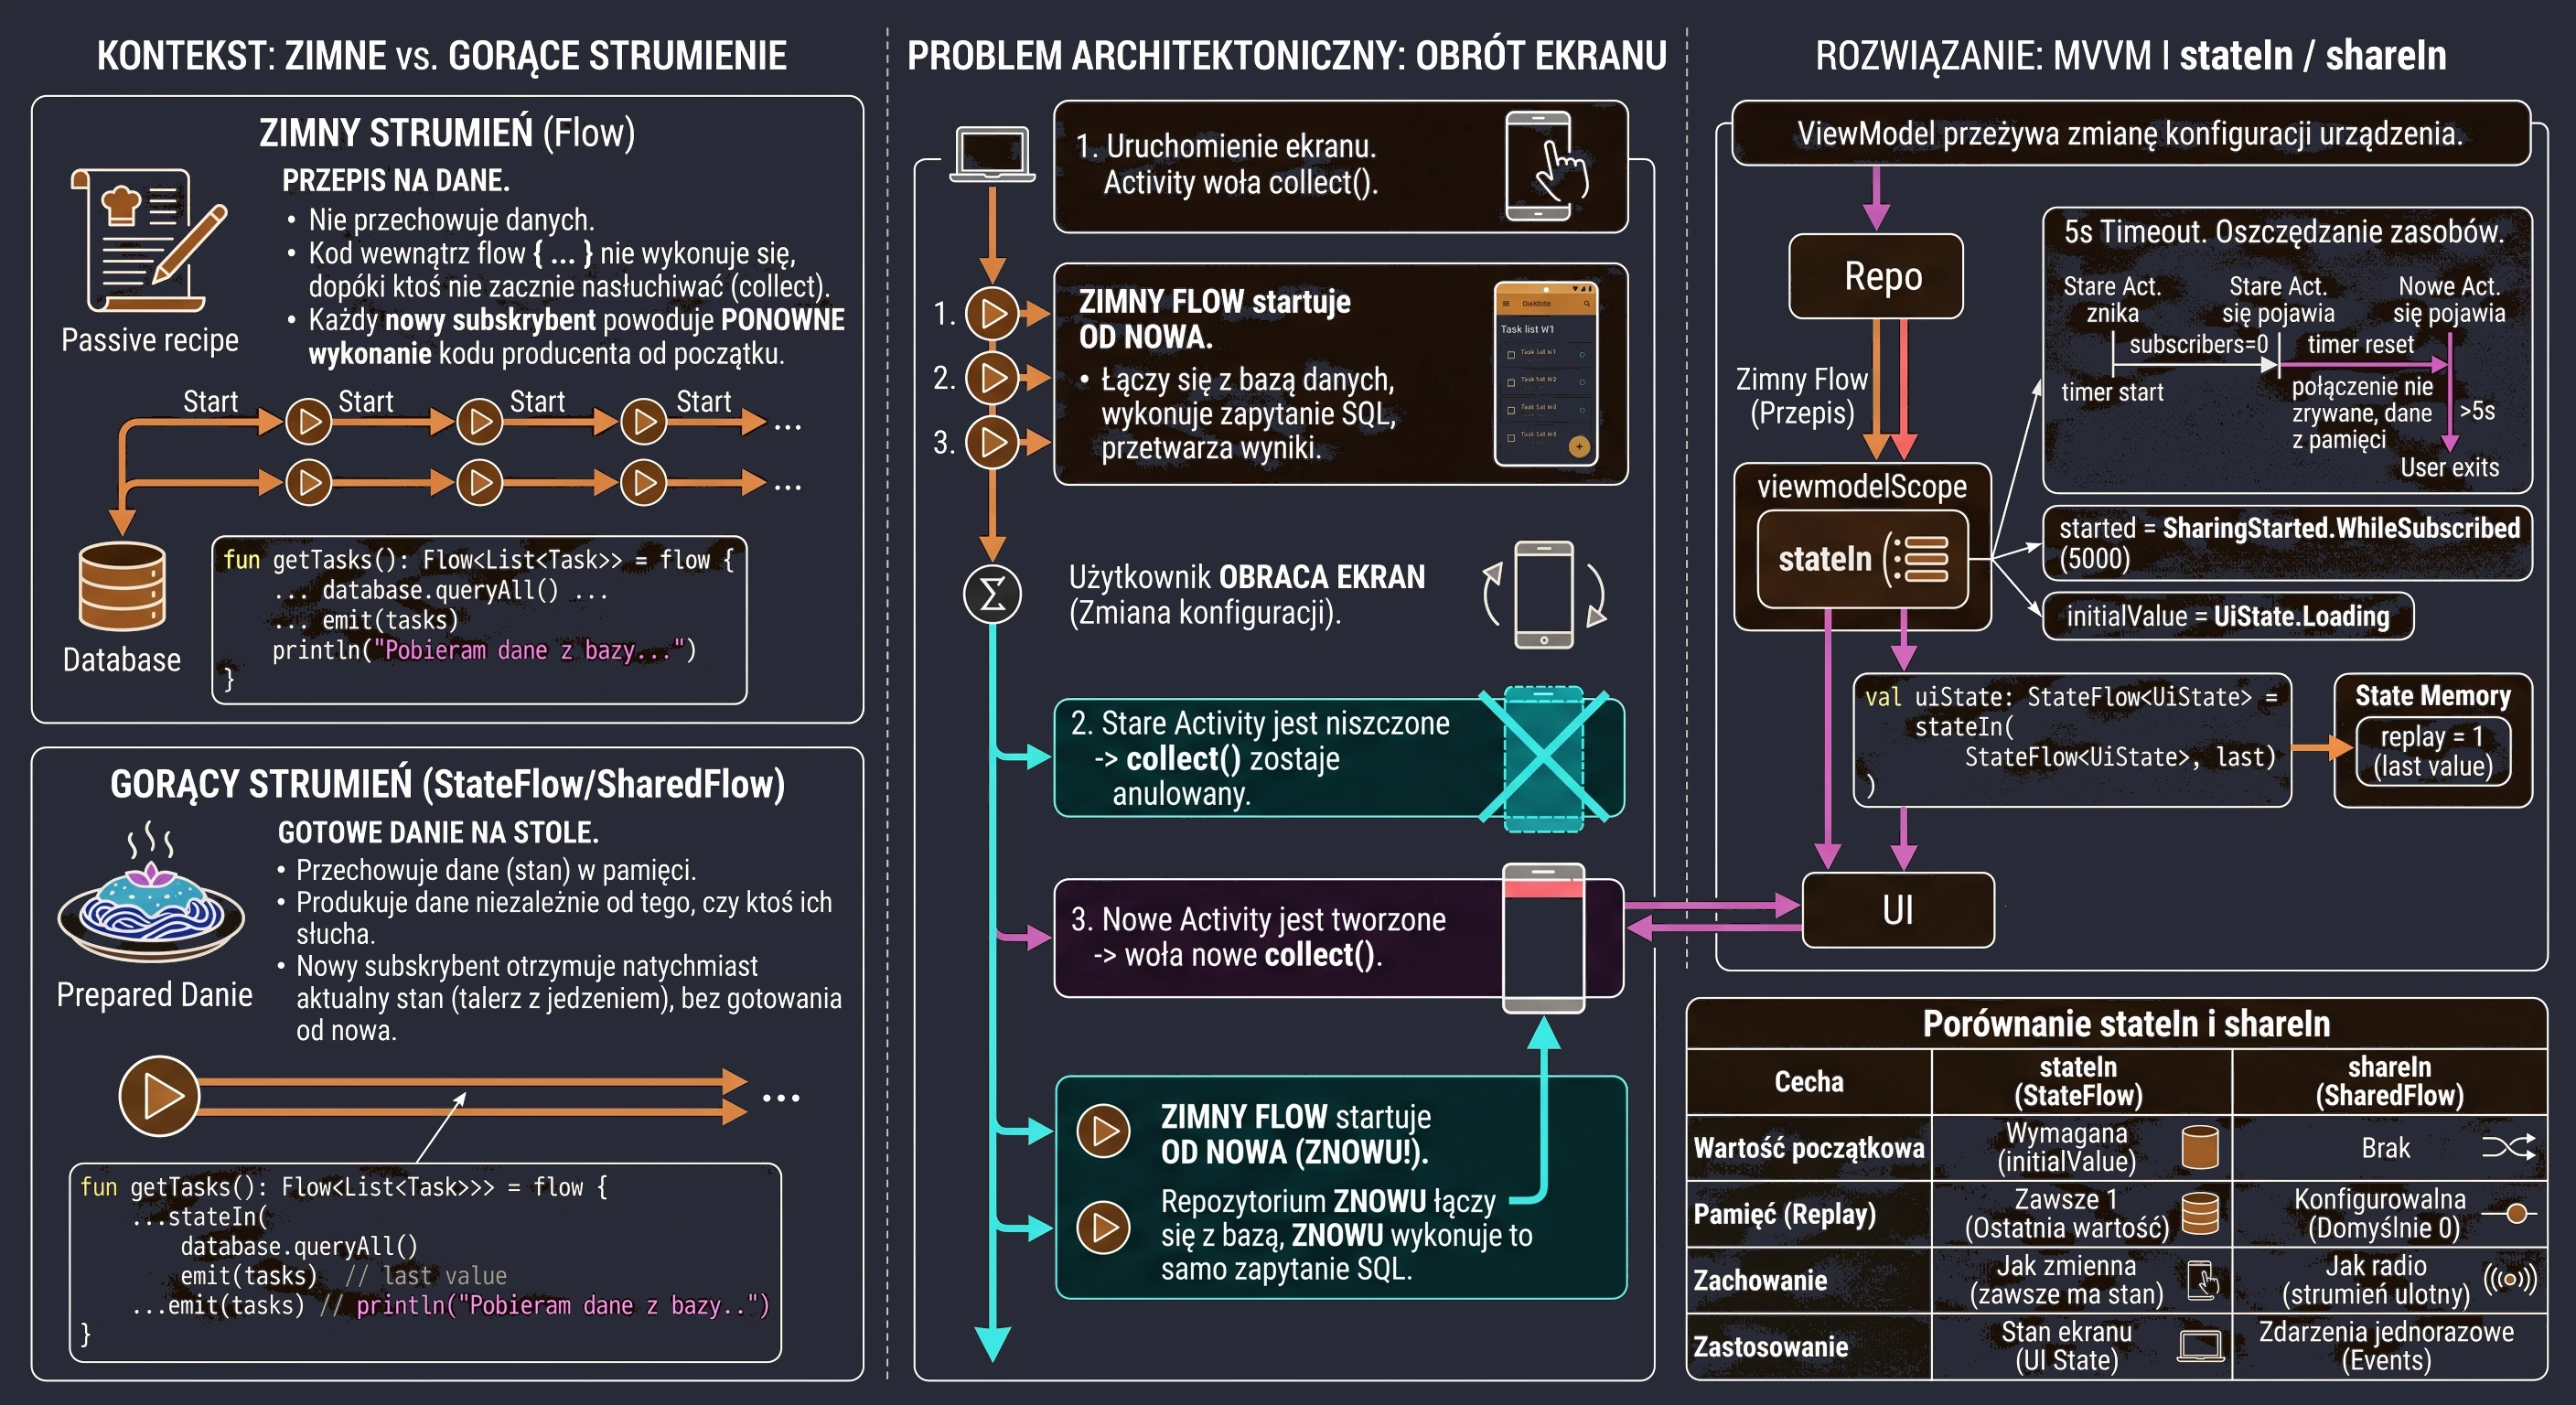
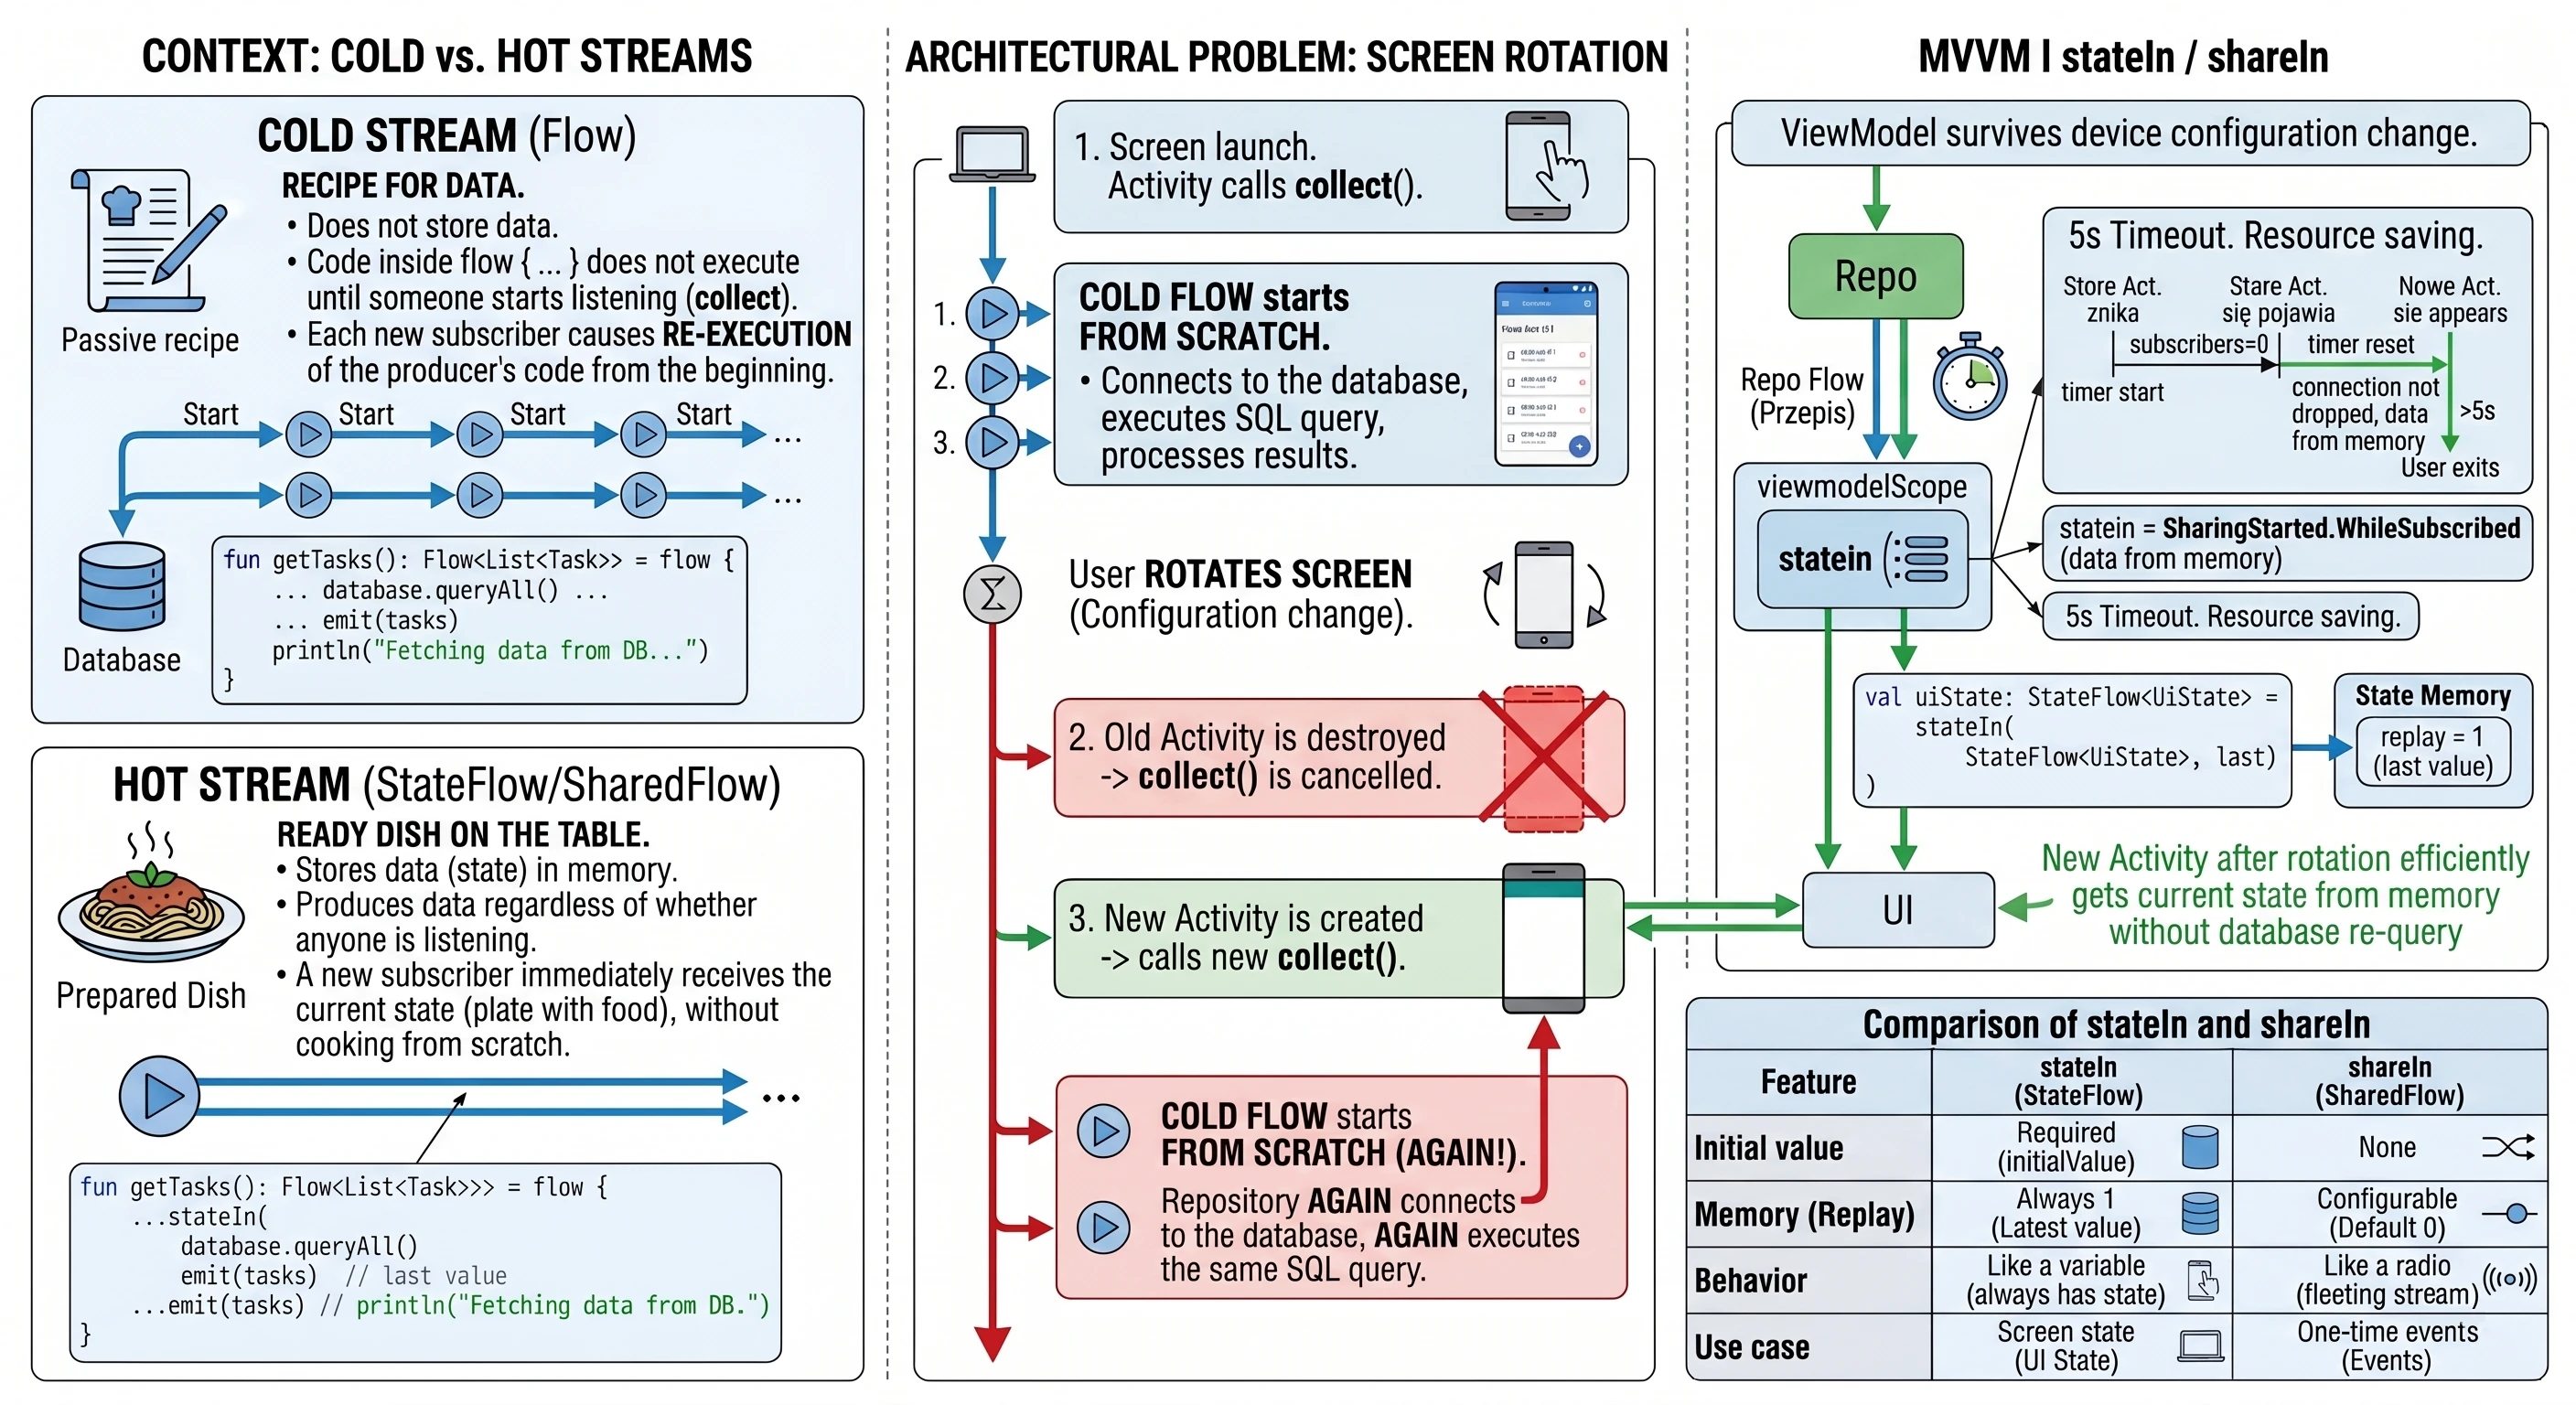
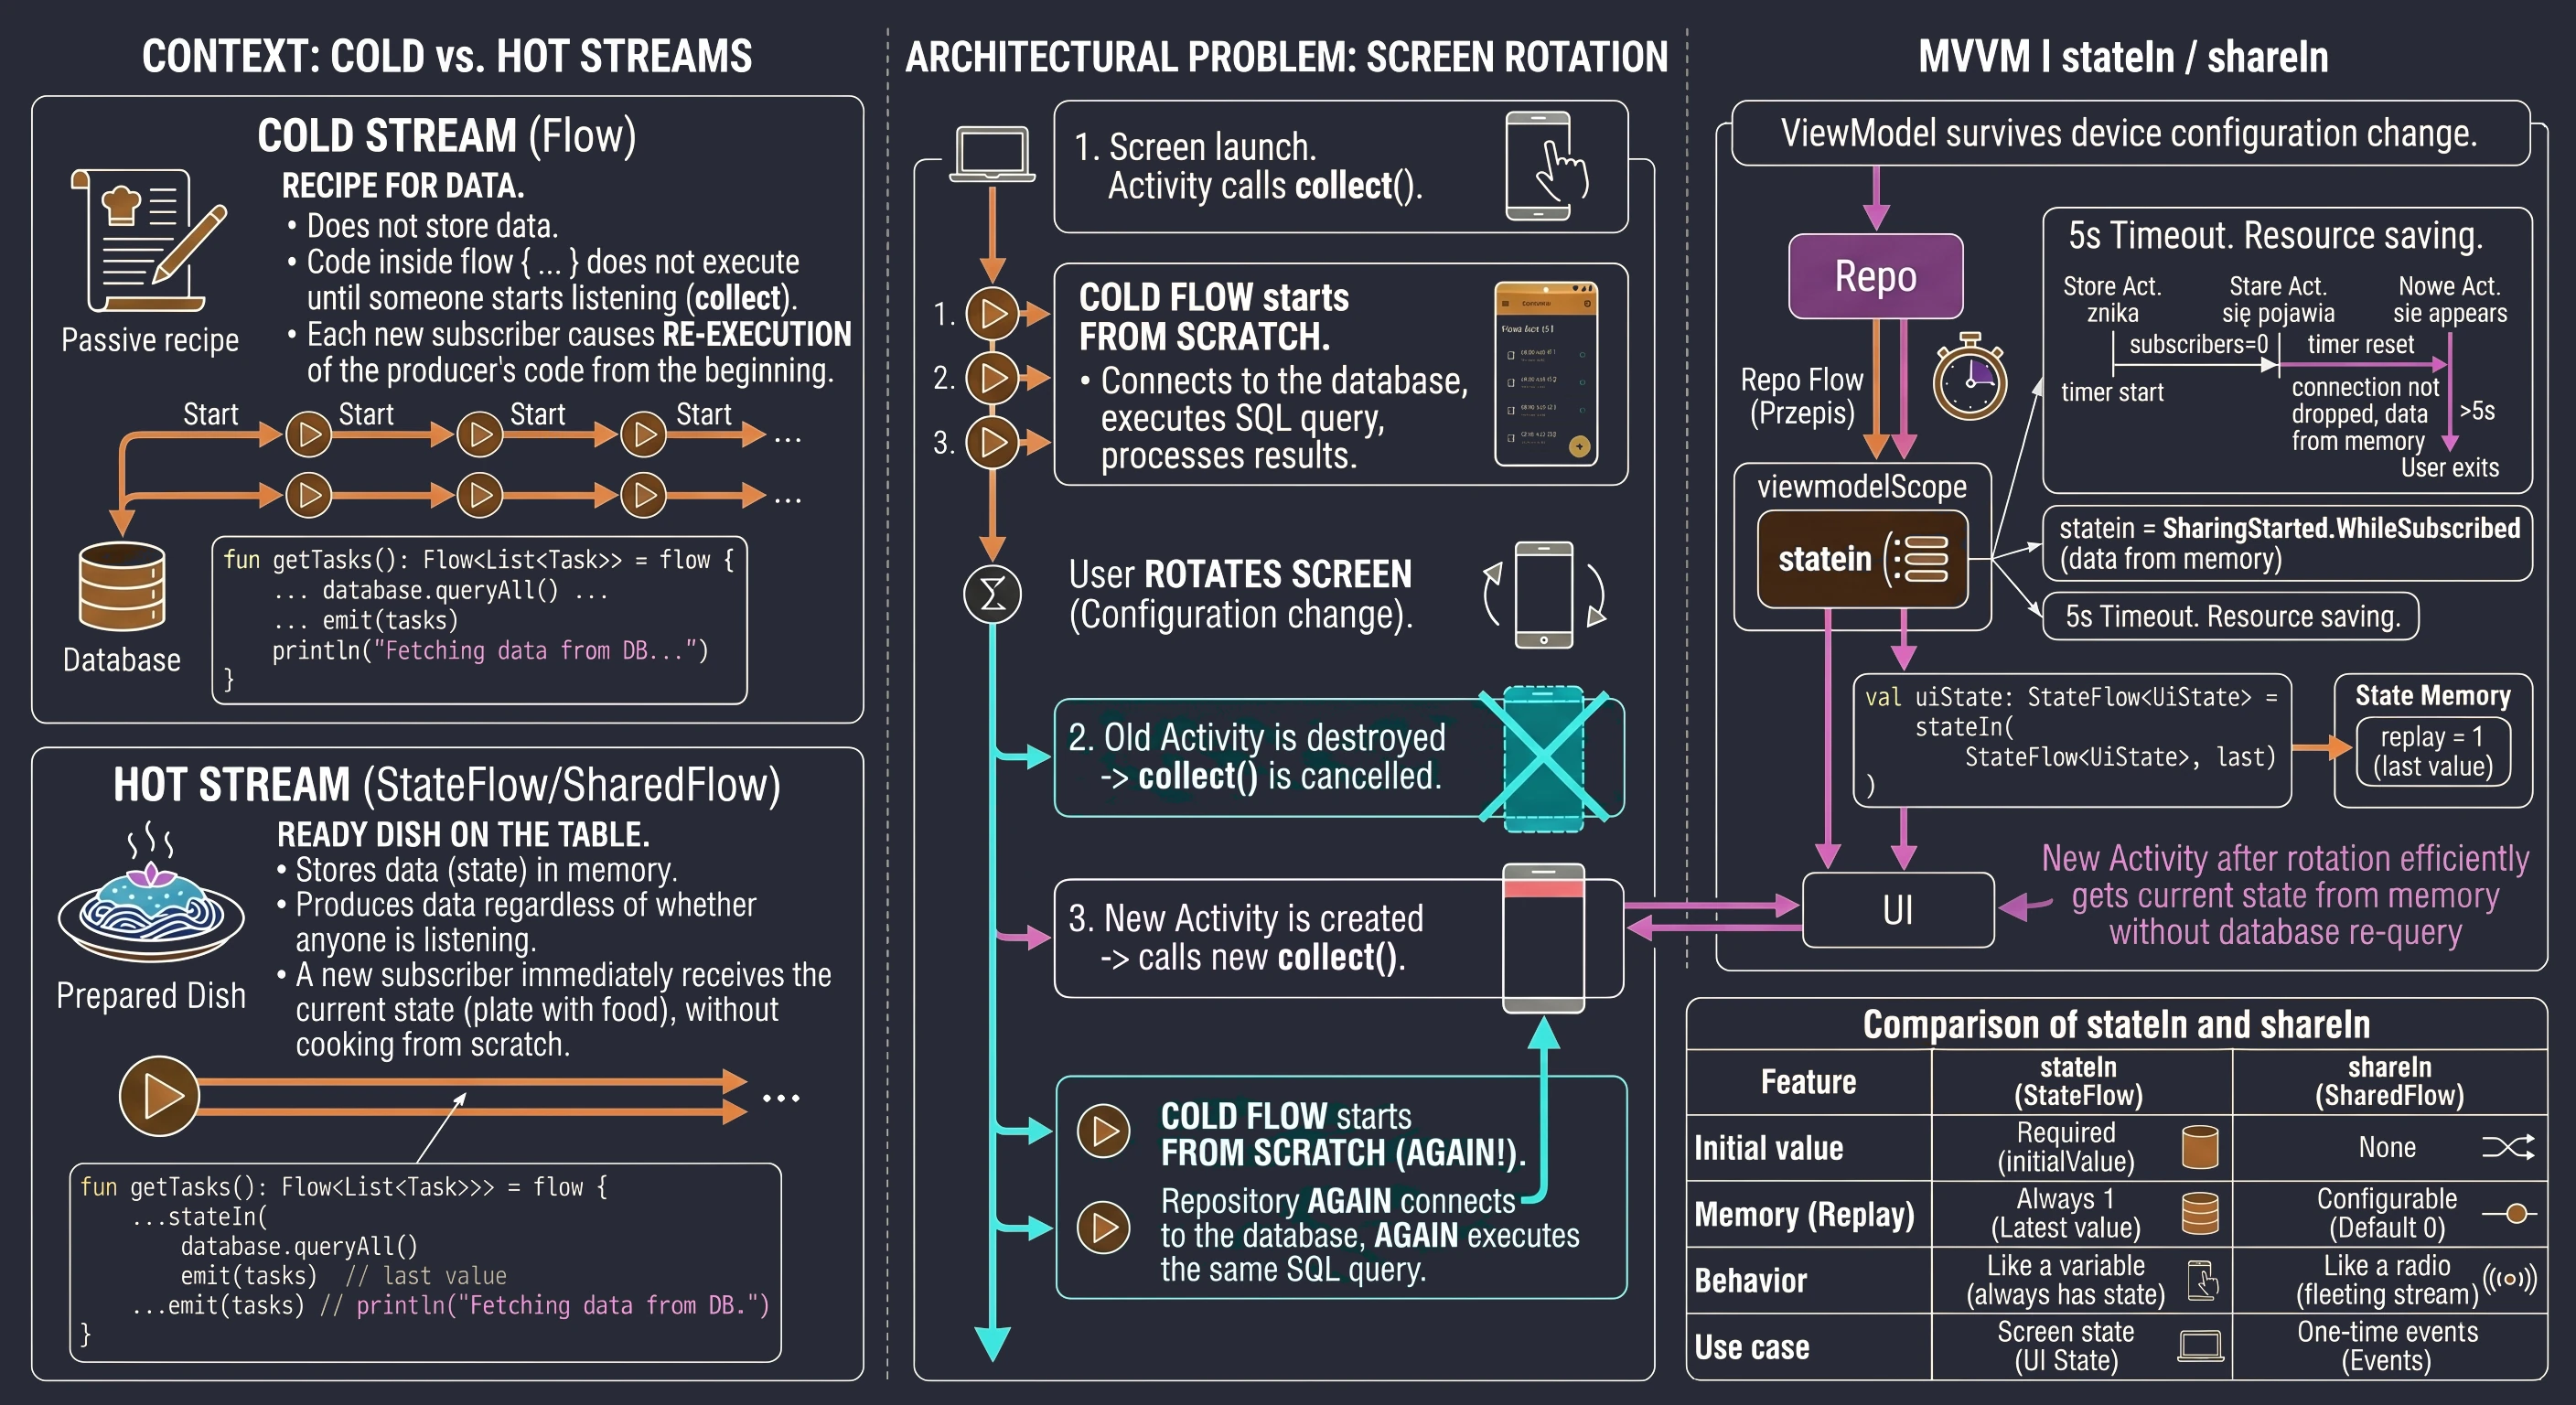
Imagine a stream of alerts from a server. We want these alerts to reach all screens in the application, but we do not want a newly opened screen to display old, outdated messages.
val notificationEvents: SharedFlow<String> = repository.getAlerts()
    .shareIn(
        scope = viewModelScope,
        started = SharingStarted.WhileSubscribed(5000),
        replay = 0
    )
If we set replay = 1, every newly opened screen would immediately receive the latest message.
Summary:
| Feature | stateIn (StateFlow) | shareIn (SharedFlow) |
|---|---|---|
| Initial value | Required (initialValue) | None |
| Memory (Replay) | Always 1 (latest value) | Configurable (default 0) |
| Behavior | Like a variable (always has state) | Like radio (transient stream) |
| Use case | Screen state (UI State) | One-shot events (Events) |
Combining data: the combine operator
In applications, screen state (UI State) rarely comes from a single source. Often we need to combine data from two or more independent streams.
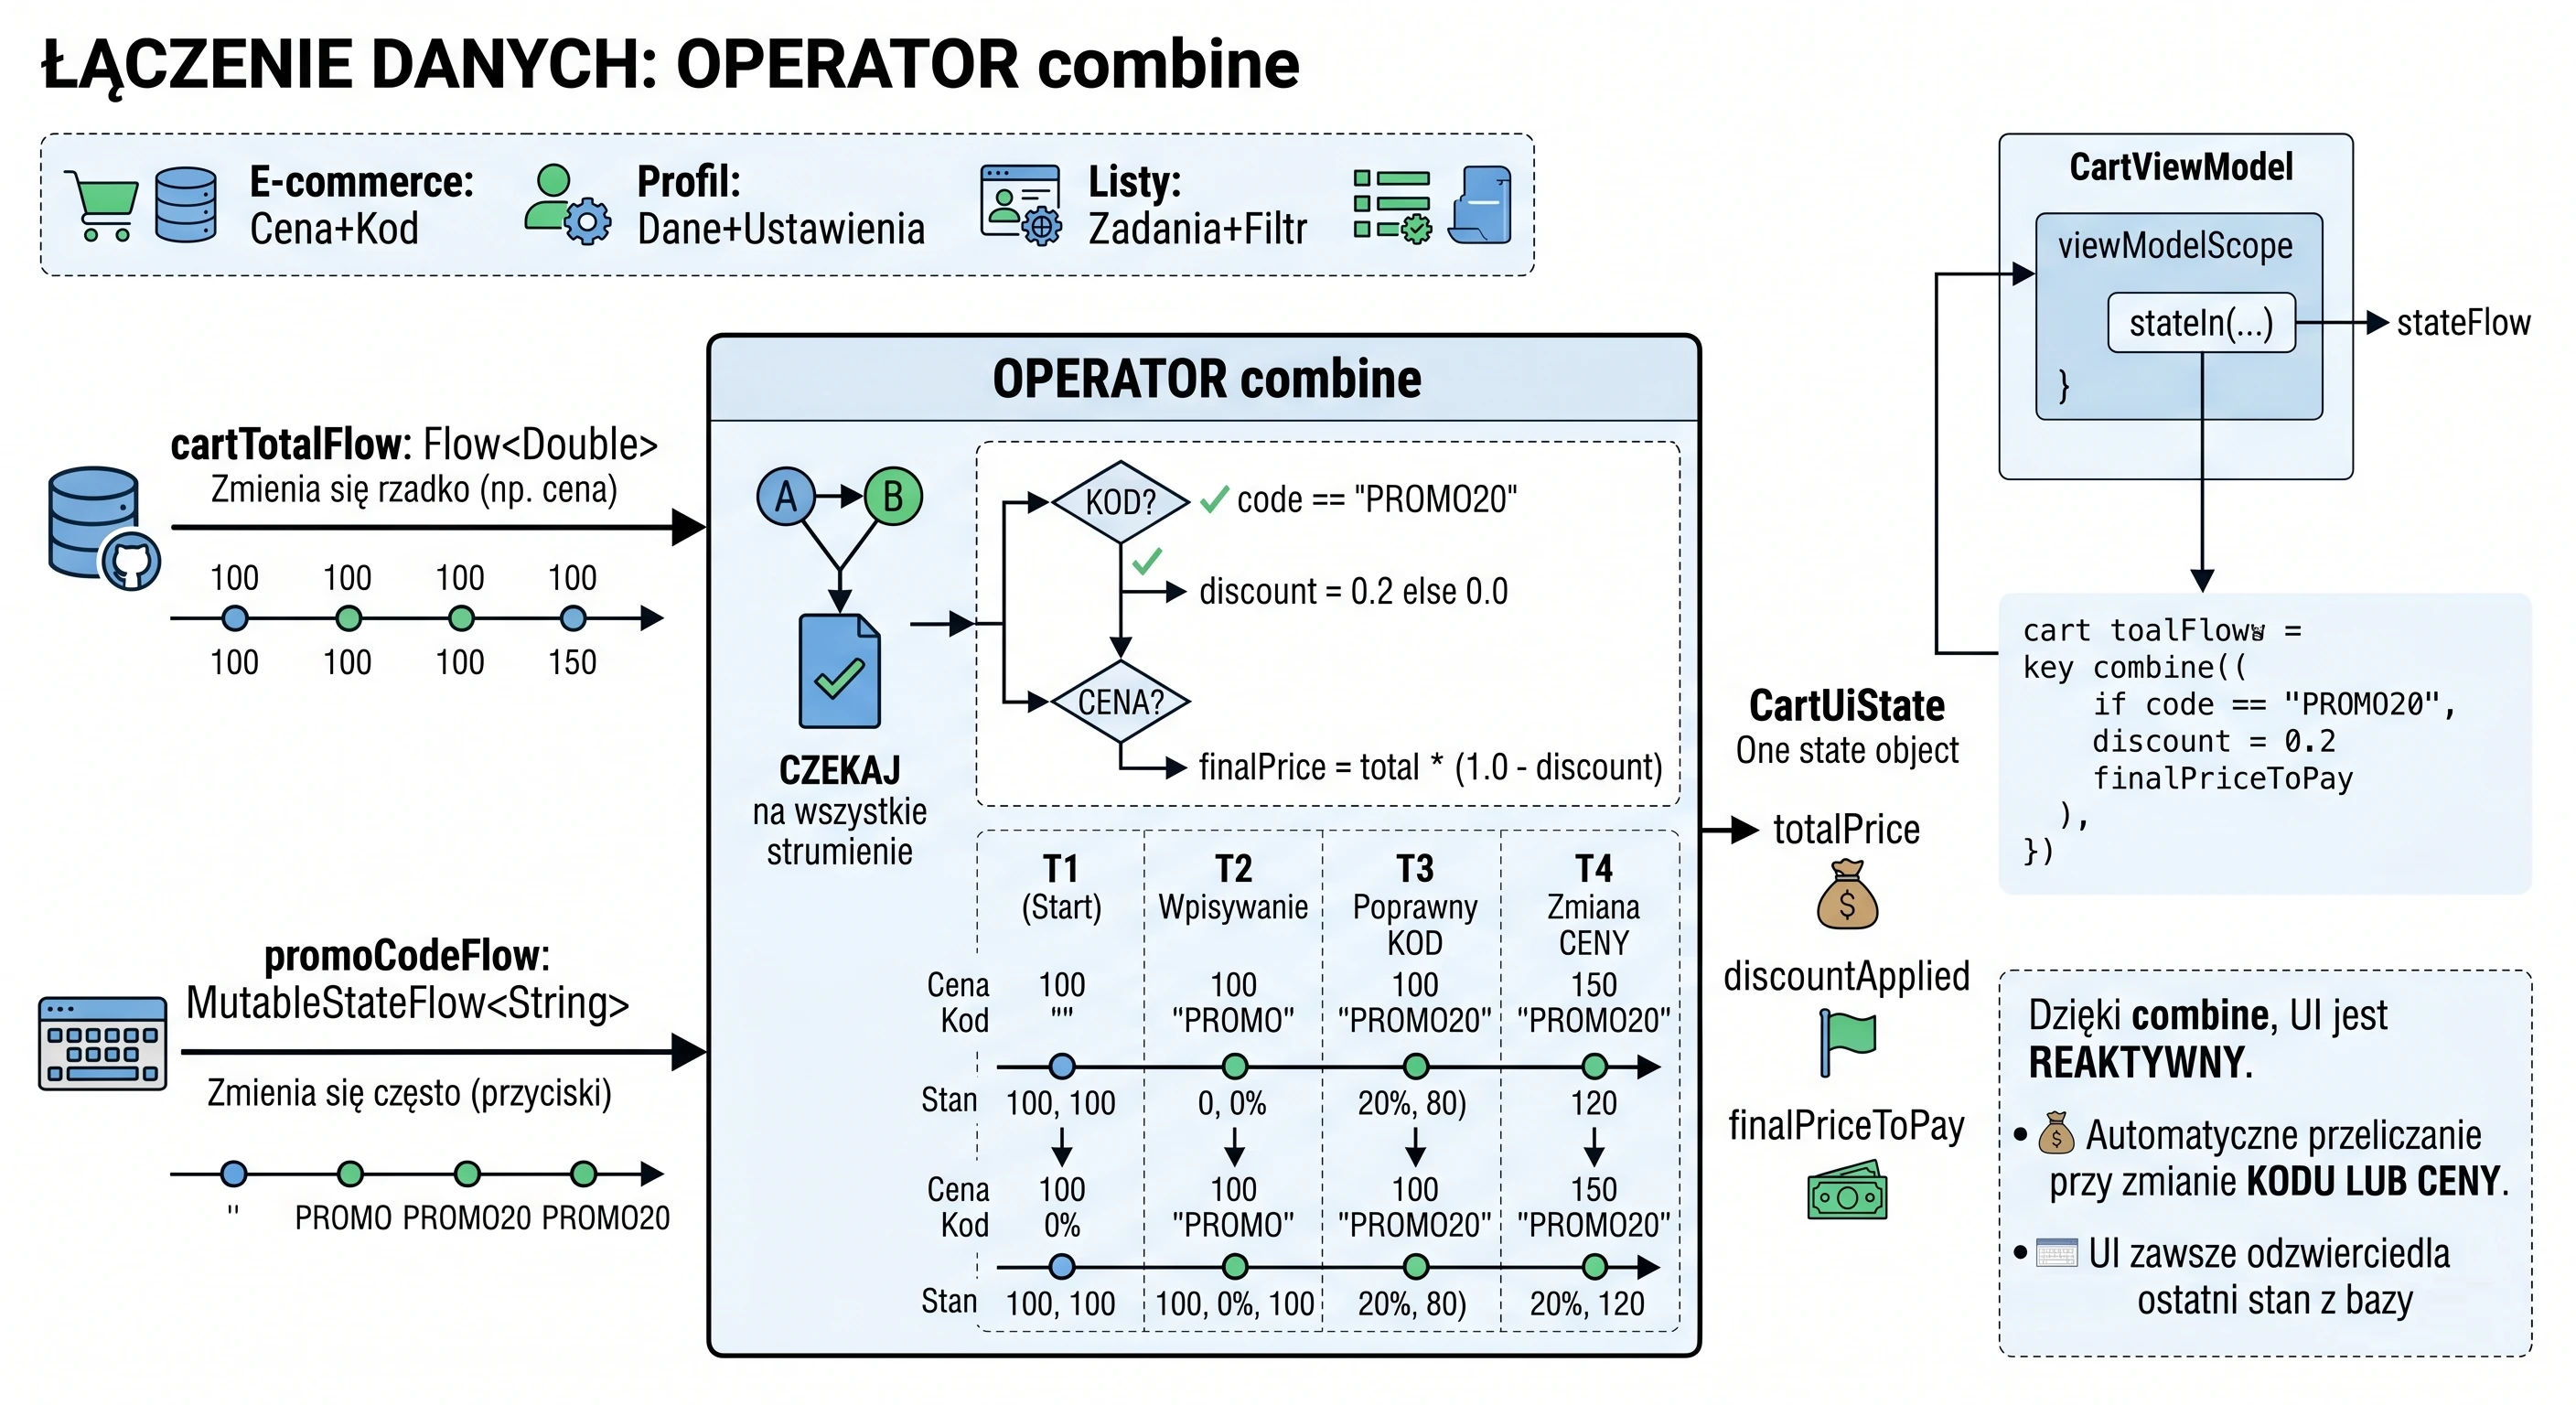
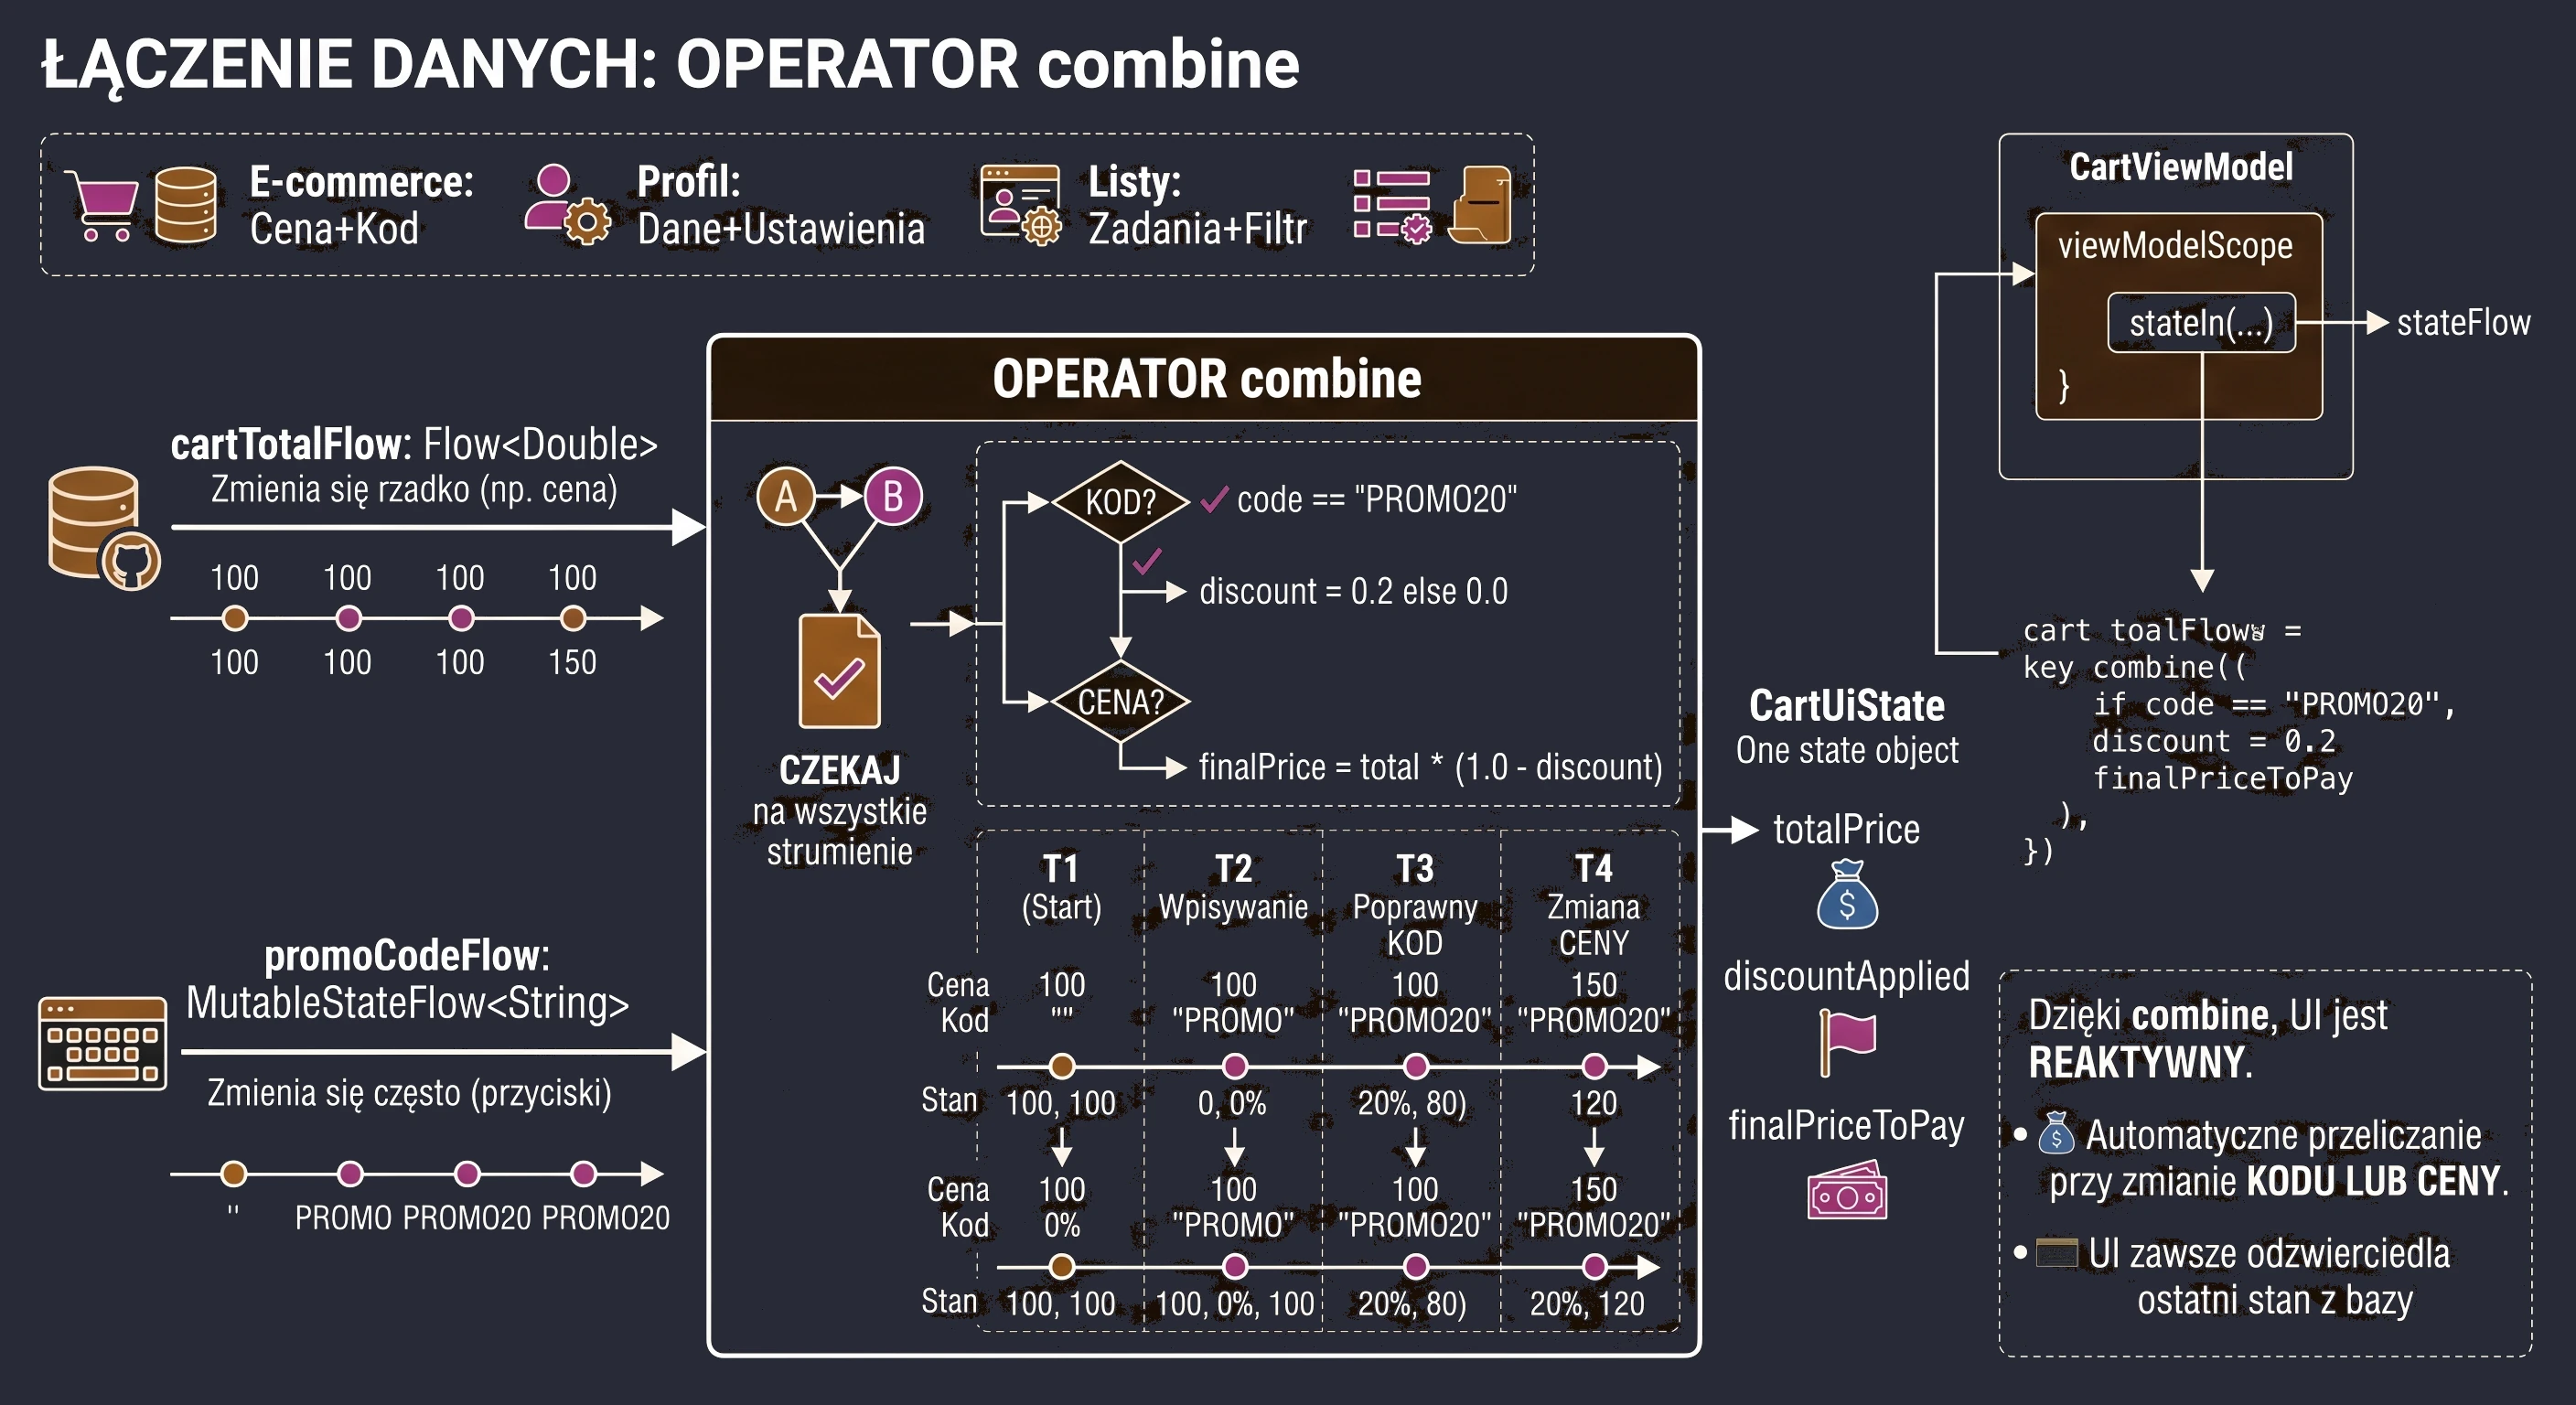
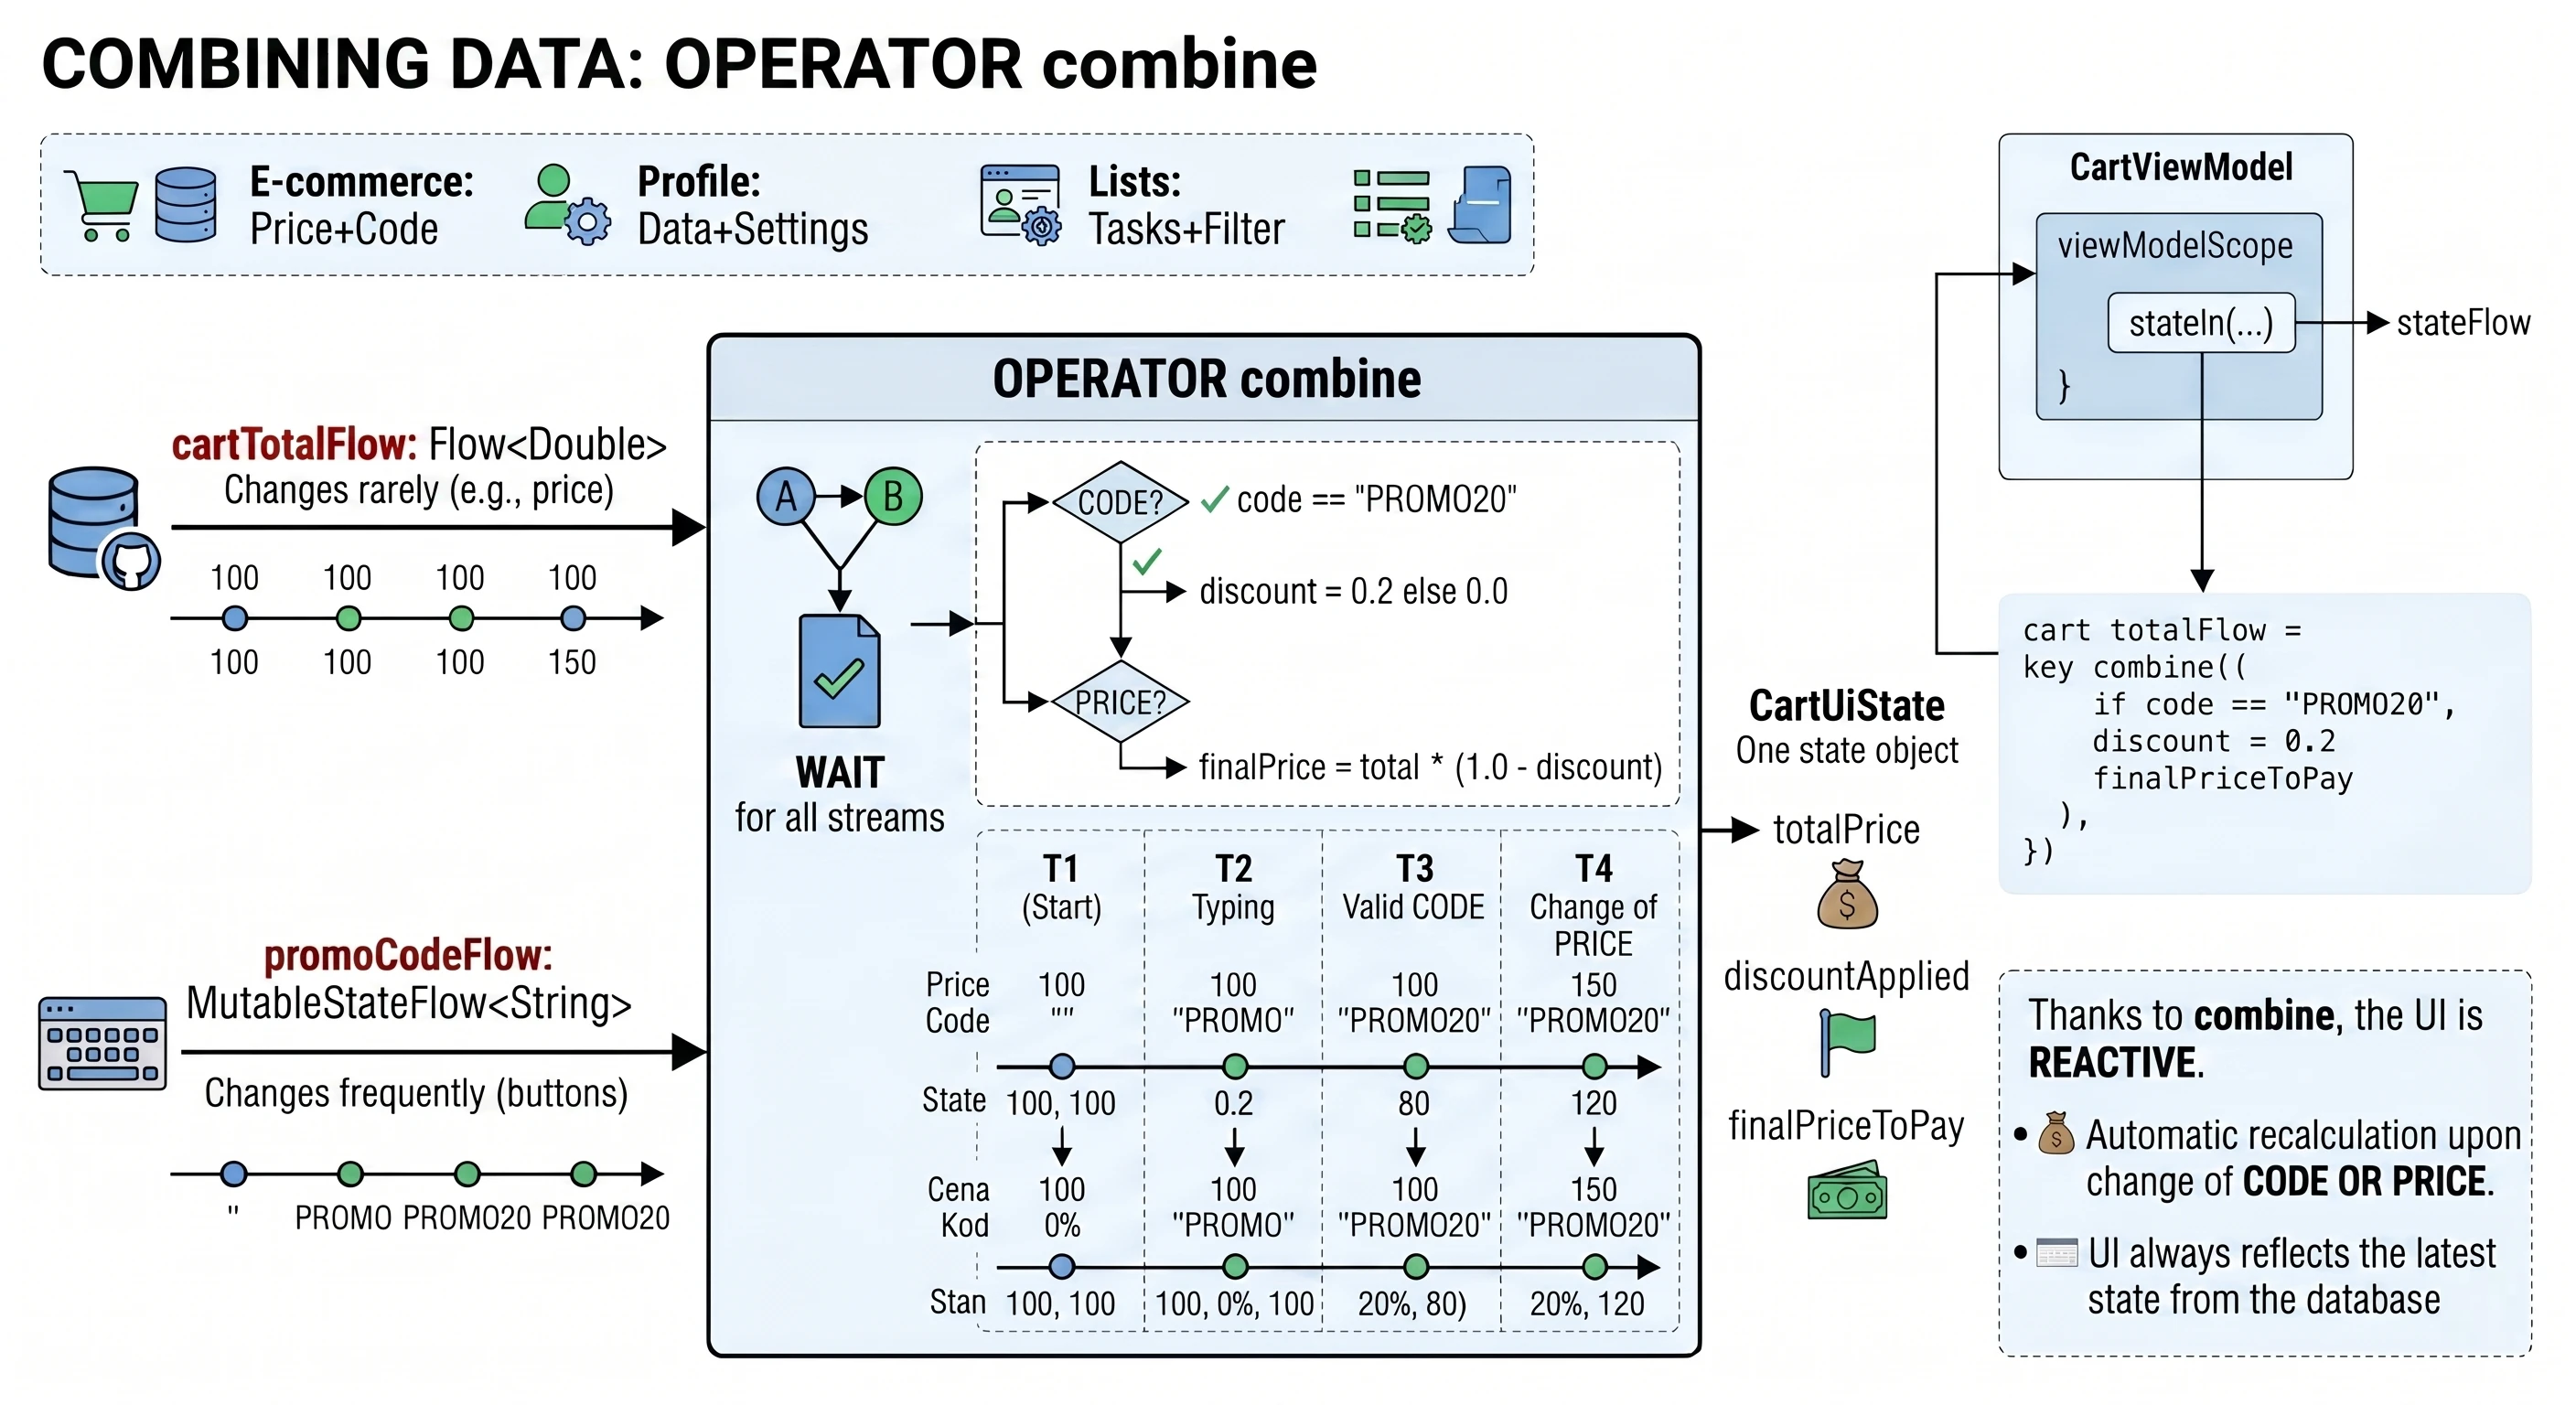
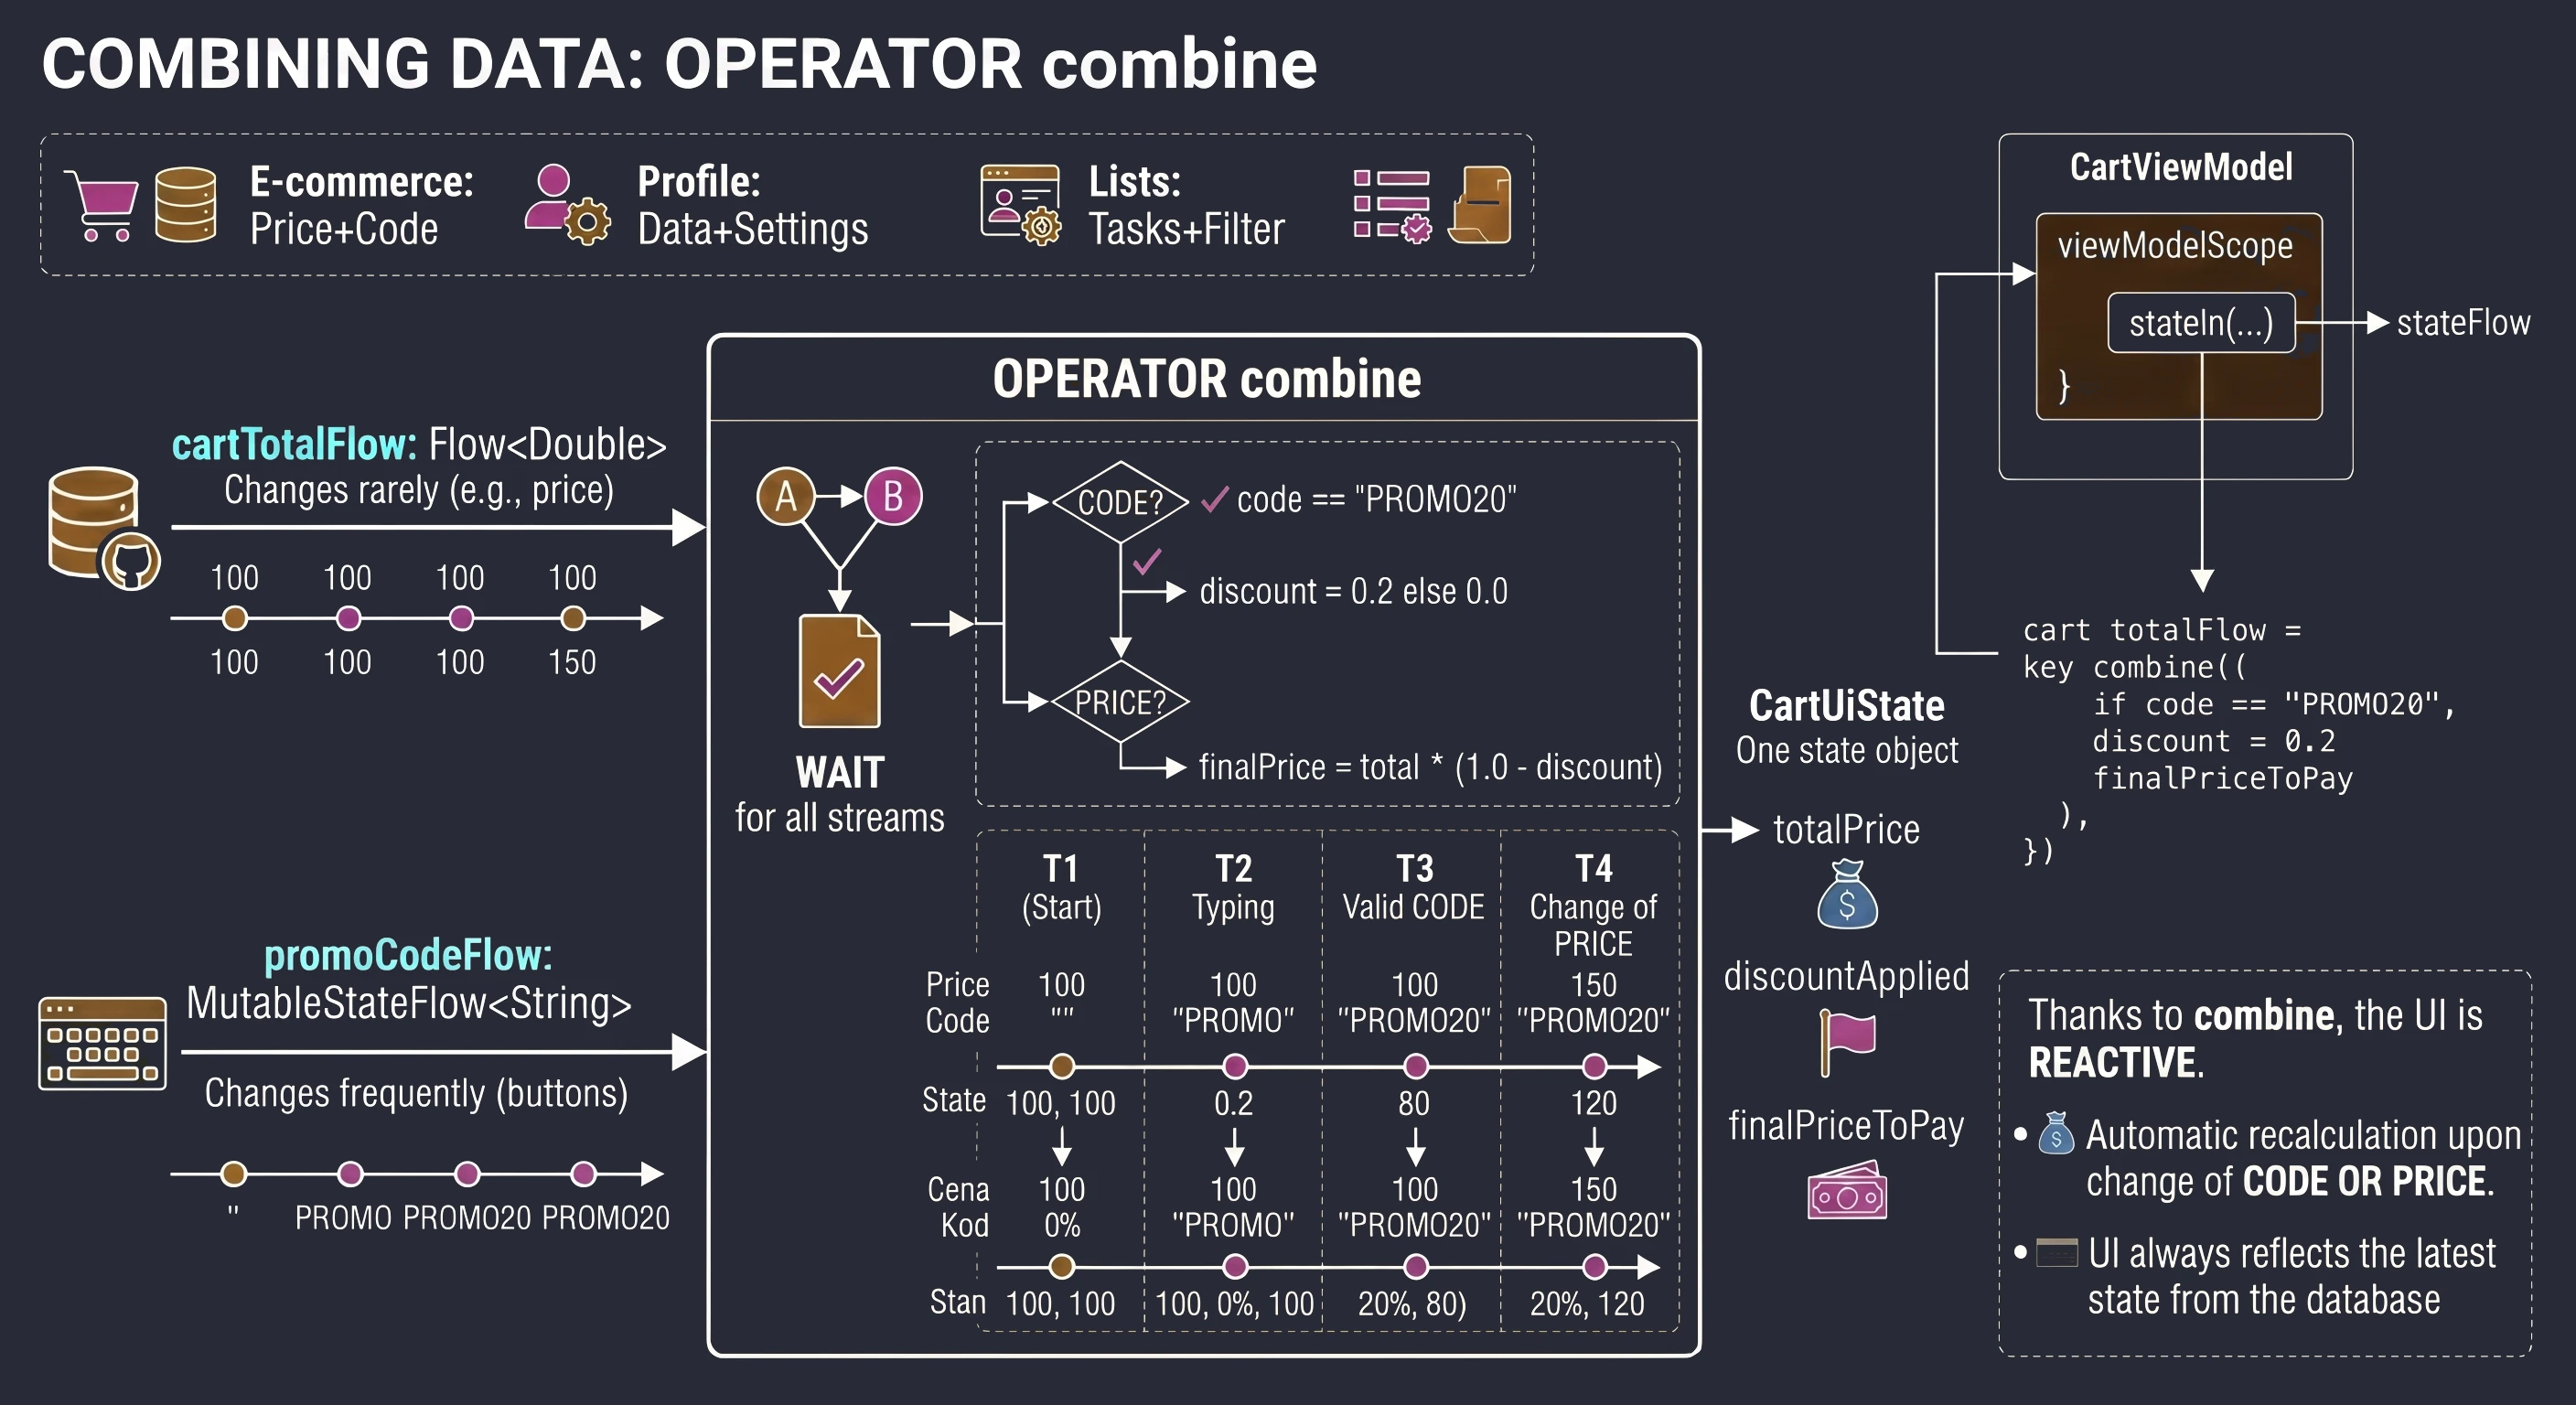
Typical scenarios:
- E-commerce: Product price (from database) + discount code (from text field).
- Profile: User data (from network) + privacy settings (from DataStore).
- Lists: Task list (from database) + selected category filter (from ViewModel).
The combine operator is used for this. It listens to several streams at the same time. Its behavior can be compared to a spreadsheet formula, for example =A1+B1.
- It waits until all streams emit their first value (initial synchronization).
- Whenever any stream emits a new value, the operator takes that new value and the latest known values from the remaining streams.
- It runs a lambda block where we combine those values into one result object.
Assume that we have a repository providing the current cart total and a text field in the ViewModel where the user enters a discount code.
class CartViewModel(repository: CartRepository) : ViewModel() {

    // 1. Stream from repository (e.g. from database)
    // Changes rarely (only when we add a product)
    val cartTotalFlow: Flow<Double> = repository.getCartTotal()

    // 2. Stream from the text field
    // Changes often (on every key press)
    val promoCodeFlow = MutableStateFlow("")

    // 3. Combine into one UI state
    val uiState: StateFlow<CartUiState> = combine(
        cartTotalFlow,
        promoCodeFlow
    ) { total, code ->
        // This lambda runs when either the price OR the code changes

        val discount = if (code == "PROMO20") 0.20 else 0.0
        val finalPrice = total * (1.0 - discount)

        // Return the state object
        CartUiState(
            totalPrice = total,
            discountApplied = discount > 0,
            finalPriceToPay = finalPrice
        )
    }.stateIn(
        scope = viewModelScope,
        started = SharingStarted.WhileSubscribed(5000),
        initialValue = CartUiState() // Initial state (empty)
    )

    fun onCodeChanged(code: String) {
        promoCodeFlow.value = code
    }
}
Thanks to combine, our UI is fully reactive. If the user enters a valid code, the price is recalculated immediately. If, in the meantime, a price update arrives from the database in the background, the price is also recalculated automatically, taking the entered code into account.
Complete implementation examples
Below are complete source-code examples for the topics discussed, ready to be copied into a project.
Example 1: safe calculations with withContext
This example shows the imperative approach. We execute a heavy operation, simulating video rendering, after a button click without blocking the progress indicator on the screen.
// 1. UI state definition (sealed interface)
sealed interface UiState {
    data object Idle : UiState
    data object Loading : UiState
    data class Success(val result: Int) : UiState
}

// 2. ViewModel (business logic)
class CalculationViewModel : ViewModel() {

    private val _uiState = MutableStateFlow<UiState>(UiState.Idle)
    val uiState: StateFlow<UiState> = _uiState.asStateFlow()

    fun onCalculateClicked() {
        viewModelScope.launch {
            _uiState.value = UiState.Loading

            val result = performHeavyCalculation()

            _uiState.value = UiState.Success(result)
        }
    }

    private suspend fun performHeavyCalculation(): Int {
        return withContext(Dispatchers.Default) {
            Thread.sleep(2000)
            42 * 100
        }
    }
}

// 3. View (Composable)
@Composable
fun CalculationScreen(viewModel: CalculationViewModel = viewmodel()) {
    val state by viewModel.uiState.collectAsStateWithLifecycle()

    Box(
        modifier = Modifier.fillMaxSize(),
        contentAlignment = Alignment.Center
    ) {
        Column(
            horizontalAlignment = Alignment.CenterHorizontally,
            verticalArrangement = Arrangement.spacedBy(16.dp)
        ) {
            // React to a specific state
            when (val currentState = state) {
                is UiState.Idle -> {
                    Text(text = "Ready for calculations")
                }
                is UiState.Loading -> {
                    CircularProgressIndicator()
                    Text(text = "Processing...")
                }
                is UiState.Success -> {
                    Text(
                        text = "Result: ${currentState.result}"
                    )
                }
            }
            Button(
                onClick = { viewModel.onCalculateClicked() },
                enabled = state !is UiState.Loading
            ) {
                Text("Start heavy work")
            }
        }
    }
}
Example 2: stream optimization with flowOn
This example shows the reactive approach. We move stream-data processing (filtering and sorting) to a background thread, while the repository and view remain clean.
// 1. Data model
data class User(val name: String, val isActive: Boolean)

// 2. Repository (data-layer simulation)
class UserRepository {
    // The function returns a "cold" stream (Cold Flow)
    fun fetchUsersFromDb(): Flow<List<User>> = flow {
        // SIMULATION OF BLOCKING IO
        // Normally this would block the UI if not for flowOn
        Thread.sleep(2000)

        val users = listOf(
            User("Anna Kowalska", true),
            User("John Novak", false),
            User("Mark Clock", true),
            User("Sophia Example", true)
        )
        emit(users)
    }
}

class UserViewModel : ViewModel() {
    private val repository = UserRepository()

    val uiState: StateFlow<UiState> = repository.fetchUsersFromDb()
        .map { users -> users.filter { it.isActive }}
        .flowOn(Dispatchers.IO) // <--- CONTEXT-SWITCH BOUNDARY (upstream on IO)
        .map { users ->
            // This map is AFTER flowOn, so it runs in the collector context (Main)
            UiState.Success(users.map { it.name.uppercase() }) as UiState
        }
        .onStart {
            // Emit loading state at the beginning of the subscription
            emit(UiState.Loading)
        }
        .stateIn(
            scope = viewModelScope,
            started = SharingStarted.WhileSubscribed(5000),
            initialValue = UiState.Loading
        )
}

// View state definition
sealed interface UiState {
    data object Loading : UiState
    data class Success(val userNames: List<String>) : UiState
}

// 4. View (Composable)
@Composable
fun UserListScreen(viewModel: UserViewModel = viewModel()) {
    val state by viewModel.uiState.collectAsState()

    Box(modifier = Modifier.fillMaxSize(), contentAlignment = Alignment.Center) {
        when (val currentState = state) {
            is UiState.Loading -> {
                Column(horizontalAlignment = Alignment.CenterHorizontally) {
                    CircularProgressIndicator()
                    Spacer(modifier = Modifier.height(8.dp))
                    Text("Fetching database...")
                    Text("(Check Logcat)")
                }
            }
            is UiState.Success -> {
                LazyColumn(
                    modifier = Modifier.fillMaxSize(),
                    contentPadding = PaddingValues(16.dp)
                ) {
                    item {
                        Text(
                            "Active users:",
                            modifier = Modifier.padding(bottom = 16.dp)
                        )
                    }
                    items(currentState.userNames) { name ->
                        Card(
                            modifier = Modifier
                                .fillMaxWidth()
                                .padding(vertical = 4.dp),
                            elevation = CardDefaults.cardElevation(defaultElevation = 2.dp)
                        ) {
                            Text(
                                text = name,
                                modifier = Modifier.padding(16.dp)                            )
                        }
                    }
                }
            }
        }
    }
}
Example 3: combining data streams with combine
// 1. UI state model
data class CartUiState(
    val baseTotal: Double = 0.0,
    val finalPrice: Double = 0.0,
    val discountApplied: Boolean = false,
    val currentCode: String = ""
)

// 2. Repository (external-data simulation)
class CartRepository {
    // Simulates a cart that changes over time
    fun getCartTotal(): Flow<Double> = flow {
        // Initial cart price
        emit(100.0)

        // After 5 seconds, simulate that a product was added on another device
        delay(5000)
        emit(200.0) // Price increases. Combine automatically recalculates the result.
    }
}

// 3. ViewModel (stream-combination logic)
class CartViewModel : ViewModel() {
    private val repository = CartRepository()

    // Stream 1: price from database (read-only Flow)
    private val cartTotalFlow = repository.getCartTotal()

    // Stream 2: code entered by the user (MutableStateFlow)
    private val promoCodeFlow = MutableStateFlow("")

    // combine operator
    val uiState: StateFlow<CartUiState> = combine(
        cartTotalFlow,
        promoCodeFlow
    ) { total, code ->
        // This lambda runs when EITHER the price OR the code changes

        // Business logic for the discount
        val isPromoValid = code.trim() == "PROMO20"
        val discount = if (isPromoValid) 0.20 else 0.0
        val finalPrice = total * (1.0 - discount)

        // Return the new combined state
        CartUiState(
            baseTotal = total,
            finalPrice = finalPrice,
            discountApplied = isPromoValid,
            currentCode = code
        )
    }.stateIn(
        scope = viewModelScope,
        started = SharingStarted.WhileSubscribed(5000),
        initialValue = CartUiState()
    )

    // Function called from UI when typing text
    fun onCodeChanged(newCode: String) {
        promoCodeFlow.value = newCode
    }
}

// 4. View (Composable)
@Composable
fun ShoppingCartScreen(viewModel: CartViewModel = viewModel()) {
    // UI reacts to every change in uiState (coming from any stream)
    val state by viewModel.uiState.collectAsStateWithLifecycle()

    Column(
        modifier = Modifier
            .fillMaxSize()
            .padding(24.dp),
        horizontalAlignment = Alignment.CenterHorizontally,
        verticalArrangement = Arrangement.Center
    ) {
        Text("Your cart")

        Spacer(modifier = Modifier.height(32.dp))

        // Summary card
        Card(
            elevation = CardDefaults.cardElevation(defaultElevation = 4.dp),
            modifier = Modifier.fillMaxWidth()
        ) {
            Column(modifier = Modifier.padding(16.dp)) {
                Row(
                    modifier = Modifier.fillMaxWidth(),
                    horizontalArrangement = Arrangement.SpaceBetween
                ) {
                    Text("Product price:")
                    Text(
                      "${state.baseTotal} PLN",
                      fontWeight = FontWeight.Bold
                    )
                }

                // Row: discount
                if (state.discountApplied) {
                    Row(
                        modifier = Modifier.fillMaxWidth(),
                        horizontalArrangement = Arrangement.SpaceBetween
                    ) {
                        Text("Discount (PROMO20):")
                        Text(
                          "-20%",
                          fontWeight = FontWeight.Bold
                        )
                    }
                }

                Divider(modifier = Modifier.padding(vertical = 8.dp))

                // Row: final total
                Row(
                    modifier = Modifier.fillMaxWidth(),
                    horizontalArrangement = Arrangement.SpaceBetween
                ) {
                    Text("To pay:")
                    Text(
                        "${state.finalPrice} PLN",
                    )
                }
            }
        }

        Spacer(modifier = Modifier.height(24.dp))

        // Text field for entering the code
        OutlinedTextField(
            value = state.currentCode,
            onValueChange = { viewModel.onCodeChanged(it) },
            label = { Text("Discount code") },
            placeholder = { Text("Enter: PROMO20") },
            singleLine = true,
            modifier = Modifier.fillMaxWidth(),
            isError = state.currentCode.isNotEmpty() && !state.discountApplied,
            supportingText = {
                if (state.currentCode.isNotEmpty() && !state.discountApplied) {
                    Text("Invalid code")
                } else if (state.discountApplied) {
                    Text("Code accepted!", color = Color(0xFF2E7D32))
                }
            }
        )
    }
}
In the previous chapters we used streams (Flow) to transfer data. A stream worked like radio: a broadcasting station emitted a signal, and everyone who tuned in their receiver (collect) received the same data.
But what if we need precise one-to-one communication? Imagine a factory: one machine produces screws, and another machine packages them. Every screw produced by machine A must reach machine B. We do not want a screw to get lost, and we do not want it to end up in two packages at once. For such tasks, Kotlin provides a separate synchronization primitive: Channels.
A Channel is conceptually a conveyor belt connecting two coroutines.
- Sender (Producer): Puts data into one end of the pipe.
- Receiver (Consumer): Takes data out from the other end.


Channel.The key feature of channels is that they are used not only for transferring data, but also for synchronizing coroutine work. If the pipe is empty, the receiver waits. If the pipe is full (for buffered channels), the sender waits.
Channel vs Flow (SharedFlow)
The difference is fundamental and concerns the data-distribution model.
Note: A channel may have many receivers, but then they work like competing workers: each element is handled by only one of them. In SharedFlow, every worker would receive a copy of every task.
- Use StateFlow/SharedFlow when data should reach the UI layer (View). The UI usually only observes state and does not consume it permanently.
- Use Channel when you implement a producer-consumer mechanism inside business logic, for example a queue of files to upload to a server.
Basic API: send() and receive()
Unlike Flow, which we define declaratively, channel handling resembles a traditional queue, but with one key difference: it is asynchronous.
The Channel<T> interface implements two smaller interfaces:
SendChannel<T>- allows only sending data and closing the channel.ReceiveChannel<T>- allows only receiving data.
This lets us pass only the ReceiveChannel interface to the receiver, ensuring that it cannot accidentally send anything or close the channel. The two main methods for working with a channel are send(element) and receive(). Both are suspending functions (suspend).
- receive() suspends when the channel is empty.
- send() suspends when the channel is full.
The consumer approaches the conveyor belt. If there is no package there, it does not block the thread (it does not stand idle). The coroutine suspends (goes on a break) and is resumed only when the Sender puts something into the channel.
If the conveyor belt has limited capacity (discussed in section 7.4) and is clogged, the Sender cannot put a new package on it. The coroutine suspends and waits until the Consumer removes something from the belt, making space.
val channel = Channel<Int>()

// COROUTINE 1: Producer
launch {
    for (x in 1..5) {
        // If the receiver is not ready, send() suspends this coroutine
        channel.send(x * x)
        delay(100)
    }
    // Important: signal that there will be no more data
    channel.close()
}

// COROUTINE 2: Consumer
launch {
    // The for loop finishes automatically
    // when the channel is closed
    for (y in channel) {
        println("Received: $y")
    }
    println("Channel closed, work finished.")
}
A channel is conceptually open as long as we do not close it. Unlike Flow, which finishes naturally after executing its code block, a channel can run forever.
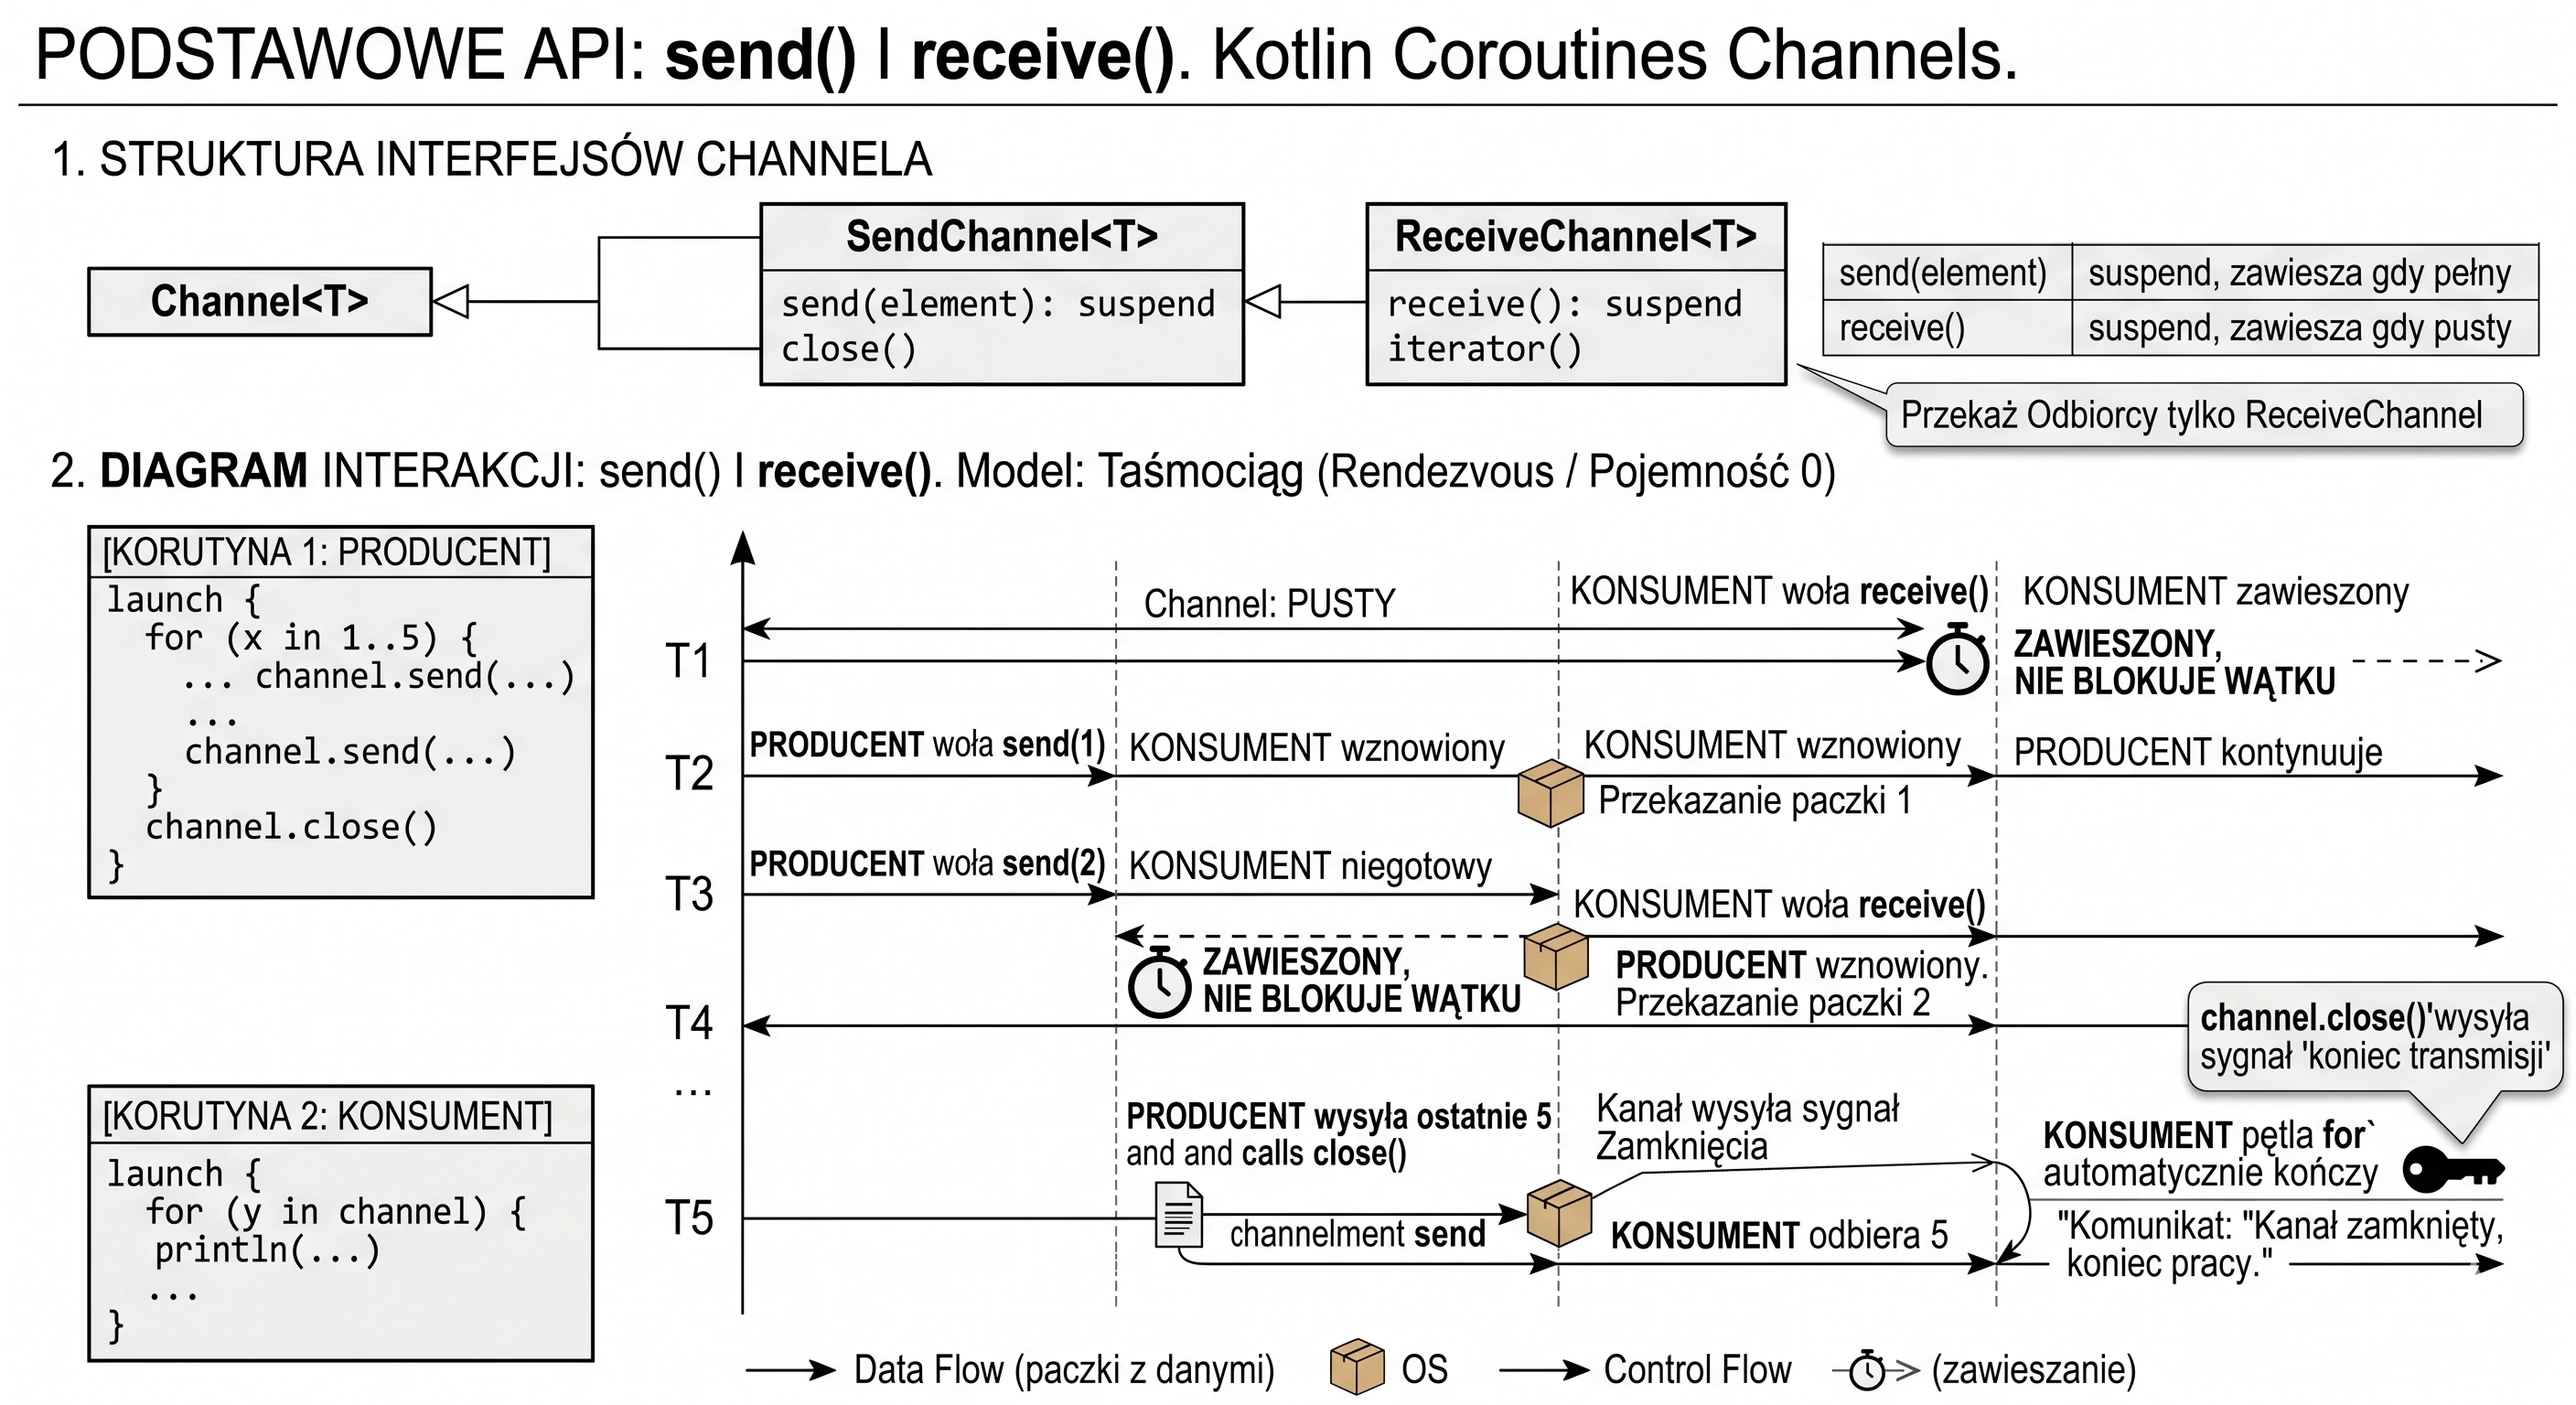

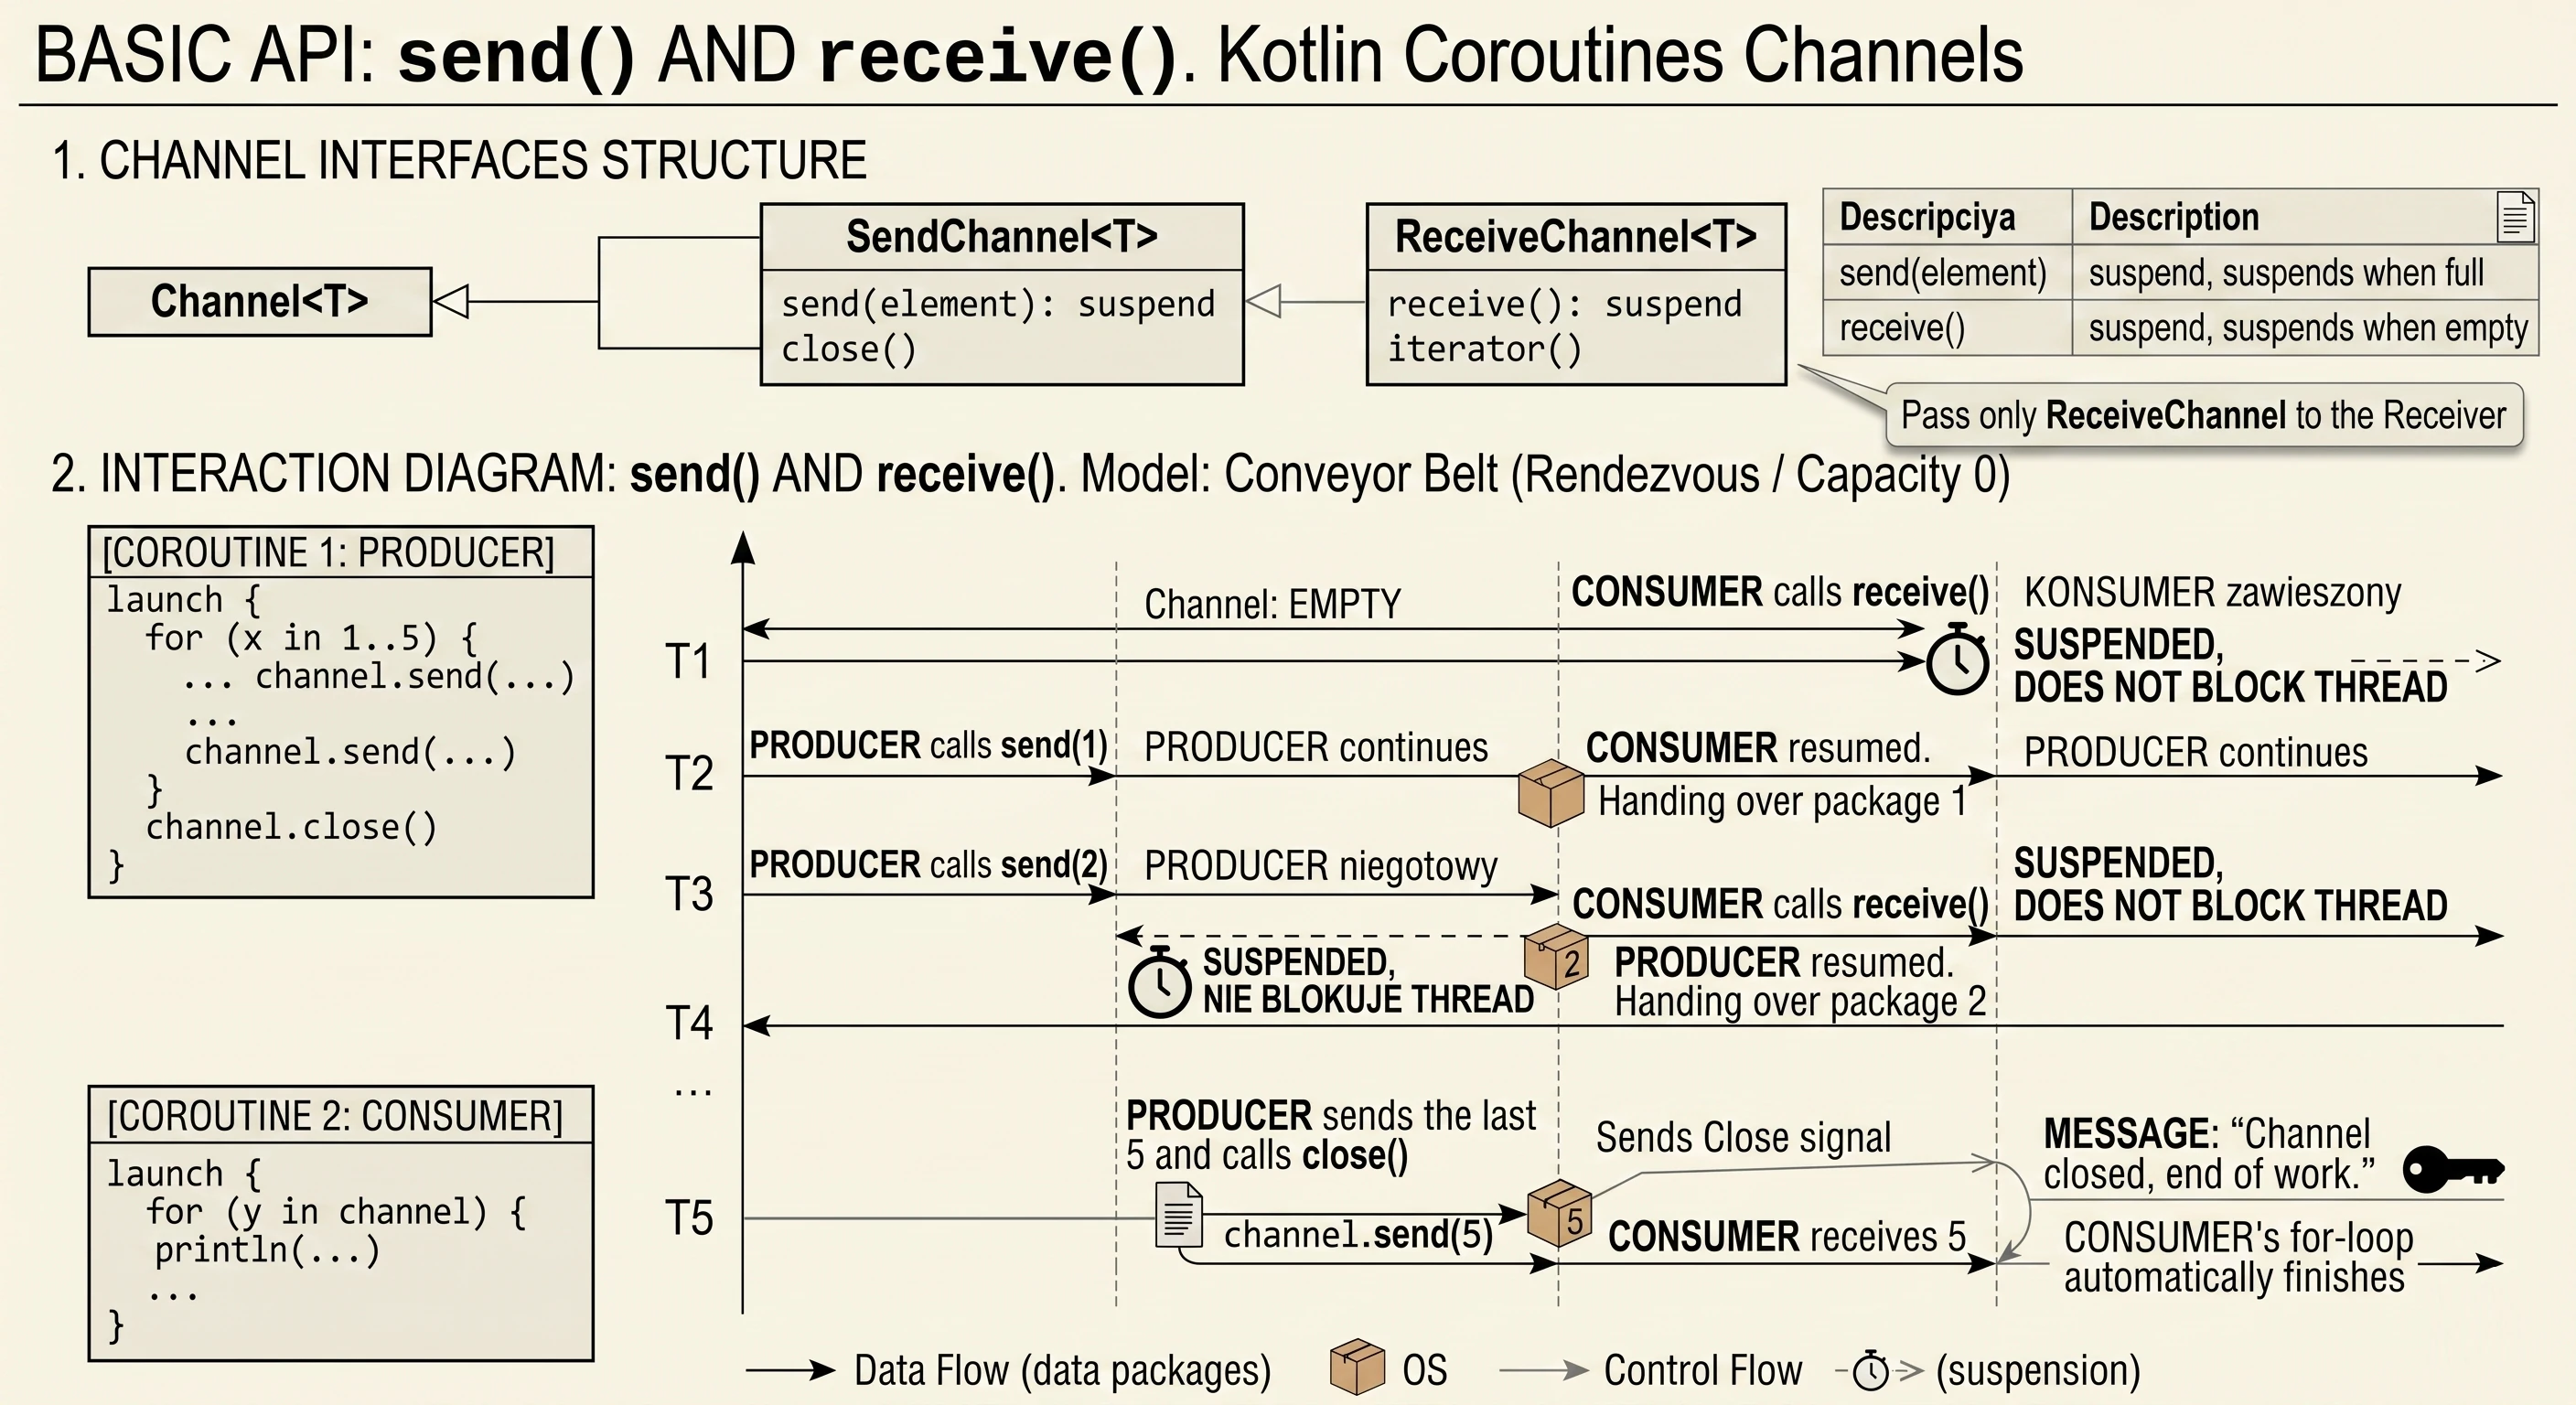
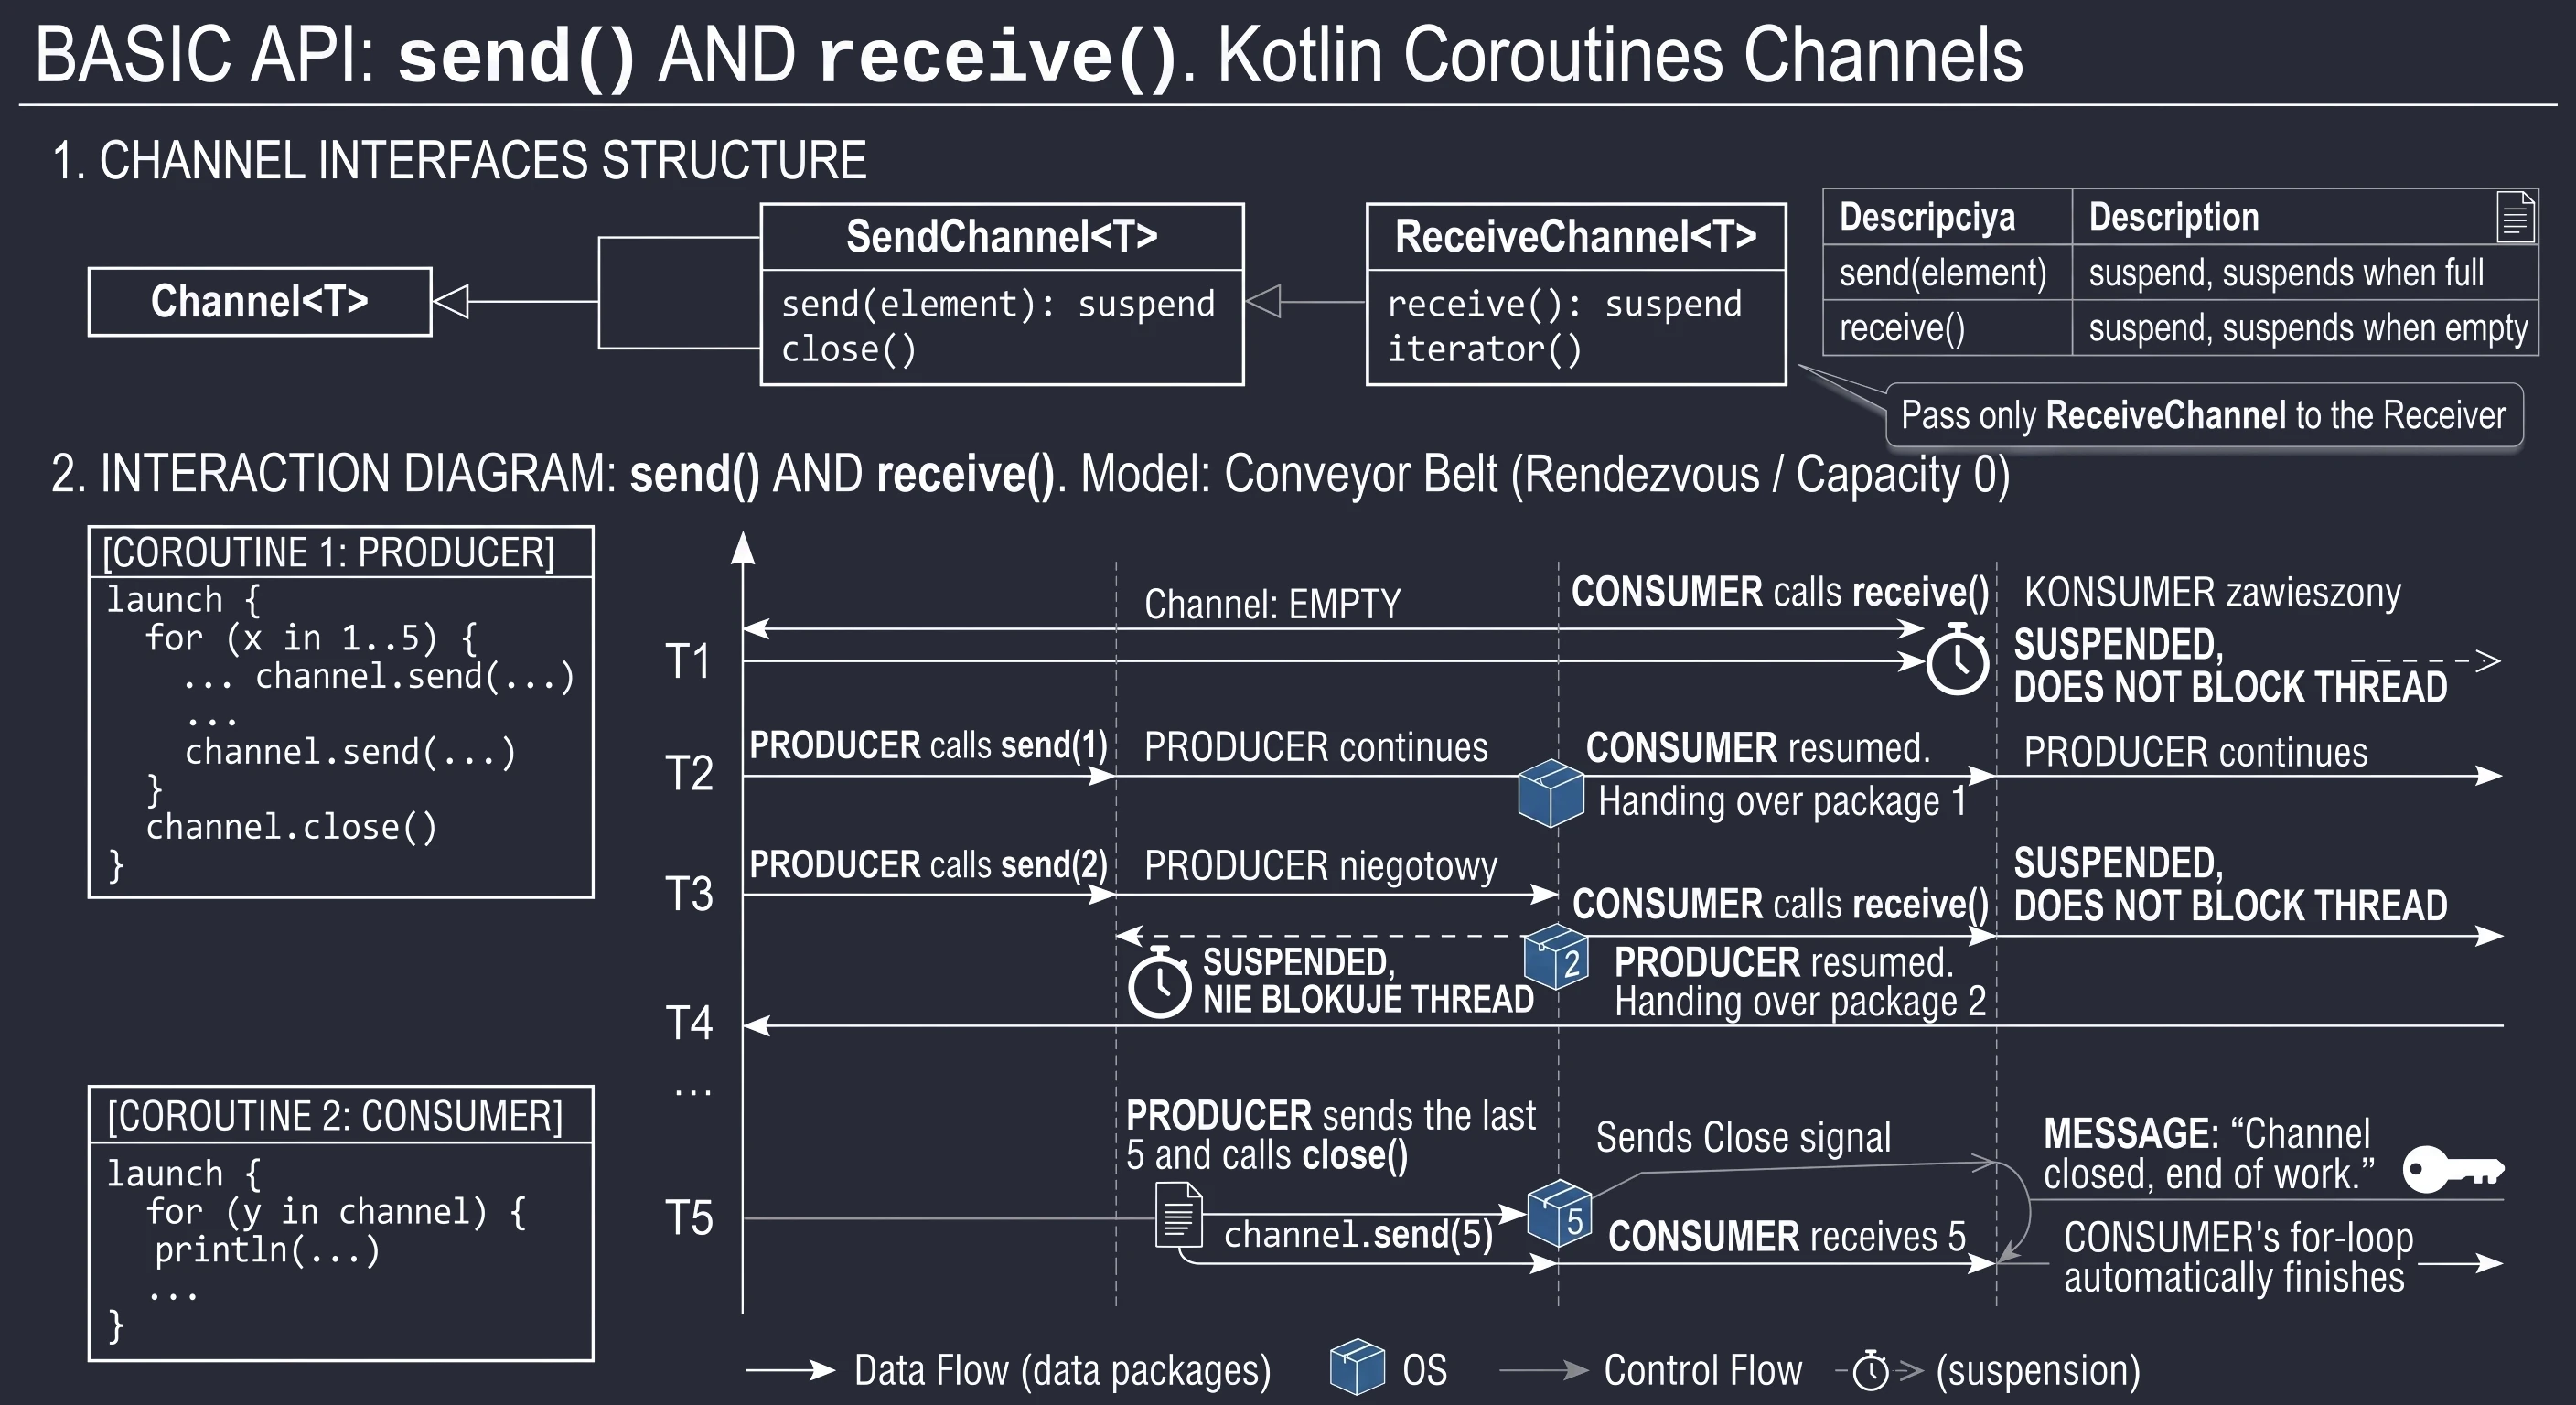
The close() method sends a special end of transmission signal.
- Attempting to send (
send) to a closed channel throws aClosedSendChannelException. - Attempting to receive (
receive) from a closed channel (when the buffer is empty) throws aClosedReceiveChannelException.
More often, you will see for (item in channel), which automatically handles channel closing and safely exits the loop.
Channel types (buffering)
The Channel class constructor accepts an optional capacity parameter. It determines when the send() function suspends the sender. Choosing the right buffer type is crucial for managing data flow.
Rendezvous (default)
capacity = Channel.RENDEZVOUS (or 0).
This is the default and most restrictive channel type. It has no buffer.
- Behavior: Sender and Receiver must meet (French: rendezvous) at the same moment.
- Runtime behavior:
send()suspends until the other side callsreceive(), and vice versa. - Metaphor: Passing a baton in a relay race. Runner A cannot let go of the baton until runner B catches it.
This is an ideal solution for strict synchronization between two threads.
Buffered
capacity = positive number (for example 10).
The channel has a fixed-size queue (ArrayChannel).
- Behavior: The sender can send as many elements as fit in the buffer without waiting for the receiver.
- Runtime behavior:
send()suspends only when the buffer is full. - Metaphor: A conveyor belt in a factory. The producing machine can work faster for a while, filling the belt, even if the packaging machine temporarily stops.
Conflated
capacity = Channel.CONFLATED.
This is a specific channel with capacity 1, which never suspends the sender.
- Behavior: If the receiver cannot keep up, old elements are dropped, and only the newest one remains in the channel.
- Runtime behavior:
send()never suspends. - Metaphor: A currency-exchange board. We are not interested in the history of changes from the last 5 minutes; we only want the current price.
Unlimited
capacity = Channel.UNLIMITED.
A channel with a buffer based on a linked list (LinkedList), which grows without limit.
- Behavior: Accepts everything.
- Runtime behavior:
send()never suspends, unless RAM runs out. - Warning: Using this channel is risky. If the sender is faster than the receiver, the program will eventually throw an
OutOfMemoryError.
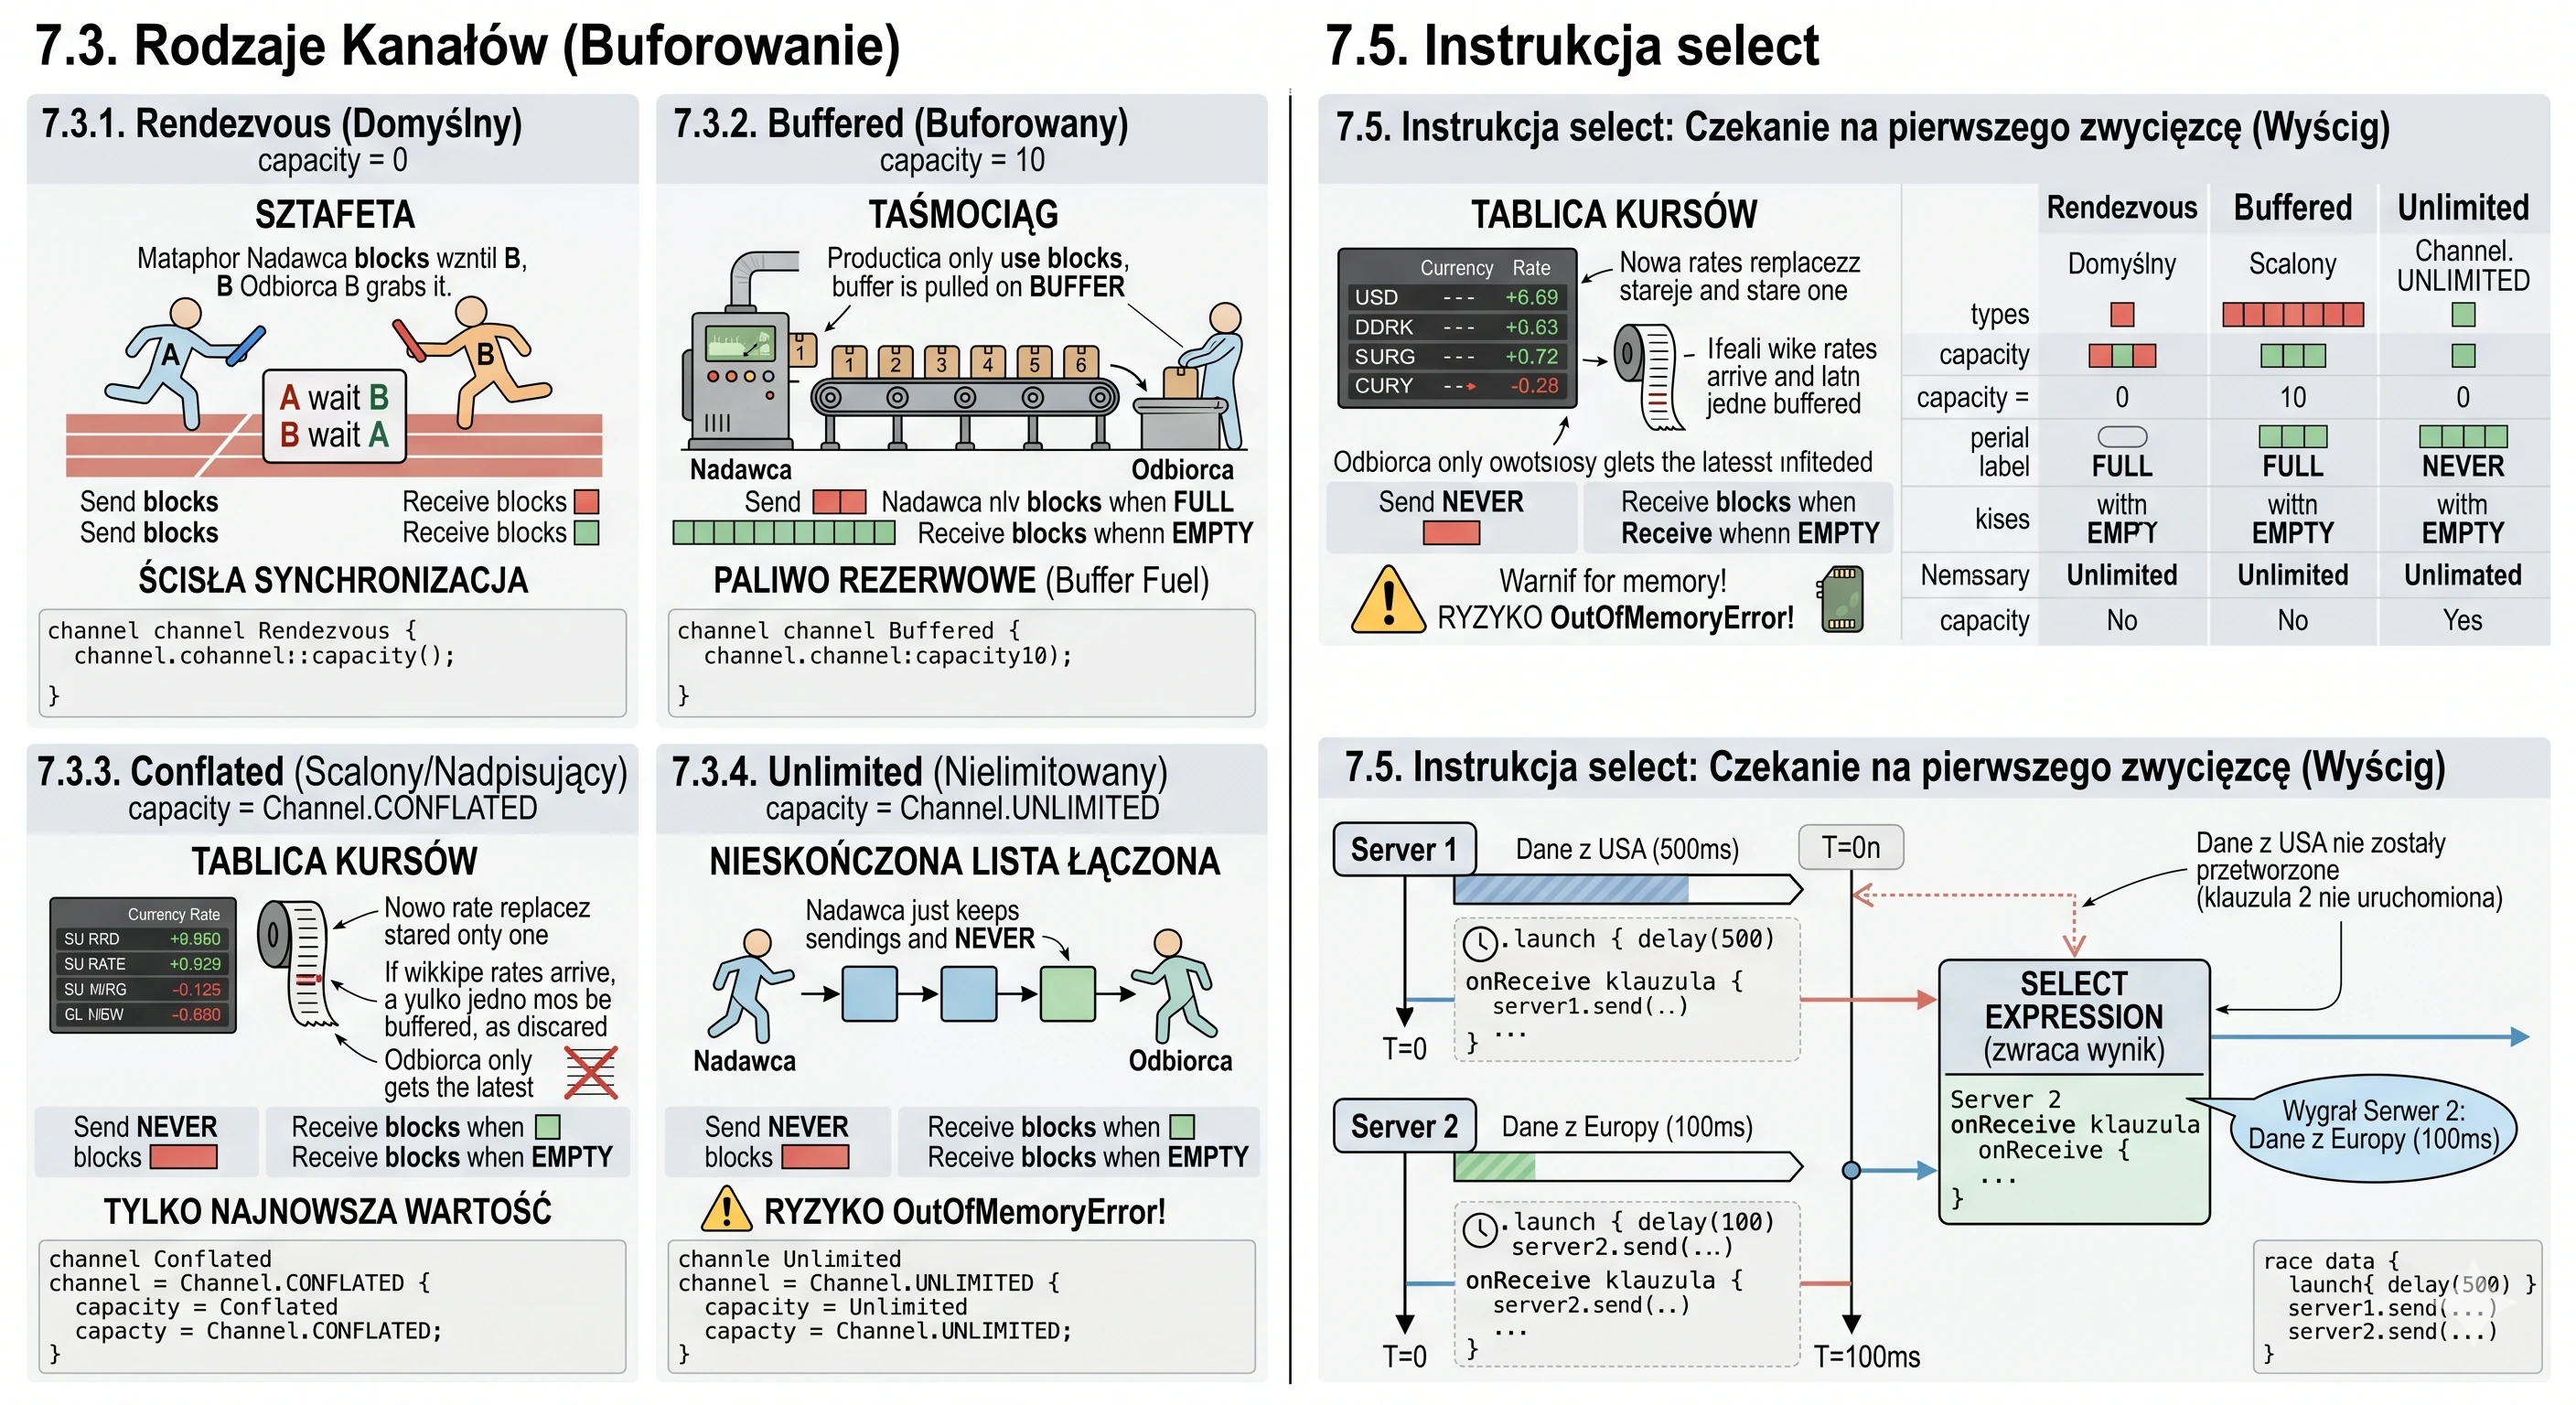
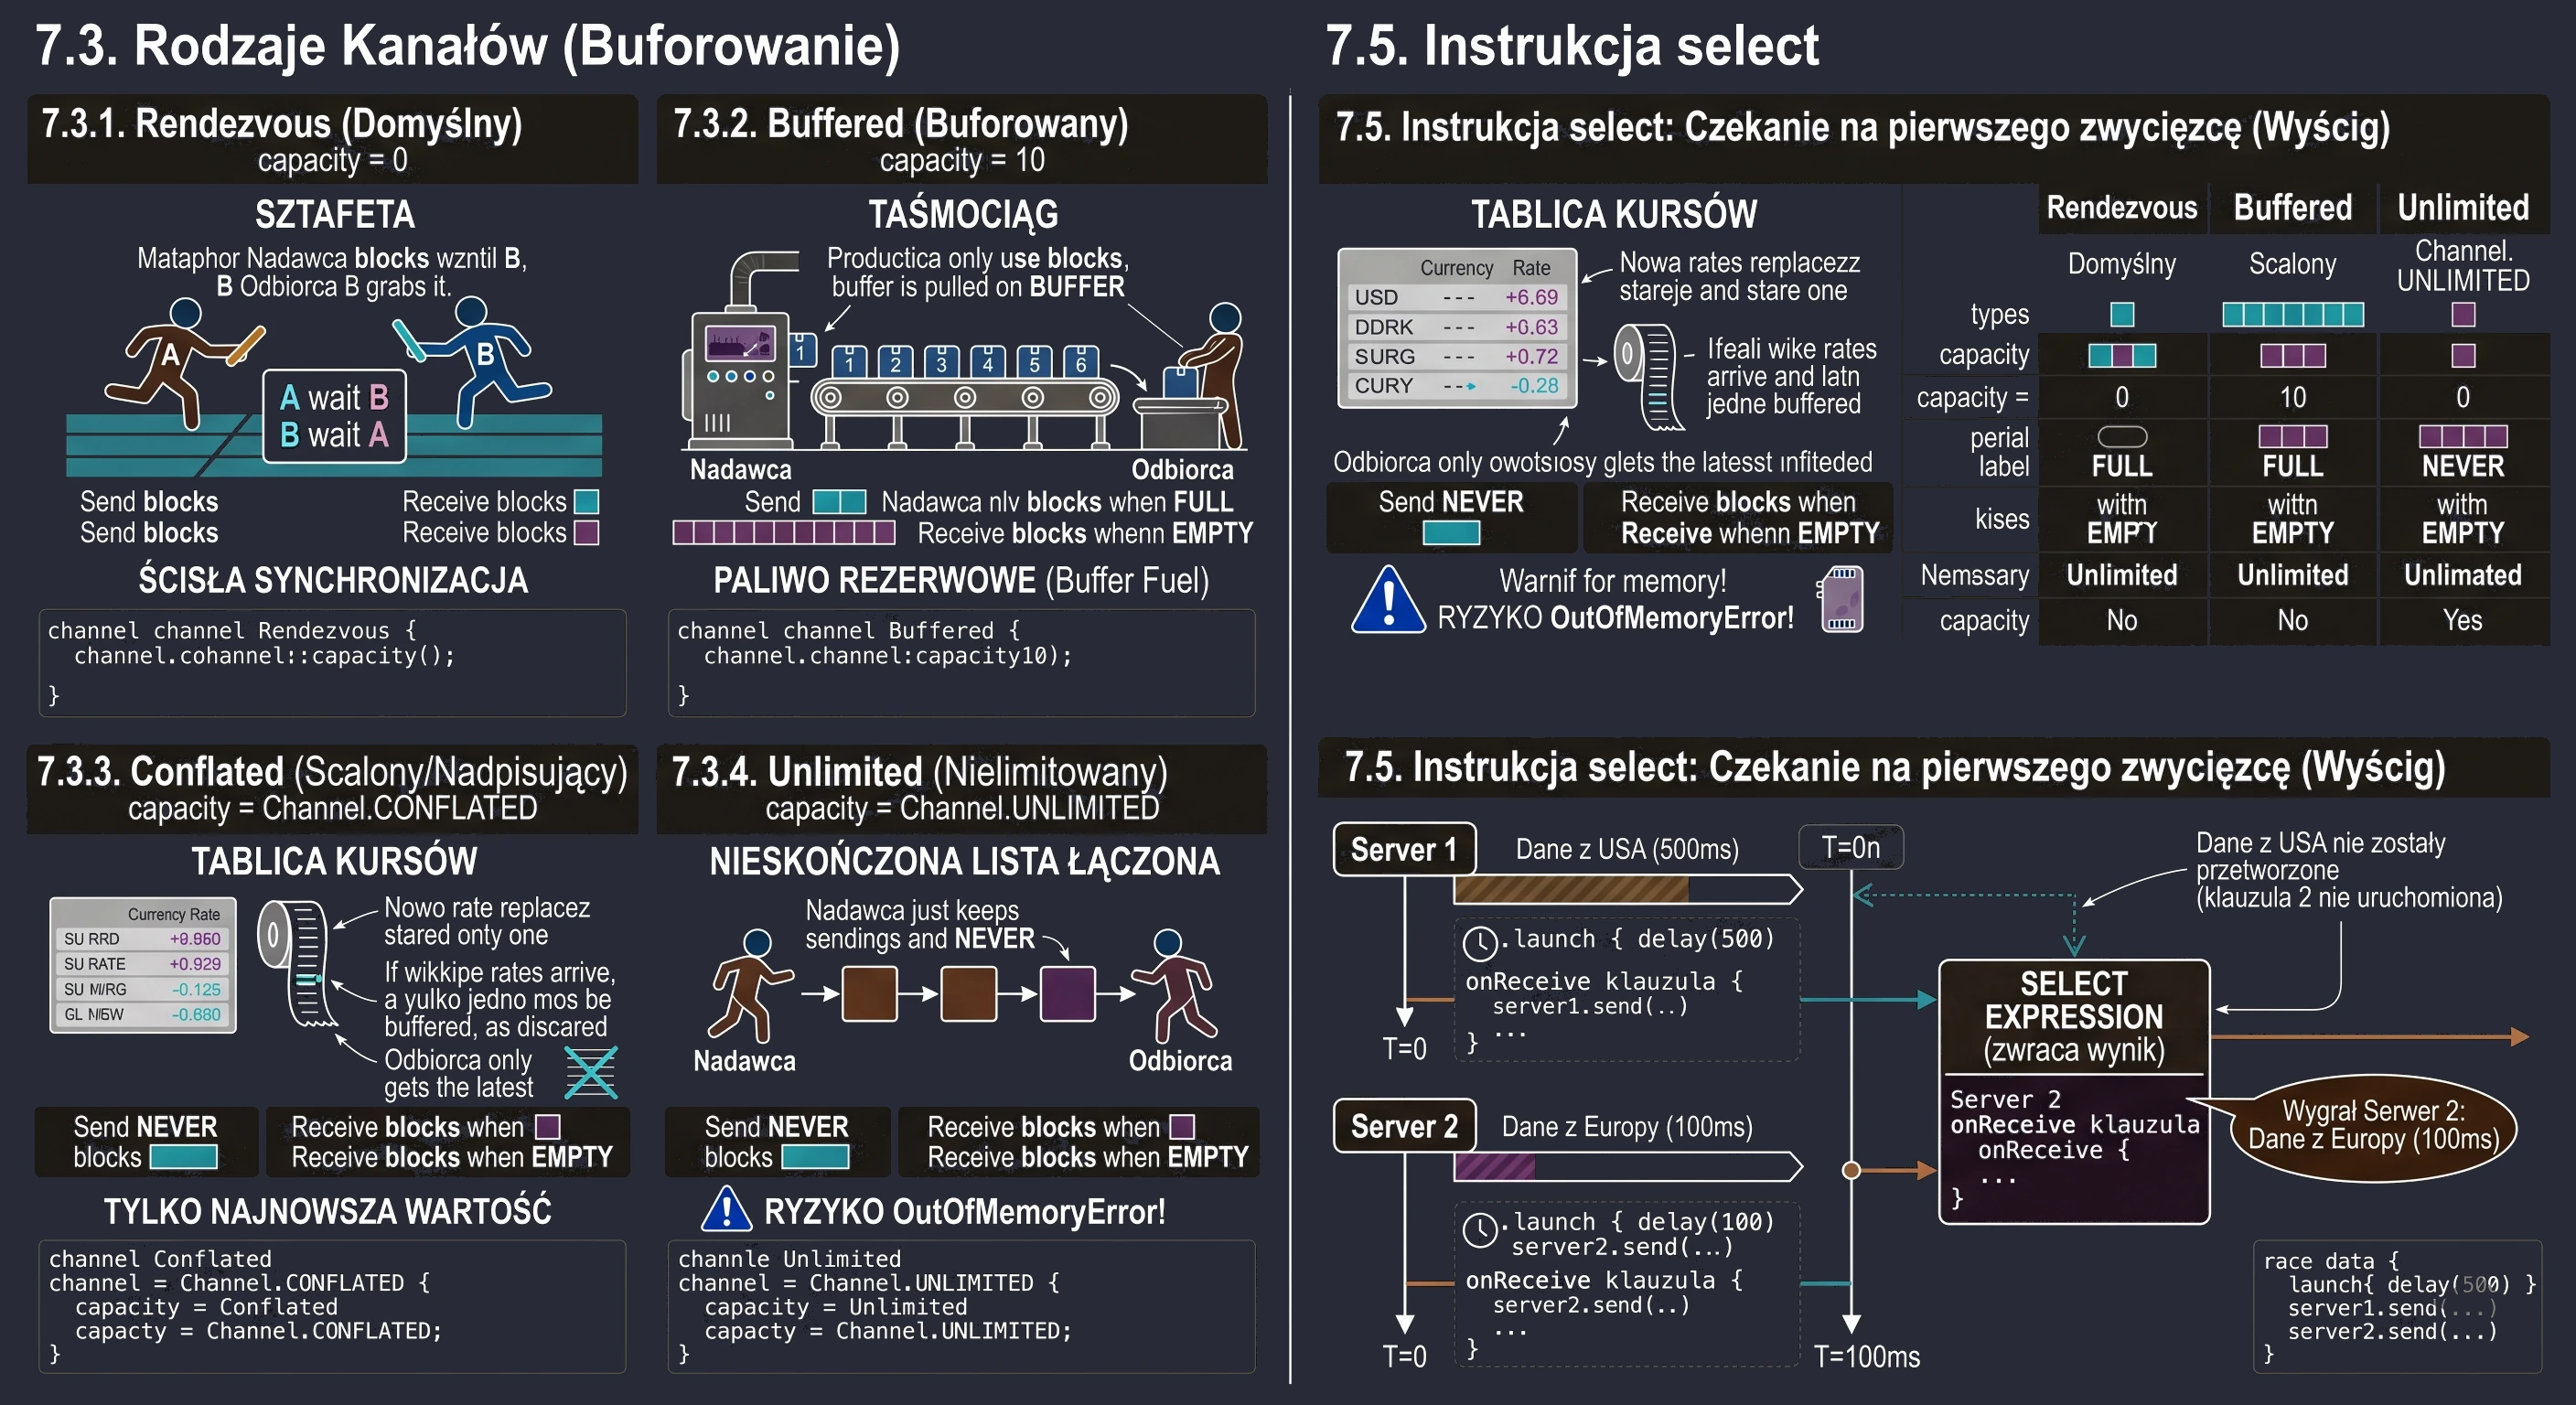
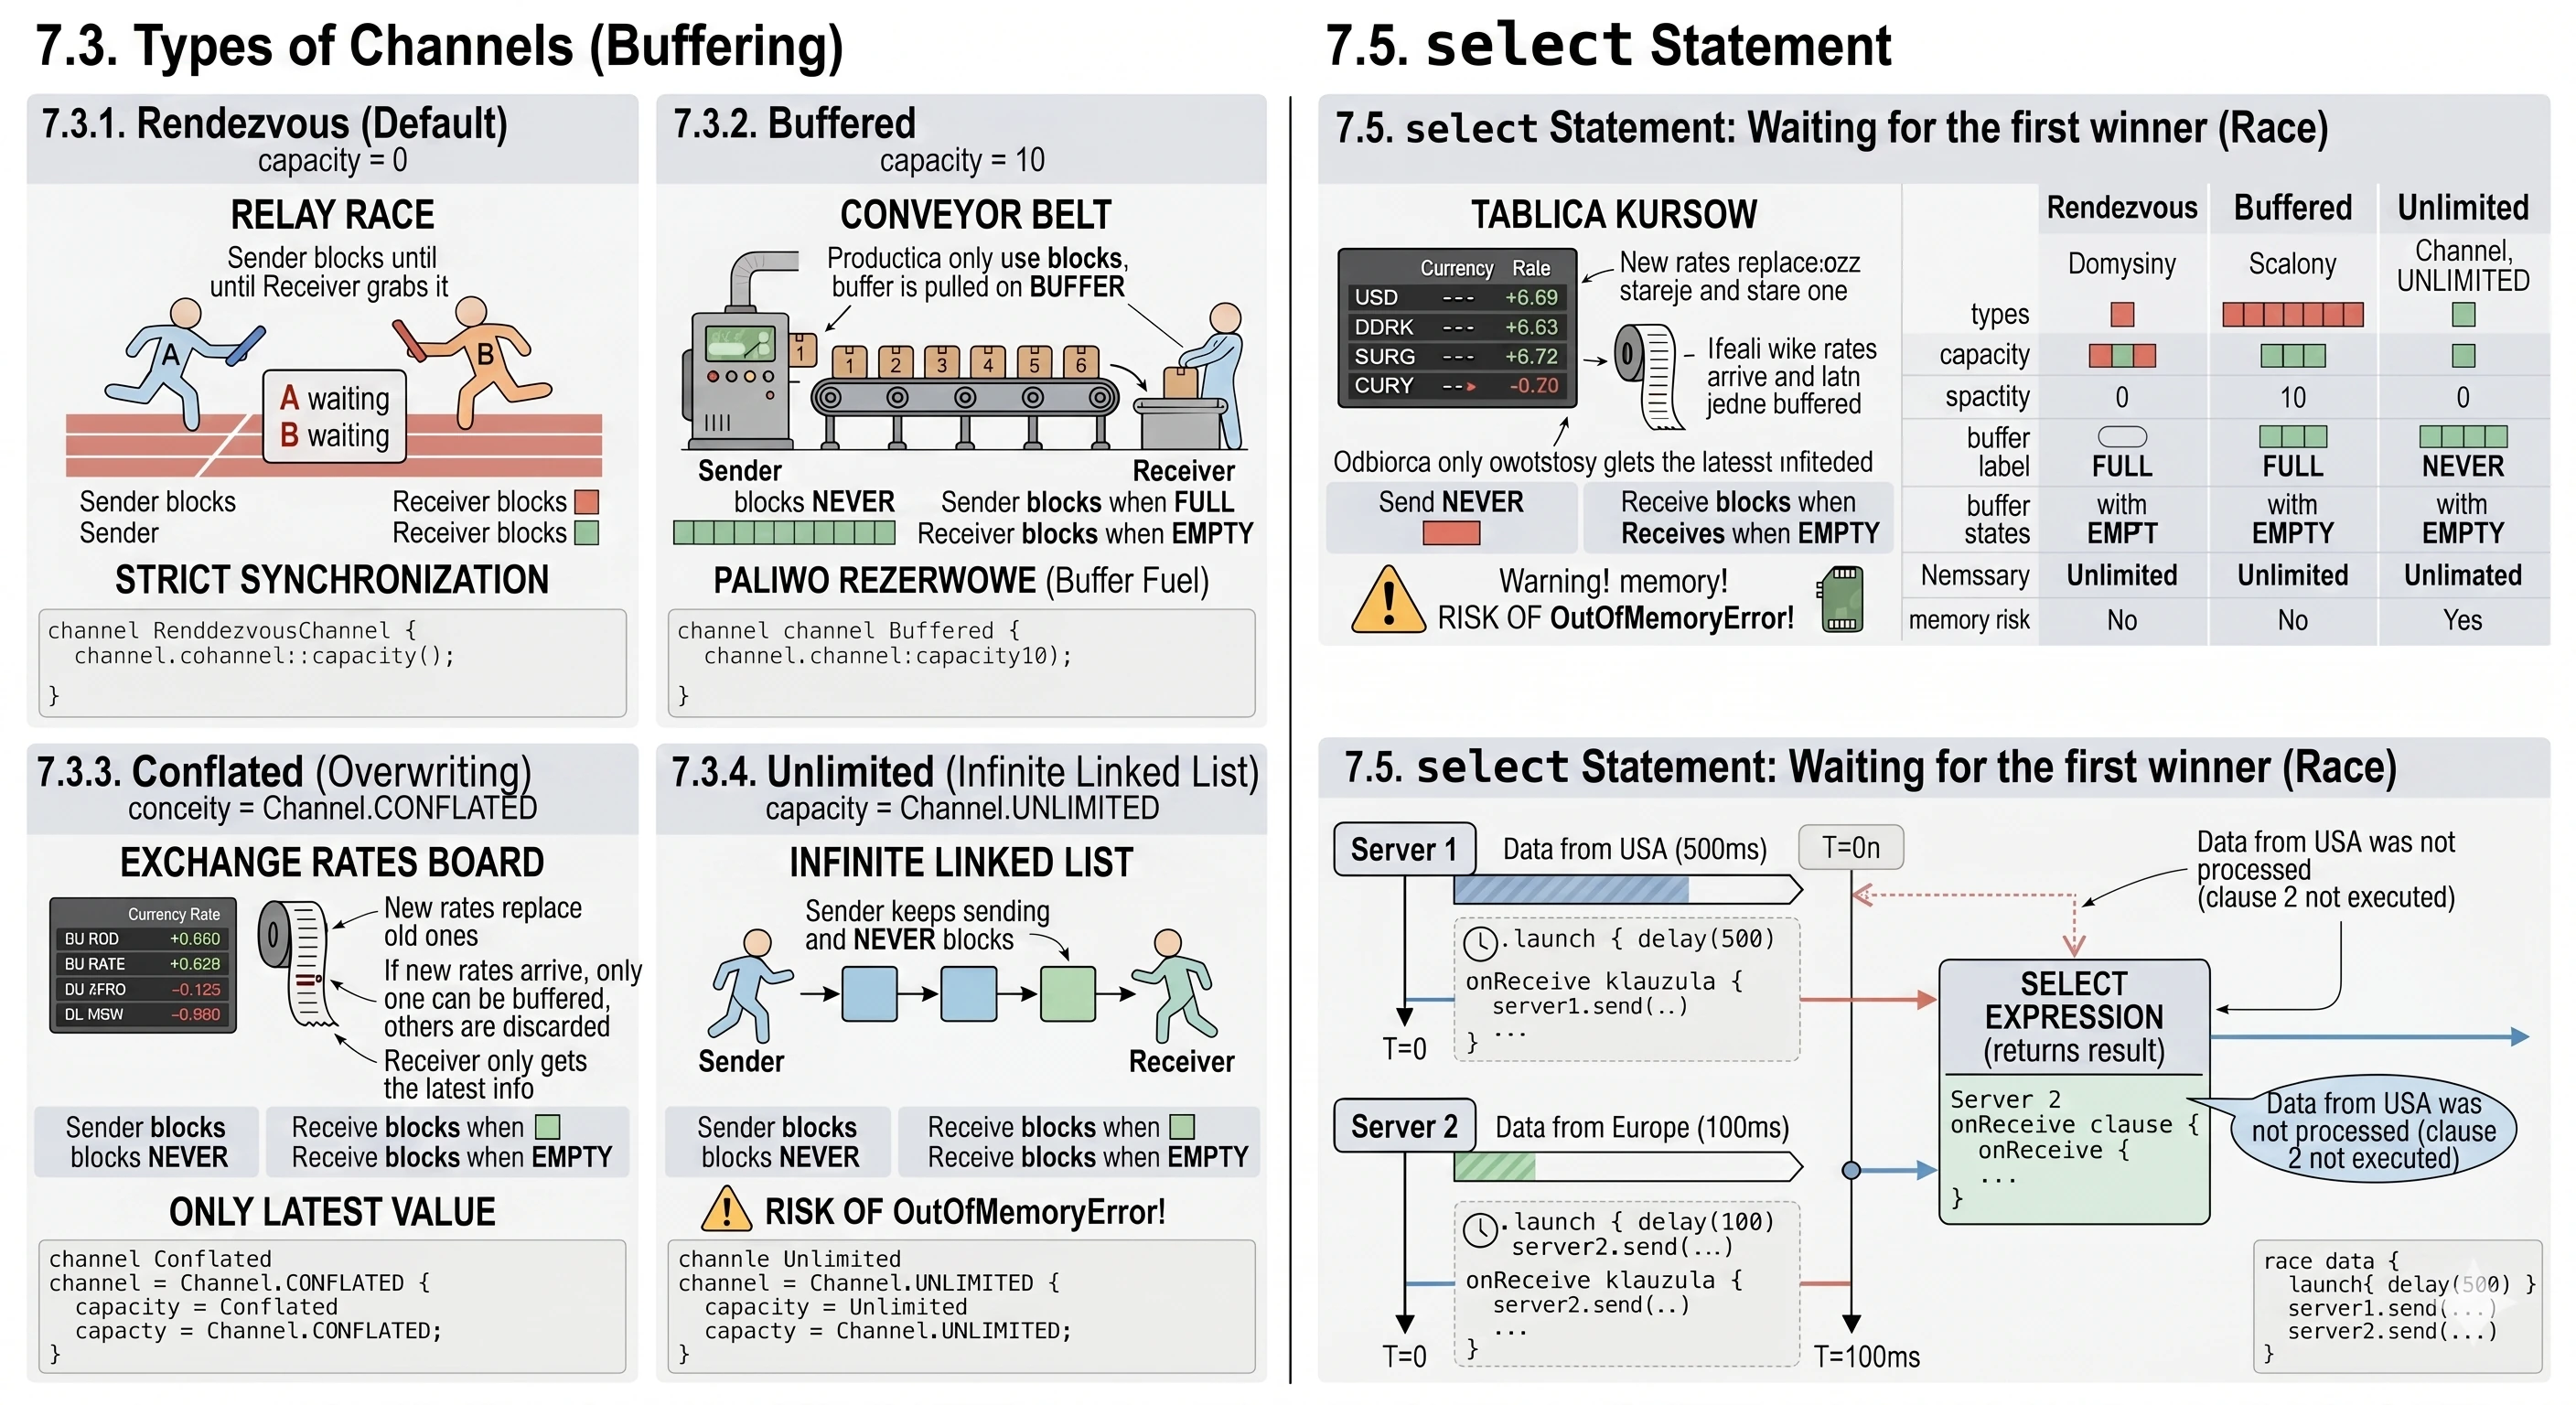
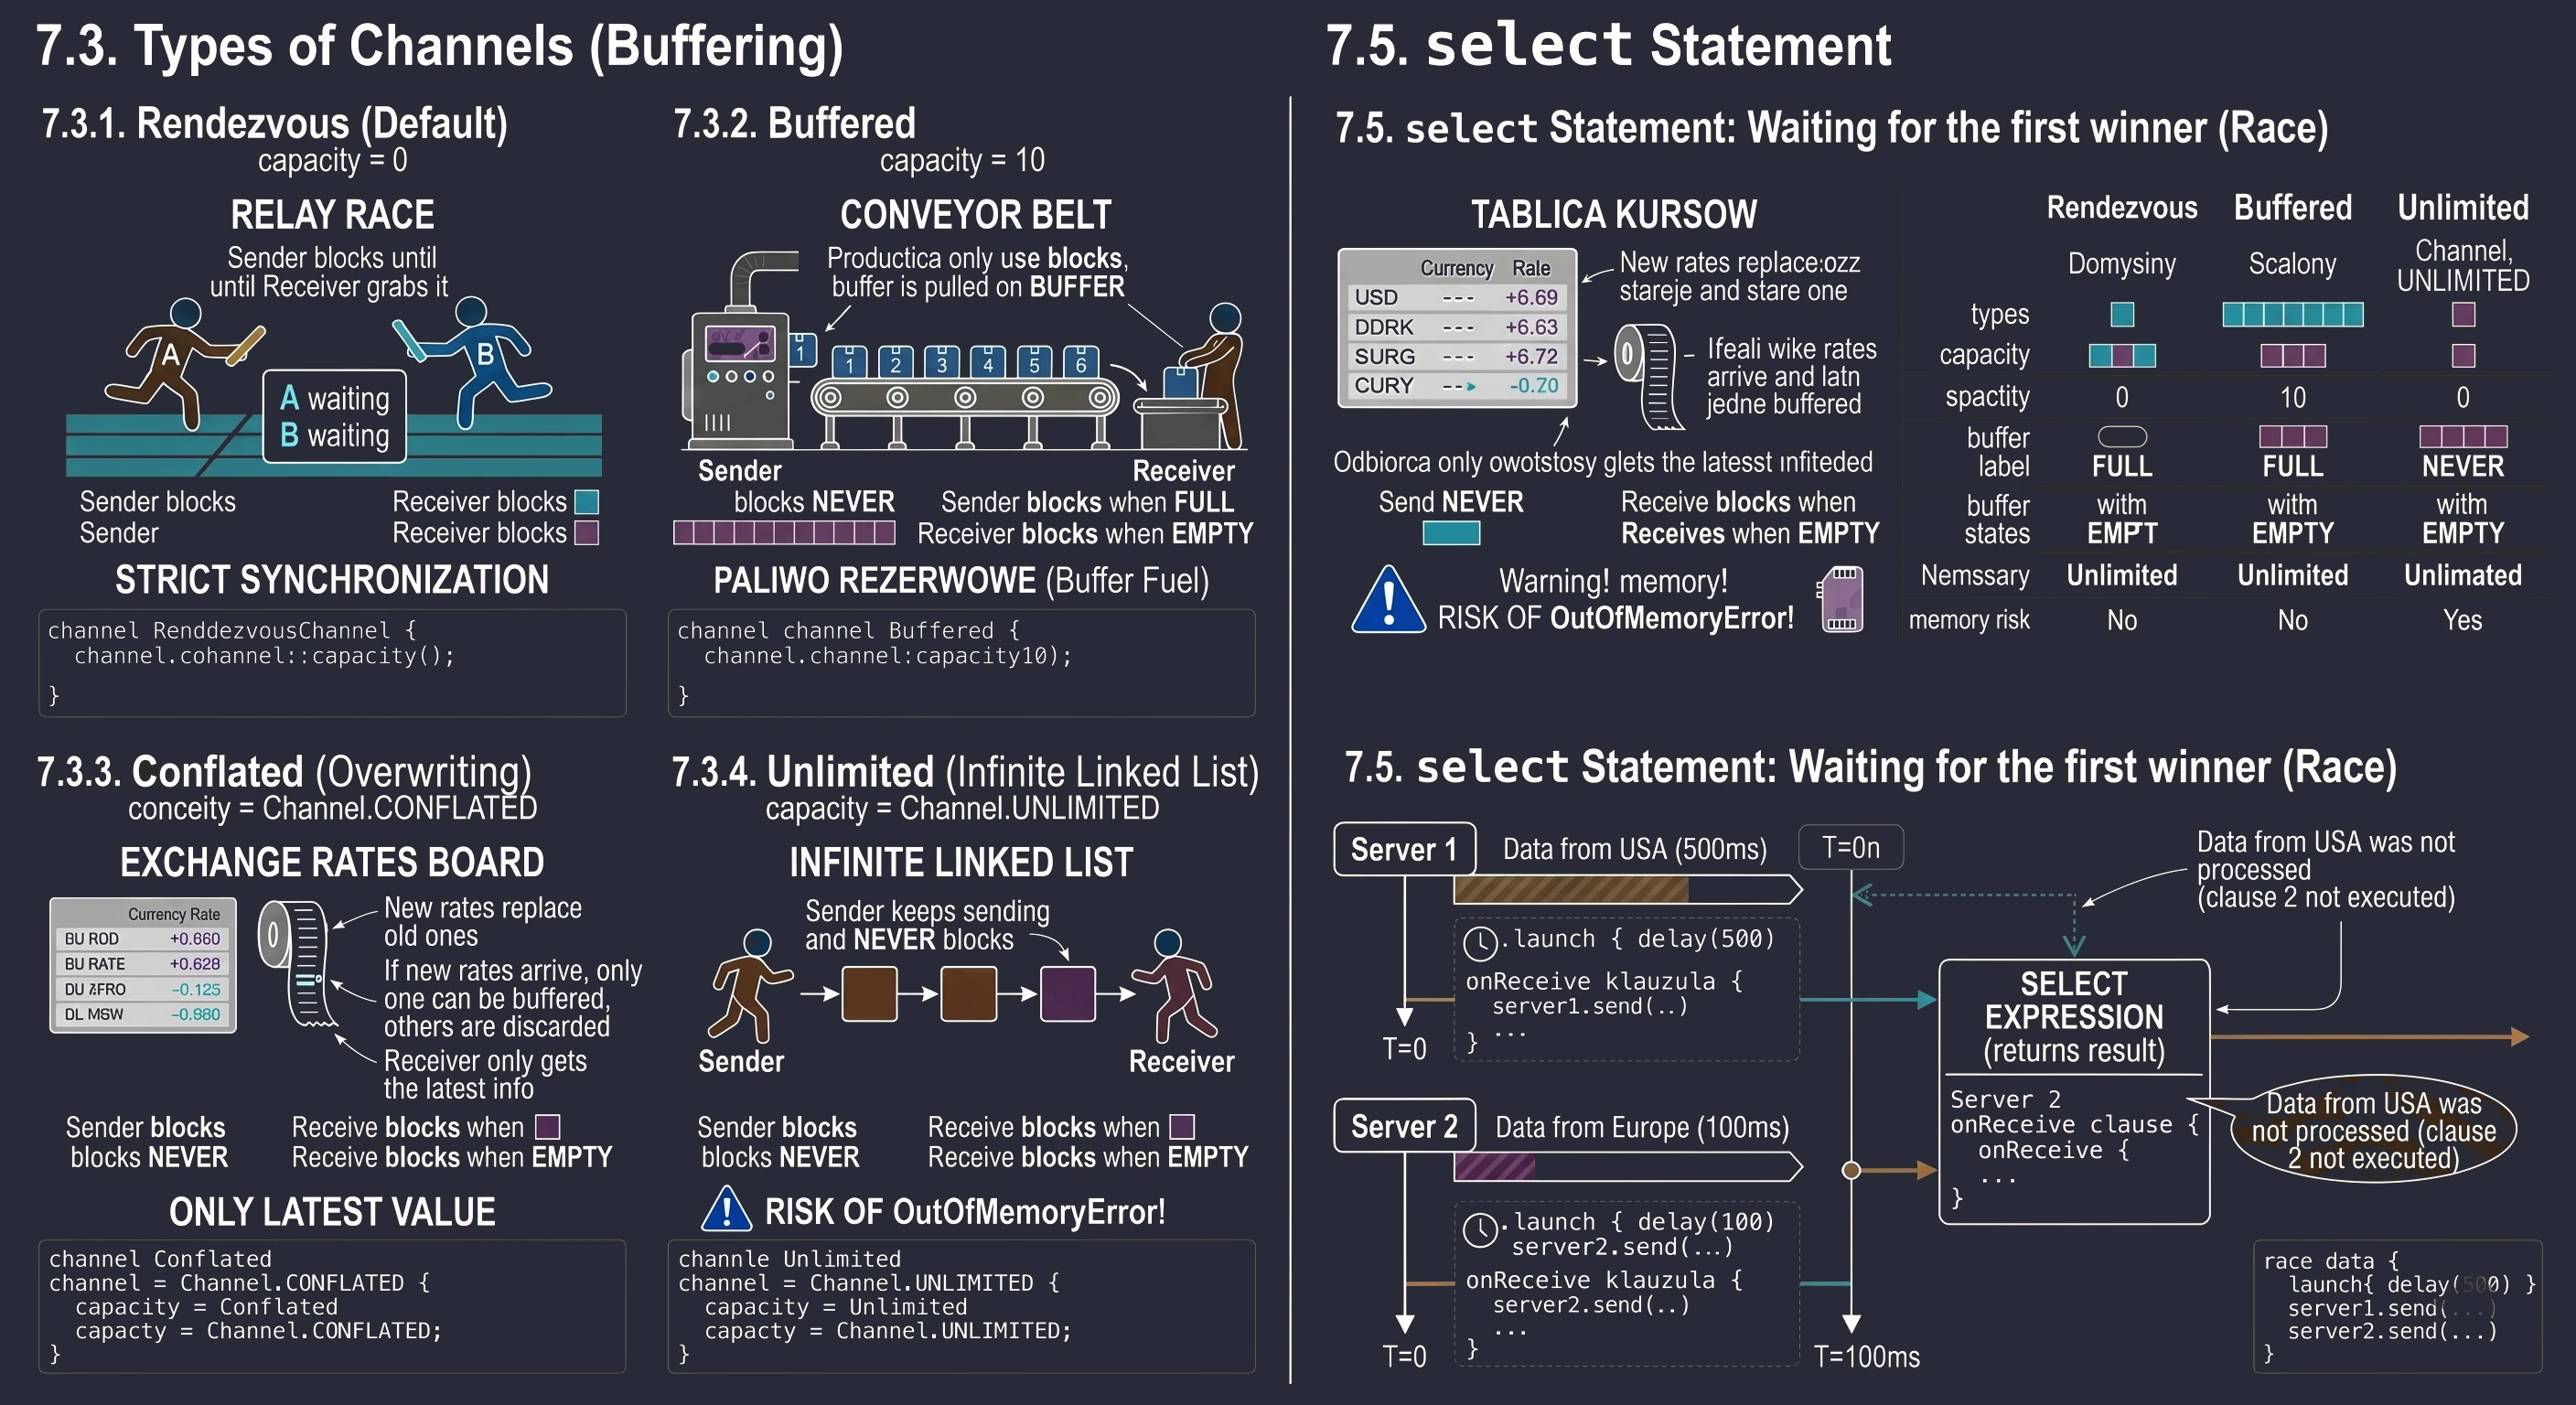
Configuration example
// 1. Rendezvous (default) - strict synchronization
val c1 = Channel<Int>()

// 2. Buffered - buffer for 10 elements
val c2 = Channel<Int>(10)

// 3. Conflated - only the newest value
val c3 = Channel<Int>(Channel.CONFLATED)
It is worth noting that StateFlow behaves very similarly to a Conflated channel: it keeps only the newest state. A regular Flow with a buffer behaves like a Buffered channel.
The select expression
In standard asynchronous code, using await or receive, we wait sequentially: first for result A, then for result B. We have one more option: we can process the result from whichever source responds faster using the select expression. It allows us to listen to many channels (or Deferred objects) at the same time and run the code associated only with the event that happens first.
The select<T> expression returns a result of type T. Inside the block, we define clauses such as onReceive, which say what to do if this source wins the race.
suspend fun raceData() {
    val server1 = Channel<String>()
    val server2 = Channel<String>()

    // Simulation: Server 1 is slow
    launch {
        delay(500)
        server1.send("Data from USA (500ms)")
    }

    // Simulation: Server 2 is fast
    launch {
        delay(100)
        server2.send("Data from Europe (100ms)")
    }

    // RACE: Wait for the FIRST result
    val winner = select<String> {
        // Clause 1: If server1 sends first...
        server1.onReceive { msg ->
            "Server 1 won: $msg"
        }

        // Clause 2: If server2 sends first...
        server2.onReceive { msg ->
            "Server 2 won: $msg"
        }
    }

    println(winner)
}
Practical use: timeout
The most common use of select is using onTimeout to give up waiting if an operation takes too long.
val dataChannel = Channel<String>()

val result = select<String?> {
    // Option 1: data arrived on time
    dataChannel.onReceive { it }

    // Option 2: time passed (e.g. 1 second)
    onTimeout(1000) {
        println("Too long! Cancelling.")
        null
    }
}
Example use of channels
To consolidate the knowledge about channels, let us build an online auction simulation.
Here we deal with asymmetry:
- Producers (Bidders): There are many of them. They run on different threads and at different speeds. They do not know about one another.
- Channel (auction table): The synchronization point. It guarantees that bids are processed one by one, even if they arrived in the same millisecond.
- Consumer (Auctioneer): There is one. Their task is to validate bids, for example whether the new bid is higher than the previous one, and announce the winner.
If we used a regular variable here (var currentPrice), we would need mutexes or locks to avoid race conditions. The channel takes this burden away from us: it queues access to the auctioneer.
Let us see what this looks like in code. The key element is the for loop iterating over the channel.
// Simple bid data model
data class Bid(val bidderName: String, val amount: Int)

class AuctionViewModel : ViewModel() {

    // UI state (observed by Compose)
    private val _uiState = MutableStateFlow(AuctionUiState())
    val uiState = _uiState.asStateFlow()

    // CHANNEL: The heart of synchronization.
    // We use UNLIMITED or a large capacity so we do not block bidders.
    private val bidChannel = Channel<Bid>(capacity = Channel.UNLIMITED)

    init {
        // Start the "Auctioneer" when the ViewModel is created
        startAuctioneer()
    }

    // --- CONSUMER (Auctioneer) ---
    private fun startAuctioneer() {
        viewModelScope.launch {
            // The for loop suspends when the channel is empty.
            // When bids arrive, it takes them ONE BY ONE.
            for (bid in bidChannel) {

                // Get current state
                val currentState = _uiState.value

                // Business logic: is the bid valid?
                // It is allowed to change state based on bids!
                if (bid.amount > currentState.currentPrice) {
                    val newLog = "${bid.bidderName} raises to ${bid.amount} PLN"
                    _uiState.update {
                        it.copy(
                            currentPrice = bid.amount,
                            winningBidder = bid.bidderName,
                            logs = it.logs + newLog
                        )
                    }
                } else {
                    // Bid too low - ignore it or log an error
                    val errorLog = "Rejected ${bid.amount} from ${bid.bidderName} (too low)"
                     _uiState.update { it.copy(logs = it.logs + errorLog) }
                }

                // Simulate processing time (e.g. the auctioneer calls out the price)
                delay(50)
            }
        }
    }

    // --- PRODUCER (Bidder) ---
    fun placeBid(name: String, amount: Int) {
        viewModelScope.launch {
            // This is an atomic operation.
            bidChannel.send(Bid(name, amount))
        }
    }

    // Cleanup
    override fun onCleared() {
        super.onCleared()
        bidChannel.close() // Close the channel
    }
}
Complete implementation examples
Example 1: auction system
In this example, the ViewModel plays the role of the "Auctioneer". It has one Channel into which bids flow from different buttons simulating different users. Thanks to the for loop over the channel, bids are processed sequentially, which eliminates the risk of concurrency errors (race conditions) when updating the price.
// --- 1. Data model ---
data class Bid(val bidderName: String, val amount: Int)

data class AuctionUiState(
    val currentPrice: Int = 100,
    val winningBidder: String = "None",
    val recentLogs: List<String> = emptyList(), // Log of recent events
    val isAuctionActive: Boolean = true
)

// --- 2. ViewModel (Auctioneer) ---
class AuctionViewModel : ViewModel() {
    private val _uiState = MutableStateFlow(AuctionUiState())
    val uiState = _uiState.asStateFlow()

    // CHANNEL: Funnel into which bids fall from different UI threads
    private val bidChannel = Channel<Bid>(capacity = Channel.UNLIMITED)

    init {
        startAuctioneer()
    }

    private fun startAuctioneer() {
        viewModelScope.launch {
            // CONSUMER: This loop runs as long as the channel is open.
            // It guarantees that bids are processed one after another.
            for (bid in bidChannel) {
                val currentState = _uiState.value

                // Bid validation (business logic)
                if (bid.amount > currentState.currentPrice) {
                    _uiState.update {
                        it.copy(
                            currentPrice = bid.amount,
                            winningBidder = bid.bidderName,
                            recentLogs = (
                              it.recentLogs +
                                "${bid.bidderName} raises to ${bid.amount} PLN"
                            ).takeLast(5)
                        )
                    }
                } else {
                    _uiState.update {
                        it.copy(
                            recentLogs = (
                              it.recentLogs +
                                "Rejected ${bid.amount} from ${bid.bidderName} (too low)"
                            ).takeLast(5)
                        )
                    }
                }
                // Simulate auctioneer reaction time
                delay(100)
            }
        }
    }

    // PRODUCER: Function called from UI (Button)
    fun placeBid(name: String) {
        if (!_uiState.value.isAuctionActive) return

        // Put the bid into the channel
        val randomBid = _uiState.value.currentPrice + Random.nextInt(10, 50)
        viewModelScope.launch {
            bidChannel.send(Bid(name, randomBid))
        }
    }

    fun stopAuction() {
        _uiState.update {
          it.copy(
            isAuctionActive = false,
            recentLogs = it.recentLogs + "AUCTION FINISHED")
        }
        bidChannel.close() // Close the channel -
                           // the loop in 'startAuctioneer' will finish
    }
}

// --- 3. View (Compose) ---
@Composable
fun AuctionScreen(viewModel: AuctionViewModel = viewModel()) {
    val state by viewModel.uiState.collectAsStateWithLifecycle()

    Column(modifier = Modifier.padding(16.dp)) {
        Text("Current price: ${state.currentPrice} PLN")
        Text("Winning: ${state.winningBidder}")

        Spacer(Modifier.height(16.dp))

        // Buttons simulating different players
        Row(horizontalArrangement = Arrangement.spacedBy(8.dp)) {
            Button(
              onClick = { viewModel.placeBid("Anna") },
              enabled = state.isAuctionActive
            ) { Text("Anna bids") }
            Button(
              onClick = { viewModel.placeBid("Tom") },
              enabled = state.isAuctionActive
            ) { Text("Tom bids") }
        }

        Button(
            onClick = { viewModel.stopAuction() },
            modifier = Modifier.padding(top = 8.dp)
        ) { Text("Finish auction") }

        Spacer(Modifier.height(16.dp))
        Text("Auction log:")
        LazyColumn {
            items(state.recentLogs) { log -> Text(log) }
        }
    }
}
Example 2: server race with select
This example shows how to use the select expression inside a ViewModel. The user clicks Search offer, and the ViewModel sends requests to two sources in parallel. The one that responds first wins.
// --- 1. ViewModel ---
class RaceViewModel : ViewModel() {
    var resultText by mutableStateOf("Press start to search")
        private set
    var isSearching by mutableStateOf(false)
        private set

    @OptIn(ExperimentalCoroutinesApi::class)
    fun startRace() {
        viewModelScope.launch {
            isSearching = true
            resultText = "Searching for the fastest offer..."

            // Create two channels simulating two servers
            val fastServer = Channel<String>()
            val slowServer = Channel<String>()

            // Start data "producers"
            launch {
                delay(Random.nextLong(200, 1500)) // Random time
                fastServer.send("Offer from Amazon (USA)")
            }
            launch {
                delay(Random.nextLong(200, 1500)) // Random time
                slowServer.send("Offer from Allegro (PL)")
            }

            // SELECT: Wait for the FIRST result
            val winner = select<String> {
                fastServer.onReceive { offer -> "FastServer won: $offer" }
                slowServer.onReceive { offer -> "SlowServer won: $offer" }

                // Timeout if both servers are too slow (e.g. > 1000ms)
                onTimeout(1000) { "Error: timeout exceeded!" }
            }

            resultText = winner
            isSearching = false
        }
    }
}

// --- 2. View (Compose) ---
@Composable
fun RaceScreen(viewModel: RaceViewModel = viewModel()) {
    Column(
        modifier = Modifier.fillMaxSize(),
        verticalArrangement = Arrangement.Center,
        horizontalAlignment = Alignment.CenterHorizontally
    ) {
        if (viewModel.isSearching) {
            CircularProgressIndicator()
        }

        Spacer(Modifier.height(16.dp))

        Text(viewModel.resultText)

        Spacer(Modifier.height(32.dp))

        Button(
          onClick = { viewModel.startRace() },
          enabled = !viewModel.isSearching
        ) {
            Text("Find the best offer (race)")
        }
    }
}
In the previous chapters, while discussing MVVM architecture and state management, we worked with data stored in RAM. Variables inside a ViewModel, StateFlow streams and data collections exist only as long as the application process lives.
In the Android ecosystem, there are three main categories of data storage, selected depending on the structure and volume of information:
- Files (File API): Intended for unstructured data or byte streams, such as media (photos, video), PDF documents or cache files.
- Relational databases (SQLite / Room): Intended for large sets of structured data that require complex queries, relations and transactions, for example a task list or order history. This topic will be discussed in detail in Chapter 9.
- Key-value stores (Preferences): Intended for lightweight configuration data, flags and simple settings, for example
isDarkModeEnabledorsessionToken. This is the category we focus on in the current chapter.
SharedPreferences mechanism
For many years, the standard way to store simple data in Android was the SharedPreferences library. Although it is now being replaced by newer solutions, it can still be found in many existing projects.
SharedPreferences is an API that manages an XML file stored in the application's private directory. Data is saved as pairs: Key (String) -> Value (Int, Boolean, String, Float, Long).
class SettingsManager(context: Context) {
    // Create/open the "app_settings.xml" file
    private val prefs = context.getSharedPreferences(
      "app_settings",
      Context.MODE_PRIVATE
    )

    fun saveTheme(isDark: Boolean) {
        prefs.edit()
             .putBoolean("is_dark_mode", isDark)
             .apply()
    }

    fun isDarkMode(): Boolean {
        return prefs.getBoolean("is_dark_mode", false)
    }
}
When analyzing the code above, it is worth focusing on two key elements: the role of the Context object and the file-opening mode.
The getSharedPreferences() method is not static; it must be called on a Context instance. This follows from the Android security architecture.
Each Android application runs as a separate user and has its own private, protected directory on disk. The Context object is a window into system resources and the application environment. It knows where the current application's private directory is physically located. Without it, the library would not know in which path to create or read the XML file.
The second method parameter is the mode flag. It defines filesystem permissions assigned to the created XML file.
Context.MODE_PRIVATE(0): This means that the created file can be read only by the application that created it. This guarantees that other applications installed on the phone cannot inspect the data stored there.
Despite its simplicity, SharedPreferences has important architectural disadvantages that became problematic in modern reactive programming.
- Synchronous API (thread blocking): The most serious disadvantage is that read methods, such as
getStringandgetBoolean, are called synchronously. - No native reactivity:
SharedPreferencesdoes not expose data streams. To observe setting changes, the programmer must register a more complexOnSharedPreferenceChangeListener. This does not integrate naturally with Kotlin Coroutines or Flow.
When we call prefs.getBoolean() on the Main Thread (UI Thread), the application must wait for data to be read from the filesystem. If the preferences file is large or the device is under heavy I/O load, this can lead to dropped animation frames (jank), and in extreme cases to an ANR (Application Not Responding) error.
DataStore
Google introduced DataStore as a successor to SharedPreferences. This library was designed from the ground up with asynchrony and type safety in mind.
Main advantages of DataStore:
- Integration with Coroutines and Flow: Read operations are exposed as a
Flowstream, and write operations assuspendfunctions. - Thread safety: Disk operations are moved to
Dispatchers.IOby default. - Error handling: It has built-in mechanisms for catching
IOExceptionexceptions while reading a file.
There are two variants of the library:
- Preferences DataStore: This is the one we discuss now. It works like
SharedPreferences, as a key-value map, and does not require defining a schema. - Proto DataStore: Stores typed objects and requires a schema definition using Protocol Buffers. It provides type safety, but is harder to configure.
DataStore does not return a value immediately. It returns a stream (Flow) that emits a new value every time the data on disk changes.
First, we create a DataStore instance as a singleton (an extension for Context). This is crucial to avoid conflicts during simultaneous file access.
// In a file such as DataStoreConfig.kt
val Context.dataStore: DataStore<Preferences> by preferencesDataStore(name = "user_prefs")

object UserPrefsKeys {
    // Define keys with their data types
    val USER_NAME = stringPreferencesKey("user_name")
    val IS_DARK_MODE = booleanPreferencesKey("is_dark_mode")
}
A good practice is to hide direct access to DataStore in the repository layer.
class UserPreferencesRepository(private val context: Context) {

    // READ: return Flow. The UI will listen for changes.
    val userNameFlow: Flow<String> = context.dataStore.data
        .catch { exception ->
            // Handle file-read errors
            if (exception is IOException) {
                emit(emptyPreferences())
            } else {
                throw exception
            }
        }
        .map { preferences ->
            // Get the value or the default ("")
            preferences[UserPrefsKeys.USER_NAME] ?: ""
        }

    // WRITE: suspending function
    suspend fun saveUserName(name: String) {
        // The edit method is transactional (atomic)
        context.dataStore.edit { preferences ->
            preferences[UserPrefsKeys.USER_NAME] = name
        }
    }
}
Integration with MVVM architecture
Having a repository layer (UserPreferencesRepository) that exposes data as a Flow stream, we can integrate it with the presentation layer. We need to convert the cold stream from DataStore into hot UI state that is immediately available to the view. We will use the stateIn operator for this.
The ViewModel has two roles in this process:
- Transformation: It converts
Flow<String>from the repository intoStateFlow<String>. - Lifecycle management: Thanks to
viewModelScope, listening for changes in the preferences file happens only when the screen is active.
class UserViewModel(
    private val repository: UserPreferencesRepository
) : ViewModel() {

    // 1. Text-field state (temporary, editable by the user)
    var textFieldValue by mutableStateOf("")
        private set

    // 2. State saved on disk (persistent, read-only)
    // The stateIn operator converts Flow to StateFlow
    val savedUserName: StateFlow<String> = repository.userNameFlow
        .stateIn(
            scope = viewModelScope,
            started = SharingStarted.WhileSubscribed(stopTimeoutMillis = 5000),
            initialValue = "" // Initial value before the file is loaded
        )

    fun onTextFieldValueChanged(newValue: String) {
        textFieldValue = newValue
    }

    // Trigger save (asynchronous operation)
    fun onSaveClicked() {
        viewModelScope.launch {
            repository.saveUserName(textFieldValue)
            // NOTE: We do not need to manually update `savedUserName`!
            // DataStore detects the file change itself and emits a new value,
            // which automatically reaches our StateFlow.
        }
    }
}
Practical example: settings screen
The final element is the view layer (UI). Thanks to StateFlow, our screen becomes fully reactive.
@Composable
fun UserSettingsScreen(viewModel: UserViewModel = viewModel()) {
    val savedName by viewModel.savedUserName.collectAsStateWithLifecycle()

    Column(
        modifier = Modifier.fillMaxSize().padding(16.dp),
        horizontalAlignment = Alignment.CenterHorizontally,
        verticalArrangement = Arrangement.Center
    ) {
        Text(
            text = if (savedName.isBlank()) "Hello, stranger!"
                   else "Hello, $savedName!",
        )

        Spacer(Modifier.height(32.dp))

        OutlinedTextField(
            value = viewModel.textFieldValue,
            onValueChange = viewModel::onTextFieldValueChanged,
            label = { Text("Enter your name") },
            modifier = Modifier.fillMaxWidth()
        )

        Spacer(Modifier.height(16.dp))

        Button(
            onClick = { viewModel.onSaveClicked() },
            modifier = Modifier.fillMaxWidth()
        ) {
            Text("Save persistently")
        }
    }
}
Let us trace what happens after clicking the button:
- UI: The user clicks Save.
viewModel.onSaveClicked()is called. - ViewModel: It starts a coroutine and delegates to
repository.saveUserName(). - DataStore: Saves data to a file on disk (IO thread).
- DataStore (callback): Detects the file change and emits a new value to the
userNameFlowstream. - ViewModel:
StateFlowreceives the new value and updates its state. - UI: The
UserSettingsScreencomponent receives a state-change notification and redraws (recomposition) with the new name.
Thread safety
Let us briefly return to the biggest pain point of SharedPreferences: blocking the main thread. As we remember, calling prefs.getString() happened exactly where it was called, often on the UI Thread.
The library was designed so that its methods can be safely called from the main thread, while heavy work (I/O operations, disk writes) is automatically moved to the appropriate background thread.
DataStore internally uses coroutines and dispatchers. Regardless of whether you read or write data, the library delegates these tasks to the Dispatchers.IO thread pool, which is optimized for disk and network operations.
- When writing (
edit): The function is marked assuspend. When you call it, DataStore suspends the coroutine, switches to an IO thread, performs an atomic file write, and then resumes the coroutine on the original thread. - When reading (
data): TheFlowstream emits values that are read from disk in the background.
In this case, similarly to Room and Retrofit in the next chapters, manual switching with withContext is not necessary. For DataStore, the following construction is redundant:
// Incorrect approach (redundant code)
suspend fun saveToken(token: String) {
    // DataStore switches to IO anyway, so this call is unnecessary duplication
    withContext(Dispatchers.IO) {
        context.dataStore.edit { prefs ->
            prefs[TOKEN_KEY] = token
        }
    }
}

// Correct approach (Main-Safe)
suspend fun saveToken(token: String) {
    // We can safely call this from ViewModel (Main Thread)
    context.dataStore.edit { prefs ->
        prefs[TOKEN_KEY] = token
    }
}
Remember that while disk reads happen on IO, data transformations (the .map operators on a Flow stream) run on the thread where subscription (collection) happened. For simple types such as String or Boolean, this does not matter, but for more complex processing it is worth remembering the flowOn operator discussed in Chapter 6.
Complete implementation examples
Below are complete source-code examples for the topics discussed.
Example 1: SharedPreferences
This example shows the "old style". We have a settings manager that works with an XML file. Notice that to update the UI after changing the switch, we must manually change state in the Composable (isNotificationsEnabled = newCheckedState), because SharedPreferences does not notify us about changes automatically.
// --- 1. SettingsManager.kt ---
class SettingsManager(context: Context) {
    // MODE_PRIVATE mode: only this application has access to the file
    private val prefs = context.getSharedPreferences(
      "app_settings",
      Context.MODE_PRIVATE
    )

    companion object {
        private const val NOTIFICATIONS_KEY = "notifications_enabled"
    }

    // WRITE (asynchronous thanks to .apply())
    fun saveNotificationsSetting(isEnabled: Boolean) {
        prefs.edit {
            putBoolean(NOTIFICATIONS_KEY, isEnabled)
            apply()
        }
    }

    // READ (synchronous - watch out for UI blocking with large files!)
    fun isNotificationEnabled(): Boolean {
        return prefs.getBoolean(NOTIFICATIONS_KEY, false)
    }
}

// --- 2. Screen.kt ---
@Composable
fun LegacySettingsScreen() {
    val context = LocalContext.current
    val settingsManager = remember { SettingsManager(context) }

    // Local UI state
    var isNotificationsEnabled by remember {
        mutableStateOf(settingsManager.isNotificationEnabled())
    }

    Column(modifier = Modifier.padding(16.dp)) {
        Text("Settings (Legacy)")
        Spacer(Modifier.height(16.dp))

        Row(
            modifier = Modifier.fillMaxWidth(),
            horizontalArrangement = Arrangement.SpaceBetween,
            verticalAlignment = Alignment.CenterVertically
        ) {
            Text("Push notifications")
            Switch(
                checked = isNotificationsEnabled,
                onCheckedChange = { newState ->
                    // 1. Update UI
                    isNotificationsEnabled = newState
                    // 2. Save in the background
                    settingsManager.saveNotificationsSetting(newState)
                }
            )
        }
    }
}
Example 2: DataStore (MVVM architecture)
File structure:
DataStoreConfig.kt- singleton DataStore instance.UserPreferencesRepository.kt- read logic (Flow) and write logic (suspend).UserViewModel.kt- Flow to StateFlow conversion.UserScreen.kt- reactive view.
// --- 1. DataStoreConfig.kt ---
// Delegate creating a singleton. The file name is "user_prefs.preferences_pb"
val Context.dataStore by preferencesDataStore(name = "user_prefs")

// --- 2. UserPreferencesRepository.kt ---
class UserPreferencesRepository(private val context: Context) {

    private object Keys {
        val USER_NAME = stringPreferencesKey("user_name")
    }

    // READ: return Flow that emits data whenever the file changes
    val userNameFlow: Flow<String> = context.dataStore.data
        .catch { exception ->
            if (exception is IOException) emit(emptyPreferences())
            else throw exception
        }
        .map { preferences ->
            preferences[Keys.USER_NAME] ?: "Anonymous"
        }

    // WRITE: suspending function (runs on Dispatchers.IO)
    suspend fun saveUserName(name: String) {
        context.dataStore.edit { preferences ->
            preferences[Keys.USER_NAME] = name
        }
    }
}

// --- 3. UserViewModel.kt ---
class UserViewModel(
    private val repository: UserPreferencesRepository
) : ViewModel() {

    // Text-field state
    var inputName by mutableStateOf("")
        private set

    // State from disk (what is saved)
    // stateIn turns a cold Flow into a hot StateFlow available to the UI
    val savedName: StateFlow<String> = repository.userNameFlow
        .stateIn(
            scope = viewModelScope,
            started = SharingStarted.WhileSubscribed(5000),
            initialValue = "Loading..."
        )

    fun onInputChange(newValue: String) {
        inputName = newValue
    }

    fun saveName() {
        viewModelScope.launch {
            repository.saveUserName(inputName)
            inputName = "" // Clear the field after saving
        }
    }
}

// --- 4. UserScreen.kt ---
@Composable
fun UserScreen(viewModel: UserViewModel = viewModel()) {
    // Observe StateFlow. Every change in the DataStore file
    // automatically triggers recomposition of this view.
    val savedName by viewModel.savedName.collectAsStateWithLifecycle()

    Column(
        modifier = Modifier.fillMaxSize().padding(24.dp),
        horizontalAlignment = Alignment.CenterHorizontally,
        verticalArrangement = Arrangement.Center
    ) {
        Text("Hello, $savedName!")

        Spacer(Modifier.height(32.dp))

        OutlinedTextField(
            value = viewModel.inputName,
            onValueChange = viewModel::onInputChange,
            label = { Text("Change your name") },
            modifier = Modifier.fillMaxWidth()
        )

        Spacer(Modifier.height(16.dp))

        Button(
            onClick = { viewModel.saveName() },
            modifier = Modifier.fillMaxWidth()
        ) {
            Text("Save in DataStore")
        }
    }
}
In the previous chapter, we learned how to save simple settings. For larger amounts of data, especially data with a more complex structure, we use a relational database. On Android, we have access to Room.
Android has a built-in SQLite engine. It is a relational database stored in a single file. We can use it with the SQL language. Room is a library from Android Jetpack that acts as an abstraction layer over SQLite.
- It checks SQL query correctness during compilation.
- It automatically maps query results to Kotlin objects (data classes).
- It returns
Flowstreams, so the UI refreshes itself.
Dependencies (Gradle)
To use the library and all annotations, we must configure the project correctly:
In build.gradle.kts(Project), add:
plugins {
    id("androidx.room") version "2.8.0" apply false
    id("com.google.devtools.ksp") version "2.0.21-1.0.27" apply false
}
In build.gradle.kts(Module), add:
plugins {
    id("androidx.room")
    id("com.google.devtools.ksp")
}

android {
    room {
        schemaDirectory("$projectDir/schemas")
    }
}

dependencies {

    implementation("androidx.room:room-runtime:2.8.0")
    ksp("androidx.room:room-compiler:2.8.0")
    implementation("androidx.room:room-ktx:2.8.0")

    implementation("androidx.lifecycle:lifecycle-viewmodel-compose:2.9.4")
    implementation("androidx.lifecycle:lifecycle-runtime-compose:2.9.4")
}
Room architecture
To use Room, we must define three main components. A warehouse analogy works well here:
- Entity: A data class (
data class) that defines the table structure (columns). - DAO (Data Access Object): An interface that defines methods for accessing the database. This is where we write SQL queries.
- Database: The main database access point that connects entities with DAOs.
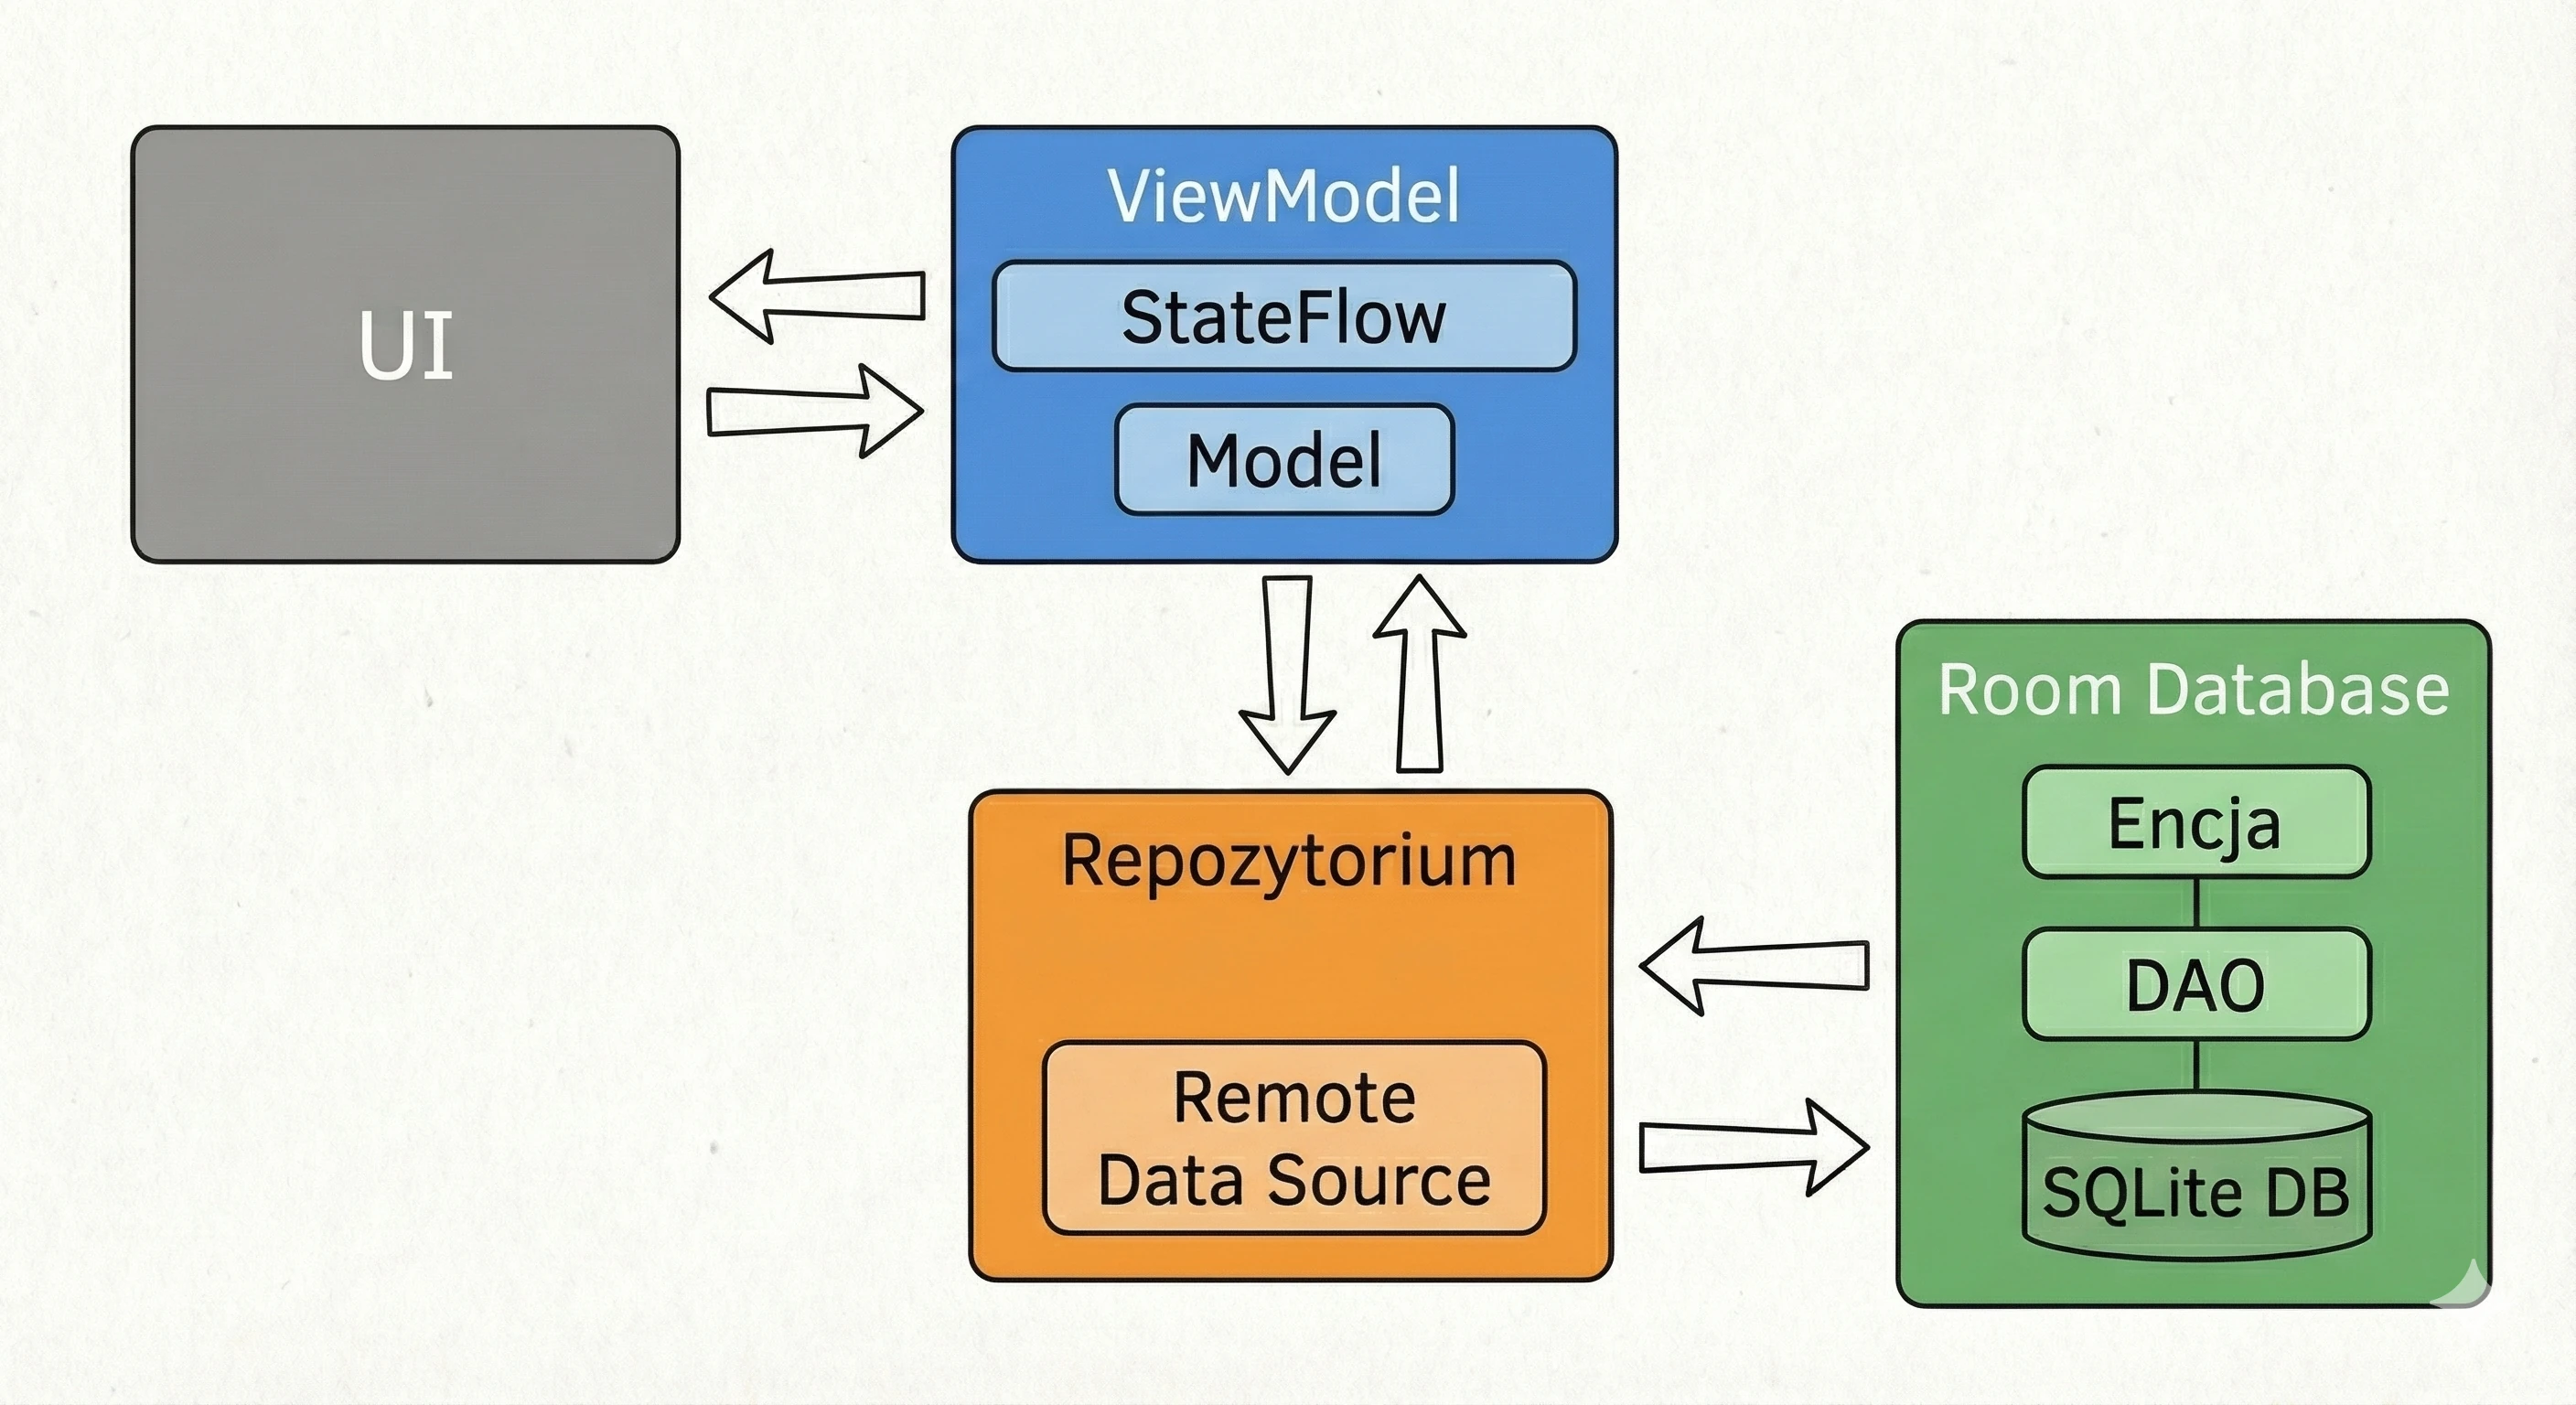
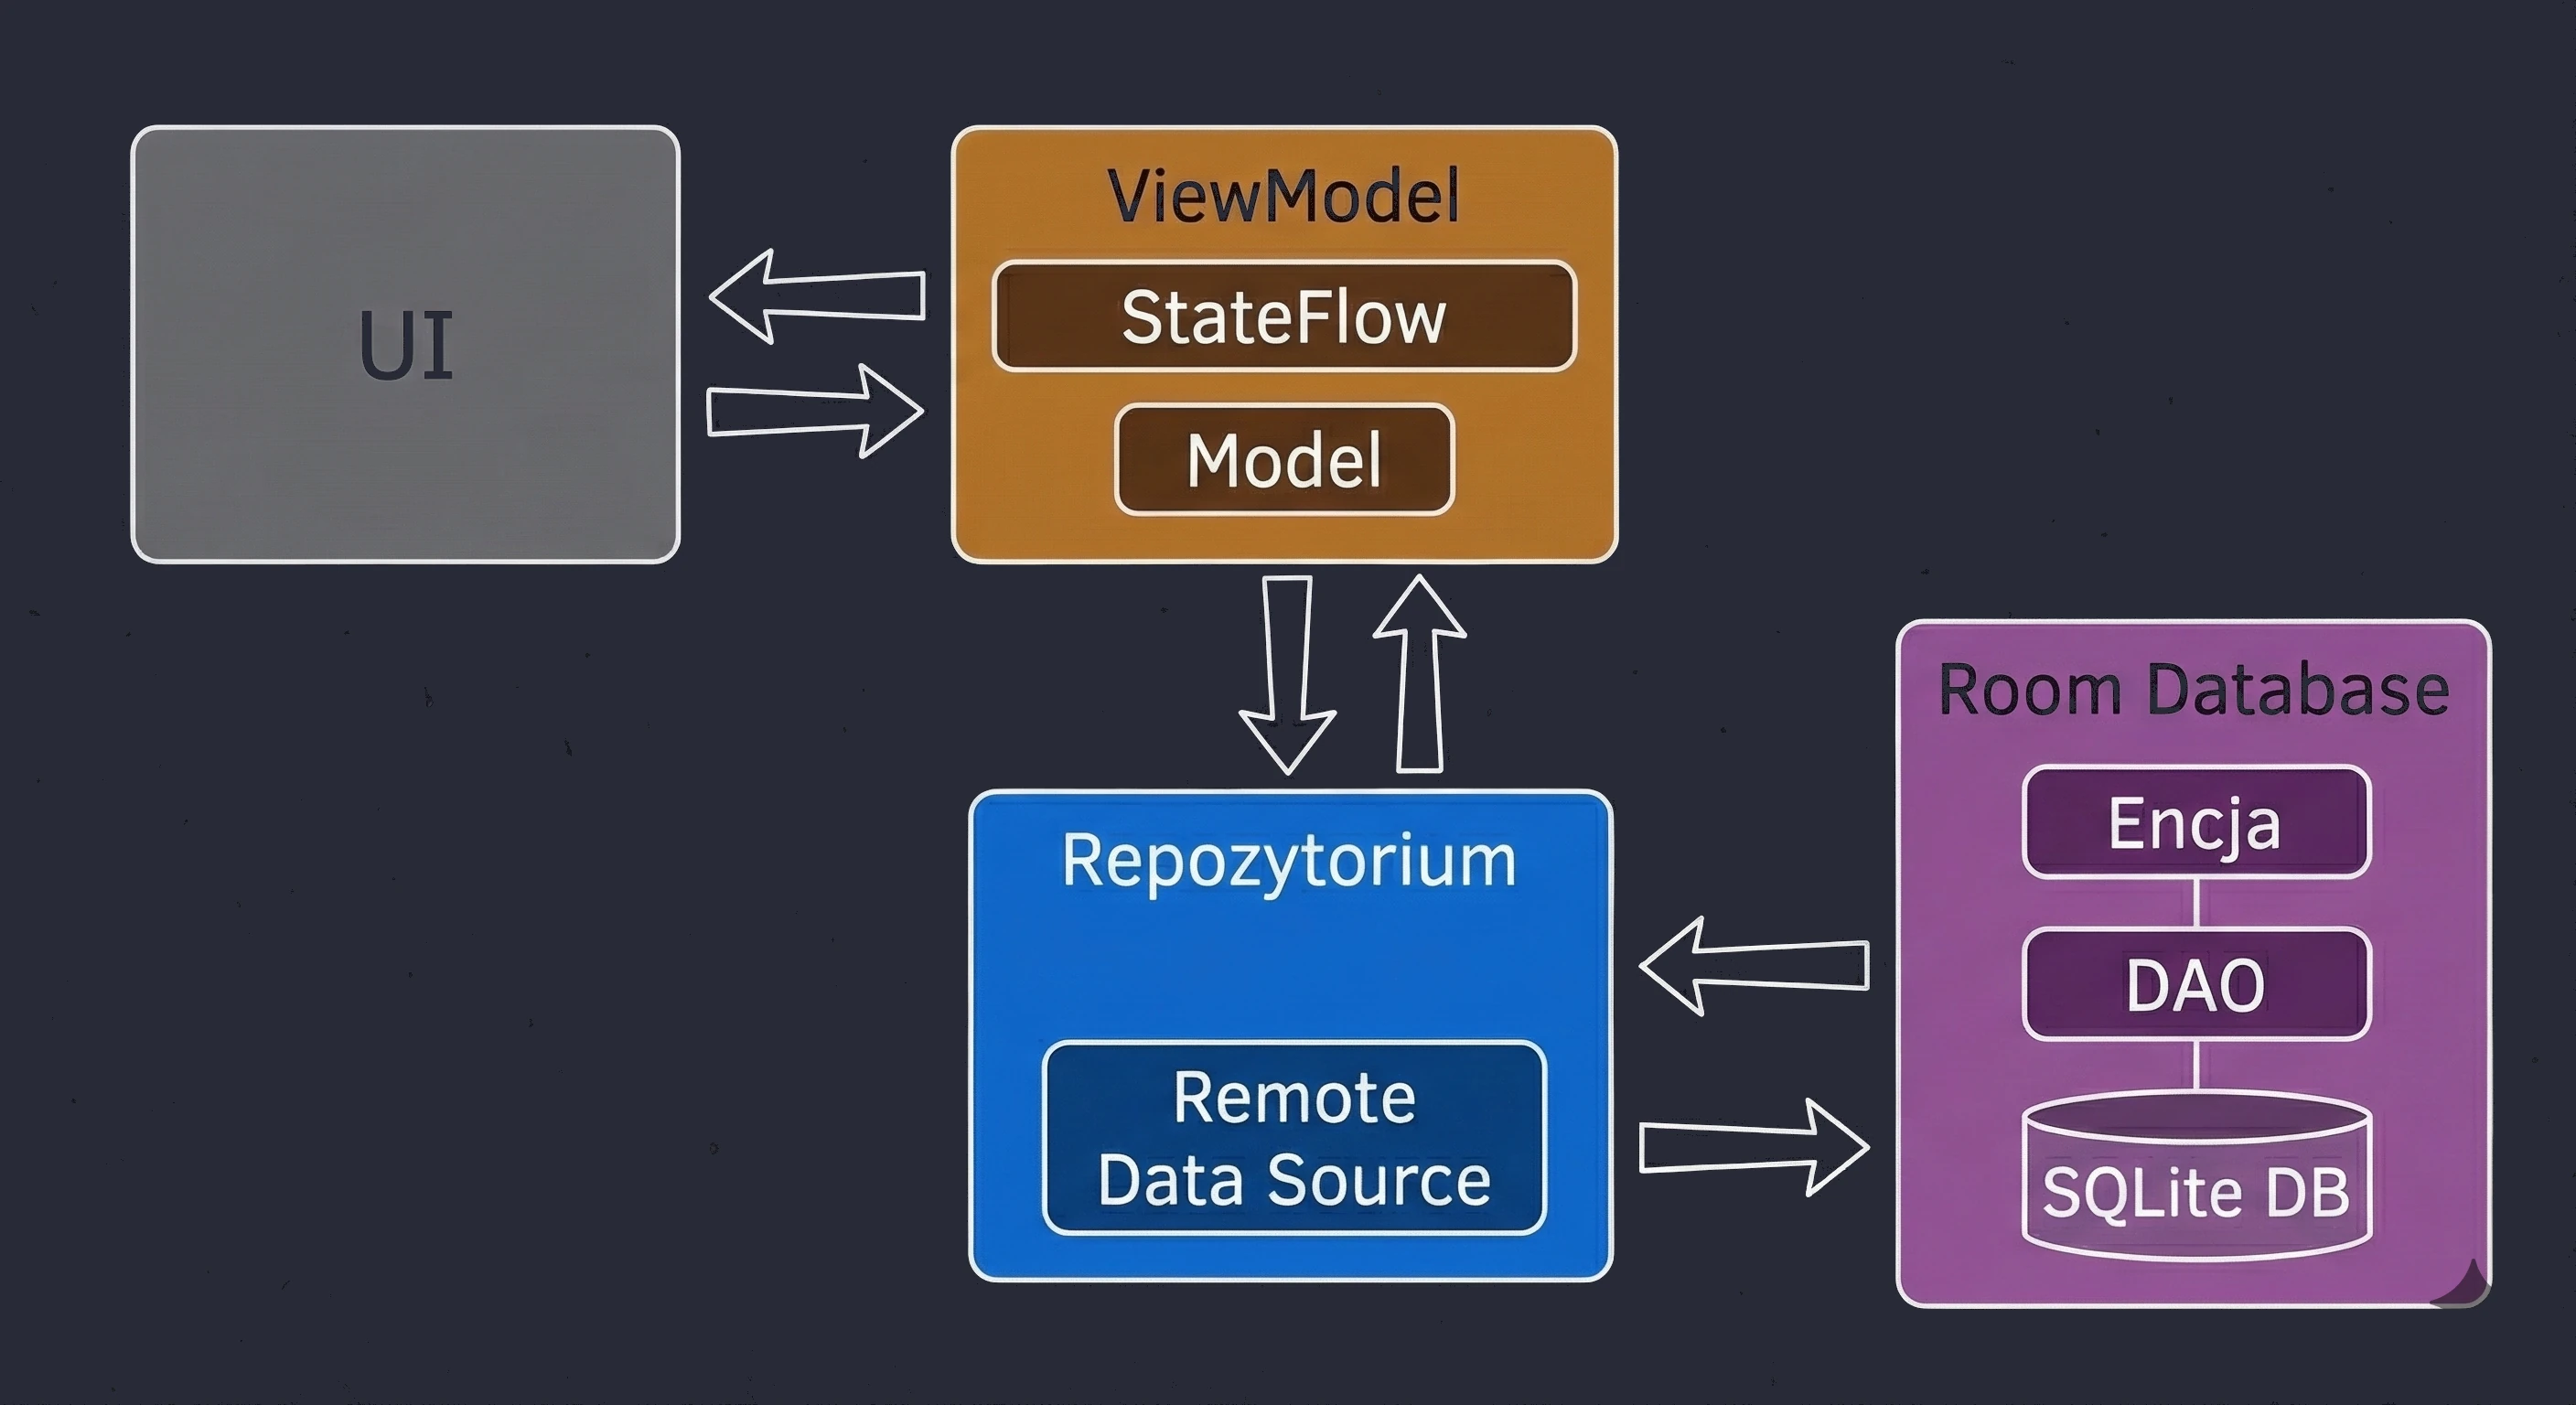

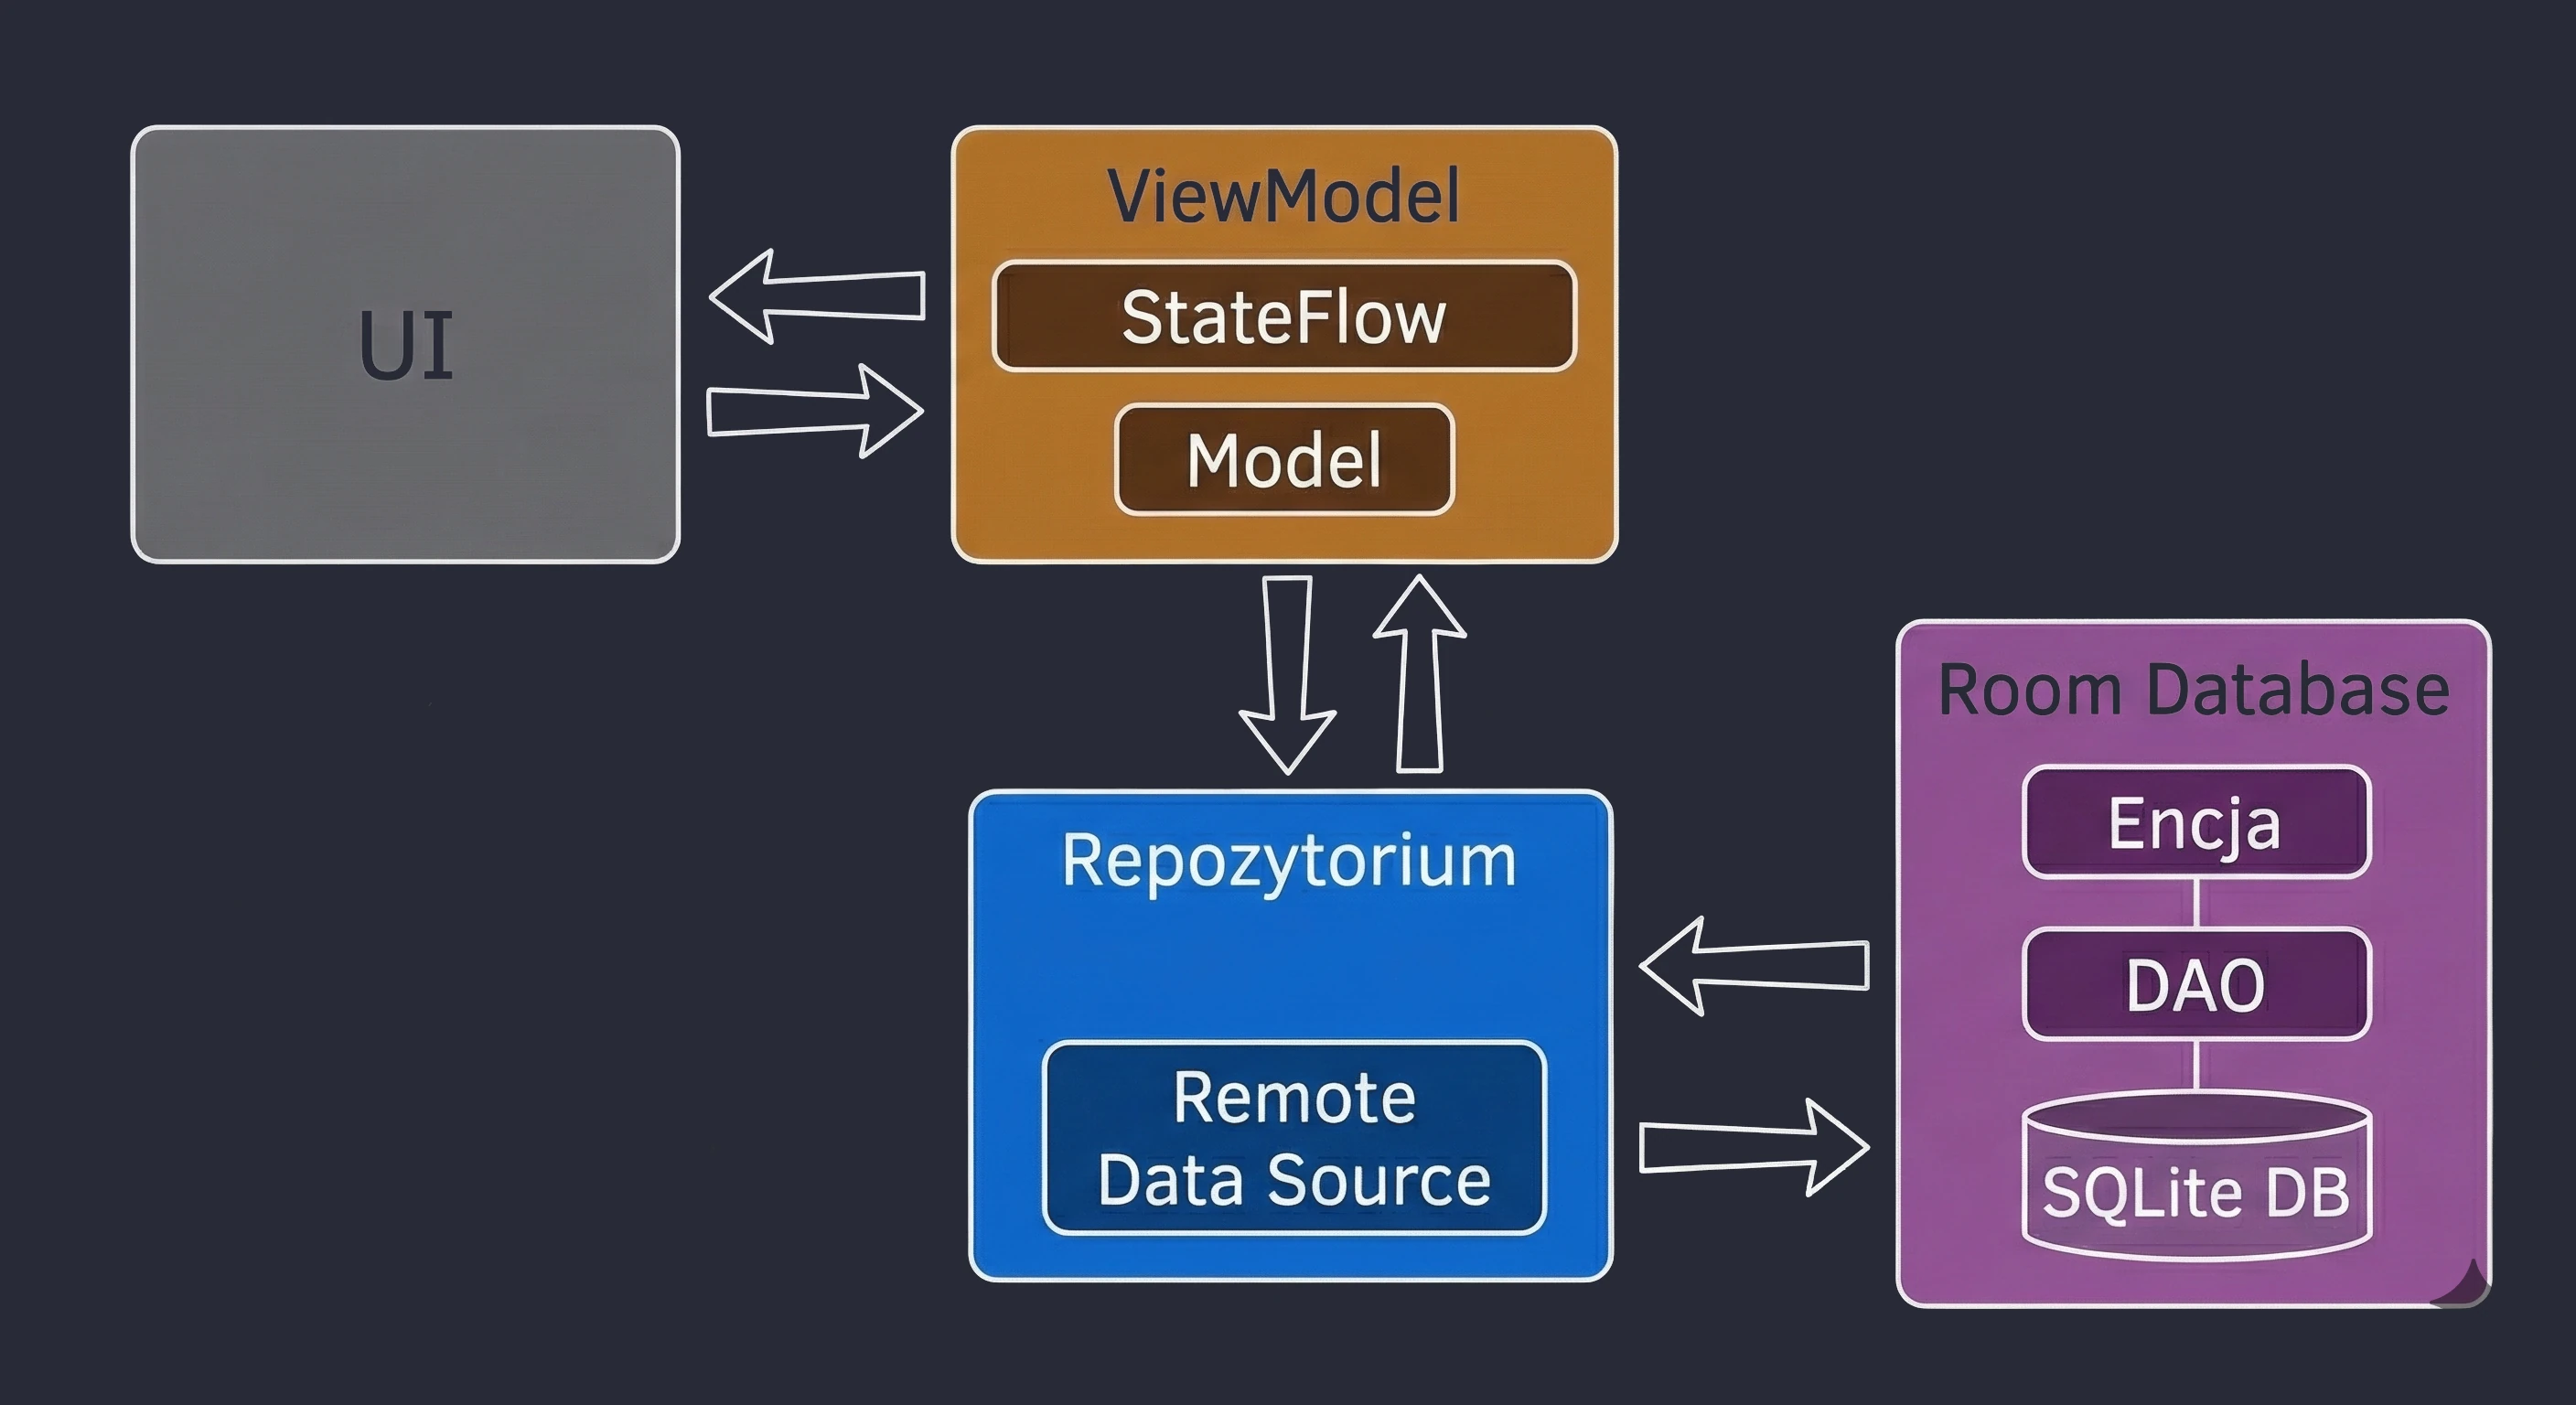
Entity (defining a table)
Let us start by creating a table for a simple task. We use annotations to teach Room how to treat our class.
@Entity(tableName = "tasks_table") // Table name in SQL
data class TaskEntity(
    @PrimaryKey(autoGenerate = true)
    val id: Long = 0, // Room assigns subsequent IDs automatically

    @ColumnInfo(name = "task_title")
    val title: String,

    val isCompleted: Boolean, // By default, Room will name
                              // the column "isCompleted"

    val createdAt: Long = System.currentTimeMillis()
)
DAO (data operations)
The Data Access Object (DAO) is an abstraction layer separating application business logic from low-level SQLite database operations. In Room, a DAO must be an interface (or an abstract class), because the actual implementation of methods, including SQL code and cursor management, is generated automatically during compilation.
@Dao
interface TaskDao {

    // One-shot operations (save/edit/delete)
    // They must be SUSPEND, because these operations may take
    // a significant amount of time.
    // Room automatically executes them on Dispatchers.IO (Main-Safe).

    @Upsert
    suspend fun upsertTask(task: TaskEntity)

    @Delete
    suspend fun deleteTask(task: TaskEntity)

    @Update
    suspend fun updateTask(task: TaskEntity)

    // Read operations (reactive)
    // They are NOT suspend! They return Flow.
    // Flow emits a new list every time anything
    // changes in the table.

    @Query("SELECT * FROM tasks_table ORDER BY createdAt DESC")
    fun getAllTasks(): Flow<List<TaskEntity>>

    // We can also perform one-shot reads for a specific record
    @Query("SELECT * FROM tasks_table WHERE id = :id")
    suspend fun getTaskById(id: Long): TaskEntity?
}
Methods annotated with @Upsert, @Delete and @Update are responsible for modifying database state.
suspendmodifier: Disk write operations (I/O) are blocking by nature and may take from a few to several dozen milliseconds. Marking them assuspendforces the programmer to call them inside a coroutine.- Main-safety: Room guarantees main-thread safety. The generated implementation of these methods automatically moves SQL query execution to a dedicated database dispatcher, usually based on
Dispatchers.IO, regardless of the thread on which the parent coroutine was started. - Conflict strategy: In older code, we often see
@Insert(onConflict = OnConflictStrategy.REPLACE), which maps to SQLiteINSERT OR REPLACE. This operation has delete + insert semantics, not classic in-place update semantics. Therefore, when we want explicit insert or update semantics, it is worth preferring the@Upsertannotation in Room.
The getAllTasks() method returns Flow<List<TaskEntity>>.
- No
suspend: Notice that this method is not a suspending function. This is because calling the method itself does not execute an SQL query. It only creates and returns a stream instance (Flow). The query starts only when someone subscribes to the stream (thecollectoperation). - Invalidation Tracker: Room automatically monitors database tables. When any change occurs in the
tasks_tabletable, for example throughupsertTask, Room detects that event, automatically executes theSELECTquery again and emits the updated list to the stream. This keeps the view consistent with the data without manually refreshing the UI.
The getTaskById method is an example of a classic query returning a single result (snapshot).
- Unlike a query returning
Flow, here we must use thesuspendkeyword, because the SQL query is executed immediately when the function is called, which requires suspending for the duration of the I/O operation. - The return type is nullable (
TaskEntity?), forcing the programmer to handle the case where a record with the given ID does not exist in the database.
Database (entry point)
Finally, we create an abstract database class.
@Database(entities = [TaskEntity::class], version = 1)
abstract class AppDatabase : RoomDatabase() {

    abstract fun taskDao(): TaskDao

    companion object {
        @Volatile
        private var INSTANCE: AppDatabase? = null

        fun getDatabase(context: Context): AppDatabase {
            // Double-check locking pattern for a singleton
            return INSTANCE ?: synchronized(this) {
                val instance = Room.databaseBuilder(
                    context.applicationContext,
                    AppDatabase::class.java,
                    "my_todo_database"
                )
                .fallbackToDestructiveMigration()
                .build()
                INSTANCE = instance
                instance
            }
        }
    }
}
The code above implements the Singleton design pattern using double-check locking, with the goal of ensuring safe access to a resource in a multithreaded environment with minimal performance overhead.
The @Database annotation acts as a configurator for the annotation processor (KSP/KAPT).
entities: Defines the database schema. Room verifies that these classes have correct mappings to SQL types.version: An integer defining the schema version. Changing the entity structure, for example adding a field, requires incrementing this value and providing a migration strategy.- The class is
abstract, because Room generates its concrete implementation (with the_Implsuffix) at compile time, injecting code responsible for SQL transactions.
The static INSTANCE variable is marked as @Volatile. In the Java Memory Model (JMM), this is critical for memory-visibility guarantees:
- Problem: Threads may keep variable values in local CPU registers (CPU cache) instead of main RAM. Without
@Volatile, thread A could initialize the database, but thread B could still seenullin its own cache. - Solution:
@Volatileenforces a happens-before relationship. A write to this variable is immediately visible to all other threads (flush to main memory), and a read always obtains the value from main memory. It also prevents so-called instruction reordering by the compiler, which could otherwise lead to using an object that has not been fully initialized.
The getDatabase function implements lazy initialization with a performance optimization:
- First check (without lock):
return INSTANCE ?: ...checks whether the instance already exists. If it does, it returns it immediately, avoiding the cost of entering a synchronized block. - Critical section (synchronization):
synchronized(this)ensures that only one thread at a time can execute the code inside the block. This protects against a race condition where two threads would simultaneously observe that no instance exists and create two independent database copies. - Second check (inside the lock): Inside the
synchronizedblock, hidden in the Elvis-operator and assignment logic, verification happens again. This is necessary because between the first check and entering the critical section another thread could have already created the instance.
The context.applicationContext call protects against memory leaks. The database, as a singleton, lives for the entire lifetime of the application process. If we passed an Activity Context to it, the singleton would hold a reference to the Activity, preventing the Garbage Collector from freeing memory after the screen is closed. The application context is independent of the view lifecycle.
The .fallbackToDestructiveMigration() method defines behavior when the schema version (the version parameter) does not match the actual database file on disk and no migration path (a Migration class) is defined. In this mode, Room deletes the database file and creates it again. This is acceptable during development (prototyping), but in production it causes permanent loss of user data and should be replaced with an implementation using .addMigrations().
Integration with MVVM architecture
Having defined the database, we should not use it directly in the presentation layer (Activity/Composable). Instead, we apply the Repository pattern.
The repository acts as a mediator. The ViewModel does not need to know whether data comes from a SQLite database, the network or a JSON file. It only wants data.
class TaskRepository(private val taskDao: TaskDao) {

    // Data stream (observation)
    // The repository simply forwards Flow from DAO.
    // We do not need 'suspend' here, because obtaining the stream reference
    // is immediate.
    val allTasks: Flow<List<TaskEntity>> = taskDao.getAllTasks()

    // Edit operations
    // Here we must use 'suspend' so we do not block the thread
    // from which this function is called (usually ViewModel).
    suspend fun addTask(title: String) {
        val newTask = TaskEntity(title = title, isCompleted = false)
        taskDao.upsertTask(newTask)
    }

    suspend fun toggleTaskCompletion(task: TaskEntity) {
        val updatedTask = task.copy(isCompleted = !task.isCompleted)
        taskDao.updateTask(updatedTask)
    }

    suspend fun removeTask(task: TaskEntity) {
        taskDao.deleteTask(task)
    }
}
This is where the database stream is converted into user-interface state. As with DataStore (Chapter 8), we use the stateIn operator.
class TaskViewModel(private val repository: TaskRepository) : ViewModel() {

    // Convert Flow<List<TaskEntity>> -> StateFlow<List<TaskEntity>>
    // Thanks to this, the UI always has access to the "freshest" task list.
    val tasks: StateFlow<List<TaskEntity>> = repository.allTasks
        .stateIn(
            scope = viewModelScope,
            started = SharingStarted.WhileSubscribed(5000),
            initialValue = emptyList()
        )

    // Functions called by the UI (e.g. after a button click)
    fun onAddTaskClick(title: String) {
        if (title.isBlank()) return

        viewModelScope.launch {
            // Room automatically moves this to Dispatchers.IO
            repository.addTask(title)
            // We do not need to refresh the list manually!
            // Room detects the change, updates Flow,
            // and StateFlow sends new data to the UI.
        }
    }

    fun onTaskCheckedChange(task: TaskEntity) {
        viewModelScope.launch {
            repository.toggleTaskCompletion(task)
        }
    }

    fun onTaskDelete(task: TaskEntity) {
         viewModelScope.launch {
            repository.removeTask(task)
        }
    }
}
Practical example: ToDo application
Let us connect all discussed elements into a working application. Our goal is to create a screen where the user can add tasks and mark them as completed. Thanks to Room's reactivity, the list will update automatically.
To preserve architectural correctness, the database instance and repository should live as long as the application. The best place to initialize them is a class inheriting from Application.
// 1. Register this class in AndroidManifest.xml in the android:name attribute
class TodoApplication : Application() {

    // Lazy initialization - the database is created only on first use,
    // not at application startup (faster launch time).
    val database by lazy { AppDatabase.getDatabase(this) }

    val repository by lazy { TaskRepository(database.taskDao()) }
}<manifest xmlns:android="http://schemas.android.com/apk/res/android"
xmlns:tools="http://schemas.android.com/tools">
<application
android:name=".TodoApplication"
android:allowBackup="true"
android:dataExtractionRules="@xml/data_extraction_rules"
android:fullBackupContent="@xml/backup_rules"
android:icon="@mipmap/ic_launcher"
android:label="@string/app_name"
android:theme="@style/Theme.TodoApp">
<activity
android:name=".MainActivity"
android:exported="true"
android:theme="@style/Theme.TodoApp">
<intent-filter>
<action android:name="android.intent.action.MAIN" />
<category android:name="android.intent.category.LAUNCHER" />
</intent-filter>
</activity>
</application>
</manifest>Because our TaskViewModel accepts a parameter in the constructor (repository), Android cannot create it by default. We must provide a factory.
class TaskViewModelFactory(private val repository: TaskRepository) : ViewModelProvider.Factory {
    override fun <T : ViewModel> create(modelClass: Class<T>): T {
        if (modelClass.isAssignableFrom(TaskViewModel::class.java)) {
            @Suppress("UNCHECKED_CAST")
            return TaskViewModel(repository) as T
        }
        throw IllegalArgumentException("Unknown ViewModel class")
    }
}
Below is the screen code in Jetpack Compose. Notice the absence of list-refresh logic. The UI simply reacts to what arrives from StateFlow.
@Composable
fun TaskScreen(viewModel: TaskViewModel) {
    // 1. Observe state (lifecycle-safe)
    val tasks by viewModel.tasks.collectAsStateWithLifecycle()

    // Local state for the text field
    var newTaskTitle by remember { mutableStateOf("") }

    Column(modifier = Modifier.fillMaxSize().padding(16.dp)) {

        // Add section
        Row(verticalAlignment = Alignment.CenterVertically) {
            OutlinedTextField(
                value = newTaskTitle,
                onValueChange = { newTaskTitle = it },
                label = { Text("New task") },
                modifier = Modifier.weight(1f)
            )
            Spacer(Modifier.width(8.dp))
            Button(onClick = {
                viewModel.onAddTaskClick(newTaskTitle)
                newTaskTitle = "" // Clear the field after adding
            }) {
                Text("Add")
            }
        }

        Spacer(Modifier.height(16.dp))

        // List section
        if (tasks.isEmpty()) {
            Text(
                text = "No tasks. Add something!",
                modifier = Modifier
                  .align(Alignment.CenterHorizontally)
                  .padding(top = 32.dp),
            )
        } else {
            LazyColumn {
                items(tasks, key = { it.id }) { task ->
                    TaskItem(
                        task = task,
                        onCheckedChange = { viewModel.onTaskCheckedChange(task) },
                        onDeleteClick = { viewModel.onTaskDelete(task) }
                    )
                }
            }
        }
    }
}

@Composable
fun TaskItem(
    task: TaskEntity,
    onCheckedChange: () -> Unit,
    onDeleteClick: () -> Unit
) {
    Card(
        modifier = Modifier.fillMaxWidth().padding(vertical = 4.dp),
        elevation = CardDefaults.cardElevation(2.dp)
    ) {
        Row(
            modifier = Modifier.padding(16.dp),
            verticalAlignment = Alignment.CenterVertically
        ) {
            Checkbox(
                checked = task.isCompleted,
                onCheckedChange = { onCheckedChange() }
            )
            Text(
                text = task.title,
                modifier = Modifier.weight(1f).padding(start = 8.dp),
            )
            IconButton(onClick = onDeleteClick) {
                Icon(Icons.Default.Delete, contentDescription = "Delete")
            }
        }
    }
}
The final element is connecting everything in MainActivity. We obtain the repository from the Application class and pass it to the factory.
class MainActivity : ComponentActivity() {
    override fun onCreate(savedInstanceState: Bundle?) {
        super.onCreate(savedInstanceState)

        // Obtain the ready repository (singleton)
        val appContainer = application as TodoApplication
        val repository = appContainer.repository

        setContent {
            AppTheme {
                // Create ViewModel using the factory
                val viewModel: TaskViewModel = viewModel(
                    factory = TaskViewModelFactory(repository)
                )

                TaskScreen(viewModel = viewModel)
            }
        }
    }
}
In the previous chapter, we learned how to store data locally on the device. This is an offline-first approach. However, modern mobile applications rarely work in isolation. To download a weather forecast, display the latest news or synchronize tasks between devices, we must communicate with an external server.
Network communication in mobile applications is usually based on the REST (Representational State Transfer) architecture.
- Client (your application): Sends an HTTP request to a specific URL.
- Server (API): Processes the request and sends back a response.
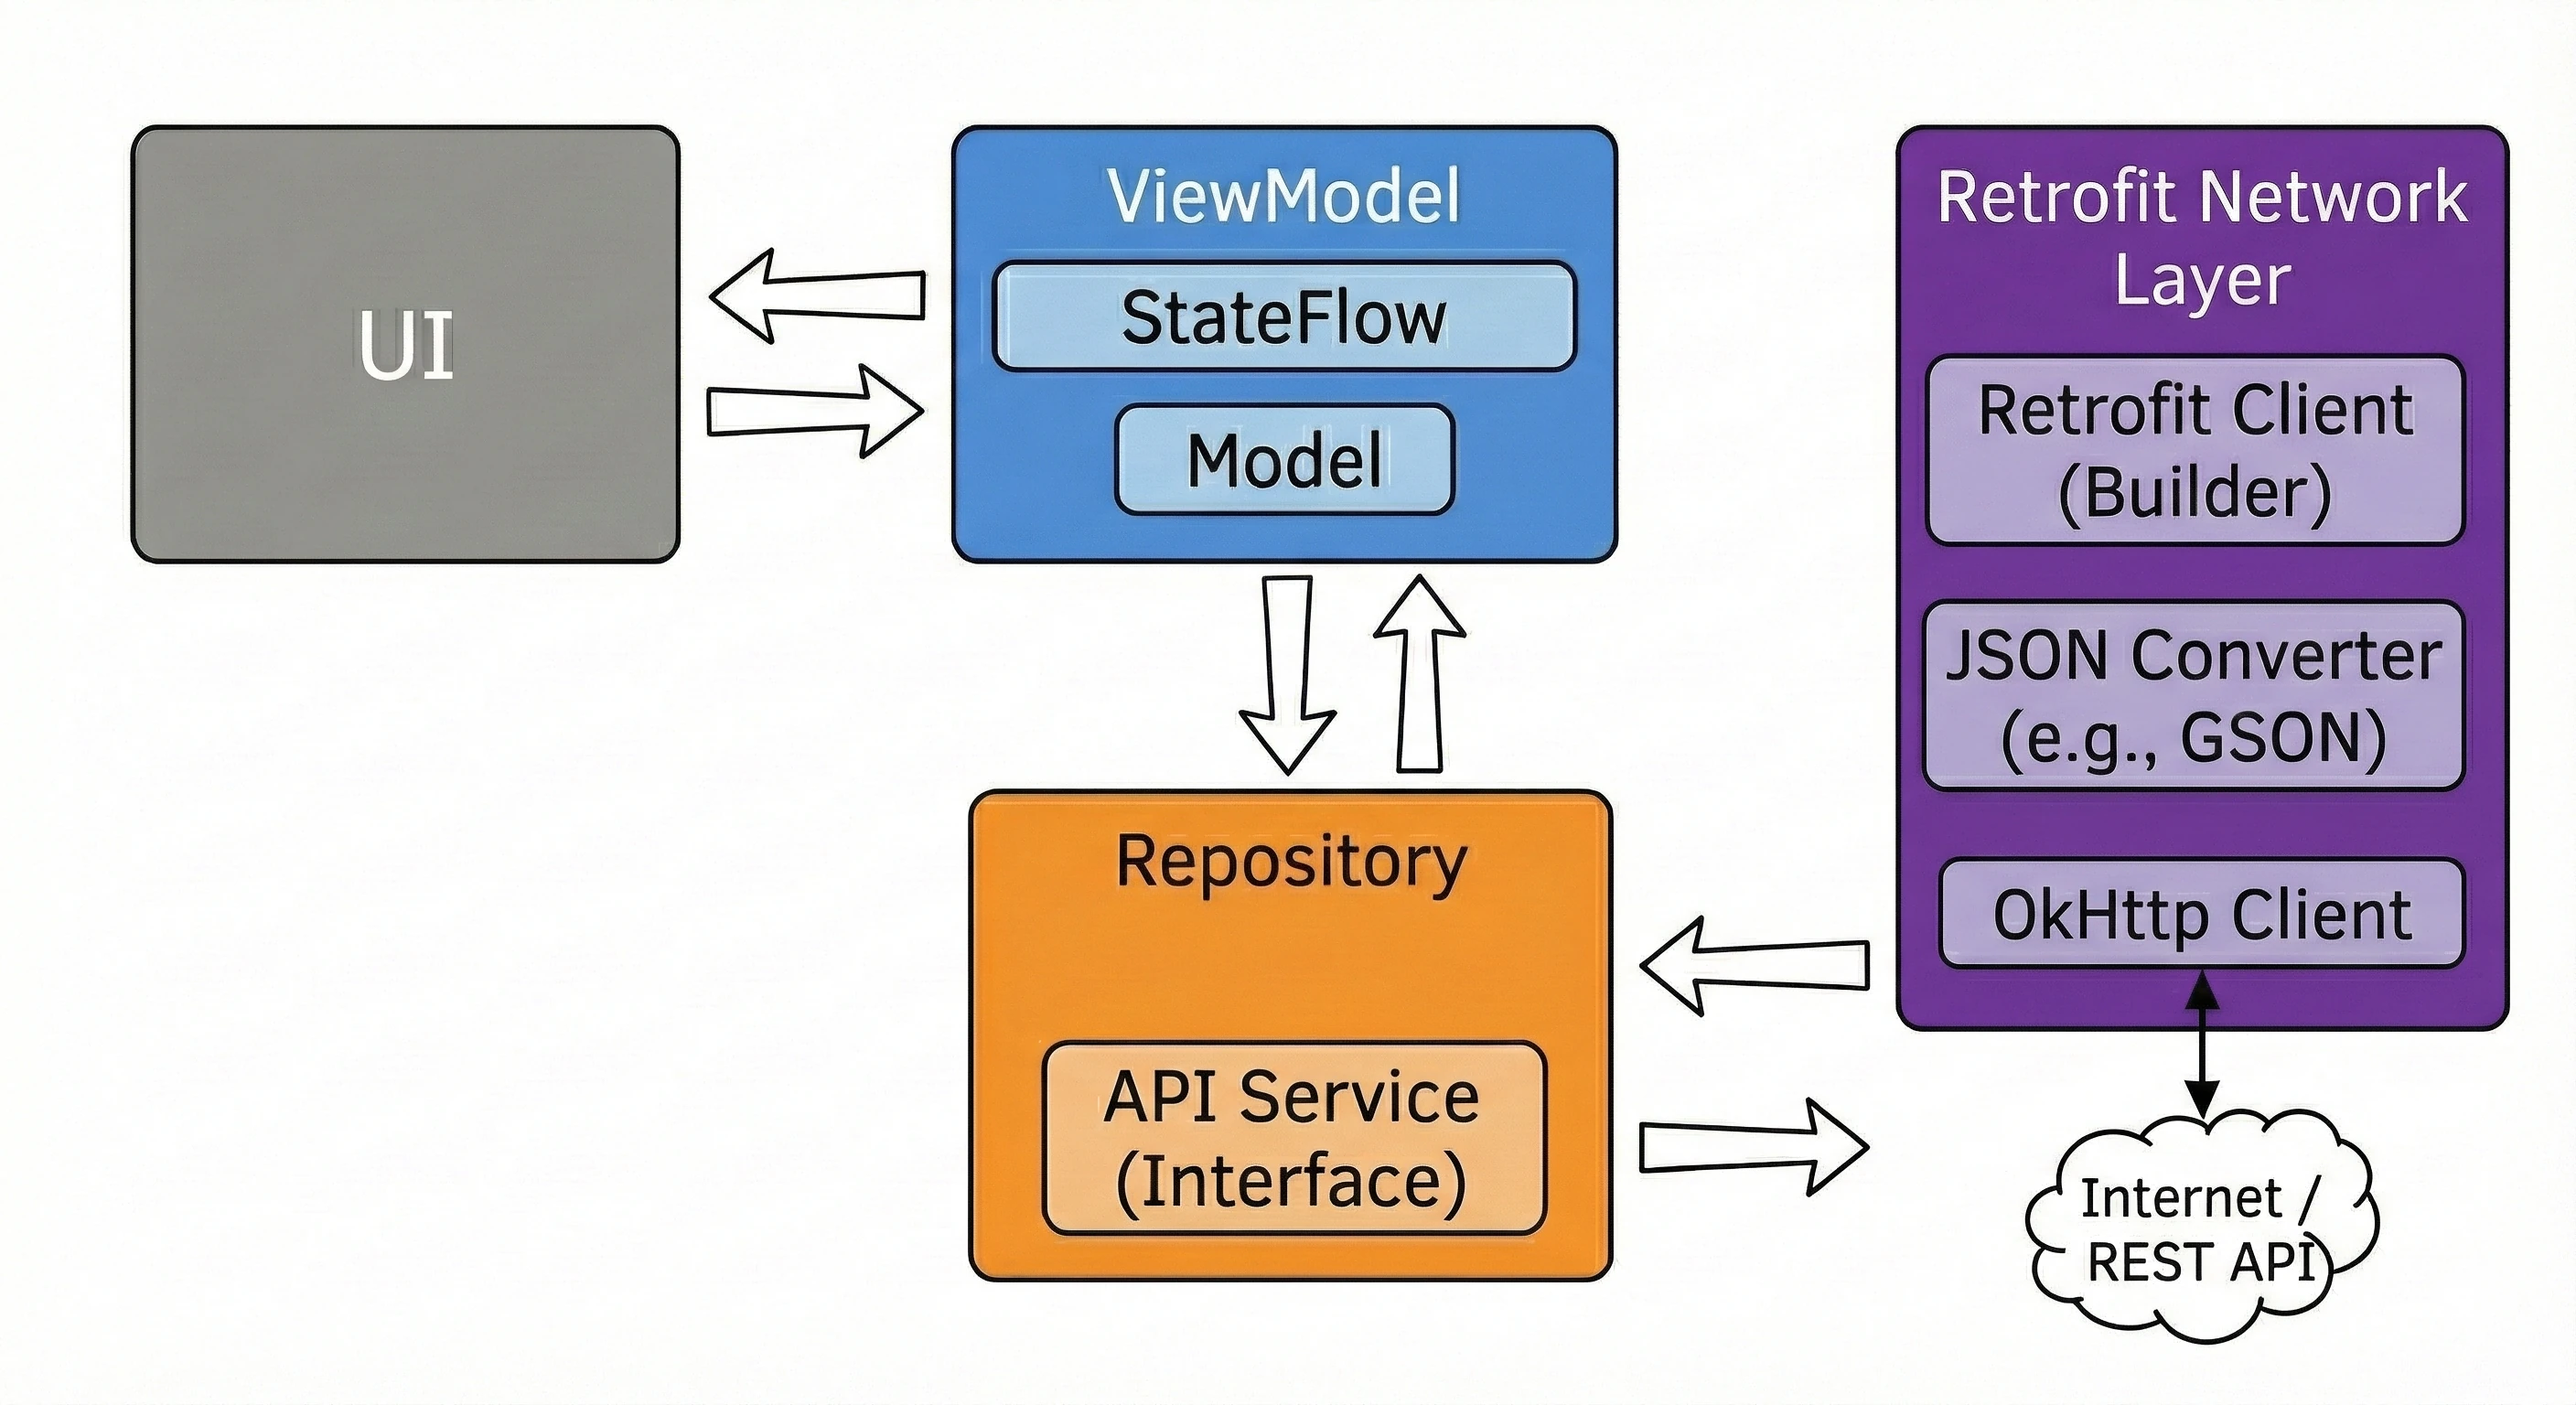


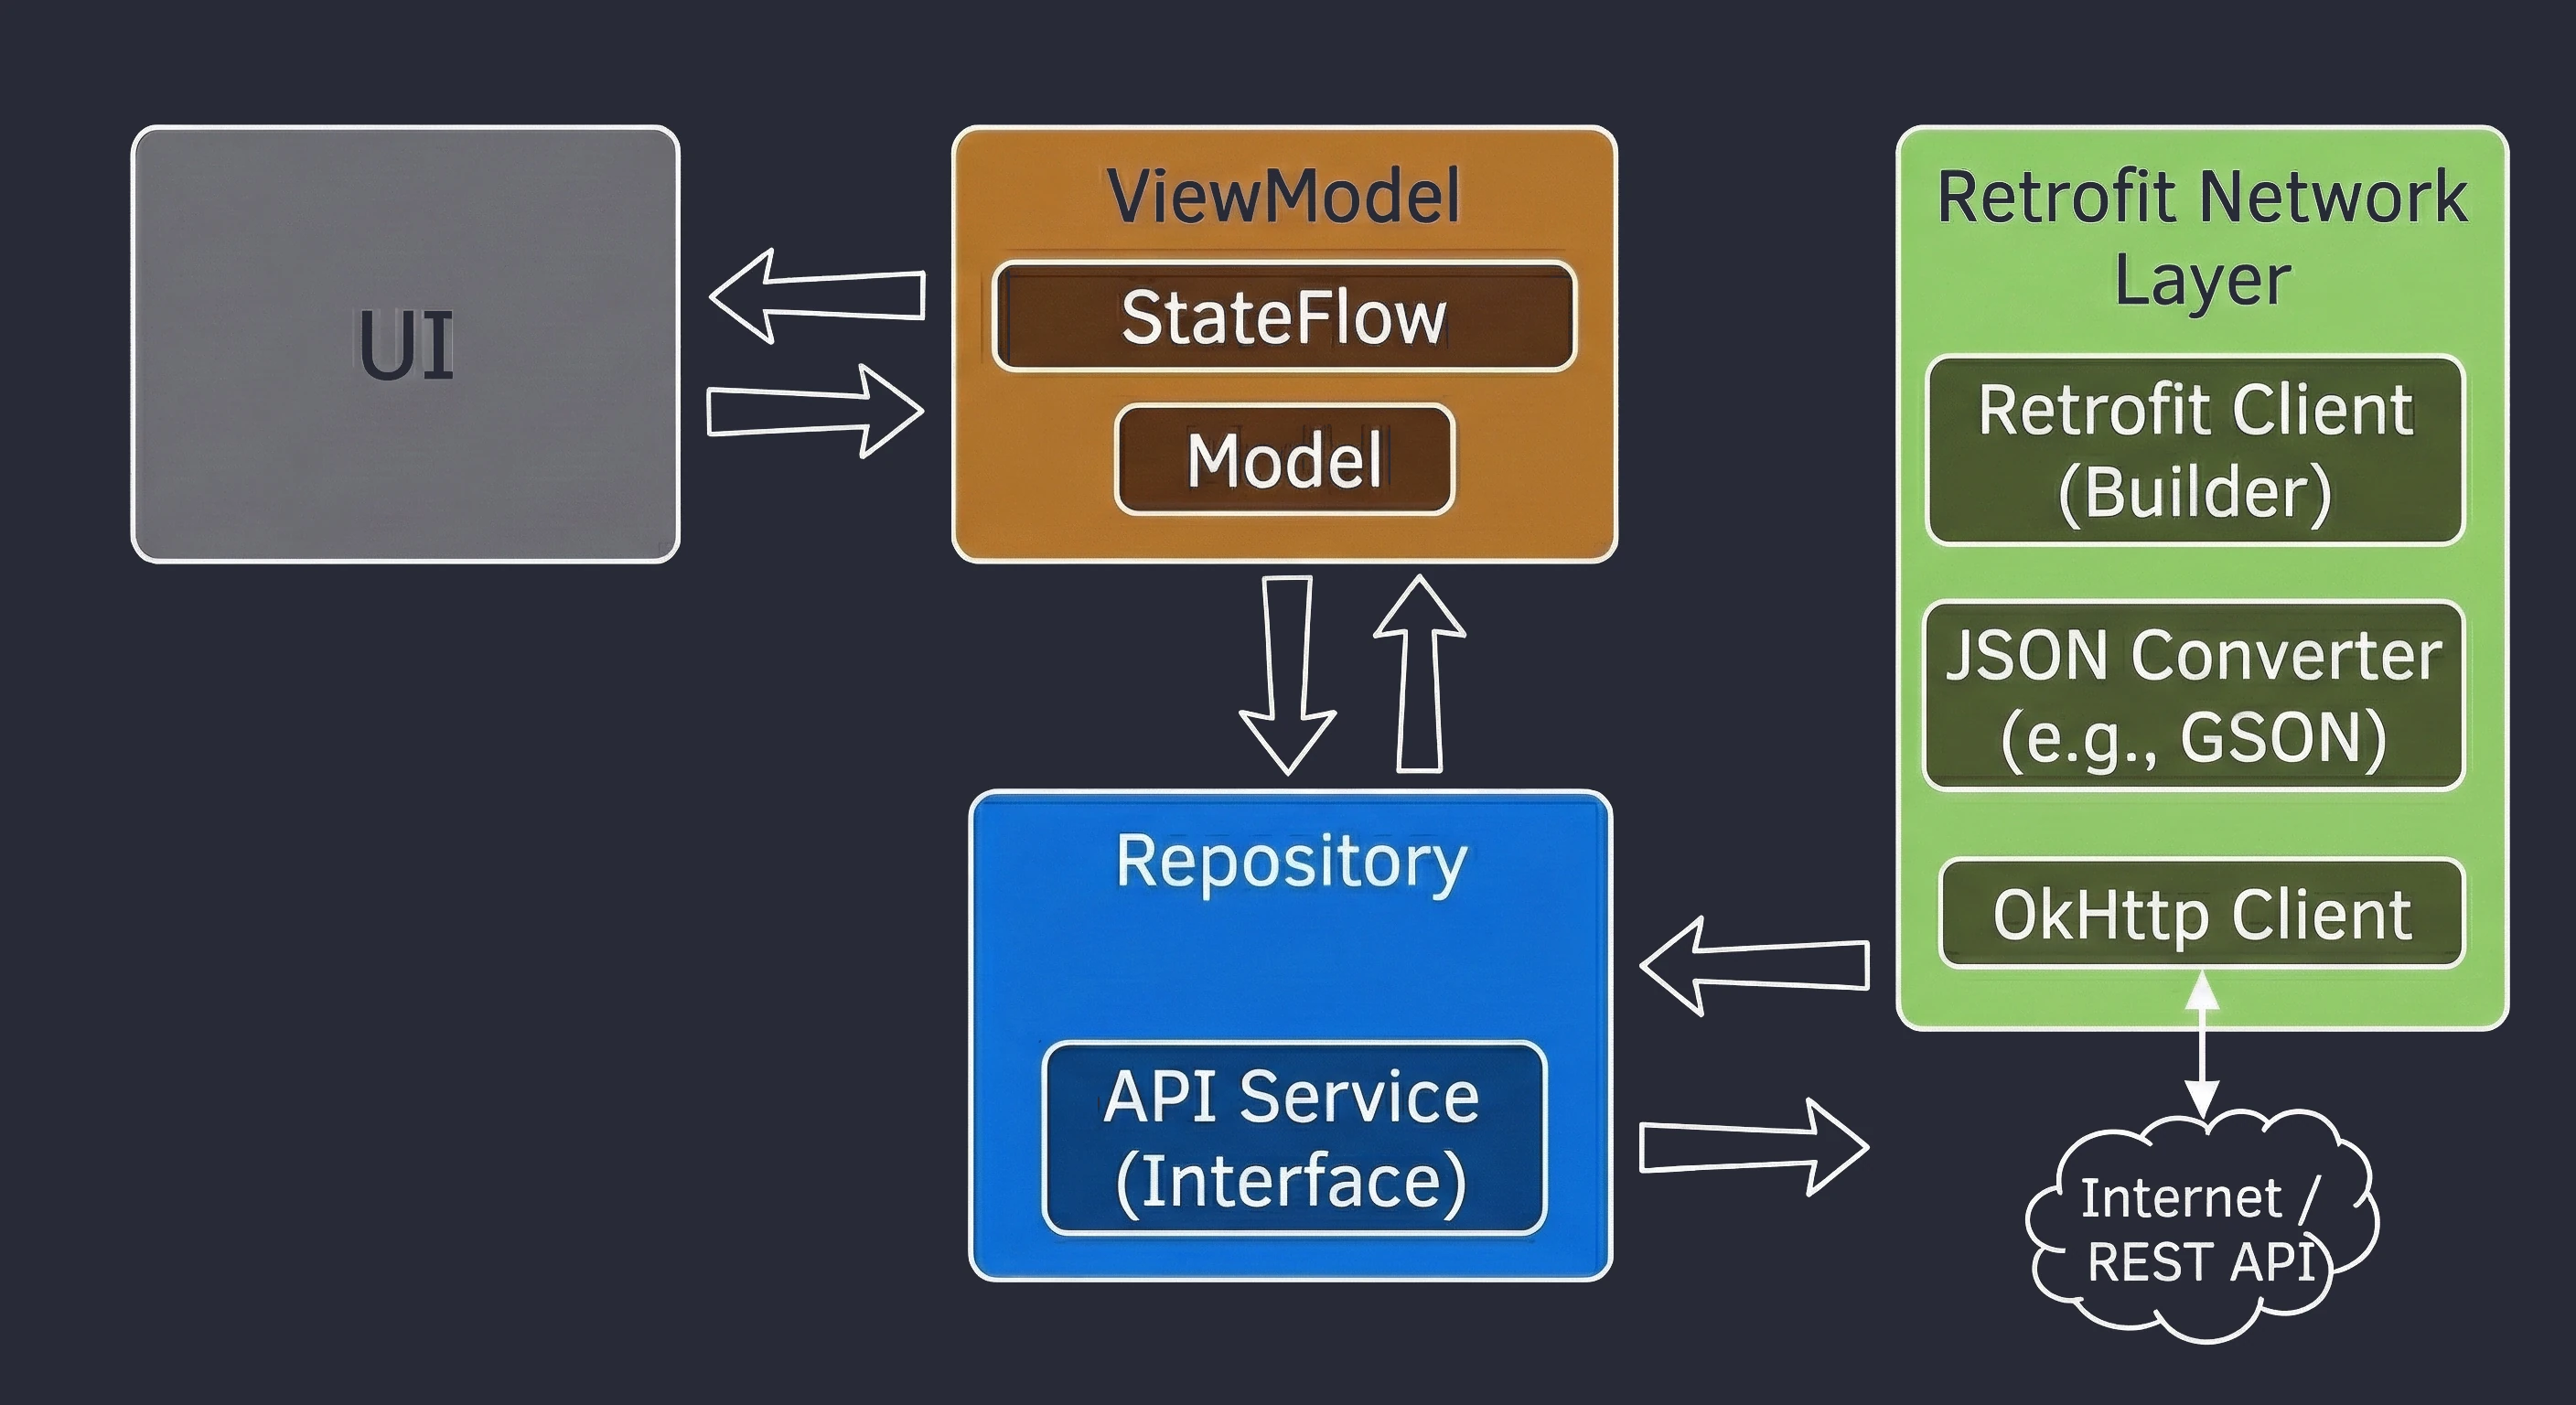
A network operation is highly unpredictable. Server response time (latency) depends on signal quality (LTE/5G/WiFi), connection load and geographical distance from the server. It may take from 50 ms to several seconds. Because of this unpredictability, Android enforces a strict limitation: performing any network operations on the Main Thread (UI Thread) is not allowed in practice. Attempting to execute network code inside MainActivity, without coroutines or background threads, immediately throws a NetworkOnMainThreadException.
Application permissions
By default, an Android application is not allowed to connect to the Internet. To enable this, we must declare the proper permission in the manifest file. This is a Normal permission, which means it is granted automatically during installation and does not require separate user approval at runtime (Runtime Permission).
<manifest xmlns:android="http://schemas.android.com/apk/res/android">

    <uses-permission android:name="android.permission.INTERNET" />

    <application ...>
        ...
    </application>
</manifest>
Retrofit 2 library
In the early days of Android, network access was handled with the HttpURLConnection class. This required manually opening streams, buffering data, handling character encoding and manually parsing returned text formats, for example JSON, into Java objects.
Square created the Retrofit library to simplify this process. Retrofit is a so-called type-safe HTTP client, which lets the programmer define an API as a simple Kotlin interface. Instead of writing code that implements a connection, we only declare what the request looks like (HTTP method, path, parameters). Retrofit automatically generates the execution code.
Main advantages:
- Abstraction: Hides low-level HTTP protocol details.
- Automatic conversion (serialization/deserialization): Works with libraries such as GSON, Moshi or Scalars, automatically converting the received response into
data classobjects. - Integration with Kotlin Coroutines: Retrofit natively supports suspending functions (
suspend).
Thanks to coroutine support, a network request in code looks like a regular synchronous call, but keeps full thread safety (main-safety).
// Interface definition (Retrofit)
interface NewsApi {
    @GET("articles")
    suspend fun getArticles(): List<Article>
}

// Usage in ViewModel
viewModelScope.launch {
    try {
        // This call:
        // 1. SUSPENDS the coroutine (releases the UI thread).
        // 2. Executes the network request in the background.
        // 3. RESUMES the coroutine on the UI thread when data arrives.
        val articles = api.getArticles()

        // Here we already have a ready list of objects, so we can update UI
        uiState = articles
    } catch (e: Exception) {
        // Error handling (e.g. no Internet)
    }
}
In the example above, we do not need to use withContext(Dispatchers.IO). Switching happens automatically, similarly to Room and DataStore.
HTTP protocol methods (semantics)
In REST architecture, each data operation (CRUD) is closely connected to the appropriate HTTP method. The selected method informs the server about the client's intention.
The most commonly used methods are:
- GET: Used only to retrieve data. It is a safe operation and usually should not modify server state, for example fetching a list of articles or user details.
- POST: Used to send new data to the server to create a resource, for example adding a new comment or registering a user. Data is sent in the request body.
- PUT: Used to fully update an existing resource. The client sends a complete new version of the object, which replaces the old one.
- PATCH: Used to partially modify a resource. We send only the fields that should change, for example changing only a password without sending the rest of the profile.
- DELETE: As the name suggests, deletes the selected resource from the server.
| CRUD operation | HTTP method | Retrofit annotation |
|---|---|---|
| Create | POST | @POST |
| Read | GET | @GET |
| Update | PUT / PATCH | @PUT / @PATCH |
| Delete | DELETE | @DELETE |
Data modeling (Data Transfer Objects)
Before we start fetching data, we must prepare containers for it. In software engineering, objects used only to transfer data between subsystems, for example Server -> Application, are called DTOs (Data Transfer Objects).
REST API servers most often return data in JSON (JavaScript Object Notation) format. Our task is to create Kotlin classes (data class) that reflect the structure of this JSON. This process can also be automated by installing appropriate IDE plugins.
Naming standards in JSON and Kotlin often differ:
- JSON: Often uses
snake_case, for examplefirst_nameorcreated_at. - Kotlin: We often use
camelCase, for examplefirstNameorcreatedAt.
To solve this conflict without breaking language conventions, we use the @SerializedName annotation from the GSON library. It works like a map, telling the converter: "assign the 'user_avatar_url' field from JSON to the 'avatarUrl' variable".
Assume that the server returns the following article object:
{
  "id": 90210,
  "title": "New Android 15 released!",
  "published_at": "2024-05-12T10:00:00Z",
  "author": {
    "name": "John Kowalski",
    "is_admin": true
  }
}
The corresponding Kotlin classes look like this:
data class ArticleDto(
    // Same name as in JSON -> annotation not needed
    val id: Long,

    val title: String,

    // Mapping snake_case -> camelCase
    @SerializedName("published_at")
    val publishedAt: String,

    // Nested objects
    val author: AuthorDto
)

data class AuthorDto(
    val name: String,

    @SerializedName("is_admin")
    val isAdmin: Boolean
)
Defining the API interface (Service)
The heart of Retrofit is an interface. This is where we declare which operations our application can perform on the server. We do not write method bodies; we do this only with annotations and return types. Retrofit generates the execution code at application runtime.
The simplest case is fetching a resource from a fixed URL.
interface NewsApiService {
    // The request will be sent to: BASE_URL + "articles"
    // The function MUST be suspend to work with coroutines.
    @GET("articles")
    suspend fun getArticles(): List<ArticleDto>
}
It is rare that we always fetch exactly the same thing. Often we want to fetch a specific article or filter a list.
Path parameter (@Path): We use it when the variable is part of the URL path.
// Request for a specific article, e.g. GET articles/123
@GET("articles/{id}")
suspend fun getArticleDetail(
    @Path("id") articleId: Long
): ArticleDto
Query parameter (@Query): We use it for filtering, sorting or pagination, that is, what appears after the ? character.
// Request: GET articles?category=tech&sort=desc
@GET("articles")
suspend fun getArticles(
    @Query("category") category: String,
    @Query("sort") sortBy: String = "desc"
): List<ArticleDto>
When we want to send an object to the server, for example to create a new comment, we use the POST method and the @Body annotation. Retrofit automatically serializes the object to JSON before sending it.
data class CommentRequest(
    val articleId: Long,
    val content: String
)

interface NewsApiService {
    @POST("comments")
    suspend fun postComment(@Body request: CommentRequest): Response<Unit>
}
APIs often require authorization, for example an API key. We can add a header statically or dynamically.
// 1. Static header for a method
@Headers("User-Agent: MyAndroidApp/1.0")
@GET("articles")
suspend fun getNews(): List<ArticleDto>

// 2. Dynamic header (e.g. session token)
@GET("profile")
suspend fun getProfile(
    @Header("Authorization") token: String
): UserDto
Client configuration (Retrofit Builder)
After defining the data model (DTO) and API interface, we must create a Retrofit instance. This process resembles configuring a Room database: here too, we use the Singleton pattern so that expensive network-connection objects are not created repeatedly.
Dependencies (Gradle)
First, make sure that the required libraries are present in build.gradle (Module: app). Retrofit is modular: by itself, it handles only HTTP connections. To parse JSON, we need an additional converter.
dependencies {
    // Retrofit engine
    implementation("com.squareup.retrofit2:retrofit:2.9.0")
    // JSON -> Kotlin Object converter (GSON)
    implementation("com.squareup.retrofit2:converter-gson:2.9.0")

    // Optional: OkHttp for logging requests in the console (debugging)
    implementation("com.squareup.okhttp3:logging-interceptor:4.11.0")
}
Singleton implementation
We create an object that manages configuration. The key elements are:
- Base URL: Main API address. Note: It must always end with a slash
/. - ConverterFactory: Class responsible for serialization/deserialization (GSON here).
- OkHttpClient: HTTP client where we can configure, for example, timeouts (waiting time for the server).
object RetrofitInstance {

    private const val BASE_URL = "https://newsapi.org/v2/"

    // HTTP client configuration (optional logging)
    private val client = OkHttpClient.Builder()
        .addInterceptor { chain ->
            val request = chain.request().newBuilder()
                // We can add a global header here, e.g. an API key
                .addHeader("X-Api-Key", "YOUR_API_KEY")
                .build()
            chain.proceed(request)
        }
        .build()

    // Lazy Retrofit initialization
    val api: NewsApiService by lazy {
        Retrofit.Builder()
            .baseUrl(BASE_URL)
            .client(client)
            .addConverterFactory(GsonConverterFactory.create())
            .build()
            .create(NewsApiService::class.java)
    }
}
Error handling and UI states
Unlike a local database, a network request can fail in many ways: no signal, 404 error, 500 error. The application must be ready for this.
Instead of keeping separate variables in the ViewModel, such as isLoading, errorText and data, an elegant solution is to use a sealed interface. Thanks to this, the view is always in one strictly defined state.
sealed interface NewsUiState {
    // 1. Initial/loading state
    data object Loading : NewsUiState

    // 2. Success - we have data to display
    data class Success(val articles: List<ArticleDto>) : NewsUiState

    // 3. Error - something went wrong
    data class Error(val message: String) : NewsUiState
}
class NewsViewModel : ViewModel() {
// Internal state (editable)
private val _uiState = MutableStateFlow<NewsUiState>(NewsUiState.Loading)
// Public state (read-only)
val uiState = _uiState.asStateFlow()
init {
fetchNews()
}
fun fetchNews() {
viewModelScope.launch {
// Set state to loading
_uiState.update { NewsUiState.Loading }
try {
// Network call (Retrofit + suspend)
val response = RetrofitInstance.api.getTopHeadlines()
// Success: update state with data
_uiState.update {
NewsUiState.Success(response.articles)
}
} catch (e: IOException) {
// Network error (no Internet, timeout)
_uiState.update {
NewsUiState.Error("No Internet connection")
}
} catch (e: HttpException) {
// Server error (4xx, 5xx)
_uiState.update {
NewsUiState.Error("Server error: ${e.code()}")
}
} catch (e: Exception) {
// Other errors
_uiState.update {
NewsUiState.Error("Unknown error: ${e.message}")
}
}
}
}
}Practical example: News Reader application
Let us connect everything together. We will create a screen that reacts to state changes: it displays a spinner while loading, a list after data is fetched, or an error message if something fails.
Model and API
Define the data structure and endpoint as in the previous sections.
// DTO (Data Transfer Object)
data class NewsResponse(val articles: List<ArticleDto>)
data class ArticleDto(val title: String, val description: String?)

// Retrofit interface
interface NewsApiService {
    @GET("top-headlines?country=us")
    suspend fun getTopHeadlines(): NewsResponse
}
Repository layer
The repository hides the data source. If in the future we add a Room database cache, we will change code only here, while the ViewModel remains unchanged.
class NewsRepository(private val apiService: NewsApiService) {

    // Suspending function that delegates the request to Retrofit
    suspend fun getNews(): List<ArticleDto> {
        return apiService.getTopHeadlines().articles
    }
}
ViewModel with StateFlow handling
The ViewModel receives the repository in the constructor. We use StateFlow to manage state.
class NewsViewModel(private val repository: NewsRepository) : ViewModel() {

    // Backing property
    private val _uiState = MutableStateFlow<NewsUiState>(NewsUiState.Loading)
    val uiState = _uiState.asStateFlow()

    init {
        fetchNews()
    }

    fun fetchNews() {
        viewModelScope.launch {
            _uiState.update { NewsUiState.Loading }

            try {
                // Fetch data from the REPOSITORY, not directly from API
                val articles = repository.getNews()

                _uiState.update { NewsUiState.Success(articles) }
            } catch (e: IOException) {
                _uiState.update { NewsUiState.Error("No Internet") }
            } catch (e: HttpException) {
                _uiState.update { NewsUiState.Error("Server error: ${e.code()}") }
            } catch (e: Exception) {
                _uiState.update { NewsUiState.Error("Unknown error") }
            }
        }
    }
}

// Factory needed to inject Repository into ViewModel
class NewsViewModelFactory(private val repository: NewsRepository) : ViewModelProvider.Factory {
    override fun <T : ViewModel> create(modelClass: Class<T>): T {
        if (modelClass.isAssignableFrom(NewsViewModel::class.java)) {
            @Suppress("UNCHECKED_CAST")
            return NewsViewModel(repository) as T
        }
        throw IllegalArgumentException("Unknown ViewModel class")
    }
}
View (Compose)
The UI layer observes state and reacts to it.
@Composable
fun NewsScreen(viewModel: NewsViewModel) { // ViewModel passed as a parameter

    val state by viewModel.uiState.collectAsStateWithLifecycle()

    Scaffold(
        topBar = { TopAppBar(title = { Text("News") }) }
    ) { padding ->
        Box(modifier = Modifier.padding(padding).fillMaxSize(),
          contentAlignment = Alignment.Center) {
            when (val currentState = state) {
                is NewsUiState.Loading -> CircularProgressIndicator()
                is NewsUiState.Error -> {
                    Column(horizontalAlignment = Alignment.CenterHorizontally) {
                        Text(text = currentState.message)
                        Button(onClick = { viewModel.fetchNews() }) { Text("Retry") }
                    }
                }
                is NewsUiState.Success -> {
                    LazyColumn(modifier = Modifier.fillMaxSize()) {
                        items(currentState.articles) { article ->
                            ArticleItem(article)
                        }
                    }
                }
            }
        }
    }
}
Entry point (MainActivity)
class MainActivity : ComponentActivity() {
    override fun onCreate(savedInstanceState: Bundle?) {
        super.onCreate(savedInstanceState)

        // 1. Create API instance (from singleton)
        val apiService = RetrofitInstance.api

        // 2. Create Repository
        val repository = NewsRepository(apiService)

        // 3. Create ViewModel through Factory
        val viewModelFactory = NewsViewModelFactory(repository)

        setContent {
            val viewModel: NewsViewModel = viewModel(factory = viewModelFactory)
            NewsScreen(viewModel = viewModel)
        }
    }
}
Singleton vs Application Class
Notice the difference in how the network client is initialized compared with the database from Chapter 9.
- For Room, we had to use the
Applicationclass because the database requires access toContext(the device filesystem). - For Retrofit, we used a simplification in the form of a static object (
object RetrofitInstance). This is possible because an HTTP client in its basic form does not depend on the Android system and does not requireContext.
In the previous two chapters, we built solid foundations for the data layer:
- Room (Chapter 9) for storing local data.
- Retrofit (Chapter 10) for fetching data from the network.
However, to connect these elements with the view (Compose), we had to write a lot of glue code in MainActivity. We manually created database, network, repository and factory instances there. In this chapter, we will learn how to automate this process using the Android industry standard: the Hilt library.
Manual dependency injection
Let us start by analyzing the code with which we ended the previous lecture. Look critically at our MainActivity class.
In the approach we used so far, the Activity (or the Application class) played the role of the all-knowing object that knows everything about how to create every object in the application.
// CODE FROM THE PREVIOUS CHAPTER (Manual DI)
class MainActivity : ComponentActivity() {
    override fun onCreate(savedInstanceState: Bundle?) {
        super.onCreate(savedInstanceState)

        // 1. Activity must know how to configure Retrofit
        // (or how to obtain it from a singleton)
        val apiService = RetrofitInstance.api

        // 2. Activity must know that Repository needs API
        val repository = NewsRepository(apiService)

        // 3. Activity must know how to build ViewModelFactory
        val viewModelFactory = NewsViewModelFactory(repository)

        setContent {
            // 4. Activity injects the factory into the ViewModel
            val viewModel: NewsViewModel = viewModel(factory = viewModelFactory)
            NewsScreen(viewModel = viewModel)
        }
    }
}
The approach above has several serious disadvantages:
- Tight coupling: Our views (Activity/Compose) know too much about the data layer. If we change the
NewsRepositoryconstructor, for example by adding a Room database there, we will have to update every place where this repository is created. - Boilerplate code: In a large application with 50 ViewModels, writing a separate factory (
ViewModelProvider.Factory) for each of them is tedious and error-prone. - Difficult testing: If
MainActivityusesRetrofitInstancedirectly, it is very difficult to replace the API with a fake (mock) during UI tests, for example to simulate no Internet connection.
Dependency Injection is a programming technique in which objects do not create their dependencies themselves, but receive them from the outside.
This can be illustrated with the analogy of a computer and a mouse (USB port):
- Without DI: The computer has the mouse permanently soldered to the motherboard.
class Computer {
    // The computer creates the mouse itself. It is tightly coupled to it.
    // It cannot be replaced with another model or tested easily.
    private val mouse = WiredMouse()

    fun click() { mouse.leftClick() }
}Mouse interface.class Computer(private val mouse: Mouse) { // Constructor injection
fun click() { mouse.leftClick() }
}
// Usage:
// We can connect a regular mouse...
val officeComputer = Computer(WiredMouse())
// ...or inject a gaming mouse without changing the computer code!
val gamingComputer = Computer(GamingMouseRGB())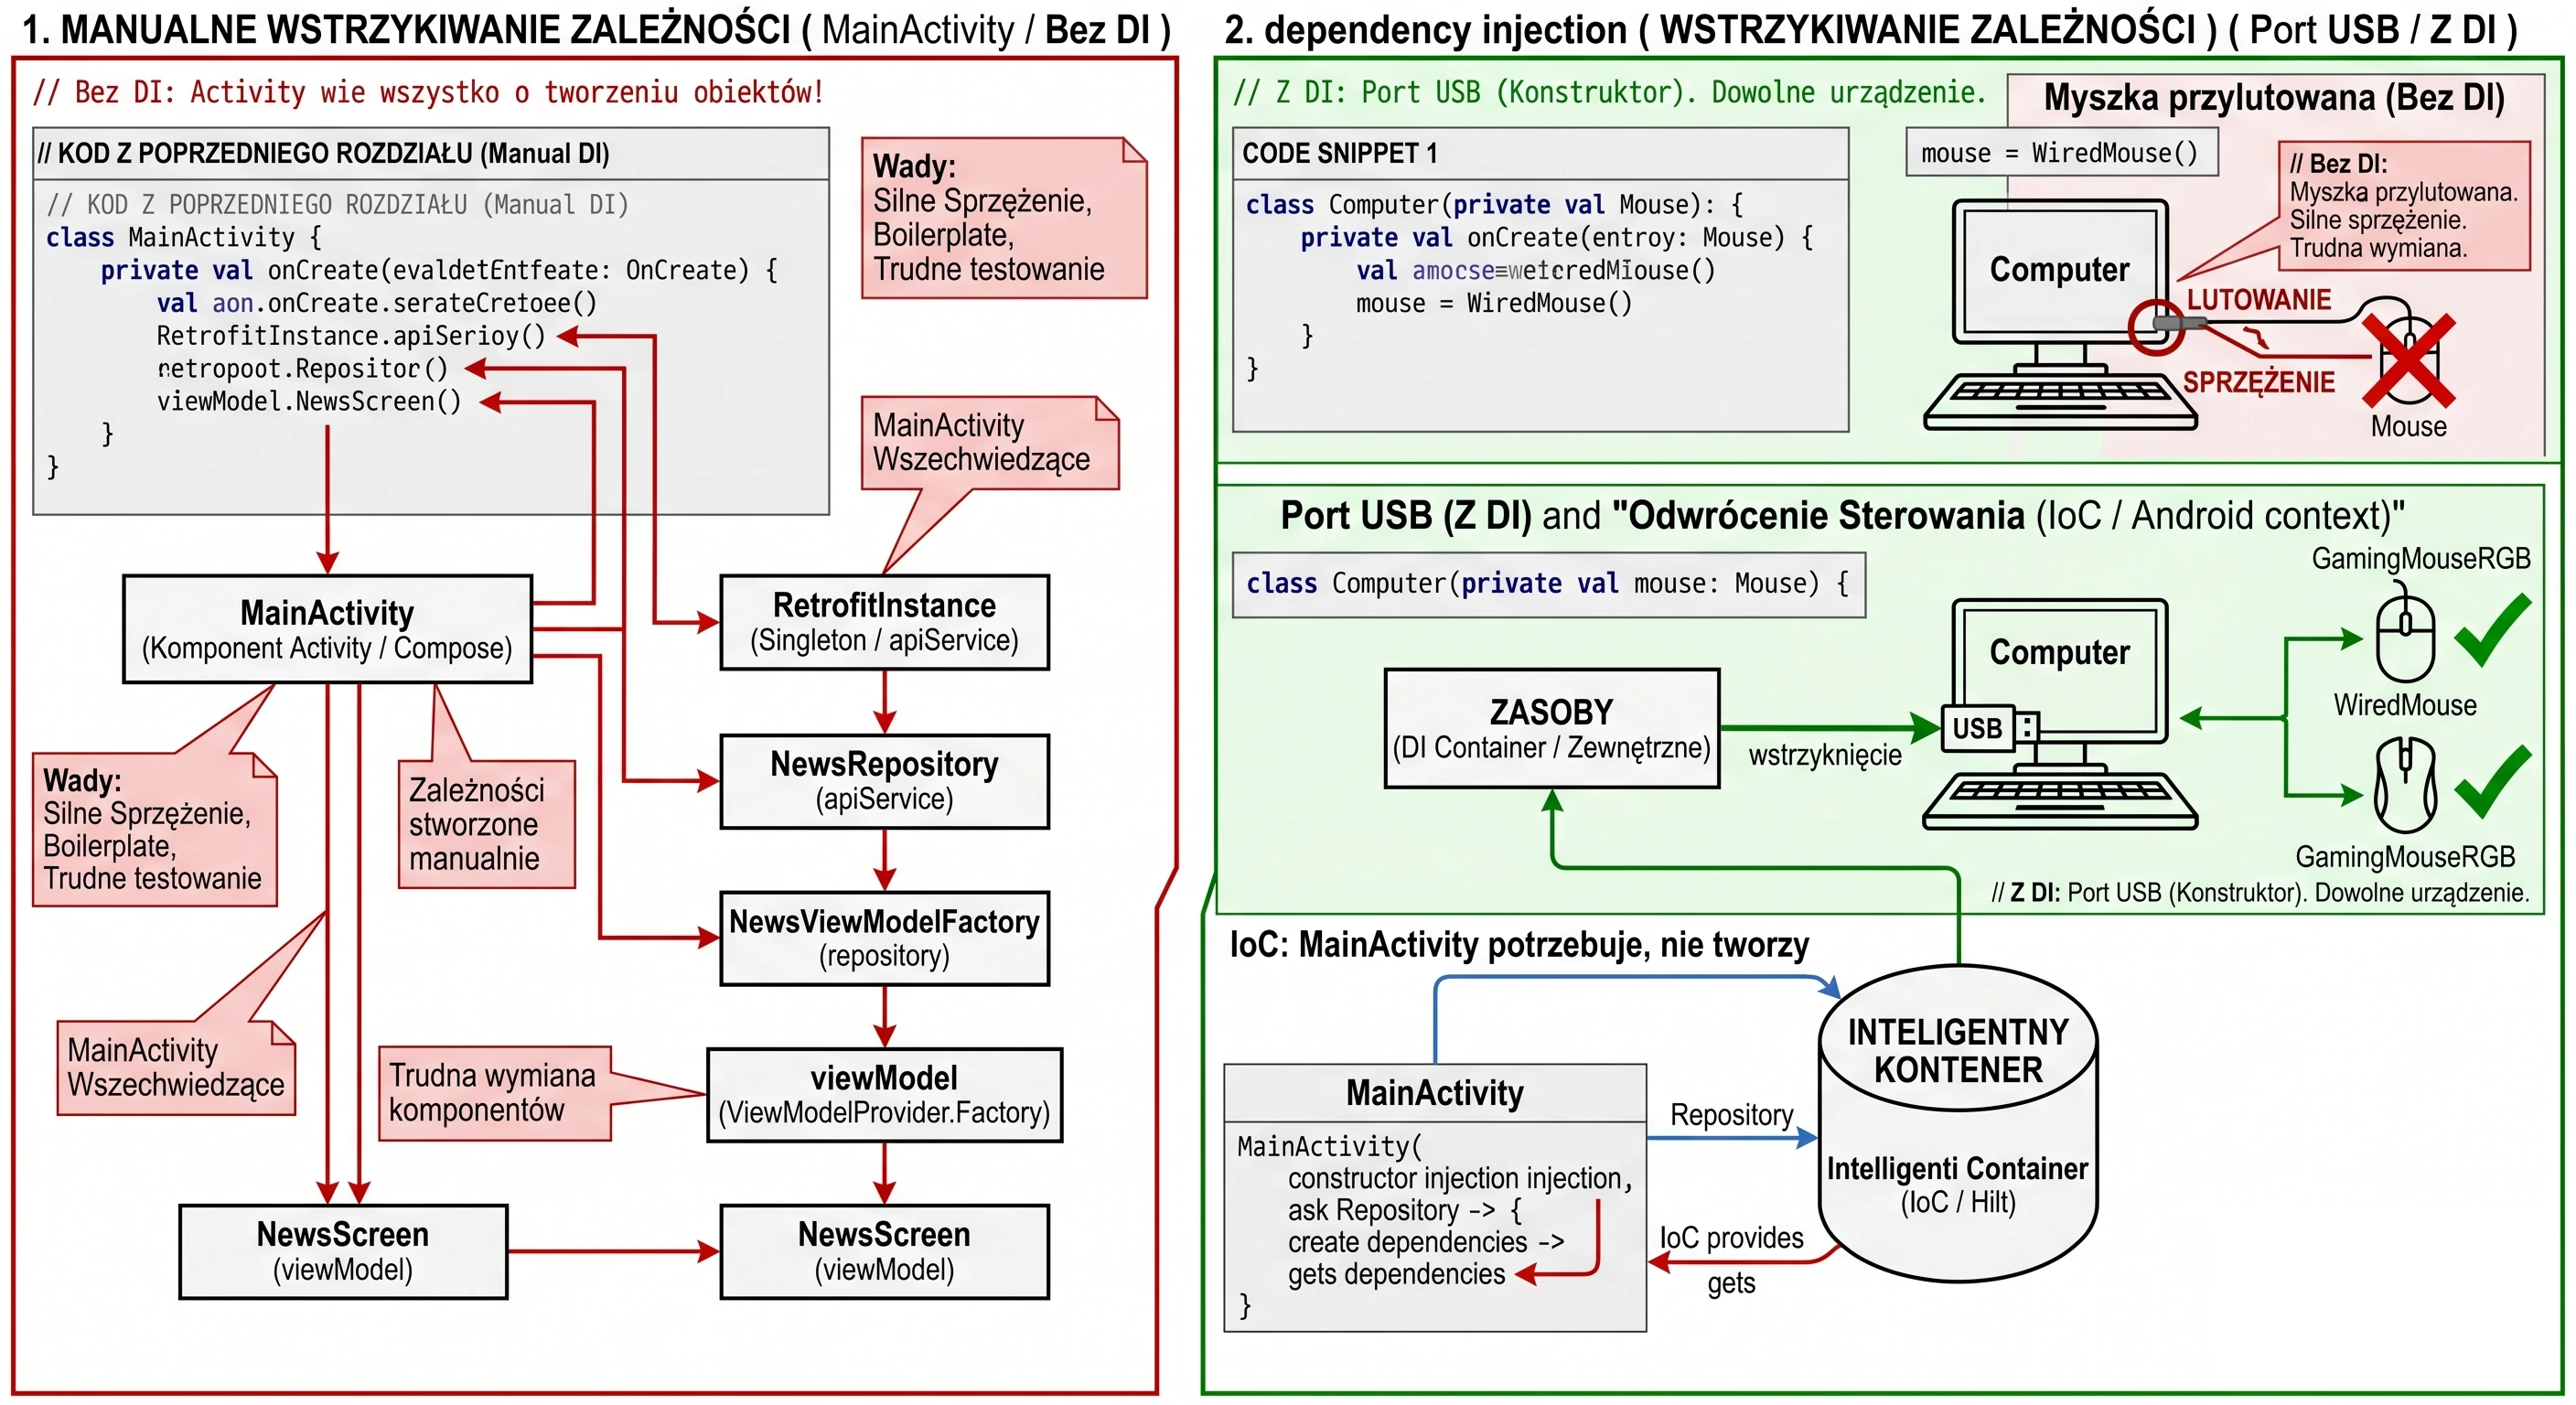
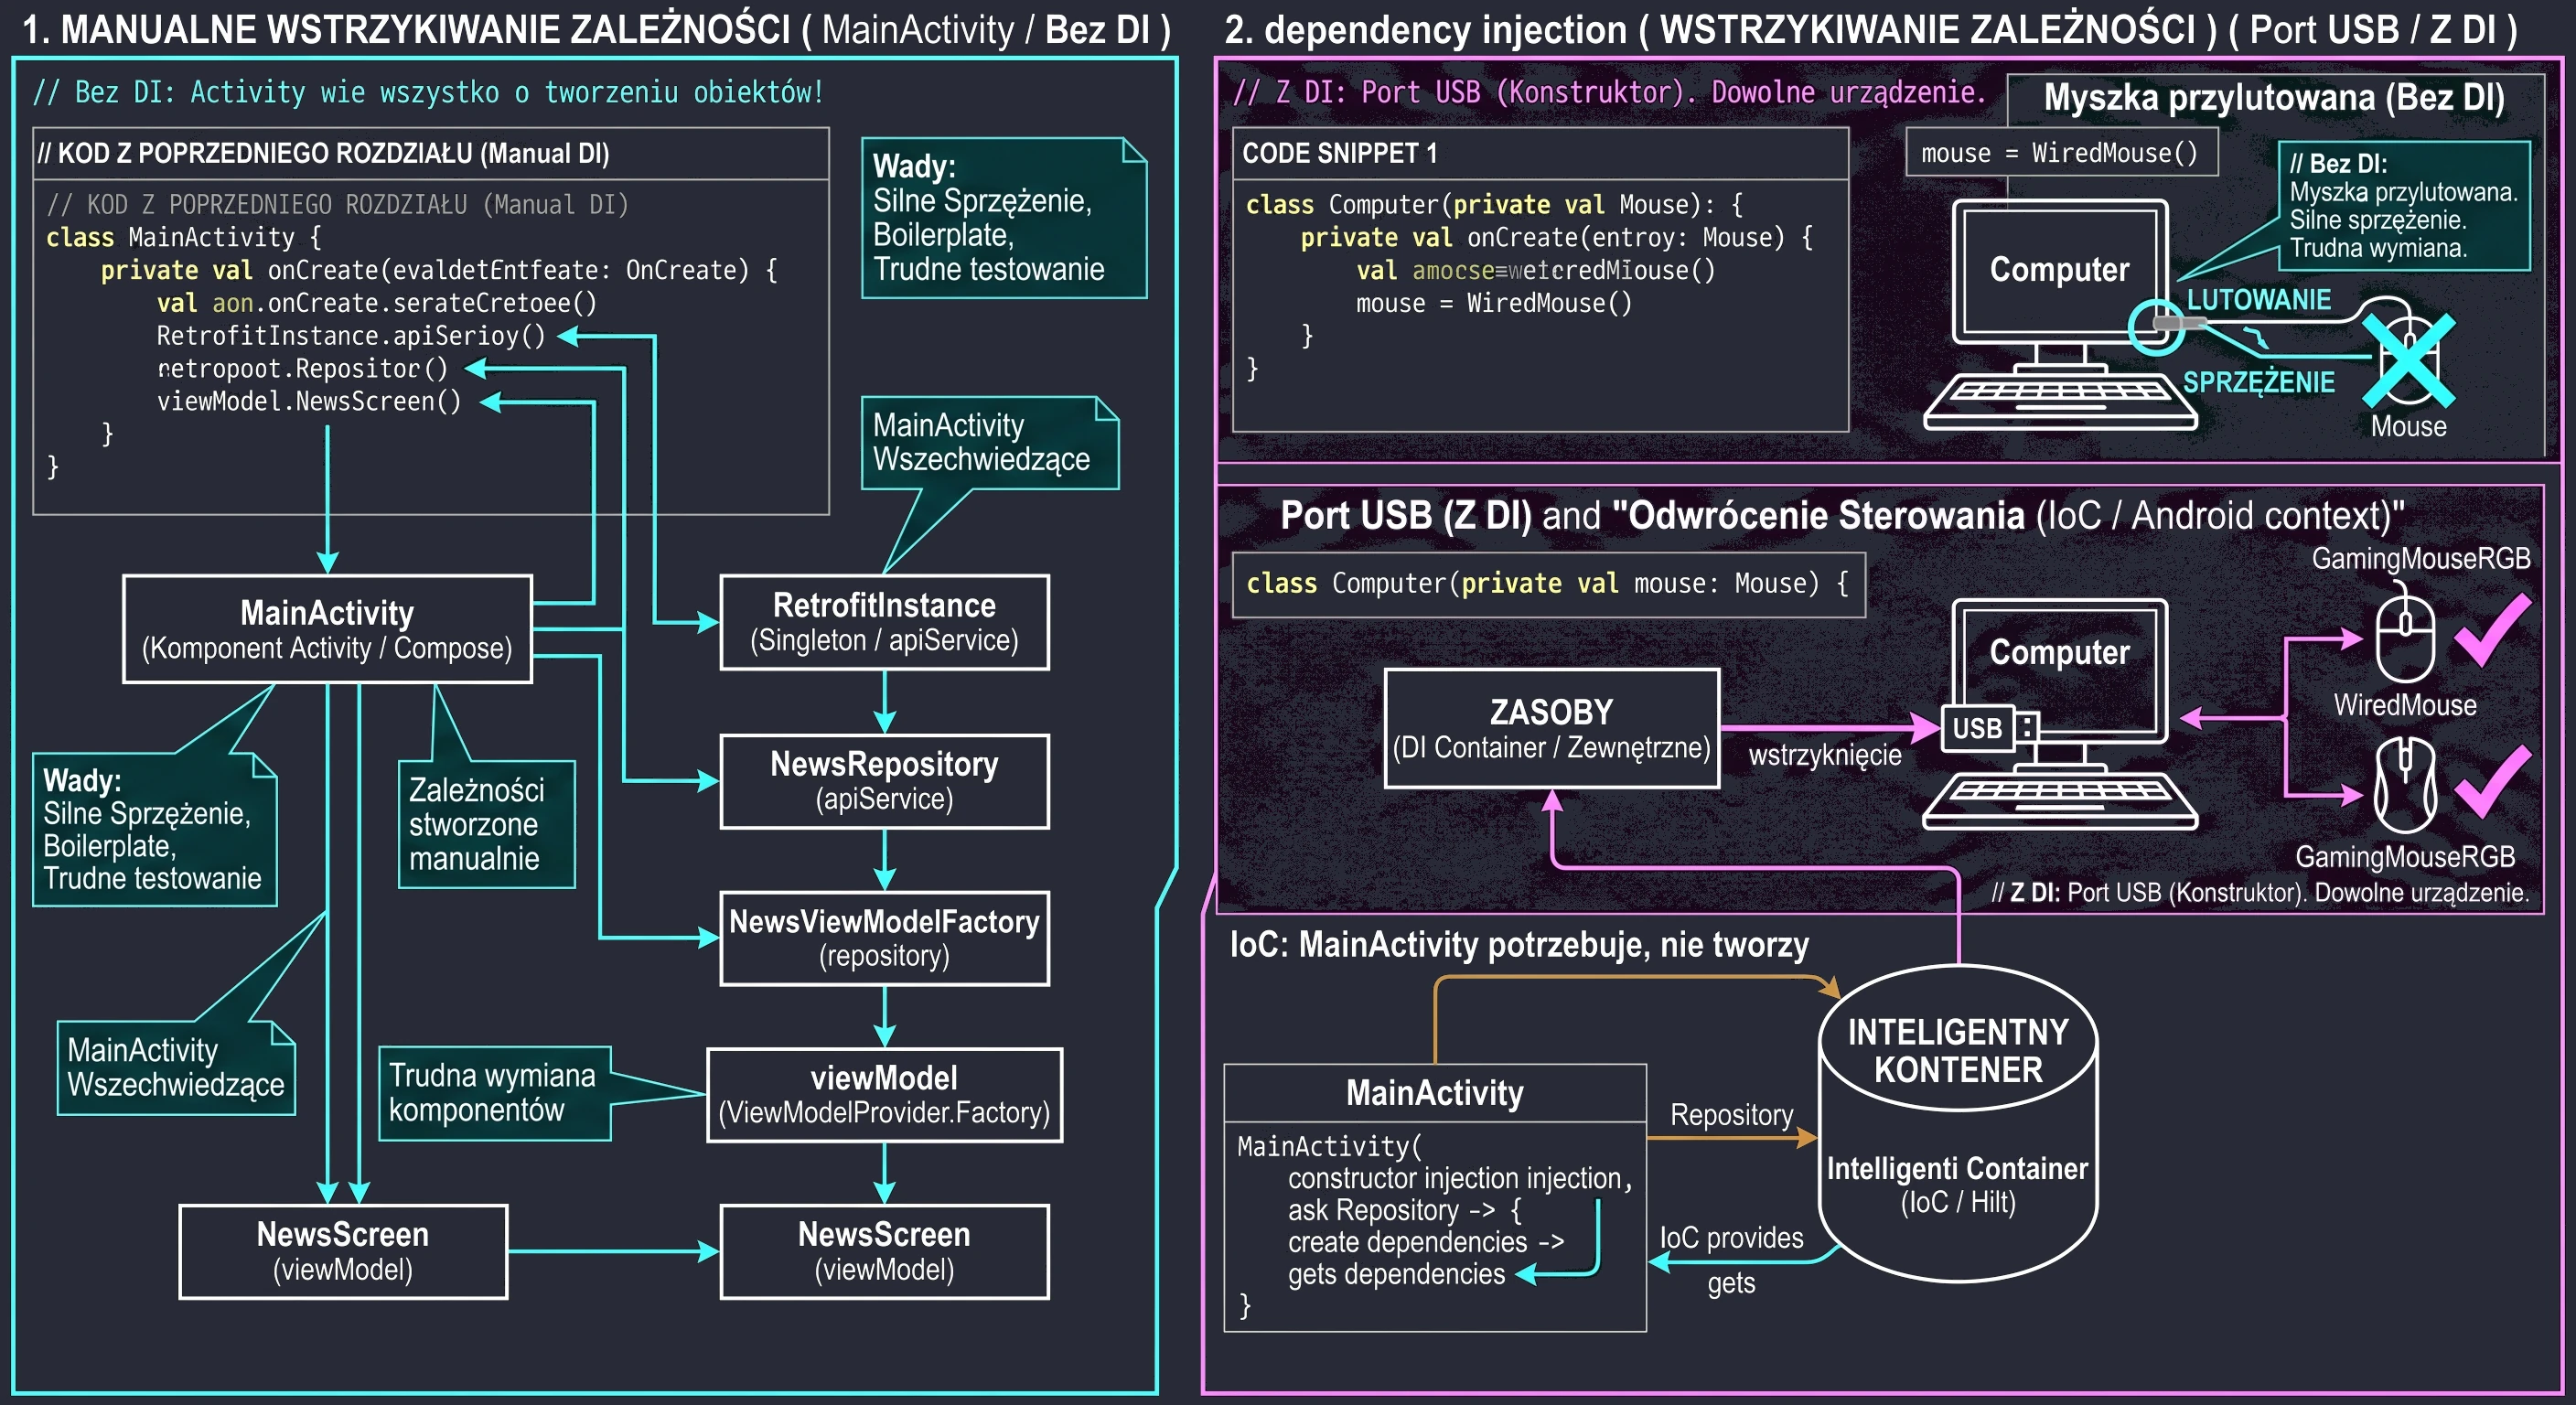
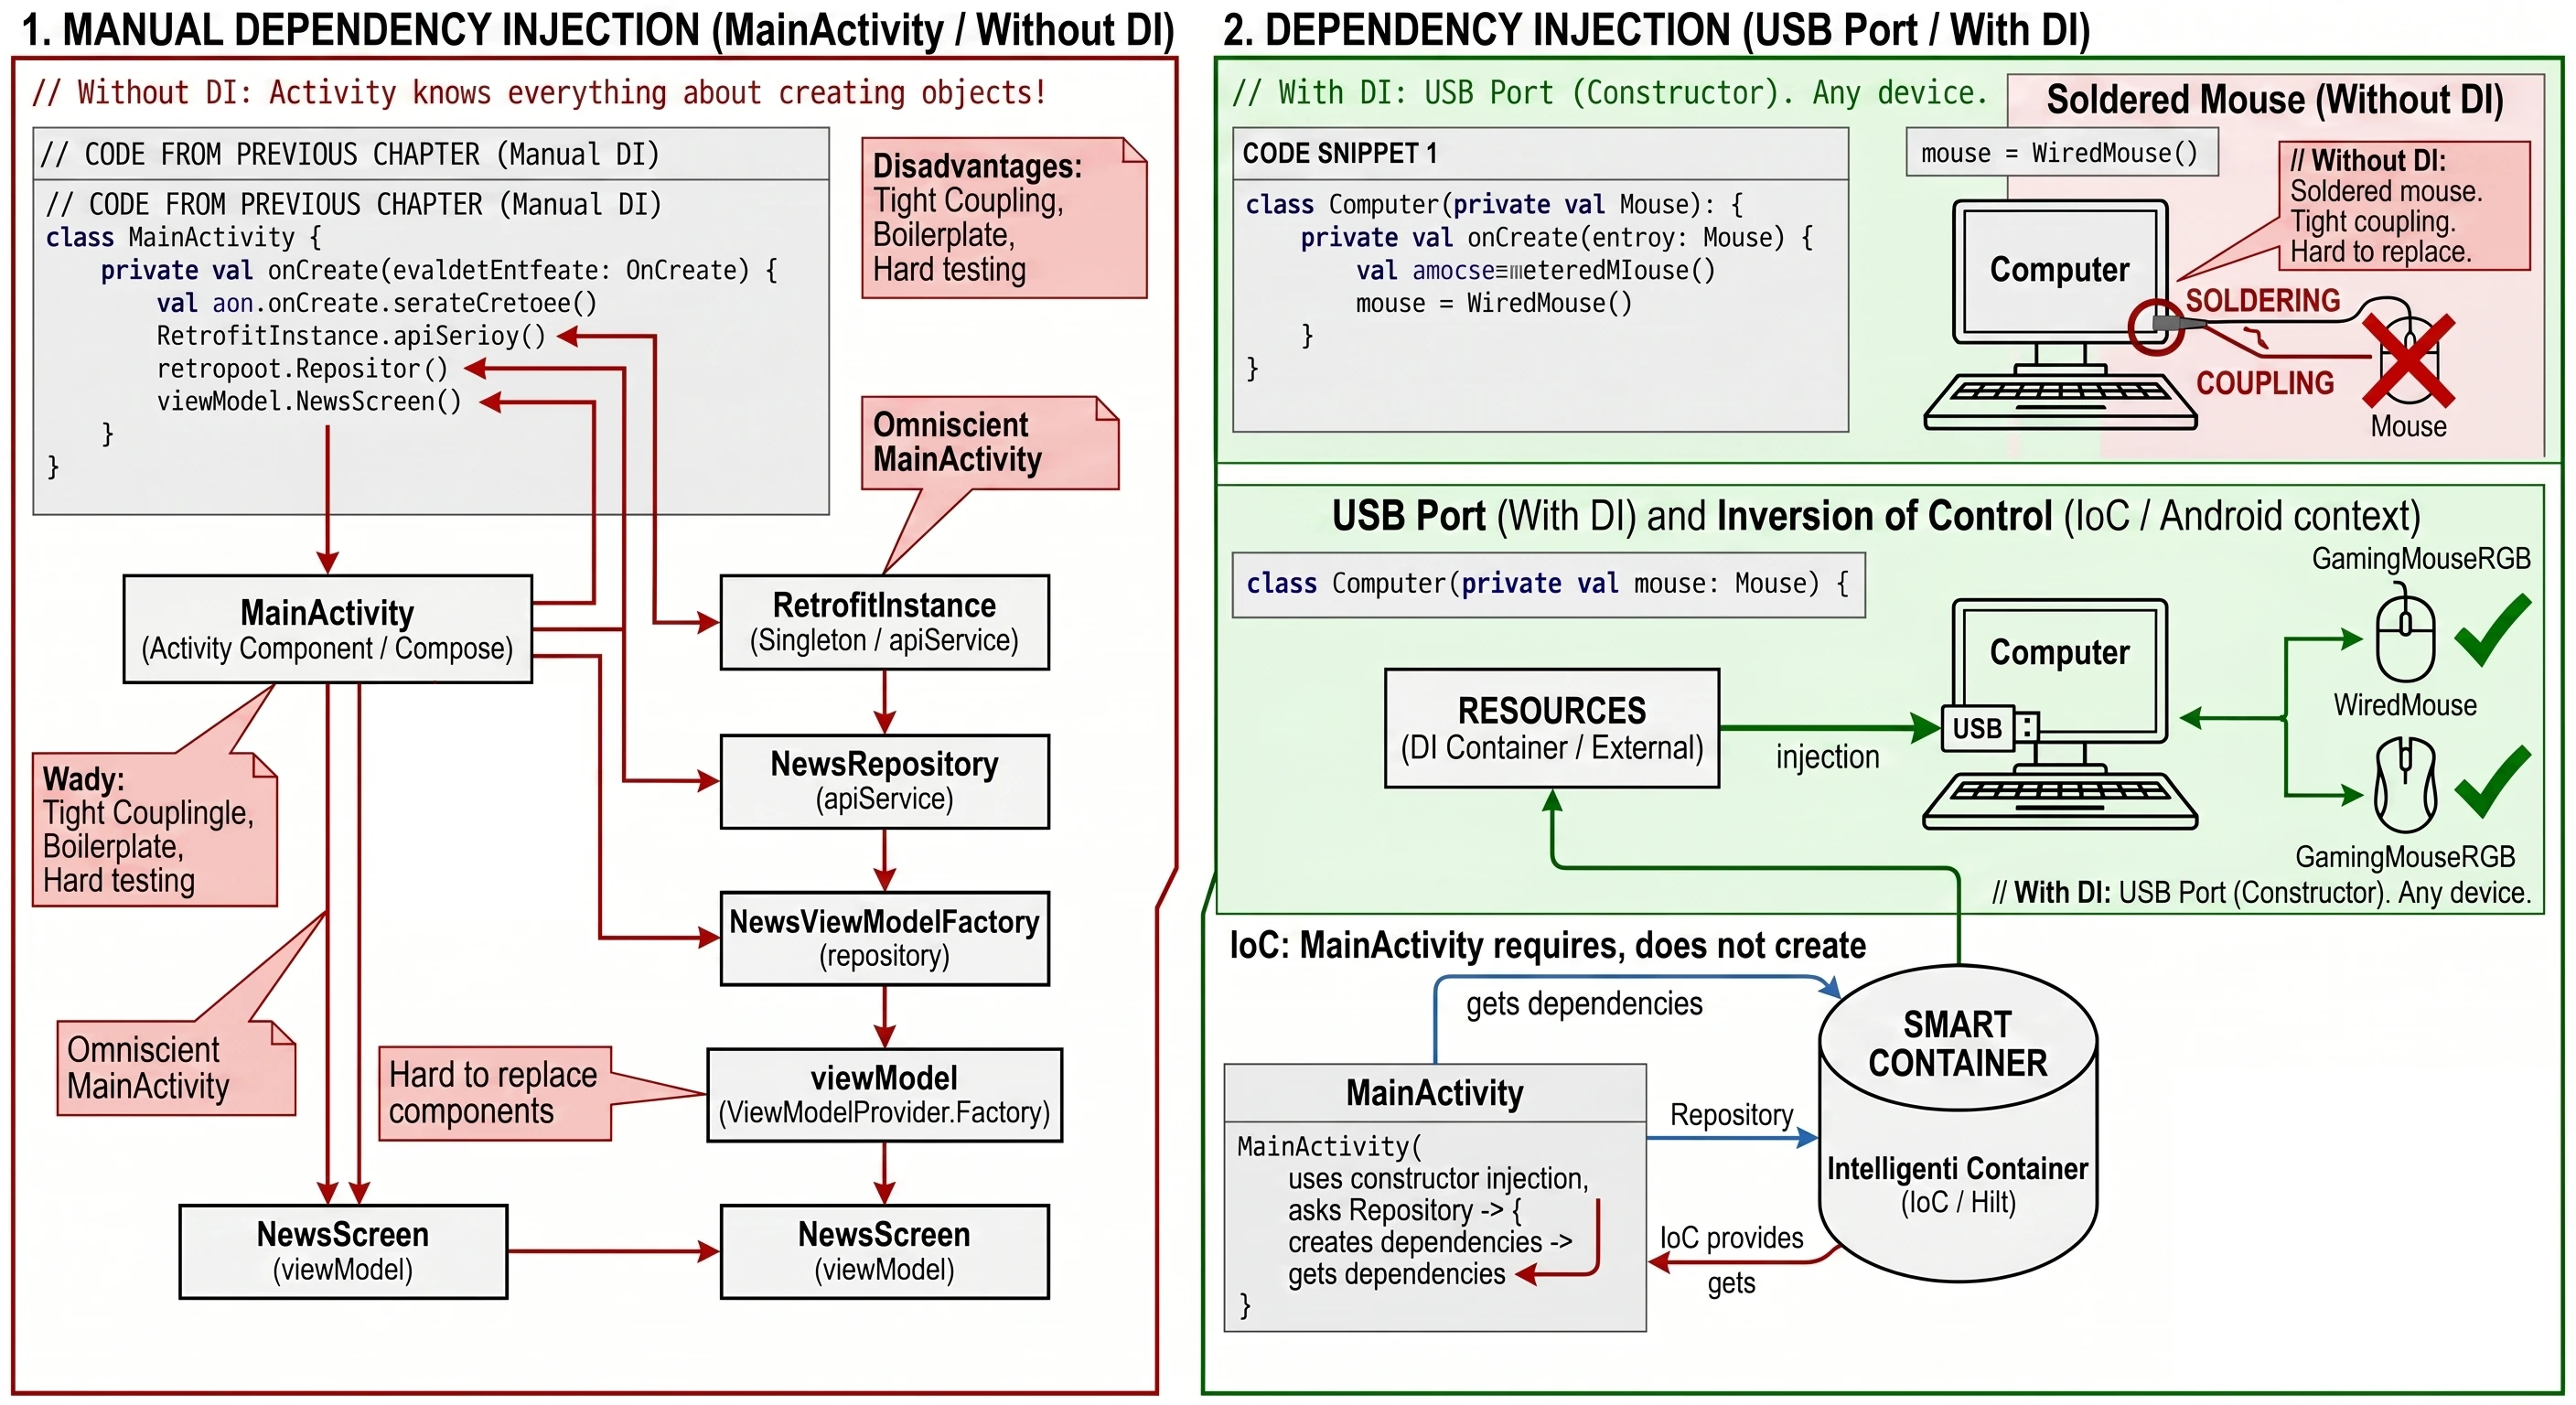

Inversion of control
For DI to work at scale, we need someone to manage all these dependencies: a container that knows how to create all necessary elements and how to deliver them to the computer. This concept is called Inversion of Control. Instead of saying: I (Activity) create the Repository, we say: I (Activity) need the Repository, provide it to me.
In the Android world, the Hilt library plays the role of this intelligent container.
Hilt library
Historically, Dagger 2 dominated the Android world, but it requires writing a large amount of complex configuration code. Hilt is a library created by Google as a layer on top of Dagger.
- Advantage: It preserves Dagger performance (compile-time code generation, no runtime overhead).
- Simplification: It standardizes dependency injection and eliminates the need to manually create Components and Subcomponents.
Project configuration (Gradle)
To use Hilt, we must add the appropriate plugins and dependencies.
In build.gradle.kts(Project), add the Hilt plugin in the plugins block. The library version should match current releases.
plugins {
    // ... other plugins (e.g. android.application, kotlin.android)
    id("com.google.dagger.hilt.android") version "2.57.2" apply false
}
In build.gradle.kts(Module), in the application module, we must apply the plugin and add libraries. Hilt uses an annotation processor, so we use ksp.
plugins {
    id("com.android.application")
    id("org.jetbrains.kotlin.android")

    // 1. Hilt and ksp plugins
    id("com.google.devtools.ksp")
    id("com.google.dagger.hilt.android")
}

dependencies {
    // 2. Hilt library
    implementation("com.google.dagger:hilt-android:2.57.2")

    // 3. Compiler (generates Dagger code)
    ksp("com.google.dagger:hilt-android-compiler:2.57.2")
}
Application foundation (@HiltAndroidApp)
Every application using Hilt must contain a class inheriting from Application, annotated with @HiltAndroidApp.
This is the point where the root of the dependency graph (Root Component) is generated. This is where Hilt obtains knowledge about all singletons in the application.
In the first step, we create a class representing the application:
// This annotation is REQUIRED. Without it, Hilt will not work.
@HiltAndroidApp
class NewsApplication : Application()
Next, we register the class in AndroidManifest.xml. Creating the class alone is not enough. We must inform Android that it should use it when starting the process. We do this in the android:name attribute of the <application> tag.
<manifest xmlns:android="http://schemas.android.com/apk/res/android" ...>

    <application
        android:name=".NewsApplication"
        ... >

        <activity android:name=".MainActivity" ... />
    </application>
</manifest>
After these steps and rebuilding the project (Gradle sync), Hilt is ready to work.
Injection basics
After configuring the Application class, the DI container is initialized, but the dependency graph remains empty. For Hilt to manage objects, we must define two key aspects:
- Binding definitions: Instructions for the compiler explaining how to instantiate individual classes.
- Injection targets: Android system components that should receive dependencies from the container.
There are two injection techniques: constructor injection (preferred) and field injection (forced by Android system architecture). The basic way to extend the dependency graph in Hilt is the @Inject annotation placed on a class constructor.
Using this annotation causes two operations during compilation (annotation processing):
- Registration in the graph: The class becomes available to the DI container. Hilt implicitly generates a factory for it.
- Dependency declaration: Constructor parameters are treated as dependencies required to create the instance. Hilt automatically tries to resolve (find) them in the graph.
// File: NewsRepository.kt

// The @Inject annotation tells Hilt how to create a NewsRepository instance.
// This is a "binding".
class NewsRepository @Inject constructor(
    // The apiService parameter is a dependency
    // that Hilt must provide (resolve).
    private val apiService: NewsApiService
) {
    suspend fun getNews() = apiService.getTopHeadlines()
}
In the example above, every request to inject NewsRepository will cause Hilt to automatically create the object after first resolving the apiService dependency.
Integration with Android components (@AndroidEntryPoint)
In Android, the lifecycle of key components (Activity, Fragment, Service, BroadcastReceiver) is managed by the operating system, not by the programmer. These classes are instantiated using system reflection, which prevents constructor injection.
In such cases, we use the field injection pattern. To enable injection into system classes, we must annotate them with @AndroidEntryPoint.
This annotation generates an individual DI container (Hilt Component) for the given class, tied to its lifecycle, for example ActivityComponent.
// File: MainActivity.kt

@AndroidEntryPoint
class MainActivity : ComponentActivity() {

    // Field Injection: Hilt injects the instance after Activity creation,
    // but before onCreate() is called.
    // Fields cannot be private (generated-code requirement).
    @Inject
    lateinit var analytics: AnalyticsLogger

    override fun onCreate(savedInstanceState: Bundle?) {
        super.onCreate(savedInstanceState)
        // At this point, the 'analytics' field is already initialized and safe to use.
        analytics.logEvent("App Started")

        setContent {
            // ...
        }
    }
}
Hilt modules: providing external dependencies
Constructor injection is sufficient for classes that belong to the project. However, we hit a barrier for dependencies from external libraries (third-party libraries), such as Retrofit, OkHttp or Room.
There are two main obstacles that prevent using the @Inject annotation:
- No access to source code: We cannot modify a library class to add an annotation to its constructor.
- Complex instantiation: These objects are often created using the Builder or Factory Method pattern, not through a simple constructor call.
The solution to this problem is Hilt modules. A module is a class (or object) acting as a factory, where we define methods that provide instances of required types.
Module structure (@Module, @InstallIn)
Every module must have two annotations:
@Module: Tells Hilt that this class contains binding definitions.@InstallIn(Component::class): Defines in which container (component) the dependencies from this module should be available. This determines object lifetime.
The most commonly used component is SingletonComponent, which is tied to the lifecycle of the whole application (the Application class).
Defining providers (@Provides)
Inside a module, we create functions annotated with @Provides. The body of such a function contains the logic needed to create and configure an object instance.
Below is an implementation of a network module replacing the manually created RetrofitInstance singleton from the previous lecture.
// File: di/NetworkModule.kt

@Module
@InstallIn(SingletonComponent::class)
object NetworkModule {

    // Binding definition for the Retrofit type.
    // The @Singleton annotation guarantees that only one client instance
    // will exist within the application (critical for the HTTP connection pool).
    @Provides
    @Singleton
    fun provideRetrofit(): Retrofit {
        return Retrofit.Builder()
            .baseUrl("https://newsapi.org/v2/")
            .addConverterFactory(GsonConverterFactory.create())
            .build()
    }

    // Binding definition for the NewsApiService type.
    // The 'retrofit' dependency in the parameter will be provided automatically
    // by the provideRetrofit() method defined above.
    @Provides
    @Singleton
    fun provideNewsApiService(retrofit: Retrofit): NewsApiService {
        return retrofit.create(NewsApiService::class.java)
    }
}
With the configuration above, when NewsRepository requests a NewsApiService object in its constructor, Hilt automatically calls the provideNewsApiService method.
Access to application context (@ApplicationContext)
Room database configuration requires access to a Context object. Hilt provides a predefined binding for the application context through the @ApplicationContext qualifier annotation.
This allows us to safely inject context into modules without the risk of memory leaks associated with storing references to an Activity.
// File: di/DatabaseModule.kt

@Module
@InstallIn(SingletonComponent::class)
object DatabaseModule {

    @Provides
    @Singleton
    fun provideDatabase(
        // Inject system context
        @ApplicationContext context: Context
    ): AppDatabase {
        return Room.databaseBuilder(
            context,
            AppDatabase::class.java,
            "news_database"
        ).build()
    }

    // Provide DAO directly to the dependency graph.
    // Thanks to this, repositories do not have to depend on the whole database
    // (AppDatabase), only on a specific DAO (Interface Segregation Principle).
    @Provides
    fun provideArticleDao(database: AppDatabase): ArticleDao {
        return database.articleDao()
    }
}
Lifecycle management and scopes
By default, Hilt, like Dagger 2, behaves as a stateless factory. This means that every dependency-injection request creates a new instance of the object.
class AnalyticsAdapter @Inject constructor() { ... }

// Injection 1: object A is created (memory address: @1234)
@Inject lateinit var analytics1: AnalyticsAdapter

// Injection 2: object B is created (memory address: @5678)
@Inject lateinit var analytics2: AnalyticsAdapter
For lightweight objects, for example presenters or helpers, this behavior is desired. However, for heavy resources (HTTP client, database connection) or objects storing state (a repository with an in-memory cache), we must guarantee instance uniqueness for a specific period. Scopes are used to control this behavior.
Available scopes in Hilt
Assigning a scope to a binding (a class or a @Provides method) makes the DI container store the created instance in a cache and return it for each subsequent request as long as the given component exists.
Using @Singleton
The most commonly used scope in the data layer is @Singleton. It guarantees that only one instance of a given class exists in the whole application. This is critical for:
- Retrofit/OkHttpClient: They maintain a TCP/IP connection pool. Creating them repeatedly is computationally expensive.
- RoomDatabase: It manages a connection to the SQLite file.
- Repositories (with cache): If a repository stores data in a variable, for example
List<Data>, it must be a singleton so that data does not disappear when the view reloads.
Example from our network module:
@Module
@InstallIn(SingletonComponent::class)
object NetworkModule {

    @Provides
    @Singleton // <--- KEY: forces a single instance
    fun provideRetrofit(): Retrofit {
        // This method runs only ONCE during application lifetime.
        // Subsequent requests return the remembered object.
        return Retrofit.Builder()...build()
    }
}
Component hierarchy
Hilt components form a tree hierarchy. Dependencies are available "down" the hierarchy:
- An object from
SingletonComponentcan be injected intoActivity,ViewModelorFragment. - An object from
ActivityComponentcannot be injected intoSingletonComponent(compile-time error).
This rule protects against memory leaks. An object with a shorter lifecycle, for example Activity, cannot be injected into an object with a longer lifecycle, for example a singleton repository, because the repository would hold a reference to a destroyed Activity.
Integration with ViewModel
In the standard approach without DI, injecting dependencies into a ViewModel is problematic because ViewModels must survive configuration changes, such as screen rotation. This requires creating complicated ViewModelProvider.Factory classes that manually pass dependencies to the constructor. Hilt completely eliminates the need to write factories. It provides a dedicated ViewModelComponent and a special @HiltViewModel annotation.
@HiltViewModel annotation
To enable automatic dependency injection into a ViewModel, we must satisfy two conditions:
- Annotate the class with
@HiltViewModel. - Use
@Inject constructorfor the constructor.
Let us modify our NewsViewModel from the previous lecture:
// File: NewsViewModel.kt

@HiltViewModel // <--- Step 1: inform Hilt about this ViewModel
class NewsViewModel @Inject constructor(
    // <--- Step 2: Hilt injects the Repository itself
    private val repository: NewsRepository
) : ViewModel() {

    // The rest of the code remains unchanged...
    private val _uiState = MutableStateFlow<NewsUiState>(NewsUiState.Loading)
    val uiState = _uiState.asStateFlow()

    init {
        fetchNews()
    }
    // ...
}
Obtaining a ViewModel in Compose
To obtain an instance of such a configured ViewModel inside a Composable function, we use the helper function hiltViewModel().
Under the hood, this library performs the following steps:
- Checks whether a ViewModel instance already exists for the given screen. If so, it returns it.
- If not, it asks Hilt to create a new instance, resolving all constructor dependencies.
- It ties the ViewModel to the lifecycle of the current view (Activity or Navigation Graph entry).
// Required dependency in build.gradle:
// implementation("androidx.hilt:hilt-navigation-compose:<version_number>")

@Composable
fun NewsScreen(
    // Hilt automatically finds and injects the proper ViewModel
    viewModel: NewsViewModel = hiltViewModel()
) {
    val state by viewModel.uiState.collectAsStateWithLifecycle()
    // ... rest of UI
}
Practical example: refactoring
Let us summarize what we learned by looking at how our application entry point, MainActivity.kt, changed.
Before introducing Hilt (Chapter 10)
The code was polluted with configuration logic:
// OLD VERSION (Manual DI)
class MainActivity : ComponentActivity() {
    override fun onCreate(savedInstanceState: Bundle?) {
        super.onCreate(savedInstanceState)

        // Manual dependency graph creation
        val api = RetrofitInstance.api
        val repo = NewsRepository(api)
        val factory = NewsViewModelFactory(repo) // Manual factory

        setContent {
            val viewModel: NewsViewModel = viewModel(factory = factory)
            NewsScreen(viewModel)
        }
    }
}
After introducing Hilt
By moving object-creation responsibility to modules (section 11.4) and applying automation, our Activity becomes clean and follows the Single Responsibility Principle.
// NEW VERSION (Hilt)
@AndroidEntryPoint // <--- Entry point
class MainActivity : ComponentActivity() {
    override fun onCreate(savedInstanceState: Bundle?) {
        super.onCreate(savedInstanceState)

        // No manual object creation!
        // Hilt manages everything in the background.

        setContent {
            // NewsScreen internally uses hiltViewModel(),
            // so we do not have to pass anything here.
            NewsScreen()
        }
    }
}
Data flow (summary)
The complete control flow in our application now looks like this:
- Application start: The
NewsApplicationclass annotated with@HiltAndroidAppis created. Hilt builds the dependency graph, creating singletons defined inNetworkModule(Retrofit). - Activity start:
MainActivityannotated with@AndroidEntryPointstarts. - Screen start: The
NewsScreenfunction callshiltViewModel(). - ViewModel creation: Hilt notices that
NewsViewModelrequiresNewsRepository. - Repository creation: Hilt notices that
NewsRepositoryrequiresNewsApiService. - Injection: Hilt obtains the ready Retrofit instance (singleton), creates the API service, creates the Repository, creates the ViewModel and provides it to the View.
This entire complex process happens automatically, and we only have to define the recipes (modules) and annotate classes correctly.
Complete example code: News Reader (Hilt Edition)
Below is the complete source code for the key application files after migrating from manual dependency injection to Hilt.
Application entry point
// NewsApplication.kt
package com.example.newsreader

@HiltAndroidApp // Generates the dependency graph (Root Component)
class NewsApplication : Application()
Network module (DI)
// di/NetworkModule.kt
package com.example.newsreader.di

@Module
@InstallIn(SingletonComponent::class) // Available across the whole application
object NetworkModule {

    @Provides
    @Singleton // One Retrofit instance for the whole application
    fun provideRetrofit(): Retrofit {
        return Retrofit.Builder()
            .baseUrl("https://newsapi.org/v2/")
            .addConverterFactory(GsonConverterFactory.create())
            .build()
    }

    @Provides
    @Singleton
    fun provideNewsApi(retrofit: Retrofit): NewsApiService {
        return retrofit.create(NewsApiService::class.java)
    }
}
Data layer (Repository)
// Article model (should match the one from the API)
data class Article(
    val title: String,
    val description: String?,
    val url: String? = null,
    val urlToImage: String? = null
)

// data/NewsRepository.kt
package com.example.newsreader.data

// @Inject tells Hilt: "Create instances of this class this way".
// Hilt automatically finds 'apiService' in NetworkModule.
class NewsRepository @Inject constructor(
    private val apiService: NewsApiService
) {
    suspend fun getTopHeadlines() = apiService.getTopHeadlines().articles
}
Presentation layer (ViewModel)
// View states
sealed interface NewsUiState {
    data object Loading : NewsUiState
    data class Success(val articles: List<Article>) : NewsUiState
    data class Error(val message: String) : NewsUiState
}

// ui/NewsViewModel.kt
package com.example.newsreader.ui

@HiltViewModel // Eliminates the need to write ViewModelFactory
class NewsViewModel @Inject constructor(
    private val repository: NewsRepository
) : ViewModel() {

    private val _uiState = MutableStateFlow<NewsUiState>(NewsUiState.Loading)
    val uiState = _uiState.asStateFlow()

    init {
      fetchData
    }

    fun fetchData(){
        viewModelScope.launch {
            try {
                val news = repository.getTopHeadlines()
                _uiState.update { NewsUiState.Success(news) }
            } catch (e: Exception) {
                _uiState.update { NewsUiState.Error("Fetch error") }
            }
        }
    }
}
UI layer (Compose and Activity)
// MainActivity.kt
package com.example.newsreader

@AndroidEntryPoint // Required so the Activity can
                   // host screens using Hilt
class MainActivity : ComponentActivity() {
    override fun onCreate(savedInstanceState: Bundle?) {
        super.onCreate(savedInstanceState)
        setContent {
            NewsScreen()
        }
    }
}

@Composable
fun NewsScreen(
    // ViewModel is injected
    viewModel: NewsViewModel = hiltViewModel()
) {
    // Observe state from StateFlow
    val state by viewModel.uiState.collectAsState()

    Scaffold(
        topBar = {
            TopAppBar(
                title = { Text("News Reader (Hilt)") }
            )
        }
    ) { paddingValues ->
        // Main container with padding from Scaffold
        Box(
            modifier = Modifier
                .padding(paddingValues)
                .fillMaxSize(),
            contentAlignment = Alignment.Center
        ) {
            when (val currentState = state) {
                // 1. Loading state
                is NewsUiState.Loading -> {
                    CircularProgressIndicator()
                }

                // 2. Error state
                is NewsUiState.Error -> {
                    Column(
                        horizontalAlignment = Alignment.CenterHorizontally,
                        verticalArrangement = Arrangement.Center,
                        modifier = Modifier.padding(16.dp)
                    ) {
                        Text(
                            text = "Error: ${currentState.message}",
                            color = MaterialTheme.colorScheme.error,
                            style = MaterialTheme.typography.bodyLarge
                        )
                        Spacer(modifier = Modifier.height(8.dp))
                        Button(onClick = { viewModel.fetchData() }) {
                            Text("Try again")
                        }
                    }
                }

                // 3. Success state (list)
                is NewsUiState.Success -> {
                    if (currentState.articles.isEmpty()) {
                        Text("No articles to display.")
                    } else {
                        LazyColumn(
                            modifier = Modifier.fillMaxSize(),
                            contentPadding = PaddingValues(16.dp),
                            verticalArrangement = Arrangement.spacedBy(8.dp)
                        ) {
                            items(currentState.articles) { article ->
                                ArticleItem(article)
                            }
                        }
                    }
                }
            }
        }
    }
}

// --- SINGLE LIST ITEM ---

@Composable
fun ArticleItem(article: Article) {
    Card(
        elevation = CardDefaults.cardElevation(defaultElevation = 4.dp),
        modifier = Modifier.fillMaxWidth()
    ) {
        Column(
            modifier = Modifier.padding(16.dp)
        ) {
            Text(
                text = article.title,
                fontWeight = FontWeight.Bold,
                maxLines = 2,
                overflow = TextOverflow.Ellipsis
            )

            if (!article.description.isNullOrBlank()) {
                Spacer(modifier = Modifier.height(4.dp))
                Text(
                    text = article.description,
                    maxLines = 3,
                    overflow = TextOverflow.Ellipsis
                )
            }
        }
    }
}
In the previous chapter, we learned how to use Hilt for automatic dependency injection. However, we used a simplification there: our ViewModels depended directly on concrete repository classes, for example NewsRepository.
In this chapter, we will improve the quality of our architecture by introducing two key improvements:
- Interfaces in the data layer: To decouple code from a concrete implementation, following the Dependency Inversion principle.
- The domain layer (Use Cases): To move business logic out of ViewModels.
Improving the data layer: why do we need interfaces?
Look at the ViewModel code with which we ended the previous lecture:
@HiltViewModel
class NewsViewModel @Inject constructor(
    // ARCHITECTURAL ERROR: dependency on a concrete class
    private val repository: NewsRepository
) : ViewModel() { ... }
Although this approach works, it has serious disadvantages from the perspective of software engineering (SOLID):
- Difficult testing: To test
NewsViewModel, we must provide it with a realNewsRepositoryinstance, which may connect to the Internet. In unit tests, we would prefer to use a stub (FakeRepository) that returns dummy data. - Tight coupling: If in the future we want to change the data source from Retrofit to Firebase or GraphQL, we will have to rebuild code inside all ViewModels.
Instead of injecting a class, we should inject an object typed as an interface. The interface defines a contract: it says what the repository can do, but not how it does it.
// 1. Define the interface (in the Domain or Data layer)
interface NewsRepository {
    suspend fun getTopHeadlines(): List<Article>
}

// 2. Implement the interface (in the Data layer)
class NewsRepositoryImpl @Inject constructor(
    private val api: NewsApiService
) : NewsRepository {
    override suspend fun getTopHeadlines() = api.getTopHeadlines().articles
}

// 3. ViewModel now depends on the interface (Dependency Inversion)
class NewsViewModel @Inject constructor(
    private val repository: NewsRepository // <--- CHANGE
) : ViewModel() { ... }
Thanks to this change, the ViewModel does not know whether data comes from the network, a database or a test file. It only cares that the object satisfies the NewsRepository contract.
Hilt configuration for interfaces (@Binds)
After introducing an interface, we encounter a problem with Hilt.
When Hilt tries to create NewsViewModel, it sees that the ViewModel needs NewsRepository. Hilt searches its recipes (dependency graph), but it does not find instructions for creating an interface. Hilt only knows how to create the NewsRepositoryImpl class, because it has the @Inject constructor annotation.
We must connect these two facts. We must tell Hilt: If someone asks you for NewsRepository, give them a NewsRepositoryImpl instance.
To bind interfaces to implementations, we use the @Binds annotation. It requires creating an abstract module.
// File: di/RepositoryModule.kt

@Module
@InstallIn(SingletonComponent::class)
abstract class RepositoryModule {

    // The @Binds annotation works similarly to @Provides, but is more efficient.
    // The method must be abstract.
    // The method parameter is the concrete implementation already known to Hilt
    // (it has @Inject).
    // The return type is the interface type that we want to inject.

    @Binds
    @Singleton // If we want the repository to be a singleton
    abstract fun bindNewsRepository(
        impl: NewsRepositoryImpl
    ): NewsRepository
}
We could achieve the same effect using the familiar @Provides annotation:
// Approach with @Provides (less optimal for interfaces):
@Provides
fun provideRepository(impl: NewsRepositoryImpl): NewsRepository {
    return impl
}
However, using @Binds is recommended because:
- Performance:
@Bindsdoes not generate a new factory method body. Hilt simply casts the type in generated Java code, reducing application size and speeding up compilation. - Readability: It explicitly indicates that we are binding an interface, not creating a new object from an external library.
A module containing @Binds methods must be an abstract class or an interface. You cannot mix regular @Provides methods in it unless they are static, which in Kotlin means placing them in a companion object. Therefore, it is good practice to keep Retrofit/Room configuration in a separate module, for example NetworkModule, and repository bindings in another one, for example RepositoryModule.
Introduction to Clean Architecture
As application complexity grows, the standard MVVM (Model-View-ViewModel) pattern starts revealing its limitations. In the architecture we used so far, the ViewModel often takes on too many responsibilities:
- It manages UI state (correctly).
- It handles network errors (correctly).
- It performs complex mathematical calculations, for example taxes or discounts.
- It validates input data, for example email-address correctness.
- It combines data from several repositories, for example user profile + order history.
Such overloaded classes are difficult to read, maintain and test. The solution is to introduce a new middle layer: the domain layer. It sits between the Presentation layer (UI + ViewModel) and the Data layer (Repository).
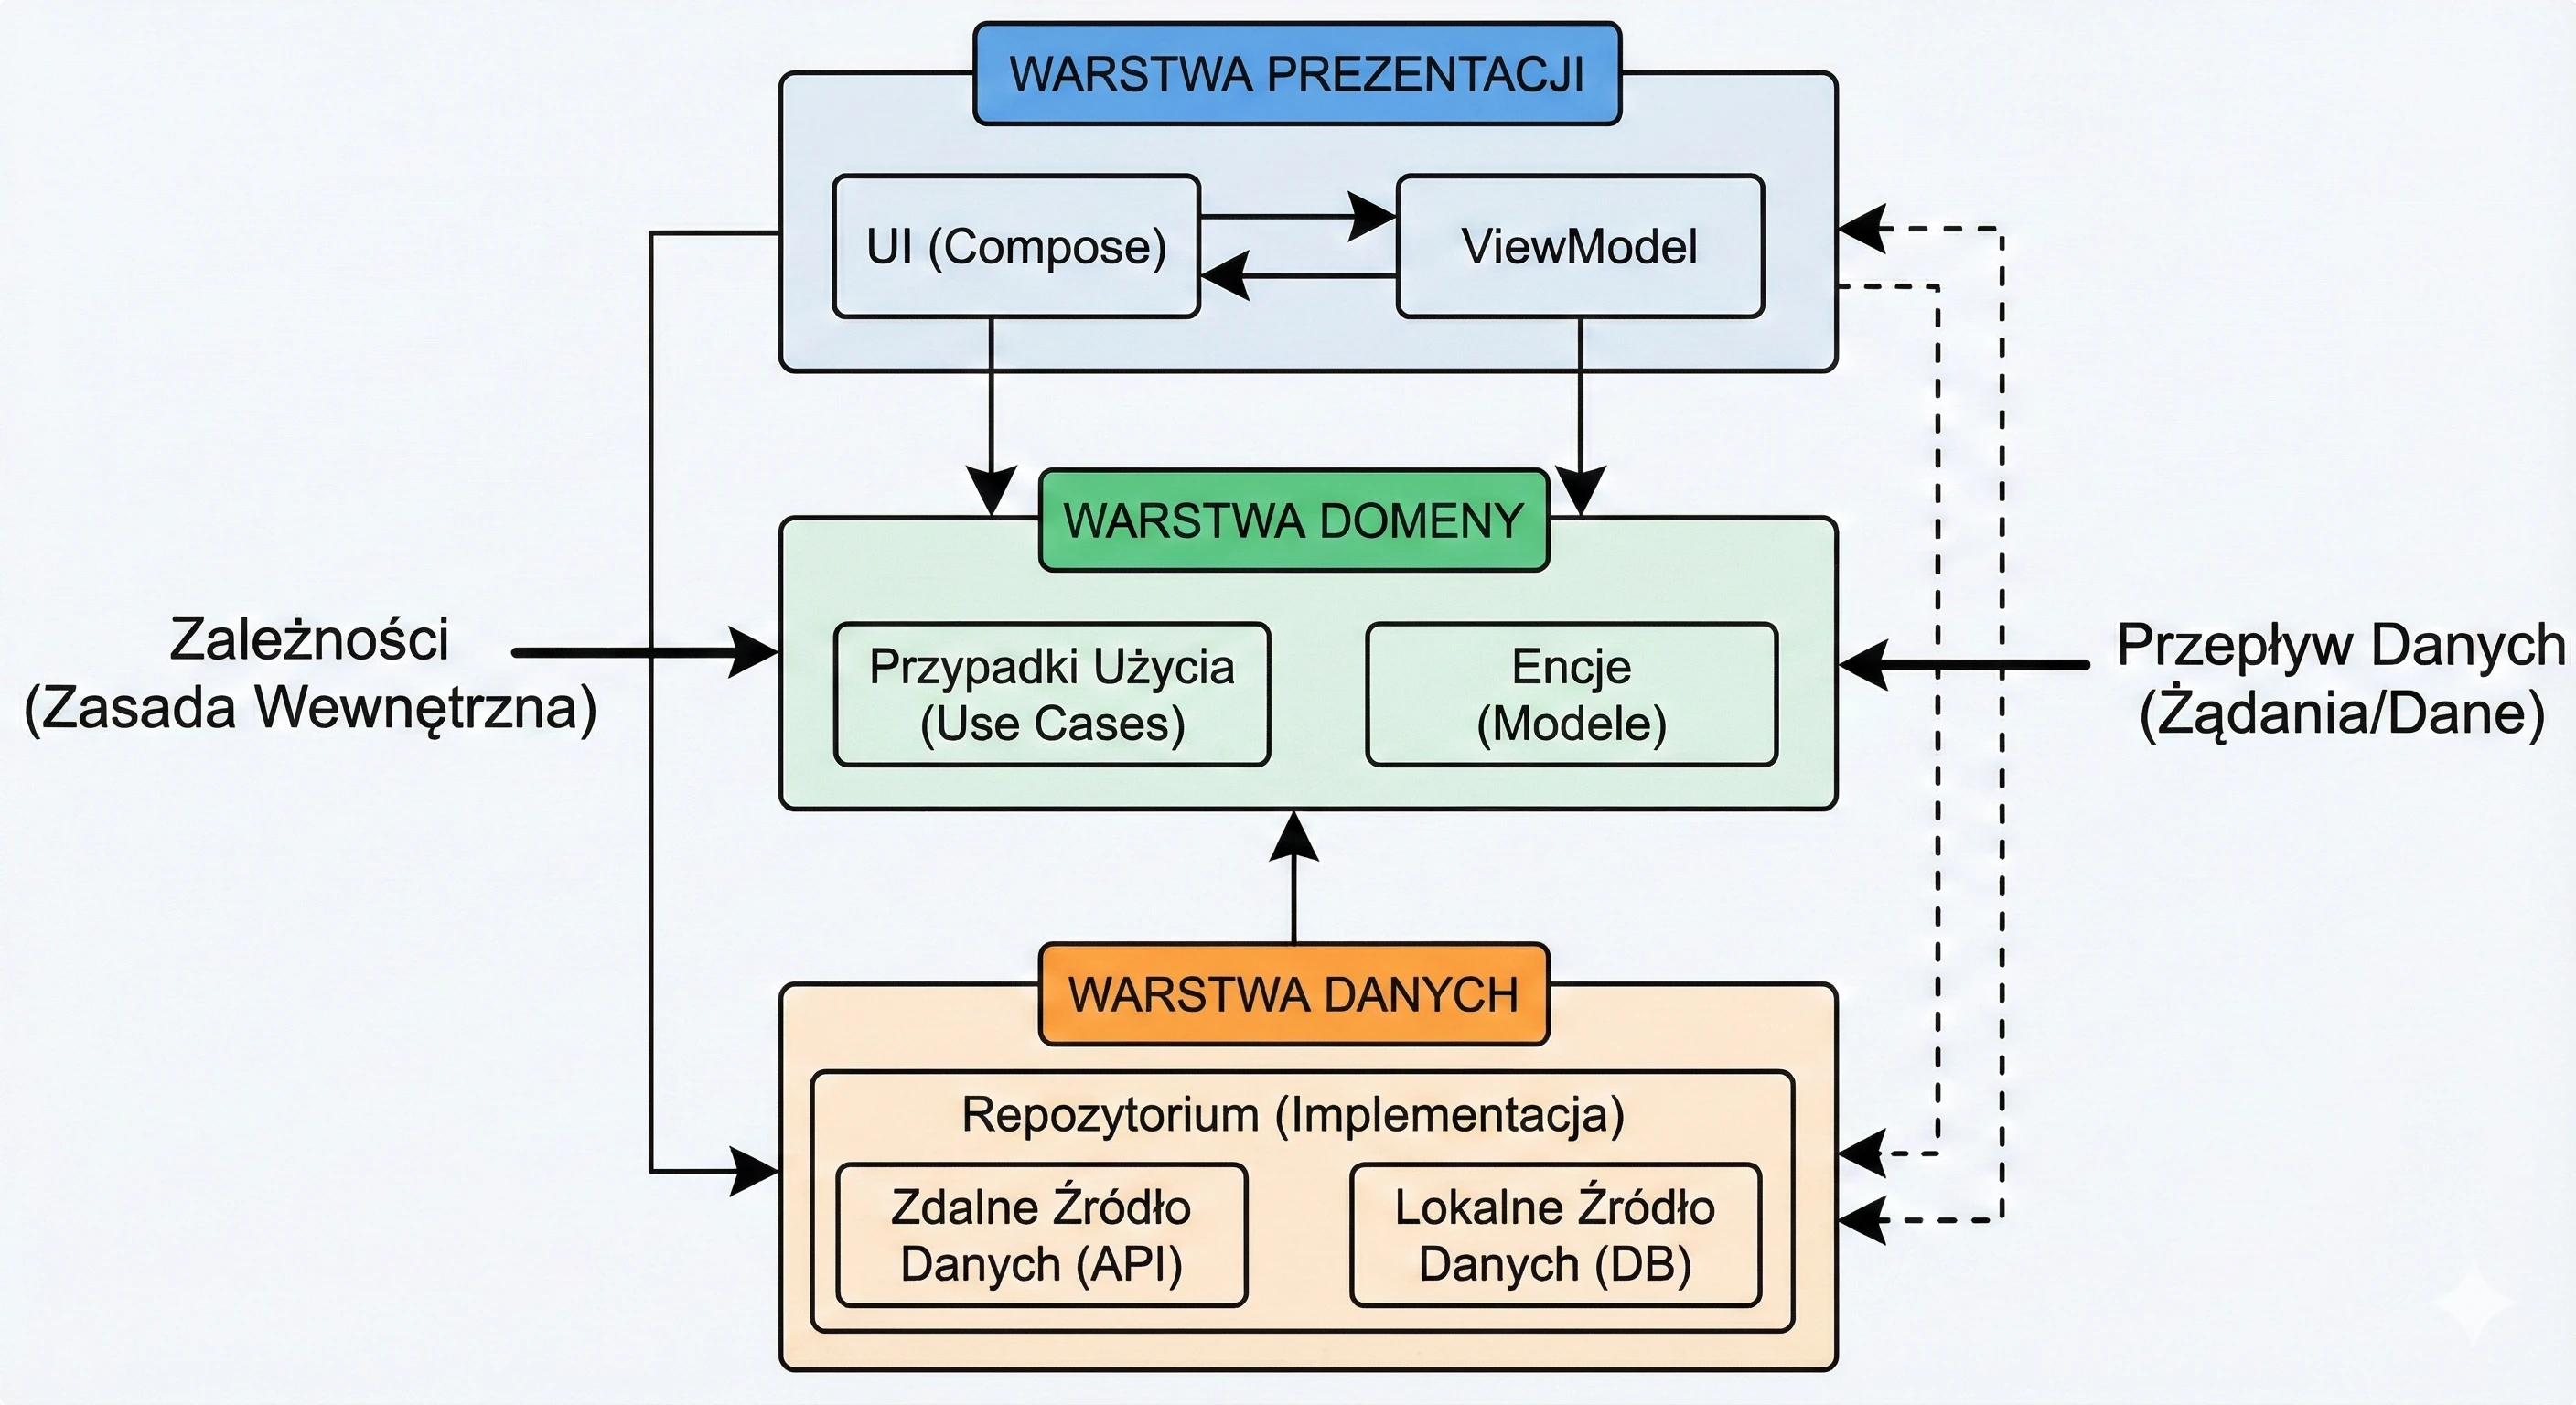
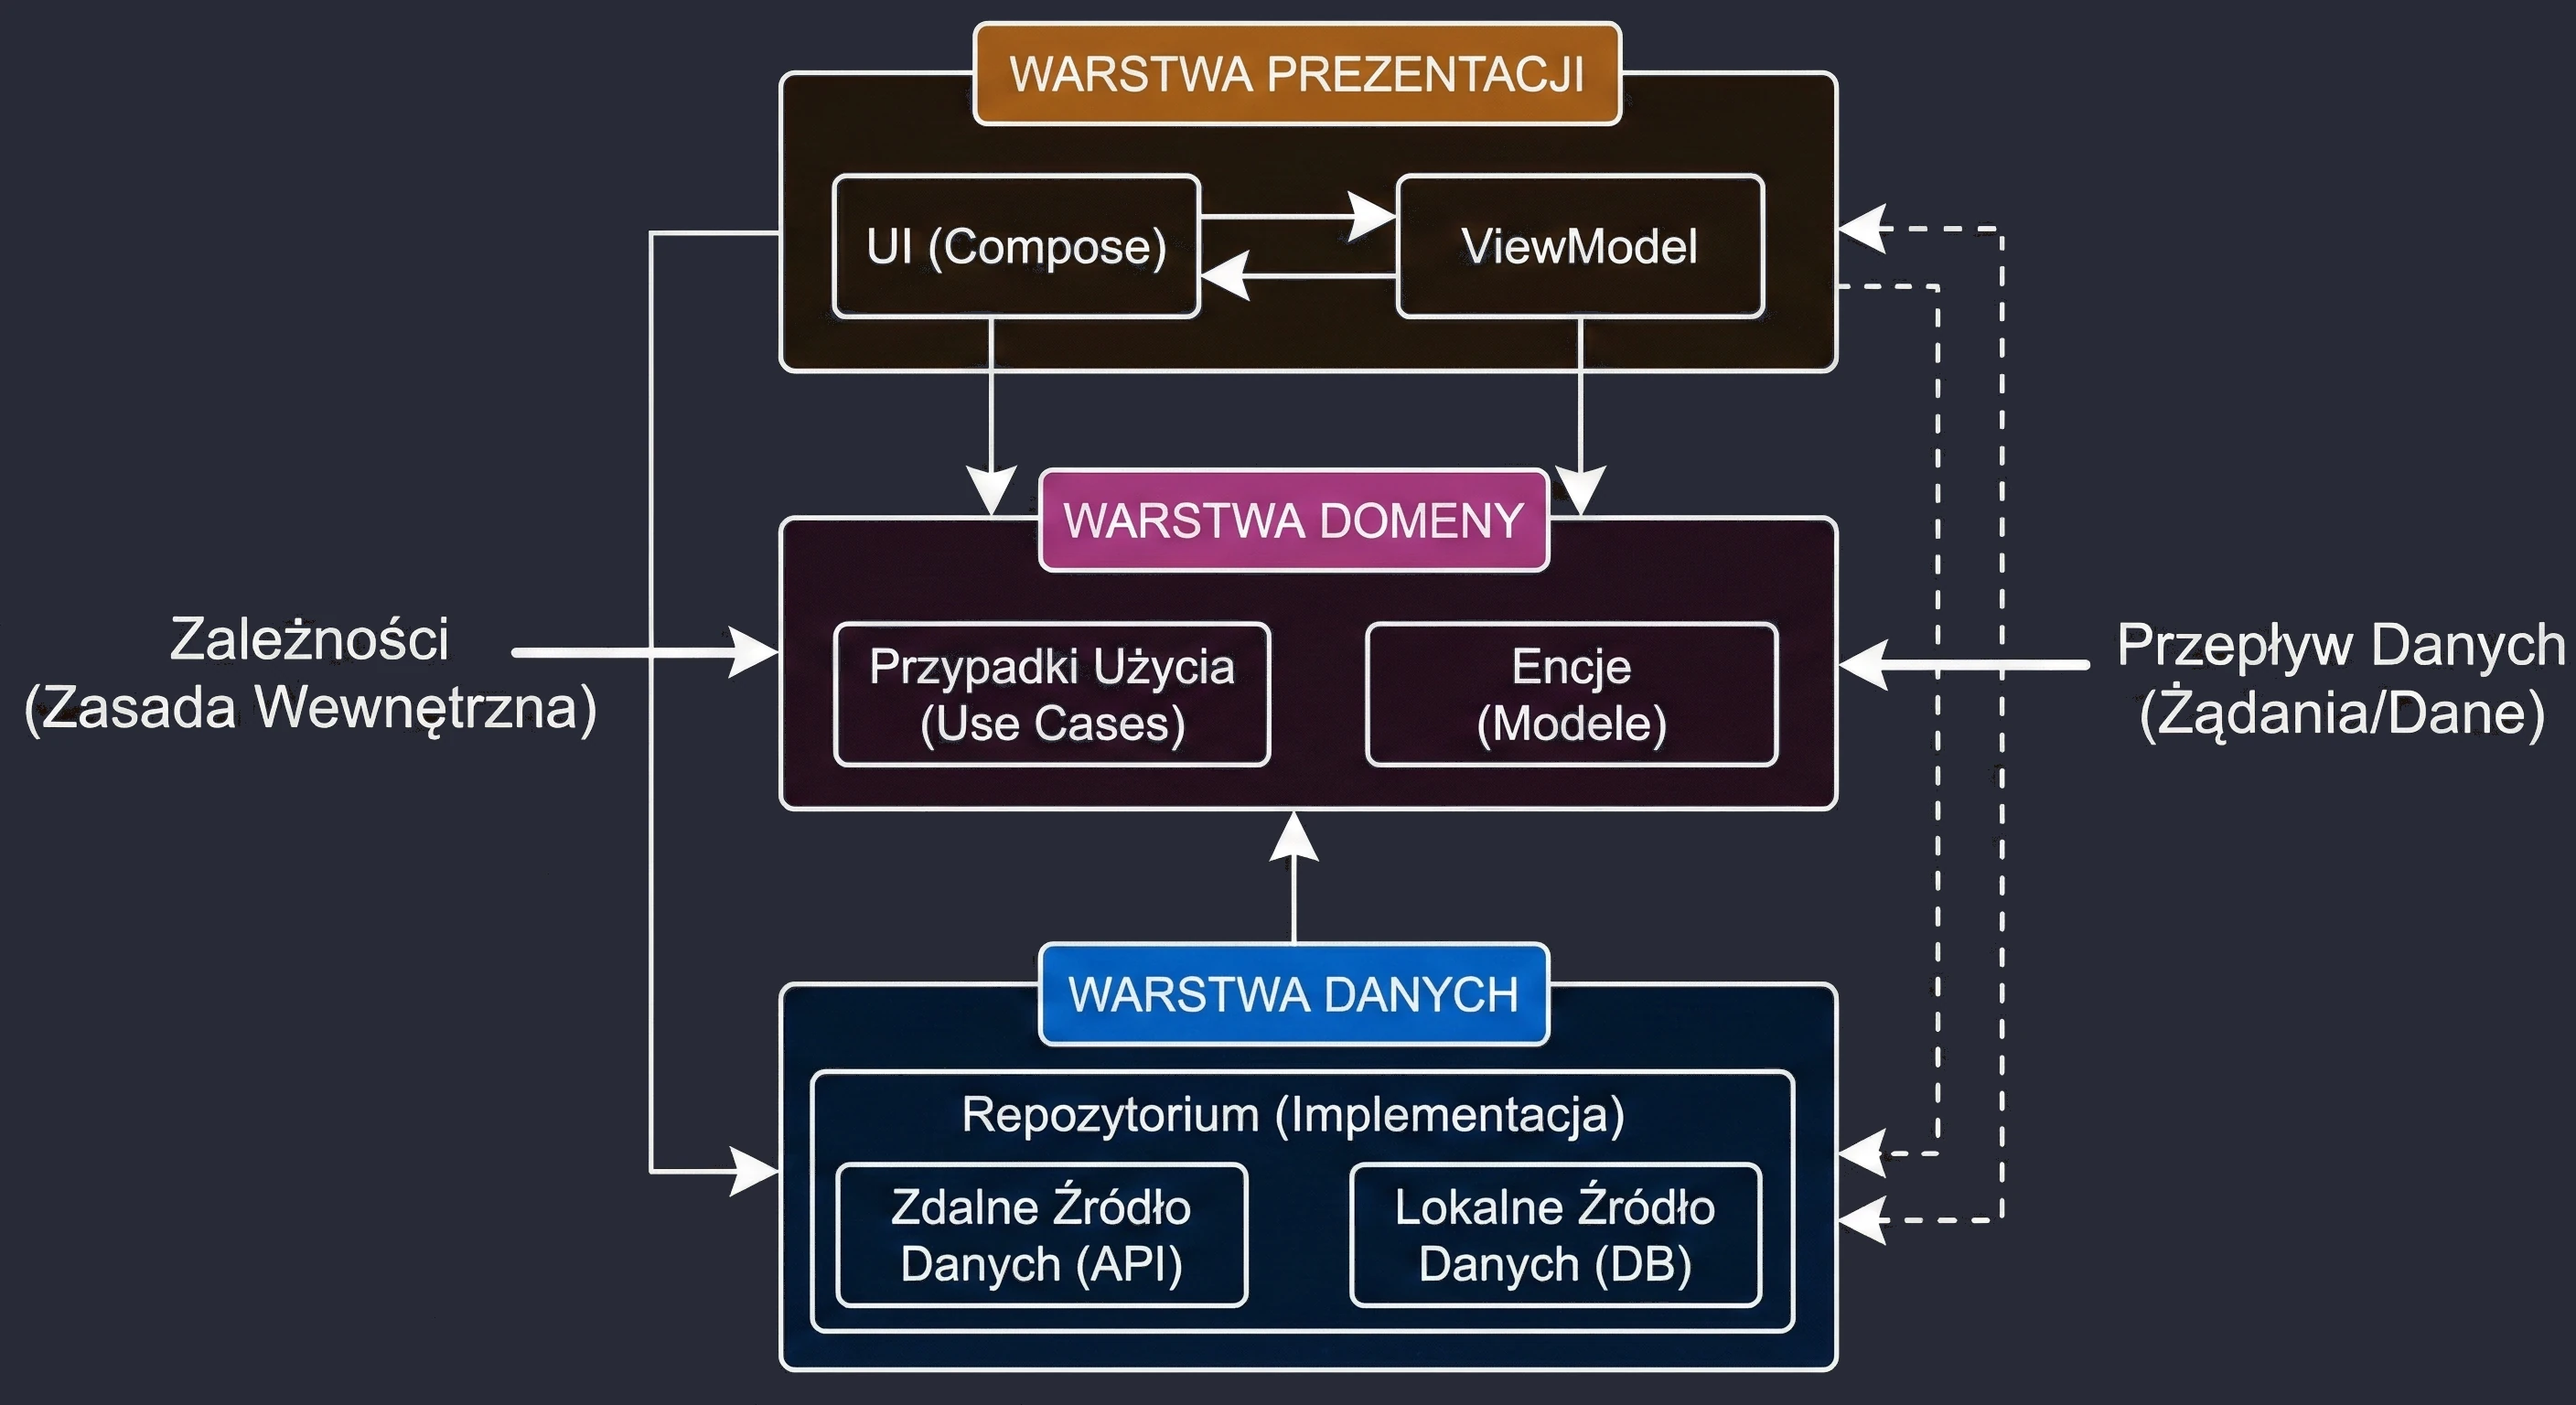
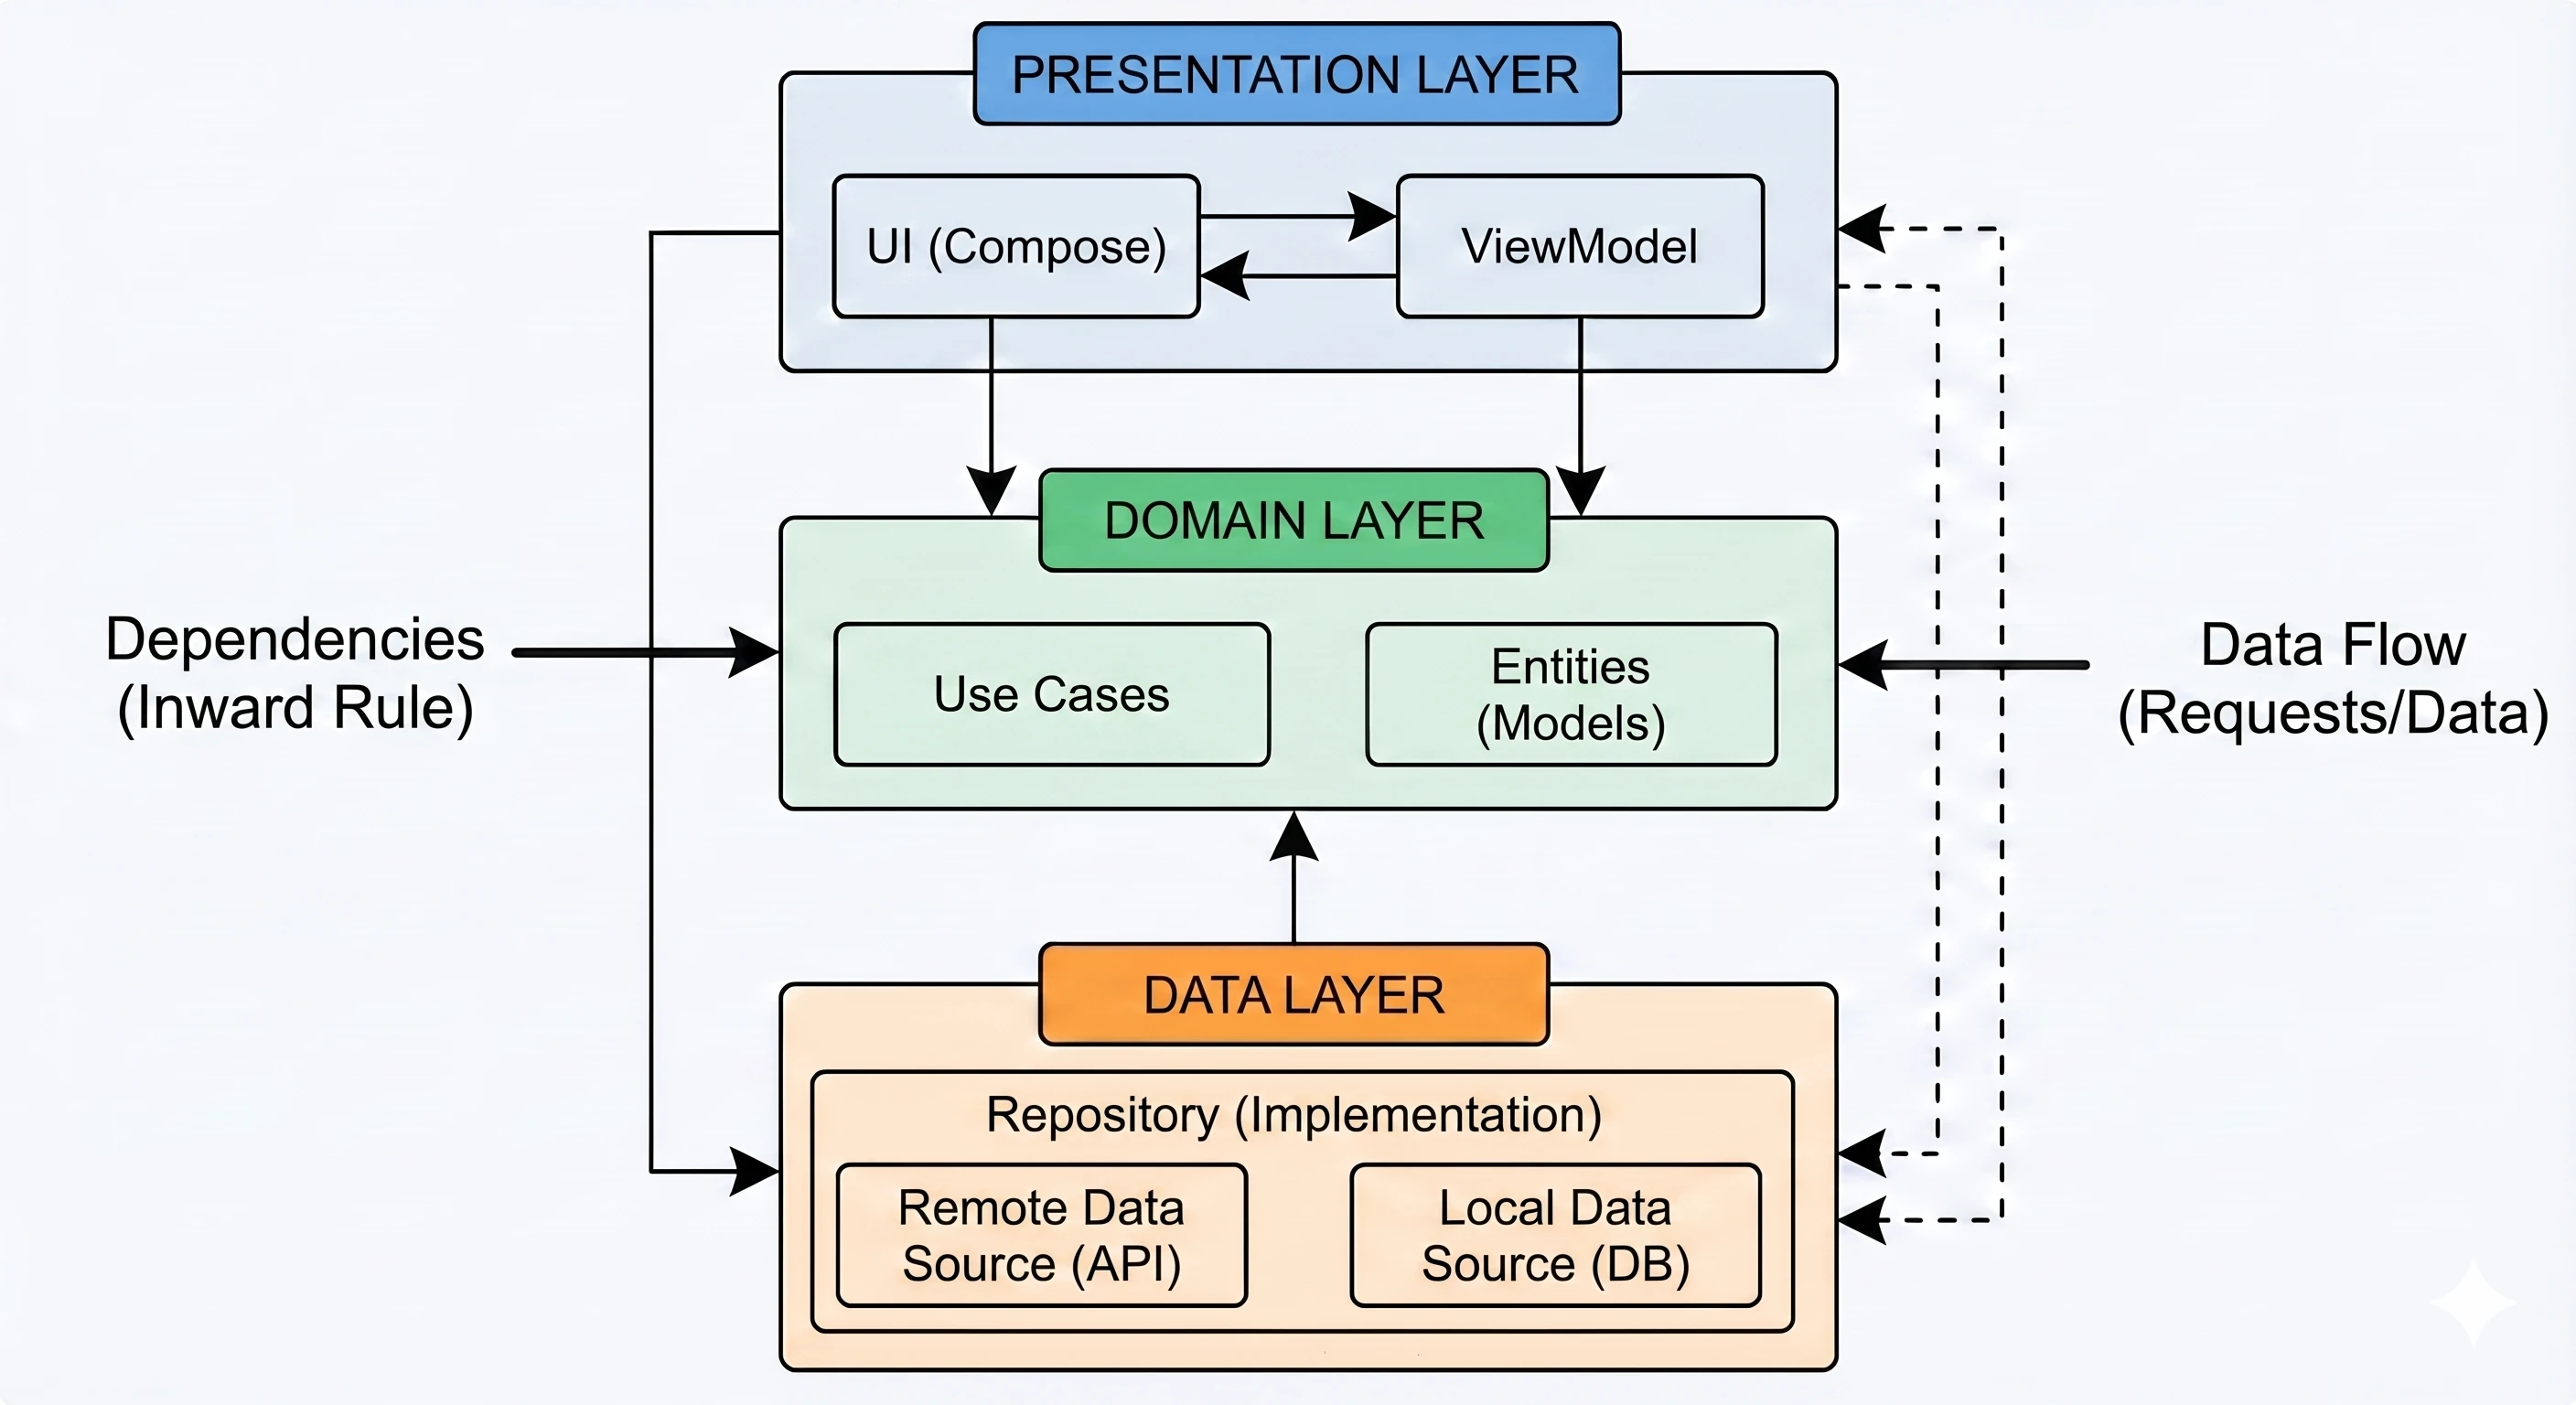
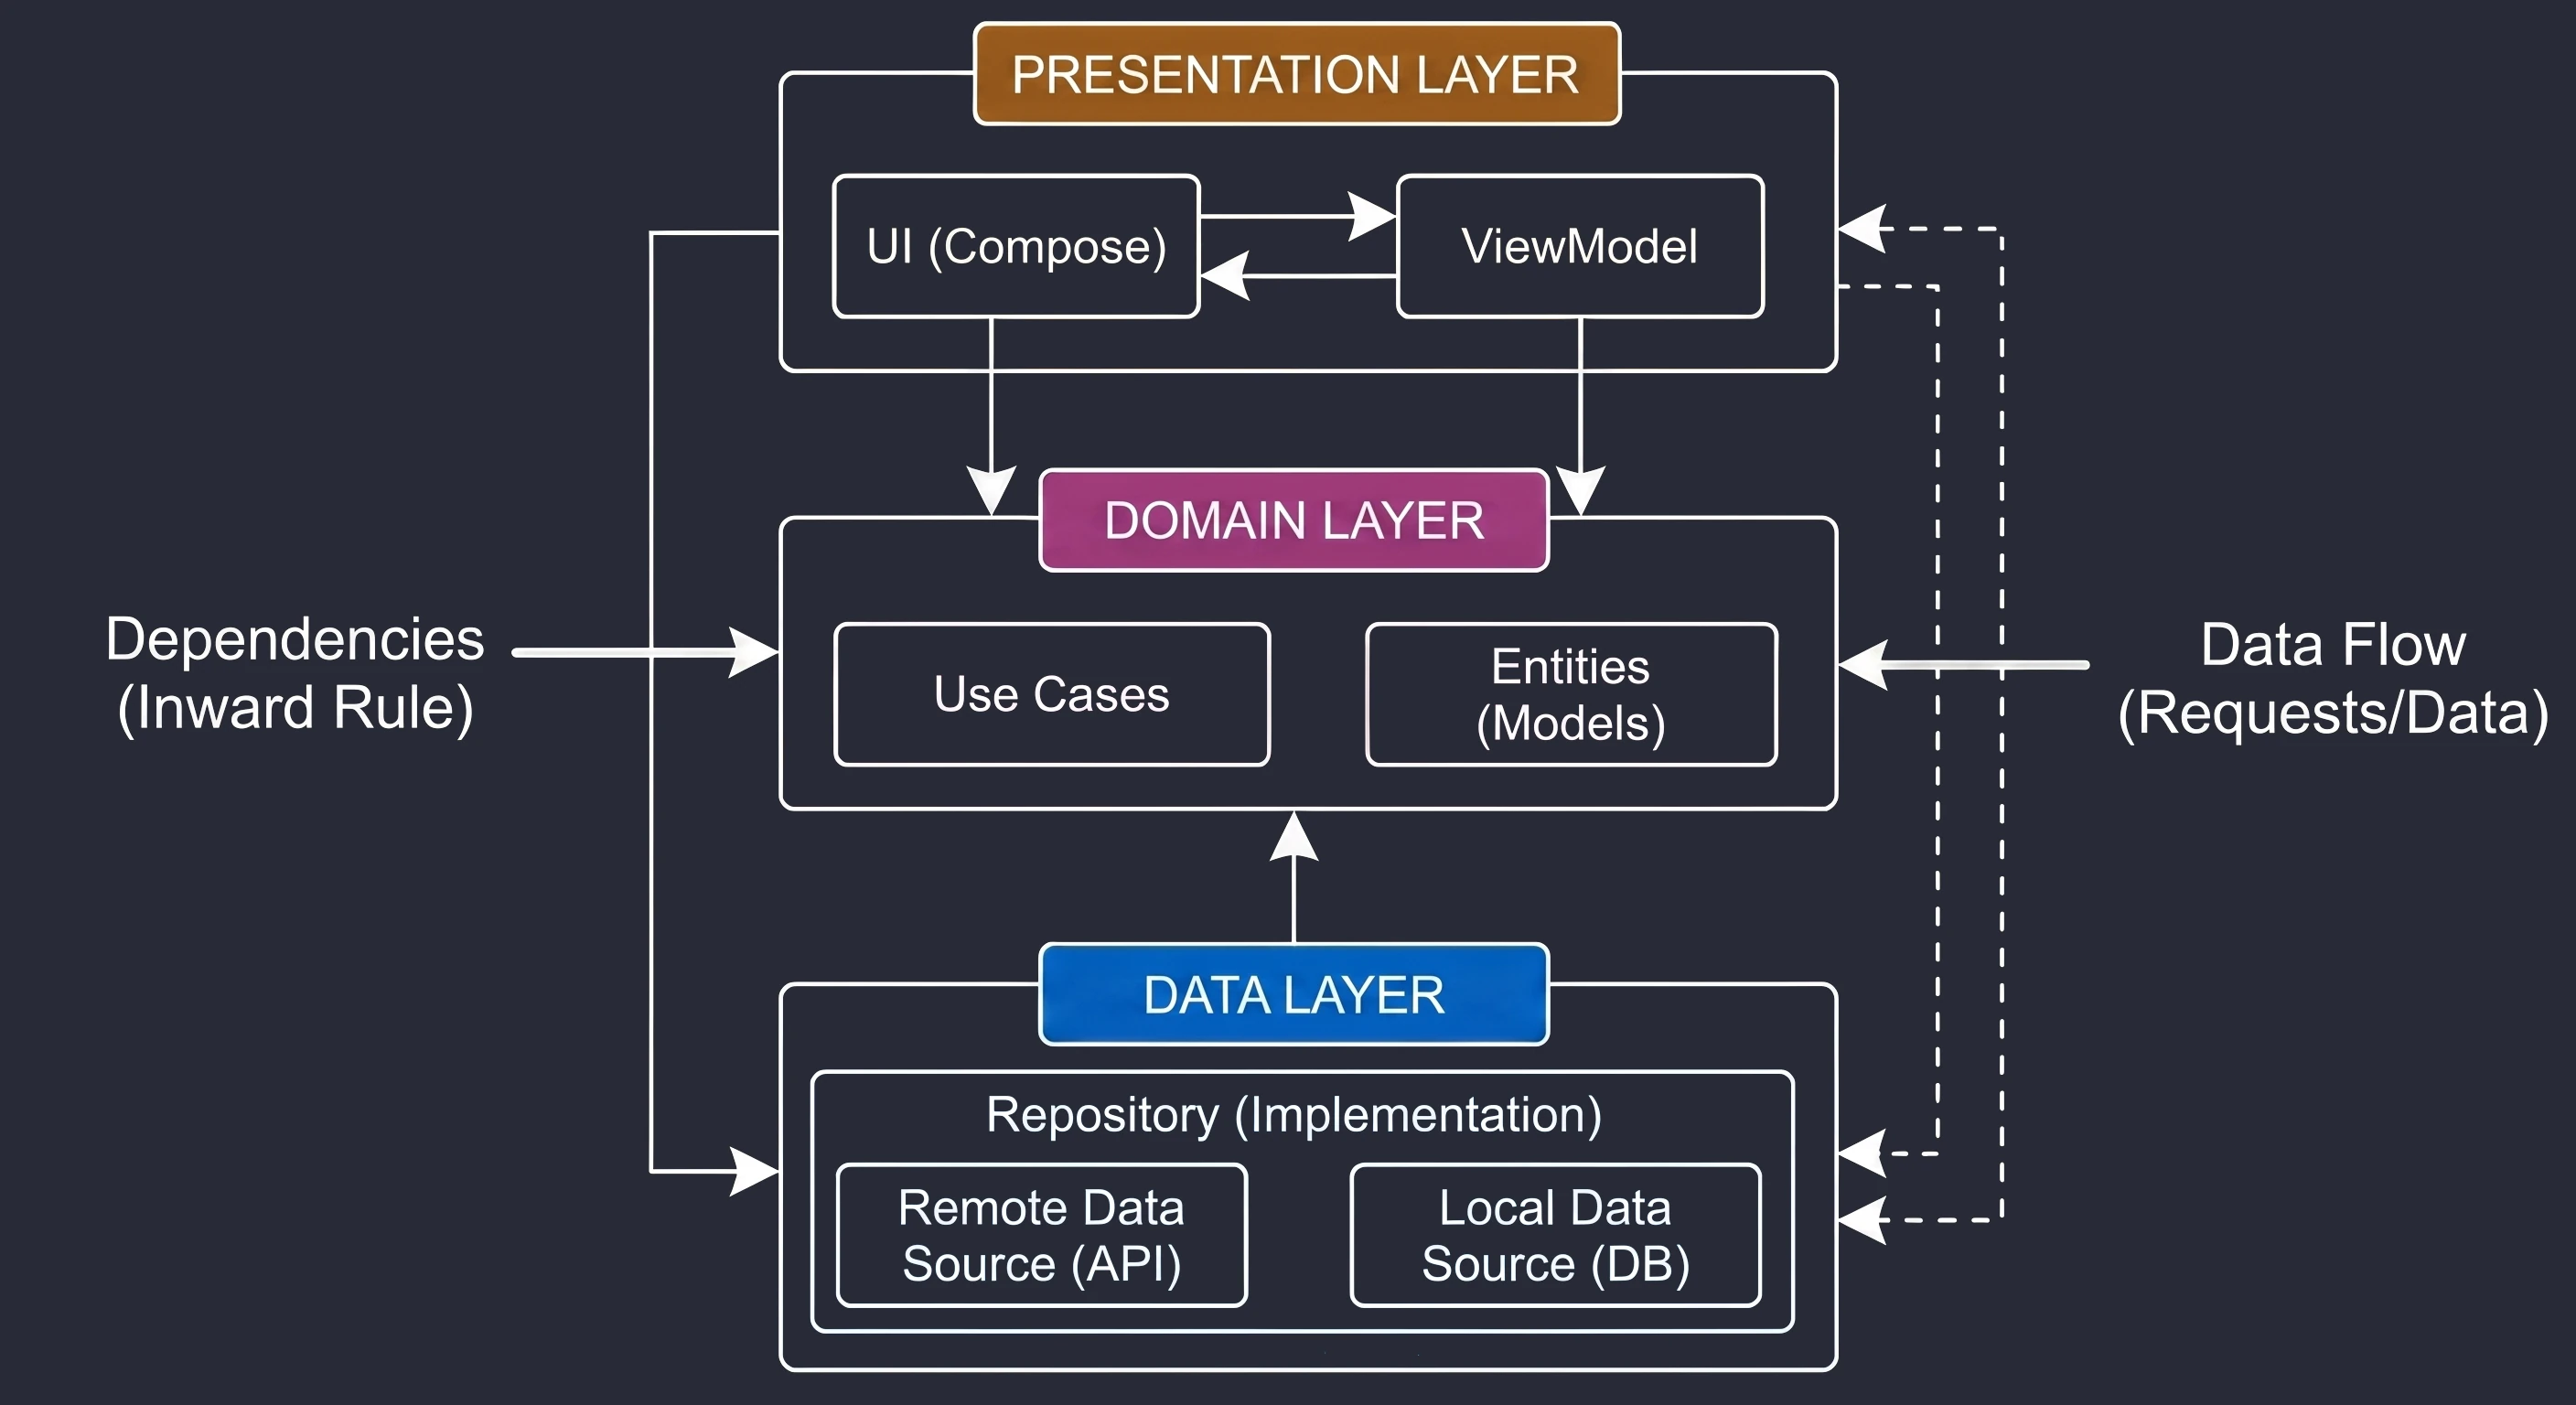
Main principles of the domain layer:
- Pure Kotlin: Code in this layer should not depend on the Android framework. We will not find
Context,Activity,R.stringor libraries such as Retrofit or Room here. - Independence: The domain defines application business logic, for example how to calculate the cart price, which remains unchanged regardless of whether we display data on a phone screen or a watch.
- Stability: This is the least volatile part of the application. Changing a button appearance (UI) or changing the database (Data) should not affect tax-calculation logic (Domain).
Domain layer: UseCase
The basic building block of the domain layer is a Use Case, often also called an interactor. It is a class that performs one business action. According to the Single Responsibility Principle (SRP), it should have only one reason to change.
Examples of UseCase names (rule: Verb + Noun + UseCase):
LoginUserUseCaseGetArticlesUseCaseCalculateVatPriceUseCaseValidateCouponUseCase
With this naming convention, by looking at the project file structure, we immediately know what the application does, not only which components it consists of. This is called Screaming Architecture.
In Kotlin, implementing UseCases is very simple thanks to operator overloading. We use the invoke operator, which allows us to treat a class instance as if it were a function. Let us create an example UseCase for calculating a price with VAT:
// File: domain/CalculateVatPriceUseCase.kt

// A UseCase is a regular class injected through the constructor
class CalculateVatPriceUseCase @Inject constructor() {

    // Business logic: fixed VAT rate
    private val vatRate = 0.23

    // The invoke operator allows calling: useCase(price)
    operator fun invoke(basePrice: Double): Double {
        if (basePrice < 0) throw IllegalArgumentException("Price cannot be negative")
        return basePrice * (1 + vatRate)
    }
}
More advanced use cases must fetch data. We inject repositories into them (defined in section 12.1).
// File: domain/GetProductDetailsUseCase.kt

class GetProductDetailsUseCase @Inject constructor(
    private val productRepository: ProductRepository // Dependency on an interface
) {
    // suspend functions are naturally supported
    suspend operator fun invoke(productId: String): Product {
        // Additional logic could be placed here, e.g. combining data from different sources
        return productRepository.getProductById(productId)
    }
}
Benefits of this approach:
- Reusability: The same
CalculateVatPriceUseCasecan be used inCartViewModel,ProductDetailsViewModelandCheckoutViewModel. We do not have to copy the VAT formula in three places. - Testability: Testing a UseCase is trivial: it is a pure function that accepts input data and returns a result. We do not need an emulator or UI-testing libraries.
- Slimmer ViewModel: The ViewModel becomes a simple coordinator that only passes data to the appropriate UseCases.
Implementing the domain layer with Hilt
Let us see how to connect it with the rest of the application using Hilt. We will create a complete dependency chain for the final price calculation scenario.
Use cases are an ideal place to combine data from different sources (repositories) and configuration. Hilt handles them without any additional modules: the @Inject constructor annotation is enough.
// domain/CalculateFinalPriceUseCase.kt

class CalculateFinalPriceUseCase @Inject constructor(
    // Hilt automatically finds the implementation
    // of this interface (thanks to @Binds)
    private val repository: ProductRepository,

    // We can also inject other helper classes
    private val taxCalculator: TaxCalculator
) {
    suspend operator fun invoke(productId: String): Double {
        // 1. Fetch data (Data layer)
        val basePrice = repository.getProductPrice(productId)

        // 2. Process data (business logic)
        return taxCalculator.addVat(basePrice)
    }
}
Our ViewModel stops being aware of repositories or databases. Its only window to the world becomes the domain layer.
// ui/CartViewModel.kt

@HiltViewModel
class CartViewModel @Inject constructor(
    // CHANGE: instead of 'ProductRepository', we inject a concrete business action
    private val calculateFinalPriceUseCase: CalculateFinalPriceUseCase
) : ViewModel() {

    private val _uiState = MutableStateFlow(CartUiState())
    val uiState = _uiState.asStateFlow()

    fun loadPrice(productId: String) {
        viewModelScope.launch {
            try {
                // Calling a UseCase looks like calling a regular function
                val price = calculateFinalPriceUseCase(productId)
                _uiState.update { it.copy(totalPrice = price) }
            } catch (e: Exception) {
                // UI error handling
            }
        }
    }
}
Compare the ViewModel constructor before and after the changes:
Before cleanup:
class CartViewModel(
    val repo: ProductRepository, // Access to everything (fetch, delete, edit)
    val userRepo: UserRepository,
    val promoRepo: PromoRepository
)
The ViewModel had access to methods it did not need, for example repo.deleteAllProducts().
After cleanup:
class CartViewModel(
    val calculatePrice: CalculateFinalPriceUseCase // Access ONLY to what is needed
)
The ViewModel receives a narrow, precise tool for performing a specific task.
Package structure (packaging strategies)
Introducing Clean Architecture increases the number of files. Instead of one NewsViewModel class, we now have NewsViewModel, GetNewsUseCase, NewsRepository (interface), NewsRepositoryImpl, and so on.
If we put all these files into one bag, the project becomes unreadable. There are two main code-organization strategies.
Strategy 1: package by layer
This is the classic approach, where files are grouped by their technical role in the system.
com.example.shop
  +-- data            (All repositories and data sources)
  |     +-- CartRepositoryImpl.kt
  |     +-- ProductRepositoryImpl.kt
  +-- domain          (All UseCases and models)
  |     +-- Cart.kt
  |     +-- CalculatePriceUseCase.kt
  +-- ui              (All screens and ViewModels)
        +-- CartViewModel.kt
        +-- ProductListViewModel.kt
Advantages: Easy to understand for beginners.
Disadvantages: Weak scalability. To modify the Cart feature, you must jump between three directories (data, domain, ui). In large projects, these directories become overloaded.
Strategy 2: package by feature
In modern Android and in Clean Architecture, grouping files by business functionality is preferred.
com.example.shop
  +-- cart            (Everything related to the cart)
  |     +-- CartRepository.kt
  |     +-- CartViewModel.kt
  |     +-- CalculatePriceUseCase.kt
  +-- product         (Everything related to products)
  |     +-- ProductRepository.kt
  |     +-- ProductListScreen.kt
  +-- checkout        (Everything related to payment)
Advantages:
- High cohesion: Everything related to the cart is in one place.
- Modularity: If we want to remove the cart feature, we simply delete the
cartfolder. - Readability: Looking at the file structure, we immediately know what the application does (Screaming Architecture).
Hybrid approach
In practice, a combination of both approaches works best. At the top level, we divide the application into features, and inside each feature we keep the layer split if the feature is complex. Additionally, we extract shared elements (core, di).
com.example.shop
  +-- core            (Shared elements for the whole application)
  |     +-- ui        (Theme, shared Compose components)
  |     +-- util      (Extensions, helpers)
  +-- di              (Global Hilt modules - NetworkModule, DatabaseModule)
  +-- features
        +-- cart
        |     +-- domain  (UseCases specific to the cart)
        |     +-- data    (Cart repository implementation)
        |     +-- ui      (CartScreen, CartViewModel)
        +-- product_list
              +-- ...
This structure is resistant to project growth and makes teamwork easier: one developer works on the cart folder, another on profile, without stepping on each other's toes.
Practical example: shopping cart application
Below is a complete implementation of the Cart feature using Clean Architecture and Hilt. The code is split into packages.
Business scenario:
- We fetch the product price (Data layer).
- The user enters a discount code.
- The application calculates VAT and applies the discount (Domain layer).
- The result is displayed on the screen (Presentation layer).
Project structure
First, create the appropriate packages in the com.example.shop folder:
com.example.shop
  +-- di              (Hilt modules)
  +-- data            (Repositories - implementations)
  +-- domain          (UseCases and interfaces)
  +-- ui              (ViewModel and Compose Screen)
  +-- NewsApplication.kt
  +-- MainActivity.kt
Domain layer
Here we define business logic. Notice that these classes know nothing about Android or the database.
// domain/ProductRepository.kt
package com.example.shop.domain

// Interface (contract)
interface ProductRepository {
    suspend fun getBasePrice(): Double
}

// domain/CalculateFinalPriceUseCase.kt
package com.example.shop.domain

class CalculateFinalPriceUseCase @Inject constructor(
    private val repository: ProductRepository
) {
    private val vatRate = 0.23 // 23% VAT

    // Function called with the operator: useCase(coupon)
    suspend operator fun invoke(couponCode: String): Double {
        val basePrice = repository.getBasePrice()
        val priceWithVat = basePrice * (1 + vatRate)

        // Simple discount business logic
        return if (couponCode == "STUDENT") {
            priceWithVat * 0.5 // 50% discount
        } else {
            priceWithVat
        }
    }
}
Data layer
Here we implement the interface and configure Hilt so it knows how to connect it.
// data/ProductRepositoryImpl.kt
package com.example.shop.data

class ProductRepositoryImpl @Inject constructor() : ProductRepository {
    override suspend fun getBasePrice(): Double {
        delay(500) // Simulate network delay
        return 100.0 // Product base price
    }
}

// di/AppModule.kt
package com.example.shop.di

@Module
@InstallIn(SingletonComponent::class)
abstract class AppModule {

    @Binds
    @Singleton
    abstract fun bindProductRepository(
        impl: ProductRepositoryImpl
    ): ProductRepository
}
Presentation layer (UI layer)
The ViewModel does not perform calculations: it only delegates work to the UseCase and updates state.
// ui/CartViewModel.kt
package com.example.shop.ui

data class CartUiState(
    val finalPrice: String = "---",
    val isLoading: Boolean = false
)

@HiltViewModel
class CartViewModel @Inject constructor(
    // Inject the UseCase, not the Repository!
    private val calculateFinalPrice: CalculateFinalPriceUseCase
) : ViewModel() {

    private val _uiState = MutableStateFlow(CartUiState())
    val uiState = _uiState.asStateFlow()

    fun calculatePrice(coupon: String) {
        viewModelScope.launch {
            _uiState.update { it.copy(isLoading = true) }

            // Call business logic
            val result = calculateFinalPrice(coupon)

            _uiState.update {
                it.copy(
                    isLoading = false,
                    finalPrice = String.format("%.2f PLN", result)
                )
            }
        }
    }
}
View (Compose)
// ui/CartScreen.kt
package com.example.shop.ui

@Composable
fun CartScreen(
    viewModel: CartViewModel = hiltViewModel()
) {
    val state by viewModel.uiState.collectAsState()
    var couponText by remember { mutableStateOf("") }

    Column(
        modifier = Modifier.fillMaxSize().padding(16.dp),
        horizontalAlignment = Alignment.CenterHorizontally,
        verticalArrangement = Arrangement.Center
    ) {
        Text("Shopping cart")

        Spacer(Modifier.height(32.dp))

        OutlinedTextField(
            value = couponText,
            onValueChange = { couponText = it },
            label = { Text("Discount code (e.g. STUDENT)") }
        )

        Spacer(Modifier.height(16.dp))

        Button(
            onClick = { viewModel.calculatePrice(couponText) },
            enabled = !state.isLoading
        ) {
            Text("Calculate price")
        }

        Spacer(Modifier.height(32.dp))

        if (state.isLoading) {
            CircularProgressIndicator()
        } else {
            Text(
                text = "To pay: ${state.finalPrice}"
            )
        }
    }
}
Application configuration
For everything to work, we still need Android and Hilt entry points.
// ShopApplication.kt
package com.example.shop

@HiltAndroidApp
class ShopApplication : Application()
// MainActivity.kt
package com.example.shop
@AndroidEntryPoint
class MainActivity : ComponentActivity() {
override fun onCreate(savedInstanceState: Bundle?) {
super.onCreate(savedInstanceState)
setContent {
CartScreen()
}
}
}In AndroidManifest.xml, register the application class in the android:name attribute: <application android:name=".ShopApplication" ... >
In the previous chapters, we learned how to fetch data from the Internet with Retrofit and how to save it in a local database with Room. So far, we treated these technologies separately. Our applications worked in an Online-Only mode: if the phone lost network coverage, the user saw an empty screen or an error message.
In this chapter, we combine these technologies to build an Offline-First application.
Offline-First
Mobile devices naturally operate in environments with variable network quality. A user may enter an elevator, travel through a subway tunnel, or simply end up in an area with weak signal.
In simple applications, the data flow looks like this:
UI <-> ViewModel <-> Retrofit (Internet)The disadvantages of this approach are critical for User Experience (UX):
- No offline data: Without the Internet, the application is useless.
- Latency: Even with a good connection, every screen entry requires waiting for a server response and showing a loading spinner.
- Data loss: If the user fills in a form and taps Send exactly when the connection is lost, the data may be lost.
The Offline-First paradigm reverses this logic. It assumes that the lack of Internet access is not an error, but a normal operating state of the application. In this model, the application works always, regardless of the network. It displays data that was fetched earlier (cache), while the Internet is used only for synchronization, that is for updating this data in the background.
Main assumptions:
- The application starts and shows content immediately, using the local database.
- If the network is available, we fetch newer data and update the database.
- If the network is unavailable, the user can still browse old data and even modify state, for example add items to favorites. These changes will be sent when the connection returns.
To achieve this goal, we must significantly redesign the architecture of our repositories by implementing the Single Source of Truth (SSoT) pattern.
The Single Source of Truth (SSoT) Pattern
The Single Source of Truth (SSoT) pattern is a foundation of modern mobile applications. The user interface (UI) and the ViewModel should never communicate directly with the network API. The only trusted source of data for the view is the local database.
This means that even when we have an excellent Internet connection, the data first goes into the database (Room), and only then is displayed on the screen. In this approach, the data flow is no longer linear (Fetch -> Display). It is split into two independent processes:
- Read Path:
- Responsibility: Delivering data to the UI.
- Direction:
Room -> Repository -> ViewModel -> UI. - Mechanism: Reactivity (
Flow). The ViewModel subscribes to table changes. As soon as anything changes in the database, the UI refreshes automatically. - Synchronization Path (Write Path):
- Responsibility: Updating data in the database.
- Direction:
Retrofit -> Repository -> Room. - Mechanism: Suspending functions (
suspend). The repository fetches JSON from the network, maps it to entities, and saves it in the database.
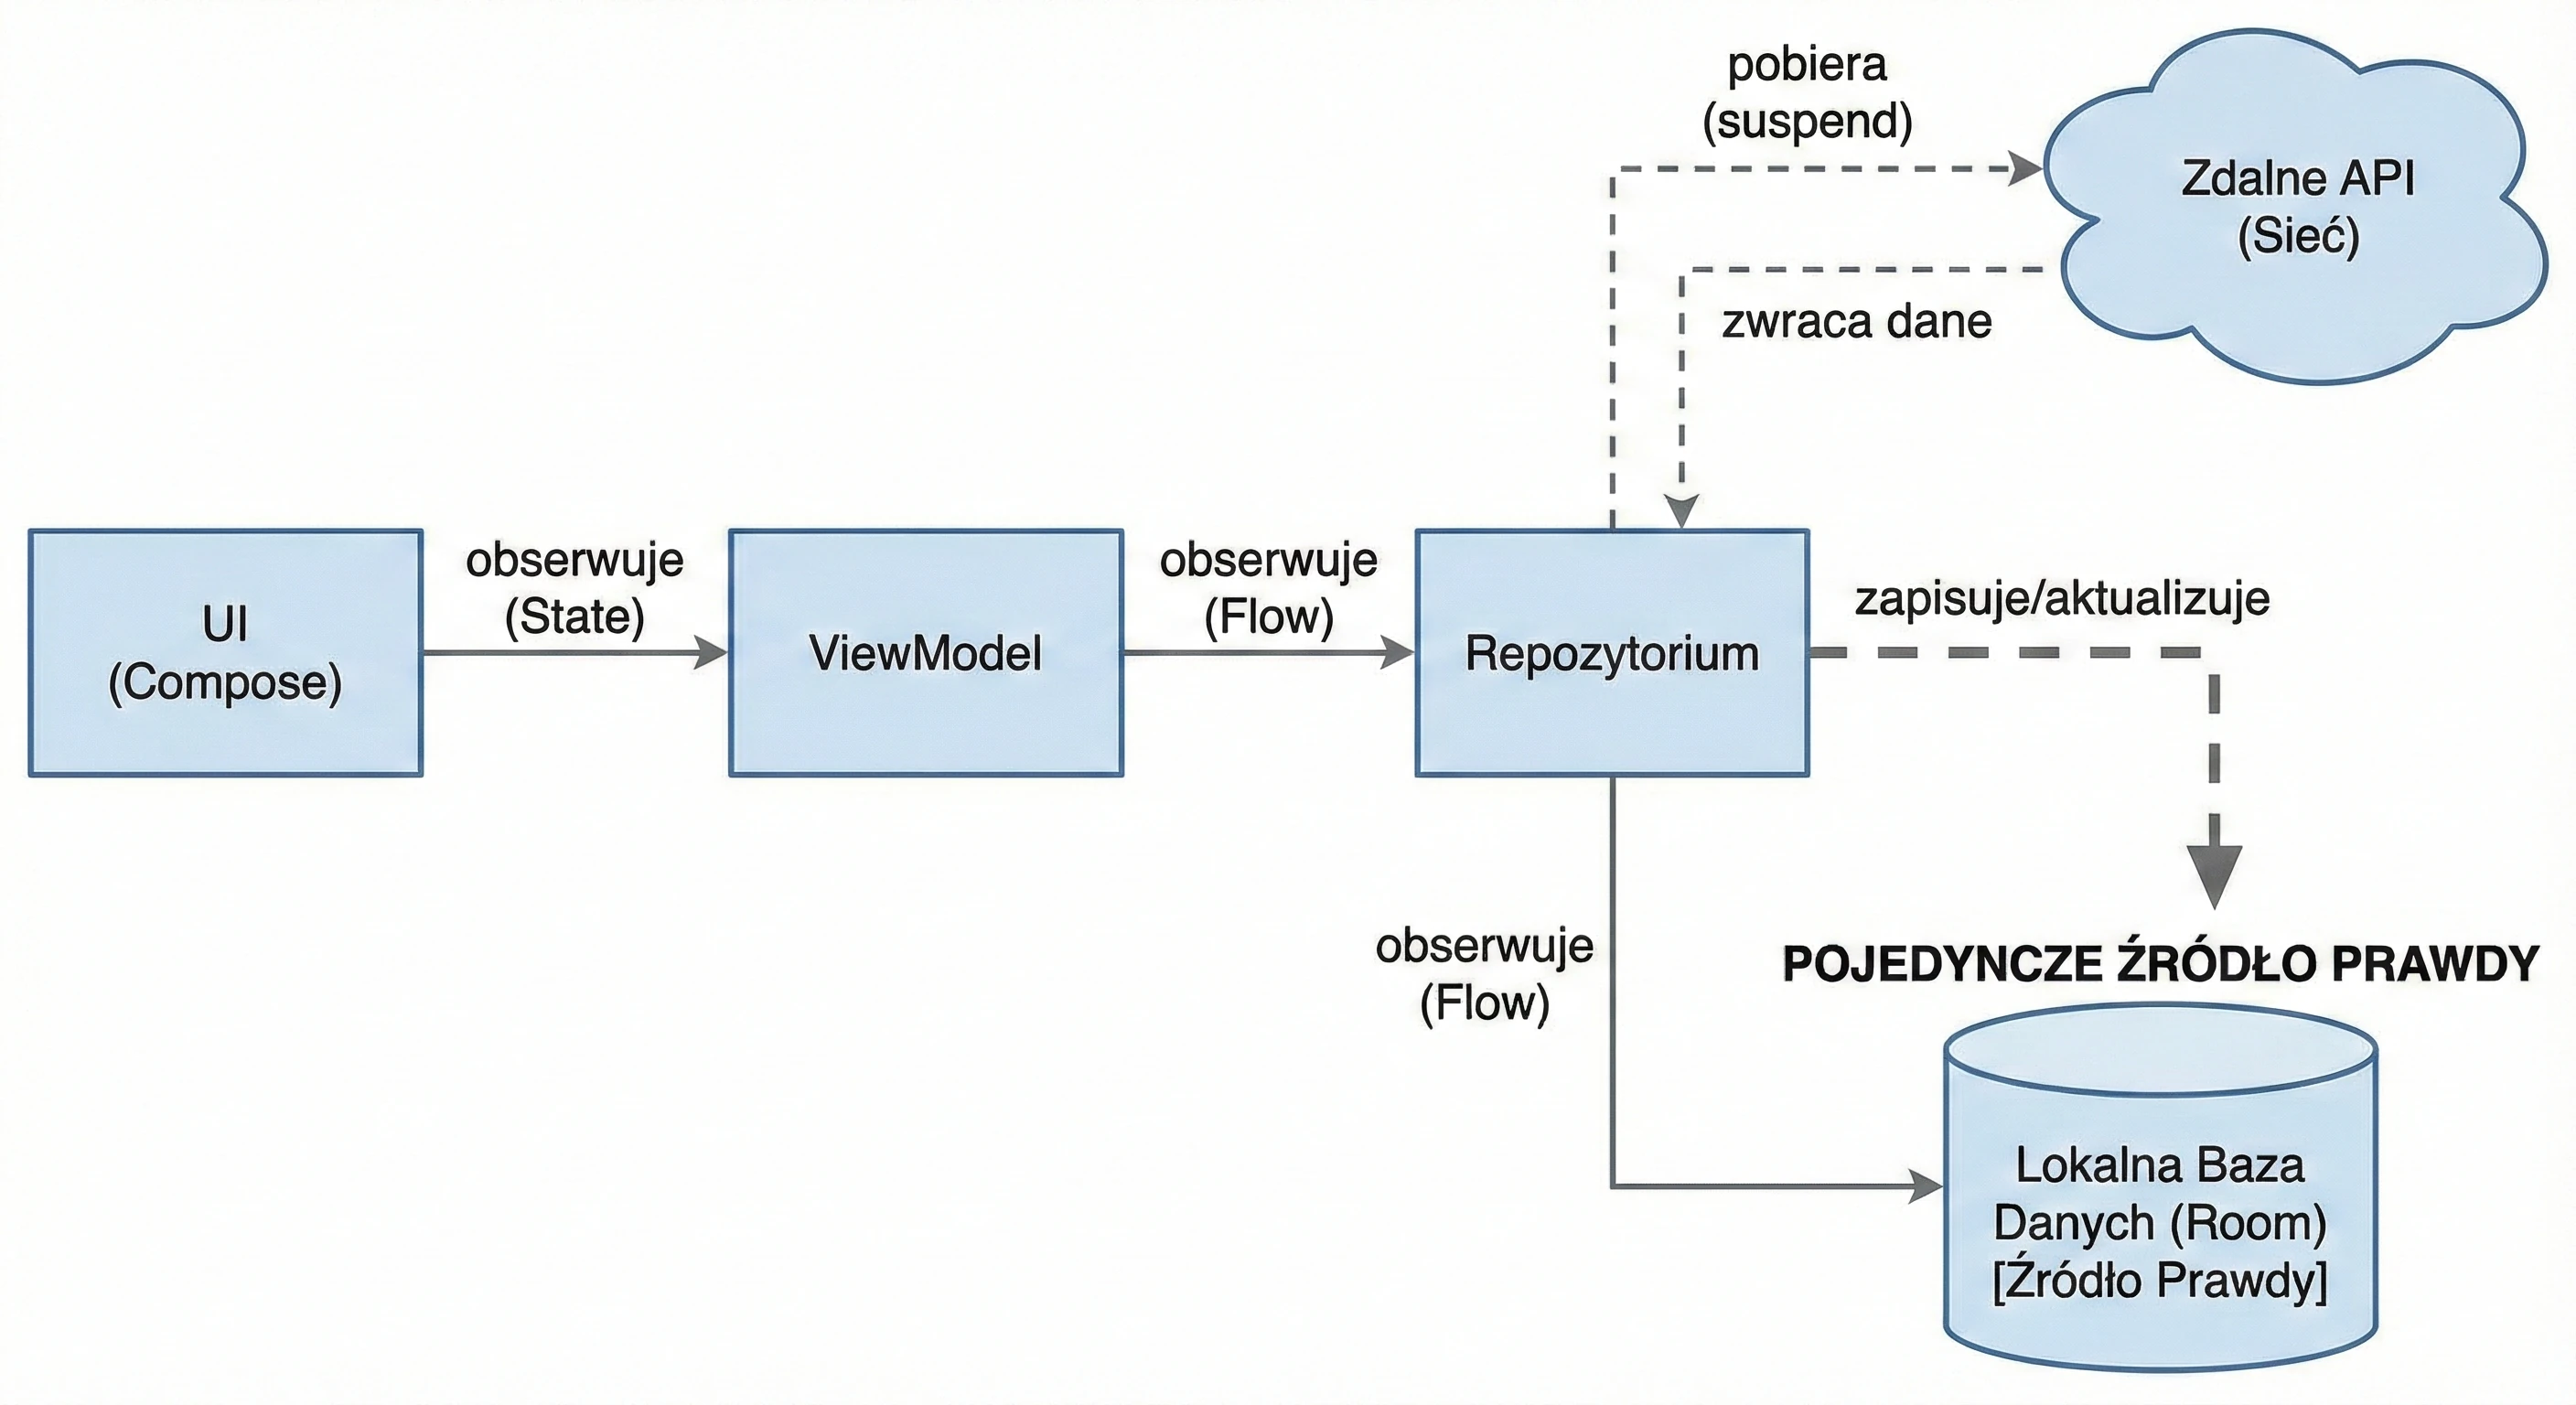
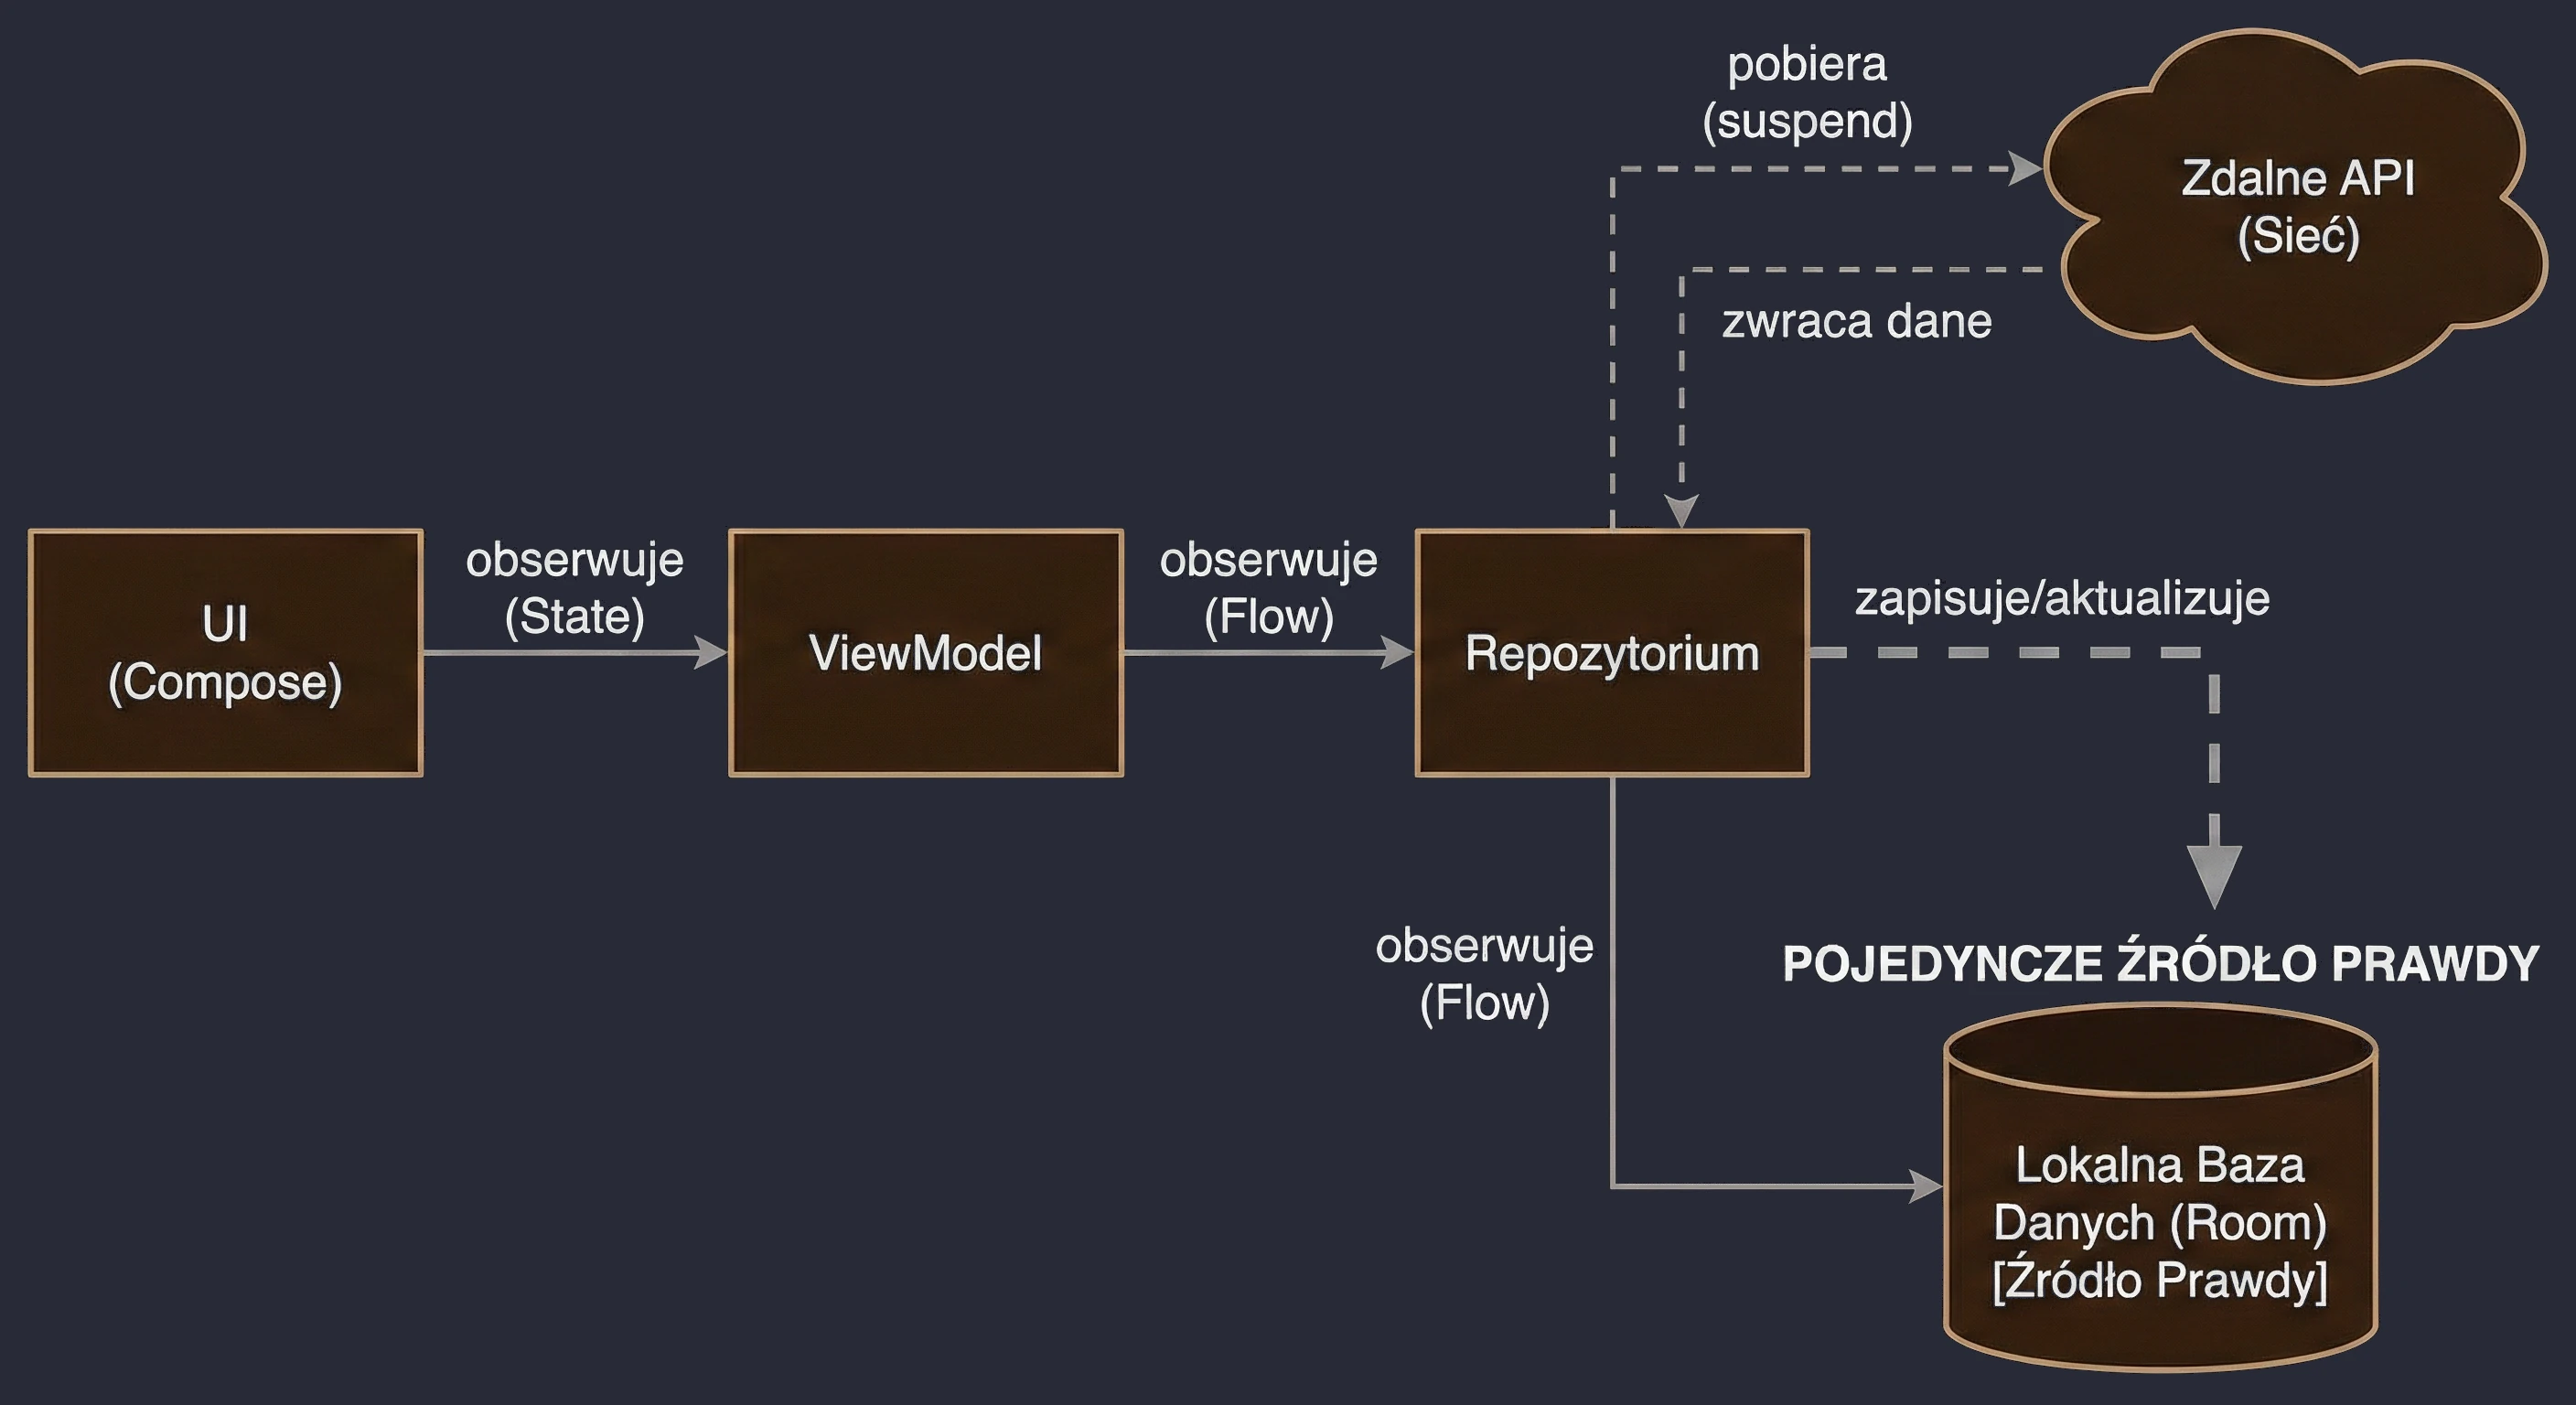
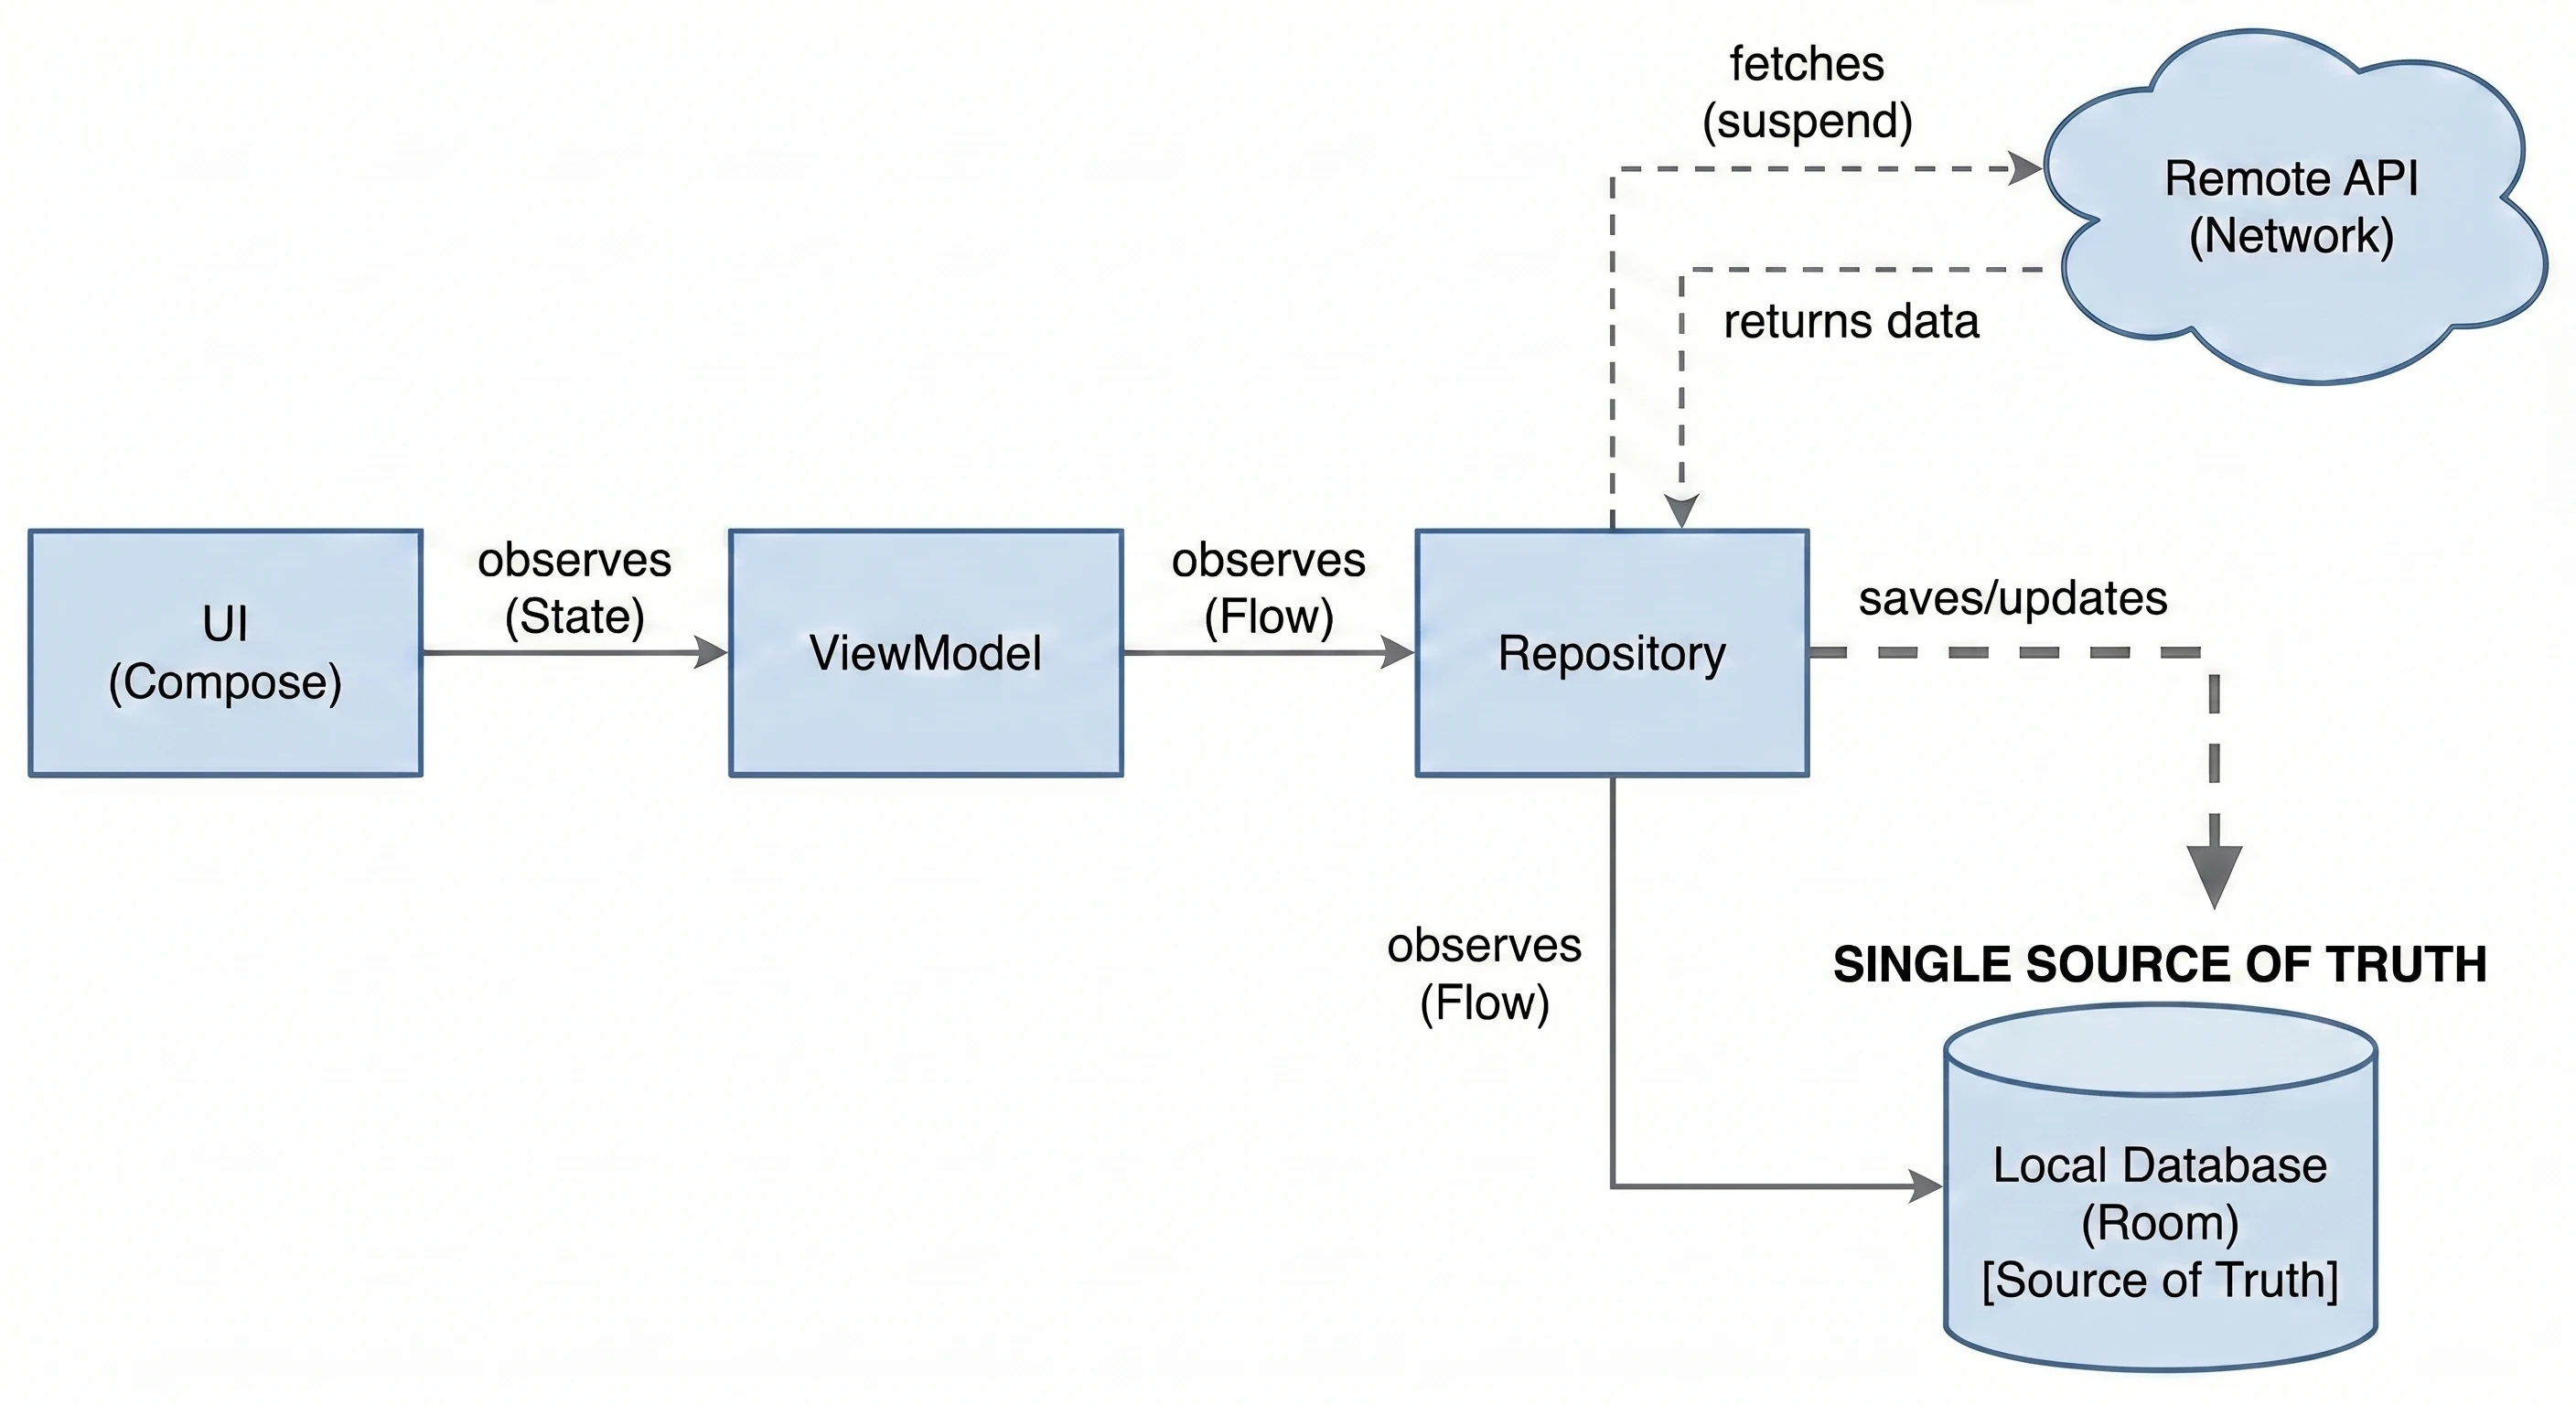
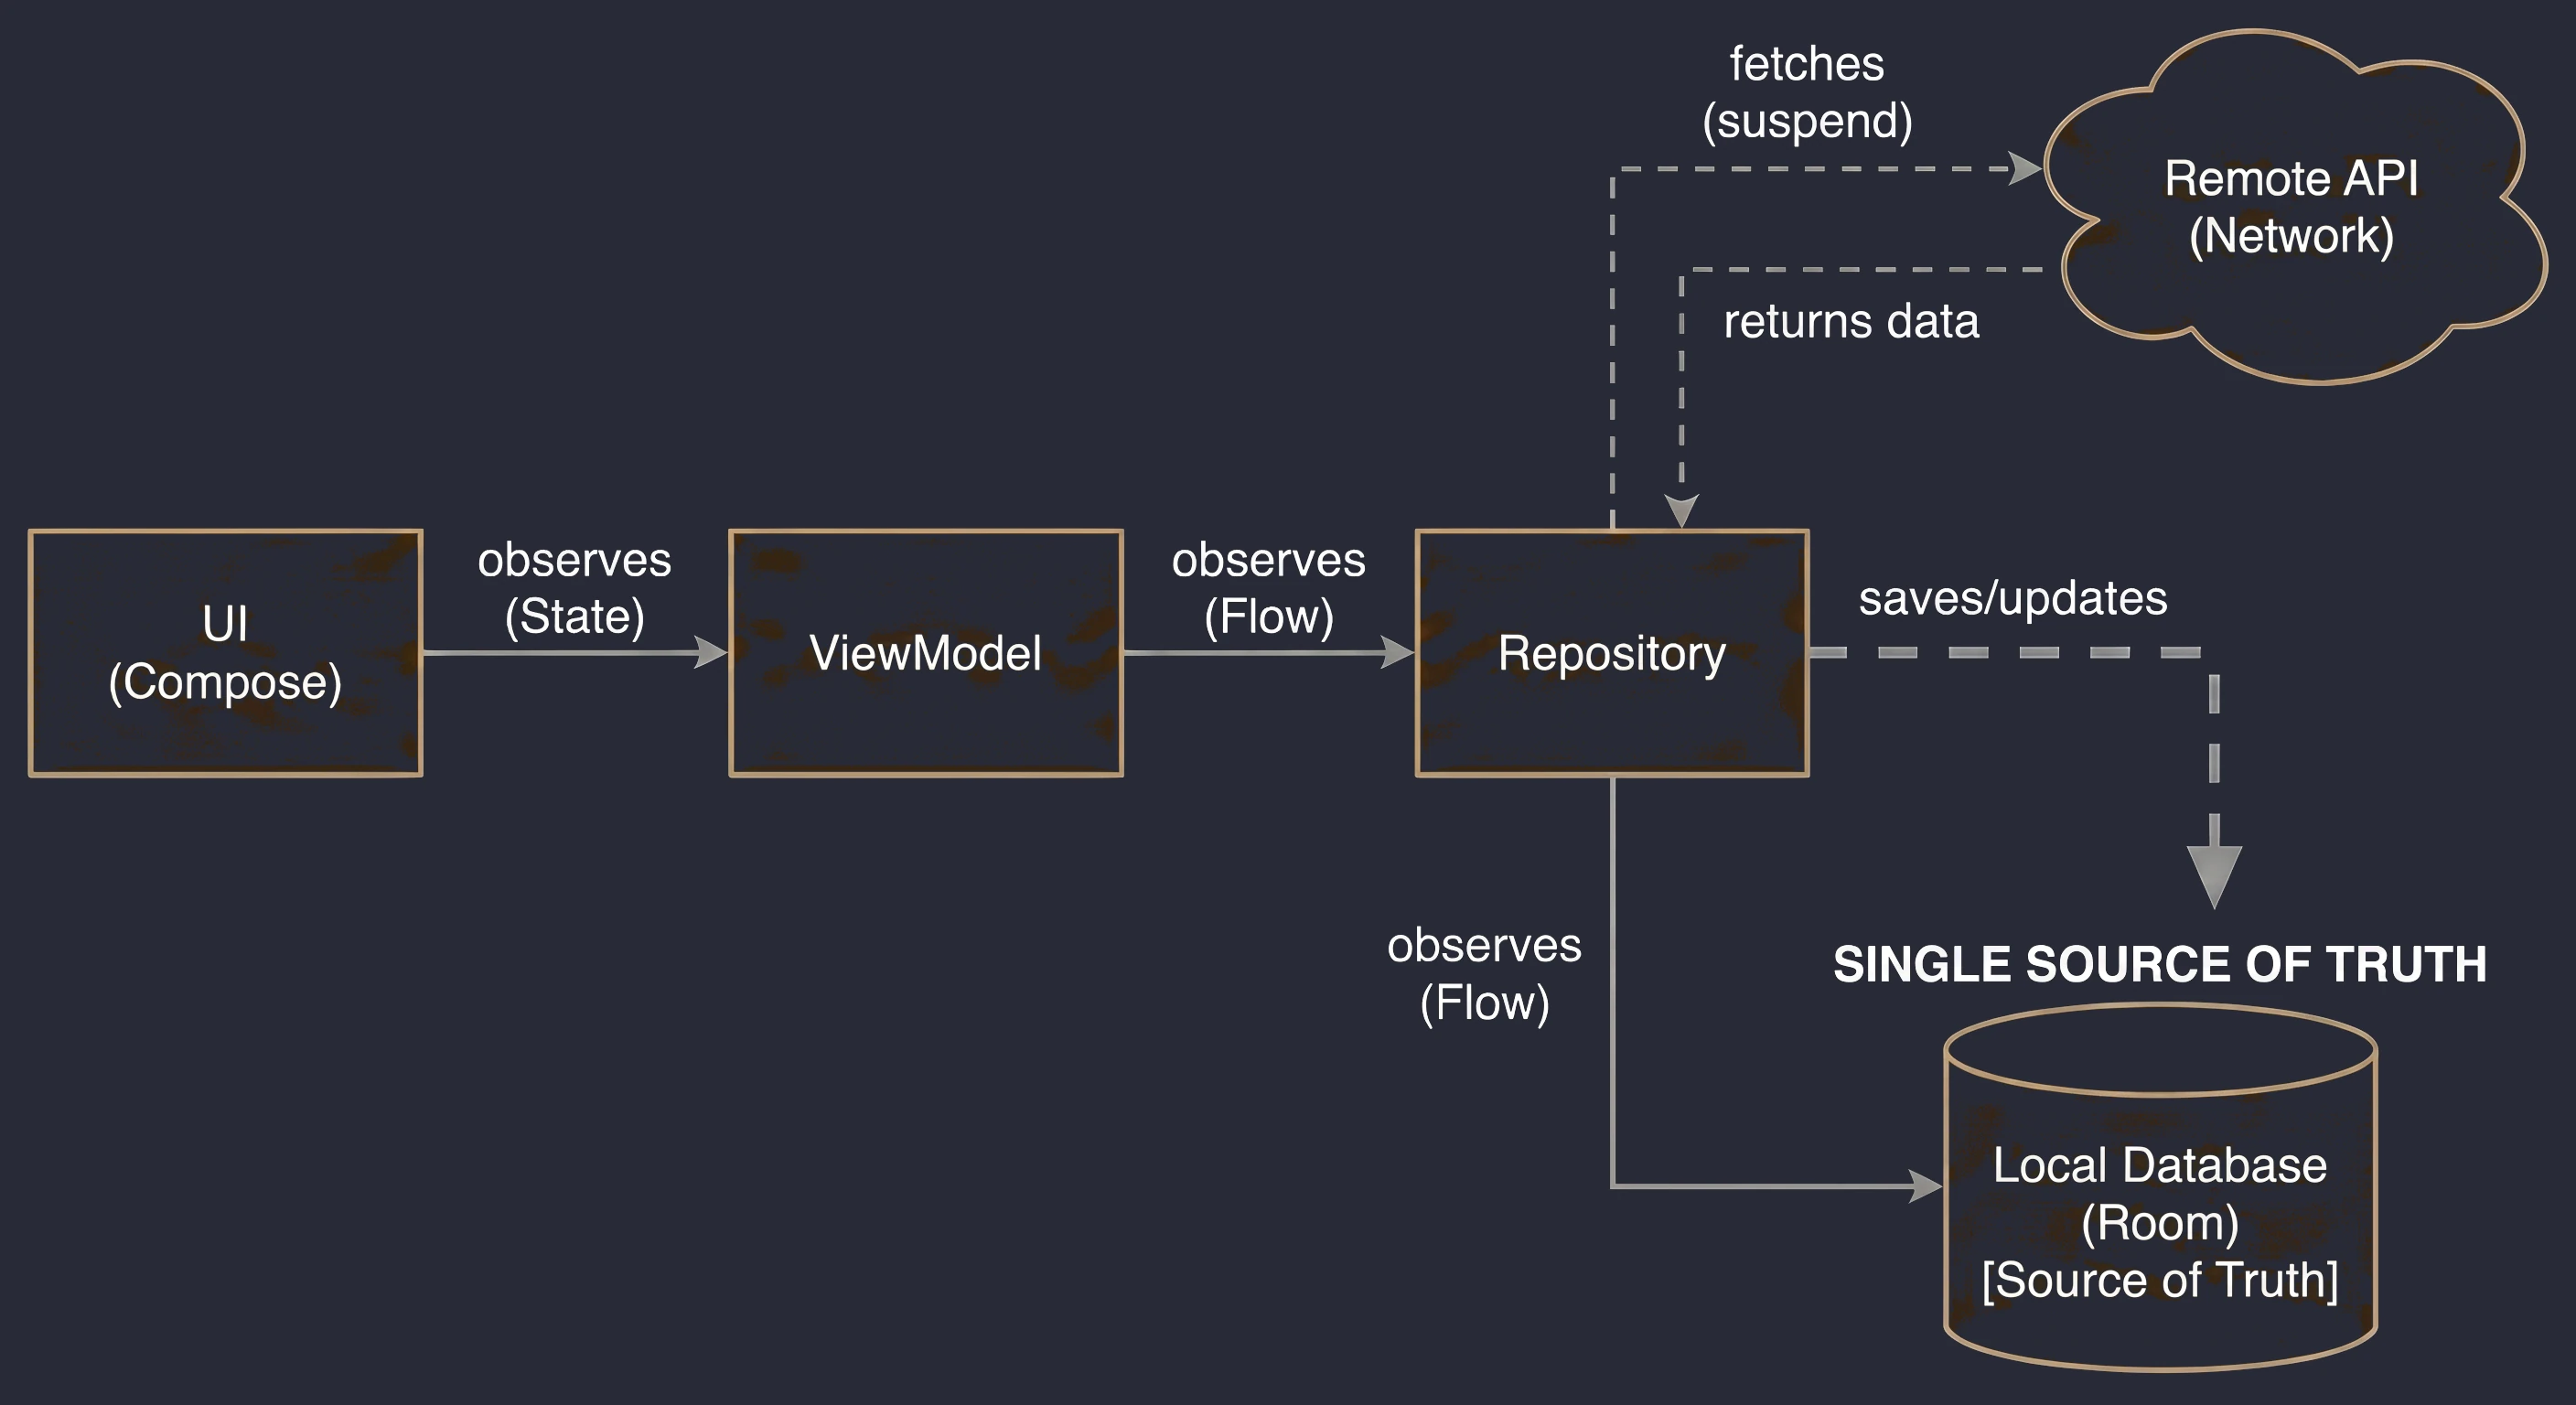
Let us see how the interface of our repository changes:
// We separate observation from refresh.
class UserRepository(
    private val api: UserApi,
    private val dao: UserDao
) {
    // 1. Read Path: returns a Flow from the database.
    // Works always, even without the Internet (returns empty or old data).
    fun getUsersStream(): Flow<List<UserEntity>> {
        return dao.getAllUsers()
    }

    // 2. Synchronization Path: fetches from the network and saves to the database.
    // Does not return data! It returns Unit or a network error.
    suspend fun refreshUsers() {
        val remoteUsers = api.getUsers()
        // Database write logic, for example delete old records and insert new ones.
        dao.replaceUsers(remoteUsers.map { it.toEntity() })
    }
}
The refreshUsers() method does not return a list of users. Its only responsibility is to update the database. When the database is updated, Room automatically emits a new list in the getUsersStream() stream, which refreshes the screen.
Basic Caching
The simplest way to synchronize a local database with a server is to treat the database as a temporary mirror, or cache. On every refresh, we remove the old contents of the table and insert the new data fetched from the API.
The algorithm of the refresh() method is:
- Fetch a list of objects from the API.
- Open a database transaction.
- Delete all records from the table (
DELETE FROM ...). - Insert the new records fetched in step 1.
Why do we delete everything? Because some elements may have been removed on the server. If we only used Insert (OnConflict = REPLACE), deleted elements would remain hanging in our local database forever.
In Room, the Clear and Insert operation should be atomic, that is executed in a single transaction, so the user does not see an empty screen for a fraction of a second between deletion and insertion.
// data/local/UserDao.kt

@Dao
interface UserDao {
    // 1. Read Path (always returns the latest table state)
    @Query("SELECT * FROM users")
    fun getAllUsers(): Flow<List<UserEntity>>

    // Helper operations for the Write Path
    @Insert(onConflict = OnConflictStrategy.REPLACE)
    suspend fun insertAll(users: List<UserEntity>)

    @Query("DELETE FROM users")
    suspend fun clearAll()

    // Transaction: guarantees that deletion and insertion
    // happen "at the same time" from the Flow observers' perspective.
    @Transaction
    suspend fun replaceUsers(users: List<UserEntity>) {
        clearAll()
        insertAll(users)
    }
}
The repository connects the API with the DAO. This is also where we map network objects (DTOs) to database objects (entities).
// data/UserRepository.kt

class UserRepository @Inject constructor(
    private val api: UserApi,
    private val dao: UserDao
) {
    // Read Path - we simply pass the Flow through.
    val users: Flow<List<UserEntity>> = dao.getAllUsers()

    // Write Path
    suspend fun refreshUsers() {
        try {
            // 1. Fetch from the network.
            val remoteUsers = api.getUsers()

            // 2. Map to entities.
            val entities = remoteUsers.map { dto ->
                UserEntity(
                    id = dto.id,
                    name = dto.name,
                    email = dto.email
                    // Note: We do not map local fields such as isFavorite,
                    // because the API does not return them!
                )
            }

            // 3. Update the database (Source of Truth).
            dao.replaceUsers(entities)

        } catch (e: Exception) {
            // Network error? That happens.
            // We do not throw the exception higher, unless we want to show a Snackbar.
            // This way, the UI still displays old data from the 'users' Flow.
            throw e
        }
    }
}
The ViewModel starts refresh on initialization, but it reads data from the stream.
@HiltViewModel
class UserViewModel @Inject constructor(
    private val repository: UserRepository
) : ViewModel() {

    // The UI observes this field. It contains data from the database.
    // Thanks to stateIn, Flow is converted into StateFlow (a hot stream).
    val uiState = repository.users
        .stateIn(viewModelScope, SharingStarted.WhileSubscribed(5000), emptyList())

    init {
        refreshData()
    }

    fun refreshData() {
        viewModelScope.launch {
            try {
                repository.refreshUsers()
            } catch (e: Exception) {
                // Handle the error here, for example send a "No network" event to the UI.
                // But the list of users will NOT disappear from the screen!
            }
        }
    }
}
The strategy above is excellent for read-only data, for example a list of news items. However, it has one critical drawback.
Imagine that we add an isFavorite: Boolean field to the entity, and the user changes it by tapping a heart icon in the application.
- The user taps Favorite next to Jan Kowalski. In the database,
isFavoritechanges totrue. - A network refresh occurs by calling
refreshUsers. - The
clearAll()method removes all users, including the favorite information. - The
insertAll()method inserts fresh data from the server. The server knows nothing about favorites, so the field receives its default value (false).
Result: Refreshing data resets the local application state. To prevent this, we need a more advanced approach.
Advanced Caching
To solve the problem of disappearing hearts during data refresh, we must physically separate data coming from the server from data generated by the user. We will use an architecture based on two tables:
- Cache table, for example
movies_cache: Contains raw data from the API, such as title, description, and poster. This table is temporary: therefresh()strategy can freely clear and overwrite it. - State table, for example
favorite_ids: Contains only identifiers of elements marked by the user. This table is persistent: the network synchronization process never modifies it.
The final domain object (Movie) that reaches the UI is created by combining these two tables in real time. We need two separate entities in the Room database.
// data/local/MovieCacheEntity.kt
@Entity(tableName = "movies_cache")
data class MovieCacheEntity(
    @PrimaryKey val id: Int,
    val title: String,
    val overview: String
    // There is NO isFavorite field here!
)

// data/local/FavoriteIdEntity.kt
@Entity(tableName = "favorite_ids")
data class FavoriteIdEntity(
    @PrimaryKey val id: Int
    // This table stores only IDs of favorite movies.
)

// Domain model (what the UI sees)
data class Movie(
    val id: Int,
    val title: String,
    val overview: String,
    val isFavorite: Boolean // We compute this field dynamically.
)
The most important part is the DAO query. We must fetch all movies from the cache and attach information about whether their ID exists in the favorites table. We use the LEFT JOIN clause for this.
// data/local/MovieDao.kt

@Dao
interface MovieDao {

    // Read Path: We join two tables.
    // (f.id IS NOT NULL) returns 1 (true) when the ID was found in favorites,
    // or 0 (false) when it was not found.
    @Query("""
        SELECT
            m.id,
            m.title,
            m.overview,
            (f.id IS NOT NULL) as isFavorite
        FROM movies_cache AS m
        LEFT JOIN favorite_ids AS f ON m.id = f.id
    """)
    fun getMoviesStream(): Flow<List<Movie>>

    // Cache operations (network)
    @Query("DELETE FROM movies_cache")
    suspend fun clearCache()

    @Insert(onConflict = OnConflictStrategy.REPLACE)
    suspend fun insertCache(movies: List<MovieCacheEntity>)

    @Transaction
    suspend fun refreshCache(movies: List<MovieCacheEntity>) {
        clearCache()
        insertCache(movies)
    }

    // Favorite operations (user)
    @Insert(onConflict = OnConflictStrategy.IGNORE)
    suspend fun addFavorite(id: FavoriteIdEntity)

    @Query("DELETE FROM favorite_ids WHERE id = :id")
    suspend fun removeFavorite(id: Int)
}
Let us trace the same scenario as in the previous section:
- The user taps the heart next to the movie with ID=5.
- The application adds a
FavoriteIdEntity(5)record to thefavorite_idstable. - Room automatically recalculates the
LEFT JOINquery. For movie ID=5, the conditionf.id IS NOT NULLbecomes true. The UI refreshes and shows a red heart. - A network refresh occurs.
- The
refreshCache()method clears themovies_cachetable and inserts new data. - The
favorite_idstable is not touched. - Room recalculates the
LEFT JOINagain. The new movie record from the cache joins with the existing favorite record. - The UI refreshes with the new movie descriptions, but the heart next to ID=5 remains in place.
This approach is robust and forms the basis of Offline-First applications. In this model, if the server stops returning the movie with ID=5, for example because it was removed from the catalog, it will also disappear from the application list, because FROM movies_cache will not return it, even if its ID is still present in the favorites table. This is usually the desired behavior: an orphaned record in favorites is harmless.
Concurrency (Race Conditions)
We now have a system that works correctly in 99% of cases. However, in specific conditions, such as a slow network and an impatient user, data corruption may occur. Consider the following race condition scenario:
- The application starts fetching data from the network. This takes 2 seconds.
- In the meantime, the user taps Add to favorites for movie X.
- The application saves the ID of movie X in the
favorite_idstable. - The network fetch finishes successfully.
- The application clears the
movies_cachetable and inserts new data.
In the scenario above, everything is fine because the tables are separate. But what happens if the business logic is more complex?
Assume that instead of a separate table, we store the number of likes directly in the movie table, because the API returns a global like count and we want to increment it locally.
// Error scenario:
// 1. The user taps Like (locally: likes = 10 + 1 = 11)
// 2. The repository fetches data from the network (server: likes = 10)
// 3. The repository overwrites local changes with server data (likes = 10)
As a result, the user's like is swallowed by the data refresh. Even with two tables, there is still a risk of inconsistency if operations are not atomic.
suspend fun toggleFavorite(id: Int) {
    // 1. Check whether the item is in favorites.
    val isFavorite = dao.isFavorite(id)

    // <--- At this moment, a thread switch occurs (context switch).
    // <--- Another process removes this movie from the database.

    // 2. If it was favorite, remove it. If not, add it.
    if (isFavorite) dao.remove(id) else dao.add(id)
}
To protect ourselves against such situations, we must synchronize access to the database and make sure that only one modifying operation at a time, either a network write or a user write, is executed.
Solution 1: Mutex (Mutual Exclusion)
To prevent race conditions, we must guarantee that write operations to the database are executed sequentially, not in parallel. In the Kotlin Coroutines world, this is done with a tool called Mutex, from Mutual Exclusion.
It works like a lock on a door: only one person (coroutine) may be inside, that is in the critical section. Others must wait in a queue until the lock is released. The Mutex class comes from the kotlinx.coroutines.sync library. We use the withLock { ... } method, which automatically locks at the beginning of the block and unlocks at the end, even if an exception occurs. Let us modify our repository:
// data/MovieRepository.kt

class MovieRepository @Inject constructor(
    private val api: MovieApi,
    private val dao: MovieDao
) {
    // The Mutex object must be a class field, shared by all calls.
    private val mutex = Mutex()

    // Operation 1: network refresh
    suspend fun refreshMovies() {
        // STEP A: Fetch from the network (long!)
        // We do this OUTSIDE the lock. We do not want to block the UI
        // while waiting for the server.
        val remoteMovies = api.getMovies()
        val entities = remoteMovies.map { it.toEntity() }

        // STEP B: Write to the database (short!)
        // This is our CRITICAL SECTION.
        mutex.withLock {
            dao.refreshCache(entities)
        }
    }

    // Operation 2: changing favorite status
    suspend fun toggleFavorite(movieId: Int) {
        // The whole "check and write" logic must be atomic.
        mutex.withLock {
            val isFavorite = dao.isFavorite(movieId)
            if (isFavorite) {
                dao.removeFavorite(movieId)
            } else {
                dao.addFavorite(FavoriteIdEntity(movieId))
            }
        }
    }
}
Let us return to the race scenario:
- Thread A (Refresh): Fetches data from the network. This takes 2 seconds. The Mutex is open.
- Thread B (User): Taps Like. It calls
toggleFavorite. - Thread B: Enters
mutex.withLock. It locks the mutex, writes the favorite movie to the database, and unlocks it. - Thread A: Finishes fetching data. It tries to enter
mutex.withLock. - If Thread B still holds the lock, Thread A suspends and waits.
- When Thread B releases the lock, Thread A enters the critical section and safely updates the cache.
Because the favorite write operation (addFavorite) and cache clearing (refreshCache) never happen at the same time, the database remains consistent.
Notice that the network request (api.getMovies()) is placed before the mutex.withLock block. If we also included the network request in the locked section, the user would not be able to tap Like during the whole synchronization process, and the application would appear frozen. We lock only access to the shared resource, that is the database.
Advantages of this method:
- Simple implementation.
- Readable code: the critical section is explicit.
Disadvantages of this method:
- Risk of deadlock if we try to nest two mutexes or enter the same mutex twice from the same thread, although Kotlin's Mutex is not reentrant.
- With a very large number of operations, constant locking and unlocking can become a performance bottleneck.
Solution 2: Actor Pattern
Mutex solves the problem, but it works as a hard lock. If refresh takes 5 seconds and the user taps Like, that operation must wait in suspension.
An alternative approach is the Actor Pattern. Instead of allowing many threads to access the database directly and making them wait in a queue, we create one actor: a dedicated coroutine that is the only component allowed to write to the database. The rest of the application does not modify data directly, but sends messages to the actor, such as requests or actions.
The repository is no longer just a set of methods. It becomes an active component that owns:
- Channel: A mailbox into which commands arrive, for example Refresh or Like.
- Actor loop: An infinite loop inside
initthat takes messages one by one and processes them.
Thanks to this, operations are naturally synchronized, because the actor does only one thing at a time. At the same time, the thread that sends the message is not blocked: it drops a letter into the mailbox and continues. For the implementation, we use Channel and a sealed interface to define message types.
// data/MovieRepository.kt

// 1. We define possible actions (intents).
sealed interface DataAction {
    data object Refresh : DataAction
    data class ToggleFavorite(val id: Int) : DataAction
}

@Singleton
class MovieRepository @Inject constructor(
    private val api: MovieApi,
    private val dao: MovieDao,
    // We need a scope to start the actor, which lives as long as the application.
    @ApplicationScope private val externalScope: CoroutineScope
) {
    // 2. Channel (queue) with unlimited capacity.
    private val actionChannel = Channel<DataAction>(Channel.UNLIMITED)

    // Read Path (unchanged)
    val movies: Flow<List<Movie>> = dao.getMoviesStream()

    init {
        // 3. Starting the actor (loop).
        externalScope.launch {
            // consumeEach processes messages sequentially (FIFO).
            actionChannel.consumeEach { action ->
                processAction(action)
            }
        }
    }

    // Processing logic, private and available only to the actor.
    private suspend fun processAction(action: DataAction) {
        when (action) {
            is DataAction.Refresh -> {
                try {
                    val remoteMovies = api.getMovies() // This may take a long time.
                    dao.refreshCache(remoteMovies.map { it.toEntity() })
                } catch (e: Exception) {
                    // Log error
                }
            }
            is DataAction.ToggleFavorite -> {
                val isFavorite = dao.isFavorite(action.id)
                if (isFavorite) dao.removeFavorite(action.id)
                else dao.addFavorite(FavoriteIdEntity(action.id))
            }
        }
    }

    // 4. Public API (fire and forget)
    // Methods are no longer 'suspend', because sending to the channel is fast.
    fun refresh() {
        actionChannel.trySend(DataAction.Refresh)
    }

    fun toggleFavorite(id: Int) {
        actionChannel.trySend(DataAction.ToggleFavorite(id))
    }
}
Let us return to our race scenario:
- The UI calls
refresh()-> theRefreshaction enters the channel. - The actor takes
Refreshand starts fetching data from the network. - In the meantime, the UI calls
toggleFavorite(5)-> theToggleaction enters the channel and waits. - The actor finishes fetching and saves cache data.
- The actor finishes processing
Refresh. The loop returns to the beginning. - The actor takes the waiting
ToggleFavorite(5)action from the channel. - The actor updates the favorites table.
Although the user action had to wait for processing, it was queued and executed correctly after synchronization finished. No data was lost.
Advantages of this method:
- No classical locking, so deadlocks are impossible.
- Guaranteed operation order (FIFO).
- The UI does not wait for the write operation to complete (fire and forget).
Disadvantages of this method:
- No immediate feedback: the
toggleFavoritemethod returnsvoid. The UI must rely on observing theFlowfrom the database to learn whether the operation succeeded. This follows the SSoT philosophy, but it requires a different programming mindset.
Complete Example: Clean Architecture and the Actor Pattern
Below is the complete source code of a module that combines Offline-First architecture with a full separation into layers (Clean Architecture).
In this approach, the ViewModel does not communicate directly with the Repository. The intermediaries are Use Cases, which encapsulate business logic.
Domain Layer
This layer is independent of Android frameworks. It defines models, interfaces, and business logic.
Domain model:
// File: domain/model/Movie.kt
package com.example.movieapp.domain.model

data class Movie(
    val id: Int,
    val title: String,
    val overview: String,
    val rating: Double,
    val isFavorite: Boolean
)
Repository interface (contract):
// File: domain/repository/MovieRepository.kt
package com.example.movieapp.domain.repository

interface MovieRepository {
    // Data stream (always up to date)
    fun getMoviesStream(): Flow<List<Movie>>

    // Actions (fire-and-forget or suspend)
    suspend fun refresh()
    suspend fun toggleFavorite(id: Int)
}
Use Cases: Each class performs one business task.
// File: domain/usecase/GetMoviesUseCase.kt
package com.example.movieapp.domain.usecase

class GetMoviesUseCase @Inject constructor(
    private val repository: MovieRepository
) {
    operator fun invoke(): Flow<List<Movie>> {
        return repository.getMoviesStream()
    }
}

// File: domain/usecase/RefreshMoviesUseCase.kt
package com.example.movieapp.domain.usecase

class RefreshMoviesUseCase @Inject constructor(
    private val repository: MovieRepository
) {
    suspend operator fun invoke() {
        repository.refresh()
    }
}

// File: domain/usecase/ToggleFavoriteUseCase.kt
package com.example.movieapp.domain.usecase

class ToggleFavoriteUseCase @Inject constructor(
    private val repository: MovieRepository
) {
    suspend operator fun invoke(id: Int) {
        repository.toggleFavorite(id)
    }
}
Data Layer
Implementation of data access. This is where the Room, Retrofit, and actor logic is located.
Database entities:
// File: data/local/MovieEntities.kt
package com.example.movieapp.data.local

@Entity(tableName = "movies_cache")
data class MovieCacheEntity(
    @PrimaryKey val id: Int,
    val title: String,
    val overview: String,
    val voteAverage: Double
)

@Entity(tableName = "favorite_ids")
data class FavoriteIdEntity(
    @PrimaryKey val id: Int
)
DAO (Data Access Object):
// File: data/local/MovieDao.kt
package com.example.movieapp.data.local

@Dao
interface MovieDao {
    // SSoT: joining data from two tables.
    @Query("""
        SELECT
            m.id, m.title, m.overview, m.voteAverage as rating,
            (f.id IS NOT NULL) as isFavorite
        FROM movies_cache AS m
        LEFT JOIN favorite_ids AS f ON m.id = f.id
    """)
    fun getMoviesStream(): Flow<List<Movie>>

    // Atomic operations for the actor.
    @Transaction
    suspend fun refreshCache(movies: List<MovieCacheEntity>) {
        clearCache()
        insertCache(movies)
    }

    @Query("DELETE FROM movies_cache")
    suspend fun clearCache()

    @Insert(onConflict = OnConflictStrategy.REPLACE)
    suspend fun insertCache(movies: List<MovieCacheEntity>)

    // Favorites
    @Insert(onConflict = OnConflictStrategy.IGNORE)
    suspend fun addFavorite(entity: FavoriteIdEntity)

    @Query("DELETE FROM favorite_ids WHERE id = :id")
    suspend fun removeFavorite(id: Int)

    @Query("SELECT EXISTS(SELECT 1 FROM favorite_ids WHERE id = :id)")
    suspend fun isFavorite(id: Int): Boolean
}
API (Retrofit):
// File: data/remote/TmdbApi.kt
package com.example.movieapp.data.remote

data class TmdbResponse(@SerializedName("results") val results: List<MovieDto>)

data class MovieDto(
    val id: Int,
    val title: String,
    val overview: String,
    @SerializedName("vote_average") val voteAverage: Double
)

interface TmdbApi {
    @GET("movie/popular")
    suspend fun getPopularMovies(
        @Query("api_key") apiKey: String,
        @Query("language") language: String = "en-US"
    ): TmdbResponse
}
Repository (actor implementation): This class implements the domain interface. It uses a channel for synchronization.
// File: data/repository/MovieRepositoryImpl.kt
package com.example.movieapp.data.repository

// Internal actor messages
private sealed interface RepoAction {
    data object Refresh : RepoAction
    data class ToggleFavorite(val id: Int) : RepoAction
}

@Singleton
class MovieRepositoryImpl @Inject constructor(
    private val api: TmdbApi,
    private val dao: MovieDao,
    private val externalScope: CoroutineScope, // Application Scope
    private val apiKey: String
) : MovieRepository {

    private val actorChannel = Channel<RepoAction>(Channel.UNLIMITED)

    override fun getMoviesStream(): Flow<List<Movie>> = dao.getMoviesStream()

    init {
        // Start the processing loop.
        externalScope.launch {
            actorChannel.consumeEach { action ->
                processAction(action)
            }
        }
    }

    private suspend fun processAction(action: RepoAction) {
        when (action) {
            is RepoAction.Refresh -> {
                try {
                    val response = api.getPopularMovies(apiKey)
                    val entities = response.results.map { dto ->
                        MovieCacheEntity(dto.id, dto.title, dto.overview, dto.voteAverage)
                    }
                    dao.refreshCache(entities)
                } catch (e: Exception) { /* Ignore network error */ }
            }
            is RepoAction.ToggleFavorite -> {
                val isFav = dao.isFavorite(action.id)
                if (isFav) dao.removeFavorite(action.id)
                else dao.addFavorite(FavoriteIdEntity(action.id))
            }
        }
    }

    // Interface methods enqueue tasks.
    override suspend fun refresh() {
        actorChannel.send(RepoAction.Refresh)
    }

    override suspend fun toggleFavorite(id: Int) {
        actorChannel.send(RepoAction.ToggleFavorite(id))
    }
}
Dependency Injection (Hilt)
The module that binds the repository implementation to its interface.
// File: di/AppModule.kt
package com.example.movieapp.di

@Module
@InstallIn(SingletonComponent::class)
object AppModule {

    @Provides
    @Singleton
    fun provideDatabase(@ApplicationContext context: Context): MoviesDatabase {
        return Room.databaseBuilder(context, MoviesDatabase::class.java, "app.db").build()
    }

    @Provides
    fun provideDao(db: MoviesDatabase): MovieDao = db.movieDao()

    @Provides
    @Singleton
    fun provideApi(): TmdbApi {
        return Retrofit.Builder()
            .baseUrl("https://api.themoviedb.org/3/")
            .addConverterFactory(GsonConverterFactory.create())
            .build()
            .create(TmdbApi::class.java)
    }

    @Provides
    @Singleton
    fun provideAppScope(): CoroutineScope =
      CoroutineScope(SupervisorJob() + Dispatchers.Default)

    @Provides
    fun provideApiKey(): String = "YOUR_API_KEY"

    // Injecting the implementation as the domain interface.
    @Provides
    @Singleton
    fun provideMovieRepository(
        impl: MovieRepositoryImpl
    ): MovieRepository = impl
}
The provideAppScope definition above requires a comment. Injecting a CoroutineScope associated with the application process, and not with a screen, is critical for the Offline-First pattern for two reasons:
- Independence from the UI lifecycle (fire and forget):
- Error isolation (SupervisorJob):
The standard viewModelScope is canceled when the user leaves the screen or rotates the device. If we used it to start a write operation such as toggleFavorite, and the user closed the application while this operation was running, the write process could be interrupted halfway. This could lead to data inconsistency. externalScope guarantees that a started operation is completed in the background, even if the user interface no longer exists.
The default Job in coroutines works according to collective responsibility: if one coroutine in the scope throws an exception, the entire scope is canceled (fail-fast). For an actor that handles many independent tasks, this is undesirable behavior. A network synchronization error should not block the ability to add movies to favorites. Using SupervisorJob makes the failure of one coroutine not affect the others or the scope itself, which keeps the actor's message-processing loop stable.
The line of code:
CoroutineScope(SupervisorJob() + Dispatchers.Default)consists of three important elements that together create a safe environment for background operations. The first one was discussed above. Let us look at the other two:
Dispatchers.Default:- The
+operator:
Defines the default thread pool for this scope. Default is optimized for CPU-intensive operations, which makes it a good starting point for general business logic, for example processing actor logic. Remember that input/output (I/O) operations, such as Room or Retrofit calls, should internally switch to Dispatchers.IO anyway.
In Kotlin, CoroutineContext works like a map, that is a set of elements. The plus operator is used to combine these elements. In this case, we create a context that has both specific error behavior (SupervisorJob) and a specific threading strategy (Dispatchers.Default).
To summarize: we create a lifetime space for background work that is resistant to individual failures and runs on an efficient background thread pool.
Presentation Layer (ViewModel)
The ViewModel uses only use cases. It has no access to the repository or the database.
// File: presentation/MoviesViewModel.kt
package com.example.movieapp.presentation

@HiltViewModel
class MoviesViewModel @Inject constructor(
    getMoviesUseCase: GetMoviesUseCase,
    private val refreshMoviesUseCase: RefreshMoviesUseCase,
    private val toggleFavoriteUseCase: ToggleFavoriteUseCase
) : ViewModel() {

    // Convert Flow to StateFlow (UI state).
    val uiState: StateFlow<List<Movie>> = getMoviesUseCase()
        .stateIn(
            scope = viewModelScope,
            started = SharingStarted.WhileSubscribed(5000),
            initialValue = emptyList()
        )

    init {
        // Fetch data on startup.
        viewModelScope.launch {
            refreshMoviesUseCase()
        }
    }

    fun onFavoriteClick(movie: Movie) {
        viewModelScope.launch {
            toggleFavoriteUseCase(movie.id)
        }
    }

    fun onSwipeRefresh() {
        viewModelScope.launch {
            refreshMoviesUseCase()
        }
    }
}
Application Configuration (Hilt & Manifest)
For dependency injection to work, we must create a class that inherits from Application and annotate it with @HiltAndroidApp. This is where Hilt generates the dependency graph.
// File: MovieApplication.kt
package com.example.movieapp

@HiltAndroidApp
class MovieApplication : Application()
Do not forget to register this class in the AndroidManifest.xml file. Without this, the application will throw an error at startup.
<manifest xmlns:android="http://schemas.android.com/apk/res/android"
    package="com.example.movieapp">

    <uses-permission android:name="android.permission.INTERNET" />

    <application
        android:name=".MovieApplication"
        android:allowBackup="true"
        android:icon="@mipmap/ic_launcher"
        android:label="@string/app_name"
        android:theme="@style/Theme.MovieApp">

        <activity
            android:name=".presentation.MainActivity"
            android:exported="true">
            <intent-filter>
                <action android:name="android.intent.action.MAIN" />
                <category android:name="android.intent.category.LAUNCHER" />
            </intent-filter>
        </activity>
    </application>
</manifest>
View Layer (UI - Jetpack Compose)
The final element is MainActivity, which acts as the entry point (@AndroidEntryPoint). We build the user interface with Jetpack Compose, observing the StateFlow from the ViewModel. The view is completely passive: it only displays state and passes events, such as clicks, to the ViewModel.
// File: presentation/MainActivity.kt
package com.example.movieapp.presentation

@AndroidEntryPoint
class MainActivity : ComponentActivity() {
    override fun onCreate(savedInstanceState: Bundle?) {
        super.onCreate(savedInstanceState)
        setContent {
            MaterialTheme {
                MoviesScreen()
            }
        }
    }
}

@OptIn(ExperimentalMaterial3Api::class)
@Composable
fun MoviesScreen(
    viewModel: MoviesViewModel = hiltViewModel()
) {
    // Observe UI state (convert Flow to State).
    val movies by viewModel.uiState.collectAsState()

    Scaffold(
        topBar = {
            TopAppBar(
                title = { Text("Offline-First Movies") },
                actions = {
                    IconButton(onClick = { viewModel.onSwipeRefresh() }) {
                        Icon(Icons.Default.Refresh, contentDescription = "Refresh")
                    }
                }
            )
        }
    ) { padding ->
        LazyColumn(
            contentPadding = padding,
            modifier = Modifier.fillMaxSize()
        ) {
            items(movies, key = { it.id }) { movie ->
                MovieItem(
                    movie = movie,
                    onFavoriteClick = { viewModel.onFavoriteClick(movie) }
                )
            }
        }
    }
}

@Composable
fun MovieItem(
    movie: Movie,
    onFavoriteClick: () -> Unit
) {
    ListItem(
        headlineContent = { Text(movie.title) },
        supportingContent = {
            Text(
                text = movie.overview,
                maxLines = 2,
            )
        },
        trailingContent = {
            IconButton(onClick = onFavoriteClick) {
                // The icon changes depending on the isFavorite field (SSoT).
                Icon(
                    imageVector = if (movie.isFavorite) Icons.Default.Favorite
                                  else Icons.Default.FavoriteBorder,
                    contentDescription = null,
                    tint = if (movie.isFavorite) Color.Red else Color.Gray
                )
            }
        },
        leadingContent = {
            Surface(
                color = MaterialTheme.colorScheme.primaryContainer,
                shape = MaterialTheme.shapes.small,
                modifier = Modifier.size(40.dp)
            ) {
                Box(contentAlignment = Alignment.Center) {
                    Text(
                        text = movie.rating.toString(),
                    )
                }
            }
        },
        modifier = Modifier.clickable { /* Open details */ }
    )
    Divider()
}
Serverless Architecture and the NoSQL Model
In the previous chapters, we built applications based on an architecture in which we were responsible for the local database (Room) and used ready-made APIs (REST/Retrofit). In this chapter, we change the approach. We will use the Backend-as-a-Service (BaaS) model, in which the server infrastructure is provided by an external platform, in this case Firebase.
Backend-as-a-Service (BaaS)
Traditional backend development requires setting up a server, for example in Ktor or Spring Boot, configuring a database such as PostgreSQL, and managing hosting, for example AWS or Google Cloud.
Firebase, a Google platform, removes this burden by offering ready-made modules:
- Firestore: A cloud database.
- Authentication: A ready-made login system (Google, Facebook, Email).
- Cloud Functions: Business logic executed in response to events (serverless architecture).
- Storage: Space for files, such as photos and videos.
Thanks to this, a developer can create a fully functional system, from the database to login, without writing a single line of server-side code.
SQL (Room) vs NoSQL (Firestore)
The most important change for the developer is the transition from a relational database (SQL) to a document database (NoSQL). SQL is based on tables and strict relations. We must define the schema in advance. If we want to add a new field to a table, we must perform a database migration.
Cloud Firestore is a non-relational database. There are no tables or rows. Instead, we have:
- Collections: Containers for documents, equivalent to tables, for example
users. - Documents: JSON objects stored in a collection, equivalent to rows.
- Fields: Key-value pairs inside a document.
Table 14.1 shows the mapping of concepts between these two worlds.
| SQL (Room) | NoSQL (Firestore) |
|---|---|
| Table | Collection |
| Row | Document |
| Column | Field |
| Foreign Key | Reference |
| Relation (Join) | Usually absent (denormalization) |
Key difference: In Firestore, documents may have different structures within the same collection because the schema is flexible. Instead of joining tables (JOIN), we often duplicate data (denormalization) to speed up reads.
Environment Configuration (Firebase Setup)
Integrating an application with Firebase is different from adding a regular library. It requires two-sided configuration: creating a project in the cloud console and introducing our application to Google servers by using a unique identifier and a configuration file.
The first step is to create a logical container for our cloud data.
- Go to https://console.firebase.google.com/ and sign in with a Google account.
- Click "Add project". Give it a name, for example MovieApp-Cloud, and disable Google Analytics because it is not needed in this exercise.
- After creating the project, click the Android icon on the main screen (Get started by adding Firebase to your app).
During application registration, you will be asked for the Android package name. It must be identical to the value in the build.gradle file of your application, for example com.example.movieapp.
| Field | Description |
|---|---|
| Package name | Must exactly match the applicationId in app/build.gradle.kts. |
| App nickname | Name displayed only in the console (optional). |
| SHA-1 | The fingerprint of the key used to sign the application. Required for Google sign-in (Auth) and Dynamic Links. Optional for Firestore alone, but worth adding. |
After registering the application, the console will generate the google-services.json file. This is the identity proof of your application. It contains API keys, the database URL, and project identifiers.
- Download the
google-services.jsonfile. - In Android Studio, switch the project view from Android to "Project" in the upper-left corner of the file panel.
- Drag the file into the
app/directory, next to the modulebuild.gradlefile.
Security note: This file contains API keys that are theoretically public because they are embedded in the application, but good practice suggests not placing it in public GitHub repositories if the project is open source. In commercial projects, it is usually part of the repository.
We must add Gradle dependencies:
1. Project level (Project build.gradle.kts): We define the Google Services plugin version.
// build.gradle.kts (Project)
plugins {
    // ...
    id("com.google.gms.google-services") version "4.4.0" apply false
}
2. Module level (App build.gradle.kts): We apply the plugin and add dependencies.
// app/build.gradle.kts (Module)
plugins {
    id("com.android.application")
    id("org.jetbrains.kotlin.android")
    // Apply the Google Services plugin.
    id("com.google.gms.google-services")
}

dependencies {
    // Import Firebase BoM (Bill of Materials).
    // This is the only place where we define the version (32.7.0).
    implementation(platform("com.google.firebase:firebase-bom:32.7.0"))

    // Firebase libraries (WITHOUT specifying versions).
    // Versions will be taken automatically from the BoM.
    implementation("com.google.firebase:firebase-firestore-ktx")
    implementation("com.google.firebase:firebase-analytics")
}
After adding these changes, perform Gradle Sync. If synchronization succeeds, the application is ready to communicate with the cloud.
The final step is to create the database instance itself in the console:
- In the Firebase console side menu, choose Firestore Database.
- Click Create database.
- Choose a server location, for example
eur3 (europe-west)for Poland, which gives lower latency. - In the Security Rules step, choose Start in test mode.
Data Modeling in Firestore
Firestore is a document database. This means that we do not define a schema at the database level. In the same collection, we can store a document that has only the name field, and next to it a document with name, age, address.
Despite this flexibility, in an Android application, which is strongly typed, we try to impose structure through DTO (Data Transfer Object) classes. The Firestore data model resembles a file system on a computer disk:
- Collection is a folder. It may contain only documents, not other collections directly.
- Document is a file, for example JSON. It contains data and may also contain links to subfolders, that is subcollections.
The structure must always alternate:
Collection -> Document -> Collection -> Document ...Example structure for an e-commerce application:
users (collection)
  |-- user_abc123 (document)
       |-- name: "John Smith"
       |-- email: "john@example.com"
       |-- orders (subcollection)
             |-- order_999 (document)
                  |-- total: 150.00
                  |-- items: [...]
Shallow Queries: Fetching the user_abc123 document fetches only its fields (name, email). It does not automatically fetch data from the orders subcollection. To fetch orders, we must make a separate query to the subcollection. This is a key difference compared with relations in SQL.
The Firestore library for Android has a built-in mapping mechanism (POJO mapper), which automatically converts JSON documents into Kotlin objects. For this to work correctly, we must satisfy one technical requirement: the class must have a no-argument constructor.
In Kotlin, the easiest way to achieve this is to assign default values to all fields in the data class.
// data/remote/model/MovieDto.kt

data class MovieDto(
    // 1. Map the document ID to a class field.
    @DocumentId
    val id: String = "",

    // 2. Data fields (they must have default values!)
    val title: String = "",
    val description: String = "",

    // The field name in the database must match the variable name,
    // or we use @PropertyName("poster_path").
    val posterUrl: String? = null,

    val rating: Double = 0.0,

    // 3. Server-side time handling.
    @ServerTimestamp
    val createdAt: Date? = null
)
The most important annotations:
@DocumentId:@ServerTimestamp:@PropertyName("name"):
In Firestore, the document ID is part of metadata, not part of the JSON body. This annotation tells the library: Take the ID of this document and put it into this field during deserialization. Thanks to this, we do not need to manually copy the ID after fetching data.
When we send an object to the database, this field is sent as null, and the Firestore server inserts its current time there. This is critical for synchronizing data between users from different time zones or users with incorrectly configured phone clocks.
Optional annotation, similar to Gson's @SerializedName, used when the database field name differs from the code field name, for example first_name vs firstName.
Firestore supports a richer set of types than SQLite:
- Simple: String, Number (Long/Double), Boolean, Null.
- Complex:
- Map: A nested JSON object. It maps to
Map<String, Any>or to another nested DTO class. - Array: A list of values. It maps to
List<T>. Note: Firestore arrays should not be large because you cannot fetch only part of an array. - Timestamp: A precise timestamp.
- GeoPoint: Latitude and longitude.
Integration with Clean Architecture
In MVVM architecture, we want the UI layer (ViewModel) to receive data as streams (Flow), without knowing that the Firebase SDK is working underneath.
The challenge is that the Firestore library was written around the callback mechanism, such as OnSuccessListener and addSnapshotListener, rather than suspending functions (suspend). We therefore need to build a bridge between these technologies.
To convert real-time listening into Flow, we use the callbackFlow builder. It creates a stream that stays open as long as someone observes it (collects it), and it lets us manually emit values from inside the callback. Below is the implementation scheme of the getMoviesStream() method in the repository:
// data/repository/FirestoreMovieRepository.kt

override fun getMoviesStream(): Flow<List<Movie>> = callbackFlow {
    // 1. Reference to the collection.
    val collection = firestore.collection("movies")

    // 2. Registering a listener (this is the Firebase API).
    val listenerRegistration = collection.addSnapshotListener { snapshot, error ->

        // A. Error handling.
        if (error != null) {
            close(error) // Closes the Flow and throws the exception to the collector.
            return@addSnapshotListener
        }

        // B. Data mapping.
        if (snapshot != null) {
            val movies = snapshot.documents.map { doc ->
                // Convert JSON into a DTO object, then into the domain model.
                val dto = doc.toObject(MovieDto::class.java)
                // Important: toObject may return null if the document is empty.
                dto?.toDomain()
            }.filterNotNull()

            // C. Emission to the stream.
            trySend(movies)
        }
    }

    // 3. Cleanup (very important!)
    // The awaitClose block suspends the coroutine until the Flow is canceled,
    // for example when the user closes the screen. Then the code inside runs.
    awaitClose {
        listenerRegistration.remove() // Detach the listener to avoid memory leaks.
    }
}
The awaitClose pitfall: If you omit the awaitClose block, the callbackFlow function will finish immediately after registering the listener, and the stream will be closed. awaitClose keeps the stream alive.
For operations that do not require real-time listening, such as adding a product, deleting an item, or one-shot fetching, we use suspending functions.
The standard Firebase API returns a Task<T> object. To avoid callbacks such as addOnSuccessListener, we use the helper library kotlinx-coroutines-play-services, which adds the .await() extension function.
// data/repository/FirestoreMovieRepository.kt

class FirestoreMovieRepository(...) {

    // WRITE (Create)
    override suspend fun addMovie(movie: Movie) {
        val dto = movie.toDto()

        // .await() suspends the coroutine until the cloud write is complete.
        // If an error occurs, for example no network and no cache, it throws an exception.
        firestore.collection("movies")
            .document(movie.id) // Use our own ID, or .document() for an auto-ID.
            .set(dto)
            .await()
    }

    // DELETE
    override suspend fun deleteMovie(id: String) {
        firestore.collection("movies")
            .document(id)
            .delete()
            .await()
    }

    // ONE-SHOT READ (One-shot Get)
    override suspend fun getMovieDetails(id: String): Movie {
        val snapshot = firestore.collection("movies")
            .document(id)
            .get() // Fetches the state at this moment.
            .await()

        return snapshot.toObject(MovieDto::class.java)?.toDomain()
            ?: throw Exception("Movie not found")
    }
}
It is worth noting that the Firestore SDK is optimized.
addSnapshotListenercalls the callback on the main thread by default. This is safe because Firestore performs network operations on its own background thread pool and posts only ready results to the main thread.- However, if data mapping, such as the
snapshot.documents.mapline, is computationally expensive, for example a list of 1000 elements, it is worth moving the emission to another dispatcher usingflowOn(Dispatchers.Default)in the ViewModel or repository.
Write and Modification Operations
Firestore offers several write methods that differ in how identifiers are generated and how existing data is handled.
All operations below return a Task<Void> object, which means that in Kotlin we can use the .await() function on them to suspend the coroutine until the server confirms the write. Firebase libraries are written in Java, where generic types do not support void as an empty return. Therefore, the wrapper class java.lang.Void is used. In Kotlin, the .await() function then returns null, which we simply ignore, treating the whole call like a function returning Unit. We have two strategies for creating new documents:
- Automatic ID (
add): - Custom ID (
set):
When we do not care about a specific identifier, for example a new comment or an error log. Firestore generates a unique 20-character string.
When the identifier comes from outside, for example userId from Firebase Auth, an EAN product code, or another external identifier.
// data/repository/FirestoreWriteRepository.kt

// STRATEGY 1: add() - Firestore generates the ID.
suspend fun addComment(content: String) {
    val comment = hashMapOf("content" to content)

    // The result is a reference to the newly created document.
    val newDocRef = firestore.collection("comments").add(comment).await()
    println("Created comment with ID: ${newDocRef.id}")
}

// STRATEGY 2: set() - we impose the ID.
suspend fun createUserProfile(userId: String, name: String) {
    val user = UserDto(id = userId, name = name)

    // The document will have the same ID as userId from Auth.
    firestore.collection("users")
        .document(userId)
        .set(user)
        .await()
}
Now let us move to data updates, which is where mistakes are most commonly made.
set(data)(Overwrite):update()(Partial edit):set(..., SetOptions.merge())(Upsert):
By default, the set method deletes the entire previous contents of the document and replaces it with the new object. If the document had 50 fields and we pass an object with 2 fields, the remaining 48 fields are removed.
Modifies only the specified fields. If the document does not exist, the operation ends with an error.
Combination of Update and Insert. If the document exists, it updates the specified fields. If it does not exist, it creates it. This is the safest method for data synchronization.
// EXAMPLE: Change only the product price.

suspend fun updatePrice(productId: String, newPrice: Double) {
    // Method A: update() - requires the document to exist.
    try {
        firestore.collection("products").document(productId)
            .update("price", newPrice)
            .await()
    } catch (e: Exception) {
        // Throws an error if the product does not exist.
    }

    // Method B: Merge (Upsert) - safer for synchronization.
    val data = mapOf("price" to newPrice)
    firestore.collection("products").document(productId)
        .set(data, SetOptions.merge()) // Does not delete other fields!
        .await()
}
Dot notation: To update a field in a nested object (Map), we use a dot in the field name. For example, update("address.city", "Wroclaw"). Do not send the entire address object, because you will overwrite its other fields.
Deleting is simple, but it has one critical feature in NoSQL databases that is unintuitive for people familiar with SQL, where Cascade Delete exists.
suspend fun deleteUser(userId: String) {
    firestore.collection("users").document(userId)
        .delete()
        .await()
}
Subcollection pitfall: Deleting a document in Firestore does NOT delete its subcollections. If you delete the users/jan document, but Jan had a users/jan/orders subcollection, the orders still exist in the database but become orphaned. You cannot find them by browsing the console in the usual way, but you can still refer to them directly. To delete everything, you must manually fetch and delete every document from the subcollection.
Sometimes we must execute several operations atomically, all or nothing.
- WriteBatch: Lets you execute up to 500 operations (set, update, delete) at once. If one fails, for example because there is no network, none of them is executed. This does not lock the database for other users.
- Transaction: More advanced. Lets you read a value and then modify it, for example incrementing a like counter, while guaranteeing that nobody else changed it in the meantime.
Advanced Queries and Indexes
Firestore is a database optimized for read speed. It guarantees that data fetch time depends on the number of results, not on the size of the entire collection. Fetching 50 movies from a database containing 100 documents mainly depends on the number of returned results, assuming correct indexing.
To achieve this, Firestore imposes restrictions on query construction and requires indexing every field that we want to search by. Queries are created by chaining method calls on a CollectionReference object. Each call returns a Query object.
// data/repository/FirestoreQueryExample.kt

fun getSciFiMoviesStream(): Flow<List<Movie>> = callbackFlow {
    val query = firestore.collection("movies")
        // 1. Filtering (equality)
        .whereEqualTo("genre", "Sci-Fi")
        // 2. Filtering (range)
        .whereGreaterThan("rating", 4.0)
        // 3. Sorting
        .orderBy("rating", Query.Direction.DESCENDING)
        // 4. Limiting results
        .limit(10)

    val listener = query.addSnapshotListener { ... }
    awaitClose { listener.remove() }
}
Unlike SQL, where the WHERE clause allows any combination of conditions, Firestore has strict rules:
- One range per query:
- GOOD:
whereGreaterThan("age", 18).whereLessThan("age", 30) - BAD:
whereGreaterThan("age", 18).whereGreaterThan("income", 5000) - Sorting and filtering compatibility:
- No "real" OR:
You can filter by range (>, <, >=, <=) only on one field in a single query.
If you filter by range on field X, for example age > 18, the first orderBy must also refer to field X.
Until recently, the OR operation did not exist. Today we use whereIn for arrays or Filter.or, but they have performance limits, with a maximum of 30 alternative clauses.
To make queries fast, Firestore uses indexes.
1. Single-field indexes: They are created automatically for every field in a document. Thanks to this, simple queries such as whereEqualTo("city", "Warsaw") work immediately without configuration.
2. Composite indexes: They are required when a query combines conditions on multiple fields at the same time, for example: Category == "Books" AND Price > 50 PLN.
When you try to execute such a query without an index, the application throws an error, and in Logcat you will see a special message:
com.google.firebase.firestore.FirebaseFirestoreException: FAILED_PRECONDITION:
The query requires an index. You can create it here:
https://console.firebase.google.com/v1/r/project/my-app/firestore...
Firestore does not support classic full-text search, for example finding the word terminator in a long movie description. The whereGreaterThan and startAt operators only allow prefix search, that is words that start with a given prefix.
Solutions to this problem:
- Array-contains approach:
- Alternative approach:
When saving a movie, we create an additional keywords field, an array of words, for example ["star", "wars", "new", "hope"]. Searching is done with: whereArrayContains("keywords", "hope").
Integration with an external search engine such as Algolia or Typesense. Data from Firestore is synchronized with the search engine through Cloud Functions, and the mobile application asks the search engine for search results, receiving document IDs.
Offline Mode and Synchronization
In Chapter 13, we built offline mode support manually by creating a local Room database and writing synchronization logic in the repository. Firestore provides Offline Persistence built directly into the SDK.
For Android and iOS, this mode is enabled by default. This means that every application using Firestore is, by definition, an Offline-first application.
When the application fetches data from the cloud, Firestore saves a copy in a local internal database on the device, implemented internally with LevelDB/SQLite.
When the user loses network coverage:
- Read:
get()queries andaddSnapshotListenerlisteners automatically switch to reading from the local cache. The repository code does not need to change. - Write:
add/set/updateoperations save the change locally and add it to a pending queue. - Synchronization: When the device regains connection, the SDK automatically sends the queued changes to the server and fetches the latest updates.
One of the most important Firestore features is the so-called Optimistic UI Update. In the classic REST approach, when the user taps Send message, the application shows a spinner, sends a request to the server, and only after receiving HTTP 200 OK displays the message in the list. With a slow Internet connection, this is irritatingly slow.
Firestore works differently:
- The user taps Send.
- The SDK saves the message in the local cache.
- The listener (
onSnapshot) fires immediately, in a fraction of a second, emitting a new list of messages containing the added item. - The UI updates right away. The user feels that the application is extremely fast.
- In the background, the SDK sends the data to the cloud. When the server confirms the write, the listener may fire a second time to update metadata, but this is invisible to the user.
Sometimes the UI must know whether the data it displays is final (from the server) or temporary (from cache, not yet sent). Snapshot metadata (SnapshotMetadata) is used for this. We can use it, for example, to gray out a chat message that has not yet reached the server.
// data/repository/FirestoreChatRepository.kt

collection.addSnapshotListener { snapshot, e ->
    if (snapshot != null) {

        // Check the data source.
        val source = if (snapshot.metadata.isFromCache) {
            "Local Cache"
        } else {
            "Server"
        }
        Log.d("Firestore", "Data comes from: $source")

        val messages = snapshot.documents.map { doc ->
            val message = doc.toObject(MessageDto::class.java)

            // hasPendingWrites = true means this specific document
            // was modified locally but has not reached the cloud yet.
            message.isSending = doc.metadata.hasPendingWrites()

            message
        }
        trySend(messages)
    }
}
The Firestore cache does not grow indefinitely. By default, the limit is 100 MB. When it is exceeded, the SDK removes the oldest unused documents using the LRU algorithm, Least Recently Used. We can configure this limit at application startup:
// Configuration in the DI module.
val settings = FirebaseFirestoreSettings.Builder()
    .setCacheSizeBytes(FirebaseFirestoreSettings.CACHE_SIZE_UNLIMITED) // Or for example 50 MB.
    .setPersistenceEnabled(true) // true by default; can be disabled.
    .build()

firestore.firestoreSettings = settings
Although offline mode works very well, it has limits:
- Search: You cannot execute offline queries that require indexes that are not yet in the cache, for example filtering a large collection that the user has never fetched before.
- Transactions: Transaction operations (
runTransaction) do not work offline, because they require a server connection to check data consistency. In offline mode, useWriteBatch. - Security Rules: Permission validation (Security Rules) is performed on the server. If the user tries to perform a forbidden operation offline, they will learn about the error only after the connection returns.
Example: Shared Shopping List (ToDo)
As a chapter summary, we will create a complete mini-application: a task list that synchronizes in real time between multiple devices. We will use the knowledge about callbackFlow, DTO mapping, and write operations.
The application will allow:
- Displaying a list of tasks (real time).
- Adding a new task.
- Marking a task as done (update).
- Deleting a task (delete).
We separate the domain model, used in the UI, from the DTO model, used for JSON serialization in Firestore.
// domain/model/Task.kt
package com.example.todoapp.domain.model

data class Task(
    val id: String,
    val content: String,
    val isDone: Boolean
)

// data/remote/model/TaskDto.kt
package com.example.todoapp.data.remote.model

import com.google.firebase.firestore.DocumentId
import com.google.firebase.firestore.ServerTimestamp
import java.util.Date

// Remember: Default values are required for the empty constructor!
data class TaskDto(
    @DocumentId val id: String = "",
    val content: String = "",
    @field:JvmField val isDone: Boolean = false, // @field helps with boolean mapping.
    @ServerTimestamp val createdAt: Date? = null
)

// Extension function for mapping.
fun TaskDto.toDomain() = Task(
    id = this.id,
    content = this.content,
    isDone = this.isDone
)
Now let us move to the repository that implements the logic for listening to changes.
// data/repository/TaskRepository.kt
package com.example.todoapp.data.repository


class TaskRepository @Inject constructor(
    private val firestore: FirebaseFirestore
) {
    private val collection = firestore.collection("tasks")

    // 1. READ (real time)
    fun getTasksStream(): Flow<List<Task>> = callbackFlow {
        // Sort: unfinished tasks first, then by creation date.
        val query = collection
            .orderBy("isDone", Query.Direction.ASCENDING)
            .orderBy("createdAt", Query.Direction.DESCENDING)

        val listener = query.addSnapshotListener { snapshot, error ->
            if (error != null) {
                close(error)
                return@addSnapshotListener
            }

            if (snapshot != null) {
                val tasks = snapshot.documents.mapNotNull { doc ->
                    doc.toObject(TaskDto::class.java)?.toDomain()
                }
                trySend(tasks)
            }
        }

        awaitClose { listener.remove() }
    }

    // 2. WRITE (Create)
    suspend fun addTask(content: String) {
        val task = TaskDto(
            content = content,
            isDone = false
            // createdAt will be set by the server thanks to @ServerTimestamp.
        )
        collection.add(task).await()
    }

    // 3. UPDATE
    suspend fun toggleTask(taskId: String, isDone: Boolean) {
        // We update only one field.
        collection.document(taskId).update("isDone", isDone).await()
    }

    // 4. DELETE
    suspend fun deleteTask(taskId: String) {
        collection.document(taskId).delete().await()
    }
}
// di/FirebaseModule.kt
package com.example.todoapp.di
@Module
@InstallIn(SingletonComponent::class)
object FirebaseModule {
@Provides
@Singleton
fun provideFirestore(): FirebaseFirestore {
// We use the KTX version.
return Firebase.firestore
}
}The ViewModel is simple because callbackFlow in the repository performs all the heavy work related to state updates.
// presentation/TasksViewModel.kt
package com.example.todoapp.presentation

@HiltViewModel
class TasksViewModel @Inject constructor(
    private val repository: TaskRepository
) : ViewModel() {

    // The stream automatically updates the UI whenever something changes in the cloud.
    val tasks: StateFlow<List<Task>> = repository.getTasksStream()
        .stateIn(
            scope = viewModelScope,
            started = SharingStarted.WhileSubscribed(5000),
            initialValue = emptyList()
        )

    fun onAddTask(content: String) {
        if (content.isBlank()) return
        viewModelScope.launch {
            repository.addTask(content)
        }
    }

    fun onToggleTask(task: Task) {
        viewModelScope.launch {
            repository.toggleTask(task.id, !task.isDone)
        }
    }

    fun onDeleteTask(task: Task) {
        viewModelScope.launch {
            repository.deleteTask(task.id)
        }
    }
}
The interface reacts to changes in StateFlow. Thanks to Firestore, if you run this application on two phones, or on a phone and an emulator, tapping a checkbox on one device immediately updates it on the other.
// presentation/TasksScreen.kt

@Composable
fun TasksScreen(
    viewModel: TasksViewModel = hiltViewModel()
) {
    val tasks by viewModel.tasks.collectAsState()
    var newTaskText by remember { mutableStateOf("") }

    Column(modifier = Modifier.fillMaxSize().padding(16.dp)) {
        // Add section.
        Row(verticalAlignment = Alignment.CenterVertically) {
            TextField(
                value = newTaskText,
                onValueChange = { newTaskText = it },
                modifier = Modifier.weight(1f),
                placeholder = { Text("What needs to be bought?") }
            )
            Spacer(modifier = Modifier.width(8.dp))
            Button(onClick = {
                viewModel.onAddTask(newTaskText)
                newTaskText = "" // Clear the field after adding.
            }) {
                Text("Add")
            }
        }

        Spacer(modifier = Modifier.height(16.dp))

        // Task list.
        LazyColumn {
            items(tasks, key = { it.id }) { task ->
                TaskItem(
                    task = task,
                    onToggle = { viewModel.onToggleTask(task) },
                    onDelete = { viewModel.onDeleteTask(task) }
                )
            }
        }
    }
}

@Composable
fun TaskItem(
    task: Task,
    onToggle: () -> Unit,
    onDelete: () -> Unit
) {
    Row(
        modifier = Modifier
            .fillMaxWidth()
            .padding(vertical = 8.dp),
        verticalAlignment = Alignment.CenterVertically
    ) {
        Checkbox(
            checked = task.isDone,
            onCheckedChange = { onToggle() }
        )
        Text(
            text = task.content,
            modifier = Modifier.weight(1f)
        )
        IconButton(onClick = onDelete) {
            Icon(Icons.Default.Delete, contentDescription = "Delete")
        }
    }
}